MERCEDES-BENZ R-Class 2010 R171 Comand Manual
Manufacturer: MERCEDES-BENZ, Model Year: 2010, Model line: R-Class, Model: MERCEDES-BENZ R-Class 2010 R171Pages: 224, PDF Size: 7 MB
Page 41 of 224
Switching the Display On/OffXTo switch the display off: Select System
£ Display Off .
The display is switched off.XTo switch on the display: Press the 9
button, the k button or one of the
= , ; , : or 9 buttons.
or
XPress the q button.
The system menu appears.
i You can also press one of the function
buttons, e.g. the h button. This turns on
the display and switches to the
corresponding function.
Time
Setting the Time
i The correct time must be set for the
following functions to operate correctly:
R Calculation of expected time of arrival
R Time stamps for calls received and calls
dialed
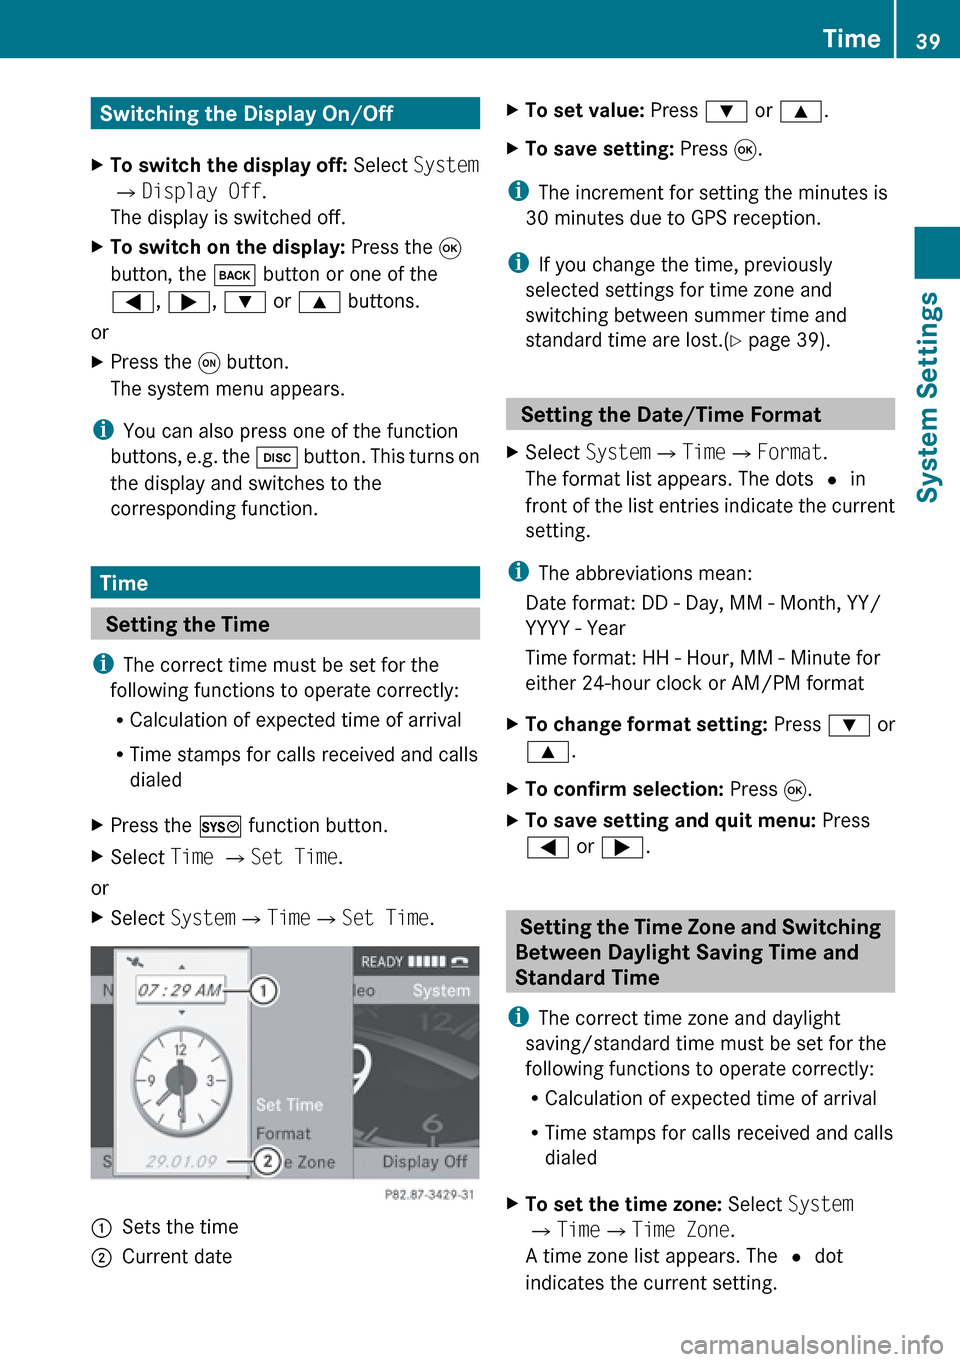
XPress the W function button.XSelect Time £ Set Time .
or
XSelect System £Time £Set Time .1Sets the time2Current dateXTo set value: Press : or 9 .XTo save setting: Press 9.
i
The increment for setting the minutes is
30 minutes due to GPS reception.
i If you change the time, previously
selected settings for time zone and
switching between summer time and
standard time are lost.( Y page 39).
Setting the Date/Time Format
XSelect System £Time £Format .
The format list appears. The dots R in
front of the list entries indicate the current
setting.
i The abbreviations mean:
Date format: DD - Day, MM - Month, YY/
YYYY - Year
Time format: HH - Hour, MM - Minute for
either 24-hour clock or AM/PM format
XTo change format setting: Press : or
9 .XTo confirm selection: Press 9.XTo save setting and quit menu: Press
= or ; .
Setting the Time Zone and Switching
Between Daylight Saving Time and
Standard Time
i The correct time zone and daylight
saving/standard time must be set for the
following functions to operate correctly:
R Calculation of expected time of arrival
R Time stamps for calls received and calls
dialed
XTo set the time zone: Select System
£ Time £Time Zone .
A time zone list appears. The R dot
indicates the current setting.Time39System SettingsZ
Page 42 of 224
XPress : or 9 to select the
appropriate time zone.XTo switch between Daylight Saving and
Standard Time: Select Daylight
Saving Time (Summer) or Standard
Time (Winter).
The R dot indicates the current setting.XTo save setting and exit menu:
Press = or ; .
Language Setting
This function allows you to determine the
language for the menu displays and the
navigation messages. The language selection
affects the input options in the editing and
smart speller.
XSelect System £Settings £Language .
The language list appears. The R dot
indicates the current setting.XTo change setting: Press : or 9 to
select the desired language.XTo confirm the language selection:
Press 9.
COMAND loads the selected language and
sets it.
Display Settings
Adjusting Brightness
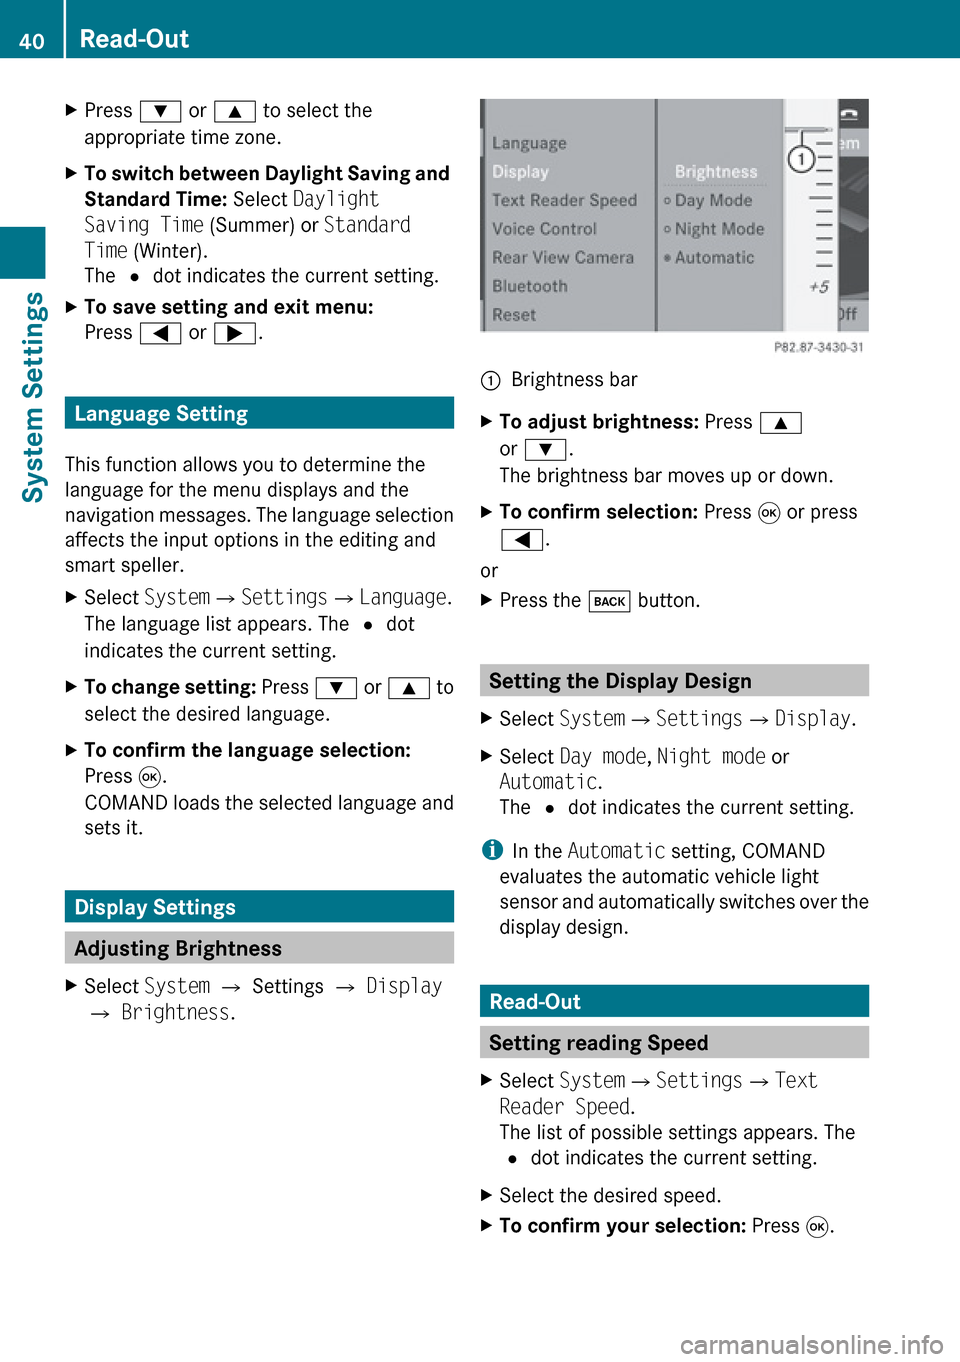
XSelect System £ Settings £ Display
£ Brightness .1Brightness barXTo adjust brightness: Press 9
or : .
The brightness bar moves up or down.XTo confirm selection: Press 9 or press
= .
or
XPress the k button.
Setting the Display Design
XSelect System £Settings £Display .XSelect Day mode , Night mode or
Automatic .
The R dot indicates the current setting.
i
In the Automatic setting, COMAND
evaluates the automatic vehicle light
sensor and automatically switches over the
display design.
Read-Out
Setting reading Speed
XSelect System £Settings £Text
Reader Speed .
The list of possible settings appears. The
R dot indicates the current setting.XSelect the desired speed.XTo confirm your selection: Press 9.40Read-OutSystem Settings
Page 43 of 224
Voice Control
Switching the Help Screen On or Off
XSelect System £Settings £Voice
Control .XSelect Help Window .
You have switched the help window on
Ç or off c.
i
In addition to the audible instructions, the
help screen displays other information
during the individualization process and the
later voice control mode.
Individualization Function
You can use the individualization function
option to adapt the Voice control system to
your own voice and therefore improve voice
recognition. This will affect the ability of the
system to recognize the voices of other users,
and for this reason it can be switched off
( Y page 42).
The individualization function comprises two
parts and lasts around five minutes. During
the process you will practice a few number
sequences and voice commands.
Starting New Individualization Process
i You can only start the individualization
function when the vehicle is stationary.
First switch off all interfering units/
functions. After starting, the system will
take you through the training by means of
audible instructions.
XSelect System £Settings £Voice
Control £Start New
Individualization .
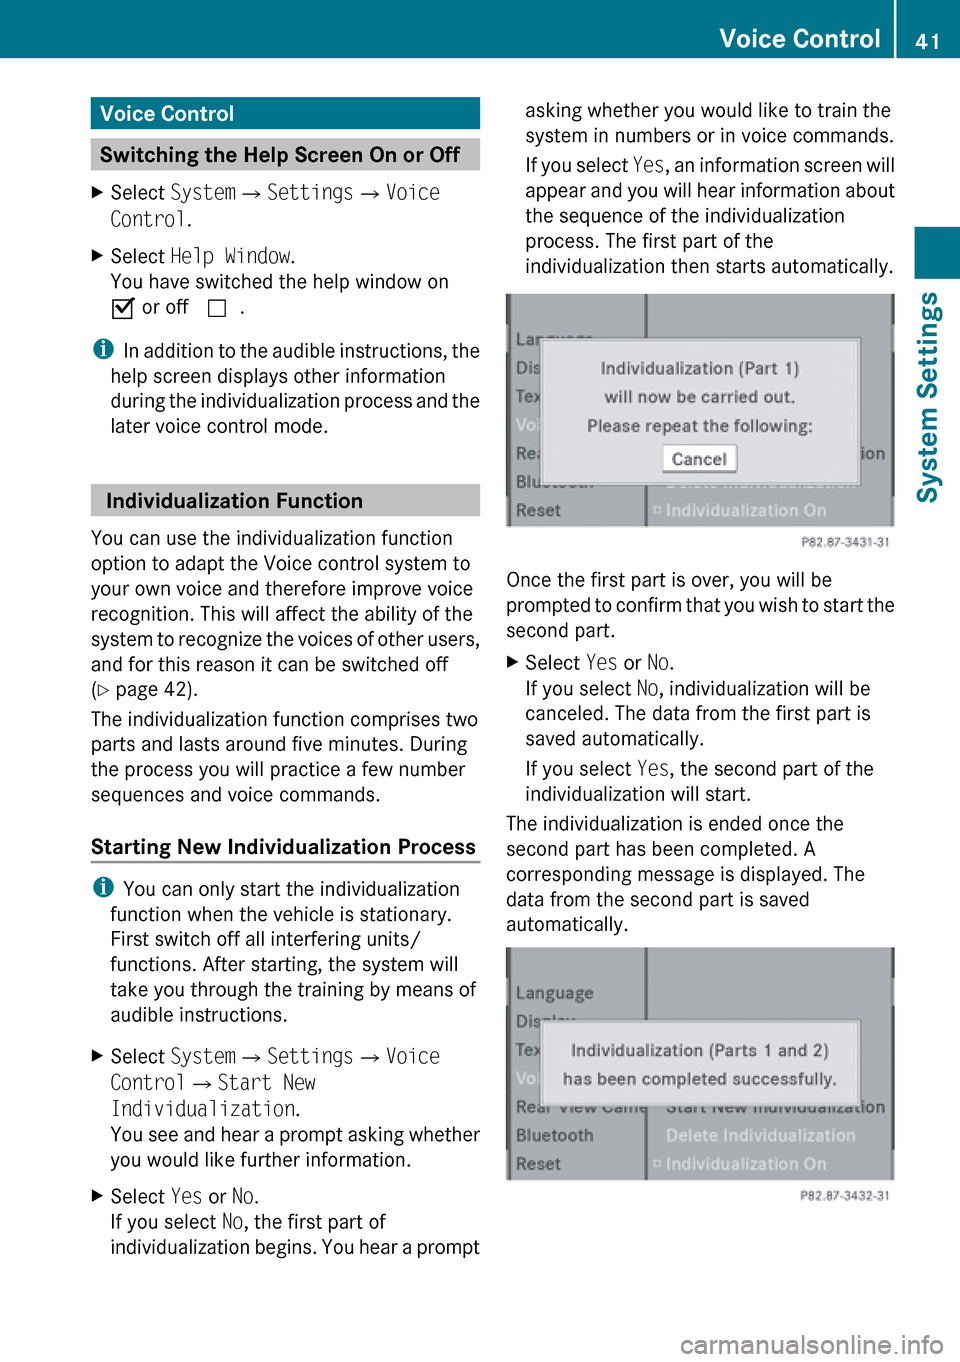
You see and hear a prompt asking whether
you would like further information.XSelect Yes or No.
If you select No, the first part of
individualization begins. You hear a promptasking whether you would like to train the
system in numbers or in voice commands.
If you select Yes, an information screen will
appear and you will hear information about
the sequence of the individualization
process. The first part of the
individualization then starts automatically.
Once the first part is over, you will be
prompted to confirm that you wish to start the
second part.
XSelect Yes or No.
If you select No, individualization will be
canceled. The data from the first part is
saved automatically.
If you select Yes, the second part of the
individualization will start.
The individualization is ended once the
second part has been completed. A
corresponding message is displayed. The
data from the second part is saved
automatically.
Voice Control41System SettingsZ
Page 44 of 224
Canceling the First or Second Part of
IndividualizationXSelect Cancel .
You will be prompted to confirm that you
really wish to cancel.XSelect Yes or No.
If you select Yes, individualization will be
canceled.The data from the canceled part
will be lost.
If you select No, the canceled part of the
individualization will restart.
Deleting Existing Individualization Data
XSelect System £Settings £Voice
Control £Delete
Individualization .
You will be prompted to confirm that you
really wish to delete it.XSelect Yes or No.
The individualization data will be deleted or
retained on the basis of the selection. A
corresponding message is displayed.
Switching Individualization On and Off
XSelect System £Settings £Voice
Control £ Individualization On .
This switches the individualization on Ç or
off c .
Rear View Camera
COMAND shows the camera picture on the
display when
R the function is switched on in the System
Settings menu and
R the vehicle is shifted into reverse gear
As soon as you shift out of reverse gear, the
previous display is shown.
Switching On/Off the Display of the
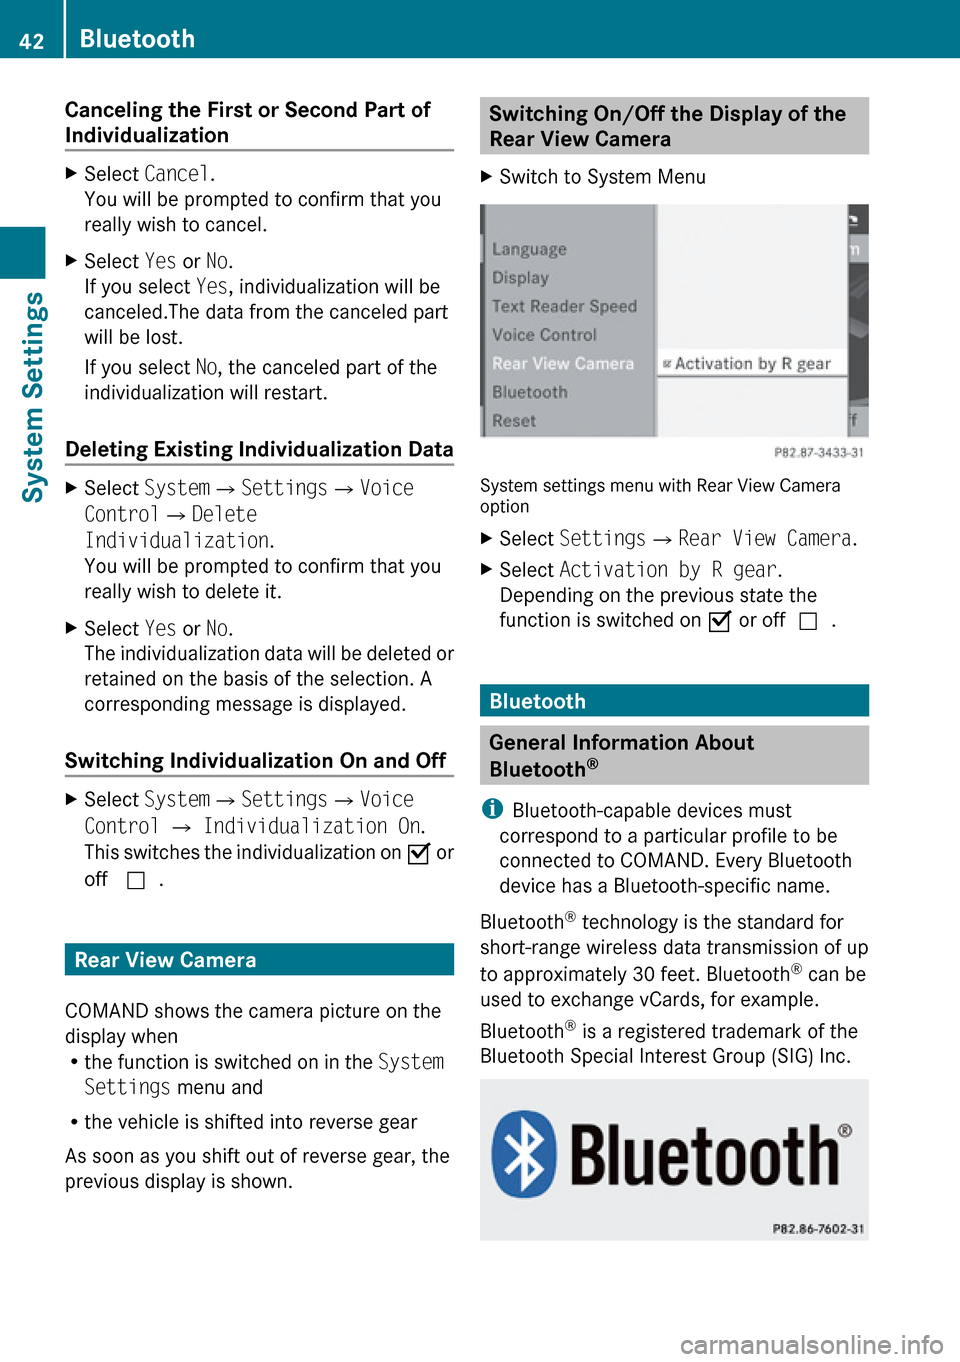
Rear View Camera XSwitch to System Menu
System settings menu with Rear View Camera
option
XSelect Settings £Rear View Camera .XSelect Activation by R gear .
Depending on the previous state the
function is switched on Ç or off c.
Bluetooth
General Information About
Bluetooth ®
i Bluetooth-capable devices must
correspond to a particular profile to be
connected to COMAND. Every Bluetooth
device has a Bluetooth-specific name.
Bluetooth ®
technology is the standard for
short-range wireless data transmission of up
to approximately 30 feet. Bluetooth ®
can be
used to exchange vCards, for example.
Bluetooth ®
is a registered trademark of the
Bluetooth Special Interest Group (SIG) Inc.
42BluetoothSystem Settings
Page 45 of 224
Switching Bluetooth®
On or Off XSelect System £Settings
£ Bluetooth £Activate Bluetooth .
Bluetooth is switched on Ç or off c.
Connecting Bluetooth Devices
i To connect a Bluetooth device, the
Bluetooth function must be switched on in
COMAND and on the particular device. The
Bluetooth device must also be “visible” to
COMAND in order for COMAND to find and
display it. For the setting procedures,
please see the operating instructions for
the Bluetooth device.
It is possible to establish a Bluetooth
connection between COMAND and the
following types of device:
R Mobile phone
i Bluetooth-enabled mobile phones must
correspond to particular profiles to be
connected to COMAND.
Further information on suitable mobile
phones and connecting Bluetooth-enabled
mobile phones to COMAND is available via
the Internet at www.mbusa-mobile.com . Or
call the Mercedes-Benz Customer
Assistance Center at 1-800-FOR-
MERCedes (1-800-367-6372) (US), or
Customer Relations at 1-800-387-0100
(Canada).
The volume of telephone conversations can
change after the phone has been
connected.
R Portable personal computer
You can connect up to ten devices to
COMAND.
The connection process includes searching
for the device and its subsequent
authorization.
Opening the Bluetooth Device List
and Searching for a Device
i You must first switch on Bluetooth to be
able to call up the list of Bluetooth devices
( Y page 43).XTo open the list: Select System
£ Settings £Bluetooth £
Bluetooth Device List .XTo start the search: Select Update .
COMAND starts the search for devices
within reception range. The device list
appears after a short time.
i If you open the device list again, it may
not display all devices as you may have
removed one from the car for a while, for
example. In this case, start a new search to
update the device list.
XTo cancel search: Select Cancel.
The device list can contain the following
devices:
R All (available) devices found, regardless of
whether they have been authorized or not.
R All authorized devices, regardless of
whether they have been found (are
available) or not.
The device list may show the following icons
immediately after manual updating:
Bluetooth43System SettingsZ
Page 46 of 224
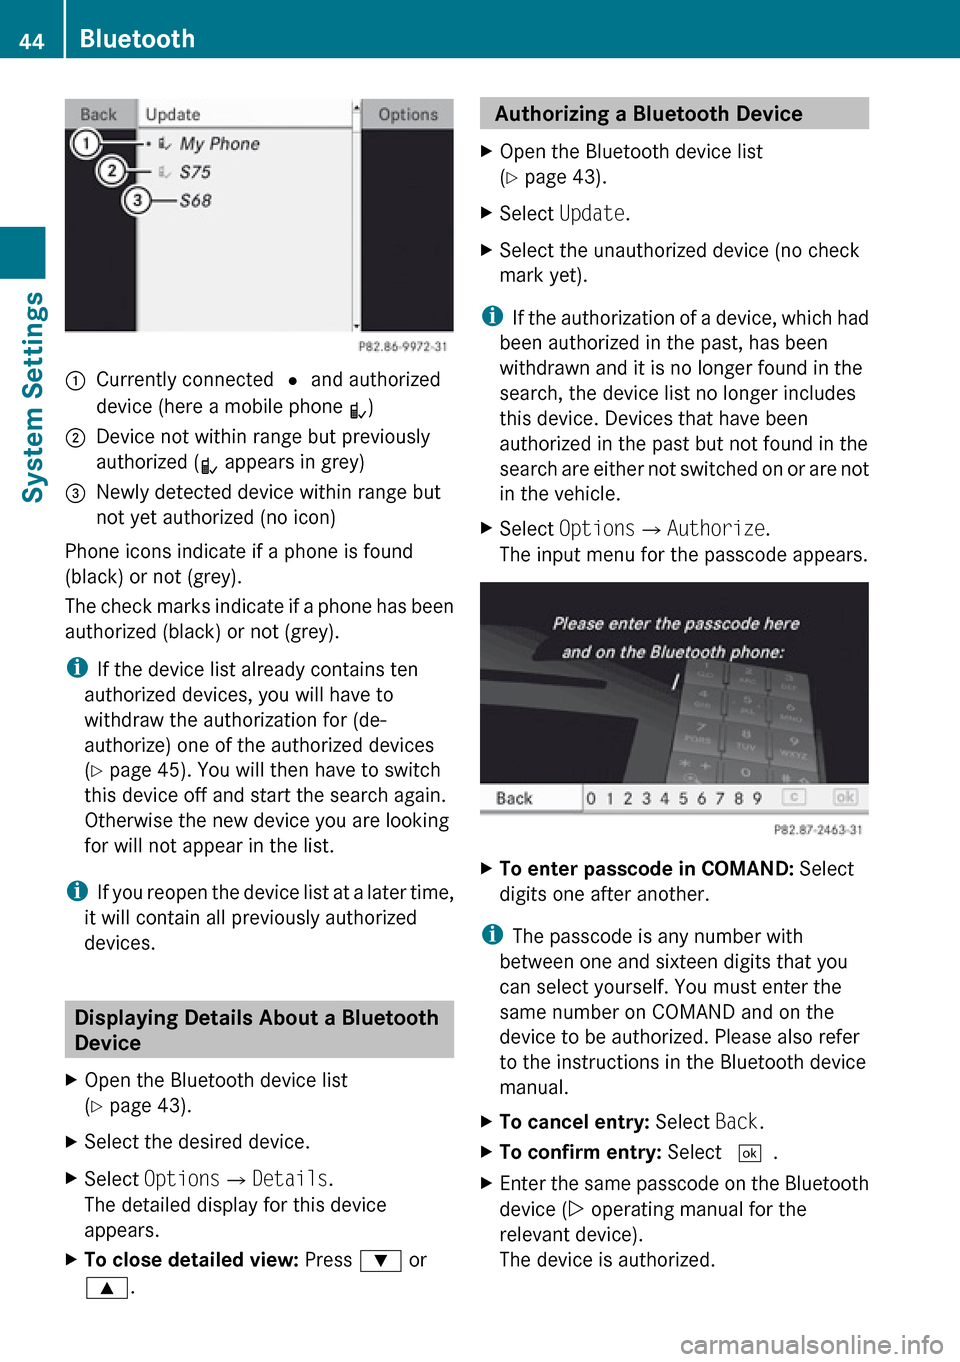
1Currently connected R and authorized
device (here a mobile phone L)2Device not within range but previously
authorized ( ¿ appears in grey)3Newly detected device within range but
not yet authorized (no icon)
Phone icons indicate if a phone is found
(black) or not (grey).
The check marks indicate if a phone has been
authorized (black) or not (grey).
i If the device list already contains ten
authorized devices, you will have to
withdraw the authorization for (de-
authorize) one of the authorized devices
( Y page 45). You will then have to switch
this device off and start the search again.
Otherwise the new device you are looking
for will not appear in the list.
i If you reopen the device list at a later time,
it will contain all previously authorized
devices.
Displaying Details About a Bluetooth
Device
XOpen the Bluetooth device list
( Y page 43).XSelect the desired device.XSelect Options £Details .
The detailed display for this device
appears.XTo close detailed view: Press : or
9 . Authorizing a Bluetooth Device XOpen the Bluetooth device list
( Y page 43).XSelect Update .XSelect the unauthorized device (no check
mark yet).
i If the authorization of a device, which had
been authorized in the past, has been
withdrawn and it is no longer found in the
search, the device list no longer includes
this device. Devices that have been
authorized in the past but not found in the
search are either not switched on or are not
in the vehicle.
XSelect Options £Authorize .
The input menu for the passcode appears.XTo enter passcode in COMAND: Select
digits one after another.
i The passcode is any number with
between one and sixteen digits that you
can select yourself. You must enter the
same number on COMAND and on the
device to be authorized. Please also refer
to the instructions in the Bluetooth device
manual.
XTo cancel entry: Select Back.XTo confirm entry: Select ¬.XEnter the same passcode on the Bluetooth
device ( Y operating manual for the
relevant device).
The device is authorized.44BluetoothSystem Settings
Page 47 of 224
External Authorization
If COMAND cannot find your mobile phone,
this may be due to special security settings
on your mobile phone. In this case, you can
check whether, conversely, your mobile
phone can find COMAND.
COMAND's Bluetooth device name is “MB
Bluetooth”.XSelect System £Settings
£ Bluetooth £Bluetooth Device
List £Options £External
Authorization .XStart Bluetooth search procedure on the
mobile phone ( Y mobile phone operating
guide).XSelect COMAND (“MB Bluetooth”) from the
device list on your mobile phone.XWhen prompted to do so, enter the
passcode on the mobile phone and on
COMAND.
De-authorizing a Bluetooth Device
XOpen the Bluetooth device list
( Y page 43).XSelect the authorized device.XSelect Options £De-authorize .
You will be asked whether the device
should really be de-authorized.XSelect Yes or No.
If you select Yes, the authorization of the
device is withdrawn.
Reset
i You can fully reset COMAND to the
factory settings. This process deletes all
personal data, among other things, (e.g.
station memory, address book entries,
entries in the destination memory and in
the last destinations of the navigation
system). It is recommended that you
perform a reset before the vehicle is
handed over or sold, for example.XSelect System £Settings £Reset .
You will be prompted to confirm that you
wish to perform the reset.XSelect Yes or No.
If you select Yes, you will again be
prompted to confirm that you wish to
perform the reset.XSelect Yes or No.
If you select Yes, COMAND is reset and
restarted.Reset45System SettingsZ
Page 48 of 224

46
Page 49 of 224
Introduction ......................................... 48
Destination Input ................................ 61
POI Input .............................................. 73
Route Guidance ................................... 80
Traffic Messages ................................. 87
Destination Memory ...........................90
Last Destinations ................................ 9347Navigation
Page 50 of 224
Introduction
Vehicle Equipment
i This Operator’s Manual describes all
features, standard or optional, potentially
available for your vehicle at the time of
purchase. Please be aware that your
vehicle might not be equipped with all
features described in this manual.
Safety Instructions
GWarning
For safety reasons, only enter a destination
when the vehicle is stationary. When the
vehicle is in motion, a passenger should enter
the destination. Study manual and select
route before driving.
Bear in mind that at a speed of just 30 mph
(approximately 50 km/h), your vehicle is
covering a distance of 44 feet (approximately
14 m) every second.
COMAND calculates the route to the
destination without taking account of the
following:
R Traffic lights
R Stop and right-of-way-signs
R Lane merging
R Parking or stopping prohibited areas
R Other road and traffic rules and regulations
R Narrow bridges
GWarning
COMAND may give incorrect navigation
commands if the data in the digital map does
not correspond with the actual road/traffic
situation. Digital maps do not cover all areas
nor all routes within an area. For example, if
the traffic routing has been changed or the
direction of a one-way road has been
reversed.
For this reason, you must always observe
applicable road and traffic rules and
regulations during your journey. Road and
traffic rules and regulations always have
priority over the navigation commands
generated by the system.GWarning
Navigation announcements are intended to
direct you while driving without diverting your
attention from the road and driving.
Please always use this feature instead of
consulting the map display for directions.
Consulting the symbols or map display for
directions may cause you to divert your
attention from driving and increase your risk
of an accident.
Updating the Map Software
The digital data for the map software will
become obsolete, just like conventional road
maps. Optimum route guidance by the
navigation system is only achieved with up-
to-date map software. Information on new
map software versions is available from an
authorized Mercedes-Benz Center.
You can have the map software updated there
by means of a DVD or perform the update
process yourself.
Notes on DVD Discs
R Only touch the discs at the edges.
R Handle the discs with care in order to
prevent reading errors.
R Avoid scratching, leaving fingerprints and
dust on the discs.
R Use a commercially available cleaning cloth
to clean discs. Always wipe in a straight line
from the inside outwards, never in a circular
motion.
R After use, put the discs back into the box.
R Protect the discs from heat and direct
sunlight.
48IntroductionNavigation