navigation system MERCEDES-BENZ S-Class 2013 W221 Service Manual
[x] Cancel search | Manufacturer: MERCEDES-BENZ, Model Year: 2013, Model line: S-Class, Model: MERCEDES-BENZ S-Class 2013 W221Pages: 542, PDF Size: 7.97 MB
Page 183 of 542
Displaying real-time traffic reports
X
If necessary, switch to navigation mode
and show the menu (Y page 156).
X Select Traffic in the navigation system
menu bar by turning 0031001C0032the COMAND
controller and press 0021to confirm.
If you see the No traffic messages. message:
This means that:
R
no traffic reports have been received yet.
R no traffic reports are available.
X To cancel the search: selectCancel .
X To close the message window: select
OK .
If there are any traffic reports, a list is shown.
The conten tofthe list varies depending on
whether route guidance is active or not.
List of traffic reports X
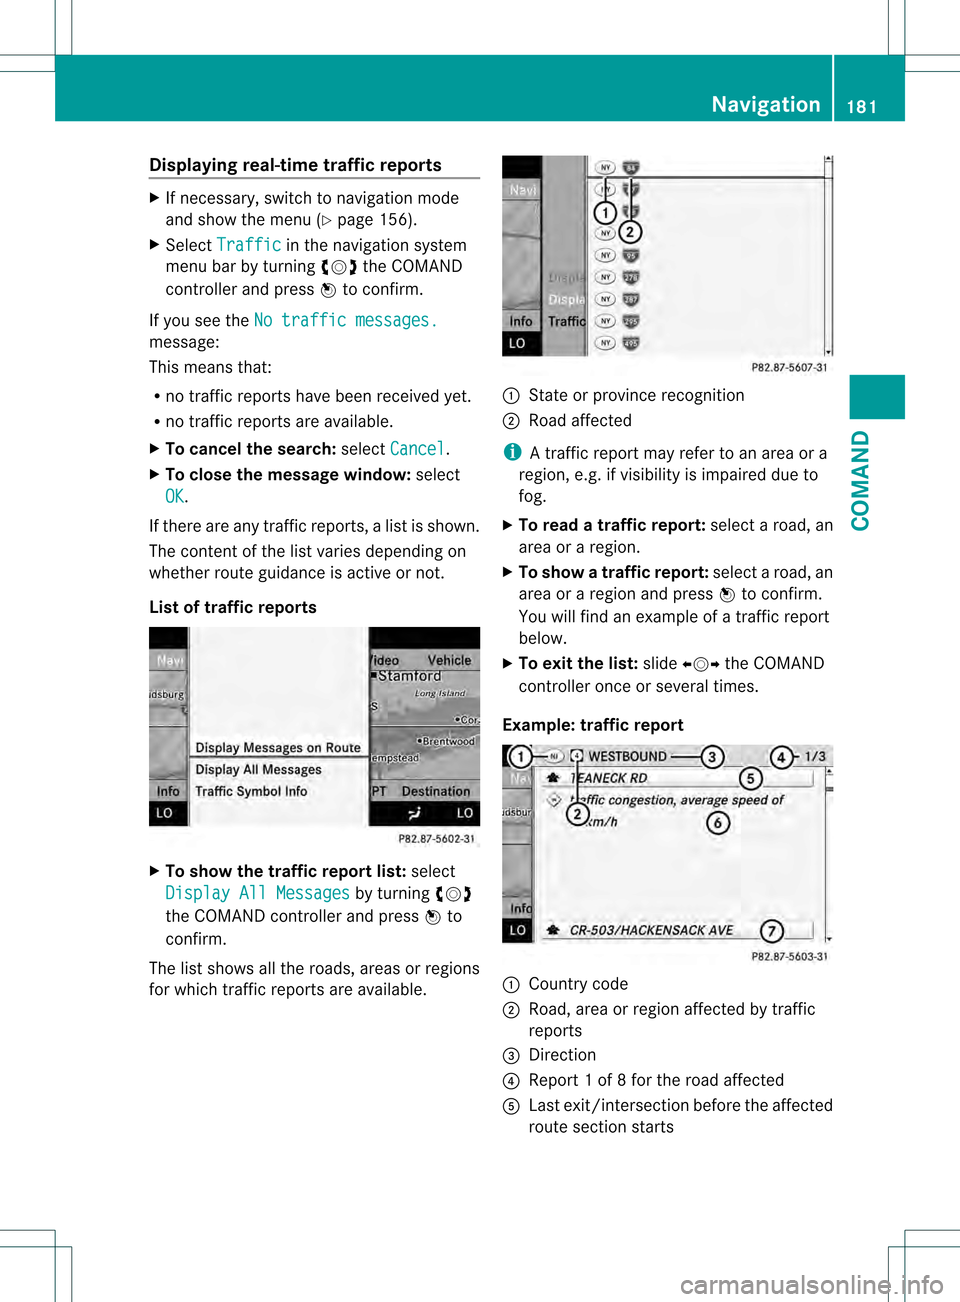
To show the traffic report list: select
Display All Messages by turning
0031001C0032
the COMAND controller and press 0021to
confirm.
The list shows all the roads, areas or regions
for which traffic reports are available. 1
State or province recognition
2 Road affected
i A traffic report may refer to an area or a
region, e.g. if visibility is impaired due to
fog.
X To read a traffic report: select a road, an
area or a region.
X To show a traffic report: select a road, an
area or a region and press 0021to confirm.
You will find an example of a traffic report
below.
X To exit the list: slide003C001C003D the COMAND
controller once or several times.
Example: traffic report 1
Country code
2 Road, area or region affected by traffic
reports
3 Direction
4 Report 1 of 8 for the road affected
5 Last exit/intersection before the affected
route section starts Navigation
181COMAND Z
Page 184 of 542
6
Repor ttext
0014 First exit/intersection after the affected
route section ends
X To scroll within arepor tort o access
the next report: turn0031001C0032 the COMAND
controller.
X To return to the list of messages: press
0021 or slide 003C001C003Dthe COMAND controller.
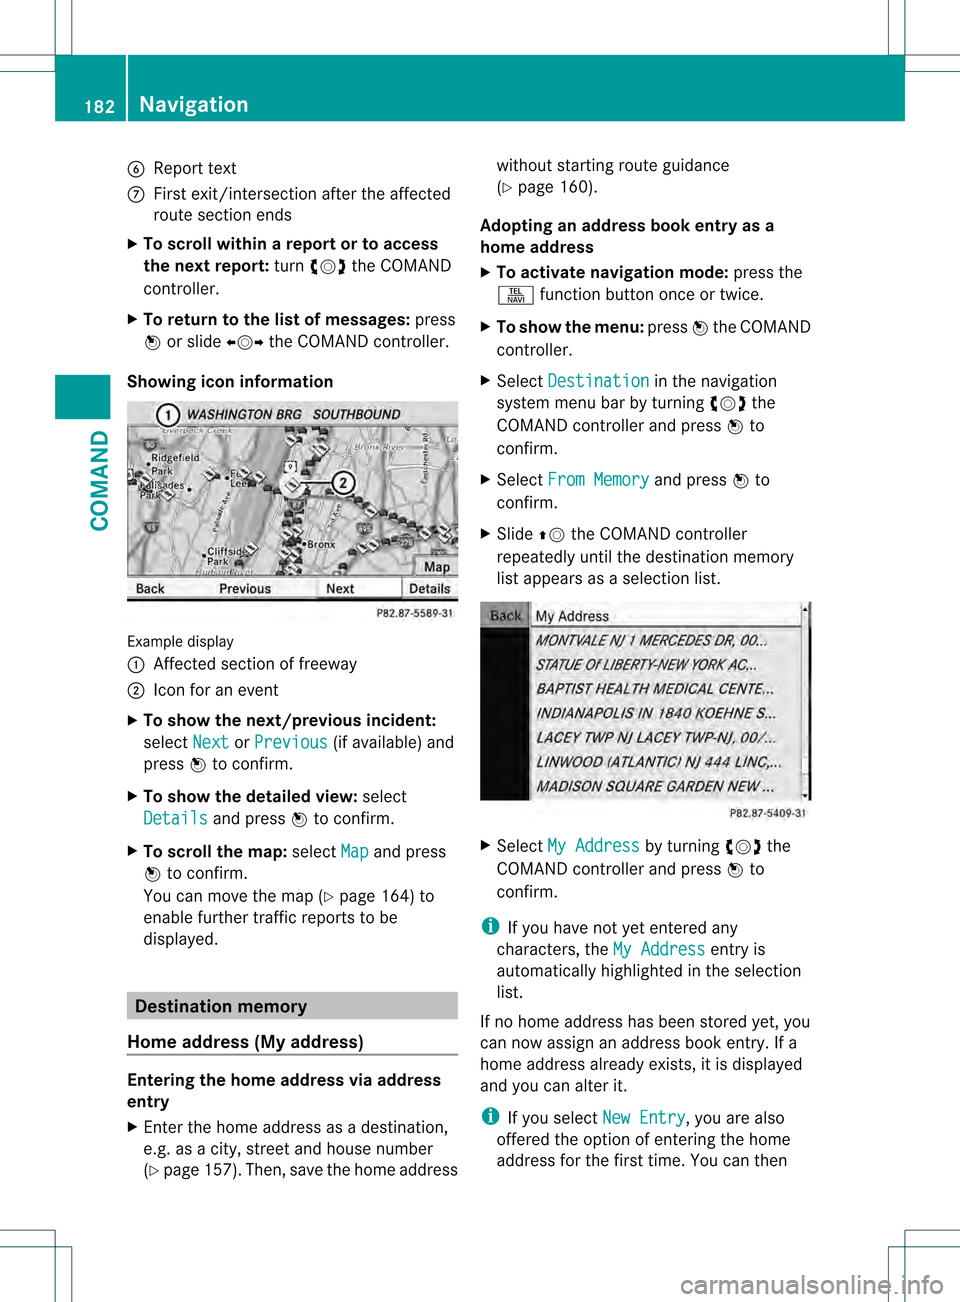
Showing icon information Example display
0002
Affected section of freeway
0003 Icon for an event
X To show the next/previous incident:
select Next or
Previous (if available) and
press 0021to confirm.
X To show the detailed view: select
Details and press
0021to confirm.
X To scroll the map: selectMap and press
0021 to confirm.
You can move the map (Y page 164) to
enable further traffic reports to be
displayed. Destination memory
Home address (My address) Entering the home address via address
entry
X Enter the home address as a destination,
e.g .as a city, street and house number
(Y page 157). Then, save the home address without starting route guidance
(Y
page 160).
Adopting an address book entry as a
home address
X To activate navigation mode: press the
0011 function button once or twice.
X To show the menu: press0021the COMAND
controller.
X Select Destination in the navigation
system menu bar by turning 0031001C0032the
COMAND controller and press 0021to
confirm.
X Select From Memory and press
0021to
confirm.
X Slide 002A001Cthe COMAND controller
repeatedly until the destination memory
list appears as a selection list. X
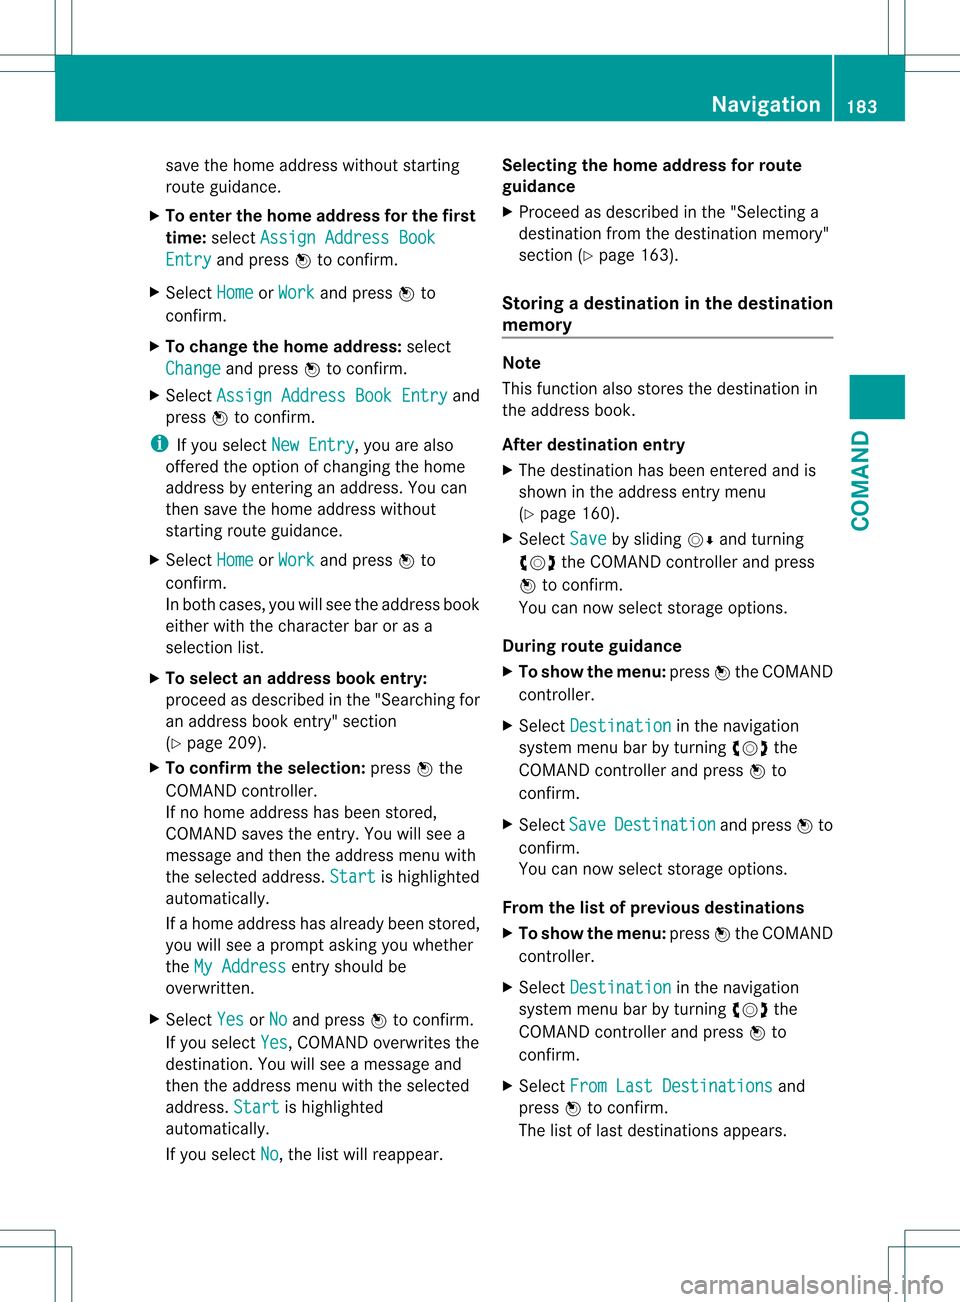
Select My Address by turning
0031001C0032the
COMAND controller and press 0021to
confirm.
i If you have not yet entered any
characters, the My Address entry is
automatically highlighted in the selection
list.
If no home address has been stored yet, you
can now assign an address book entry. If a
home address already exists, it is displayed
and you can alter it.
i If you select New Entry , you are also
offered the option of entering the home
address for the first time. You can then 182
NavigationCOMAND
Page 185 of 542
save the home address without starting
route guidance.
X To enter the home address for the first
time: select Assign Address Book Entry and press
0021to confirm.
X Select Home or
Work and press
0021to
confirm.
X To change the home address: select
Change and press
0021to confirm.
X Select Assign Address Book Entry and
press 0021to confirm.
i If you select New Entry , you are also
offered the option of changing the home
address by entering an address. You can
then save the home address without
starting route guidance.
X Select Home or
Work and press
0021to
confirm.
In both cases, you will see the address book
either with the character bar or as a
selection list.
X To select an address book entry:
proceed as described in the "Searching for
an address book entry" section
(Y page 209).
X To confirm the selection: press0021the
COMAND controller.
If no home address has been stored,
COMAND saves the entry. You will see a
message and then the address menu with
the selected address. Start is highlighted
automatically.
If a home address has already been stored,
you will see a prompt asking you whether
the My Address entry should be
overwritten.
X Select Yes or
No and press
0021to confirm.
If you select Yes , COMAND overwrites the
destination. You will see a message and
then the address menu with the selected
address. Start is highlighted
automatically.
If you select No , the list will reappear.Selecting the home address for route
guidance
X
Proceed as described in the "Selecting a
destination from the destination memory"
section (Y page 163).
Storing adestination in the destination
memory Note
This function also stores the destination in
the address book.
After destination entry
X
The destination has been entered and is
shown in the address entry menu
(Y page 160).
X Select Save by sliding
001C0006and turning
0031001C0032 the COMAND controller and press
0021 to confirm.
You can now selec tstorage options.
During route guidance
X To show the menu: press0021the COMAND
controller.
X Select Destination in the navigation
syste mmenu bar by turning 0031001C0032the
COMAND controller and press 0021to
confirm.
X Select Save Destination and press
0021to
confirm.
You can now select storage options.
From the list of previous destinations
X To show the menu: press0021the COMAND
controller.
X Select Destination in the navigation
system menu bar by turning 0031001C0032the
COMAND controller and press 0021to
confirm.
X Select From Last Destinations and
press 0021to confirm.
The list of last destinations appears. Navigation
183COMAND Z
Page 187 of 542
will appear asking whether you wish to
overwrite the existing data.
X Select Yes or
No and press
0021to confirm.
If you select Yes , COMAND stores the data.
Deleting adestination or the home
address from the destination memory X
To activate navigation mode: press the
0011 function button once or twice.
X To show the menu: press0021the COMAND
controller.
X Select Destination in the navigation
system menu bar by turning 0031001C0032the
COMAND controller and press 0021to
confirm.
X Select From Memory and press
0021to
confirm.
You will see the destination memory list
either with the character bar (option 1) or
as a selectio nlist (option 2).
X Option 1: destination memory list with
character bar: proceed as described in the
"Entering characters using the character
bar" section (Y page 133).
X Option 2: destination memory list as
selection list: selectadestination by
turning 0031001C0032the COMAND controller and
press 0021to confirm.
You see the address data of the selected
entry.
X Select Delete and press
0021to confirm.
Ap rompt appears asking whethe ryou wish
to delete the destination.
X Select Yes or
No and press
0021to confirm.
If you select Yes , COMAND deletes the
destination .You will see amessage to this
effect.
If you select No , the process is aborted.
i If the navigable address data for the
destination being deleted is also assigned
to an address book entry, COMAND will
also delete this data from there. If the corresponding address book entry does
not contain any further data, such as
telephone numbers, COMAND deletes the
entire address book entry.
Previous destinations
Introduction COMAND automatically stores the previous
destinations for which the route calculation
has been started. If the memory is full,
COMAND deletes the oldest destination. You
can also save a destination from the list of
previous destinations in the destination
memory. It will be stored there permanently.
Storing
adestination permanently in
the destination memory X
Proceed as described in the "From the list
of previous destinations" section
(Y page 183).
Storing the vehicle position in the list of
previous destinations X
To activate navigation mode: press the
0011 function button once or twice.
X To show the menu: press0021the COMAND
controller.
X Select Position in the navigation system
menu bar by turning 0031001C0032the COMAND
controller and press 0021to confirm.
X Select Store Vehicle Position and
press 0021to confirm.
COMAND stores the current vehicle
position as a destination in the list of
previous destinations. Navigation
185COMAND Z
Page 188 of 542
Storing the crosshair position in the list
of previous destinations Route guidance not active
Ac
rosshair appears on the map if you have
moved the map manually.Y ou can store the
crosshair position as a destination in the list
of previous destinations.
X To show the menu: press0021the COMAND
controller.
X Select Position in the navigation system
menu bar by turning 0031001C0032the COMAND
controller and press 0021to confirm.
X Select Save Crosshair Position and
press 0021to confirm.
Route guidance is active
X Select Destination in the navigation
system menu bar by turning 0031001C0032the
COMAND controller and press 0021to
confirm.
X Select Save Destination and press
0021to
confirm.
Deleting one of the previous
destinations X
To activate navigation mode: press the
0011 function button once or twice.
X To show the menu: press0021the COMAND
controller.
X Select Destination in the navigation
system menu bar by turning 0031001C0032the
COMAND controller and press 0021to
confirm.
X Select From Last Destinations and
press 0021to confirm.
The list of last destinations appears.
X Select the desired destination and press
0021 to confirm.
The destination address appears. X
Select Delete and press
0021to confirm.
Ap rompt appears asking whethe rthe entry
should be deleted.
X Select Yes or
No and press
0021to confirm.
If you select Yes , the entry is deleted.
If you select No , the process is aborted.
Map operation and settings
Note Company logos displayed on the map are
trademarks of the respective companies and
used solely for the purpose of indicating the
location of these companies. The use of such
logos on the map does not indicate approval
of, support of or advertising by these
companies for the navigation system itself.
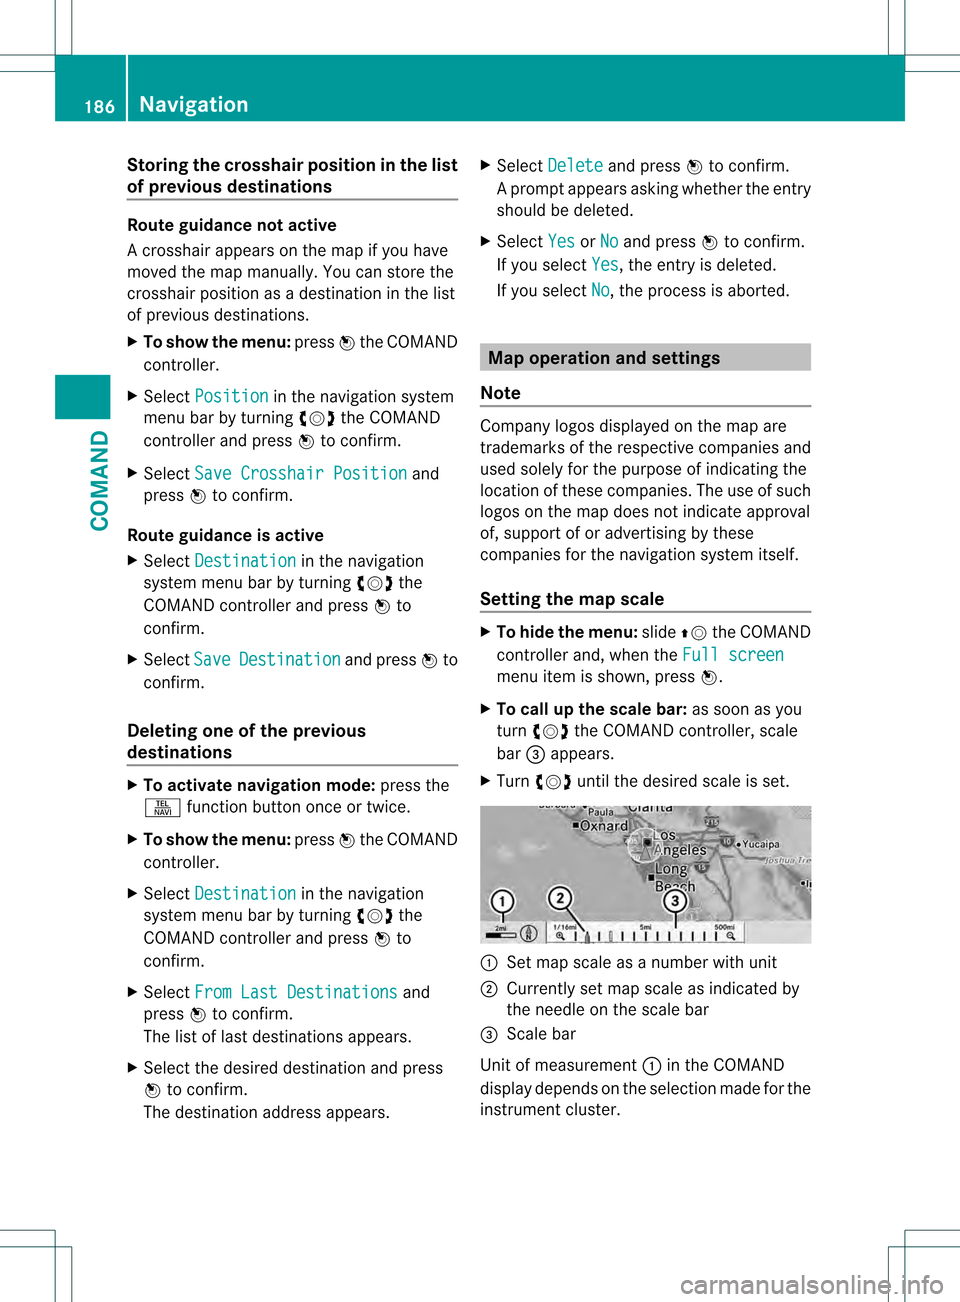
Setting the map scale
X
To hide the menu: slide002A001Cthe COMAND
controller and, when the Full screen menu item is shown, press
0021.
X To call up the scale bar: as soon as you
turn 0031001C0032 the COMAND controller, scale
bar 0026appears.
X Turn 0031001C0032 until the desired scale is set. 0002
Set map scale as a number with unit
0003 Currently set map scale as indicated by
the needle on the scale bar
0026 Scale bar
Unit of measurement 0002in the COMAND
display depends on the selection made for the
instrument cluster. 186
NavigationCOMAND
Page 189 of 542
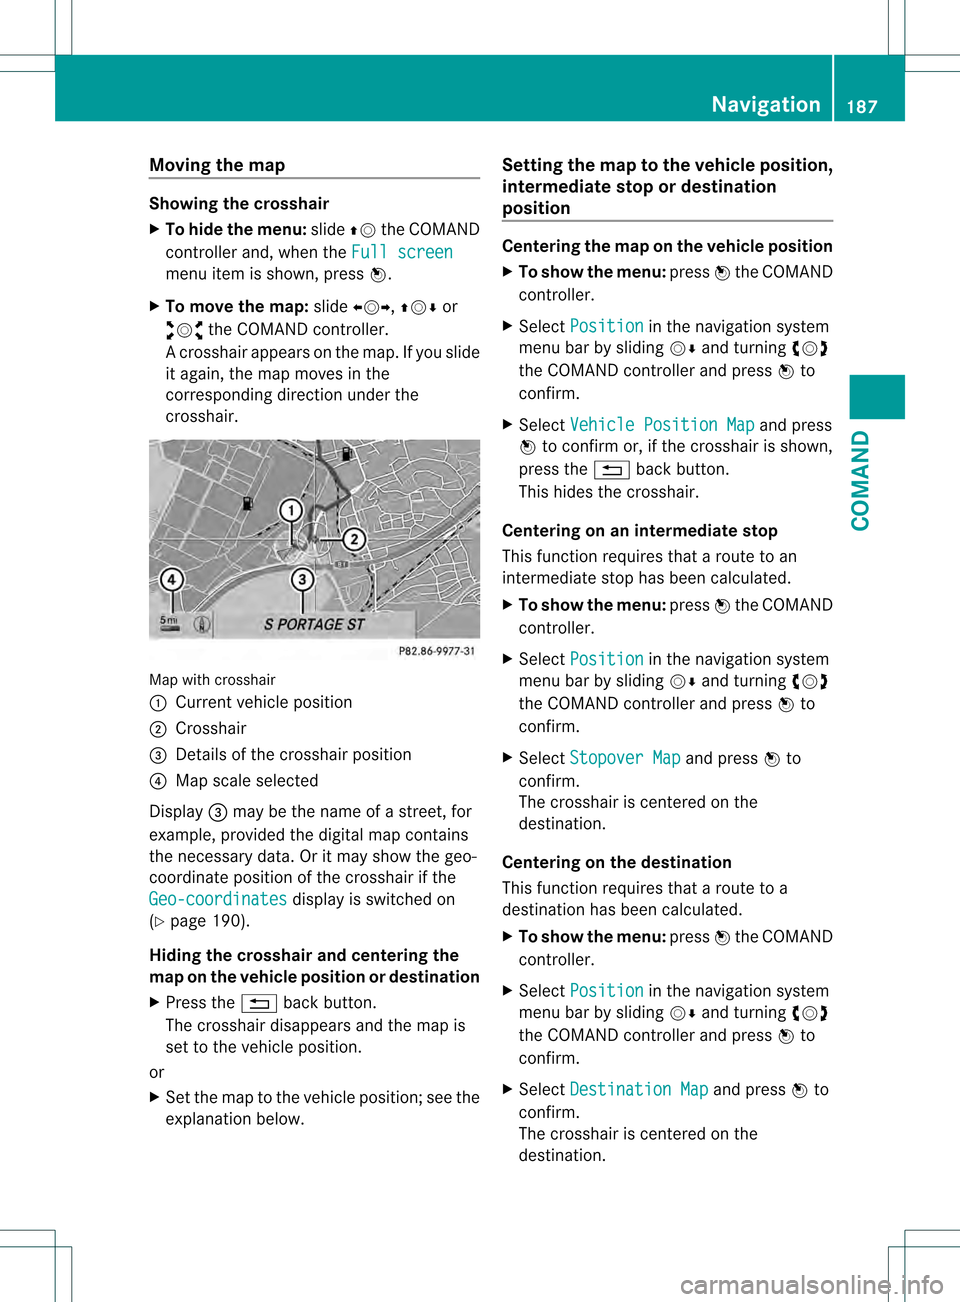
Moving the map
Showing the crosshair
X
To hide the menu: slide002A001Cthe COMAND
controller and, when the Full screenmenu item is shown, press
0021.
X To move the map: slide003C001C003D, 002A001C0006or
003A001C0030 the COMAND controller.
Ac rosshair appears on the map. If you slide
it again, the map moves in the
corresponding direction under the
crosshair. Map with crosshair
0002
Current vehicle position
0003 Crosshair
0026 Details of the crosshair position
0025 Map scale selected
Display 0026may be the name of a street, for
example, provided the digital map contains
the necessary data .Oritmay show the geo-
coordinate positio nofthe crosshair if the
Geo-coordinates display is switched on
(Y page 190).
Hiding the crosshair and centering the
map on the vehicle position or destination
X Press the 0001back button.
The crosshair disappears and the map is
set to the vehicle position.
or
X Set the map to the vehicle position; see the
explanation below. Setting the map to the vehicle position,
intermediate stop or destination
position Centering the map on the vehicle position
X
To show the menu: press0021the COMAND
controller.
X Select Position in the navigation system
menu bar by sliding 001C0006and turning 0031001C0032
the COMAND controller and press 0021to
confirm.
X Select Vehicle Position Map and press
0021 to confirm or, if the crosshair is shown,
press the 0001back button.
This hides the crosshair.
Centering on an intermediat estop
This functio nrequires that a route to an
intermediate stop has been calculated.
X To show the menu: press0021the COMAND
controller.
X Select Position in the navigation system
menu bar by sliding 001C0006and turning 0031001C0032
the COMAND controller and press 0021to
confirm.
X Select Stopover Map and press
0021to
confirm.
The crosshair is centered on the
destination.
Centering on the destination
This function requires that a route to a
destination has been calculated.
X To show the menu: press0021the COMAND
controller.
X Select Position in the navigation system
menu bar by sliding 001C0006and turning 0031001C0032
the COMAND controller and press 0021to
confirm.
X Select Destination Map and press
0021to
confirm.
The crosshair is centered on the
destination. Navigation
187COMAND Z
Page 192 of 542
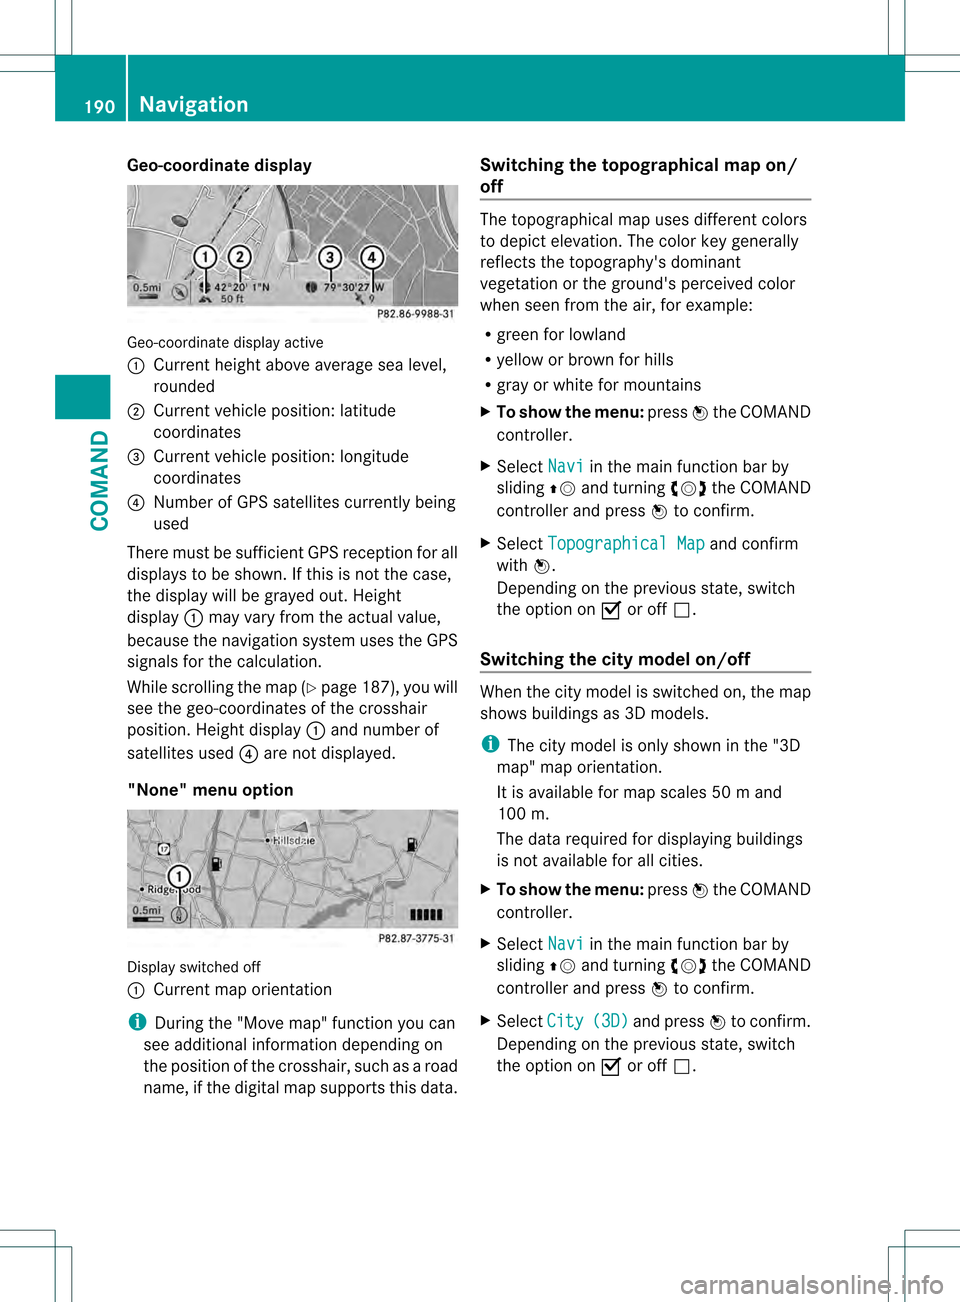
Geo-coordinate display
Geo-coordinate display active
0002
Current heigh tabove average sea level,
rounded
0003 Current vehicle position :latitude
coordinates
0026 Curren tvehicle position :longitude
coordinates
0025 Number of GPS satellites currently being
used
There must be sufficient GPS reception for all
displays to be shown. If this is not the case,
the display will be grayed out. Height
display 0002may vary from the actual value,
because the navigation system uses the GPS
signals for the calculation.
While scrolling the map (Y page 187), you will
see the geo-coordinates of the crosshair
position. Height display 0002and number of
satellites used 0025are not displayed.
"None" menu option Display switched off
0002
Current map orientation
i During the "Move map" function you can
see additional information depending on
the position of the crosshair, such as a road
name, if the digital map supports this data. Switching the topographical map on/
off The topographical map uses different colors
to depict elevation. The color key generally
reflects the topography's dominant
vegetation or the ground's perceived color
when seen from the air, for example:
R green for lowland
R yellow or brown for hills
R gray or white for mountains
X To show the menu: press0021the COMAND
controller.
X Select Navi in the main function bar by
sliding 002A001Cand turning 0031001C0032the COMAND
controller and press 0021to confirm.
X Select Topographical Map and confirm
with 0021.
Depending on the previous state, switch
the option on 000Aor off 0002.
Switching the city model on/off When the city model is switched on, the map
shows buildings as 3D models.
i
The city model is only shown in the "3D
map" map orientation.
It is available for map scales 50 mand
100 m.
The data required for displaying buildings
is not available for all cities.
X To show the menu: press0021the COMAND
controller.
X Select Navi in the main function bar by
sliding 002A001Cand turning 0031001C0032the COMAND
controller and press 0021to confirm.
X Select City (3D) and press
0021to confirm.
Depending on the previous state, switch
the optio non000Aor off0002. 190
NavigationCOMAND
Page 194 of 542
X
Select Navi in the main function bar by
sliding 002A001Cand turning 0031001C0032the COMAND
controlle rand press 0021to confirm.
X Select Highway information and press
0021 to confirm.
Depending on the previous state, switch
the optio non000Aor off0002.
SIRIUS XM service Displaying SIRIUS XM service information
You can display the SIRIUS XM service
information.
X
To show the menu: press0021the COMAND
controller.
X Select Navi in the main function bar by
sliding 002A001Cand turning 0031001C0032the COMAND
controller and press 0021to confirm.
X Select SIRIUS Service and press
0021to
confirm.
Registering for the SIRIUS XM traffic
report service
X Call the traffic report provider's phone
number shown on the screen.
i You can also have the satellite service
activated online. To do so, visit the SIRIUS
XM Radio website at
http://www.sirius.com (USA) or
http://www.siriuscanada.com
(Canada).
Once the connection has been established:
X Follow the instructions of the operator.
The activation process may take up to ten
minutes.
If registration is not included when
purchasing the system, your credit card
details will be required to activate your
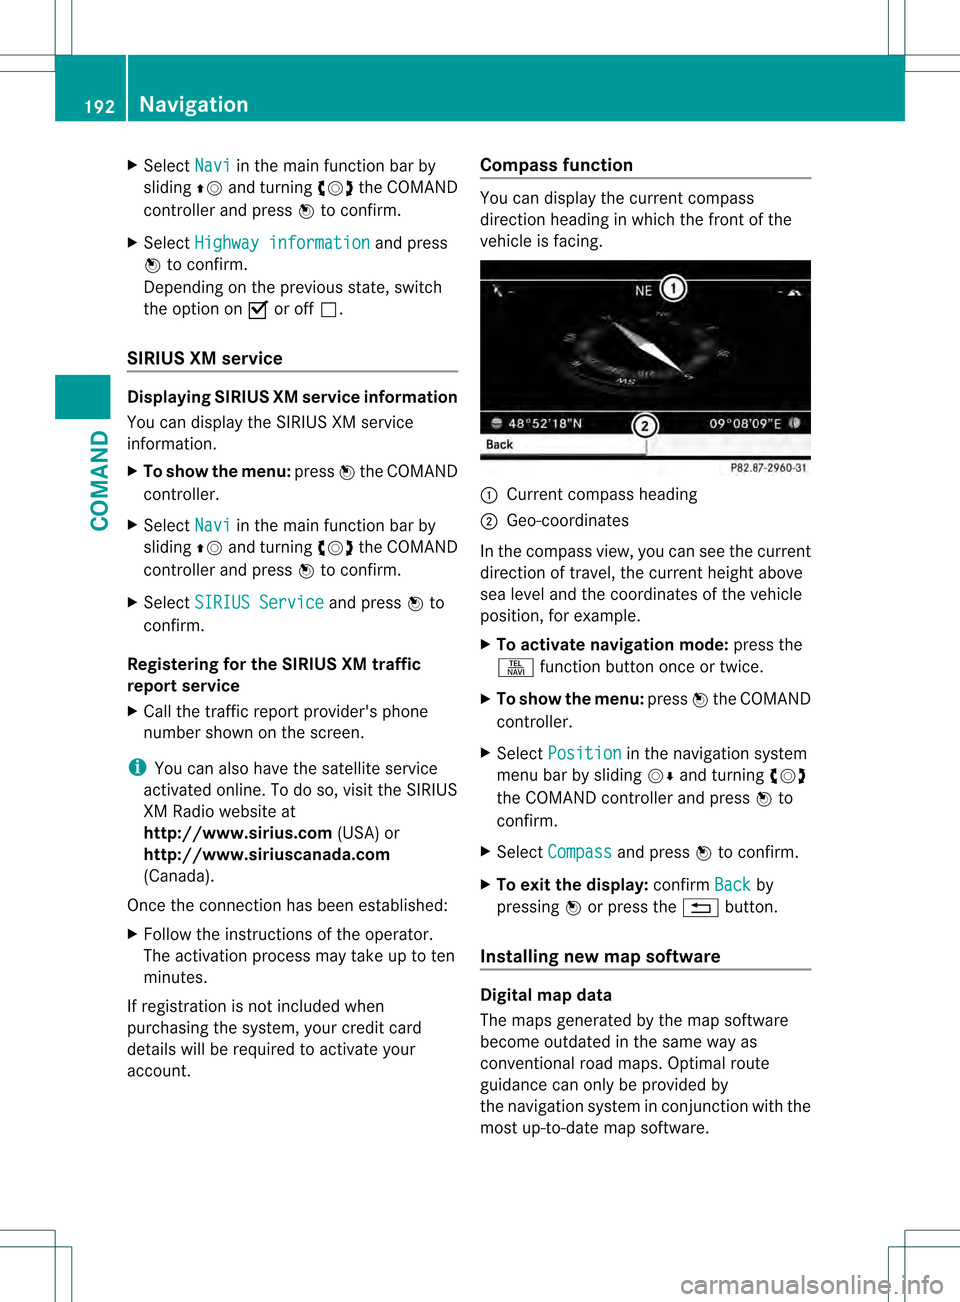
account. Compass function You can display the current compass
direction heading in which the front of the
vehicle is facing.
0002
Current compass heading
0003 Geo-coordinates
In the compass view, you can see the current
direction of travel, the current height above
sea level and the coordinates of the vehicle
position, for example.
X To activate navigation mode: press the
0011 function button once or twice.
X To show the menu: press0021the COMAND
controller.
X Select Position in the navigation system
menu bar by sliding 001C0006and turning 0031001C0032
the COMAND controller and press 0021to
confirm.
X Select Compass and press
0021to confirm.
X To exit the display: confirmBack by
pressing 0021or press the 0001button.
Installing new map software Digital map data
The maps generated by the map software
become outdated in the same way as
conventional road maps. Optimal route
guidance can only be provided by
the navigation system in conjunction with the
most up-to-date map software.192
NavigationCOMAND
Page 195 of 542
Information about new versions of map
software can be obtained from an authorized
Mercedes-Benz Center.
You can have yourm ap software updated
there with a DVD, or you can update it
yourself.
Updating process G
WARNING
Never leave the engine running in enclosed
spaces. The exhaust gases contain toxic
carbon monoxide. Breathing in exhaust fumes
is a health hazard and can lead to
unconsciousness or death.
The update process can take a long time (over
an hour), depending on th esize of the digital
map. During this time, you will only be able to
switch on radio mode and to accept incoming
calls. The update will be completed more
quickly if the vehicle is stationary.
If the starter battery is not sufficiently
charged, COMAND may end the process
automatically. This protect sthe battery. If
this occurs, restart the update with the
engine running.
Displaying information on the map
version currently in use
X To activate navigation mode: press the
0011 function button once or twice.
X To show the menu: press0021the COMAND
controller.
X Select Navi in the main function bar by
sliding 001C0006and turning 0031001C0032the COMAND
controller and press 0021to confirm.
X Select Map version and press
0021to
confirm.
Notes on handling DVDs
R Only hold DVDs by the edge.
R Handle DVDs carefully to prevent reading
errors.
R Avoid getting scratches, fingerprints and
dust on DVDs. R
Use a commercially-available cleaning
cloth to clean discs. When cleaning CDs,
you should wipe in straight lines from the
center outwards rather than in a circular
motion.
R Place DVDs back in their cases after use.
R Protect DVDs from heat and direct sunlight.
Map software copy protection
Map software for COMAND is subject to a
charge. The map software has just one
activation code which is usable in one vehicle
only, and is not transferable. You can obtain
the six-digit activation code from an
authorized Mercedes-Ben zCenter. If you
have lost the activation code, contact an
authorized Mercedes-BenzC enter. If
COMAND does not accept the activation
code that you have received, also contact an
authorized Mercedes-BenzC enter.
Your vehicle is supplied with map software at
the factory. Depending on the country, map
software for your region is either pre-installed
or the map software is supplied as a DVD.Y ou
do not require an activation code for the map
software that is provided with your vehicle.
If the map software on your vehicle has been
installed at the factory and you wish to
reinstall it, this also does not necessitate
entry of the activation code.
Installation process
X Load the map software DVD in the DVD
drive (Y page 225).
COMAND checks the DVD and shows a
corresponding message in the display.
Map software is not compatible with the
navigation system
You will see a message that the map software
cannot be installed.
X To confirm the message: press0021.
COMAND ejects the DVD.
X Take the DVD out of the slot.
X Insert a DVD which is compatible with the
vehicle’s navigation system. Navigation
193COMAND Z
Page 196 of 542
Map software is not compatible with the
current system software
You will see a message that the system
software and the map software are not
compatible.
X To confirm the message: press0021.
COMAND ejects the DVD.
X Take the DVD out of the slot.
X Have the system software updated at an
authorized Mercedes-Benz Center.
The map software cannot be installed until
the system software has been updated.
Map software compatible with the
navigation system and the current
system software
COMAND checks whethe rthe map data on
the DVD is already installed.
Map data is already installed
You will see a message that the map data is
already installed. Aprompt will also appear
asking you whethe ryou wish to continue with
the map software installation.
X Select Yes or
No .
If you select Yes , the existing map data is
overwritten.
If you select No , COMAND automatically
ejects the DVD and the installation of the
map software is canceled.
X Take the DVD out of the slot.
Map data is not installed yet
In the display, you will see a comparison of
the version statuses of the map software DVD
and the map software installed in COMAND.
Ap rompt then appears asking whethe rthe
map software installation should be carried
out.
X Select Yes or
No .
If you select Yes , the map data is installed.
If you select No , COMAND automatically
ejects the DVD and the installation of the
map software is canceled.
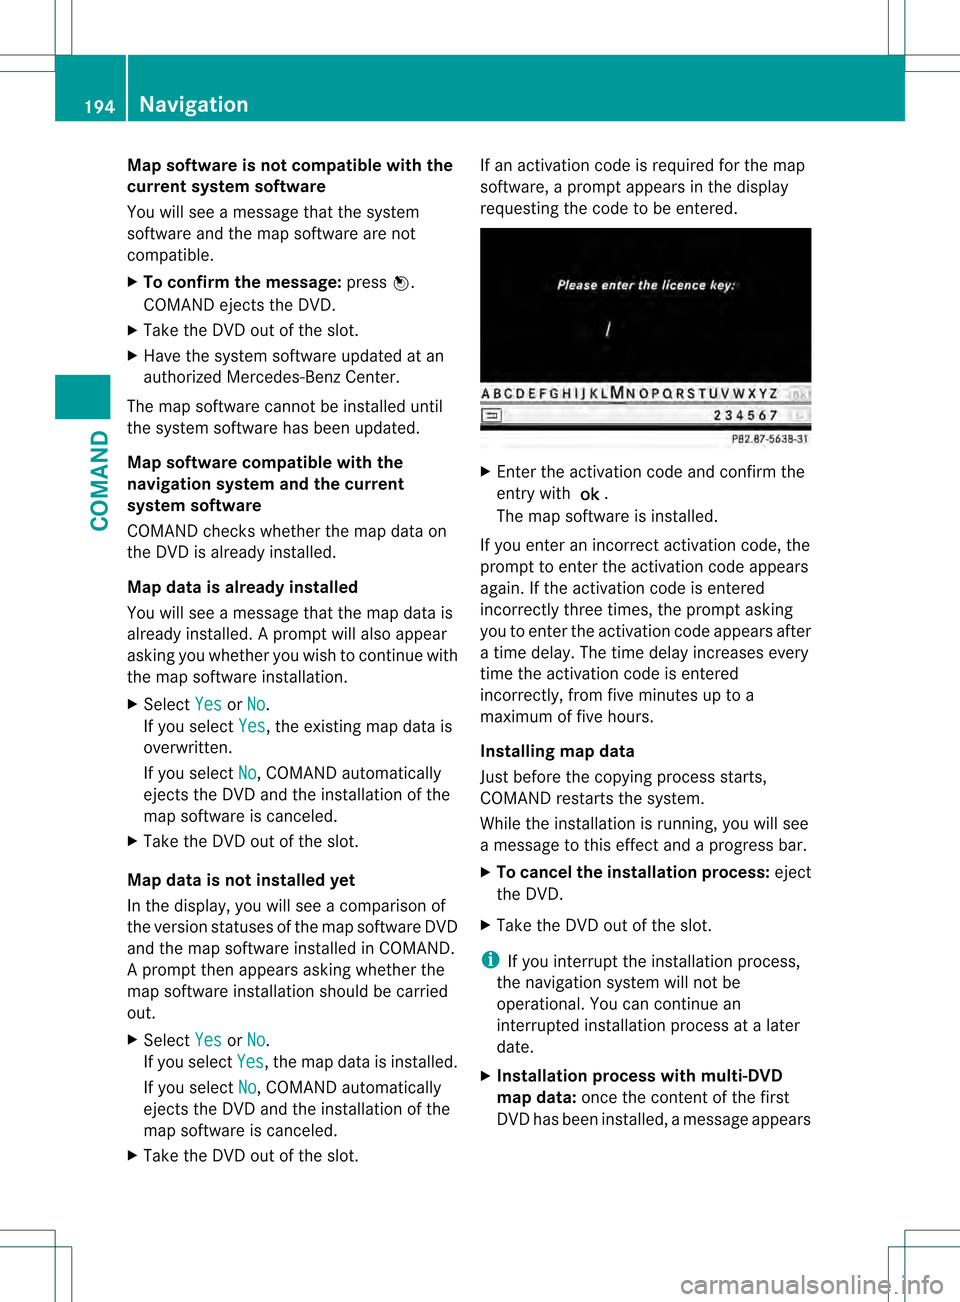
X Take the DVD out of the slot. If an activation code is required for the map
software, a prompt appears in the display
requesting the code to be entered.
X
Enter the activation code and confirm the
entry with 0024.
The map software is installed.
If you enter an incorrect activation code, the
prompt to enter the activation code appears
again. If the activation code is entered
incorrectly three times, the prompt asking
you to enter the activation code appears after
a time delay.T he time delay increases every
time the activation code is entered
incorrectly, from five minutes up to a
maximum of five hours.
Installing map data
Just before the copying process starts,
COMAND restarts the system.
While the installation is running, you will see
a message to this effect and a progress bar.
X To cancel the installation process: eject
the DVD.
X Take the DVD out of the slot.
i If you interrupt the installation process,
the navigation system will not be
operational. You can continue an
interrupted installation process at a later
date.
X Installation process with multi-DVD
map data: once the content of the first
DVD has been installed, a message appears 194
NavigationCOMAND