MERCEDES-BENZ S CLASS 2019 Owners Manual
Manufacturer: MERCEDES-BENZ, Model Year: 2019, Model line: S CLASS, Model: MERCEDES-BENZ S CLASS 2019Pages: 578, PDF Size: 23.31 MB
Page 131 of 578
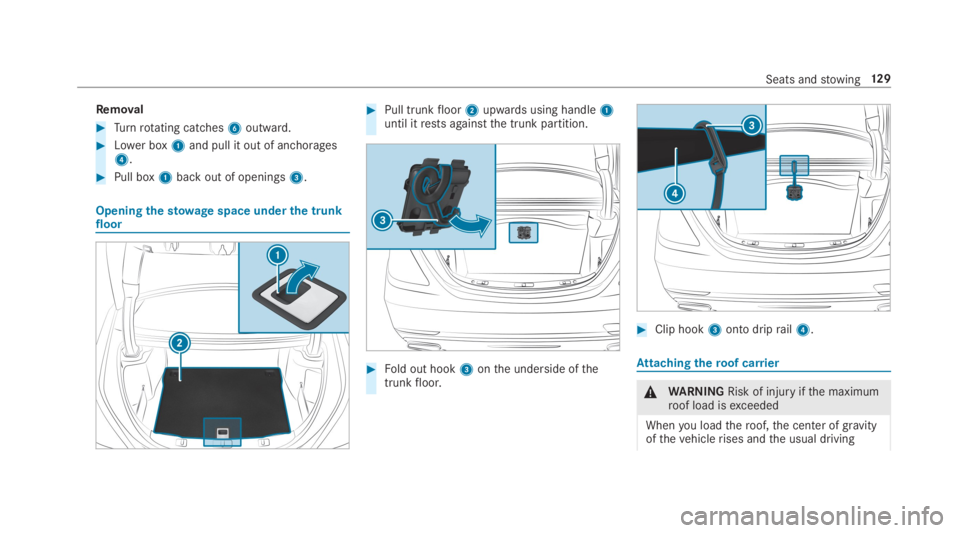
Removal
#Turnrotating catches6outward.
#Lower box1and pull it out of anchorages4.
#Pull box1back out of openings3.
Openingthestowagespace underthe trunkfloor
#Pull trunkfloor2upwards using handle1until itrests againstthe trunk partition.
#Fold out hook3onthe underside ofthetrunkfloor.
#Clip hook3onto driprail4.
Attachingtheroof carrier
&WARNINGRisk of injuryifthe maximumroof load isexceeded
Whenyou loadtheroof,the center of gravityofthevehiclerises andthe usual driving
Seats andstowing12 9
Page 132 of 578
characteristics aswell asthesteering andbrakingcharacteristicschange. During cor‐nering,thevehicle tilts morestrongly andmayreact more sluggishlytosteering move‐ments.
Ifyouexceedthe maximumroof load,thedrivingcharacteristics, aswell asthesteer‐ing and brakingcharacteristics, will begreatlyimpaired.
#Always comply withthe maximumroofload and adjustyour drivingstyle.
You willfind information onthe maximumroofload inthe "Technical data" section.
*NOTEVehicle damage from non-approvedroofracks
Thevehicle could be damagedbyroofrackswhich havenot beentested and approvedbyMercedes-Benz.
#Only useroofrackstested andapprovedbyMercedes-Benz.
#Depending onthevehicle equipment,ensurethat whentheroofrackis instal‐led:RThe sliding sunroof can be fullyraised.
RThe trunk lid can be fully opened.
#Positionthe load ontheroofrackinsuch awaythatthevehicle will not sus‐tain damageeven when it is in motion.
*NOTEDamagetothe sliding sunroofwhen aroofrackis installed
The sliding sunroof may be damagedbytheroofrackifyou attempttoopen it whentheroofrackis installed.
#Do not openthe sliding sunroof whentheroofrackis installed.
In ordertoallowventilation ofthevehicleinterior,you canraisethe sliding sunroof.
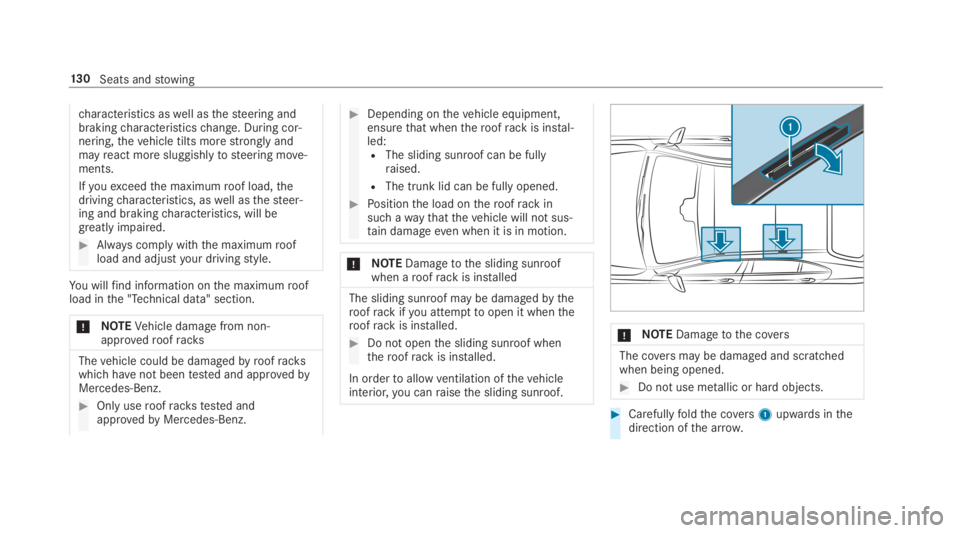
*NOTEDamagetothe covers
The coversmay be damaged and scratchedwhen being opened.
#Do not use metallic or hard objects.
#Carefullyfoldthe covers1upwards inthedirection ofthe arrow.
13 0Seats andstowing
Page 133 of 578
#Securetheroofracktothe anchorage pointsunder covers1.
#Comply withtheroofrackmanufacturer'sinstallation instructions.
#Securethe load ontheroofrack.
Cup holder
Installingthe cup holder in orremoving itfrom the center console
&WARNING‑ Risk of accident or injurywhen usingthe cup holder whilethevehicle is moving
The cup holder cannot secure containerswhilethevehicle is moving.
Ifyou use a cup holder whilethevehicle ismoving,the container may beflung aroundand liquids may be spilled. Thevehicle occu‐pants may come into contact withthe liquidand if it is hot,theycould be scalded.Yo ucould be distracted from traffic conditionsandyou may lose control ofthevehicle.
#Only usethe cup holder whenthevehi‐cle isstationary.
#Only usethe cup holderfor containersoftheright size.
#Closethe container, particularlyiftheliquid is hot.
Observethefollowingfor Mercedes-Maybachvehicles equipped withchampagneflutes:
Rdo not usethechampagneflutes whilethevehicle is in motion
Rdo not usechampagneflutes made of break‐ableglass, andstorethem inthe trunk if pos‐sible
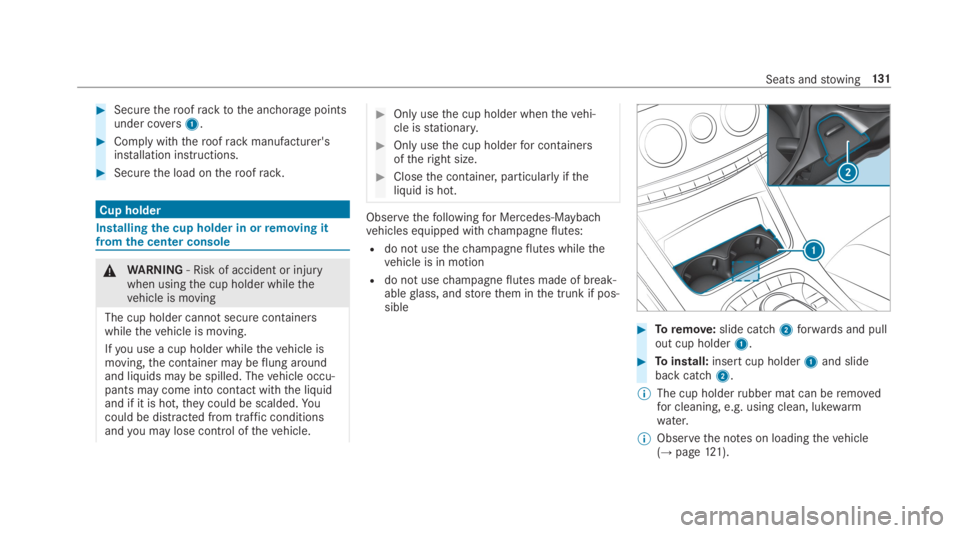
#Toremove:slide catch2forwards and pullout cup holder1.
#Toinstall:insert cup holder1and slideback catch2.
%The cup holderrubber mat can beremovedfor cleaning, e.g. using clean, lukewarmwater.
%Observethe notes on loadingthevehicle(→page121).
Seats andstowing131
Page 134 of 578
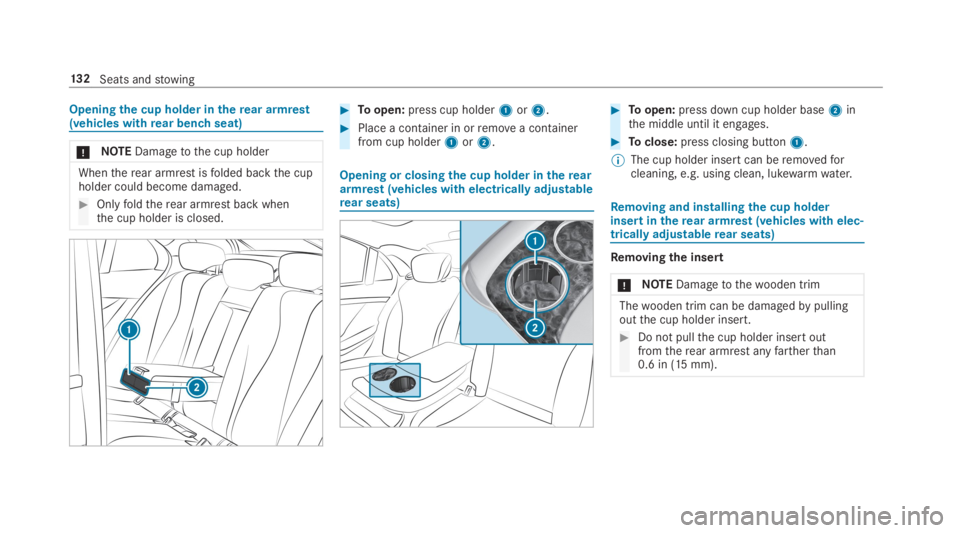
Openingthe cup holder intherear armrest(vehicles withrear benchseat)
*NOTEDamagetothe cup holder
Whentherear armrest isfolded backthe cupholder could become damaged.
#Onlyfoldtherear armrest back whenthe cup holder is closed.
#Toopen:press cup holder1or2.
#Place a container in orremovea containerfrom cup holder1or2.
Opening or closingthe cup holder inthereararmrest (vehicles withelectrically adjustablerear seats)
#Toopen:press down cup holder base2inthe middle until it engages.
#Toclose:press closing button1.
%The cup holder insert can beremovedforcleaning, e.g. using clean, lukewarmwater.
Removing and installingthe cup holderinsert intherear armrest (vehicles withelec‐trically adjustablerear seats)
Removing the insert
*NOTEDamagetothewooden trim
Thewooden trim can be damagedbypullingoutthe cup holder insert.
#Do not pullthe cup holder insert outfromtherear armrest anyfartherthan0.6 in (15 mm).
13 2Seats andstowing
Page 135 of 578
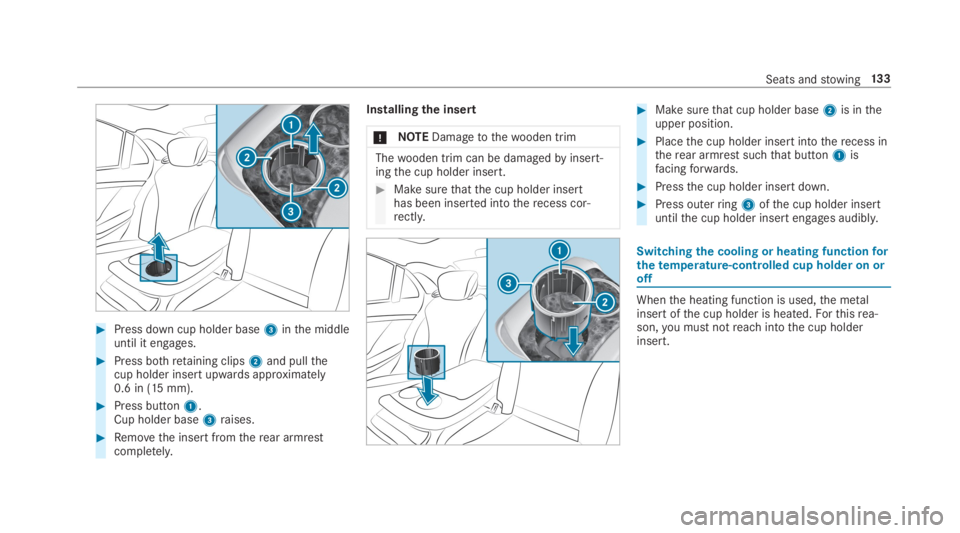
#Press down cup holder base3inthe middleuntil it engages.
#Press bothretaining clips2and pullthecup holder insertupwards approximately0.6 in (15 mm).
#Press button1.Cup holder base3raises.
#Removethe insert fromtherear armrestcompletely.
Installingthe insert
*NOTEDamagetothewooden trim
Thewooden trim can be damagedbyinsert‐ingthe cup holder insert.
#Make surethatthe cup holder inserthas been inserted intotherecess cor‐rectly.
#Makesurethat cup holder base2is intheupper position.
#Placethe cup holder insert intotherecess intherear armrest suchthat button1isfacingforwards.
#Pressthe cup holder insert down.
#Press outerring3ofthe cup holder insertuntilthe cup holder insert engages audibly.
Switchingthe cooling or heating functionforthetemperature-controlled cup holder on oroff
Whenthe heating function is used,the metalinsertofthe cup holder is heated.Forthisrea‐son,you must notreach intothe cup holderinsert.
Seats andstowing13 3
Page 136 of 578
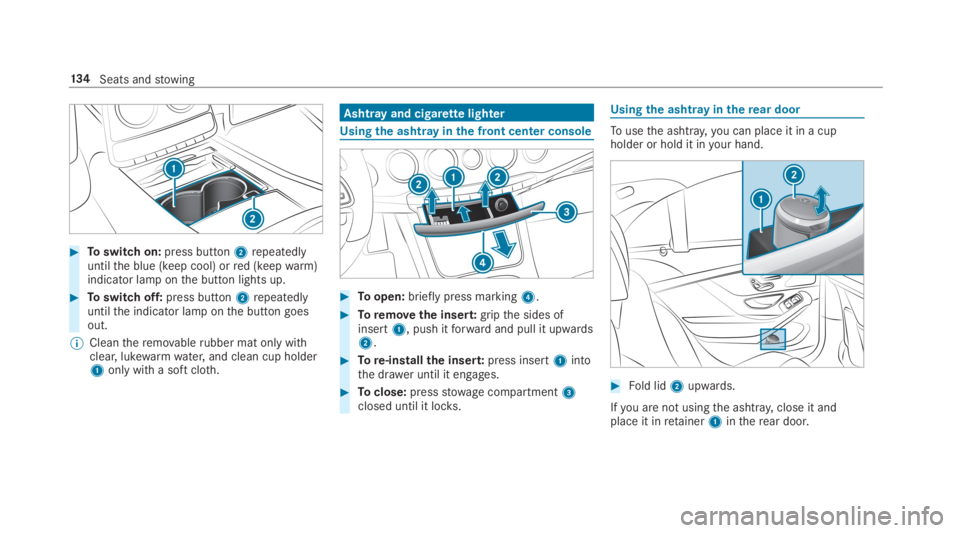
#Toswitch on:press button2repeatedlyuntilthe blue (keep cool) orred (keepwarm)indicator lamp onthe button lights up.
#Toswitch off:press button2repeatedlyuntilthe indicator lamp onthe button goesout.
%Cleantheremovablerubber mat only withclear, lukewarmwater,and clean cup holder1only witha soft cloth.
Ashtray and cigarettelighter
Usingthe ashtrayinthe front center console
#Toopen:briefly press marking4.
#Toremovethe insert:gripthe sides ofinsert1, push itforward and pull it upwards2.
#Tore-installthe insert:press insert1intothe drawer until it engages.
#Toclose:pressstowage compartment3closed until it locks.
Usingthe ashtrayintherear door
Tousethe ashtray,you can place it in a cupholder or hold it inyour hand.
#Fold lid2upwards.
Ifyou are not usingthe ashtray,close it andplace it inretainer1intherear door.
134Seats andstowing
Page 137 of 578
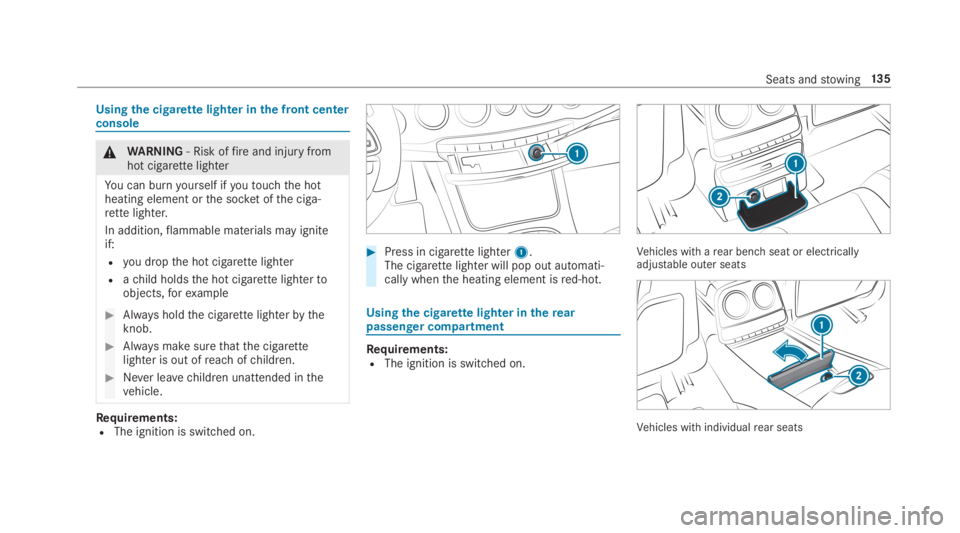
Usingthe cigarettelighter inthe front centerconsole
&WARNING‑ Risk offireand injury fromhot cigarettelighter
You can burnyourself ifyoutouchthe hotheating element orthe socket ofthe ciga‐rette lighter.
In addition,flammable materials may igniteif:
Ryou dropthe hot cigarettelighter
Rachild holdsthe hot cigarettelightertoobjects,forexample
#Always holdthe cigarettelighterbytheknob.
#Always make surethatthe cigarettelighter is out ofreach ofchildren.
#Never leavechildren unattended inthevehicle.
Requirements:RThe ignition is switched on.
#Press in cigarettelighter1.The cigarettelighter will pop out automati‐cally whenthe heating element isred-hot.
Usingthe cigarettelighter intherearpassenger compartment
Requirements:RThe ignition is switched on.
Vehicles with arear benchseat or electricallyadjustable outer seats
Vehicles with individualrear seats
Seats andstowing13 5
Page 138 of 578
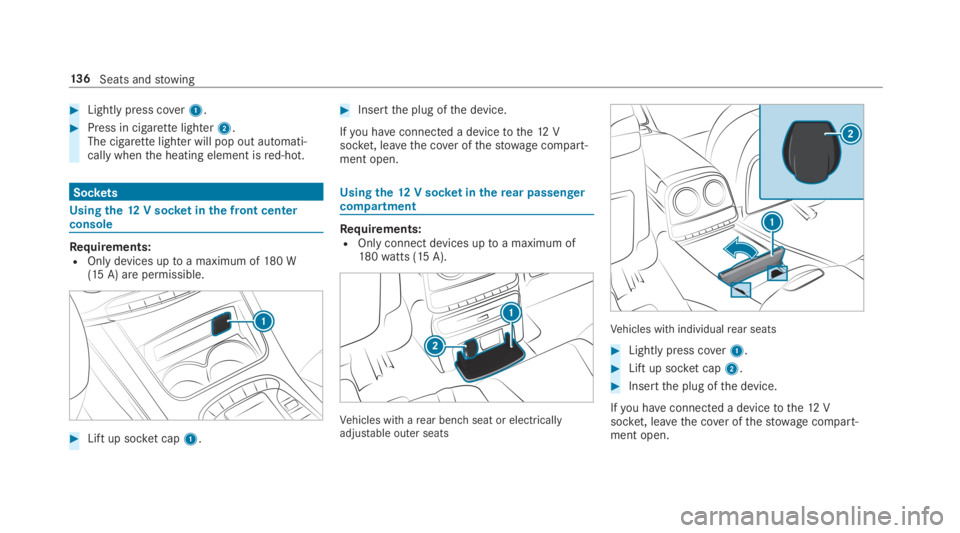
#Lightly press cover1.
#Press in cigarettelighter2.The cigarettelighter will pop out automati‐cally whenthe heating element isred-hot.
Sockets
Using the12V socketinthe front centerconsole
Requirements:ROnly devices uptoa maximum of180 W(15 A) are permissible.
#Lift up socket cap1.
#Insertthe plug ofthe device.
Ifyou haveconnected a devicetothe12 Vsocket, leavethe cover ofthestowage compart‐ment open.
Usingthe12V socketintherear passengercompartment
Requirements:ROnly connect devices uptoa maximum of180watts (15 A).
Vehicles with arear benchseat or electricallyadjustable outer seats
Vehicles with individualrear seats
#Lightly press cover1.
#Lift up socket cap2.
#Insertthe plug ofthe device.
Ifyou haveconnected a devicetothe12 Vsocket, leavethe cover ofthestowage compart‐ment open.
13 6Seats andstowing
Page 139 of 578
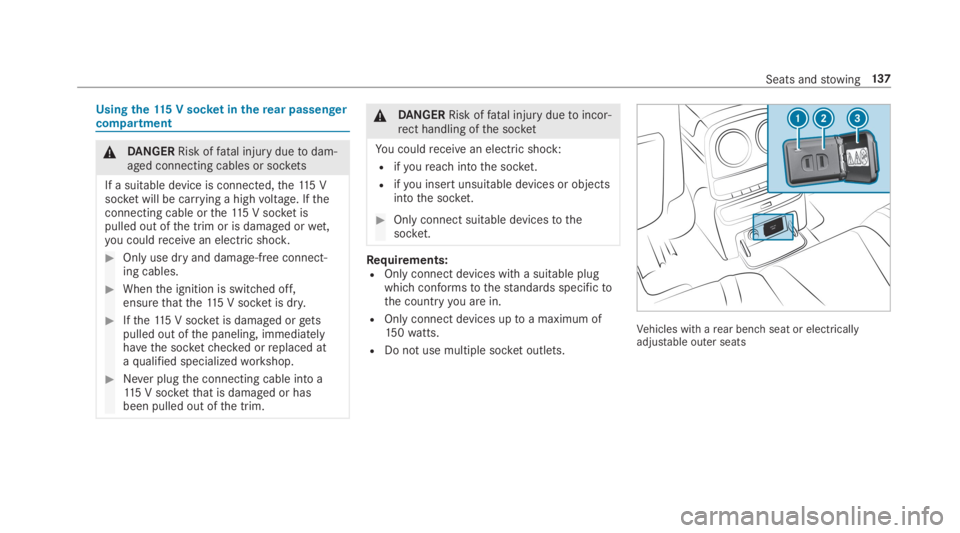
Usingthe115 V socket in therear passengercompartment
&DANGERRisk offatal injury duetodam‐aged connecting cables or sockets
If a suitable device is connected,the115 Vsocket will be carrying a highvoltage. Iftheconnecting cable orthe115 V socket ispulled out ofthe trim or is damaged orwet,you couldreceivean electric shock.
#Only use dry and damage-free connect‐ing cables.
#Whenthe ignition is switched off,ensurethatthe115 V socket is dry.
#Ifthe115 V socket is damaged orgetspulled out ofthe paneling, immediatelyhavethe socketchecked orreplaced ataqualified specializedworkshop.
#Never plugthe connecting cable into a115 V socketthat is damaged or hasbeen pulled out ofthe trim.
&DANGERRisk offatal injury duetoincor‐rect handling ofthe socket
You couldreceivean electric shock:
Rifyoureach intothe socket.
Rifyou insert unsuitable devices or objectsintothe socket.
#Only connect suitable devicestothesocket.
Requirements:ROnly connect devices with a suitable plugwhich conformstothestandards specifictothe countryyou are in.
ROnly connect devicesuptoa maximum of150watts.
RDo not use multiple socket outlets.
Vehicles with arear benchseat or electricallyadjustable outer seats
Seats andstowing137
Page 140 of 578
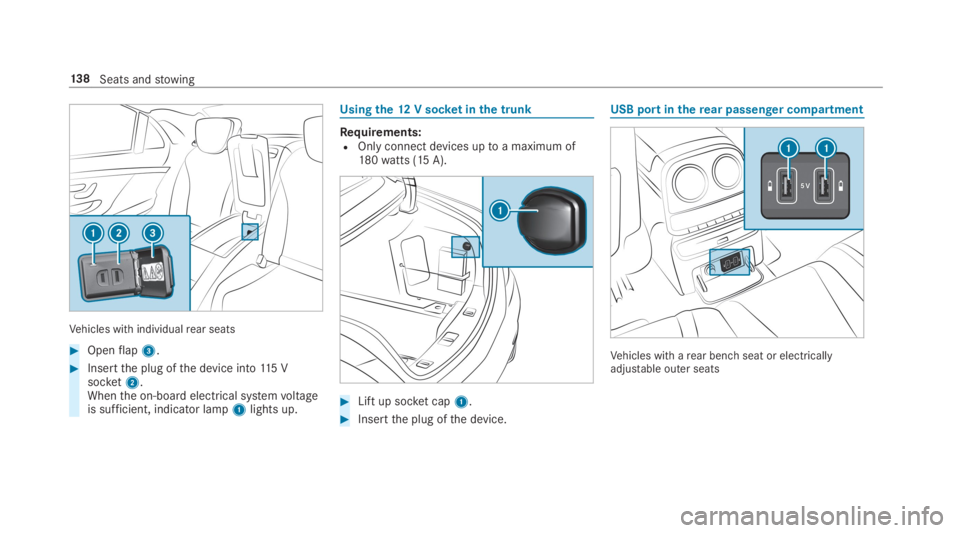
Vehicles with individualrear seats
#Openflap3.
#Insertthe plug ofthe device into115 Vsocket2.Whenthe on-board electrical systemvoltageis sufficient, indicator lamp1lights up.
Usingthe12V socketinthe trunk
Requirements:ROnly connect devices uptoa maximum of180watts (15 A).
#Liftup socket cap1.
#Insertthe plug ofthe device.
USB port intherear passenger compartment
Vehicles with arear benchseat or electricallyadjustable outer seats
13 8Seats andstowing