MERCEDES-BENZ S-CLASS CABRIOLET 2017 Owners Manual
Manufacturer: MERCEDES-BENZ, Model Year: 2017, Model line: S-CLASS CABRIOLET, Model: MERCEDES-BENZ S-CLASS CABRIOLET 2017Pages: 521, PDF Size: 10.48 MB
Page 251 of 521
The
volume of then avigation announce‐
ment changes in accordanc ewitht he vol‐
ume of thec urrent media sou rce.
R during atelephone call
R when entering or exitin gap arkin gspace
while using ActiveP arking Assist
or #
Select System. #
Select Audio. #
Selec tavolume setting. #
Setthe volume. Entering
characters Using
thec haracter input function
Use thec haracter input function in thef ollowing
situations, fore xamp le:
R Torenam eafavourite
R Toenter aPOI or address
R Tomak eap hone call The
following function sareavailable:
R Selecting acharacter in thec haracter bar
R Writin gac haracter on thet ouchpad
Character input can be star tedw ithac ontrol
element and resumed wit hanother. #
On theT ouc hControl and controller:
select acharacter in thec haracter bar.
Depending on thet arge te ntry ,the following
ch aracter sareavailable:
R The full se tofcharacter sisshown
R Onlythose character swhicha reuseful
fo rt he cur rent inpu tstring are shown
Other character saregrey ed out. #
On thet ouchpad: selectacharacter in the
ch aracter bar.
or #
Writet he character sonthetouch-sensitive
sur face of thet ouchpad.
Handwriting recognition suppo rtsy ou by
means of character suggestions and aread-
aloud function. Examples of
character ent ry:
R Renam eafavourite
R EnteraP OI or an addre ss using free or step-
by -ste ps ear ch
R Enter aweb address
Entering character susin gthe controller.
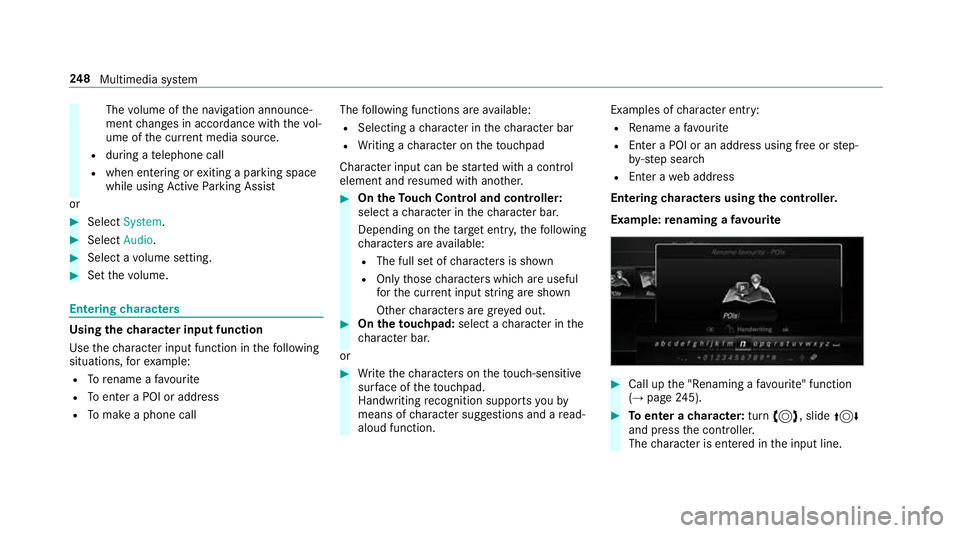
Example :renaming afavourite #
Call up the" Renaming afavo urite" function
(→ pag e245). #
Toenter acharacter: turn3,s lide4
and press thec ontroller.
The character is entered in thei np ut line. 248
Multimedia sy stem
Page 252 of 521
Use
thef ollowing entr yfunctions:
% Todele teac haracter :press thec ontrol‐
ler.
To dele tean ent ry:p ress and hol dthe
controller until thee ntir eentry is dele ted.
Ä To
switc htos pecial character sand sym‐
bols.
X To
switc htou pper-case or lo wer-case let‐
te rs.
B To
switc hthe language.
v Toswitc htoc haracter entr yonthetouch‐
pad.
% The available editing function sdepen don
th ee diting task ,the languag esetand the
ch aracter le vel. #
Toconfir mthe ent ry:select ¡.
Example: entering adestination (navigation) #
Enter theP OI or address (→ page266).
Entering character sonthetouchpad
Re quirements:
R The touchpad is swit ched on (→ page243). R
The entered or selected character shoul dbe
re ad out :the handwriting recognition read-
aloud function is swit ched on (→ page244).
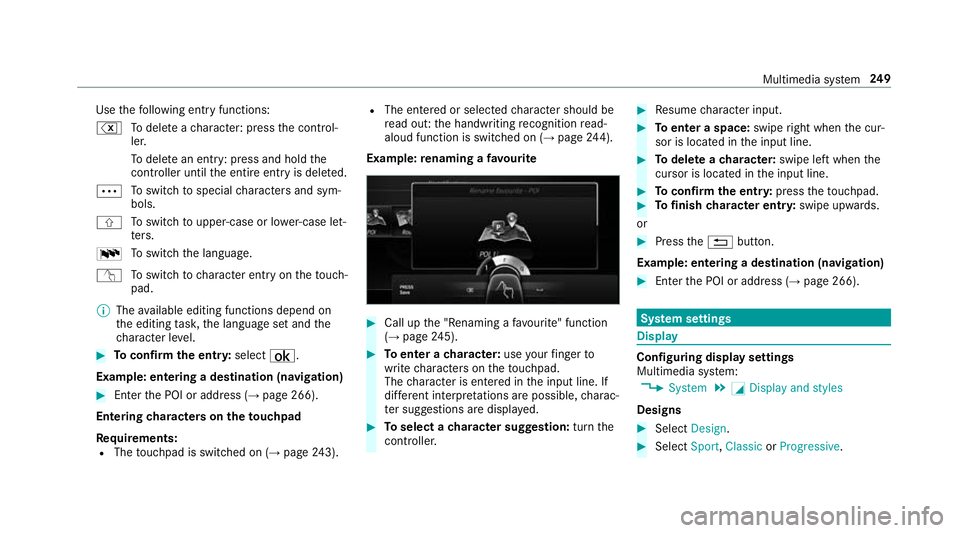
Exam ple:renaming afavo urite #
Call up the" Renaming afavo urite" function
(→ pag e245). #
Toenter acharacter: useyour finger to
writ echaracter sonthetouchpad.
The character is entered in thei np ut line. If
dif fere nt interpr etations ar epossible, charac‐
te rs uggestions ar edispla yed. #
Toselect acharacter suggestion: turnthe
controller. #
Resume character input. #
Toenter aspace: swiperight when thec ur‐
sor is located in thei np ut line. #
Todel eteac haracter: swipe leftwhent he
cursor is loc ated in thei np ut line. #
Toconfir mthe ent ry:press thet ouchpad. #
Tofinish character entr y:swipe upwards.
or #
Press the% button.
Example: entering adestination (navigation) #
Ente rthe POI or address (→ page266). Sy
stem settings Display
Configuring displa
ysettings
Multimedia sy stem:
, System .
G Display and styles
Designs #
Select Design. #
Select Sport,Classic orProgressive. Multimedia sy
stem 249
Page 253 of 521
Ad
apting thea mb ient lighting fort he style #
Select Adjust ambient light. .
Ac tivate Oor deacti vate ª thef unction.
This function adjusts thea mbient lighting for
th es elected displa ystyle.
Ad ditional displ ayarea
Depending on thev ehicle, various items of addi‐
tional information can be shown. The additional
displa yareac omprises thel eft-hand or right-
hand thirdoft he displa y. #
Select Additiona ldisplay area .
The following displa ycontent can be selected:
R Dynamic
R Navigation map
R Consumption
R Time and date
Displ aybrightness #
Select Display brightness .#
Select abrightness value. Switching
thed ispla yoff/on #
Off: select Display off . #
On: press abutton, %,f orexample.
Displ aydesign #
Select Day/nigh tdesign. #
Select Automatic, Day design orNight
design. Time and date
Setting the time and dat
eautomatical ly
Multimedia sy stem:
, System .
& Time and date #
Deactivate ªManual time adjustment.
The time and dat eareseta utomaticall yfor
th es elected time zonea nd summer time
option.
% The cor rect time is requ ired fort he following
functions: R Routeg uidance wit htime-dependent
traf ficg uida nce.
R Calculation of expected time of ar riva l. Setting
thet imez one
Multimedia sy stem:
, System .
& Time and date .
Time
zone:
The lis tofcountries is displa yed. #
Select acount ry#.
Depending on thec ount ry,t ime zones are
displa yed. #
Select atime zone.
The time zon esetis displa yeda fter Time
zone:.
Settin gsummer time
The Automatic Summer Time andSummer Time
options canno tbeselected in all countries.
Multimedi asystem:
, System .
& Time and date
Au tomatically #
Switch Automatic Summer Time onO or off
ª.
Manual ly #
Switch Automati cSummer Time offª. 250
Multimedia sy stem
Page 254 of 521
#
Select Summer Time. #
Select OnorOff.
Setting the time and dat eformat
Multimedia sy stem:
, System .
& Time and date .
Set
format #
Setthe dat eand time form at#.
Setting thet imem anually
Re quirement:
R The Manual time adjustment function is
switched on.
Multimedia sy stem:
, System .
& Time and date .
Set
time #
Setthe hours. #
Navigat etot heright tosetthe minutes. #
Setthe minutes. #
Confir mchanges when exitin gthe menu.
The dat eissetautomaticall yvia GPS. Connectivity
Setting up
ahotspo tvia business telephony
Multimedia sy stem:
, System .
ö Connectivity .
Set up
hotspot #
Select Select the vehicle's mobile hotspot . #
Select Business phone.
The hotspo tisactive.
Exte rnal devices (e.g. tablets) can be connec‐
te dtot he multimedia sy stem via business
te lephon y.
% Information abouts etting up ahotspot
(→ pag e313).
Swi tchin gtransmission of the vehicl eposi‐
tion on/off
Multimedi asystem:
, System .
ö Connectivity #
Select Transmit vehicle position . #
Switc hthe function on Oor off ª. Blue
tooth ® Information abou
tBluet oo th®
Bl ue tooth ®
tech nology is astandar dfor short-
ra ng ew ireles sdatat ransfer up toappr oximately
10 m.Youc an use Blue tooth®
to connect your
mobile phon etothe multimedia sy stem and use
th ef ollowing functions, fore xamp le:
R hands-free sy stem wit haccess tothef ollow‐
ing options:
- contacts (→ page298)
- call lists (→ page300)
- text messa ges
R Interne tconnection
R listening tomusi cvia Blue tooth®
audio
(→ pag e329)
R trans ferring business cards (vCards) int othe
ve hicle
Blue tooth ®
is ar egis tere dt rademar kofBlue‐
toot hSpecial Interes tGroup (SIG) Inc.
% Interne tconnection via Blue tooth®
is not
av ailable in all countries. Multimedia sy
stem 251
Page 255 of 521
Ac
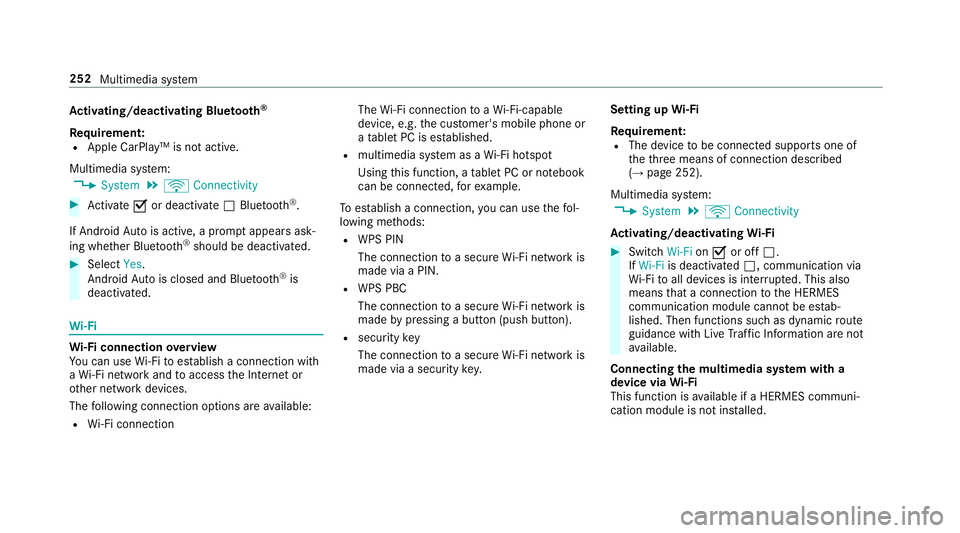
tivating/deactivatin gBluetooth ®
Requ irement:
R Apple CarPlay™ is no tactive.
Multimedia sy stem:
, System .
ö Connectivity #
Activate Oor deacti vate ª Bluetoo th®
.
If Android Autois active, apromp tappear sask‐
ing whe ther Blue tooth®
should be deactivated. #
Select Yes.
Android Autois closed and Blue tooth®
is
deactivated. Wi
-Fi Wi
-Fic on nectio noverview
Yo uc an use Wi-Fi toestablish aconnection with
aW i-Finetwo rkand toaccess theI nterne tor
ot her networ kdevices.
The following connection option sareavailable:
R Wi-Fi connection The
Wi-Fi connectio ntoaWi-Fi-capable
device ,e.g.t he cus tomer's mobil ephone or
at able tPCise stablished.
R multimedia sy stem as aWi-Fihotspot
Using this function ,atable tPCorn otebook
can be connected, fore xamp le.
To establish aconnection ,you can use thef ol‐
lowing me thods:
R WPS PIN
The connection toas ecur eWi-Finetwo rkis
mad eviaaP IN.
R WPS PBC
The connectio ntoasecureWi-Finetwo rkis
mad ebyp ressing abutton (push button).
R security key
The connection toas ecur eWi-Finetwo rkis
mad eviaas ecu rity key. Setting up
Wi-Fi
Requ irement:
R The device tobe connec teds upports one of
th et hree means of connection described
(→ pag e252).
Multimedia sy stem:
, System .
ö Connectivity
Ac tivating/deactivatin gWi-Fi #
Switch Wi-FionO or off ª.
If Wi-Fi is deacti vatedª,communicatio nvia
Wi -Fi toall devices is inter rupte d. This also
means that ac onnectio ntothe HERMES
communication module canno tbeestab‐
lished. Then function ssuchasd ynamic route
guidance wit hLiveT raffic In form ation ar enot
av ailable.
Connecting them ultimedia sy stem wit ha
device via Wi-Fi
Thi sfunction is available if aHERME Scommuni‐
cation modul eisnotins talled. 252
Multimedia sy stem
Page 256 of 521
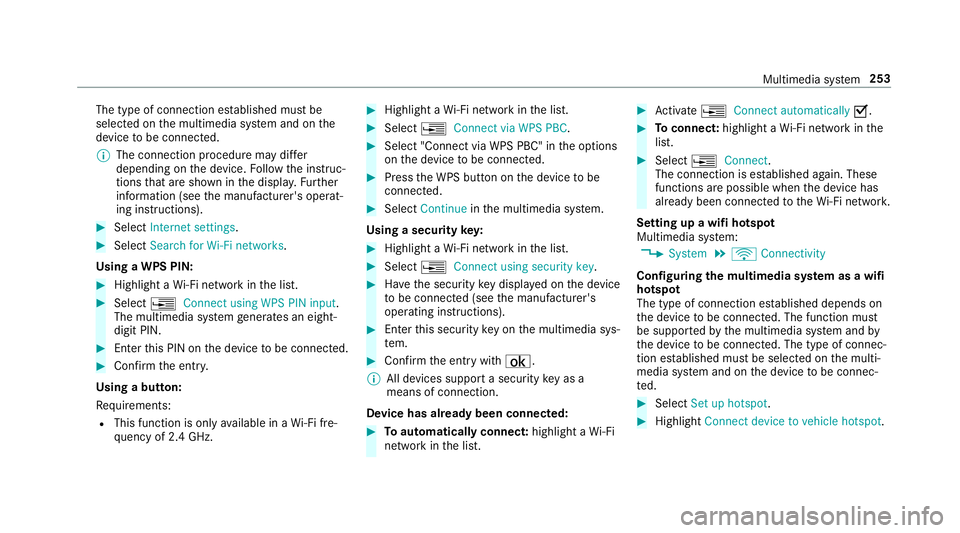
The type of connection es
tablished mus tbe
selected on them ultimedia sy stem and on the
device tobe connec ted.
% The connection procedur emaydiffer
dependin gonthe device. Followt he instruc‐
tions that ar eshown in thed ispla y.Fu rther
information (see them anufacturer's operat‐
ing instructions). #
Select Internet settings . #
Select Search for Wi-Fi networks.
Using aWPS PIN: #
Highlight aWi-Finetwo rkinthel ist. #
Select ¥Connec tusing WPS PIN input.
The multimedia sy stem generates an eight-
digi tPIN. #
Enter this PIN on thed evice tobe connec ted. #
Confir mthe entr y.
Using abutton:
Re quirements:
R This function is onl yavailable in aWi-Fifre‐
qu ency of 2.4 GHz. #
Highlight aWi-Finetwo rkinthel ist. #
Select ¥Connec tvia WPS PBC. #
Select "Connec tvia WPS PBC" in theo ptions
on thed evice tobe connec ted. #
Press theW PS button on thed evice tobe
connec ted. #
Select Continue inthem ultimedia sy stem.
Using asecurity key: #
Highlight aWi-Finetwo rkinthel ist. #
Select ¥Connec tusing securit ykey. #
Have thes ecurity keyd ispla yedont he device
to be connec ted( see them anufacturer's
operating instructions). #
Ente rthis security keyo nthe multimedia sys‐
te m. #
Confir mthe entr ywith¡.
% All devices suppor tasecurity keyasa
mean sofconnection.
Device ha salread ybeen connec ted: #
Toautomaticall yconnect: highlight aWi-Fi
networ kinthe list. #
Activate ¥ Connect automatically O. #
Toconnect: highlightaWi-Finetwo rkinthe
list. #
Select ¥Connect.
The connection is es tablished again. These
function sarepossible when thed evice has
already been connected totheW i-Finetwo rk.
Setting up awifih otspot
Multimedia sy stem:
, System .
ö Connectivity
Configuring them ultimedia sy stem as awifi
hotsp ot
The type of connection es tablished depends on
th ed evice tobe connec ted. The function must
be suppor tedbyt he multimedia sy stem and by
th ed evice tobe connec ted. The type of connec‐
tion es tablished mus tbeselected on them ulti‐
media sy stem and on thed evice tobe connec‐
te d. #
Select Set up hotspot. #
Highlight Connectdevice to vehicle hotspot. Multimedia sy
stem 253
Page 257 of 521
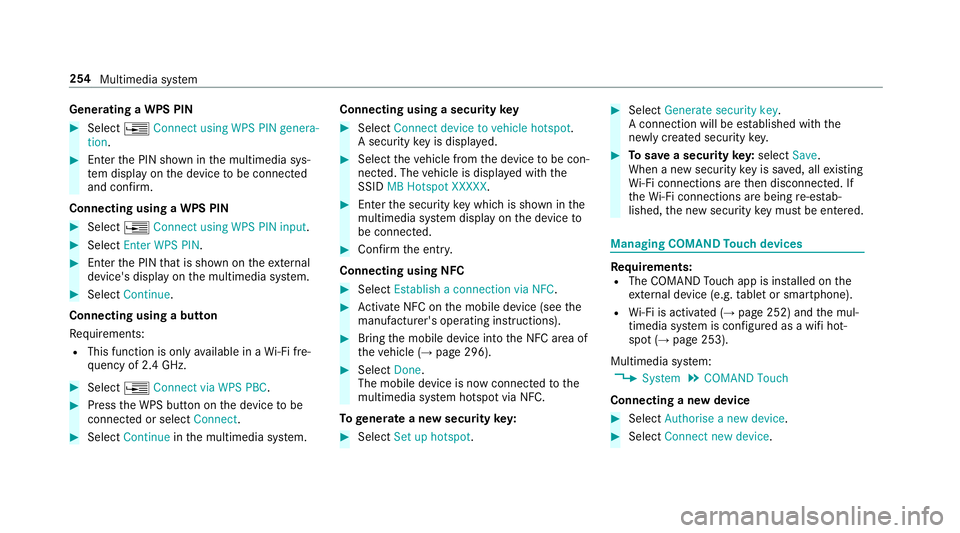
Genera
tingaW PS PIN #
Select ¥Connect using WPS PIN genera-
tion. #
Enter theP IN shown in them ultimedia sys‐
te md ispla yont he device tobe connec ted
and con firm.
Connecting usin gaWPS PIN #
Select ¥Connect usin gWPS PIN input. #
Select Enter WPS PIN. #
Entert he PIN that is shown on thee xternal
device's displa yonthe multimedia sy stem. #
Select Continue.
Connecting using abutton
Re quirements:
R This function is onl yavailable in aWi-Fifre‐
qu ency of 2.4 GHz. #
Select ¥Connec tvia WPS PBC. #
Press theW PS button on thed evice tobe
connec tedors electConnect. #
Select Continue inthem ultimedia sy stem. Connecting using
asecurity key #
Select Connect device to vehicl ehotspot .
As ecu rity keyisd isplayed. #
Select thev ehicle from thed evice tobe con‐
nec ted. The vehicle is displa yedw itht he
SSID MB Hotspot XXXXX. #
Enter thes ecurity keyw hichiss hown in the
multimedia sy stem displa yonthe device to
be connec ted. #
Confir mthe entr y.
Connecting usin gNFC #
Select Establish aconnectio nvia NFC. #
Activat eNFC on them obile device (see the
manufacturer's operating instructions). #
Bring them obile device int othe NFC area of
th ev ehicle (→ page296). #
Select Done.
The mobile device is no wconnected tothe
multimedia sy stem hotspo tvia NFC.
To generat eanewsecurity key: #
Select Set up hotspot . #
Select Generate security key .
Ac onnection will be es tablished wit hthe
newly created security key. #
Tosave asecurity key:select Save.
When anew security keyiss aved, all existing
Wi -Fi connections ar ethen disconnected. If
th eW i-Ficonnections ar ebeing re-es tab‐
lished, then ew security keym ustbee ntered. Managin
gCOMAND Touc hd evices Re
quirements:
R The COMAND Touc ha pp is ins talled on the
ex tern al devic e(e.g. table tors martphone).
R Wi-Fi is acti vated( →pag e252) and them ul‐
timedia sy stem is confi gured asawifih ot‐
spo t(→ pag e253).
Multimedia sy stem:
, System .
COMAND Touch
Connecting anew device #
Select Authorise anew device. #
Select Connec tnew device. 254
Multimedia sy stem
Page 258 of 521
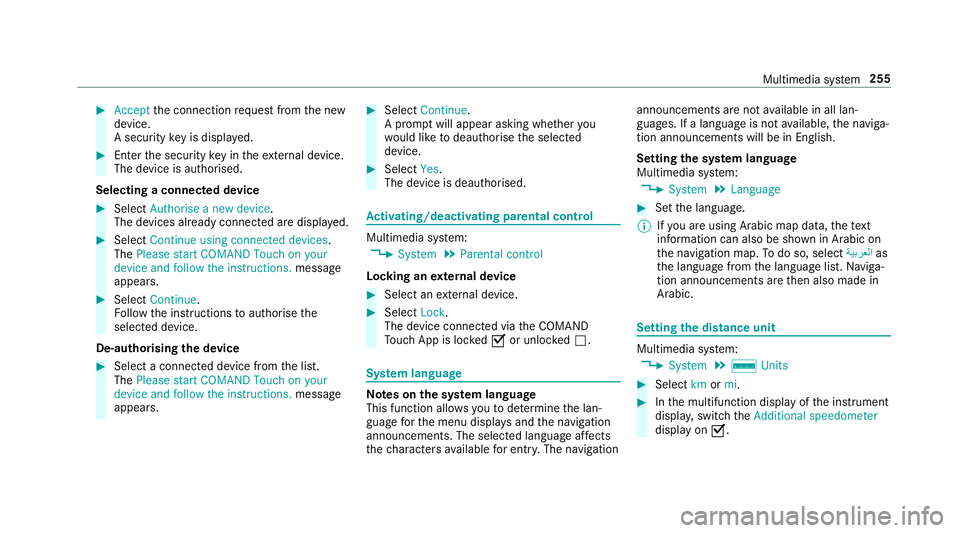
#
Accept thec onnection requ estfromt he new
device.
As ecurity keyisd isplayed. #
Ente rthe security keyint he extern al device.
The devic eisauthorised.
Selecting aconnected device #
Select Authorise anew device.
The devices already connec teda redispla yed. #
Select Continue using connected devices.
The Please start COMAND Touch on your
device and follow the instructions. message
appears. #
Select Continue.
Fo llowt he instructions toauthorise the
selected device.
De-authorising thed evice #
Select aconnec tedd evice from thel ist.
The Please start COMAND Touch on your
device and follow the instructions. message
appears. #
Select Continue.
Ap romp twill appear asking whe ther you
wo uld lik etodeauthorise thes elected
device. #
Select Yes.
The device is deauthorised. Ac
tivating/deactivatin gparenta lcon trol Multimedia sy
stem:
, System .
Parental control
Locking an extern al device #
Select an extern al device. #
Select Lock.
The devic econnec tedv iatheC OMAND
To uc hA ppis loc kedOor unloc kedª. Sy
stem language Note
sont he system language
This function allo wsyoutod etermine thel an‐
guag efor them enu displa ysand then avigation
announcements. The selected languag eaffects
th ec haracter savailable fore ntr y.The navigation announcement
sarenota vailable in all lan‐
guages. If alanguag eisnotavailable, then aviga‐
tion announcements will be in Engl ish.
Setting thes ysteml anguage
Multimedia sy stem:
, System .
Language #
Setthe language.
% Ifyo ua reusin gArabic map data, thet ext
information can also be shown in Arabic on
th en avigation map. Todo so, select ةيبرعلاas
th el anguag efromt he languag elist. Naviga‐
tion announcements ar ethen also made in
Arabic. Setting
thed istance unit Multimedia sy
stem:
, System .
% Units #
Select kmormi. #
Inthem ultifunction displa yofthe instrument
displa y,switc hthe Additional speedometer
displa yonO. Multimedia sy
stem 255
Page 259 of 521
Data impor
tand export Dat
aimp ort/expor tfunction
The following function sarepossible:
R transfer ring da tafrom one sy stem or vehicle
to ano ther sy stem or vehicle.
R creating abacku pc opyofy our personal data
and loading it again.
R protecting your personal dat aagains tunw an‐
te de xpo rtwit hP IN pr otection.
% Please no tethat theN TFS file sy stem is not
suppor ted. The FAT32 file sy stem is recom‐
mended.
Importing/exporting data
* NO
TEDat aloss #
Do no tremo vethed atas tora ge
medium when dat aisbeingexpor ted.
Mercedes-Ben zisnotliable fora ny loss of
data. Re
quirements:
R The vehicle is stationar y. R
The ignition is switched on or thev ehicle has
been star ted.
R The SD car disinserted( →pag e322) or the
USB device is connecte d(→ pag e324).
Multimedia sy stem:
, System .
System backup #
Select Import data orExport data.
Importing #
Select adatas torage medium.
Ap romp tappear sasking whe ther your eally
wish to overwrit ethe cur rent da ta.Ifd ata
originates from an other vehicle, this is recog‐
nise ddurin gdatar eading.
The multimedia sy stem is restar tedo ncet he
dat ahas been impor ted.
% Current vehicle settings can be edited af ter
th ei mp ort.
Exporting
If PIN pr otection is activated, your PIN is reques‐
te d. #
Ente rthe four-digit PIN. #
Select adatas torage medium.
The dat aisexported. The dat aexpo rtmay
ta ke severalm inutes. Ac
tivating/deactivatin gPINprotection Multimedia sy
stem:
, System .
PIN protection
Setting theP IN #
Select Set PIN. #
Enteraf our-digit PIN. #
Enter thef our-digit PIN again.
If bo thPINs match, PIN pr otection is active.
Changing theP IN
Re quiremen t:
R Acurrent PIN mu stbe set. #
Select Change settings. #
Ente rthe cur rent PIN. #
Select ChangePIN. #
Setan ewPIN. 256
Multimedia sy stem
Page 260 of 521
Ac
tivatin gPINprotection ford atae xport #
Select Change settings .
Confir mwitht he PIN. #
Select Protect data export.
Ac tivate Oor deacti vate ª thef unction.
Ac tivatin gPINprotection foro ffline mode #
Select Changesettings .
Confir mwitht he PIN. #
Select Protect deactivation of offline mode.
Ac tivate Oor deacti vate ª thef unction.
Un blocking theP IN
Re quirements:
R Ther eisanI nternetconnection.
R AM ercedes me account exists at http://
www.me rcedes.me.
R The Personalisation (→pag e259)service is
activated.
If th eP IN has been entered incor rectly three
times ,the PIN will be bloc ked. Youc an ha ve a
single-use passwor dsent to yo uviathe Mercedes me connect online por
taltor esetthe
PIN pr otection. #
Select Unbloc kPIN. #
Ente rthe single-use password.
PIN pr otection is reset, and youc an se ta
ne wP IN.
% Alternativel y,yo uc an ha vePIN pr otection
re se tata Mercedes-Benz Service Centre. User profile
Setting
auser profile
Multimedia sy stem:
, System .
g Personalisation
Displaying auser profile when starting
If th is function is active, apromp tappear swhen
st artin gthe sy stem asking whic huser profile to
use. #
Select Display profile list after start . #
Activate Oor deacti vate ª thef unction.
Selecting auser profile #
Select Guestor individual profile #.%
Some settings from theu ser profile ar eonly
loaded when thev ehicle is stationar yor
when thei gnition is switched on.
Au tomatic syn chronisation
Eac htime thei gnition is switched of foron,the
individual user profiles ar esynchronised on the
multimedia sy stem and on thes erve r.This
ensures that thel ates tuser profiles ar ealways
av ailable. #
Select Automatic synchronisation. #
Activate Oor deacti vate ª thef unction.
% Form orei nformation about importing/
ex portin guser profiles (→ page260).
Creating auser profile
Multimedia sy stem:
, System .
g Personalisation .
Cre-
ate profile #
Ente ran ame. #
Select a.
Individuals ettings ar esave dint he user profile,
e.g.:
R System settings Multimedia sy
stem 257