MERCEDES-BENZ S-CLASS CABRIOLET 2019 Owner's Manual
Manufacturer: MERCEDES-BENZ, Model Year: 2019, Model line: S-CLASS CABRIOLET, Model: MERCEDES-BENZ S-CLASS CABRIOLET 2019Pages: 518, PDF Size: 13.78 MB
Page 121 of 518
#
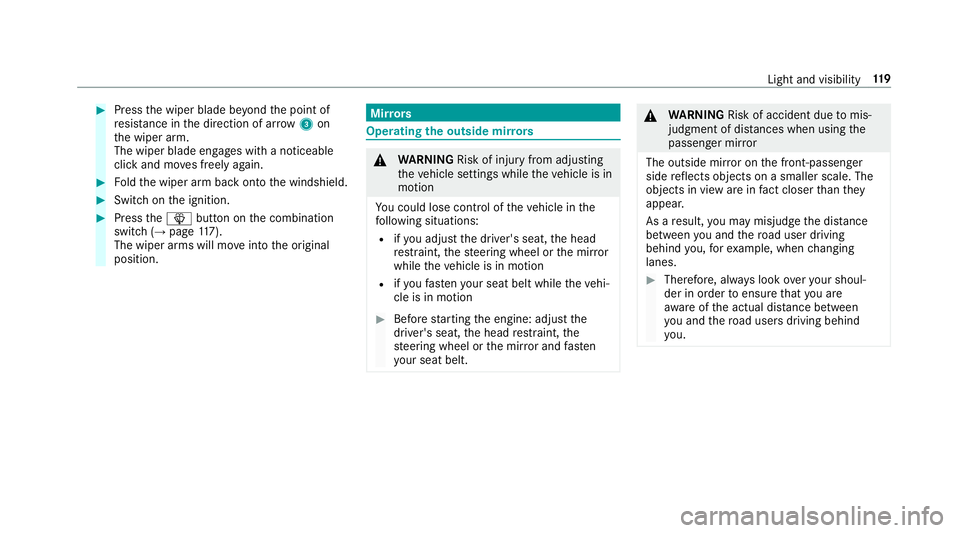
Press the wiper blade be yond the point of
re sis tance in the direction of ar row3on
th e wiper arm.
The wiper blade engages with a noticeable
click and mo ves freely again. #
Foldthe wiper arm back onto the windshield. #
Switch on the ignition. #
Press the00D4 button on the combination
switch (→ page117).
The wiper arms will mo veinto the original
position. Mir
rors Operating
the outside mir rors &
WARNING Risk of inju ryfrom adju sting
th eve hicle settings while theve hicle is in
motion
Yo u could lose cont rol of theve hicle in the
fo llowing situations:
R ifyo u adjust the driver's seat, the head
re stra int, thesteering wheel or the mir ror
while theve hicle is in motion
R ifyo ufa sten your seat belt while theve hi‐
cle is in motion #
Before starting the engine: adjust the
driver's seat, the head restra int, the
st eering wheel or the mir ror and fasten
yo ur seat belt. &
WARNING Risk of accident due tomis‐
judgment of dis tances when using the
passenger mir ror
The outside mir ror on the front-passen ger
side reflects objects on a smaller scale. The
objects in view are in fact closer than they
appear.
As a result, you may misjud gethe dis tance
between you and thero ad user driving
behind you, forex ample, when changing
lanes. #
Therefore, alw ays look over your shoul‐
der in order toensure that you are
aw are of the actual dis tance between
yo u and thero ad users driving behind
yo u. Light and visibility
11 9
Page 122 of 518
Fo
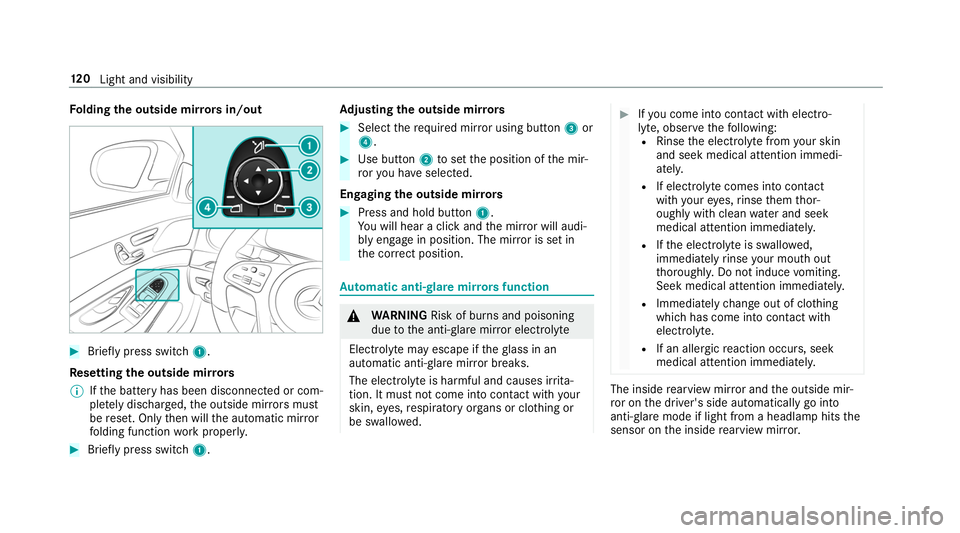
lding the outside mir rors in/out #
Brief lypress switch 1.
Re setting the outside mir rors
% Ifth e battery has been disconnected or com‐
ple tely discharged, the outside mir rors must
be reset. Only then will the automatic mir ror
fo lding function workproperly. #
Brief lypress switch 1. Ad
justing the outside mir rors #
Select there qu ired mir ror using button 3or
4. #
Use button 2toset the position of the mir‐
ro ryo u ha veselected.
Engaging the outside mir rors #
Press and hold button 1.
Yo u will hear a click and the mir ror will audi‐
bly engage in position. The mir ror is set in
th e cor rect position. Au
tomatic anti-glare mir rorsfunction &
WARNING Risk of bu rns and poisoning
due tothe anti- glare mir ror electrolyte
Electrolyte may escape if theglass in an
automatic anti-glare mir ror breaks.
The electrolyte is harmful and causes ir rita‐
tion. It mu stnot come into contact wi thyour
skin, eyes,respiratory organs or clo thing or
be swallo wed. #
Ifyo u come into contact with electro‐
ly te , obser vethefo llowing:
R Rinse the electrolyte from your skin
and seek medical attention immedi‐
atel y.
R If electrolyte comes into contact
with your eyes, rinse them thor‐
oughly with clean water and seek
medical attention immediately.
R Ifth e electrolyte is swallo wed,
immediately rinse your mouth out
th oroughly. Do not induce vomiting.
Seek medical attention immediately.
R Immedia tely ch ange out of clo thing
which has come into con tact wi th
electrolyte.
R If an allergic reaction occurs, seek
medical attention immediatel y. The inside
rearview mir ror and the outside mir‐
ro r on the driver's side automatically go into
anti- glare mode if light from a headlamp hits the
sensor on the inside rearview mir ror. 12 0
Light and visibility
Page 123 of 518
Sy
stem limitations
The sy stem does not go into anti- glare mode in
th efo llowing situations:
R the engine is switched off
R reve rsege ar is engaged
R the interior lighting is switched on Fu
nction of the front-passenger outside mir‐
ro r parking position The pa
rking position makes parking easier.
The front-passenger outside mir ror tilts down‐
wa rds and sho ws there ar wheel on the front-
passenger side in thefo llowing situations:
R the parking position is stored (→ page121)
R the passenger mir ror is selected
R reve rsege ar is engaged
The front-passenger outside mir ror mo ves back
to its original position in thefo llowing situations:
R you shift the transmission toano ther trans‐
mission position
R at speeds greater than 9 mph (15 km/h) R
you press the button forth e outside mir ror
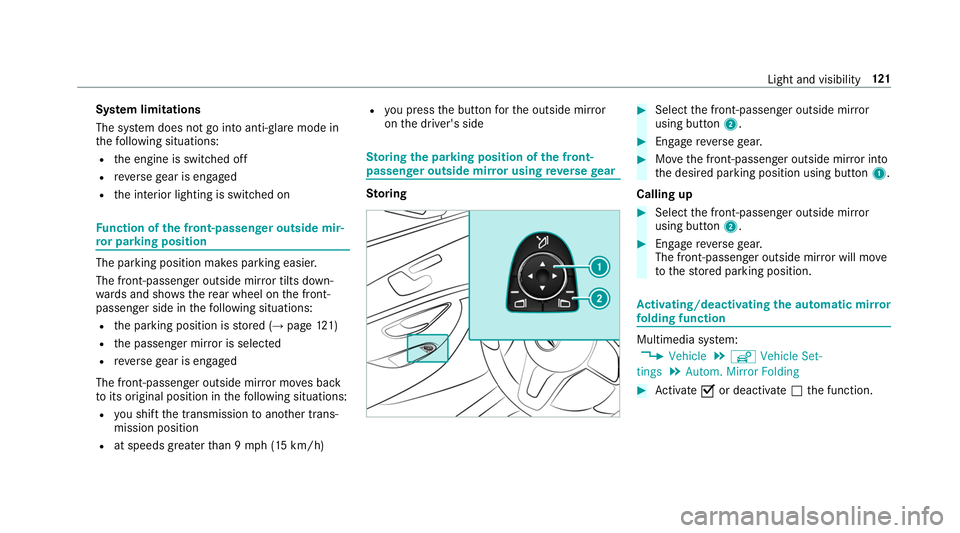
on the driver's side St
oring the pa rking position of the front-
passenger outside mir ror using reve rsege ar St
oring #
Select the front-passen ger outside mir ror
using but ton2. #
Engage reve rsege ar. #
Movethe front-passen ger outside mir ror into
th e desired parking position using button 1.
Calling up #
Select the front-passen ger outside mir ror
using but ton2. #
Engage reve rsege ar.
The front-passenger outside mir ror will mo ve
to thestored parking position. Ac
tivating/deactivating the automatic mir ror
fo lding function Multimedia sy
stem:
, Vehicle .
î Vehicle Set-
tings .
Autom. Mirror Folding #
Activate 0073or deacti vate 0053 the function. Light and visibility
121
Page 124 of 518

Operating
the sun visors
Using the single sun visor #
Glarefrom the front: fold sun visor 1
down. #
Glare from the side: swing sun visor 1to
th e side. #
Vehicles with an extendable sun visor: slide
sun visor 1horizontal lyas requ ired. 12 2
Light and visibility
Page 125 of 518

Overview of climate control sy
stems Overview of
the control panel for automatic
climate control The indica
tor lamps in the buttons indicate that
th e cor responding function is activated. 1
0058 Sets climate contro lto automatic, left
(→ page 124)
2 0082 Setsthete mp erature, left
3 002D Setsthe air flow onthe left or switches
off climate control
4 0072 Switches air-recirculation mode on/off
(→ page 125)
5 0064 Defrosts the windshield 6 Calls up
the air conditioning menu
7 006C Switches there ar wind owdefros ter
on/off
8 0056 Switches the A/C function on/off
(→ page 123)
Switches there sidual heat on/off
(→ page 125)
9 002D Setsthe air flow ,ri ght, or switches off
climate control
A 0082 Setsthete mp erature, right
B 0058 Sets climate contro lto automatic, right Operating
the clima tecont rol sy stem Ac
tivating/deactivating climate control #
Toswitch on: setthe air flow toleve l 1 or
higher using the002D button. #
Toswitch off: setthe air flow toleve l 0 using
th e002D button. %
If climate control is switched off, the win‐
do ws may fog up more quickl y.Switch off
climate control only brie fly. Switching
the A/C function on or off via the
cont rol panel The A/C function heats, cools and dehumidifies
th
eve hicle's interior air. #
Press the0056 button.
Switch off the A/C function only brief lyother‐
wise the windo wsmay fog up more quickl y.
Condensation may drip from the underside of
th eve hicle when cooling mode is active. This is
not a sign that there is a malfunction. Ac
tivating/deactivating the A/C function via
the multimedia sy stem Multimedia sy
stem:
, Vehicle .
b Climate Control .
A/C
The A/C function heats, cools and dehumidifies
th eve hicle's interior air. Climate control
12 3
Page 126 of 518

#
Activate 0073or deacti vate 0053 the function. Setting climate control
toautomatic In auto
matic mode, the set temp erature is regu‐
lated bythete mp erature of the dispensed air
and the air flow. #
Press the0058 button. #
Toswitch tomanual mode: pressthe002D
or 0082 button. Climate
style Climate
style function
In automatic mode, you can select thefo llowing
climate style settings forth e driver's and front
passenger areas:
R FOCUS: high air flow , slightly cooler setting
R MEDIUM: medium air flow ,st andard setting
R DIFFUSE: low airflow , slightly warmer and
draft-free setting Ad
justing the climate mode settings
Multimedia sy stem:
, Vehicle .
b Climate Control .
Cli-
mate Mode #
Select Driverand/or Passenger. #
Select FOCUS, MEDIUM orDIFFUSE .
% Tofeel the ef fect of the climate style, the
0058 function must be active (→ page124). Overview of
the air distribution settings The symbols on
the display indicate which vents
th e air flow is being directed thro ugh:
0061 def
rost ervents
009C center and side air
vents
009B fo
ot we llve nts
009F center, side and
foot we llve nts
0086 defros
ter and foot we llve nts
008F all
vents
0087 defros
ter,middle and side air vents
00A2 au
tomatic air distribution Setting
the air distribution Multimedia sy
stem:
, Vehicle .
b Climate Control .
Air
Distribution #
Select Driverand/or Passenger. #
Set the air distribution. Setting
thefo ot we lltemp erature Multimedia sy
stem:
, Vehicle .
b Climate Con-
trol .
Footwell Temperature #
Select Driverand/or Passenger. #
Set thefo ot we llte mp erature. Setting
there ar climate control using the
mu ltimedia sy stem Multimedia sy
stem:
, Vehicle .
b Climate Control .
Rear
Setting the airflow #
Select Airflow. 124
Climate cont rol
Page 127 of 518
#
Set the air flow.
Setting thetemp erature #
Select Temperature. #
Set thete mp erature. Ac
tivating or deactivating the climate con‐
trol syn chronization function using the multi‐
media sy stem Multimedia sy
stem:
, Vehicle .
b Climate Con-
trol .
SYNC
The climate control can be controlled cent rally
using the synchronization function. The temp era‐
ture setting is automatically adop tedfo r all cli‐
mate zones. #
Activate 0073or deacti vate 0053 the function. Re
moving condensation from the windo wsWi
ndo ws fo gged up on the inside #
Press the0058 button. #
Ifth e windo wscontinue tofog up: press the
0064 button.
Wi ndo ws fo gged up on the outside #
Swit chon the windshield wipers. #
Press the 0058 button. Switching air-recirculation mode on/off
#
Press the0072 button.
The interior air will be recirculated.
Air-reci rculation mode automatically swit ches to
fresh air mode af ter some time.
% If air-recirculation mode is switched on, the
windo wsmay fog up more quickl y.Switch on
ai r-re circulation mode only brie fly. Switching
there sidual heat on or off Re
quirements:
R The vehicle is par ked.
It is possible tomake use of there sidual heat
from the engine tocontinue heating or ventilat‐ ing
the front compartment of theve hicle for
appr oximately 30 minutes. #
Toswitch on: pressthe0056 button.
Re sidual heat is switched off automaticall y. Ac
tivating/deactivating ionization Multimedia sy
stem:
, Vehicle .
b Climate Control .
Ioni-
zation
Ionization cleans and refreshes the interior air of
th eve hicle. The ionization of the interior air is
odorless. #
Activate 0073or deacti vate 0053 the function. Fr
ag rance sy stem Setting
the frag rance sy stem
Re quirements:
R Automatic clima tecontrol is acti vated.
R The glove box is closed. Climate control
12 5
Page 128 of 518

Multimedia sy
stem:
, Vehicle .
b Climate Control .
Air
Freshener
The fragrance sy stem distributes a pleasant fra‐
grance thro ughout theve hicle interior from a fla‐
con located in theglov e box. #
Toset the intensit y:select High,Medium,
Low orOff.
Inserting or removing the flacon ofthe fra‐
gr ance sy stem &
WARNING Risk of inju ryfrom liquid per‐
fume
If ch ildren open theflacon, they could drink
th e liquid perfume or it could come into con‐
ta ct wi th theireyes. #
Do not lea vechildren unat tended in the
ve hicle. #
Consult a doctor immediately if liquid
perfume has been drunk. #
If liquid perfume comes into contact
with your eyes or skin, rinse your eyes
with clean water. #
If sym ptoms continue, consult a doctor. +
ENVIRONMENTAL
NOTEEnvironmental
dama gedue toimproper disposal of full
fl acons Fu
llflacons must not be disposed
of with household waste. #
Fu
llflacons must be take nto
a harmful subs tance collection point. 1
Cap
2 Flacon #
Toinser t:slide theflacon into the holder as
fa r as it will go. #
Toremo ve:pull out theflacon.
If yo u do not use genuine Mercedes-Benz interior
pe rfumes, obse rveth e manufacturers' saf ety
notices on the perfume pac kaging. 12 6
Climate cont rol
Page 129 of 518

Dispose of
thege nuine Mercedes-Benz interior
pe rfume flacon when it is em pty and do not refill
it.
Re fillable flacon #
Unscr ew the cap of the em ptyflacon. #
Filltheflacon with a maximum of 0.5 fl. oz.
(15 ml). #
Screw the cap back on totheflacon.
Alw aysre fill th e em ptyre fillable flacon with the
same perfume. Obser vethe separate informa‐
tion sheet with theflacon. Air
vents Ad
justing the front air vents &
WARNING ‑ Danger of bu rns or frostbite
due tobeing too close tothe air vents
Ve ry hot or very cold air can flow from the air
ve nts.
This could result in burns or frostbite in the
immediate vicinity of the air vents. #
Makesure that all vehicle occupants
alw ays maintain a suf ficient di stance to
th e air vents. #
If necessa ry, direct the air flow to
ano ther area of theve hicle interior. To
guarantee the fresh air supply thro ugh the air
ve nts into theve hicle interior, comply with the
fo llowing:
R Alw ayske ep theve nts and theve ntilation
grille in theve hicle interior free.
R Keep the air inlet free of deposits
(→ page 343). #
Toopen or close: turn controller1tothe
left or right as far as it will go. #
Toadjust the air direction: hold airvent 2
in the center and mo veit up or down or to
th e left or right.
Ad justing the rear air vents #
Toopen or close: turn controller2tothe
left or right as far as it will go. #
Toadjust the air direction: hold airvent 1
in the center and mo veit up or down or to
th e left or right. Climate control
127
Page 130 of 518
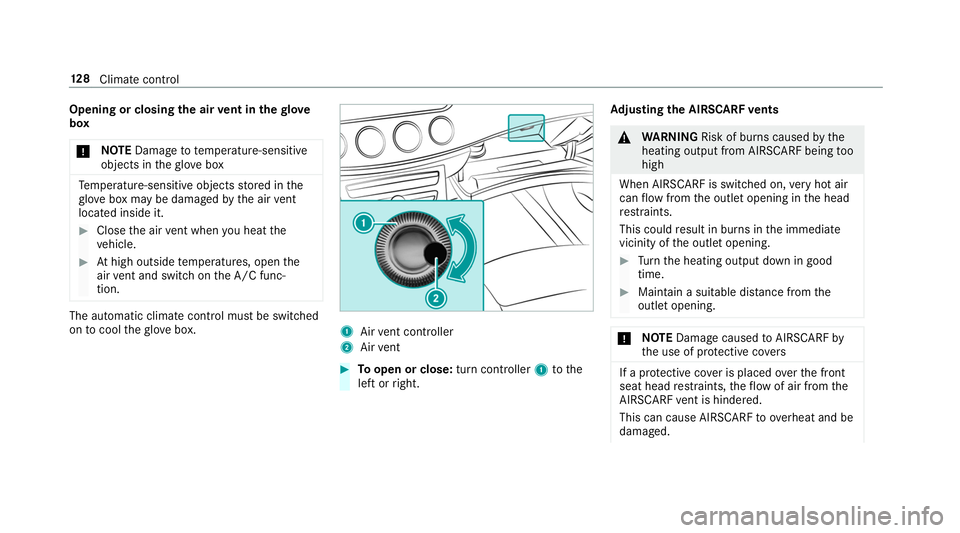
Opening or closing
the air vent in thegl ove
box
* NO
TEDama geto te mperature-sensitive
objects in theglove box Te
mp erature-sensitive objects stored in the
gl ove box may be damaged bythe air vent
located inside it. #
Close the air vent when you heat the
ve hicle. #
Athigh outside temp eratures, open the
air vent and switch on the A/C func‐
tion. The automatic climate control must be switched
on tocool theglove box. 1
Airvent controller
2 Airvent #
Toopen or close: turn controller1tothe
left or right. Ad
justing the AIRSCARF vents &
WARNING Risk of bu rns caused bythe
heating output from AIRSCARF being too
high
When AIRSCARF is switched on, very hot air
can flow from the outlet opening in the head
re stra ints.
This could result in burns in the immediate
vicinity of the outlet opening. #
Turn the heating output down in good
time. #
Maintain a suitable dis tance from the
outlet opening. *
NO
TEDama gecaused toAIRSCARF by
th e use of pr otective co vers If a pr
otective co ver is placed overth e front
seat head restra ints, theflow of air from the
AIRSCARF vent is hinde red.
This can cause AIRS CARF toove rheat and be
damaged. 12 8
Climate cont rol