MERCEDES-BENZ SL-CLASS ROADSTER 2013 Owners Manual
Manufacturer: MERCEDES-BENZ, Model Year: 2013, Model line: SL-CLASS ROADSTER, Model: MERCEDES-BENZ SL-CLASS ROADSTER 2013Pages: 572, PDF Size: 9.23 MB
Page 381 of 572
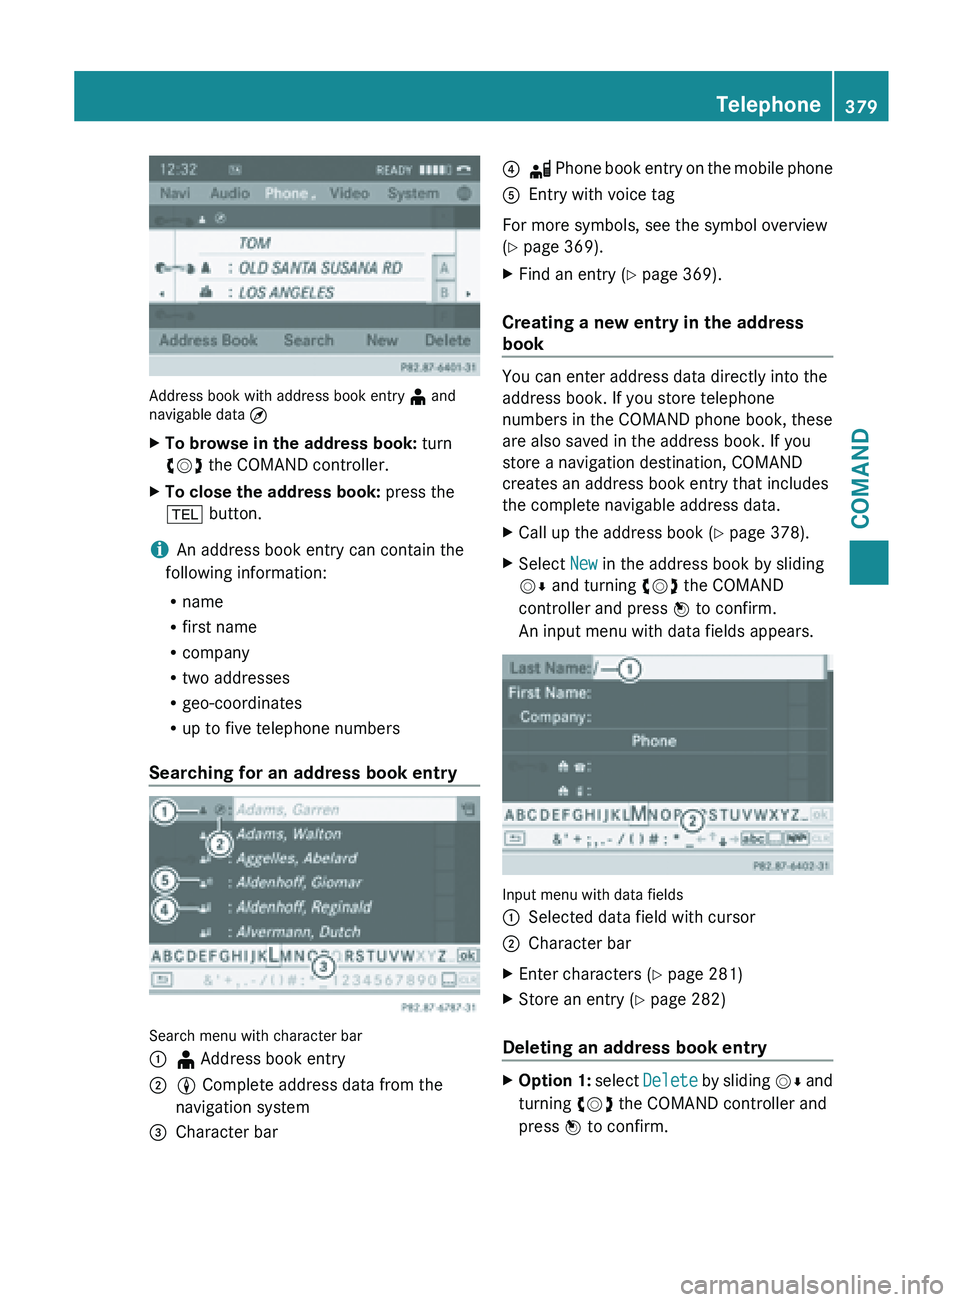
Address book with address book entry
¥ and
navigable data ¤
X To browse in the address book: turn
cVd the COMAND controller.
X To close the address book: press the
% button.
i An address book entry can contain the
following information:
R name
R first name
R company
R two addresses
R geo-coordinates
R up to five telephone numbers
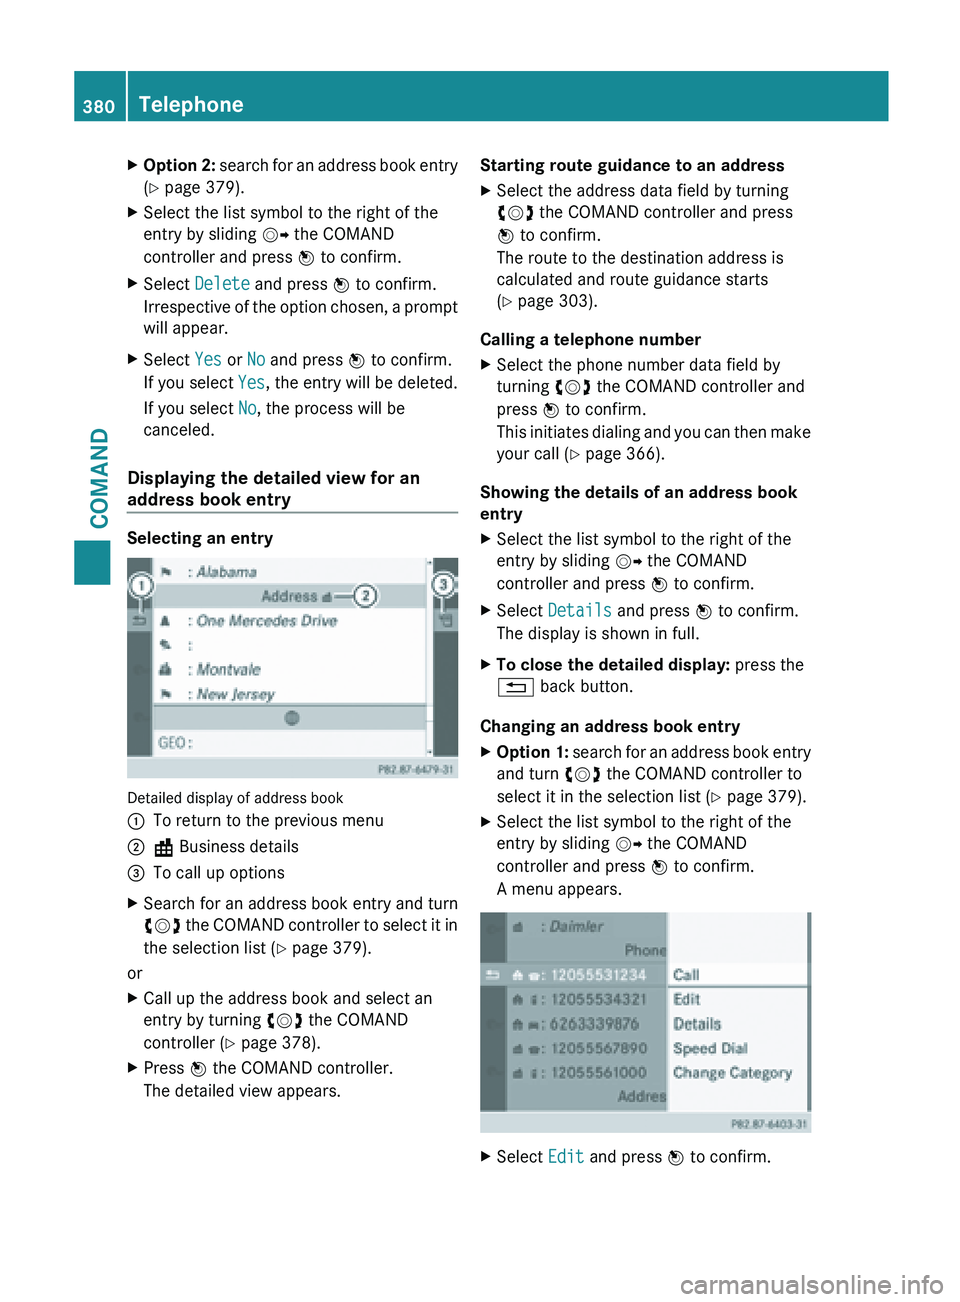
Searching for an address book entry Search menu with character bar
:
¥ Address book entry
; L Complete address data from the
navigation system
= Character bar ?
d Phone book entry on the mobile phone
A Entry with voice tag
For more symbols, see the symbol overview
(
Y page 369).
X Find an entry ( Y page 369).
Creating a new entry in the address
book You can enter address data directly into the
address book. If you store telephone
numbers in the COMAND phone book, these
are also saved in the address book. If you
store a navigation destination, COMAND
creates an address book entry that includes
the complete navigable address data.
X
Call up the address book ( Y page 378).
X Select New in the address book by sliding
VÆ and turning cVd the COMAND
controller and press W to confirm.
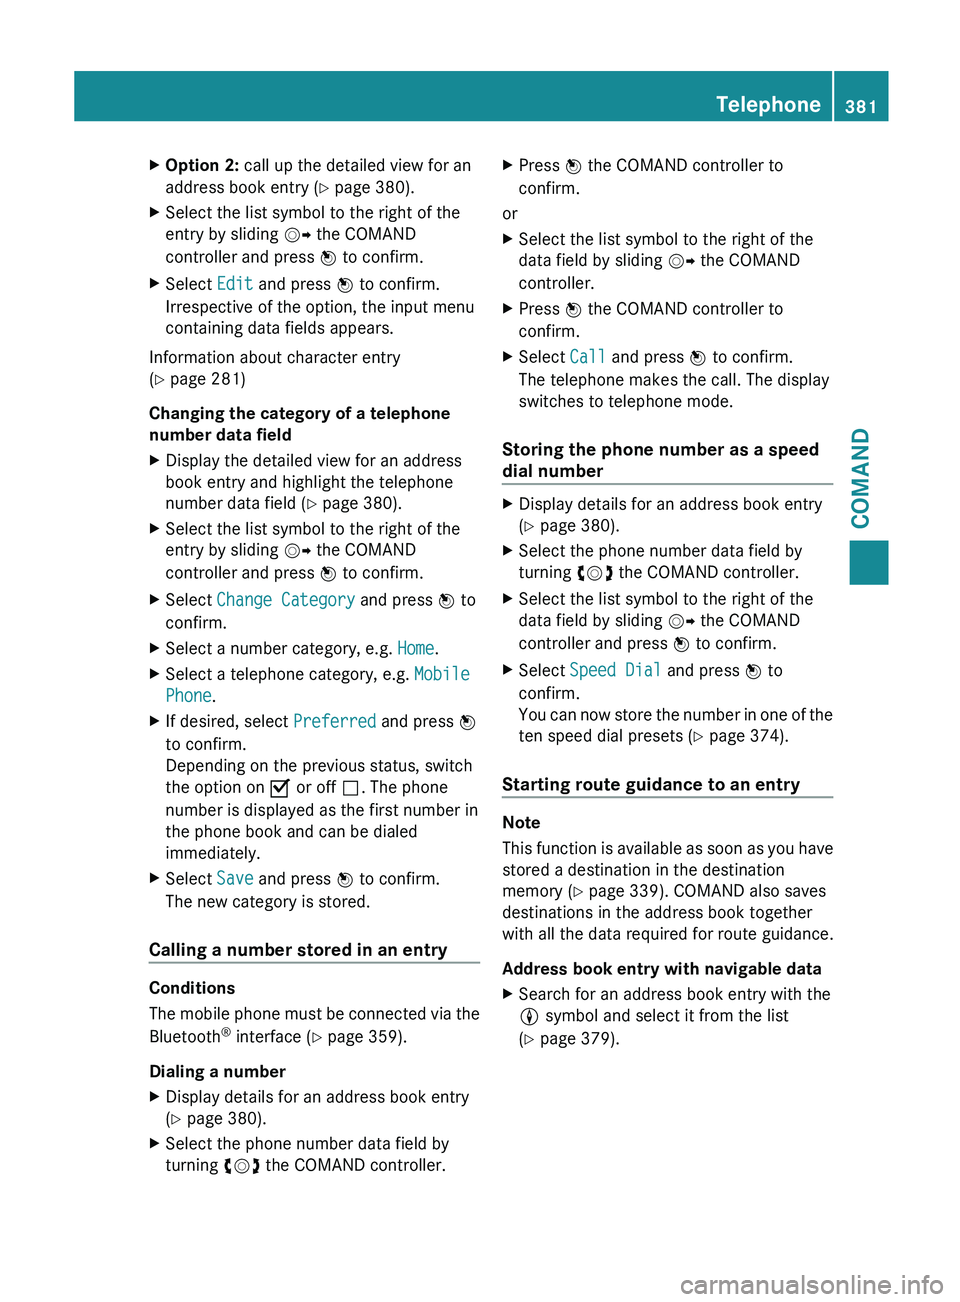
An input menu with data fields appears. Input menu with data fields
:
Selected data field with cursor
; Character bar
X Enter characters ( Y page 281)
X Store an entry (Y page 282)
Deleting an address book entry X
Option 1: select Delete
by sliding VÆ and
turning cVd the COMAND controller and
press W to confirm. Telephone
379
COMAND Z
Page 382 of 572
X
Option 2: search for an address book entry
( Y page 379).
X Select the list symbol to the right of the
entry by sliding VY the COMAND
controller and press W to confirm.
X Select Delete and press W to confirm.
Irrespective of
the option chosen, a prompt
will appear.
X Select Yes or No and press W to confirm.
If you select Yes, the
entry will be deleted.
If you select No, the process will be
canceled.
Displaying the detailed view for an
address book entry Selecting an entry
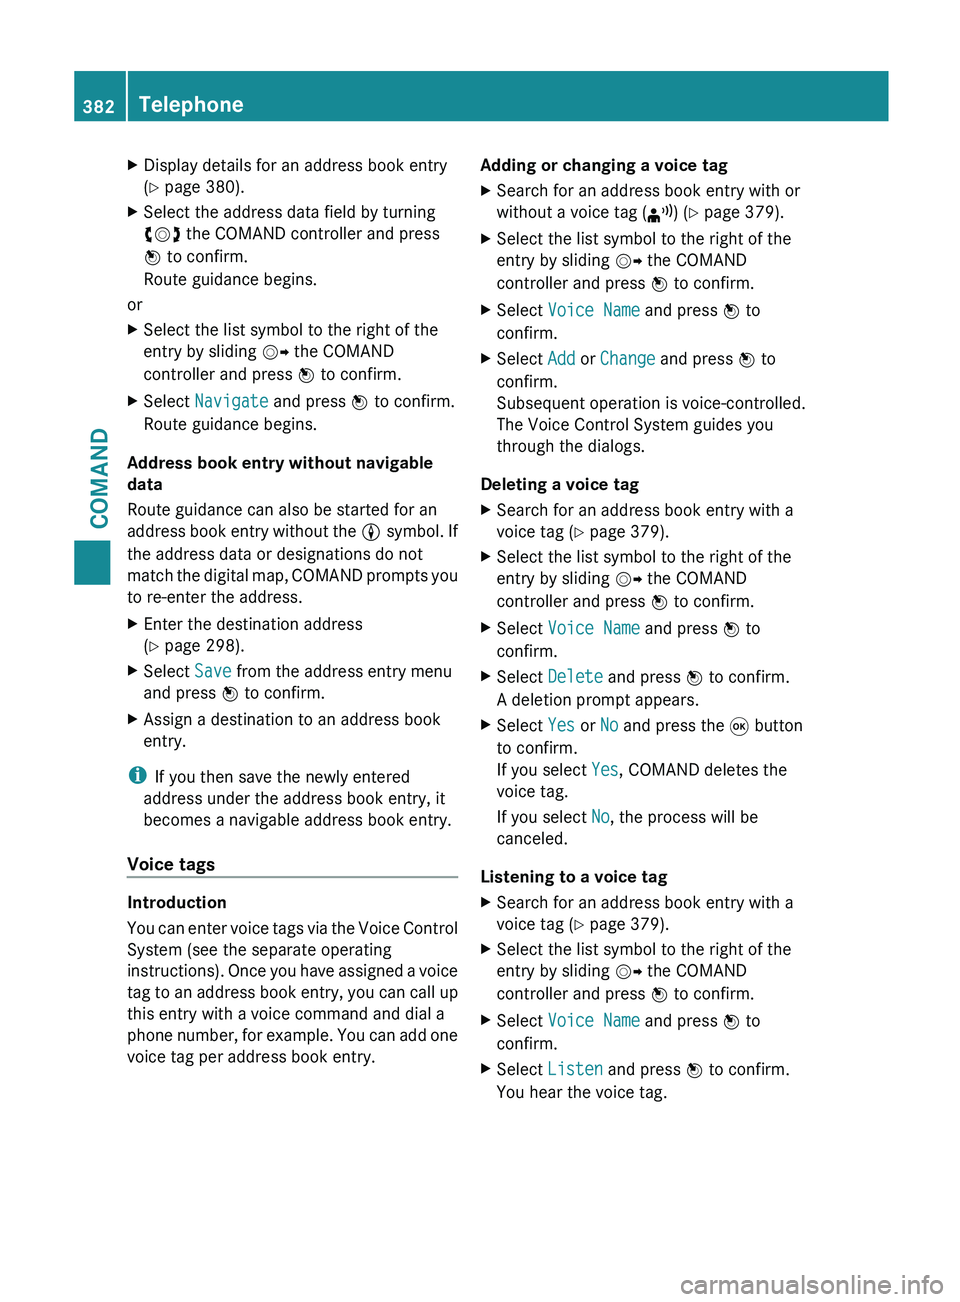
Detailed display of address book
:
To return to the previous menu
; \ Business details
= To call up options
X Search for an address book entry and turn
cVd the
COMAND controller to select it in
the selection list (Y page 379).
or
X Call up the address book and select an
entry by turning cVd the COMAND
controller (Y page 378).
X Press W the COMAND controller.
The detailed view appears. Starting route guidance to an address
X
Select the address data field by turning
cVd the COMAND controller and press
W to confirm.
The route to the destination address is
calculated and route guidance starts
(Y page 303).
Calling a telephone number
X Select the phone number data field by
turning cVd the COMAND controller and
press W to confirm.
This initiates
dialing and you can then make
your call ( Y page 366).
Showing the details of an address book
entry
X Select the list symbol to the right of the
entry by sliding VY the COMAND
controller and press W to confirm.
X Select Details and press W to confirm.
The display is shown in full.
X To close the detailed display: press the
% back button.
Changing an address book entry
X Option 1: search for an address book entry
and turn
cVd the COMAND controller to
select it in the selection list ( Y page 379).
X Select the list symbol to the right of the
entry by sliding VY the COMAND
controller and press W to confirm.
A menu appears. X
Select Edit and press W to confirm.380
Telephone
COMAND
Page 383 of 572
X
Option 2: call up the detailed view for an
address book entry ( Y page 380).
X Select the list symbol to the right of the
entry by sliding VY the COMAND
controller and press W to confirm.
X Select Edit and press W to confirm.
Irrespective of the option, the input menu
containing data fields appears.
Information about character entry
(Y page 281)
Changing the category of a telephone
number data field
X Display the detailed view for an address
book entry and highlight the telephone
number data field (Y
page 380).
X Select the list symbol to the right of the
entry by sliding VY the COMAND
controller and press W to confirm.
X Select Change Category and press W to
confirm.
X Select a number category, e.g. Home.
X Select a telephone category, e.g. Mobile
Phone.
X If desired, select Preferred and press W
to confirm.
Depending on the previous status, switch
the option on O or off ª. The phone
number is displayed as the first number in
the phone book and can be dialed
immediately.
X Select Save and press W to confirm.
The new category is stored.
Calling a number stored in an entry Conditions
The
mobile
phone must be connected via the
Bluetooth ®
interface (Y page 359).
Dialing a number
X Display details for an address book entry
(Y page 380).
X Select the phone number data field by
turning cVd the COMAND controller. X
Press W the COMAND controller to
confirm.
or
X Select the list symbol to the right of the
data field by sliding VY the COMAND
controller.
X Press W the COMAND controller to
confirm.
X Select Call and press W to confirm.
The telephone makes the call. The display
switches to telephone mode.
Storing the phone number as a speed
dial number X
Display details for an address book entry
(Y page 380).
X Select the phone number data field by
turning cVd the COMAND controller.
X Select the list symbol to the right of the
data field by sliding VY the COMAND
controller and press W to confirm.
X Select Speed Dial and press W to
confirm.
You can
now store the number in one of the
ten speed dial presets (Y page 374).
Starting route guidance to an entry Note
This
function
is available as soon as you have
stored a destination in the destination
memory ( Y page 339). COMAND also saves
destinations in the address book together
with all the data required for route guidance.
Address book entry with navigable data
X Search for an address book entry with the
L symbol and select it from the list
(Y page 379). Telephone
381
COMAND Z
Page 384 of 572
X
Display details for an address book entry
(Y page 380).
X Select the address data field by turning
cVd the COMAND controller and press
W to confirm.
Route guidance begins.
or
X Select the list symbol to the right of the
entry by sliding VY the COMAND
controller and press W to confirm.
X Select Navigate and press W to confirm.
Route guidance begins.
Address book entry without navigable
data
Route guidance can also be started for an
address book
entry without the L symbol. If
the address data or designations do not
match the digital map, COMAND prompts you
to re-enter the address.
X Enter the destination address
(Y page 298).
X Select Save from the address entry menu
and press W to confirm.
X Assign a destination to an address book
entry.
i If you then save the newly entered
address under the address book entry, it
becomes a navigable address book entry.
Voice tags Introduction
You
can
enter voice tags via the Voice Control
System (see the separate operating
instructions). Once you have assigned a voice
tag to an address book entry, you can call up
this entry with a voice command and dial a
phone number, for example. You can add one
voice tag per address book entry. Adding or changing a voice tag
X
Search for an address book entry with or
without a voice tag ( ¦) (Y page 379).
X Select the list symbol to the right of the
entry by sliding VY the COMAND
controller and press W to confirm.
X Select Voice Name and press W to
confirm.
X Select Add or Change and press W to
confirm.
Subsequent operation is voice-controlled.
The Voice Control System guides you
through the dialogs.
Deleting a voice tag
X Search for an address book entry with a
voice tag (Y page 379).
X Select the list symbol to the right of the
entry by sliding VY the COMAND
controller and press W to confirm.
X Select Voice Name and press W to
confirm.
X Select Delete and press W to confirm.
A deletion prompt appears.
X Select Yes or No and press the 9 button
to confirm.
If you select Yes, COMAND deletes the
voice tag.
If you select No, the process will be
canceled.
Listening to a voice tag
X Search for an address book entry with a
voice tag (Y page 379).
X Select the list symbol to the right of the
entry by sliding VY the COMAND
controller and press W to confirm.
X Select Voice Name and press W to
confirm.
X Select Listen and press W to confirm.
You hear the voice tag. 382
Telephone
COMAND
Page 385 of 572
Importing phone book entries
This function allows you to store phone book
entries
from
the mobile phone in the address
book.
The following can be used as a source:
R the mobile phone
R the memory card
R the USB device
R the Bluetooth ®
Interface
Imported phone book entries are indicated in
the phone book by different symbols
(Y page 369).
X Search for an entry in the phone book on
the mobile phone d(Y page 369).
X Select the list symbol to the right of the
entry by sliding VY the COMAND
controller and press W to confirm.
X Select Save Entry and press W to
confirm.
The Data saved. message appears. The
phone book entry is now saved as an
address book entry.
The d symbol is replaced by the ¥
symbol.
Importing contacts Information and requirements
You can import contacts (vCards) from the
memory card and a USB device into the
address book, or receive vCards via
Bluetooth
®
.
i Up to 2500 entries can be imported into
the address book. A message notifies you
when the maximum number is reached.
You then have to delete existing entries in
order to import new entries ( Y page 379).
Depending on
the source of the contact data,
different requirements apply: Source Conditions
Memory card The SD memory card is
inserted (Y page 424). It
contains importable
contact details.
USB device The USB device is inserted
into the USB port
(Y page 424). It contains
importable contact details.
Requirements for receiving vCards via
Bluetooth
®
You can receive vCards from devices (e.g.
from a
PC) that support the sending of vCards
via Bluetooth ®
.
It is not necessary to authorize the device in
COMAND to do so.
Please bear the following in mind:
R Bluetooth ®
must be activated in COMAND
and on the Bluetooth ®
device (see the
operating instructions for the device).
R the Bluetooth ®
device must be able to send
vCards via Bluetooth ®
(see operating
instructions for the device).
R the Bluetooth ®
device in the vehicle must
be switched on.
Importing from the memory card or USB
device
Entries imported from the memory card or
from a USB device have the ¯ symbol.
The following conditions must be fulfilled in
order to import vCards:
R vCards (vcf files) may be located in the main
directory or in folders. COMAND allows you
to select the relevant folders directly.
R vCards must have the file extension ".vcf".
i A vcf file can also contain several vCards.
COMAND supports vCards in versions 2.1
and 3.0.
X Select Address Book in the address book
or, if the telephone basic menu is shown, Telephone
383
COMAND Z
Page 386 of 572
select Phone by sliding
VÆ and turning
cVd the COMAND controller and press
W to confirm.
X Select Download Contacts and press W
to confirm.
A menu appears.
X Select From The Memory Card or From
USB device in the menu by turning cVd
the COMAND controller and press W to
confirm.
X Select Add or Overwrite and press W to
confirm.
Add imports the entries from the memory
card or USB device into the address book.
Overwrite imports the entries from the
memory card
or USB device and overwrites
all entries in the address book with the
¯ symbol. The previous entries are then
no longer available.
After the contact data has been imported
successfully, you will see a message to this
effect. The address book or the respective
telephone basic menu is displayed.
i You can
select Overwrite if the address
book already contains corresponding
entries. A message notifies you when the
address book is full.
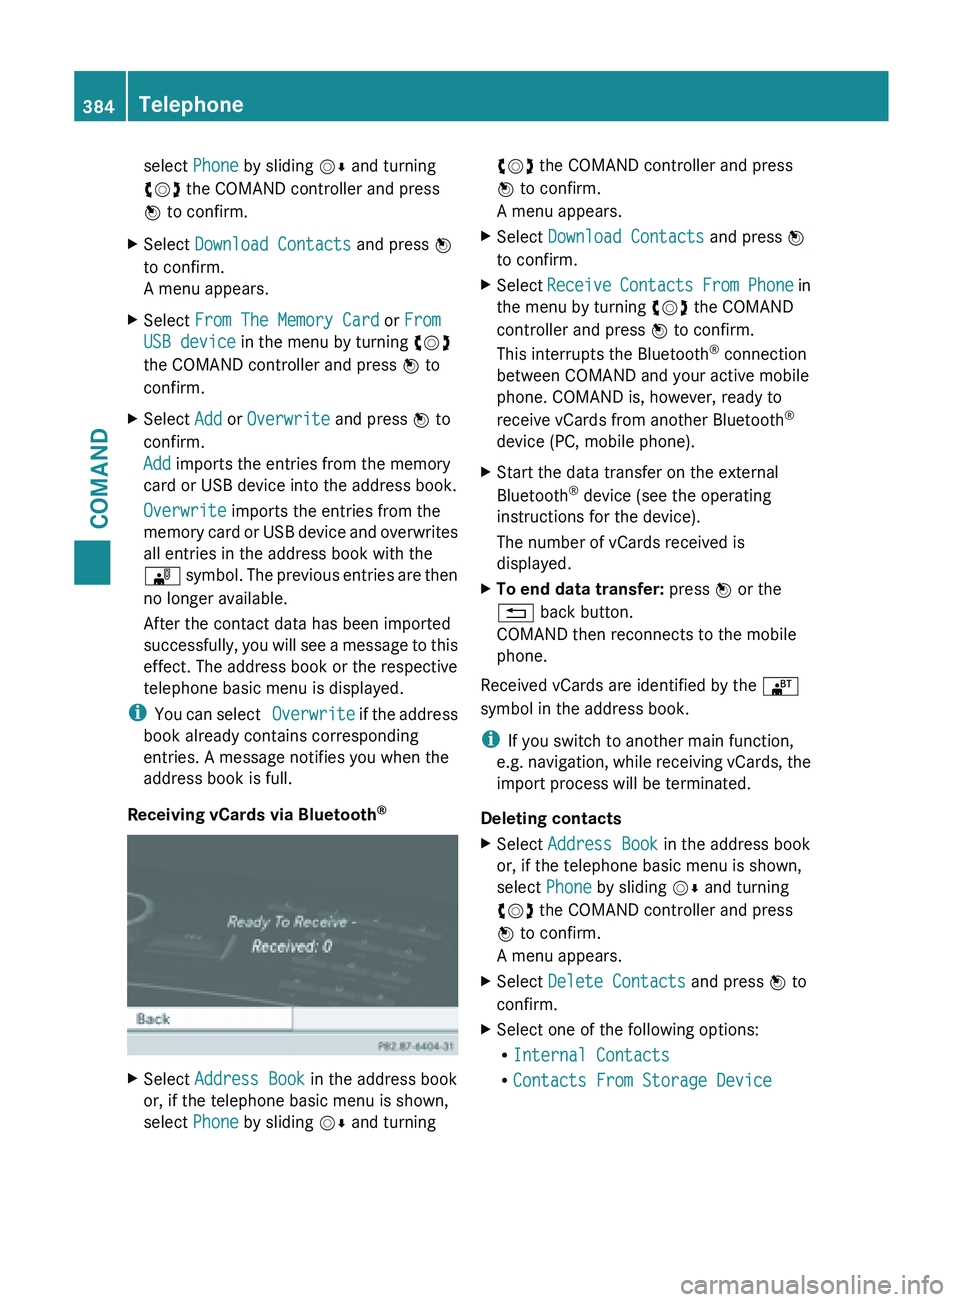
Receiving vCards via Bluetooth ®X
Select Address Book in the address book
or, if the telephone basic menu is shown,
select Phone by sliding VÆ and turning cVd the COMAND controller and press
W to confirm.
A menu appears.
X Select Download Contacts and press W
to confirm.
X Select Receive Contacts
From Phone in
the menu by turning cVd the COMAND
controller and press W to confirm.
This interrupts the Bluetooth ®
connection
between COMAND and your active mobile
phone. COMAND is, however, ready to
receive vCards from another Bluetooth ®
device (PC, mobile phone).
X Start the data transfer on the external
Bluetooth ®
device (see the operating
instructions for the device).
The number of vCards received is
displayed.
X To end data transfer: press W or the
% back button.
COMAND then reconnects to the mobile
phone.
Received vCards are identified by the ®
symbol in the address book.
i If you switch to another main function,
e.g. navigation,
while receiving vCards, the
import process will be terminated.
Deleting contacts
X Select Address Book in the address book
or, if the telephone basic menu is shown,
select Phone by sliding VÆ and turning
cVd the COMAND controller and press
W to confirm.
A menu appears.
X Select Delete Contacts and press W to
confirm.
X Select one of the following options:
R
Internal Contacts
R Contacts From Storage Device384
Telephone
COMAND
Page 387 of 572
R
Received Business Cards
R Delete All
A prompt corresponding to your selection
appears.
X Select Yes or No and press W to confirm.
If you select Yes, the contacts are deleted
according to your selection.
If you select No, the process will be
canceled. Online and Internet functions
General notes
Conditions for access To use COMAND Mercedes-Benz Apps and
Internet access, the following conditions
must be fulfilled:
R
mbrace is activated and operational
R mbrace is activated for COMAND
Mercedes-Benz Apps and Internet access
Priority of connections: an emergency call
has the highest priority. When a service call,
e.g. a breakdown service call or the MB Info
Call, is active, an emergency call can still be
initiated.
A service
call, on the other hand, has priority
over a current Internet connection. For this
reason, you cannot connect to the Internet
during a service call.
i The availability of individual COMAND
Mercedes-Benz Apps may vary depending
on the country.
i The terms of use are shown when
COMAND is used for the first time and then
once a year thereafter. Only read and
accept the terms of use when the vehicle
is stationary.
i Internet pages cannot be shown while the
vehicle is in motion. Establishing/ending the connection
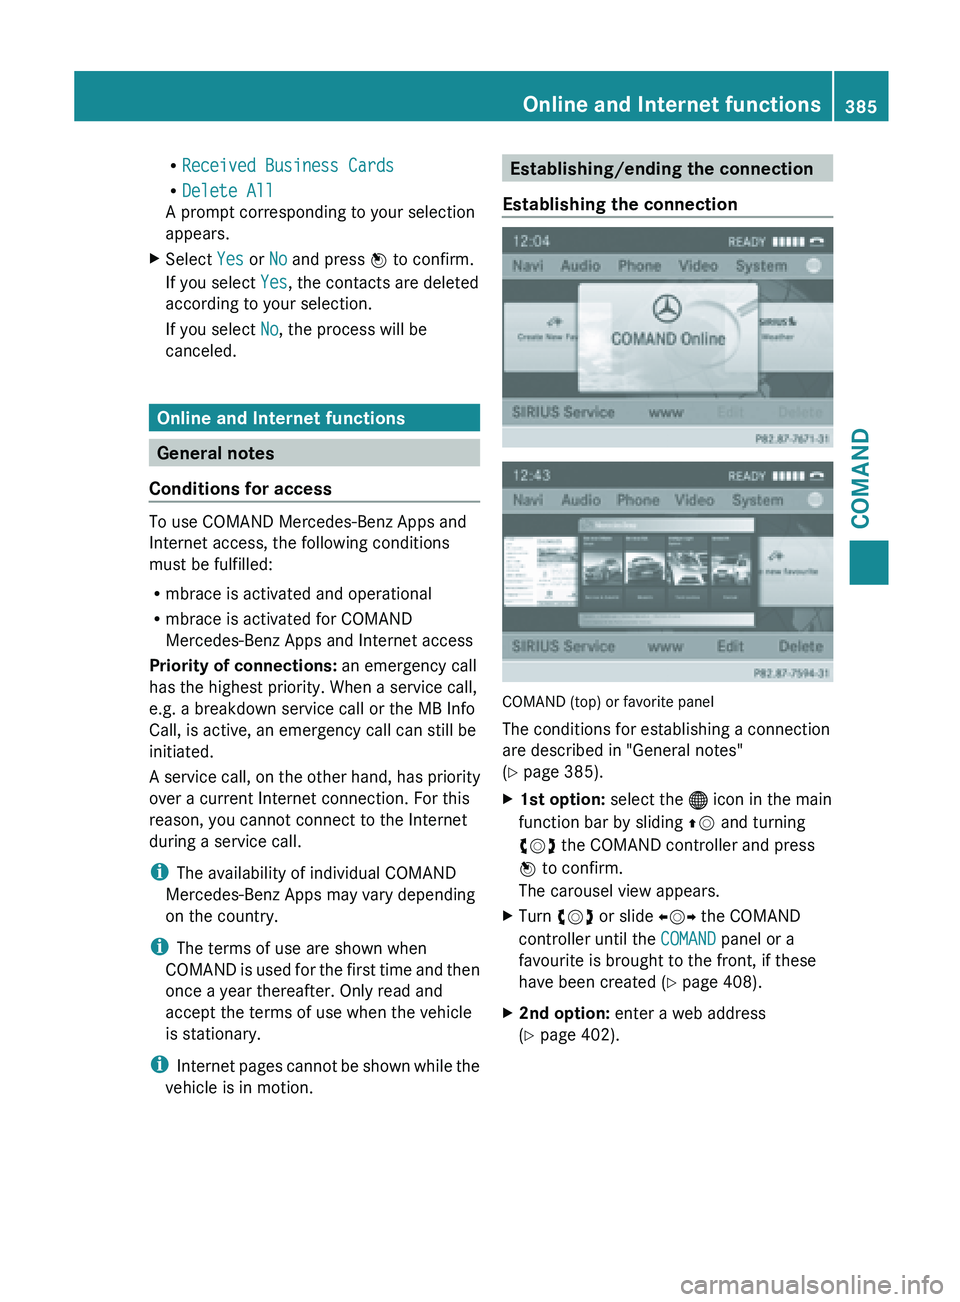
Establishing the connection COMAND (top) or favorite panel
The conditions for establishing a connection
are described in "General notes"
(Y page 385).
X
1st option: select the ® icon in the main
function bar by sliding ZV and turning
cVd the COMAND controller and press
W to confirm.
The carousel view appears.
X Turn cVd or slide XVY the COMAND
controller until the COMAND panel or a
favourite is brought to the front, if these
have been created ( Y page 408).
X 2nd option: enter a web address
(Y page 402). Online and Internet functions
385COMAND Z
Page 388 of 572
X
For both options, press W the COMAND
controller.
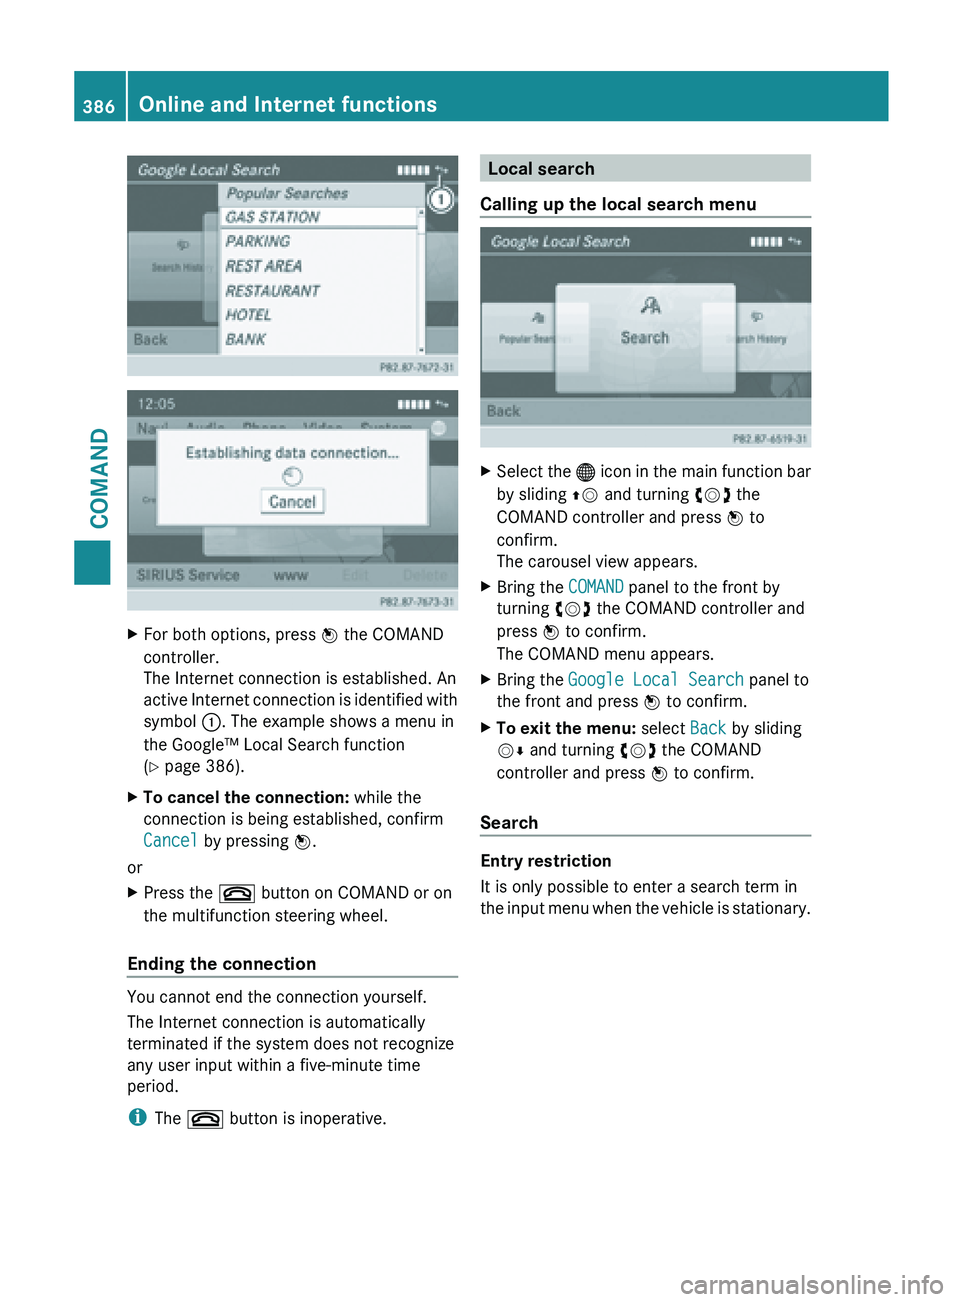
The Internet connection is established. An
active Internet
connection is identified with
symbol :. The example shows a menu in
the Google™ Local Search function
(Y page 386).
X To cancel the connection: while the
connection is being established, confirm
Cancel by pressing W.
or
X Press the ~ button on COMAND or on
the multifunction steering wheel.
Ending the connection You cannot end the connection yourself.
The Internet connection is automatically
terminated if the system does not recognize
any user input within a five-minute time
period.
i
The ~ button is inoperative. Local search
Calling up the local search menu X
Select the ® icon
in the main function bar
by sliding ZV and turning cVd the
COMAND controller and press W to
confirm.
The carousel view appears.
X Bring the COMAND panel to the front by
turning cVd the COMAND controller and
press W to confirm.
The COMAND menu appears.
X Bring the Google Local Search panel to
the front and press W to confirm.
X To exit the menu: select Back by sliding
VÆ and turning cVd the COMAND
controller and press W to confirm.
Search Entry restriction
It is only possible to enter a search term in
the input
menu when the vehicle is stationary.386
Online and Internet functions
COMAND
Page 389 of 572
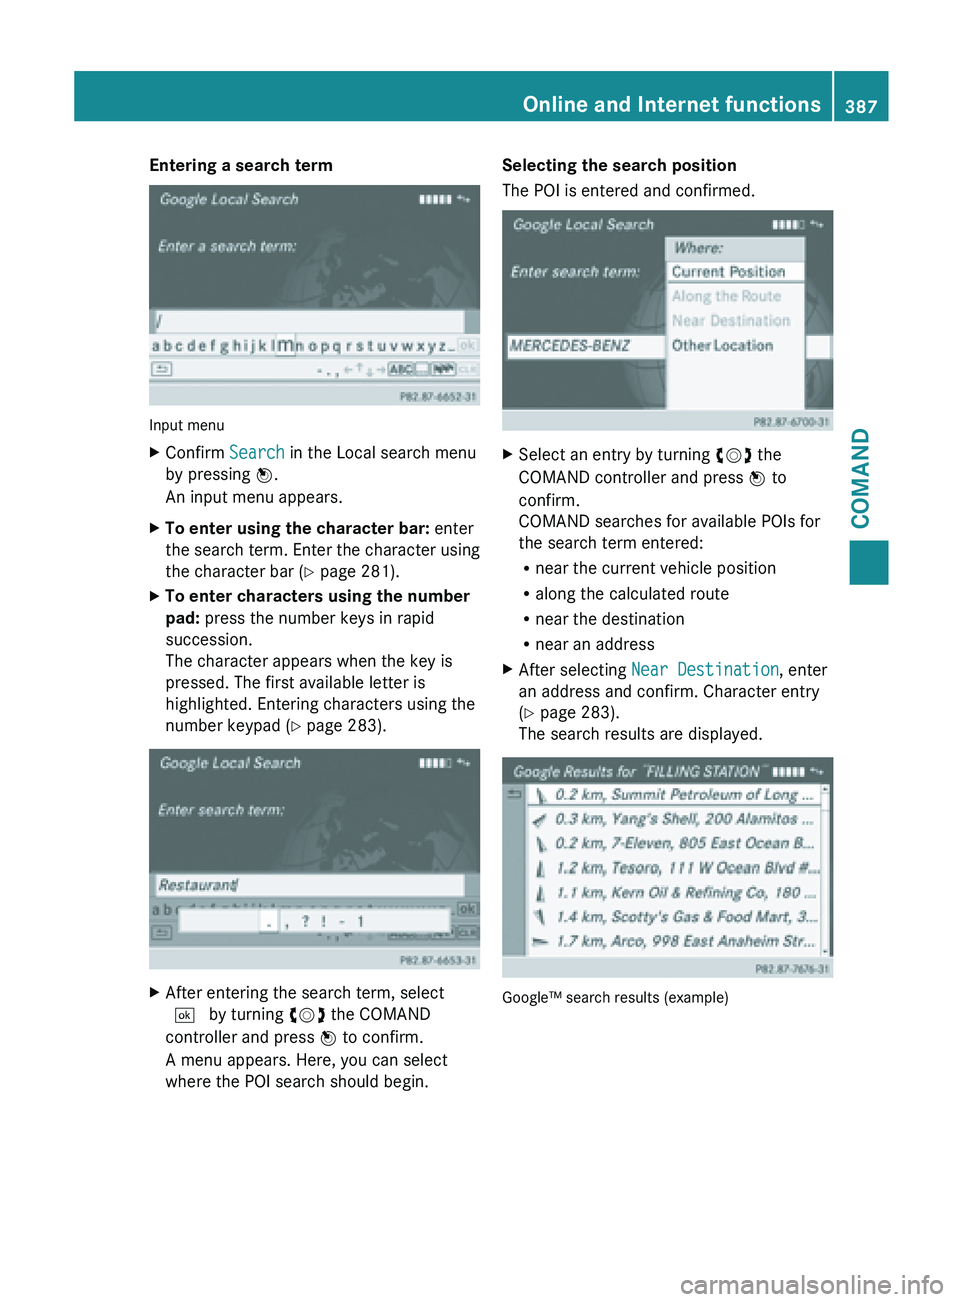
Entering a search term
Input menu
X
Confirm Search in the Local search menu
by pressing W.
An input menu appears.
X To enter using the character bar: enter
the search
term. Enter the character using
the character bar (Y page 281).
X To enter characters using the number
pad: press the number keys in rapid
succession.
The character appears when the key is
pressed. The first available letter is
highlighted. Entering characters using the
number keypad (
Y page 283).X
After entering the search term, select
¬ by turning cVd the COMAND
controller and press W to confirm.
A menu appears. Here, you can select
where the POI search should begin. Selecting the search position
The POI is entered and confirmed.
X
Select an entry by turning cVd the
COMAND controller and press W to
confirm.
COMAND searches for available POIs for
the search term entered:
R near the current vehicle position
R along the calculated route
R near the destination
R near an address
X After selecting Near Destination, enter
an address and confirm. Character entry
(Y page 283).
The search results are displayed. Google™ search results (example) Online and Internet functions
387
COMAND Z
Page 390 of 572
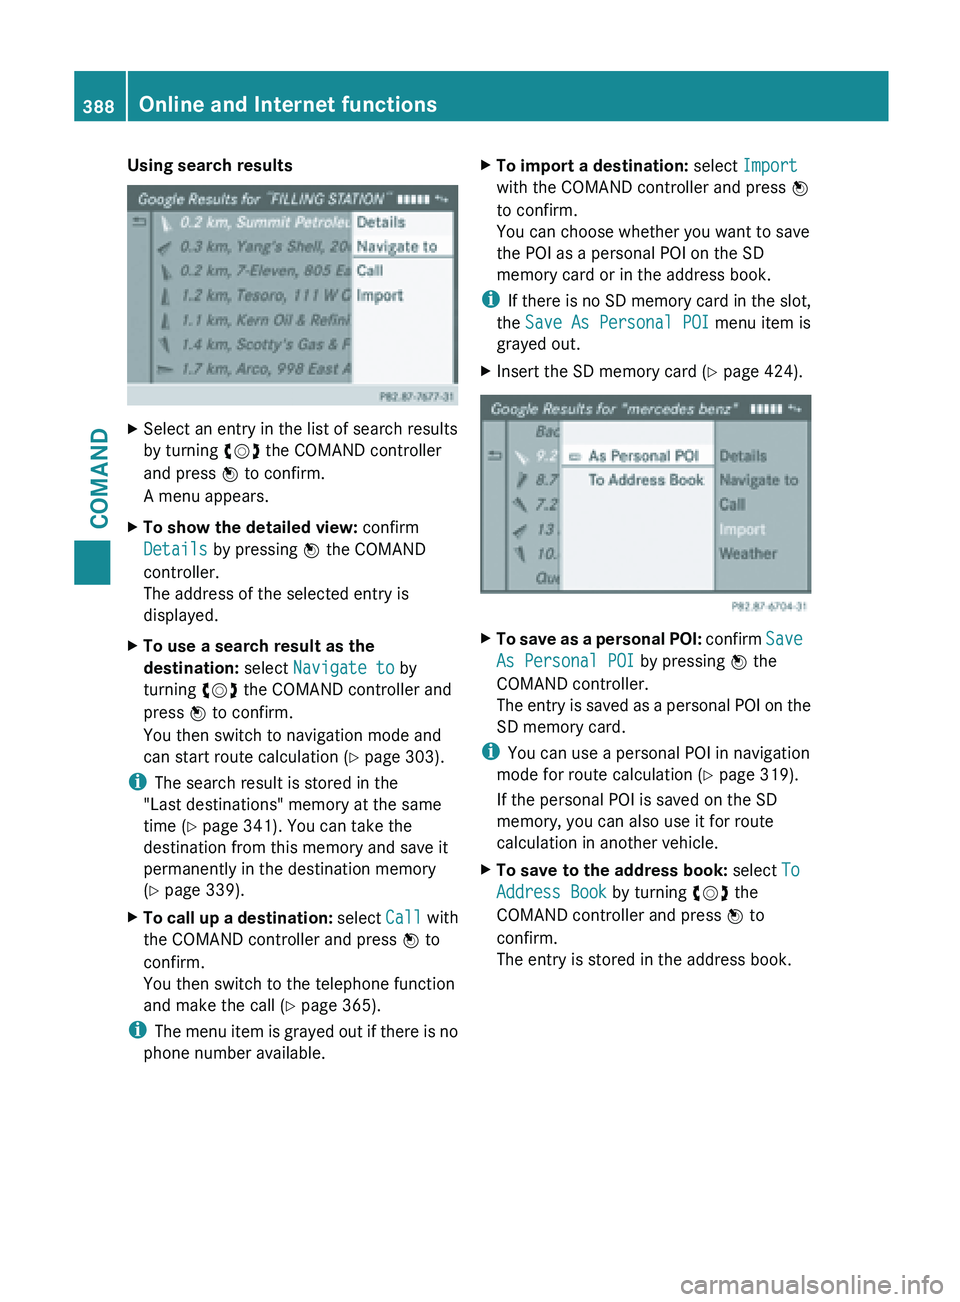
Using search results
X
Select an entry in the list of search results
by turning cVd the COMAND controller
and press W to confirm.
A menu appears.
X To show the detailed view: confirm
Details by pressing W the COMAND
controller.
The address of the selected entry is
displayed.
X To use a search result as the
destination: select Navigate to by
turning cVd the COMAND controller and
press W to confirm.
You then switch to navigation mode and
can start route calculation (Y page 303).
i The search result is stored in the
"Last destinations" memory at the same
time (Y page 341). You can take the
destination from this memory and save it
permanently in the destination memory
(Y page 339).
X To call up a destination: select
Call with
the COMAND controller and press W to
confirm.
You then switch to the telephone function
and make the call ( Y page 365).
i The menu
item is grayed out if there is no
phone number available. X
To import a destination: select Import
with the COMAND controller and press W
to confirm.
You can choose whether you want to save
the POI as a personal POI on the SD
memory card or in the address book.
i If there
is no SD memory card in the slot,
the Save As Personal POI menu item is
grayed out.
X Insert the SD memory card (Y page 424). X
To save as a personal POI: confirm Save
As Personal POI
by pressing W the
COMAND controller.
The entry is saved as a personal POI on the
SD memory card.
i You can use a personal POI in navigation
mode for route calculation ( Y page 319).
If the personal POI is saved on the SD
memory, you can also use it for route
calculation in another vehicle.
X To save to the address book: select To
Address Book by turning cVd the
COMAND controller and press W to
confirm.
The entry is stored in the address book. 388
Online and Internet functions
COMAND