MERCEDES-BENZ SPRINTER 2005 Service Repair Manual
Manufacturer: MERCEDES-BENZ, Model Year: 2005, Model line: SPRINTER, Model: MERCEDES-BENZ SPRINTER 2005Pages: 1232, PDF Size: 39.23 MB
Page 991 of 1232
HOLDING CLUTCH B2
DISASSEMBLY
(1) Remove snap ring (1) (Fig. 158).
(2) Take multiple-disc pack B2 (2) and disc spring
(3) out of the outer multiple-disc carrier B2 (8). The
outer multiple-disc carrier for the multi-disc holding
clutch B2 is the piston for the multiple-disc holding
clutch B3 at the same time.
(3) Place the Multi-use Spring Compressor 8900 on
the spring disc (14) and compress the spring until
the groove for the snap-ring is exposed.
(4) Remove snap-ring (16) (Fig. 158).
(5) Remove spring plate (15) and disc spring (14).
(6) Separate piston guide ring (13) and the B2 pis-
ton (10) from the B3 piston (8) by blowing com-
pressed air into the bore (D) (Fig. 159).
(7) Press piston guide ring (13) out of the B2 pis-
ton (10).
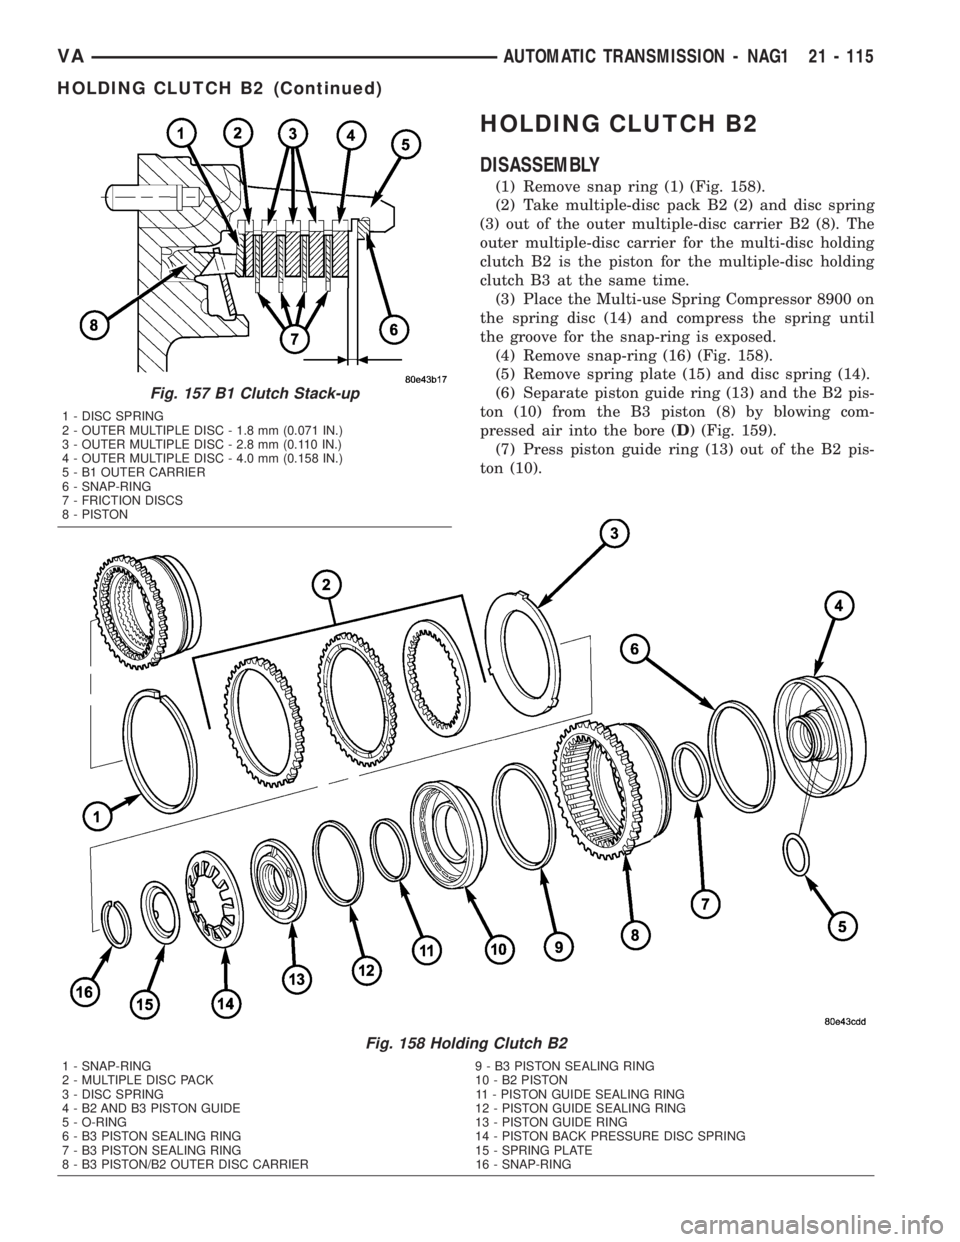
Fig. 157 B1 Clutch Stack-up
1 - DISC SPRING
2 - OUTER MULTIPLE DISC - 1.8 mm (0.071 IN.)
3 - OUTER MULTIPLE DISC - 2.8 mm (0.110 IN.)
4 - OUTER MULTIPLE DISC - 4.0 mm (0.158 IN.)
5 - B1 OUTER CARRIER
6 - SNAP-RING
7 - FRICTION DISCS
8 - PISTON
Fig. 158 Holding Clutch B2
1 - SNAP-RING 9 - B3 PISTON SEALING RING
2 - MULTIPLE DISC PACK 10 - B2 PISTON
3 - DISC SPRING 11 - PISTON GUIDE SEALING RING
4 - B2 AND B3 PISTON GUIDE 12 - PISTON GUIDE SEALING RING
5 - O-RING 13 - PISTON GUIDE RING
6 - B3 PISTON SEALING RING 14 - PISTON BACK PRESSURE DISC SPRING
7 - B3 PISTON SEALING RING 15 - SPRING PLATE
8 - B3 PISTON/B2 OUTER DISC CARRIER 16 - SNAP-RING
VAAUTOMATIC TRANSMISSION - NAG1 21 - 115
HOLDING CLUTCH B2 (Continued)
Page 992 of 1232
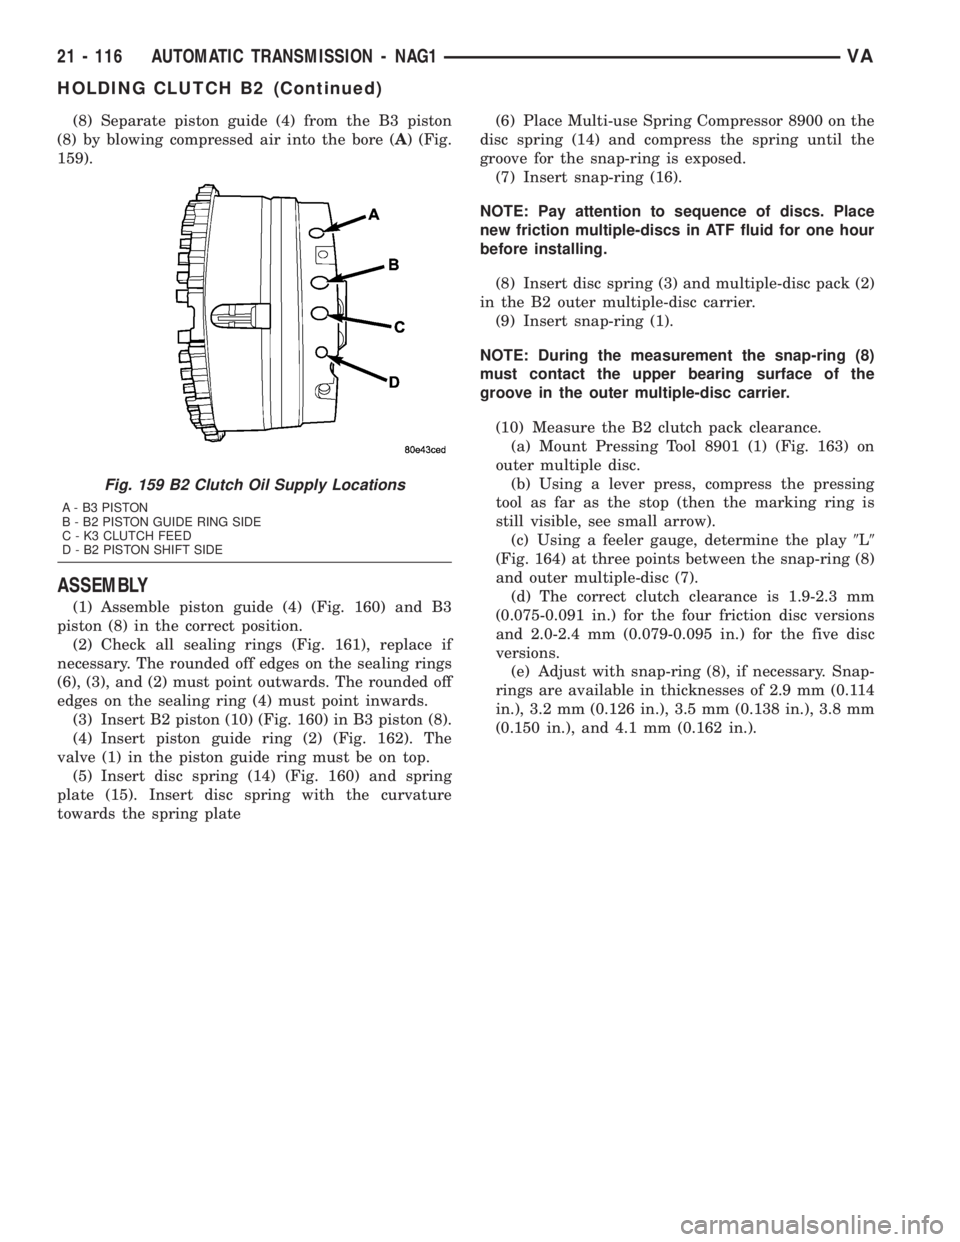
(8) Separate piston guide (4) from the B3 piston
(8) by blowing compressed air into the bore (A) (Fig.
159).
ASSEMBLY
(1) Assemble piston guide (4) (Fig. 160) and B3
piston (8) in the correct position.
(2) Check all sealing rings (Fig. 161), replace if
necessary. The rounded off edges on the sealing rings
(6), (3), and (2) must point outwards. The rounded off
edges on the sealing ring (4) must point inwards.
(3) Insert B2 piston (10) (Fig. 160) in B3 piston (8).
(4) Insert piston guide ring (2) (Fig. 162). The
valve (1) in the piston guide ring must be on top.
(5) Insert disc spring (14) (Fig. 160) and spring
plate (15). Insert disc spring with the curvature
towards the spring plate(6) Place Multi-use Spring Compressor 8900 on the
disc spring (14) and compress the spring until the
groove for the snap-ring is exposed.
(7) Insert snap-ring (16).
NOTE: Pay attention to sequence of discs. Place
new friction multiple-discs in ATF fluid for one hour
before installing.
(8) Insert disc spring (3) and multiple-disc pack (2)
in the B2 outer multiple-disc carrier.
(9) Insert snap-ring (1).
NOTE: During the measurement the snap-ring (8)
must contact the upper bearing surface of the
groove in the outer multiple-disc carrier.
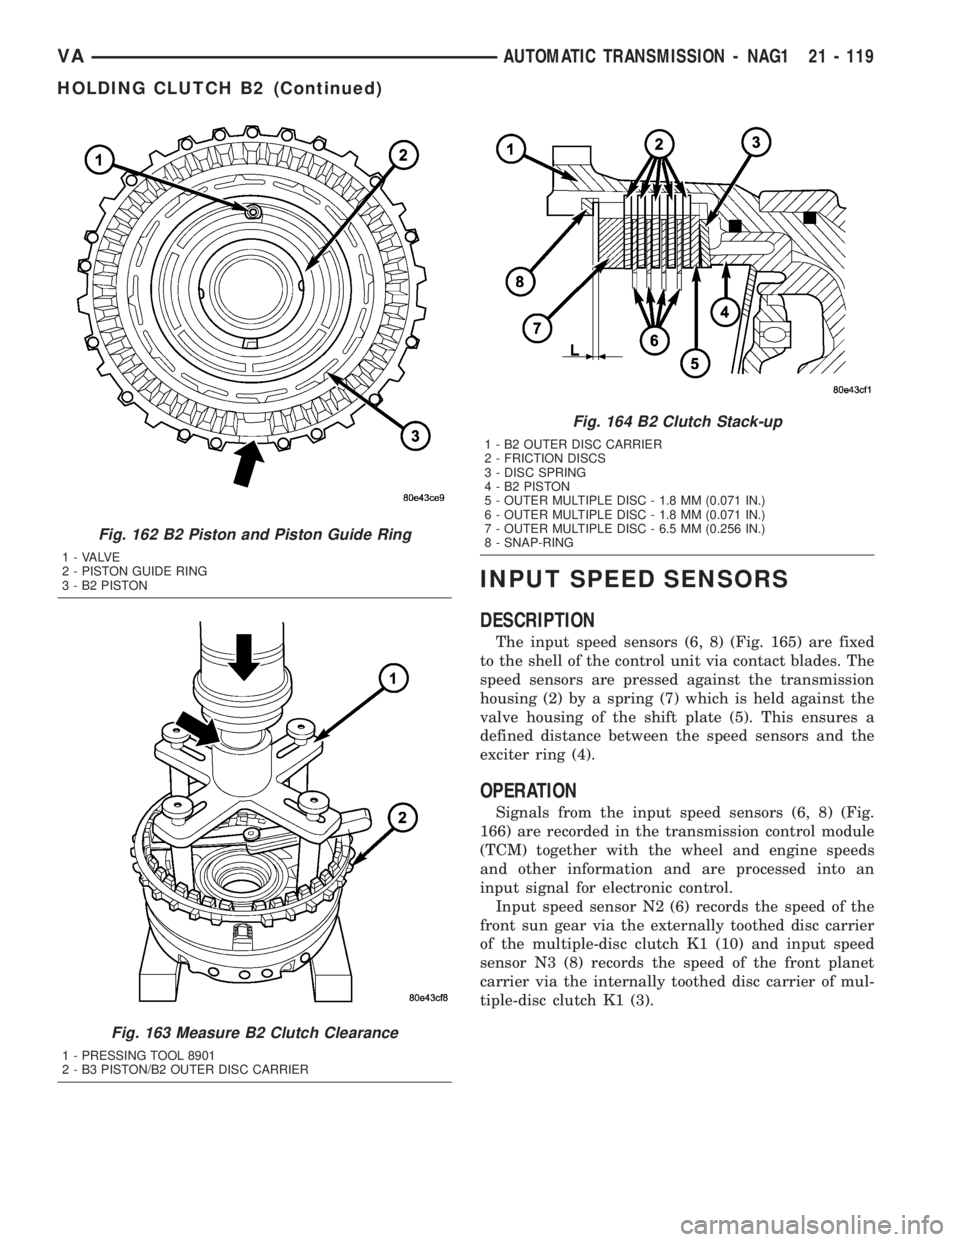
(10) Measure the B2 clutch pack clearance.
(a) Mount Pressing Tool 8901 (1) (Fig. 163) on
outer multiple disc.
(b) Using a lever press, compress the pressing
tool as far as the stop (then the marking ring is
still visible, see small arrow).
(c) Using a feeler gauge, determine the play9L9
(Fig. 164) at three points between the snap-ring (8)
and outer multiple-disc (7).
(d) The correct clutch clearance is 1.9-2.3 mm
(0.075-0.091 in.) for the four friction disc versions
and 2.0-2.4 mm (0.079-0.095 in.) for the five disc
versions.
(e) Adjust with snap-ring (8), if necessary. Snap-
rings are available in thicknesses of 2.9 mm (0.114
in.), 3.2 mm (0.126 in.), 3.5 mm (0.138 in.), 3.8 mm
(0.150 in.), and 4.1 mm (0.162 in.).
Fig. 159 B2 Clutch Oil Supply Locations
A - B3 PISTON
B - B2 PISTON GUIDE RING SIDE
C - K3 CLUTCH FEED
D - B2 PISTON SHIFT SIDE
21 - 116 AUTOMATIC TRANSMISSION - NAG1VA
HOLDING CLUTCH B2 (Continued)
Page 993 of 1232
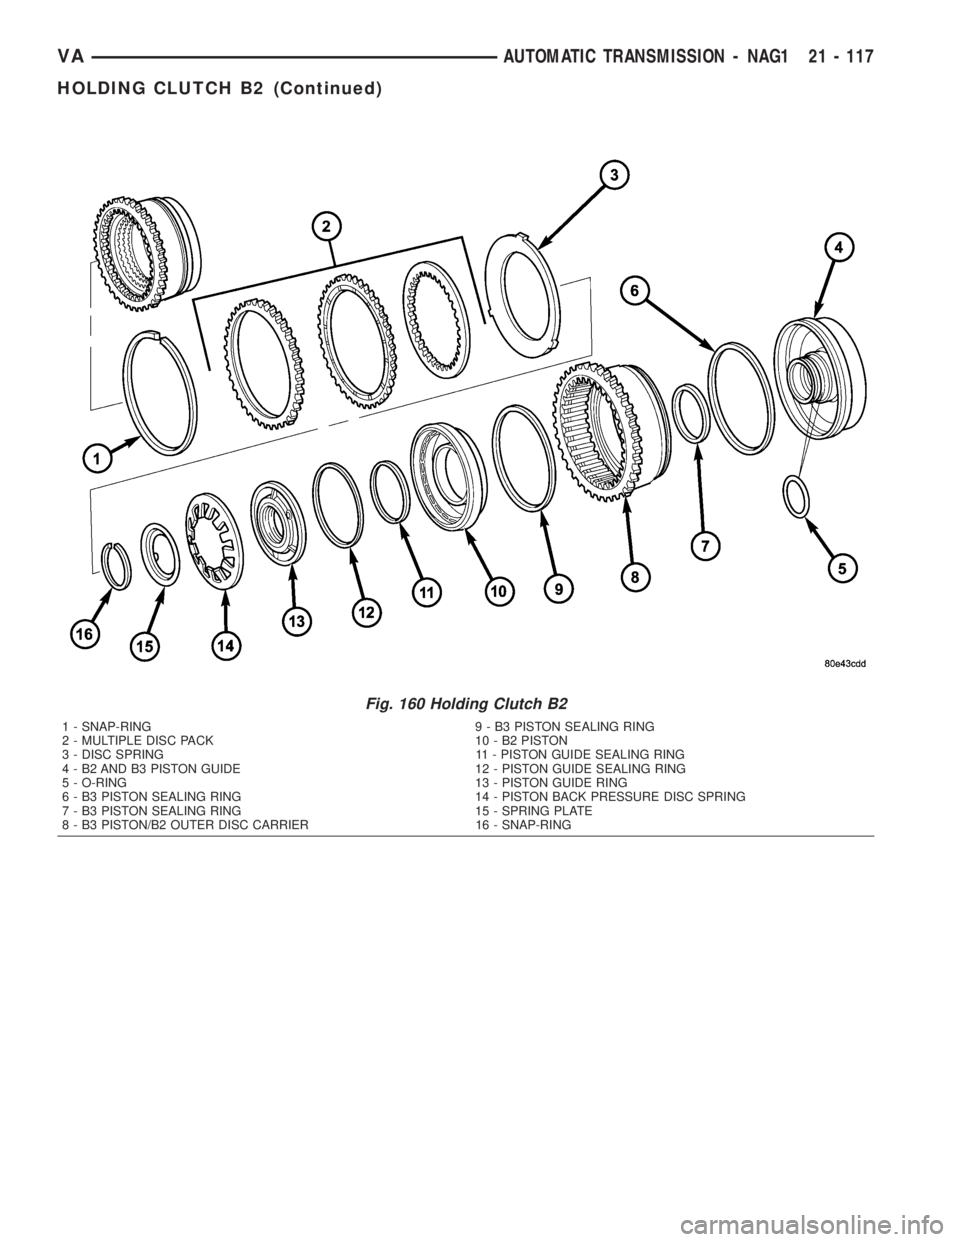
Fig. 160 Holding Clutch B2
1 - SNAP-RING 9 - B3 PISTON SEALING RING
2 - MULTIPLE DISC PACK 10 - B2 PISTON
3 - DISC SPRING 11 - PISTON GUIDE SEALING RING
4 - B2 AND B3 PISTON GUIDE 12 - PISTON GUIDE SEALING RING
5 - O-RING 13 - PISTON GUIDE RING
6 - B3 PISTON SEALING RING 14 - PISTON BACK PRESSURE DISC SPRING
7 - B3 PISTON SEALING RING 15 - SPRING PLATE
8 - B3 PISTON/B2 OUTER DISC CARRIER 16 - SNAP-RING
VAAUTOMATIC TRANSMISSION - NAG1 21 - 117
HOLDING CLUTCH B2 (Continued)
Page 994 of 1232
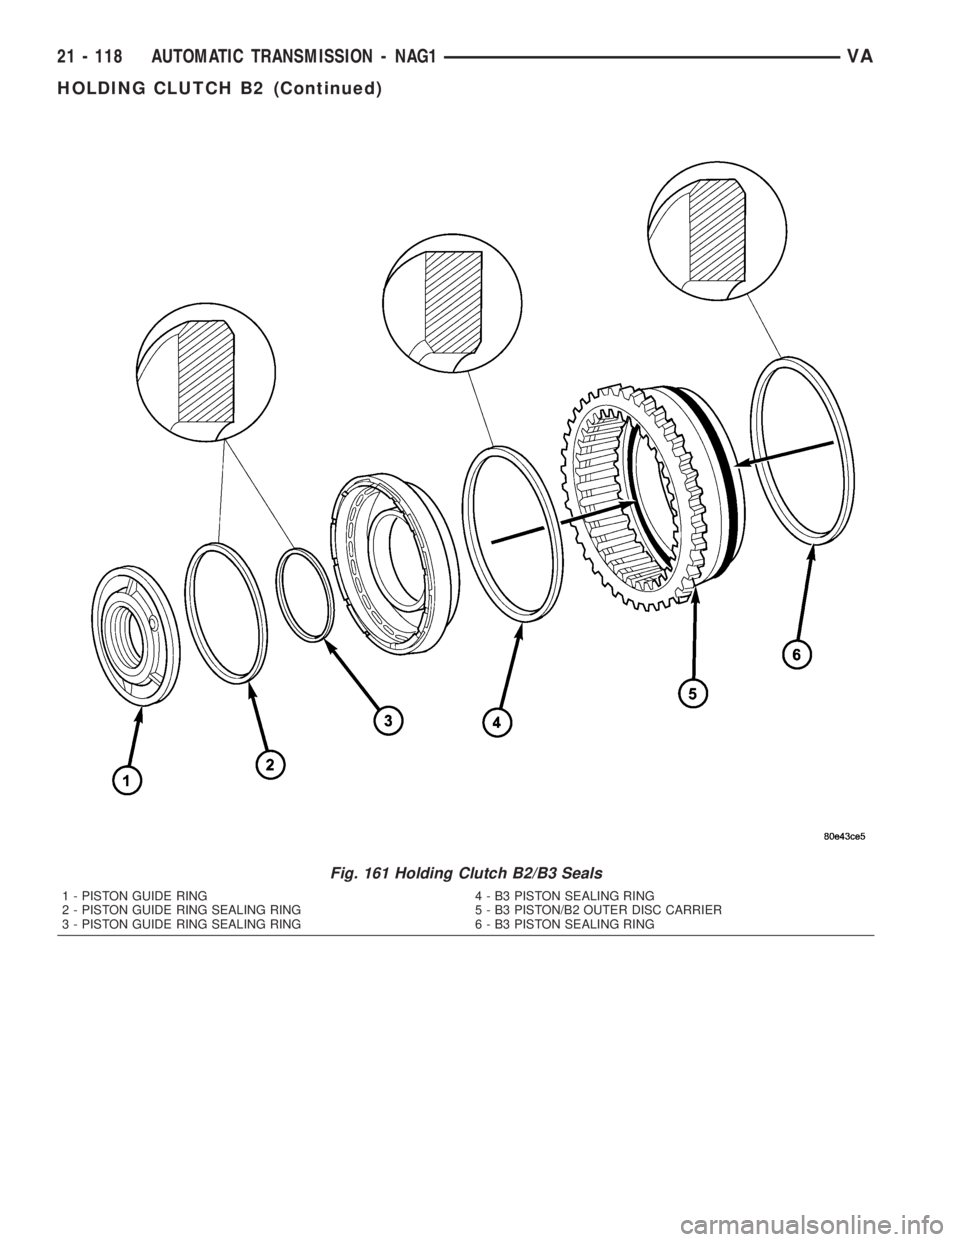
Fig. 161 Holding Clutch B2/B3 Seals
1 - PISTON GUIDE RING 4 - B3 PISTON SEALING RING
2 - PISTON GUIDE RING SEALING RING 5 - B3 PISTON/B2 OUTER DISC CARRIER
3 - PISTON GUIDE RING SEALING RING 6 - B3 PISTON SEALING RING
21 - 118 AUTOMATIC TRANSMISSION - NAG1VA
HOLDING CLUTCH B2 (Continued)
Page 995 of 1232
INPUT SPEED SENSORS
DESCRIPTION
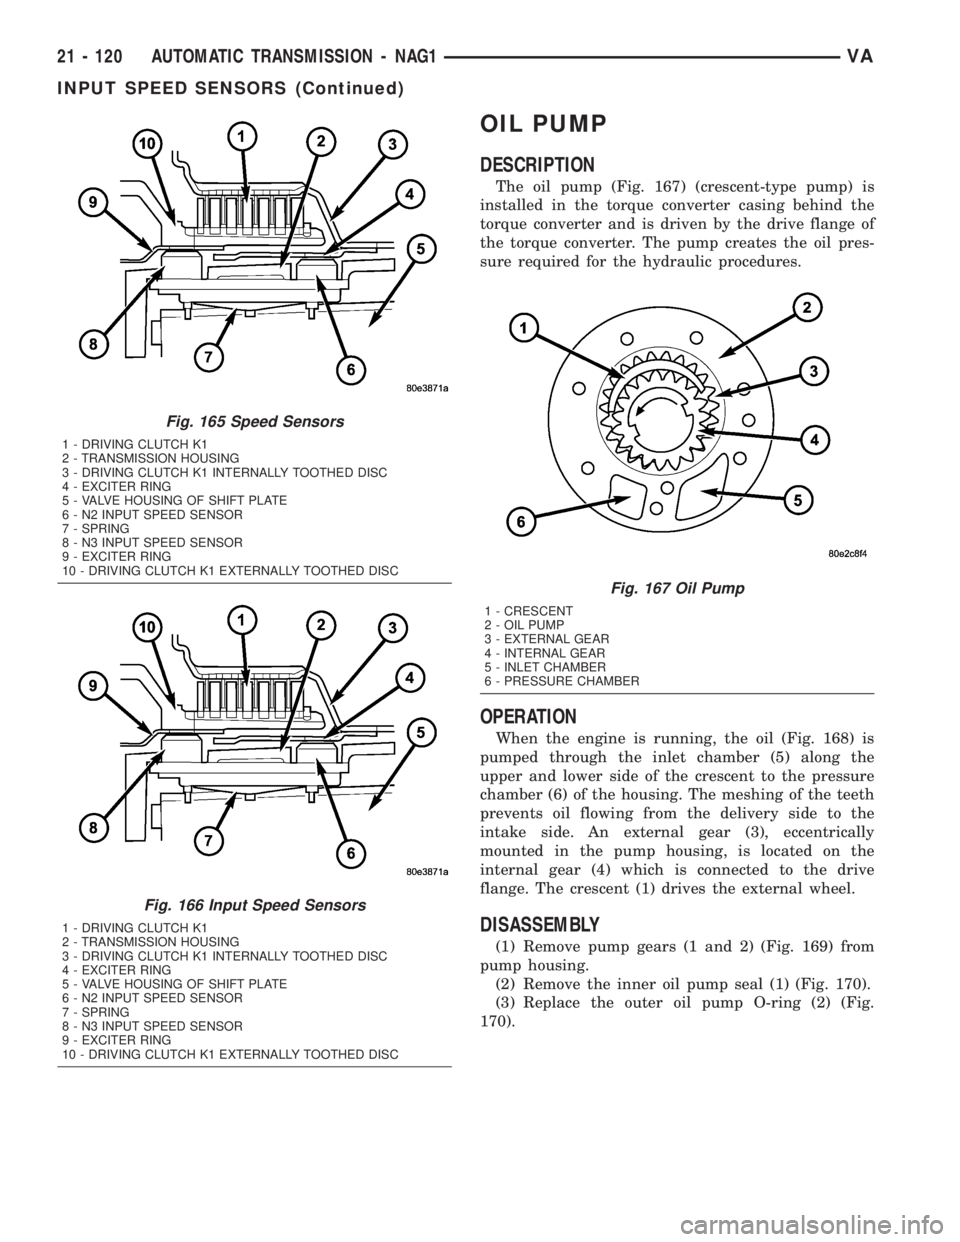
The input speed sensors (6, 8) (Fig. 165) are fixed
to the shell of the control unit via contact blades. The
speed sensors are pressed against the transmission
housing (2) by a spring (7) which is held against the
valve housing of the shift plate (5). This ensures a
defined distance between the speed sensors and the
exciter ring (4).
OPERATION
Signals from the input speed sensors (6, 8) (Fig.
166) are recorded in the transmission control module
(TCM) together with the wheel and engine speeds
and other information and are processed into an
input signal for electronic control.
Input speed sensor N2 (6) records the speed of the
front sun gear via the externally toothed disc carrier
of the multiple-disc clutch K1 (10) and input speed
sensor N3 (8) records the speed of the front planet
carrier via the internally toothed disc carrier of mul-
tiple-disc clutch K1 (3).
Fig. 162 B2 Piston and Piston Guide Ring
1 - VALVE
2 - PISTON GUIDE RING
3 - B2 PISTON
Fig. 163 Measure B2 Clutch Clearance
1 - PRESSING TOOL 8901
2 - B3 PISTON/B2 OUTER DISC CARRIER
Fig. 164 B2 Clutch Stack-up
1 - B2 OUTER DISC CARRIER
2 - FRICTION DISCS
3 - DISC SPRING
4 - B2 PISTON
5 - OUTER MULTIPLE DISC - 1.8 MM (0.071 IN.)
6 - OUTER MULTIPLE DISC - 1.8 MM (0.071 IN.)
7 - OUTER MULTIPLE DISC - 6.5 MM (0.256 IN.)
8 - SNAP-RING
VAAUTOMATIC TRANSMISSION - NAG1 21 - 119
HOLDING CLUTCH B2 (Continued)
Page 996 of 1232
OIL PUMP
DESCRIPTION
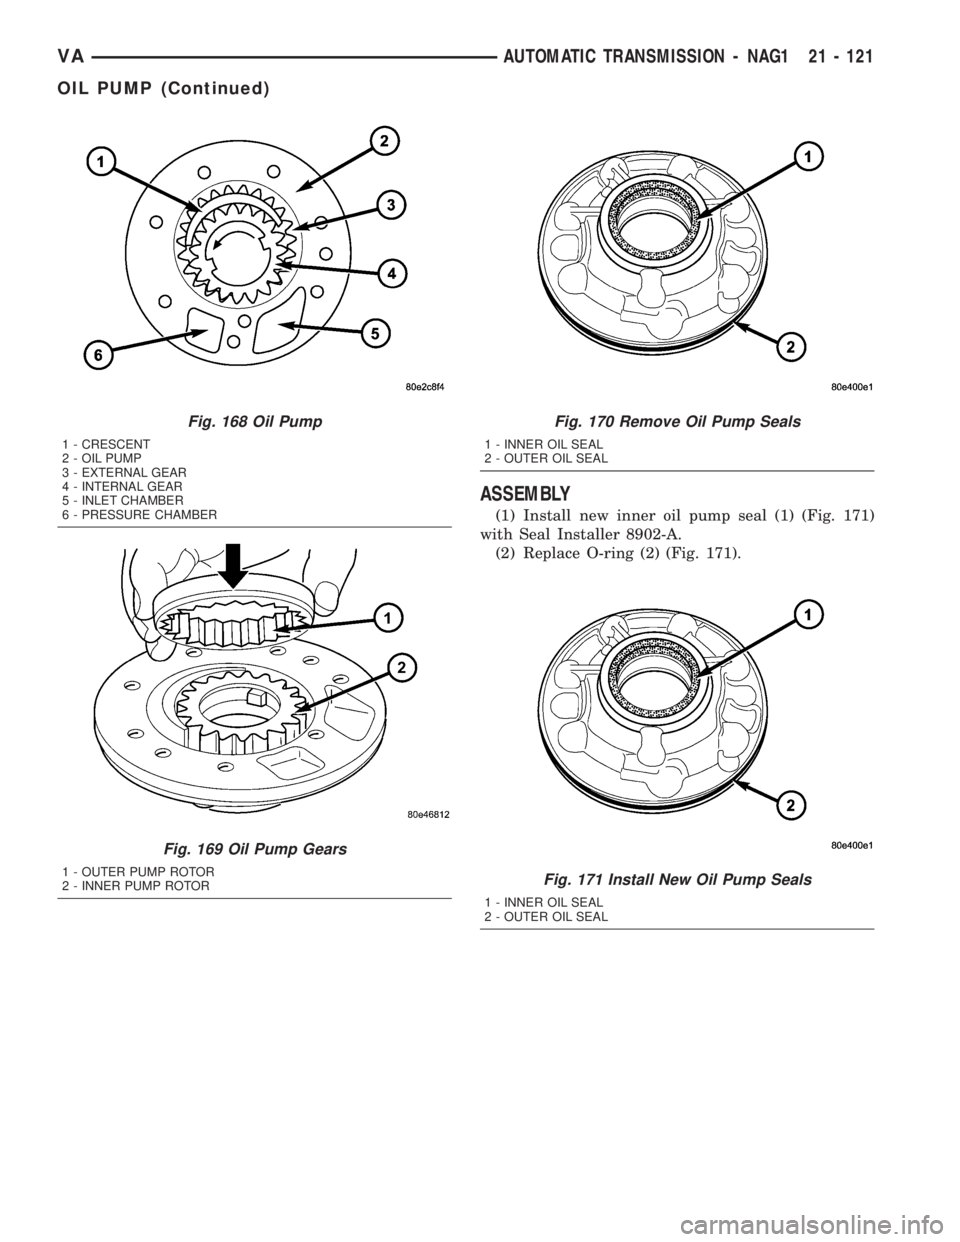
The oil pump (Fig. 167) (crescent-type pump) is
installed in the torque converter casing behind the
torque converter and is driven by the drive flange of
the torque converter. The pump creates the oil pres-
sure required for the hydraulic procedures.
OPERATION
When the engine is running, the oil (Fig. 168) is
pumped through the inlet chamber (5) along the
upper and lower side of the crescent to the pressure
chamber (6) of the housing. The meshing of the teeth
prevents oil flowing from the delivery side to the
intake side. An external gear (3), eccentrically
mounted in the pump housing, is located on the
internal gear (4) which is connected to the drive
flange. The crescent (1) drives the external wheel.
DISASSEMBLY
(1) Remove pump gears (1 and 2) (Fig. 169) from
pump housing.
(2) Remove the inner oil pump seal (1) (Fig. 170).
(3) Replace the outer oil pump O-ring (2) (Fig.
170).
Fig. 165 Speed Sensors
1 - DRIVING CLUTCH K1
2 - TRANSMISSION HOUSING
3 - DRIVING CLUTCH K1 INTERNALLY TOOTHED DISC
4 - EXCITER RING
5 - VALVE HOUSING OF SHIFT PLATE
6 - N2 INPUT SPEED SENSOR
7 - SPRING
8 - N3 INPUT SPEED SENSOR
9 - EXCITER RING
10 - DRIVING CLUTCH K1 EXTERNALLY TOOTHED DISC
Fig. 166 Input Speed Sensors
1 - DRIVING CLUTCH K1
2 - TRANSMISSION HOUSING
3 - DRIVING CLUTCH K1 INTERNALLY TOOTHED DISC
4 - EXCITER RING
5 - VALVE HOUSING OF SHIFT PLATE
6 - N2 INPUT SPEED SENSOR
7 - SPRING
8 - N3 INPUT SPEED SENSOR
9 - EXCITER RING
10 - DRIVING CLUTCH K1 EXTERNALLY TOOTHED DISC
Fig. 167 Oil Pump
1 - CRESCENT
2 - OIL PUMP
3 - EXTERNAL GEAR
4 - INTERNAL GEAR
5 - INLET CHAMBER
6 - PRESSURE CHAMBER
21 - 120 AUTOMATIC TRANSMISSION - NAG1VA
INPUT SPEED SENSORS (Continued)
Page 997 of 1232
ASSEMBLY
(1) Install new inner oil pump seal (1) (Fig. 171)
with Seal Installer 8902-A.
(2) Replace O-ring (2) (Fig. 171).
Fig. 168 Oil Pump
1 - CRESCENT
2 - OIL PUMP
3 - EXTERNAL GEAR
4 - INTERNAL GEAR
5 - INLET CHAMBER
6 - PRESSURE CHAMBER
Fig. 169 Oil Pump Gears
1 - OUTER PUMP ROTOR
2 - INNER PUMP ROTOR
Fig. 170 Remove Oil Pump Seals
1 - INNER OIL SEAL
2 - OUTER OIL SEAL
Fig. 171 Install New Oil Pump Seals
1 - INNER OIL SEAL
2 - OUTER OIL SEAL
VAAUTOMATIC TRANSMISSION - NAG1 21 - 121
OIL PUMP (Continued)
Page 998 of 1232
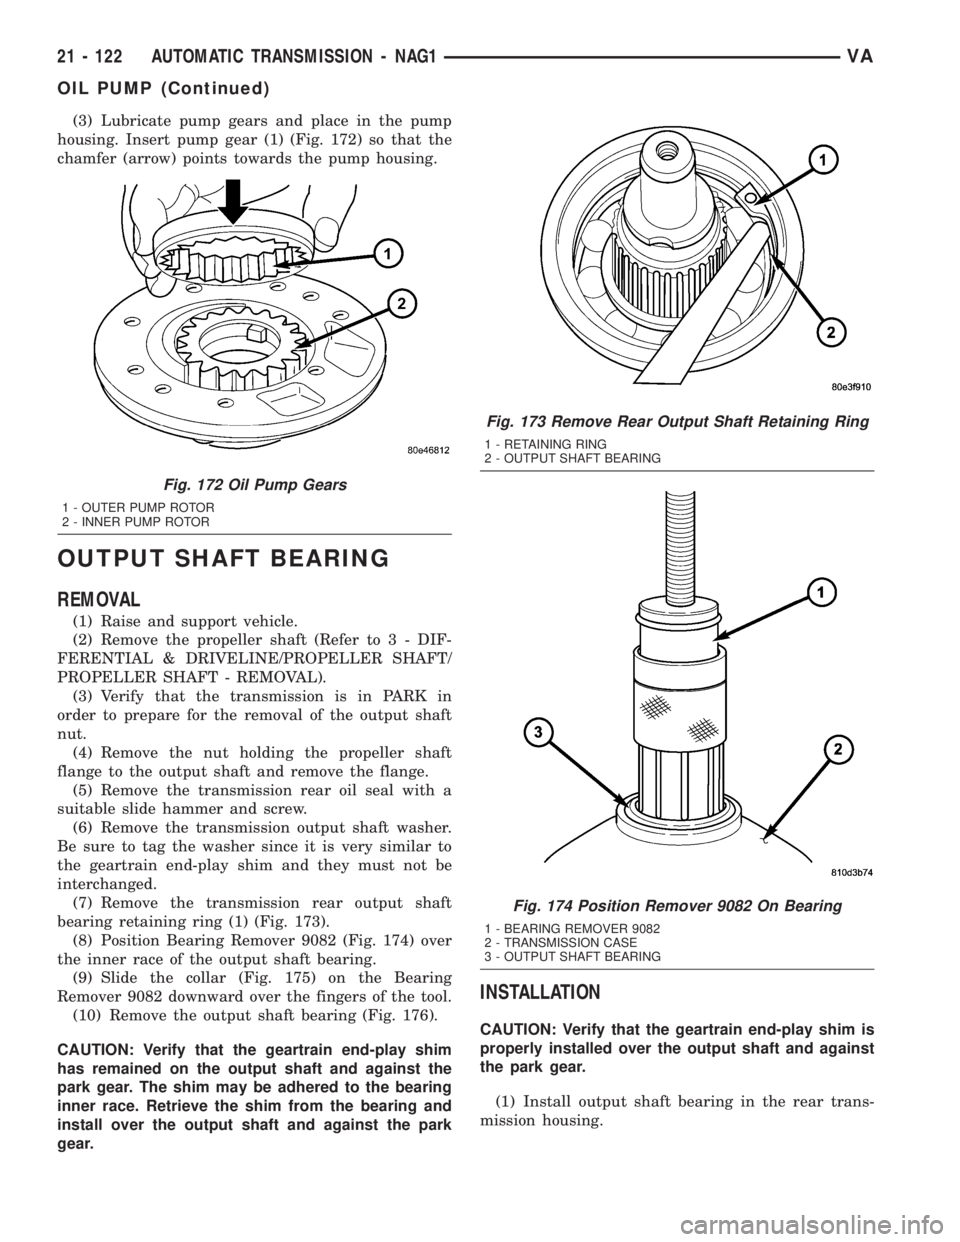
(3) Lubricate pump gears and place in the pump
housing. Insert pump gear (1) (Fig. 172) so that the
chamfer (arrow) points towards the pump housing.
OUTPUT SHAFT BEARING
REMOVAL
(1) Raise and support vehicle.
(2) Remove the propeller shaft (Refer to 3 - DIF-
FERENTIAL & DRIVELINE/PROPELLER SHAFT/
PROPELLER SHAFT - REMOVAL).
(3) Verify that the transmission is in PARK in
order to prepare for the removal of the output shaft
nut.
(4) Remove the nut holding the propeller shaft
flange to the output shaft and remove the flange.
(5) Remove the transmission rear oil seal with a
suitable slide hammer and screw.
(6) Remove the transmission output shaft washer.
Be sure to tag the washer since it is very similar to
the geartrain end-play shim and they must not be
interchanged.
(7) Remove the transmission rear output shaft
bearing retaining ring (1) (Fig. 173).
(8) Position Bearing Remover 9082 (Fig. 174) over
the inner race of the output shaft bearing.
(9) Slide the collar (Fig. 175) on the Bearing
Remover 9082 downward over the fingers of the tool.
(10) Remove the output shaft bearing (Fig. 176).
CAUTION: Verify that the geartrain end-play shim
has remained on the output shaft and against the
park gear. The shim may be adhered to the bearing
inner race. Retrieve the shim from the bearing and
install over the output shaft and against the park
gear.
INSTALLATION
CAUTION: Verify that the geartrain end-play shim is
properly installed over the output shaft and against
the park gear.
(1) Install output shaft bearing in the rear trans-
mission housing.
Fig. 172 Oil Pump Gears
1 - OUTER PUMP ROTOR
2 - INNER PUMP ROTOR
Fig. 173 Remove Rear Output Shaft Retaining Ring
1 - RETAINING RING
2 - OUTPUT SHAFT BEARING
Fig. 174 Position Remover 9082 On Bearing
1 - BEARING REMOVER 9082
2 - TRANSMISSION CASE
3 - OUTPUT SHAFT BEARING
21 - 122 AUTOMATIC TRANSMISSION - NAG1VA
OIL PUMP (Continued)
Page 999 of 1232
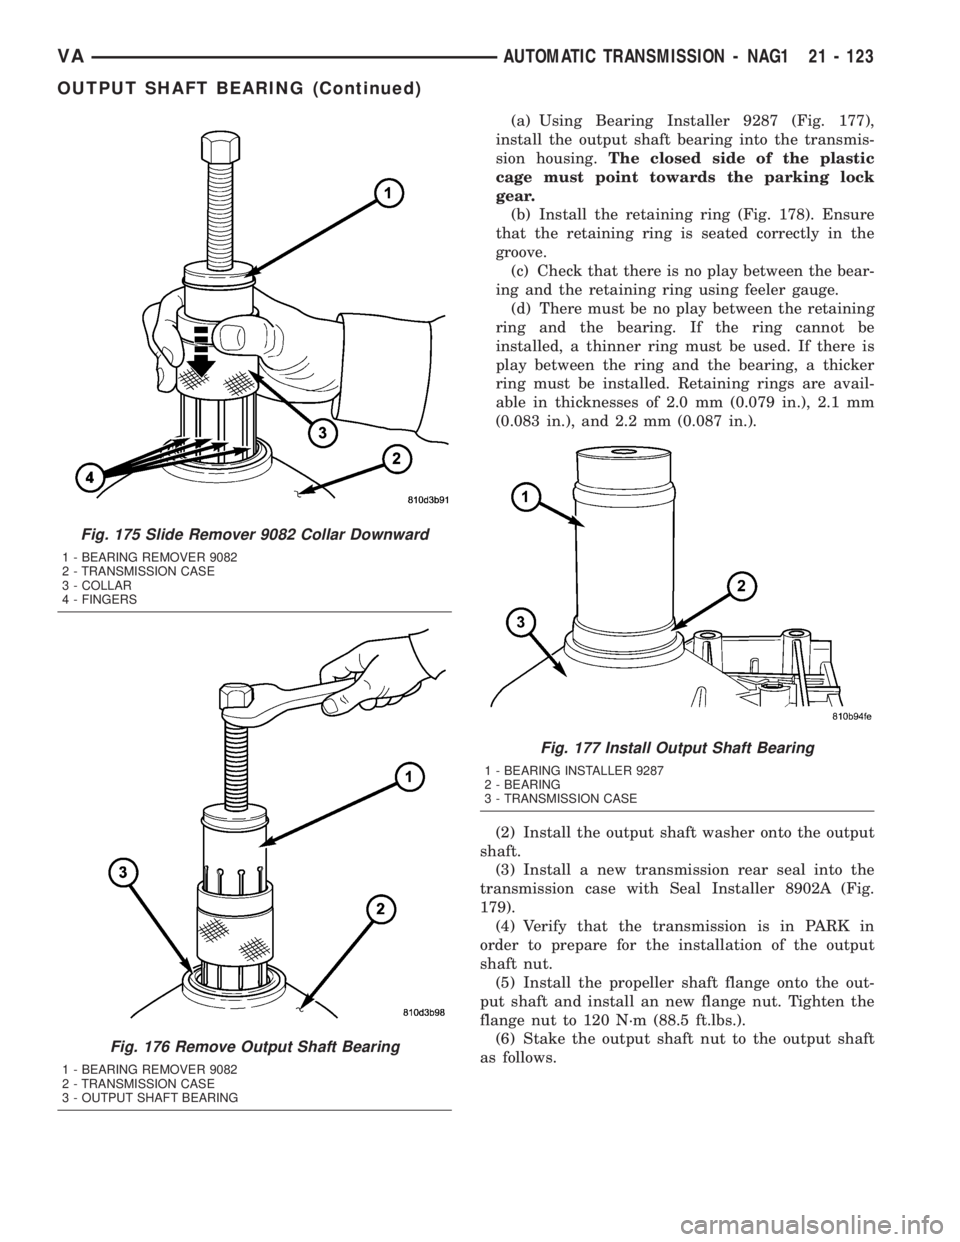
(a) Using Bearing Installer 9287 (Fig. 177),
install the output shaft bearing into the transmis-
sion housing.The closed side of the plastic
cage must point towards the parking lock
gear.
(b) Install the retaining ring (Fig. 178). Ensure
that the retaining ring is seated correctly in the
groove.
(c) Check that there is no play between the bear-
ing and the retaining ring using feeler gauge.
(d) There must be no play between the retaining
ring and the bearing. If the ring cannot be
installed, a thinner ring must be used. If there is
play between the ring and the bearing, a thicker
ring must be installed. Retaining rings are avail-
able in thicknesses of 2.0 mm (0.079 in.), 2.1 mm
(0.083 in.), and 2.2 mm (0.087 in.).
(2) Install the output shaft washer onto the output
shaft.
(3) Install a new transmission rear seal into the
transmission case with Seal Installer 8902A (Fig.
179).
(4) Verify that the transmission is in PARK in
order to prepare for the installation of the output
shaft nut.
(5) Install the propeller shaft flange onto the out-
put shaft and install an new flange nut. Tighten the
flange nut to 120 N´m (88.5 ft.lbs.).
(6) Stake the output shaft nut to the output shaft
as follows.
Fig. 175 Slide Remover 9082 Collar Downward
1 - BEARING REMOVER 9082
2 - TRANSMISSION CASE
3 - COLLAR
4 - FINGERS
Fig. 176 Remove Output Shaft Bearing
1 - BEARING REMOVER 9082
2 - TRANSMISSION CASE
3 - OUTPUT SHAFT BEARING
Fig. 177 Install Output Shaft Bearing
1 - BEARING INSTALLER 9287
2 - BEARING
3 - TRANSMISSION CASE
VAAUTOMATIC TRANSMISSION - NAG1 21 - 123
OUTPUT SHAFT BEARING (Continued)
Page 1000 of 1232
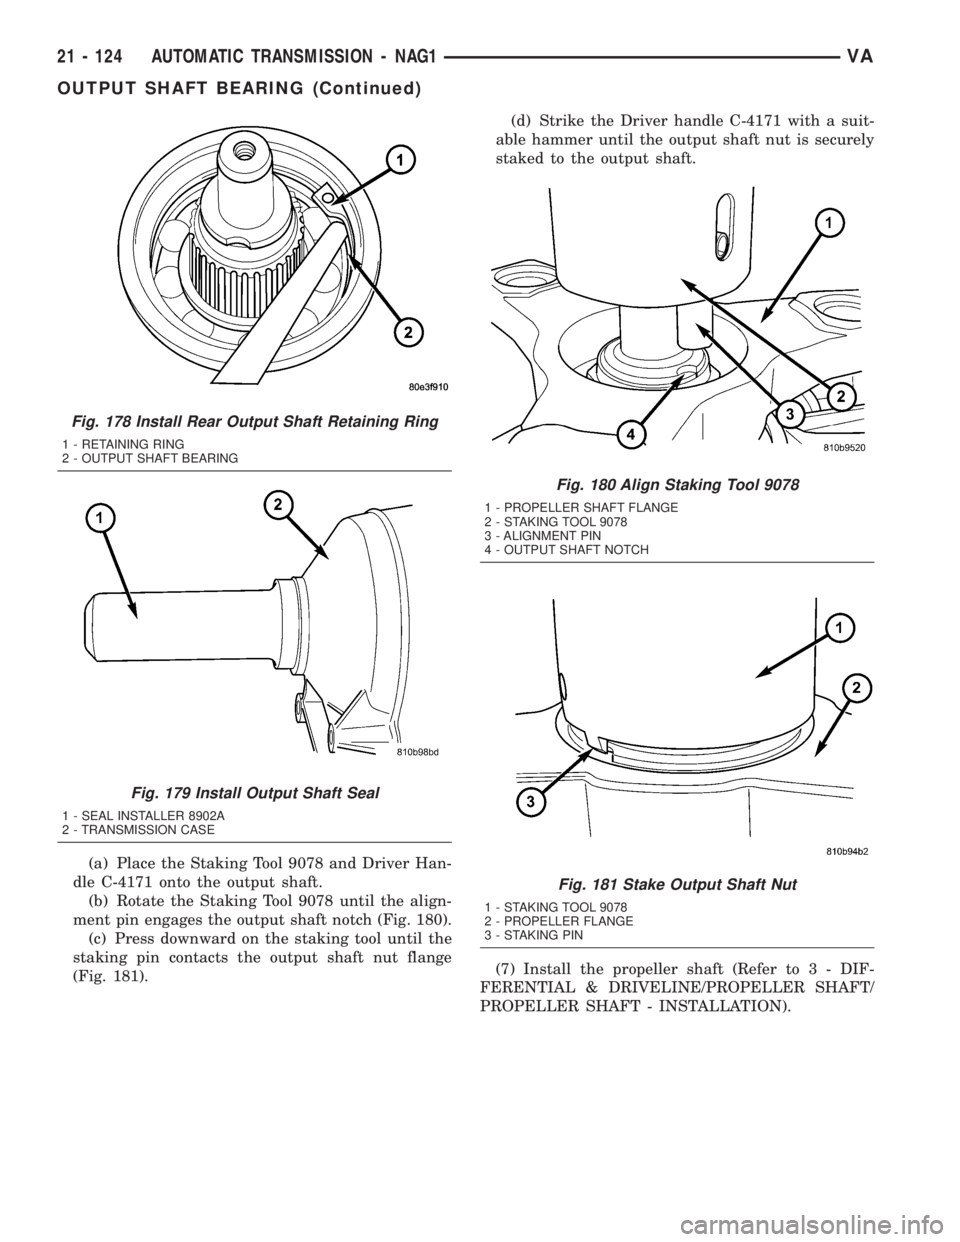
(a) Place the Staking Tool 9078 and Driver Han-
dle C-4171 onto the output shaft.
(b) Rotate the Staking Tool 9078 until the align-
ment pin engages the output shaft notch (Fig. 180).
(c) Press downward on the staking tool until the
staking pin contacts the output shaft nut flange
(Fig. 181).(d) Strike the Driver handle C-4171 with a suit-
able hammer until the output shaft nut is securely
staked to the output shaft.
(7) Install the propeller shaft (Refer to 3 - DIF-
FERENTIAL & DRIVELINE/PROPELLER SHAFT/
PROPELLER SHAFT - INSTALLATION).
Fig. 178 Install Rear Output Shaft Retaining Ring
1 - RETAINING RING
2 - OUTPUT SHAFT BEARING
Fig. 179 Install Output Shaft Seal
1 - SEAL INSTALLER 8902A
2 - TRANSMISSION CASE
Fig. 180 Align Staking Tool 9078
1 - PROPELLER SHAFT FLANGE
2 - STAKING TOOL 9078
3 - ALIGNMENT PIN
4 - OUTPUT SHAFT NOTCH
Fig. 181 Stake Output Shaft Nut
1 - STAKING TOOL 9078
2 - PROPELLER FLANGE
3 - STAKING PIN
21 - 124 AUTOMATIC TRANSMISSION - NAG1VA
OUTPUT SHAFT BEARING (Continued)