MERCEDES-BENZ SPRINTER 2011 MY11 Operator’s Manual
Manufacturer: MERCEDES-BENZ, Model Year: 2011, Model line: SPRINTER, Model: MERCEDES-BENZ SPRINTER 2011Pages: 292, PDF Size: 6.75 MB
Page 171 of 292
X
Push hood catch release handle 0047
upwards. X
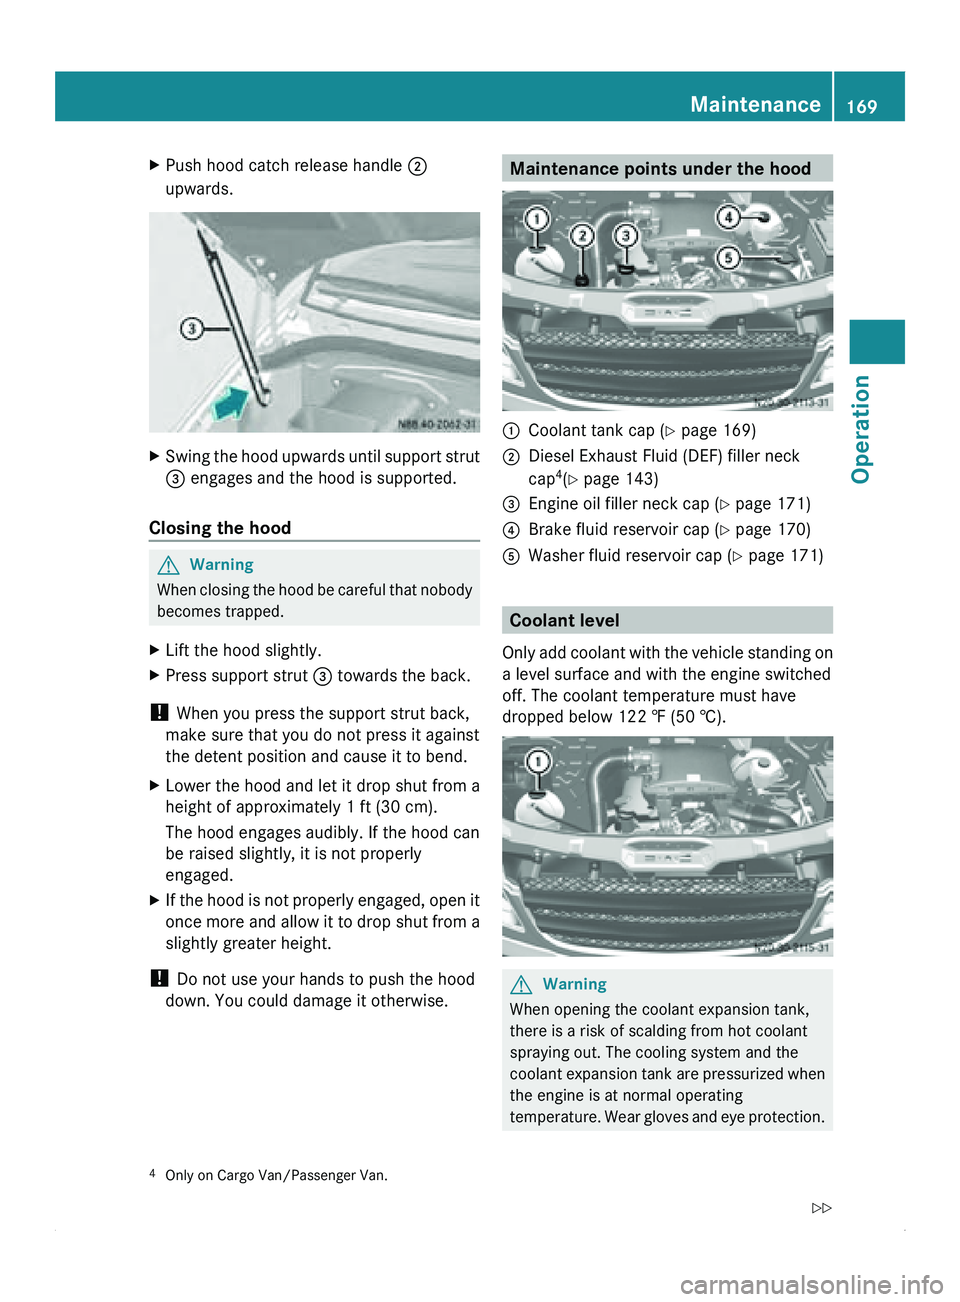
Swing the hood upwards until support strut
008A engages and the hood is supported.
Closing the hood G
Warning
When closing the hood be careful that nobody
becomes trapped.
X Lift the hood slightly.
X Press support strut 008A towards the back.
! When you press the support strut back,
make sure that you do not press it against
the detent position and cause it to bend.
X Lower the hood and let it drop shut from a
height of approximately 1 ft (30 cm).
The hood engages audibly. If the hood can
be raised slightly, it is not properly
engaged.
X If
the hood is not properly engaged, open it
once more and
allow it to drop shut from a
slightly greater height.
! Do not use your hands to push the hood
down. You could damage it otherwise. Maintenance points under the hood
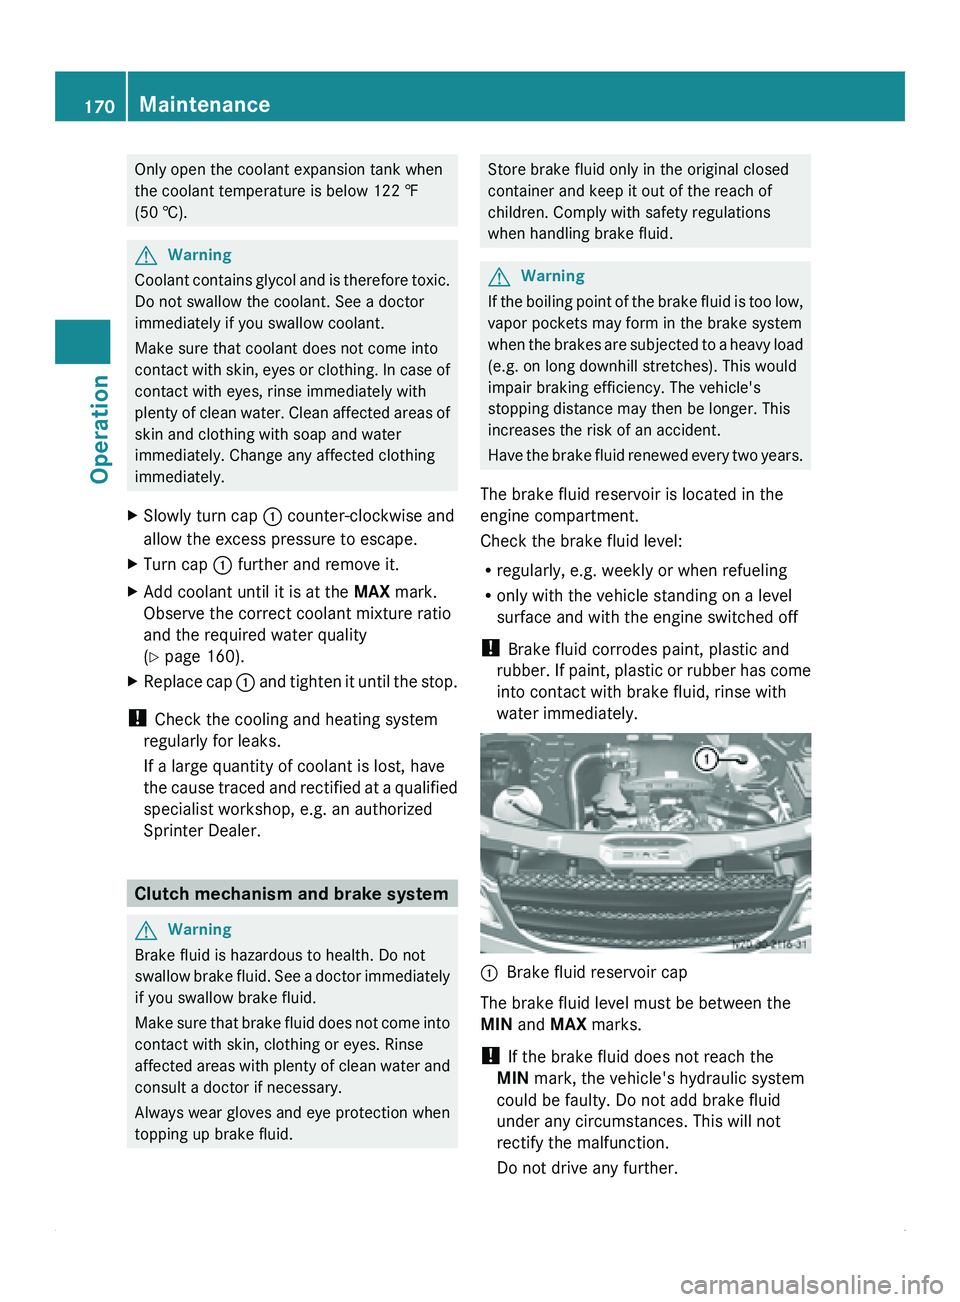
0046
Coolant tank cap (Y page 169)
0047 Diesel Exhaust Fluid (DEF) filler neck
cap 4
(Y page 143)
008A Engine oil filler neck cap (Y page 171)
0088 Brake fluid reservoir cap (Y page 170)
0086 Washer fluid reservoir cap (Y page 171) Coolant level
Only add coolant
with the vehicle standing on
a level surface and with the engine switched
off. The coolant temperature must have
dropped below 122 ‡ (50 †). G
Warning
When opening the coolant expansion tank,
there is a risk of scalding from hot coolant
spraying out. The cooling system and the
coolant expansion tank
are pressurized when
the engine is at normal operating
temperature. Wear gloves and eye protection.
4 Only on Cargo Van/Passenger Van. Maintenance
169
Operation
Z
Page 172 of 292
Only open the coolant expansion tank when
the coolant temperature is below 122 ‡
(50 †).
G
Warning
Coolant contains glycol and is therefore toxic.
Do not swallow the coolant. See a doctor
immediately if you swallow coolant.
Make sure that coolant does not come into
contact with skin,
eyes or clothing. In case of
contact with eyes, rinse immediately with
plenty of clean water. Clean affected areas of
skin and clothing with soap and water
immediately. Change any affected clothing
immediately.
X Slowly turn cap 0046 counter-clockwise and
allow the excess pressure to escape.
X Turn cap 0046 further and remove it.
X Add coolant until it is at the MAX mark.
Observe the correct coolant mixture ratio
and the required water quality
(Y page 160).
X Replace cap 0046 and tighten
it until the stop.
! Check the cooling and heating system
regularly for leaks.
If a large quantity of coolant is lost, have
the cause traced
and rectified at a qualified
specialist workshop, e.g. an authorized
Sprinter Dealer. Clutch mechanism and brake system
G
Warning
Brake fluid is hazardous to health. Do not
swallow brake fluid.
See a doctor immediately
if you swallow brake fluid.
Make sure that brake fluid does not come into
contact with skin, clothing or eyes. Rinse
affected areas with plenty of clean water and
consult a doctor if necessary.
Always wear gloves and eye protection when
topping up brake fluid. Store brake fluid only in the original closed
container and keep it out of the reach of
children. Comply with safety regulations
when handling brake fluid.
G
Warning
If the
boiling point of the brake fluid is too low,
vapor pockets may form in the brake system
when the brakes
are subjected to a heavy load
(e.g. on long downhill stretches). This would
impair braking efficiency. The vehicle's
stopping distance may then be longer. This
increases the risk of an accident.
Have the brake fluid renewed every two years.
The brake fluid reservoir is located in the
engine compartment.
Check the brake fluid level:
R regularly, e.g. weekly or when refueling
R only with the vehicle standing on a level
surface and with the engine switched off
! Brake fluid corrodes paint, plastic and
rubber. If paint, plastic or rubber has come
into contact with brake fluid, rinse with
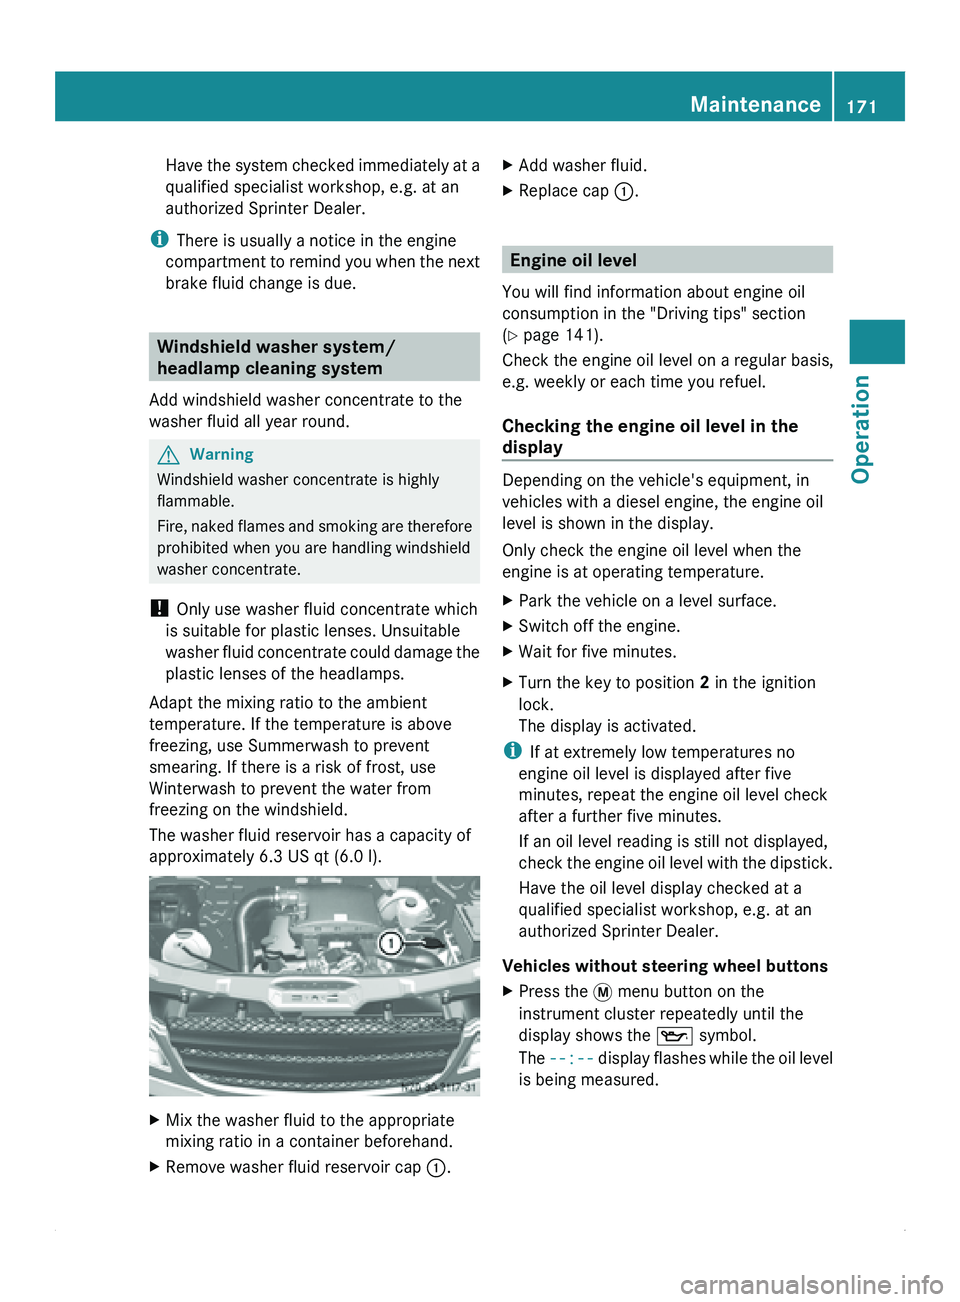
water immediately. 0046
Brake fluid reservoir cap
The brake fluid level must be between the
MIN and
MAX marks.
! If the brake fluid does not reach the
MIN mark, the vehicle's hydraulic system
could be faulty. Do not add brake fluid
under any circumstances. This will not
rectify the malfunction.
Do not drive any further. 170
Maintenance
Operation
Page 173 of 292
Have the system checked immediately at a
qualified specialist workshop, e.g. at an
authorized Sprinter Dealer.
i There is usually a notice in the engine
compartment to remind
you when the next
brake fluid change is due. Windshield washer system/
headlamp cleaning system
Add windshield washer concentrate to the
washer fluid all year round. G
Warning
Windshield washer concentrate is highly
flammable.
Fire, naked flames
and smoking are therefore
prohibited when you are handling windshield
washer concentrate.
! Only use washer fluid concentrate which
is suitable for plastic lenses. Unsuitable
washer fluid concentrate could damage the
plastic lenses of the headlamps.
Adapt the mixing ratio to the ambient
temperature. If the temperature is above
freezing, use Summerwash to prevent
smearing. If there is a risk of frost, use
Winterwash to prevent the water from
freezing on the windshield.
The washer fluid reservoir has a capacity of
approximately 6.3 US qt (6.0 l). X
Mix the washer fluid to the appropriate
mixing ratio in a container beforehand.
X Remove washer fluid reservoir cap 0046.X
Add washer fluid.
X Replace cap 0046. Engine oil level
You will find information about engine oil
consumption in the "Driving tips" section
(Y page 141).
Check the engine oil level on a regular basis,
e.g. weekly or each time you refuel.
Checking the engine oil level in the
display Depending on the vehicle's equipment, in
vehicles with a diesel engine, the engine oil
level is shown in the display.
Only check the engine oil level when the
engine is at operating temperature.
X
Park the vehicle on a level surface.
X Switch off the engine.
X Wait for five minutes.
X Turn the key to position 2 in the ignition
lock.
The display is activated.
i If at extremely low temperatures no
engine oil level is displayed after five
minutes, repeat the engine oil level check
after a further five minutes.
If an oil level reading is still not displayed,
check the engine
oil level with the dipstick.
Have the oil level display checked at a
qualified specialist workshop, e.g. at an
authorized Sprinter Dealer.
Vehicles without steering wheel buttons
X Press the 007B menu button on the
instrument cluster repeatedly until the
display shows the 00B1 symbol.
The --:-- display flashes
while the oil level
is being measured. Maintenance
171
Operation Z
Page 174 of 292
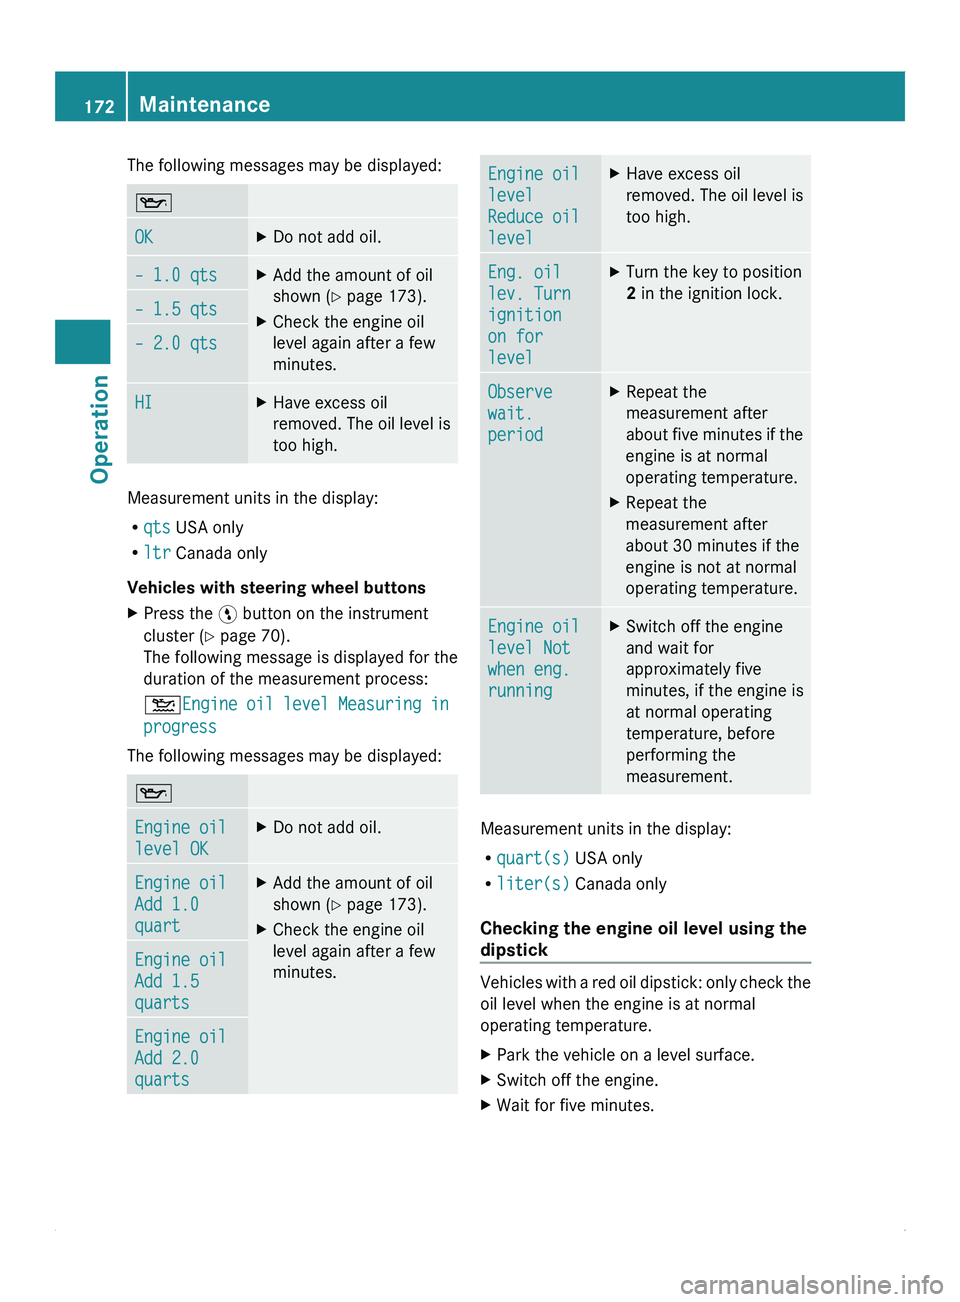
The following messages may be displayed:
00B1
OK X
Do not add oil. – 1.0 qts X
Add the amount of oil
shown (Y page 173).
X Check the engine oil
level again after a few
minutes. – 1.5 qts
– 2.0 qts
HI X
Have excess oil
removed. The oil
level is
too high. Measurement units in the display:
R
qts USA only
R ltr Canada only
Vehicles with steering wheel buttons
X Press the 00A4 button on the instrument
cluster (Y page 70).
The following message is displayed for the
duration of the measurement process:
00B4Engine oil
level
Measuring in
progress
The following messages may be displayed: 00B1
Engine oil
level OK X
Do not add oil. Engine oil
Add 1.0
quart X
Add the amount of oil
shown (Y page 173).
X Check the engine oil
level again after a few
minutes. Engine oil
Add 1.5
quarts
Engine oil
Add 2.0
quarts Engine oil
level
Reduce oil
level X
Have excess oil
removed. The oil
level is
too high. Eng. oil
lev. Turn
ignition
on for
level X
Turn the key to position
2 in the ignition lock. Observe
wait.
period X
Repeat the
measurement after
about five minutes
if the
engine is at normal
operating temperature.
X Repeat the
measurement after
about 30 minutes if the
engine is not at normal
operating temperature. Engine oil
level Not
when eng.
running X
Switch off the engine
and wait for
approximately five
minutes, if the engine is
at normal operating
temperature, before
performing the
measurement. Measurement units in the display:
R
quart(s) USA only
R liter(s) Canada only
Checking the engine oil level using the
dipstick Vehicles with a red oil dipstick: only check the
oil level when the engine is at normal
operating temperature.
X
Park the vehicle on a level surface.
X Switch off the engine.
X Wait for five minutes.172
Maintenance
Operation
Page 175 of 292
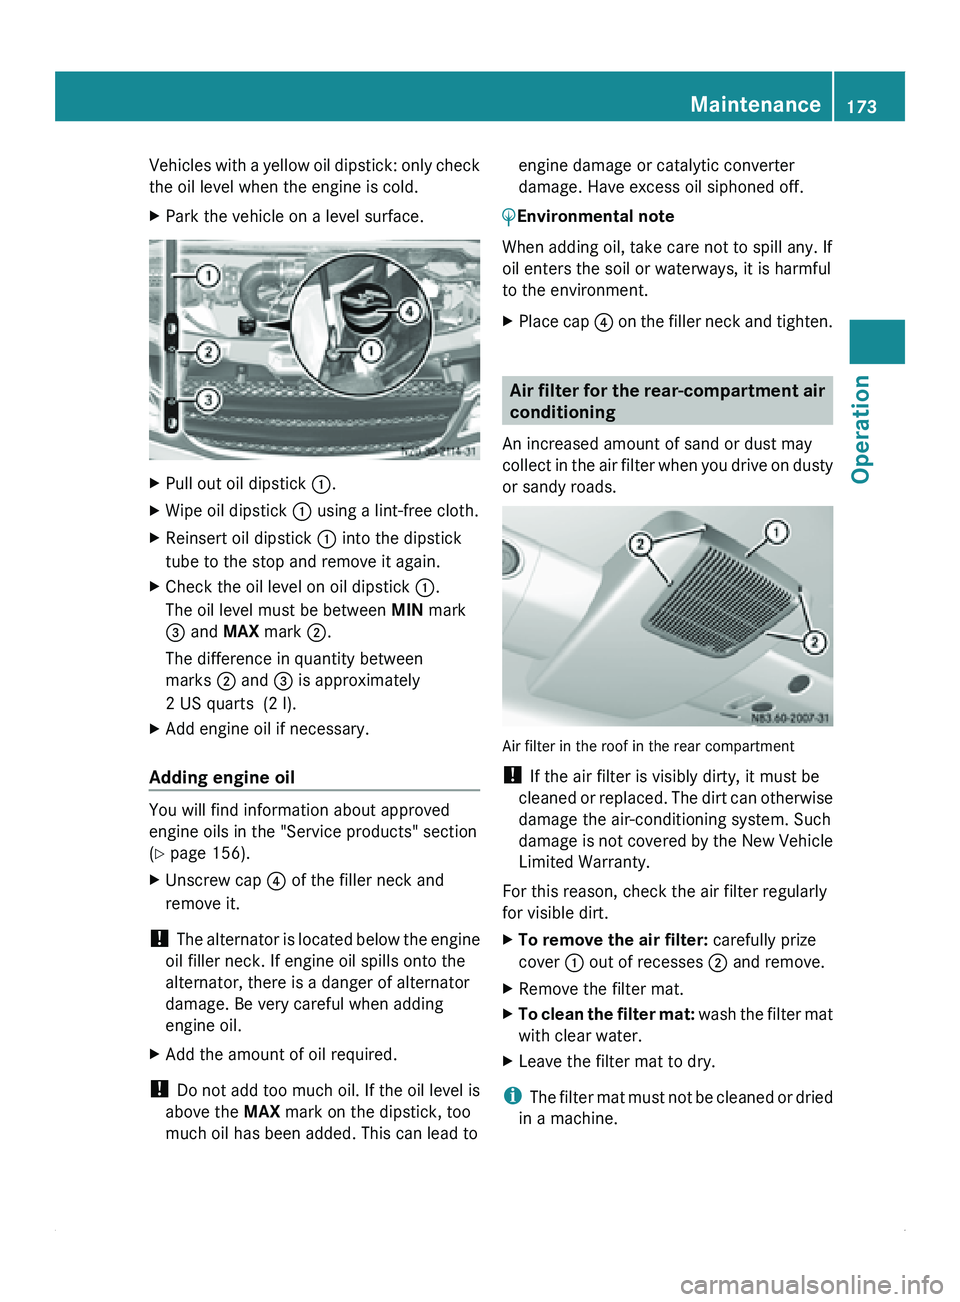
Vehicles with a yellow oil dipstick: only check
the oil level when the engine is cold.
X
Park the vehicle on a level surface. X
Pull out oil dipstick 0046.
X Wipe oil dipstick 0046 using a lint-free cloth.
X Reinsert oil dipstick 0046 into the dipstick
tube to the stop and remove it again.
X Check the oil level on oil dipstick 0046.
The oil level must be between MIN mark
008A and MAX mark 0047.
The difference in quantity between
marks 0047 and 008A is approximately
2 US quarts (2 l).
X Add engine oil if necessary.
Adding engine oil You will find information about approved
engine oils in the "Service products" section
(Y page 156).
X
Unscrew cap 0088 of the filler neck and
remove it.
! The alternator
is
located below the engine
oil filler neck. If engine oil spills onto the
alternator, there is a danger of alternator
damage. Be very careful when adding
engine oil.
X Add the amount of oil required.
! Do not add
too much oil. If the oil level is
above the MAX mark on the dipstick, too
much oil has been added. This can lead to engine damage or catalytic converter
damage. Have excess oil siphoned off.
0040Environmental note
When adding oil, take care not to spill any. If
oil enters the soil or waterways, it is harmful
to the environment.
X Place cap 0088 on the
filler neck and tighten. Air filter for the rear-compartment air
conditioning
An increased amount of sand or dust may
collect in the
air filter when you drive on dusty
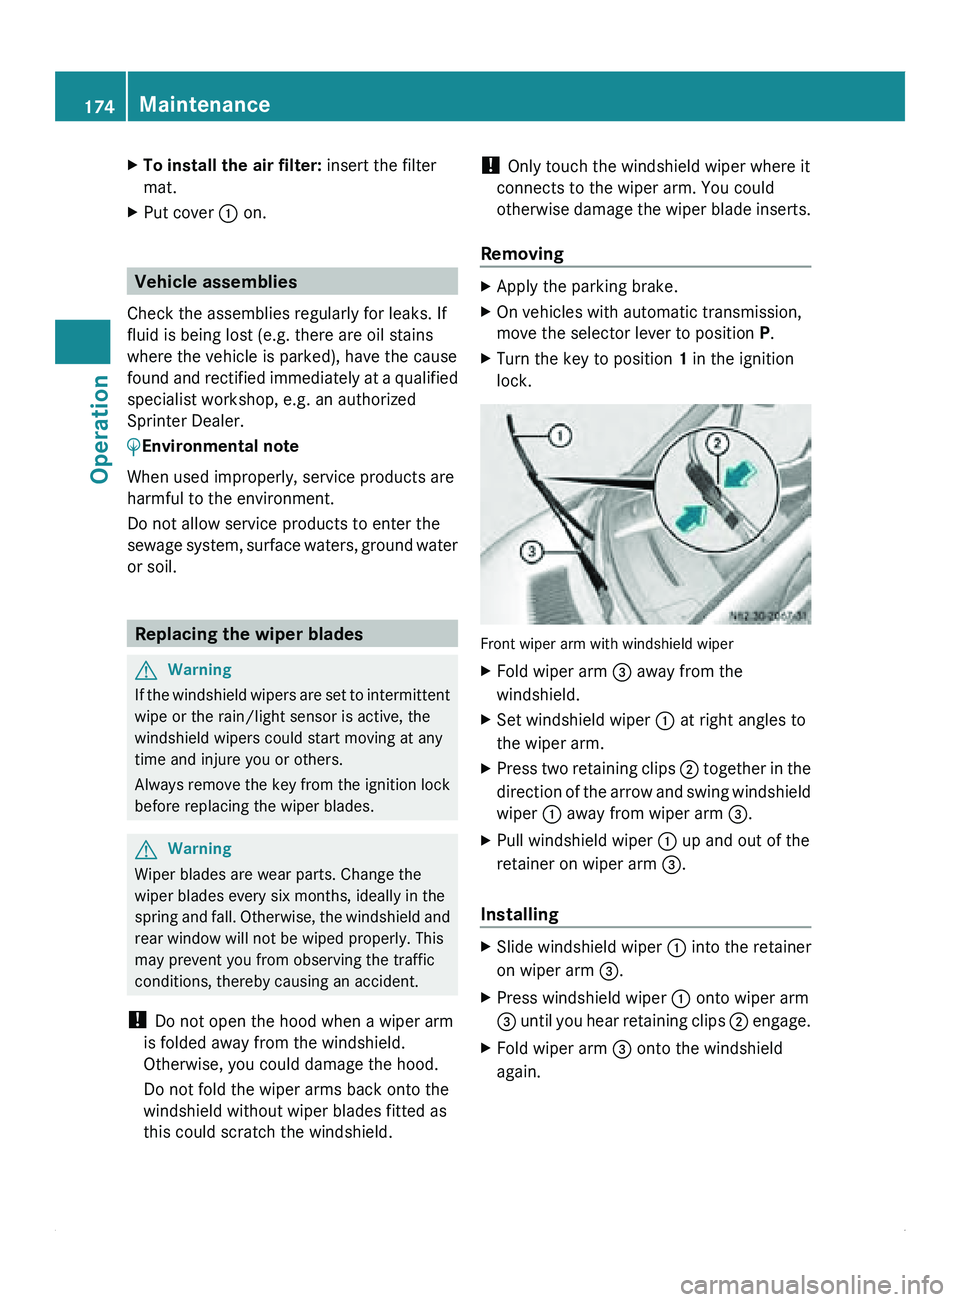
or sandy roads. Air filter in the roof in the rear compartment
!
If the air filter is visibly dirty, it must be
cleaned or replaced.
The dirt can otherwise
damage the air-conditioning system. Such
damage is not covered by the New Vehicle
Limited Warranty.
For this reason, check the air filter regularly
for visible dirt.
X To remove the air filter: carefully prize
cover 0046 out of recesses 0047 and remove.
X Remove the filter mat.
X To clean the filter mat:
wash the
filter mat
with clear water.
X Leave the filter mat to dry.
i The filter mat
must not be cleaned or dried
in a machine. Maintenance
173
Operation Z
Page 176 of 292
X
To install the air filter: insert the filter
mat.
X Put cover 0046 on. Vehicle assemblies
Check the assemblies regularly for leaks. If
fluid is being lost (e.g. there are oil stains
where the vehicle is parked), have the cause
found and rectified
immediately at a qualified
specialist workshop, e.g. an authorized
Sprinter Dealer.
0040Environmental note
When used improperly, service products are
harmful to the environment.
Do not allow service products to enter the
sewage system, surface
waters, ground water
or soil. Replacing the wiper blades
G
Warning
If the windshield wipers are set to intermittent
wipe or the rain/light sensor is active, the
windshield wipers could start moving at any
time and injure you or others.
Always remove the
key from the ignition lock
before replacing the wiper blades. G
Warning
Wiper blades are wear parts. Change the
wiper blades every six months, ideally in the
spring and fall.
Otherwise, the windshield and
rear window will not be wiped properly. This
may prevent you from observing the traffic
conditions, thereby causing an accident.
! Do not open the hood when a wiper arm
is folded away from the windshield.
Otherwise, you could damage the hood.
Do not fold the wiper arms back onto the
windshield without wiper blades fitted as
this could scratch the windshield. !
Only touch the windshield wiper where it
connects to the wiper arm. You could
otherwise damage the
wiper blade inserts.
Removing X
Apply the parking brake.
X On vehicles with automatic transmission,
move the selector lever to position P.
X Turn the key to position 1 in the ignition
lock. Front wiper arm with windshield wiper
X
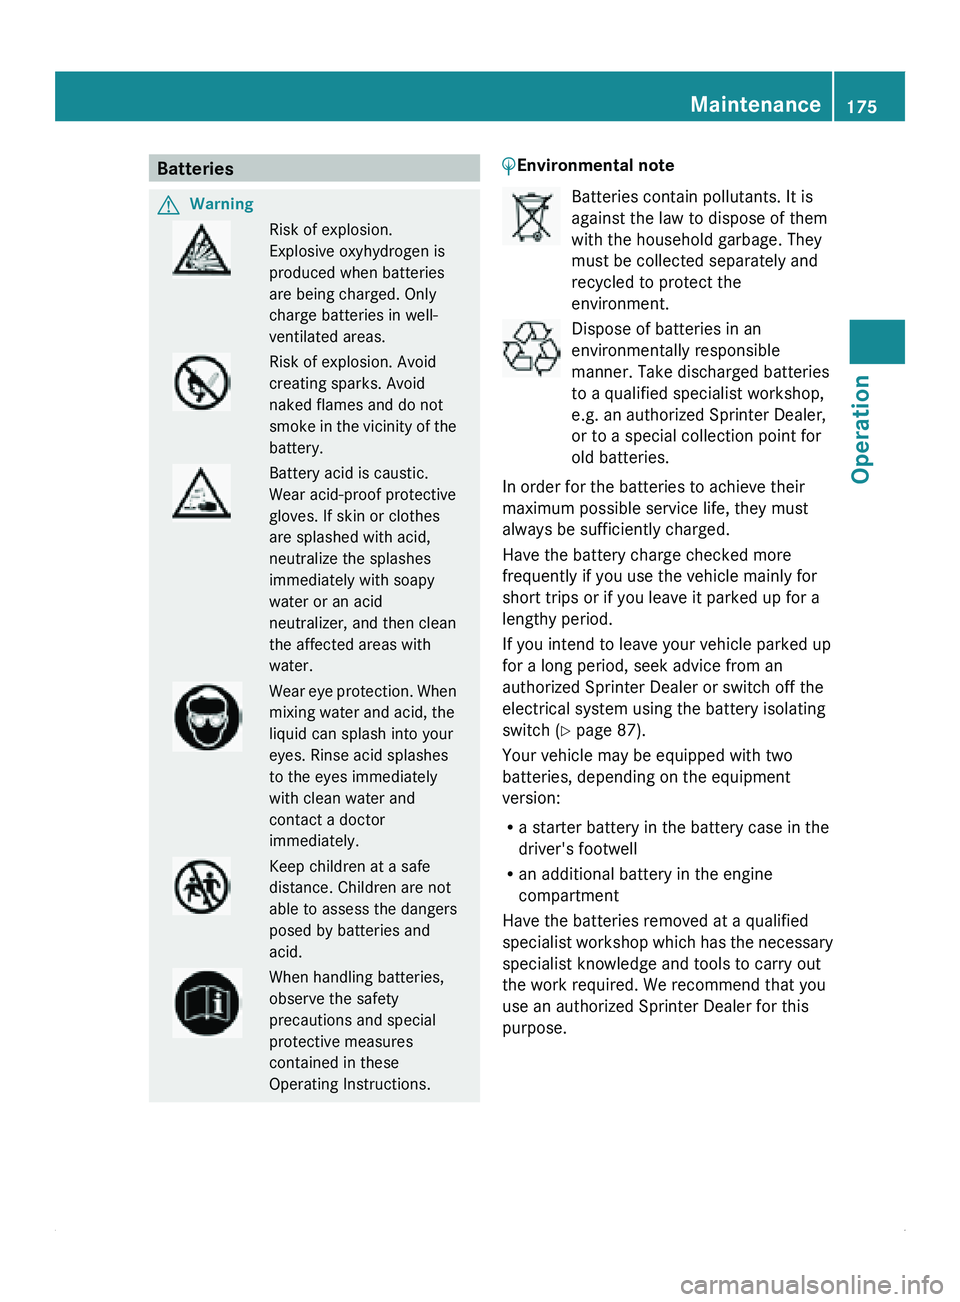
Fold wiper arm 008A away from the
windshield.
X Set windshield wiper 0046 at right angles to
the wiper arm.
X Press two retaining clips 0047 together
in
the
direction of the arrow and swing windshield
wiper 0046 away from wiper arm 008A.
X Pull windshield wiper 0046 up and out of the
retainer on wiper arm 008A.
Installing X
Slide windshield wiper 0046 into the retainer
on wiper arm 008A.
X Press windshield wiper 0046 onto wiper arm
008A until you
hear retaining clips 0047 engage.
X Fold wiper arm 008A onto the windshield
again. 174
Maintenance
Operation
Page 177 of 292
Batteries
G
Warning Risk of explosion.
Explosive oxyhydrogen is
produced when batteries
are being charged. Only
charge batteries in well-
ventilated areas.
Risk of explosion. Avoid
creating sparks. Avoid
naked flames and do not
smoke in
the
vicinity of the
battery. Battery acid is caustic.
Wear acid-proof protective
gloves. If skin or clothes
are splashed with acid,
neutralize the splashes
immediately with soapy
water or an acid
neutralizer, and then clean
the affected areas with
water.
Wear eye
protection. When
mixing water and acid, the
liquid can splash into your
eyes. Rinse acid splashes
to the eyes immediately
with clean water and
contact a doctor
immediately. Keep children at a safe
distance. Children are not
able to assess the dangers
posed by batteries and
acid.
When handling batteries,
observe the safety
precautions and special
protective measures
contained in these
Operating Instructions. 0040Environmental note Batteries contain pollutants. It is
against the law to dispose of them
with the household garbage. They
must be collected separately and
recycled to protect the
environment.
Dispose of batteries in an
environmentally responsible
manner. Take discharged batteries
to a qualified specialist workshop,
e.g. an authorized Sprinter Dealer,
or to a special collection point for
old batteries.
In order for the batteries to achieve their
maximum possible service life, they must
always be sufficiently charged.
Have the battery charge checked more
frequently if you use the vehicle mainly for
short trips or if you leave it parked up for a
lengthy period.
If you intend to leave your vehicle parked up
for a long period, seek advice from an
authorized Sprinter Dealer or switch off the
electrical system using the battery isolating
switch (Y page 87).
Your vehicle may be equipped with two
batteries, depending on the equipment
version:
R a starter battery in the battery case in the
driver's footwell
R an additional battery in the engine
compartment
Have the batteries removed at a qualified
specialist workshop which
has the necessary
specialist knowledge and tools to carry out
the work required. We recommend that you
use an authorized Sprinter Dealer for this
purpose. Maintenance
175Operation Z
Page 178 of 292
Disconnecting the battery
G
Warning
There is a risk of a short circuit if the positive
terminal of the
connected battery comes into
contact with any part of the vehicle. This could
cause the flammable gas mix to ignite. You
and others could be seriously injured.
R Do not place any metal objects or tools on
the batteries.
R When disconnecting the batteries, always
disconnect the negative terminal clamp
before the positive terminal clamp.
R When connecting the batteries, always
connect the positive terminal clamp before
the negative terminal clamp.
R Do not disconnect or connect the batteries
when the engine is running.
! Switch off the engine and remove the key
from the ignition lock before you loosen or
disconnect the terminal clamps. You may
otherwise destroy electronic components
such as the alternator.
Always disconnect the starter battery in the
battery case in the driver's footwell first.
! Always disconnect the battery in
the order described below. Never swap the
terminal clamps. You may otherwise
damage the vehicle electronics.
X Switch off all electrical consumers.
Disconnecting the starter battery
The starter battery is located in the battery
case in the driver's footwell. Removing/installing the floor covering in
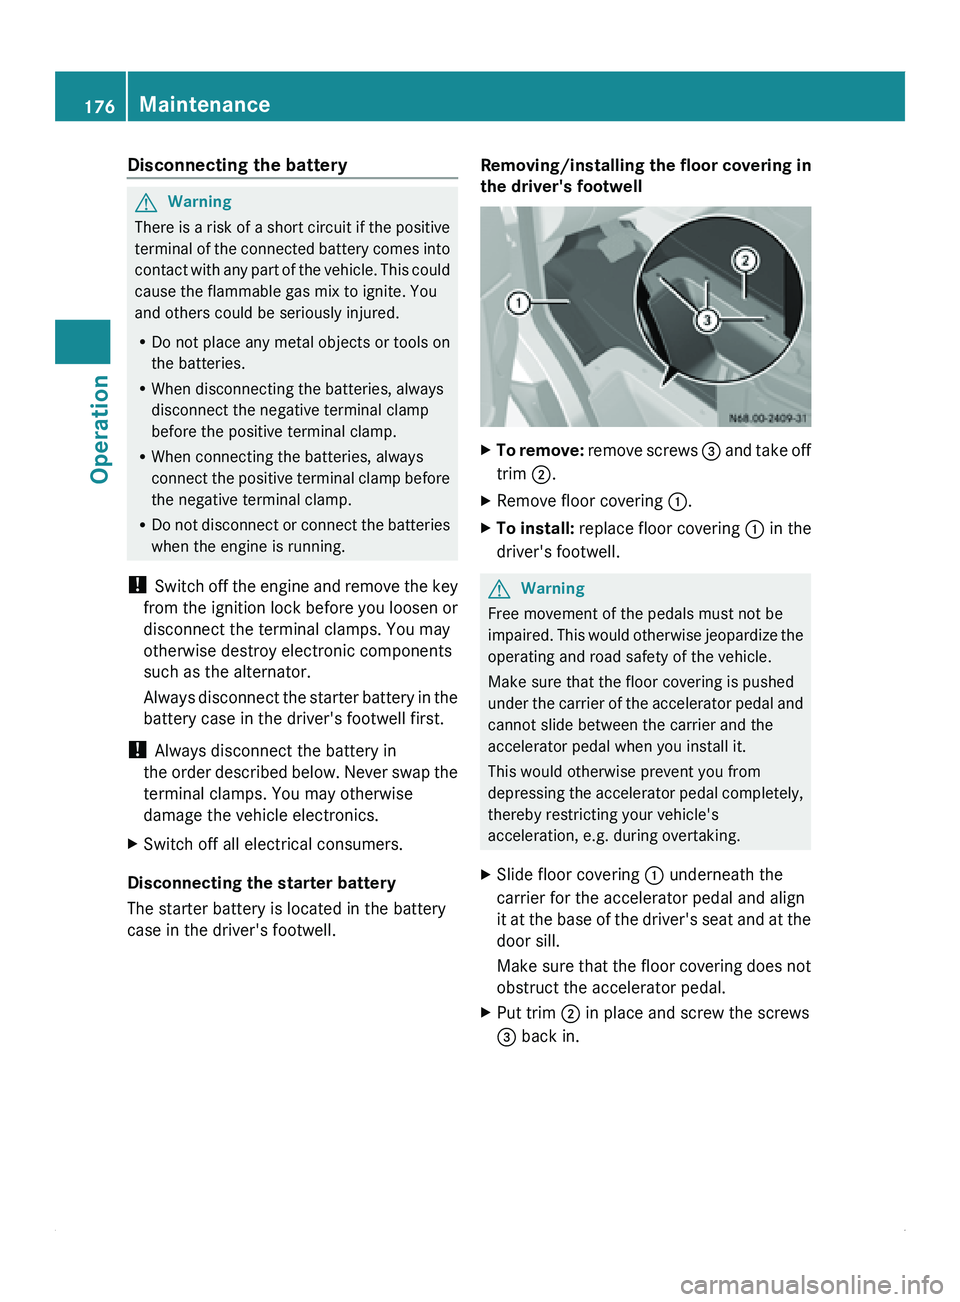
the driver's footwell X
To remove: remove screws 008A
and take off
trim 0047.
X Remove floor covering 0046.
X To install: replace floor covering
0046 in the
driver's footwell. G
Warning
Free movement of the pedals must not be
impaired. This would
otherwise jeopardize the
operating and road safety of the vehicle.
Make sure that the floor covering is pushed
under the carrier of the accelerator pedal and
cannot slide between the carrier and the
accelerator pedal when you install it.
This would otherwise prevent you from
depressing the accelerator pedal completely,
thereby restricting your vehicle's
acceleration, e.g. during overtaking.
X Slide floor covering 0046 underneath the
carrier for the accelerator pedal and align
it at the
base of the driver's seat and at the
door sill.
Make sure that the floor covering does not
obstruct the accelerator pedal.
X Put trim 0047 in place and screw the screws
008A back in.176
Maintenance
Operation
Page 179 of 292
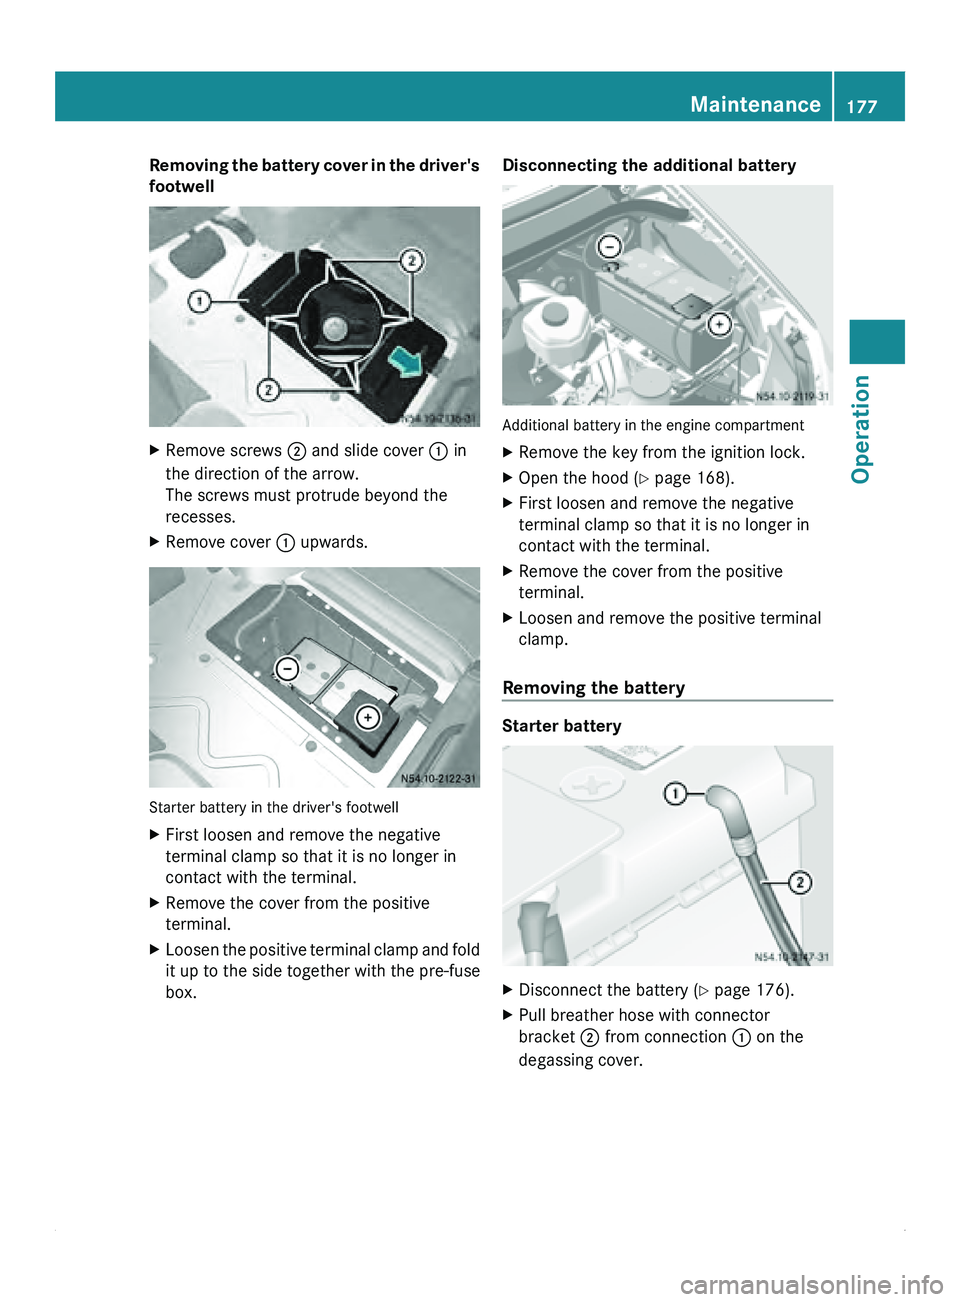
Removing the battery cover in the driver's
footwell
X
Remove screws 0047 and slide cover 0046 in
the direction of the arrow.
The screws must protrude beyond the
recesses.
X Remove cover 0046 upwards. Starter battery in the driver's footwell
X
First loosen and remove the negative
terminal clamp so that it is no longer in
contact with the terminal.
X Remove the cover from the positive
terminal.
X Loosen the positive terminal clamp and fold
it up to the side together with the pre-fuse
box. Disconnecting the additional battery
Additional battery in the engine compartment
X
Remove the key from the ignition lock.
X Open the hood (Y page 168).
X First loosen and remove the negative
terminal clamp so that it is no longer in
contact with the terminal.
X Remove the cover from the positive
terminal.
X Loosen and remove the positive terminal
clamp.
Removing the battery Starter battery
X
Disconnect the battery ( Y page 176).
X Pull breather hose with connector
bracket 0047 from connection 0046 on the
degassing cover. Maintenance
177Operation Z
Page 180 of 292
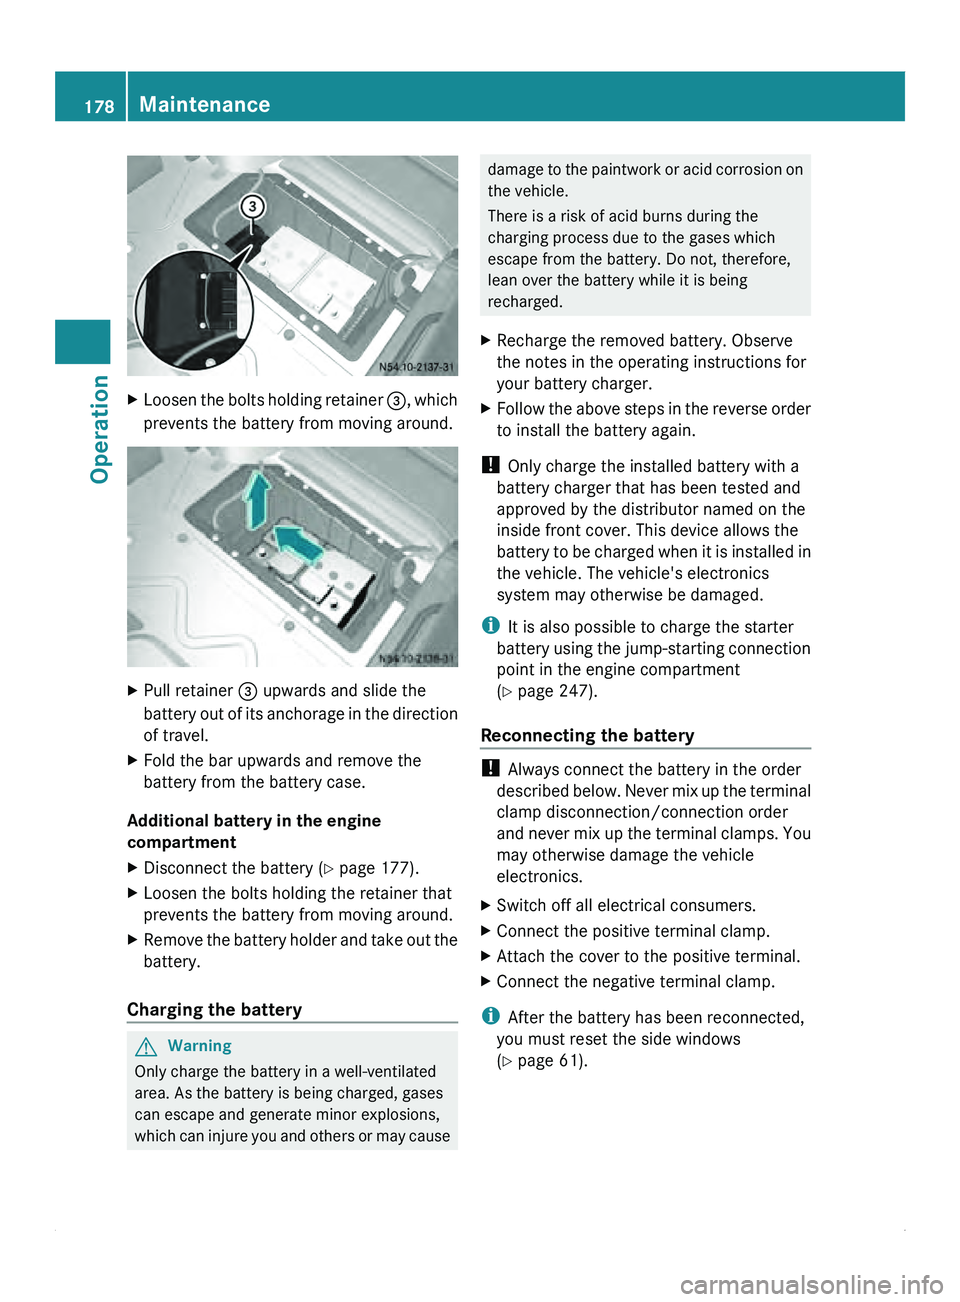
X
Loosen the bolts holding retainer 008A, which
prevents the battery from moving around. X
Pull retainer 008A upwards and slide the
battery out of
its anchorage in the direction
of travel.
X Fold the bar upwards and remove the
battery from the battery case.
Additional battery in the engine
compartment
X Disconnect the battery ( Y page 177).
X Loosen the bolts holding the retainer that
prevents the battery from moving around.
X Remove the battery holder and take out the
battery.
Charging the battery G
Warning
Only charge the battery in a well-ventilated
area. As the battery is being charged, gases
can escape and generate minor explosions,
which can injure
you and others or may cause damage to the paintwork or acid corrosion on
the vehicle.
There is a risk of acid burns during the
charging process due to the gases which
escape from the battery. Do not, therefore,
lean over the battery while it is being
recharged.
X Recharge the removed battery. Observe
the notes in the operating instructions for
your battery charger.
X Follow the above steps in the reverse order
to install the battery again.
! Only charge the installed battery with a
battery charger that has been tested and
approved by the distributor named on the
inside front cover. This device allows the
battery to be
charged when it is installed in
the vehicle. The vehicle's electronics
system may otherwise be damaged.
i It is also possible to charge the starter
battery using the jump-starting connection
point in the engine compartment
(Y page 247).
Reconnecting the battery !
Always connect the battery in the order
described below. Never
mix up the terminal
clamp disconnection/connection order
and never mix up the terminal clamps. You
may otherwise damage the vehicle
electronics.
X Switch off all electrical consumers.
X Connect the positive terminal clamp.
X Attach the cover to the positive terminal.
X Connect the negative terminal clamp.
i After the battery has been reconnected,
you must reset the side windows
(Y page 61). 178
Maintenance
Operation