MERCEDES-BENZ SPRINTER 2011 MY11 Operator’s Manual
Manufacturer: MERCEDES-BENZ, Model Year: 2011, Model line: SPRINTER, Model: MERCEDES-BENZ SPRINTER 2011Pages: 292, PDF Size: 6.75 MB
Page 251 of 292
You could otherwise become locked out
when pushing or towing the vehicle.
! Do not exceed the towing speed of
31 mph (50 km/h). You could otherwise
damage the transmission.
X Turn the key to position 2
in the ignition
lock.
X For a towing distance of up to 30 miles
(50 km), move the selector lever to
position N. G
Warning
A propeller shaft could fall off as it is being
removed and injure
you. Secure the propeller
shaft before removal to prevent it from falling
down, e.g. with the aid of another person or
by tying the propeller shaft up.
X For a towing distance greater than
30 miles(50 km), remove the propeller
shafts to the driven axles.
! Always use new bolts when installing the
propeller shafts.
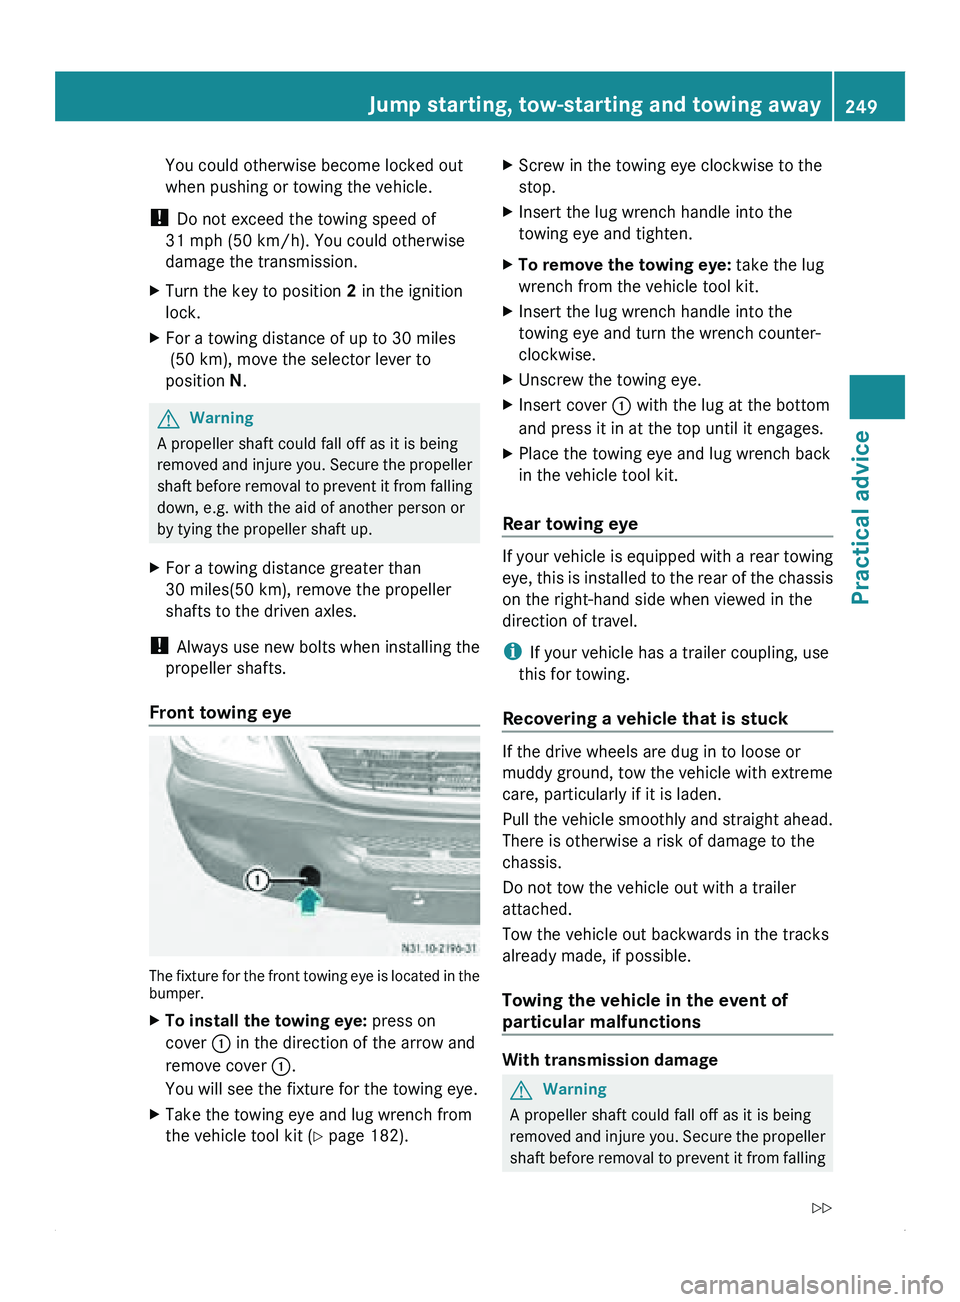
Front towing eye The fixture for the front towing eye is located in the
bumper.
X
To install the towing eye: press on
cover 0046 in the direction of the arrow and
remove cover 0046.
You will see the fixture for the towing eye.
X Take the towing eye and lug wrench from
the vehicle tool kit (Y page 182). X
Screw in the towing eye clockwise to the
stop.
X Insert the lug wrench handle into the
towing eye and tighten.
X To remove the towing eye: take the lug
wrench from the vehicle tool kit.
X Insert the lug wrench handle into the
towing eye and turn the wrench counter-
clockwise.
X Unscrew the towing eye.
X Insert cover 0046 with the lug at the bottom
and press it in at the top until it engages.
X Place the towing eye and lug wrench back
in the vehicle tool kit.
Rear towing eye If your vehicle is equipped with a rear towing
eye, this
is
installed to the rear of the chassis
on the right-hand side when viewed in the
direction of travel.
i If your vehicle has a trailer coupling, use
this for towing.
Recovering a vehicle that is stuck If the drive wheels are dug in to loose or
muddy ground, tow the vehicle with extreme
care, particularly if it is laden.
Pull the
vehicle
smoothly and straight ahead.
There is otherwise a risk of damage to the
chassis.
Do not tow the vehicle out with a trailer
attached.
Tow the vehicle out backwards in the tracks
already made, if possible.
Towing the vehicle in the event of
particular malfunctions With transmission damage
G
Warning
A propeller shaft could fall off as it is being
removed and injure
you. Secure the propeller
shaft before removal to prevent it from falling Jump starting, tow-starting and towing away
249
Practical advice
Z
Page 252 of 292
down, e.g. with the aid of another person or
by tying the propeller shaft up.
X Always remove the propeller shafts leading
to the driven axles.
! Always use new bolts when installing the
propeller shafts.
With front axle damage
X Turn the key to position 1 in the ignition
lock.
X Raise the front axle. G
Warning
A propeller shaft could fall off as it is being
removed and injure
you. Secure the propeller
shaft before removal to prevent it from falling
down, e.g. with the aid of another person or
by tying the propeller shaft up.
! The ignition must be switched off if the
vehicle is being towed with the front or rear
axle raised. Otherwise, ESP ®
may intervene
and damage the brake system.
With rear axle damage
X Turn the key to position 1 in the ignition
lock.
X Raise the rear axle.
Malfunction in the electrical system
If the battery is defective, the automatic
transmission will be locked in position P. To
shift the automatic transmission to
position N, you must provide power to the
vehicle's electrical system in the same way
as jump-starting ( Y page 247).
Have the vehicle
transported on a transporter
or trailer.
Transporting the vehicle The towing
eye can be used to pull the vehicle
onto a special transporter or trailer for
transportation.
! Only lash the
vehicle down by the wheels
or rims, not by vehicle parts such as axle or steering components. There is otherwise a
risk of damage to the vehicle.
X Move the selector lever of the automatic
transmission to position N.250
Jump starting, tow-starting and towing away
Practical advice
Page 253 of 292
Vehicle equipment ............................
252
Important safety notes ....................252
Operation ........................................... 253
Operation in winter ...........................254
Tire pressure ..................................... 255
Loading the vehicle ..........................261
Maximum tire load ............................265
Tire labeling ....................................... 266
Definition for tires and loading ........268
Changing wheels ............................... 271 251Wheels and tires
Page 254 of 292
Vehicle equipment
i Diese Betriebsanleitung beschreibt alle
Modelle, Serien- und
Sonderausstattungen
Ihres Fahrzeugs, die zum Zeitpunkt des
Redaktionsschlusses dieser
Betriebsanleitung erhältlich waren.
Länderspezifische Abweichungen sind
möglich. Beachten Sie, dass Ihr Fahrzeug
nicht mit allen beschriebenen Funktionen
ausgestattet sein könnte. Dies betrifft auch
sicherheitsrelevante Systeme und
Funktionen. Important safety notes
Contact an authorized Sprinter Dealer if you
require information on tested and
recommended tires and wheels for summer
and winter driving.
Advice on purchasing and
caring for tires is also available there. G
Warning
Replace rims or tires with the same
designation, manufacturer and
type as shown
on the original part. For further information,
contact an authorized Sprinter Dealer. If
incorrectly sized rims and tires are mounted,
the wheel brakes or suspension components
can be damaged. Also, the operating
clearance of the wheels and the tires may no
longer be correct. G
Warning!
Worn, old
tires can cause accidents. If the tire
tread is worn to minimum tread depth, or if
the tires have sustained damage, replace
them.
When replacing rims, only use genuine
Sprinter wheel bolts specified for the
particular rim type.
Failure to do so can result
in the bolts loosening and possibly an
accident.
Retreaded tires are not tested or
recommended by the dealer named on the
inside cover page, since previous damage cannot always
be recognized on retreads. The
operating safety of the vehicle cannot be
assured when such tires are used. G
Warning!
Only for vehicles without a tire pressure
monitor:
For safety reasons, we recommend that you
only use tire valves manufactured by
Schrader. These have been tested for use on
your vehicle.
Use only tire valves of type:
R TR 600 for the vehicle types 2500
R TR 418 for the vehicle types 3500
Using other tire inflation valves or valves
made by other manufacturers can result in
tire pressure loss and thereby impair the
operating safety of the vehicle.
! Do not screw additional weights (check
valves, etc.) onto the tire valves. The
electronic components could thus be
damaged. G
Warning
If you feel a sudden significant vibration or
ride disturbance, or
you suspect that possible
damage to your vehicle has occurred, you
should turn on the hazard warning lamps,
carefully slow down, and drive with caution to
an area which is a safe distance from the road.
Inspect the tires and the vehicle underbody
for possible damage. If the vehicle appears
unsafe, have the vehicle towed to the nearest
authorized Sprinter Dealer for repairs. G
Warning
Do not drive with a flat tire. A flat tire affects
the ability to steer or brake the vehicle. You
might lose control of the vehicle. Continued
driving with a
flat tire or driving at high speed
with a flat tire will cause excessive heat build-
up and possibly a fire. 252
Important safety notes
Wheels and tires
Page 255 of 292
Operation
Notes on driving
R If the vehicle
is heavily laden, check the tire
pressures, and correct them, if necessary.
R When parking your vehicle, make sure that
the tires do not get deformed by the curb
or other obstacles. If it is necessary to drive
over curbs, speed humps or similar
elevations, try to do so slowly and at an
obtuse angle. Otherwise, the tires,
particularly the sidewalls, can get
damaged. Notes on regularly inspecting wheels
and tires
G
Warning
Regularly check the tires for damage.
Damaged tires can cause tire inflation
pressure loss. As a result, you could lose
control of your vehicle.
Worn, old tires
can cause accidents. If the tire
tread is worn to minimum tread depth, or if
the tires have sustained damage, replace
them.
R Regularly check the wheels and tires of
your vehicle for damage (e.g. cuts,
punctures, tears, bulges on tires and
deformation or severe corrosion on
wheels), at least once a month, as well as
after driving off-road or on rough roads.
Damaged wheels can cause a loss of tire
pressure.
R Regularly check the tire tread depth and
the condition of the tread across the whole
width of the tire (Y page 253). If necessary,
turn the front wheels to full lock in order to
inspect the inner side of the tire surface.
R All wheels must have a valve cap to protect
the valve against dirt and moisture. Do not
install anything onto the valve (such as tire
pressure monitoring systems) other than the standard valve cap or other valve caps
approved for your vehicle.
R Regularly check the
pressure of all the tires
including the spare wheel, particularly prior
to long trips, and correct the pressure
(Y page 255). Tire tread
G
Warning
Although the
applicable federal motor vehicle
safety laws consider a tire to be worn when
the tread wear indicators (TWI) become
visible at approximately 1
/ 16 in (1.6 mm), we
recommend that you do not allow your tires
to wear down to that level. As tread depth
approaches 1
/ 8 in (3 mm), the adhesion
properties on a
wet road are sharply reduced.
Depending upon the weather and/or road
surface (conditions), the tire traction varies
widely.
Replace tires before they become excessively
worn, as the tire traction on wet road surfaces
decreases significantly when the tread depth
is less than ⅛ in (3 mm).
Tread wear indicators (TWIs) are required by
law. Six indicators are positioned over the tire
tread. They are visible once the tread depth
is approximately 1
/ 16 in (1.6 mm). If this is the
case, the tire is so worn that it must be
replaced.
The recommended tread depth for summer
tires is at least ⅛ in (3 mm). The
recommended tread depth for winter tires is
at least 1/6
in (4 mm). Operation
253
Wheels and tires Z
Page 256 of 292
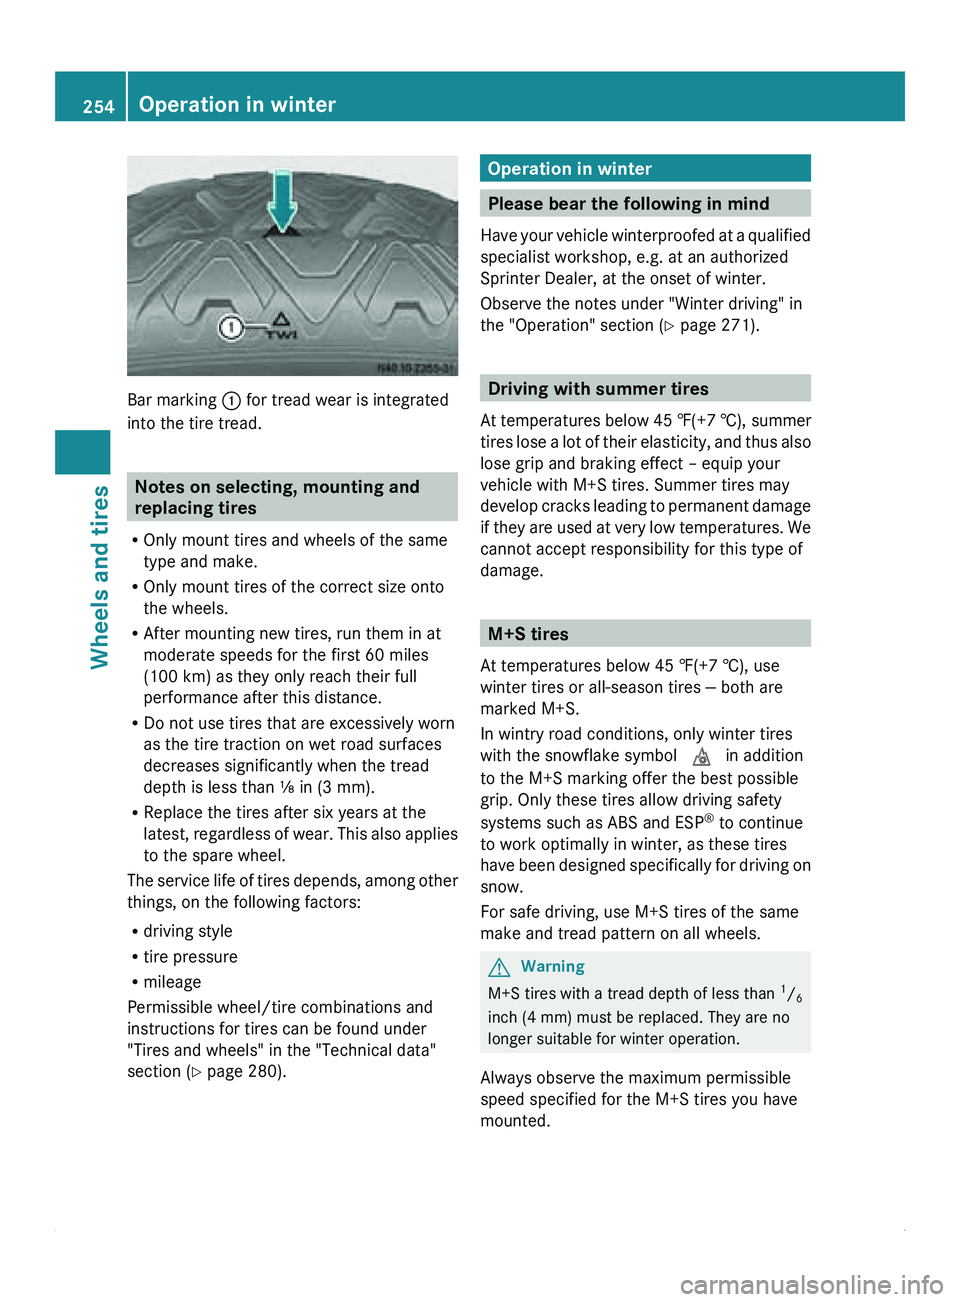
Bar marking 0046 for tread wear is integrated
into the tire tread.
Notes on selecting, mounting and
replacing tires
R Only mount tires and wheels of the same
type and make.
R Only mount tires of the correct size onto
the wheels.
R After mounting new tires, run them in at
moderate speeds for the first 60 miles
(100 km) as they only reach their full
performance after this distance.
R Do not use tires that are excessively worn
as the tire traction on wet road surfaces
decreases significantly when the tread
depth is less than ⅛ in (3 mm).
R Replace the tires after six years at the
latest, regardless of
wear. This also applies
to the spare wheel.
The service life of tires depends, among other
things, on the following factors:
R driving style
R tire pressure
R mileage
Permissible wheel/tire combinations and
instructions for tires can be found under
"Tires and wheels" in the "Technical data"
section ( Y page 280). Operation in winter
Please bear the following in mind
Have your vehicle
winterproofed at a qualified
specialist workshop, e.g. at an authorized
Sprinter Dealer, at the onset of winter.
Observe the notes under "Winter driving" in
the "Operation" section (Y page 271). Driving with summer tires
At temperatures below
45 ‡(+7 †), summer
tires lose a lot of their elasticity, and thus also
lose grip and braking effect – equip your
vehicle with M+S tires. Summer tires may
develop cracks leading to permanent damage
if they are used at very low temperatures. We
cannot accept responsibility for this type of
damage. M+S tires
At temperatures below 45 ‡(+7 †), use
winter tires or all-season tires — both are
marked M+S.
In wintry road conditions, only winter tires
with the snowflake symbol 004D in addition
to the M+S marking offer the best possible
grip. Only these tires allow driving safety
systems such as ABS and ESP ®
to continue
to work optimally in winter, as these tires
have been
designed specifically for driving on
snow.
For safe driving, use M+S tires of the same
make and tread pattern on all wheels. G
Warning
M+S tires with a tread depth of less than 1
/ 6
inch (4 mm) must be replaced. They are no
longer suitable for winter operation.
Always observe the maximum permissible
speed specified for the M+S tires you have
mounted. 254
Operation in winter
Wheels and tires
Page 257 of 292
When you have mounted M+S tires:
X
Check the tire pressure (Y page 255).
X Restart the tire pressure monitor
(Y page 258). G
Warning
If you use your spare wheel when M+S tires
are fitted on the other wheels, be aware that
the difference in
tire characteristics may very
well impair turning stability and that overall
driving stability may be reduced. Adapt your
driving style accordingly.
Have the spare wheel replaced by a regular
road wheel with an M+S tire at the nearest
authorized Sprinter Dealer. Snow chains
Snow chains increase traction on roads in
wintry conditions.
We recommend, for safety reasons, that you
only use class
U snow chains or traction aids
that conform to the SAE type U specification
and are approved for Sprinters. You can
obtain information about snow chains from
any authorized Sprinter Dealer.
R Only use snow chains when the road is
covered by a layer of snow. Do not exceed
the maximum permissible speed of 30 mph
(50 km/h). Remove the snow chains as
soon as possible once the road is no longer
covered with snow.
R The use of snow chains may be restricted
by local regulations. Observe the relevant
regulations when mounting snow chains.
! Check the snow chains for damage before
mounting them. Damaged or worn snow
chains may break, causing damage to
wheels, wheel arches or wheel suspension.
For this reason, you must use only snow
chains that are free of defects. Observe the
manufacturer's mounting instructions. If you intend to mount snow chains, please
bear the following points in mind:
R
You may not mount snow chains on all
wheel/tire combinations. When mounting
the snow chains, note the permissible tire
and snow chain dimensions.
R Mount snow chains only in pairs and only
to the rear wheels. Observe the
manufacturer's mounting instructions.
R Check the chain tension after driving
approximately 0.5 miles (1.0 km) .
i You can deactivate ASR when pulling
away with snow chains mounted.
(
Y page 49). This allows the wheels to spin
in a controlled manner, generating more
tractive force (friction effect). Tire pressure
Notes about tire pressure
G
Warning
Follow recommended tire inflation pressures.
Do not underinflate tires. Underinflated tires
wear excessively and/or unevenly, adversely
affect handling and fuel economy, and are
more likely to fail from being overheated.
Do not overinflate
tires. Overinflated tires can
adversely affect handling and ride comfort,
wear unevenly, increase stopping distance,
and result in sudden deflation (blowout)
because they are more likely to become
punctured or damaged by road debris,
potholes etc.
Do not overload the tires by exceeding the
specified load limit as indicated on the Tire
and Loading Information placard on the
driver's door B-pillar. Overloading the tires
can overheat them, possibly causing a
blowout. Overloading the tires can also result
in handling or steering problems, or brake
failure. Tire pressure
255Wheels and tires Z
Page 258 of 292
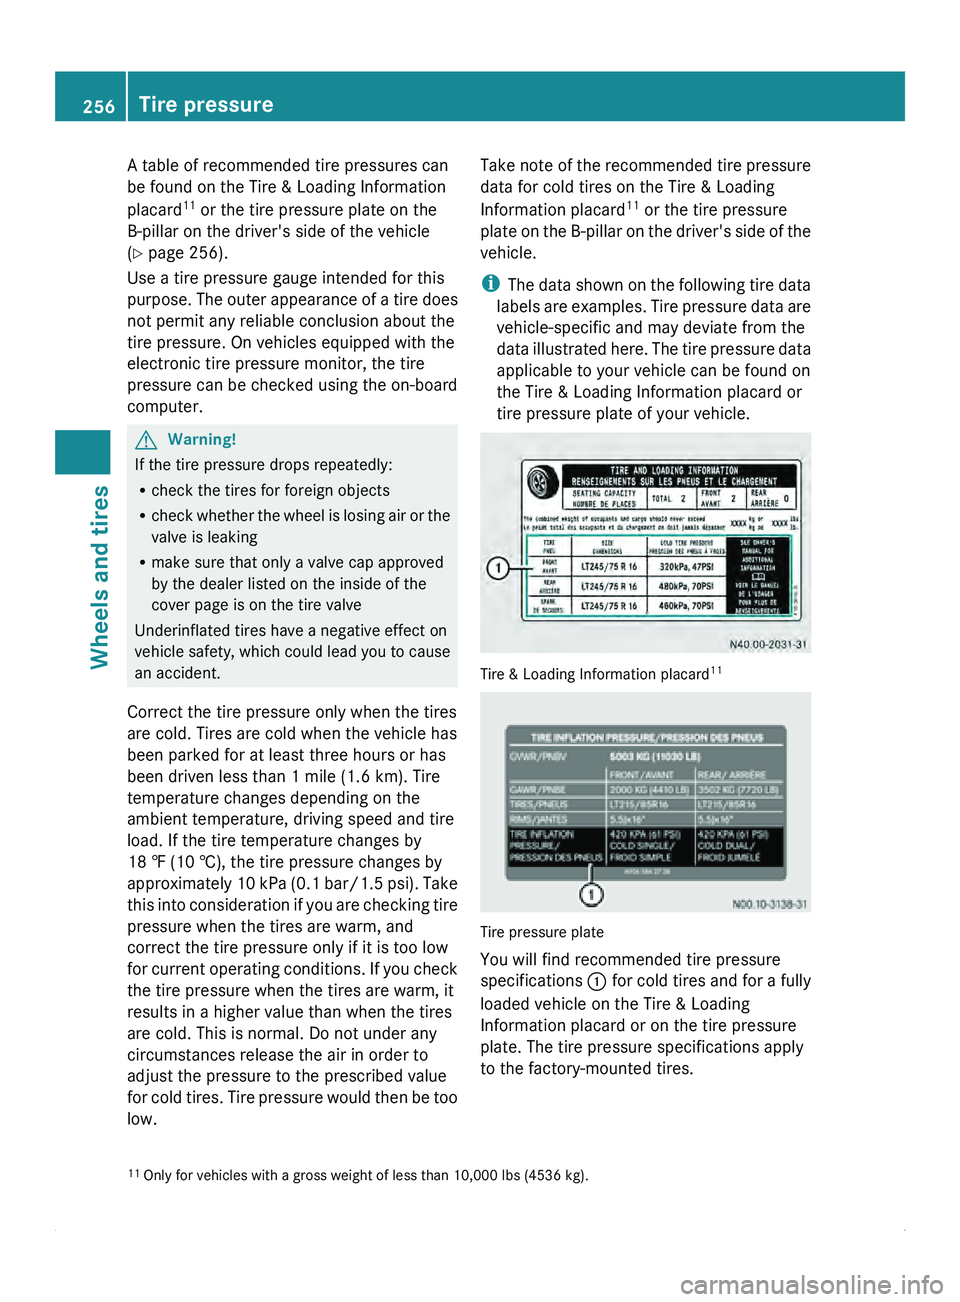
A table of recommended tire pressures can
be found on the Tire & Loading Information
placard
11
or the tire pressure plate on the
B-pillar on the driver's side of the vehicle
(Y page 256).
Use a tire pressure gauge intended for this
purpose. The outer
appearance of a tire does
not permit any reliable conclusion about the
tire pressure. On vehicles equipped with the
electronic tire pressure monitor, the tire
pressure can be checked using the on-board
computer. G
Warning!
If the tire pressure drops repeatedly:
R check the tires for foreign objects
R check whether the
wheel is losing air or the
valve is leaking
R make sure that only a valve cap approved
by the dealer listed on the inside of the
cover page is on the tire valve
Underinflated tires have a negative effect on
vehicle safety, which could lead you to cause
an accident.
Correct the tire pressure only when the tires
are cold. Tires are cold when the vehicle has
been parked for at least three hours or has
been driven less than 1 mile (1.6 km). Tire
temperature changes depending on the
ambient temperature, driving speed and tire
load. If the tire temperature changes by
18 ‡ (10 †), the tire pressure changes by
approximately 10 kPa (0.1 bar/1.5 psi). Take
this into consideration if you are checking tire
pressure when the tires are warm, and
correct the tire pressure only if it is too low
for current operating conditions. If you check
the tire pressure when the tires are warm, it
results in a higher value than when the tires
are cold. This is normal. Do not under any
circumstances release the air in order to
adjust the pressure to the prescribed value
for cold tires. Tire pressure would then be too
low. Take note of the recommended tire pressure
data for cold tires on the Tire & Loading
Information placard
11
or the tire pressure
plate on the
B-pillar on the driver's side of the
vehicle.
i The data shown on the following tire data
labels are examples. Tire pressure data are
vehicle-specific and may deviate from the
data illustrated here. The tire pressure data
applicable to your vehicle can be found on
the Tire & Loading Information placard or
tire pressure plate of your vehicle. Tire & Loading Information placard
11 Tire pressure plate
You will find recommended tire pressure
specifications
0046 for cold
tires and for a fully
loaded vehicle on the Tire & Loading
Information placard or on the tire pressure
plate. The tire pressure specifications apply
to the factory-mounted tires.
11 Only for vehicles with a gross weight of less than 10,000 lbs (4536 kg).256
Tire pressure
Wheels and tires
Page 259 of 292
Tire pressure too low or too high
Underinflated tires G
Warning
Follow recommended tire inflation pressures.
Do not underinflate tires. Underinflated tires
wear excessively and/or unevenly, adversely
affect handling and fuel economy, and are
more likely to fail from being overheated.
Underinflated tires can:
R wear excessively and/or unevenly
R adversely affect fuel economy
R fail from being overheated
R adversely affect handling
Overinflated tires G
Warning
Follow recommended tire inflation pressures.
Do not overinflate
tires. Overinflated tires can
adversely affect handling and ride comfort,
wear unevenly, increase stopping distance,
and result in sudden deflation (blowout)
because they are more likely to become
punctured or damaged by road debris,
potholes etc.
Overinflated tires can:
R adversely affect handling
R wear excessively and/or unevenly
R be more likely to become damaged
R adversely affect ride comfort
R increase stopping distance
Maximum tire pressures G
Warning
Never exceed the maximum tire inflation
pressure. Follow recommended tire inflation
pressures.
Do not underinflate tires. Underinflated tires
wear excessively and/or unevenly, adversely affect handling and fuel economy, and are
more likely to fail from being overheated.
Do not
overinflate
tires. Overinflated tires can
adversely affect handling and ride comfort,
wear unevenly, increase stopping distance,
and result in sudden deflation (blowout)
because they are more likely to become
punctured or damaged by road debris,
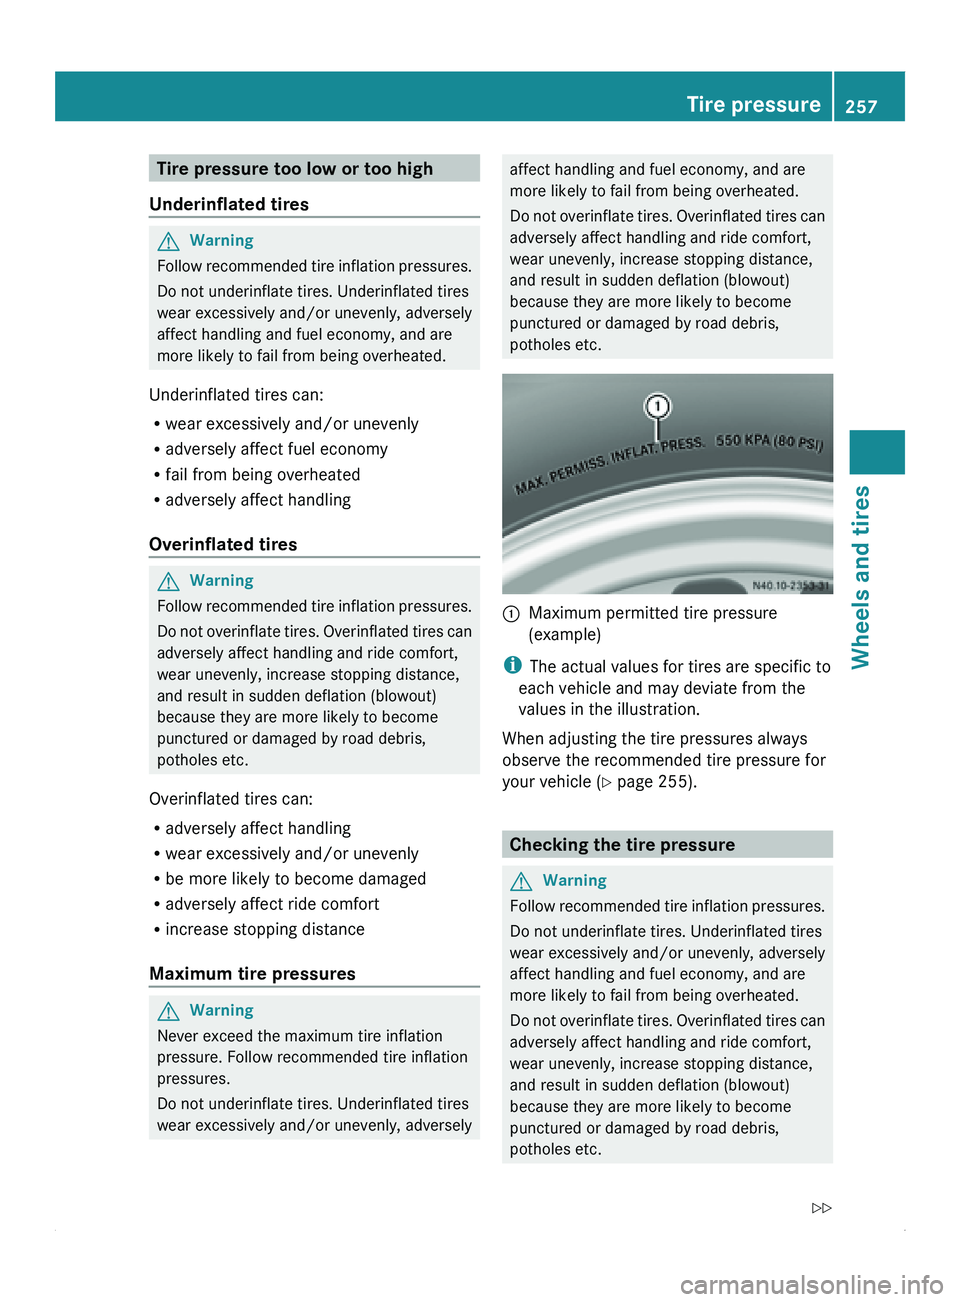
potholes etc. 0046
Maximum permitted tire pressure
(example)
i The actual values for tires are specific to
each vehicle and may deviate from the
values in the illustration.
When adjusting the tire pressures always
observe the recommended tire pressure for
your vehicle ( Y page 255). Checking the tire pressure
G
Warning
Follow recommended
tire inflation pressures.
Do not underinflate tires. Underinflated tires
wear excessively and/or unevenly, adversely
affect handling and fuel economy, and are
more likely to fail from being overheated.
Do not overinflate
tires. Overinflated tires can
adversely affect handling and ride comfort,
wear unevenly, increase stopping distance,
and result in sudden deflation (blowout)
because they are more likely to become
punctured or damaged by road debris,
potholes etc. Tire pressure
257
Wheels and tires
Z
Page 260 of 292
Do not overload the tires by exceeding the
specified load limit as indicated on the Tire
and Loading Information placard on the
driver's door B-pillar. Overloading the tires
can overheat them, possibly causing a
blowout. Overloading
the tires can also result
in handling or steering problems, or brake
failure.
Check the tire pressure at least once a month.
Only check and correct tire pressures when
the tires are cold. Checking the tire pressure manually
In order to determine and adjust the tire
pressures, proceed as follows:
X Remove the valve cap of the tire you wish
to check.
X Press the
tire pressure gauge securely onto
the valve.
X Read the tire pressure and compare it with
the recommended value on the Tire and
Loading Information placard12
or on the tire
pressure plate on the B-pillar on the driver's
side of the vehicle.
X If necessary, increase the tire pressure to
the recommended value.
X If the tire pressure is too high, release air
by pressing down
the metal pin in the valve
using the tip of a pen, for example. Then,
check the tire pressure again using the tire
pressure gauge.
X Screw the valve cap onto the valve.
X Repeat the steps for the other tires. Tire pressure monitor
Important safety notes If a tire pressure monitor is installed, the
vehicle's wheels have sensors installed that
monitor the
tire
pressures in all four tires. The
tire pressure monitor warns you when the pressure drops in one or more of the tires. The
tire pressure monitor only functions if the
correct wheel electronics units are installed
in all wheels.
The tire pressure monitor has a yellow
0077
warning lamp in the instrument cluster for
indicating pressure loss/malfunctions (USA)
or pressure loss
(Canada). Depending on how
the warning lamp flashes or lights up, an
underinflated tire or a malfunction in the tire
pressure monitor is displayed:
R if the 0077 warning lamp is lit continuously,
the tire pressure on one or more tires is
significantly too low. The tire pressure
monitor is not malfunctioning.
R USA only: if the 0077 warning lamp flashes
for 60 seconds and then remains lit
constantly, the tire pressure monitor is
malfunctioning. G
Warning
Each tire, including the spare (if provided),
should be checked at least once a month
when cold and inflated to the inflation
pressure recommended by the vehicle
manufacturer on the Tire and Loading
Information placard on the driver’s door B-
pillar or the
tire inflation pressure label on the
inside of the fuel filler flap. If your vehicle has
tires of a different size than the size indicated
on the Tire and Loading Information placard
or the tire inflation pressure label, you should
determine the proper tire inflation pressure
for those tires.
As an added safety feature, your vehicle has
been equipped with a tire pressure monitoring
system (TPMS) that illuminates a low tire
pressure telltale when one or more of your
tires are significantly underinflated.
Accordingly, when the low tire pressure
telltale illuminates, you should stop and check
your tires as soon as possible, and inflate
them to the proper pressure. Driving on a
significantly underinflated tire causes the tire
to overheat and can lead to tire failure.
12 Only for vehicles with a gross vehicle weight rating of less than 10,000 lbs(4536 kg).258
Tire pressure
Wheels and tires