MERCEDES-BENZ SPRINTER 2011 MY11 Operator’s Manual
Manufacturer: MERCEDES-BENZ, Model Year: 2011, Model line: SPRINTER, Model: MERCEDES-BENZ SPRINTER 2011Pages: 292, PDF Size: 6.75 MB
Page 231 of 292
G
Warning
If the minimum tire pressure of 43.5 psi
(3 bar) still cannot
be achieved, the tire is too
badly damaged.
Do not drive any further. Consult a qualified
specialist workshop which has the necessary
specialist knowledge and tools to carry out
the work required.
For this reason, we recommend an authorized
Sprinter Dealer. In particular, work relevant to
safety or on safety-related systems must be
carried out at a qualified specialist workshop.
0040Environmental note
Have the used tire sealant disposed of at a
qualified specialist workshop, e.g. an
authorized Sprinter Dealer.
! Have the tire sealant bottle replaced
every eight years at a qualified specialist
workshop, e.g. an authorized Sprinter
Dealer. Changing a
wheel in the event of a flat
tire G
Warning
To avoid the risk of serious or even fatal injury
and to avoid damage to the vehicle, observe
the following:
R the vehicle's jack is intended only to raise
the vehicle for
a short time when changing
a wheel.
R position the jack on the appropriate jacking
point only. Make sure that the jack is
correctly positioned under the jacking point
before raising the vehicle.
R the jack must be placed on a firm, flat
surface.
R before raising the vehicle, you should also
secure it against rolling away, e.g. by
placing chocks under the wheels. Never
release the parking brake while the vehicle
is raised. R
make sure that the distance between the
underside
of the
tires and the ground does
not exceed 1.2 in (3 cm). The vehicle could
otherwise slip off the jack or tip over.
R never place your hands or feet under the
raised vehicle.
R never start the engine, and prevent other
jolts or vibrations while the vehicle is
raised. The vehicle could otherwise slip off
the jack.
Preparing to change a wheel X
Prepare the vehicle as described
(Y
page 222).
X Secure the vehicle against rolling away
using chocks or similar items.
Use the chock ( Y
page 183) to do so. G
Warning
The vehicle
could slip off the jack on uphill and
downhill gradients.
To avoid the risk of causing serious or even
fatal injury or damage to the vehicle, do not
change wheels on uphill and downhill
gradients.
On a level road:
X Place chocks in front of and behind the
wheel which is diagonally opposite the
wheel you wish to change.
X Take the vehicle tool kit and the jack from
the footwell on the co-driver's side
(Y page 182).
X Remove the spare wheel from the spare
wheel bracket ( Y page 185).
X On wheels with wheel bolts, remove the
hub cap.
X Assemble the lug wrench extension using
the middle rod
and the rod with the largest
diameter from the three-piece jack pump
lever.
X Starting with the middle rod, slide the lug
wrench extension as far as it will go onto
the lug wrench. Wheels and tires
229
Practical advice Z
Page 232 of 292
!
Only use the jack pump lever middle rod
and the rod with the largest diameter as a
lug wrench extension.
Only slide the middle
rod as far as it will go onto the lug wrench.
The rods may otherwise bend and be
distorted to such an extent that they can
no longer be used as a pump lever for the
jack. X
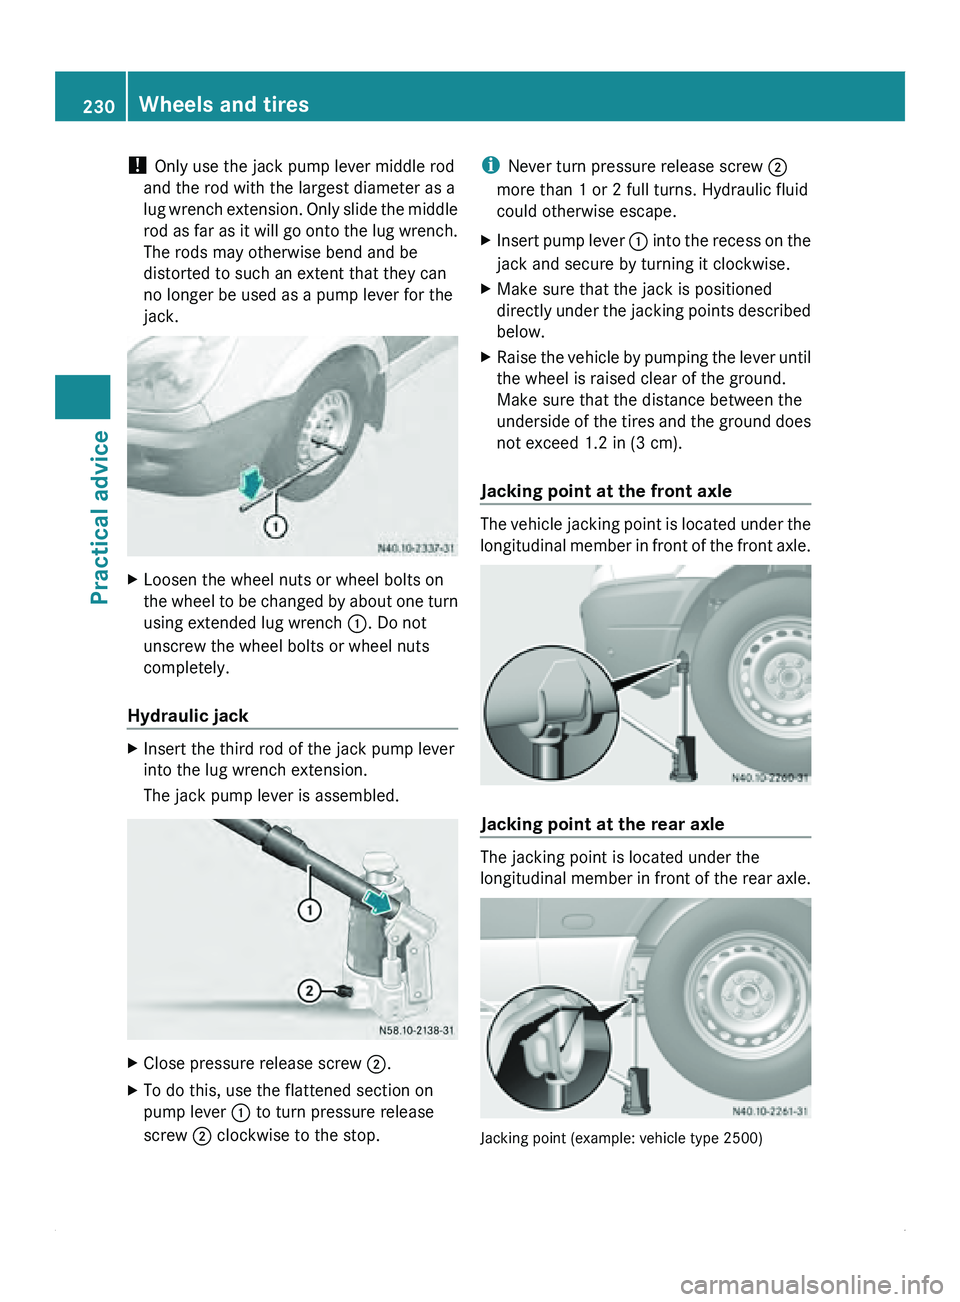
Loosen the wheel nuts or wheel bolts on
the wheel to
be changed by about one turn
using extended lug wrench 0046. Do not
unscrew the wheel bolts or wheel nuts
completely.
Hydraulic jack X
Insert the third rod of the jack pump lever
into the lug wrench extension.
The jack pump lever is assembled. X
Close pressure release screw 0047.
X To do this, use the flattened section on
pump lever 0046 to turn pressure release
screw 0047 clockwise to the stop. i
Never turn pressure release screw 0047
more than 1 or 2 full turns. Hydraulic fluid
could otherwise escape.
X Insert pump lever 0046 into the
recess on the
jack and secure by turning it clockwise.
X Make sure that the jack is positioned
directly under the
jacking points described
below.
X Raise the vehicle by pumping the lever until
the wheel is raised clear of the ground.
Make sure that the distance between the
underside of the
tires and the ground does
not exceed 1.2 in (3 cm).
Jacking point at the front axle The vehicle jacking point is located under the
longitudinal member
in
front of the front axle. Jacking point at the rear axle
The jacking point is located under the
longitudinal member
in
front of the rear axle. Jacking point (example: vehicle type 2500)230
Wheels and tires
Practical advice
Page 233 of 292
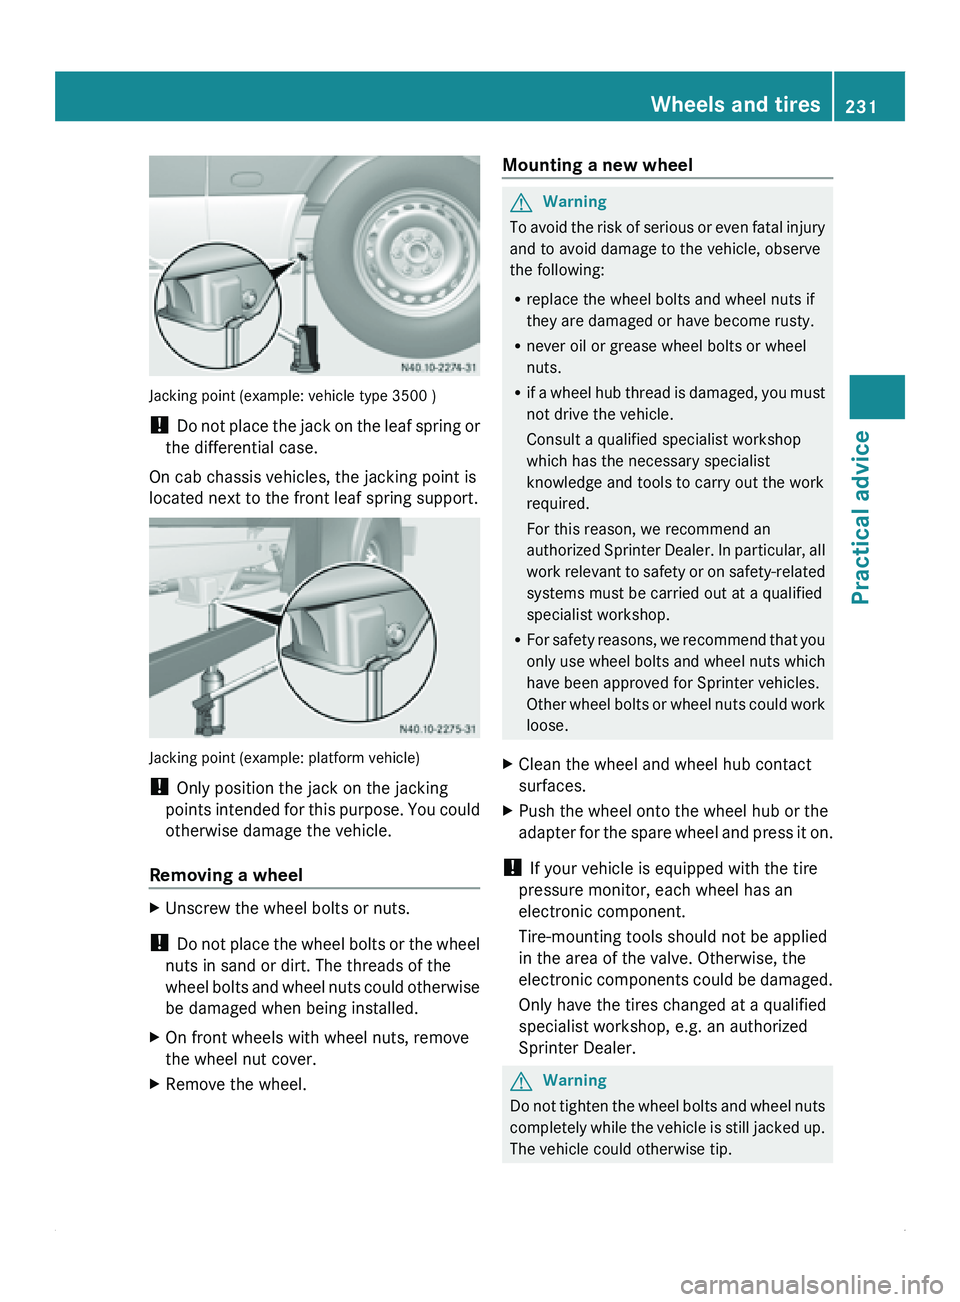
Jacking point (example: vehicle type 3500 )
!
Do not place
the jack on the leaf spring or
the differential case.
On cab chassis vehicles, the jacking point is
located next to the front leaf spring support. Jacking point (example: platform vehicle)
!
Only position the jack on the jacking
points intended for
this purpose. You could
otherwise damage the vehicle.
Removing a wheel X
Unscrew the wheel bolts or nuts.
! Do not place
the wheel bolts or the wheel
nuts in sand or dirt. The threads of the
wheel bolts and wheel nuts could otherwise
be damaged when being installed.
X On front wheels with wheel nuts, remove
the wheel nut cover.
X Remove the wheel. Mounting a new wheel G
Warning
To avoid the risk of serious or even fatal injury
and to avoid damage to the vehicle, observe
the following:
R replace the wheel bolts and wheel nuts if
they are damaged or have become rusty.
R never oil or grease wheel bolts or wheel
nuts.
R if a wheel
hub thread is damaged, you must
not drive the vehicle.
Consult a qualified specialist workshop
which has the necessary specialist
knowledge and tools to carry out the work
required.
For this reason, we recommend an
authorized Sprinter Dealer. In particular, all
work relevant to safety or on safety-related
systems must be carried out at a qualified
specialist workshop.
R For safety reasons, we recommend that you
only use wheel bolts and wheel nuts which
have been approved for Sprinter vehicles.
Other wheel bolts or wheel nuts could work
loose.
X Clean the wheel and wheel hub contact
surfaces.
X Push the wheel onto the wheel hub or the
adapter for the
spare wheel and press it on.
! If your vehicle is equipped with the tire
pressure monitor, each wheel has an
electronic component.
Tire-mounting tools should not be applied
in the area of the valve. Otherwise, the
electronic components could
be damaged.
Only have the tires changed at a qualified
specialist workshop, e.g. an authorized
Sprinter Dealer. G
Warning
Do not tighten the wheel bolts and wheel nuts
completely while the
vehicle is still jacked up.
The vehicle could otherwise tip. Wheels and tires
231
Practical advice Z
Page 234 of 292
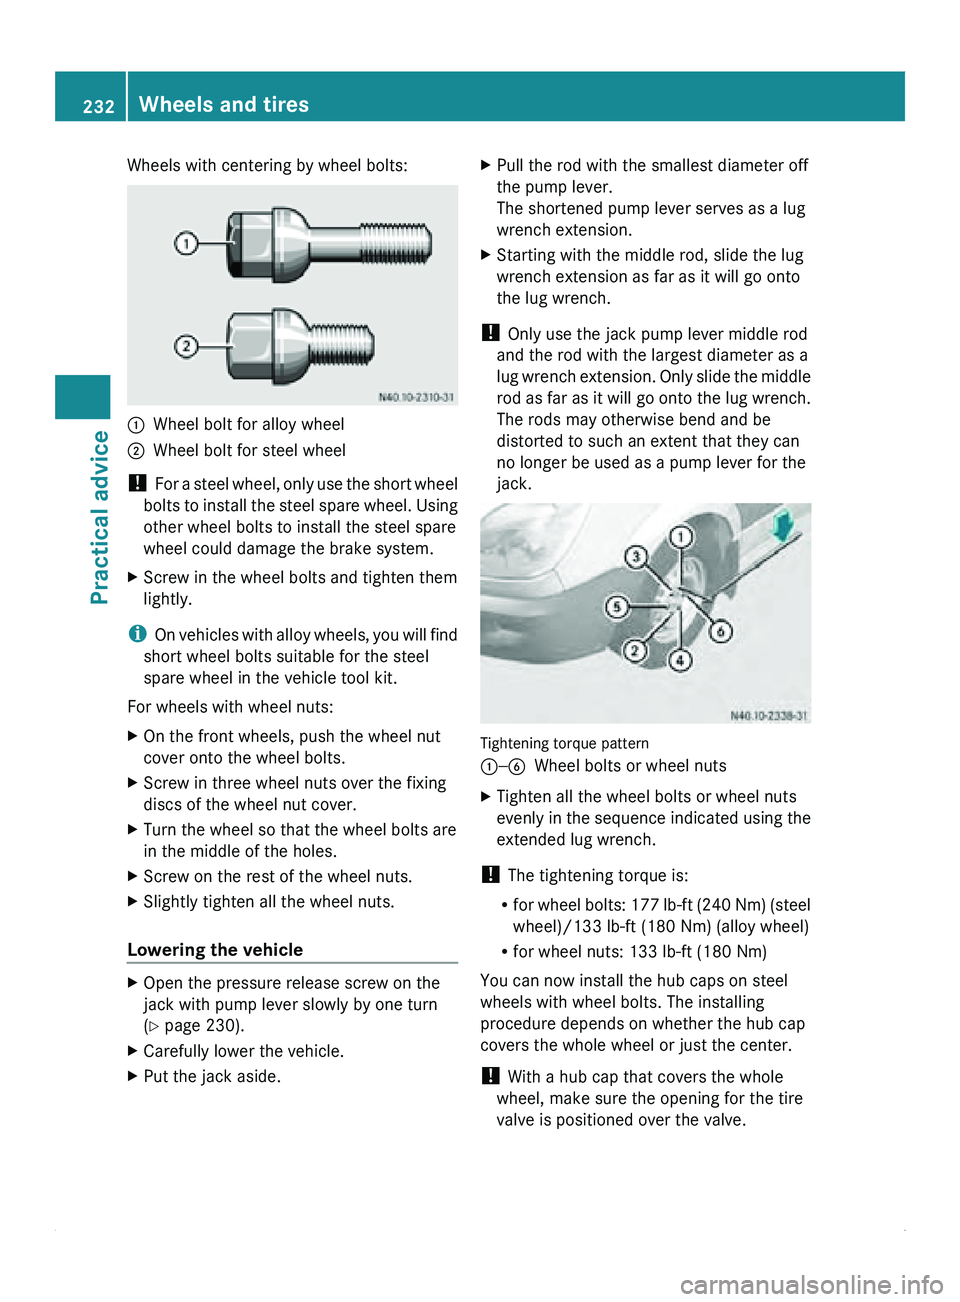
Wheels with centering by wheel bolts:
0046
Wheel bolt for alloy wheel
0047 Wheel bolt for steel wheel
! For a
steel
wheel, only use the short wheel
bolts to install the steel spare wheel. Using
other wheel bolts to install the steel spare
wheel could damage the brake system.
X Screw in the wheel bolts and tighten them
lightly.
i On vehicles with
alloy wheels, you will find
short wheel bolts suitable for the steel
spare wheel in the vehicle tool kit.
For wheels with wheel nuts:
X On the front wheels, push the wheel nut
cover onto the wheel bolts.
X Screw in three wheel nuts over the fixing
discs of the wheel nut cover.
X Turn the wheel so that the wheel bolts are
in the middle of the holes.
X Screw on the rest of the wheel nuts.
X Slightly tighten all the wheel nuts.
Lowering the vehicle X
Open the pressure release screw on the
jack with pump lever slowly by one turn
(Y page 230).
X Carefully lower the vehicle.
X Put the jack aside. X
Pull the rod with the smallest diameter off
the pump lever.
The shortened pump lever serves as a lug
wrench extension.
X Starting with the middle rod, slide the lug
wrench extension as far as it will go onto
the lug wrench.
! Only use the jack pump lever middle rod
and the rod with the largest diameter as a
lug wrench extension.
Only slide the middle
rod as far as it will go onto the lug wrench.
The rods may otherwise bend and be
distorted to such an extent that they can
no longer be used as a pump lever for the
jack. Tightening torque pattern
0046—0087
Wheel bolts or wheel nuts
X Tighten all the wheel bolts or wheel nuts
evenly in the
sequence indicated using the
extended lug wrench.
! The tightening torque is:
R for wheel bolts:
177 lb-ft (240 Nm) (steel
wheel)/133 lb-ft (180 Nm) (alloy wheel)
R for wheel nuts: 133 lb-ft (180 Nm)
You can now install the hub caps on steel
wheels with wheel bolts. The installing
procedure depends on whether the hub cap
covers the whole wheel or just the center.
! With a hub cap that covers the whole
wheel, make sure the opening for the tire
valve is positioned over the valve. 232
Wheels and tires
Practical advice
Page 235 of 292
X
Push the edge of the hub cap with both
hands against the wheel until it clicks into
place.
! With a hub
cap for the middle of the wheel,
make sure that the clamping lugs of the
cover are positioned over the wheel bolts.
X Hit the middle of the hub cap to engage it
on the wheel.
X Push the piston on the hydraulic jack in
again and close the pressure release
screw.
X Secure the faulty wheel in the spare wheel
bracket (Y page 185).
X Stow the jack and the vehicle tool kit.
X Check the tire pressure and correct if
necessary ( Y page 280).
X Retighten the wheel bolts or wheel nuts to
the specified tightening torque after the
vehicle has been driven for 30 miles
(50 km). Retightening wheel nuts/wheel bolts
G
Warning
After changing a wheel, for safety reasons you
must:
R have the tightening torque checked. For
wheel bolts, the tightening torque is
177 lb-ft (240 Nm) (steel wheel)/ 133 lb-ft
(180
Nm) (alloy wheel). For wheel nuts, the
tightening torque is 133 lb-ft (180 Nm). The
wheels could otherwise work loose.
R check the tire pressure and correct it if
necessary.
R have the wheel bolts/wheel nuts
retightened after driving a distance of 30
miles (50 km). The tightening torque for
wheel bolts is 177 lb-ft (240 Nm)(steel
wheel)/133 lb-ft (180 Nm) (alloy wheel).
The tightening torque for wheel nuts is
133 lb-ft (180 Nm).
R if using new or painted rims, have the wheel
bolts and wheel nuts retightened at the specified tightening torque after the vehicle
has been driven for approximately 600 to
3000 miles (1000 to
5000 km)
.
R have the direction of rotation corrected, if
reversed, as soon as possible at a qualified
specialist workshop, e.g. an authorized
Sprinter Dealer. The vehicle handling
characteristics could otherwise be
affected.
Otherwise, the operating reliability and road
safety of the vehicle could be jeopardized.
This could cause you to lose control of your
vehicle, resulting in an accident and injuring
yourself or others. Electrical system
Notes on changing bulbs
The bulbs and lamps are an essential
component of vehicle
safety. Therefore, make
sure that each bulb is always working. G
Warning
Bulbs and lamps can become very hot. For
this reason, allow them to cool down before
changing them. Otherwise, you could burn
yourself when you touch them.
Keep bulbs out of the reach of children.
Otherwise, they could, for example, damage
the bulbs and injure themselves.
Never use a bulb which has been dropped.
Such a bulb may explode and injure you.
Halogen bulbs are pressurized and could
explode when you change them, especially if
they are very hot. You should therefore wear
eye protection and gloves when you are
changing them. G
Warning
Xenon bulbs are under high voltage. You could
get an electric
shock and be seriously or even
fatally injured if you touch the electric
contacts on Xenon bulbs. Therefore, do not
remove the cover on Xenon bulbs. Electrical system
233
Practical advice
Z
Page 236 of 292
Do not change Xenon bulbs yourself, but have
them replaced at a qualified specialist
workshop which has
the necessary specialist
knowledge and tools to carry out the work
required.
We recommend an authorized Sprinter Dealer
for this purpose. In particular, work relevant
to safety or on safety-related systems must
be carried out at a qualified specialist
workshop.
R To prevent short circuits, switch off the
lighting system before changing a bulb.
R Only touch new bulbs with a clean, lint-free
cloth or similar. Do not work with wet or
greasy fingers.
R Only install 12 V bulbs of the same type and
of the correct wattage.
R Have the headlamp setting checked
regularly.
R If the new bulb still does not light up consult
a qualified specialist workshop, e.g. an
authorized Sprinter Dealer.
R Have the following LEDs and bulbs replaced
at a qualified specialist workshop, e.g. an
authorized Sprinter Dealer:
-the additional turn signals in the exterior
mirrors
- the high-mounted brake lamp
- the Bi-Xenon bulbs
- the fog lamps
! Make sure the bulbs are always securely
installed. Changing bulbs
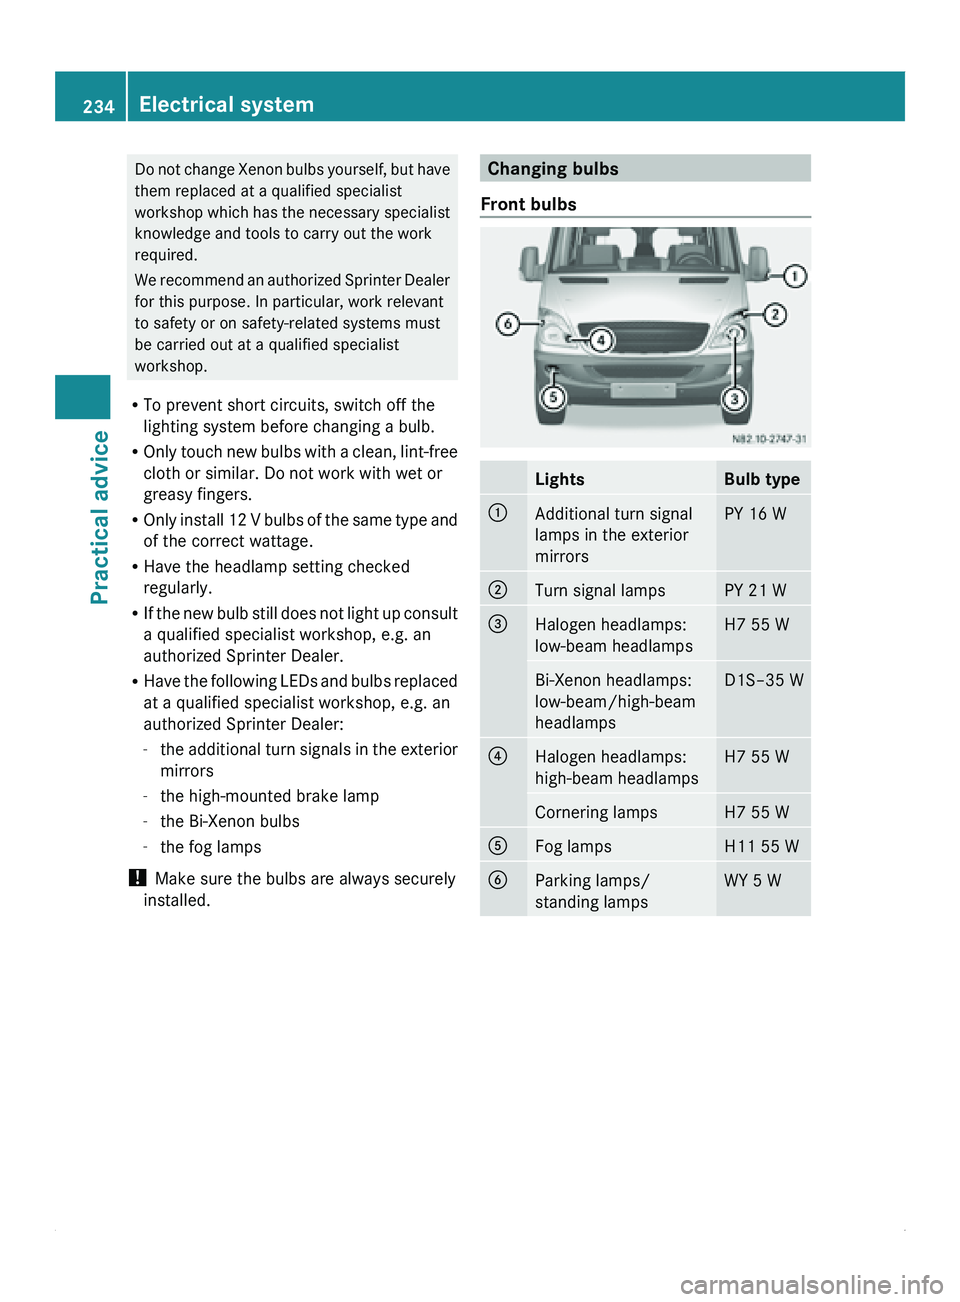
Front bulbs Lights Bulb type
0046
Additional turn signal
lamps in the exterior
mirrors PY 16 W
0047
Turn signal lamps PY 21 W
008A
Halogen headlamps:
low-beam headlamps H7 55 W
Bi-Xenon headlamps:
low-beam/high-beam
headlamps D1S–35 W
0088
Halogen headlamps:
high-beam headlamps H7 55 W
Cornering lamps H7 55 W
0086
Fog lamps H11 55 W
0087
Parking lamps/
standing lamps WY 5 W234
Electrical system
Practical advice
Page 237 of 292
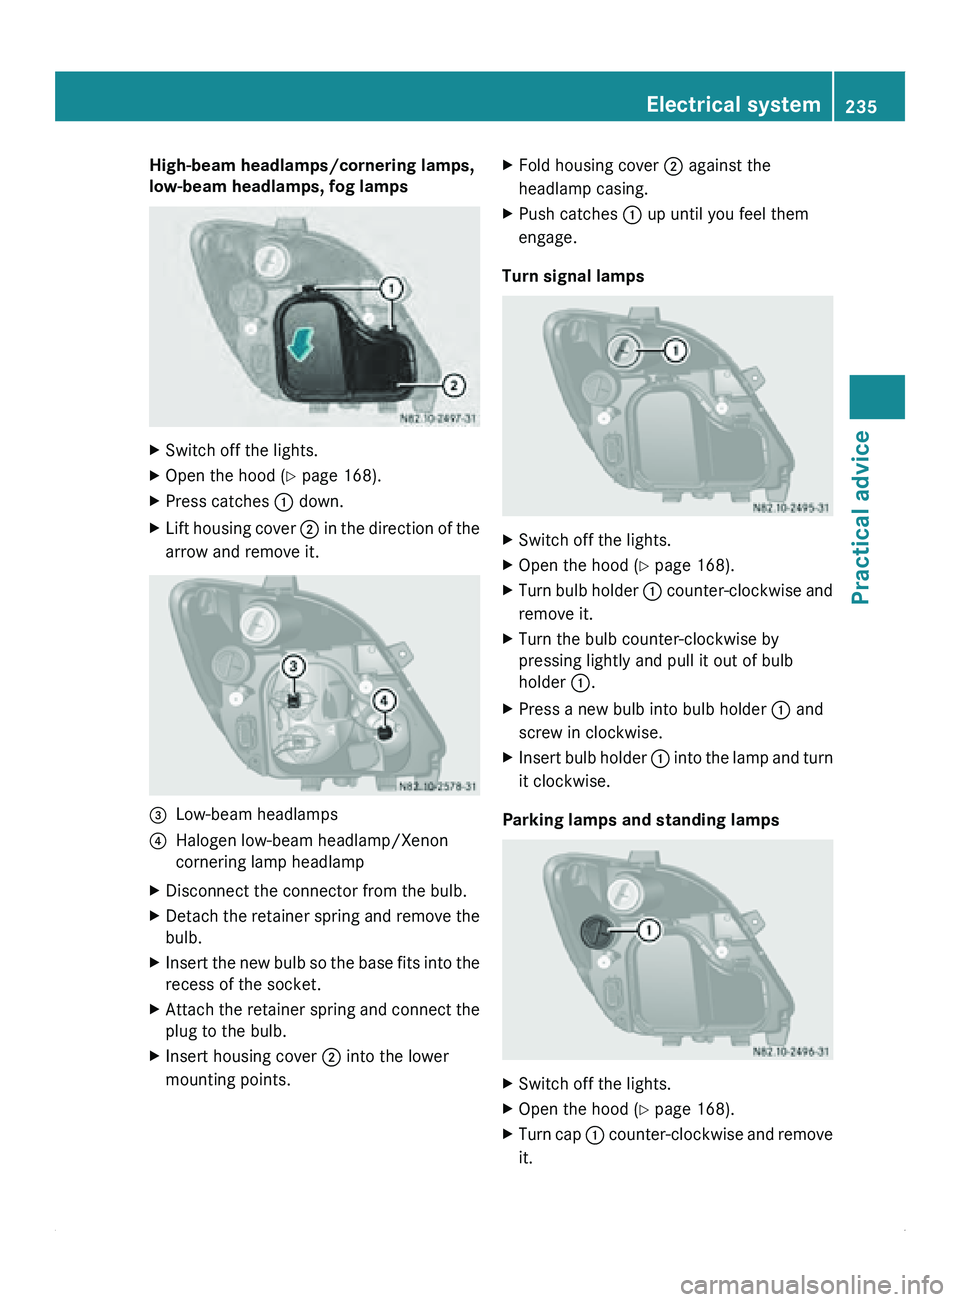
High-beam headlamps/cornering lamps,
low-beam headlamps, fog lamps
X
Switch off the lights.
X Open the hood (Y page 168).
X Press catches 0046 down.
X Lift housing cover 0047 in the direction of the
arrow and remove it. 008A
Low-beam headlamps
0088 Halogen low-beam headlamp/Xenon
cornering lamp headlamp
X Disconnect the connector from the bulb.
X Detach the retainer spring and remove the
bulb.
X Insert the new bulb so the base fits into the
recess of the socket.
X Attach the retainer spring and connect the
plug to the bulb.
X Insert housing cover 0047 into the lower
mounting points. X
Fold housing cover 0047 against the
headlamp casing.
X Push catches 0046 up until you feel them
engage.
Turn signal lamps X
Switch off the lights.
X Open the hood (Y page 168).
X Turn bulb holder 0046 counter-clockwise and
remove it.
X Turn the bulb counter-clockwise by
pressing lightly and pull it out of bulb
holder 0046
.
X Press a new bulb into bulb holder 0046 and
screw in clockwise.
X Insert bulb holder 0046 into the
lamp and turn
it clockwise.
Parking lamps and standing lamps X
Switch off the lights.
X Open the hood (Y page 168).
X Turn cap 0046 counter-clockwise and remove
it. Electrical system
235
Practical advice Z
Page 238 of 292
X
Pull out the bulb holder with the bulb.
X Pull the bulb out of the bulb holder.
X Press a new bulb into the bulb holder.
X Insert the bulb holder into the reflector.
X Replace cap 0046 and turn it clockwise to the
stop.
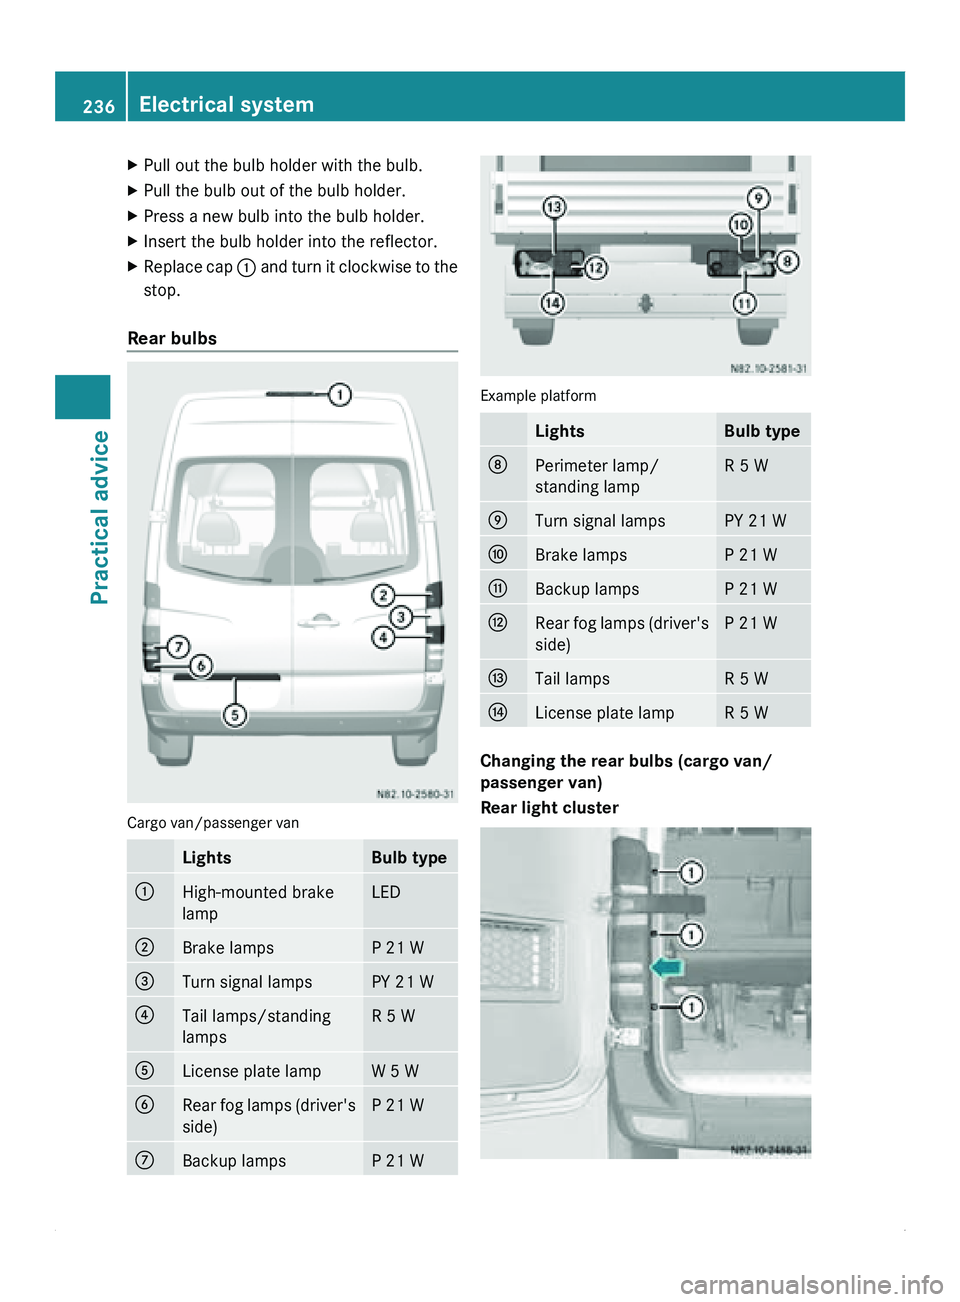
Rear bulbs Cargo van/passenger van
Lights Bulb type
0046
High-mounted brake
lamp LED
0047
Brake lamps P 21 W
008A
Turn signal lamps PY 21 W
0088
Tail lamps/standing
lamps R 5 W
0086
License plate lamp W 5 W
0087
Rear fog lamps (driver's
side) P 21 W
006E
Backup lamps P 21 W Example platform
Lights Bulb type
006F
Perimeter lamp/
standing lamp R 5 W
0070
Turn signal lamps PY 21 W
0071
Brake lamps P 21 W
0072
Backup lamps P 21 W
0073
Rear fog lamps (driver's
side) P 21 W
0074
Tail lamps R 5 W
0075
License plate lamp R 5 W
Changing the rear bulbs (cargo van/
passenger van)
Rear light cluster236
Electrical system
Practical advice
Page 239 of 292
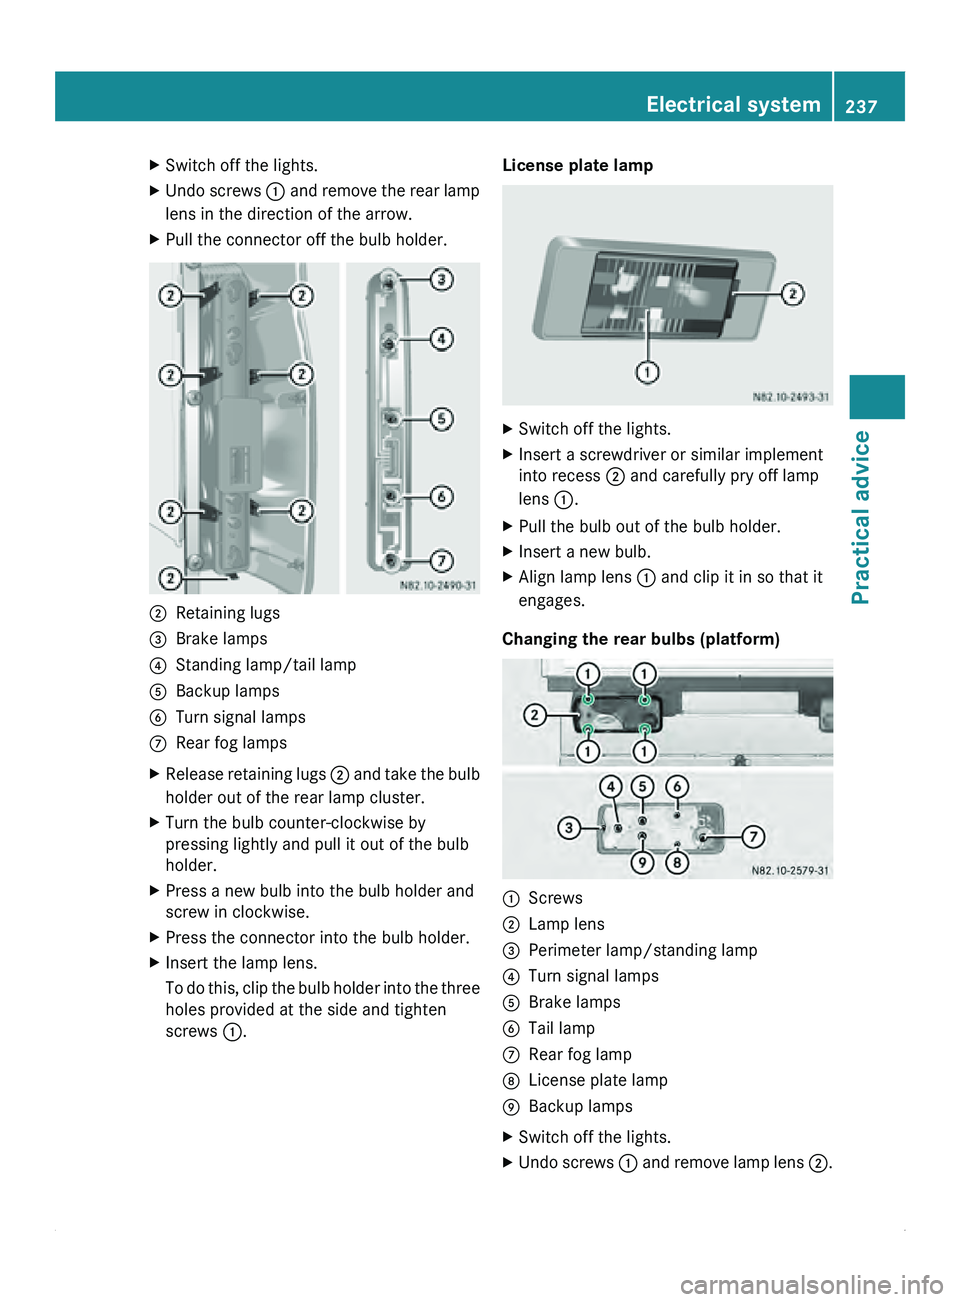
X
Switch off the lights.
X Undo screws 0046 and remove the rear lamp
lens in the direction of the arrow.
X Pull the connector off the bulb holder. 0047
Retaining lugs
008A Brake lamps
0088 Standing lamp/tail lamp
0086 Backup lamps
0087 Turn signal lamps
006E Rear fog lamps
X Release retaining lugs 0047 and
take
the bulb
holder out of the rear lamp cluster.
X Turn the bulb counter-clockwise by
pressing lightly and pull it out of the bulb
holder.
X Press a new bulb into the bulb holder and
screw in clockwise.
X Press the connector into the bulb holder.
X Insert the lamp lens.
To do this,
clip the bulb holder into the three
holes provided at the side and tighten
screws 0046. License plate lamp
X
Switch off the lights.
X Insert a screwdriver or similar implement
into recess 0047 and carefully pry off lamp
lens 0046.
X Pull the bulb out of the bulb holder.
X Insert a new bulb.
X Align lamp lens 0046 and clip it in so that it
engages.
Changing the rear bulbs (platform) 0046
Screws
0047 Lamp lens
008A Perimeter lamp/standing lamp
0088 Turn signal lamps
0086 Brake lamps
0087 Tail lamp
006E Rear fog lamp
006F License plate lamp
0070 Backup lamps
X Switch off the lights.
X Undo screws 0046 and
remove
lamp lens 0047. Electrical system
237
Practical advice Z
Page 240 of 292
X
Turn the bulb counter-clockwise by
pressing lightly and pull it out of the bulb
holder.
X Push a new bulb into the bulb holder and
screw in clockwise.
X Position lamp lens 0047 and tighten
screws 0046 again.
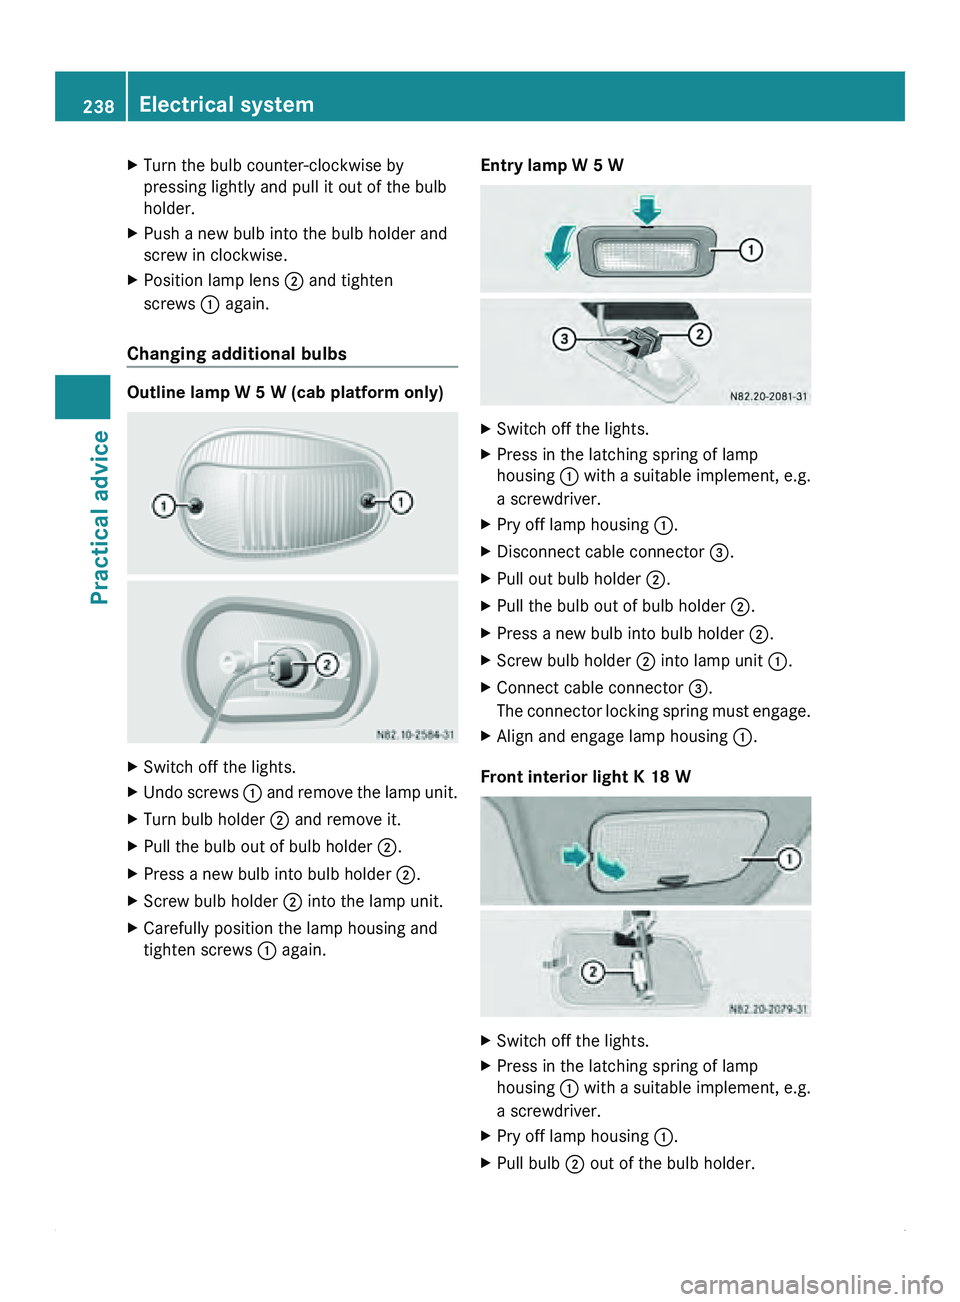
Changing additional bulbs Outline lamp W 5 W (cab platform only)
X
Switch off the lights.
X Undo screws 0046 and remove the lamp unit.
X Turn bulb holder 0047 and remove it.
X Pull the bulb out of bulb holder 0047.
X Press a new bulb into bulb holder 0047.
X Screw bulb holder 0047 into the lamp unit.
X Carefully position the lamp housing and
tighten screws 0046 again. Entry lamp W 5 W X
Switch off the lights.
X Press in the latching spring of lamp
housing 0046 with a
suitable implement, e.g.
a screwdriver.
X Pry off lamp housing 0046.
X Disconnect cable connector 008A.
X Pull out bulb holder 0047.
X Pull the bulb out of bulb holder 0047.
X Press a new bulb into bulb holder 0047.
X Screw bulb holder 0047 into lamp unit 0046.
X Connect cable connector 008A.
The connector
locking
spring must engage.
X Align and engage lamp housing 0046.
Front interior light K 18 W X
Switch off the lights.
X Press in the latching spring of lamp
housing 0046 with a
suitable implement, e.g.
a screwdriver.
X Pry off lamp housing 0046.
X Pull bulb 0047 out of the bulb holder.238
Electrical system
Practical advice