sensor MERCEDES-BENZ SPRINTER 2013 MY13 Operator’s Manual
[x] Cancel search | Manufacturer: MERCEDES-BENZ, Model Year: 2013, Model line: SPRINTER, Model: MERCEDES-BENZ SPRINTER 2013Pages: 334, PDF Size: 3.88 MB
Page 208 of 334
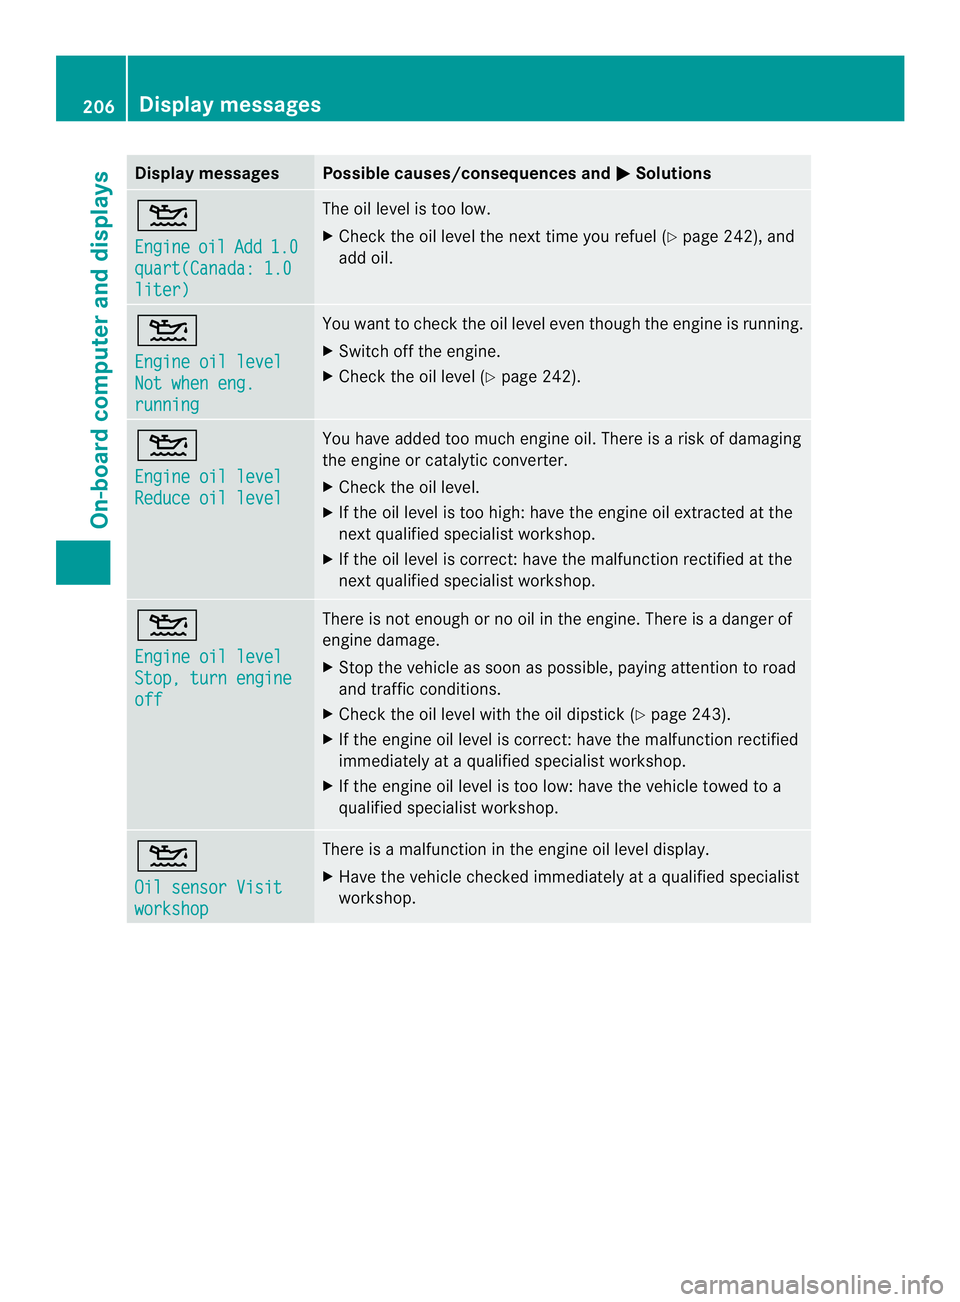
Display messages Possible causes/consequences and
0004 Solutions
001D
Engine
oil Add 1.0
quart(Canada: 1.0
liter) The oil level is too low.
X
Chec kthe oil level the next time you refuel (Y page 242), and
add oil. 001D
Engine oil level
Not when eng.
running You want to check the oil level even though the engine is running.
X
Switch off the engine.
X Check the oil level (Y page 242).001D
Engine oil level
Reduce oil level You have added too much engine oil. There is a risk of damaging
the engine or catalytic converter.
X
Check the oil level.
X If the oil level is too high: have the engine oil extracted at the
next qualified specialist workshop.
X If the oil level is correct: have the malfunction rectified at the
next qualified specialist workshop. 001D
Engine oil level
Stop, turn engine
off There is not enough or no oil in the engine. There is a danger of
engine damage.
X
Stop the vehicle as soon as possible, paying attention to road
and traffic conditions.
X Check the oil level with the oil dipstick (Y page 243).
X If the engine oil level is correct: have the malfunction rectified
immediately at a qualified specialist workshop.
X If the engine oil level is too low: have the vehicle towed to a
qualified specialist workshop. 001D
Oil sensor Visit
workshop There is a malfunction in the engine oil level display.
X
Have the vehicle checked immediately at a qualified specialist
workshop. 206
Display messagesOn-board computer and displays
Page 209 of 334
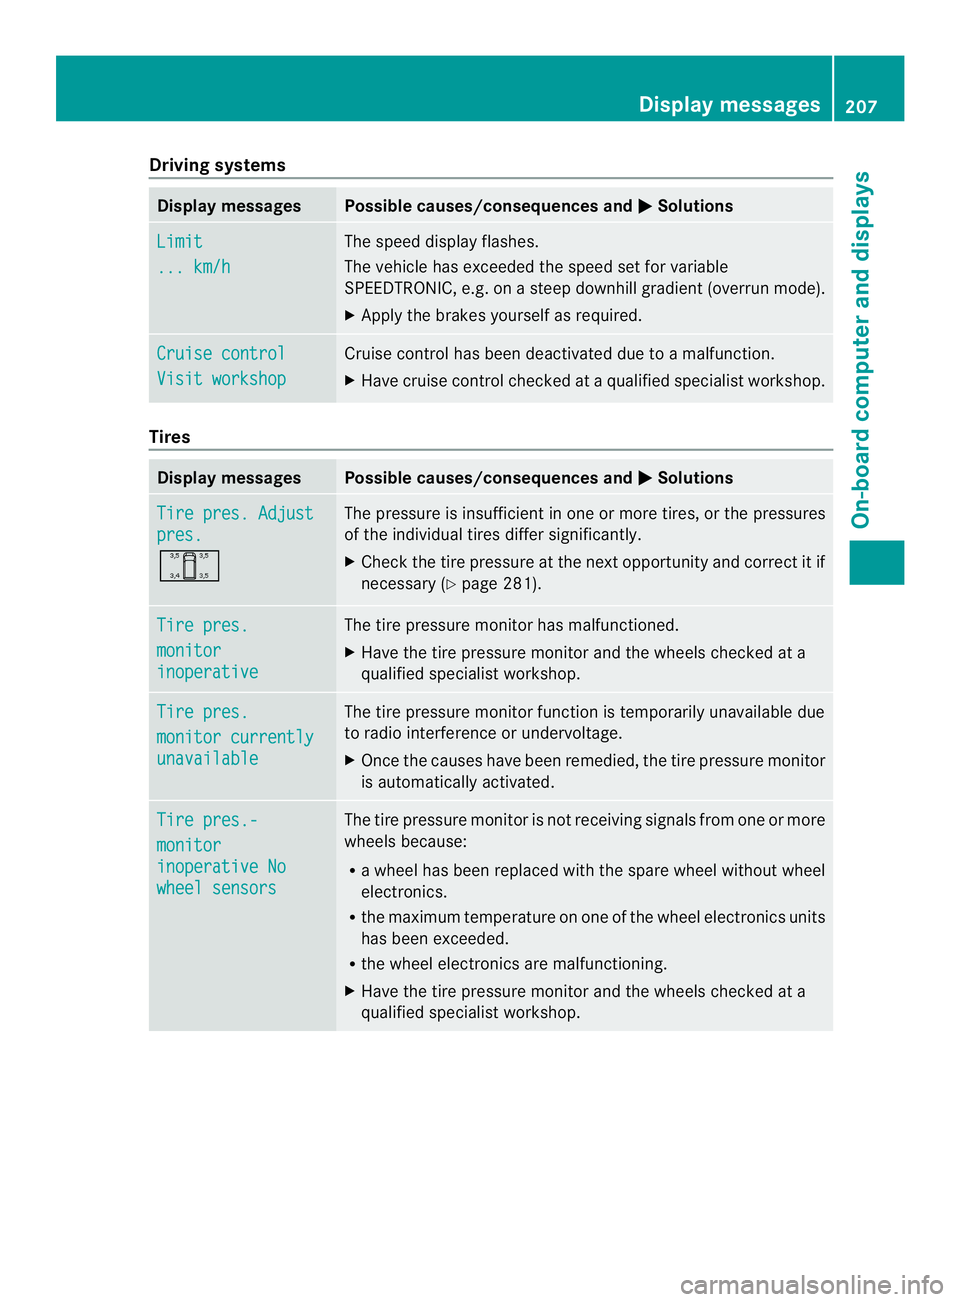
Driving systems
Display messages Possible causes/consequences and
0004 Solutions
Limit
... km/h The speed display flashes.
The vehicle has exceeded the speed set fo
rvariable
SPEEDTRONIC, e.g .onasteep downhill gradient (overrun mode).
X Apply the brakes yourselfa s required.Cruise control
Visit workshop Cruise control has been deactivated due to a malfunction.
X Have cruise control checked at a qualified specialist workshop. Tires
Display messages Possible causes/consequences and
0004 Solutions
Tire pres. Adjust
pres.
0001 The pressure is insufficient in one or more tires, or the pressures
of the individual tires differ significantly.
X
Check the tire pressure at the next opportunity and correct it if
necessary (Y page 281). Tire pres.
monitor
inoperative The tire pressure monitor has malfunctioned.
X
Have the tire pressure monitor and the wheels checked at a
qualified specialist workshop. Tire pres.
monitor currently
unavailable The tire pressure monitor function is temporarily unavailable due
to radio interference or undervoltage.
X
Once the causes have been remedied, the tire pressure monitor
is automatically activated. Tire pres.-
monitor
inoperative No
wheel sensors The tire pressure monitor is not receiving signals from one or more
wheels because:
R a wheel has been replaced with the spare wheel without wheel
electronics.
R the maximum temperature on one of the wheel electronics units
has been exceeded.
R the wheel electronics are malfunctioning.
X Have the tire pressure monitor and the wheels checked at a
qualified specialist workshop. Display messages
207On-board computer and displays Z
Page 261 of 334
cleaning cloths could scratch or damage
the plastic light lenses.
X Clea nthe plastic covers of the exterior
lighting with a damp sponge and a mild
cleaning agent, e.g. car shampoo for
Sprinter vehicles, or with cleaning cloths.
Cleaning the mirror turns ignal!
Only use cleaning agents or cleaning
cloths that are suitable for plastic lenses.
Unsuitable cleaning agents or cleaning
cloths could scratch or damage the plastic
lenses of the mirror turn signals.
X Clean the plastic lenses of the mirror turn
signals in the exterior mirror housing using
a wet sponge and mild cleaning agent, e.g.
car shampoo or cleaning cloths.
Cleaning the sensors !
Do not use dry, coarse or hard cloths and
do not scrub. You will otherwise scratch or
damage the sensors.
If you clean the sensors with a power
washer or steam cleaner, observe the
information provided by the manufacturer
regarding the distance to be maintained
betwee nthe vehicle and the nozzle of the
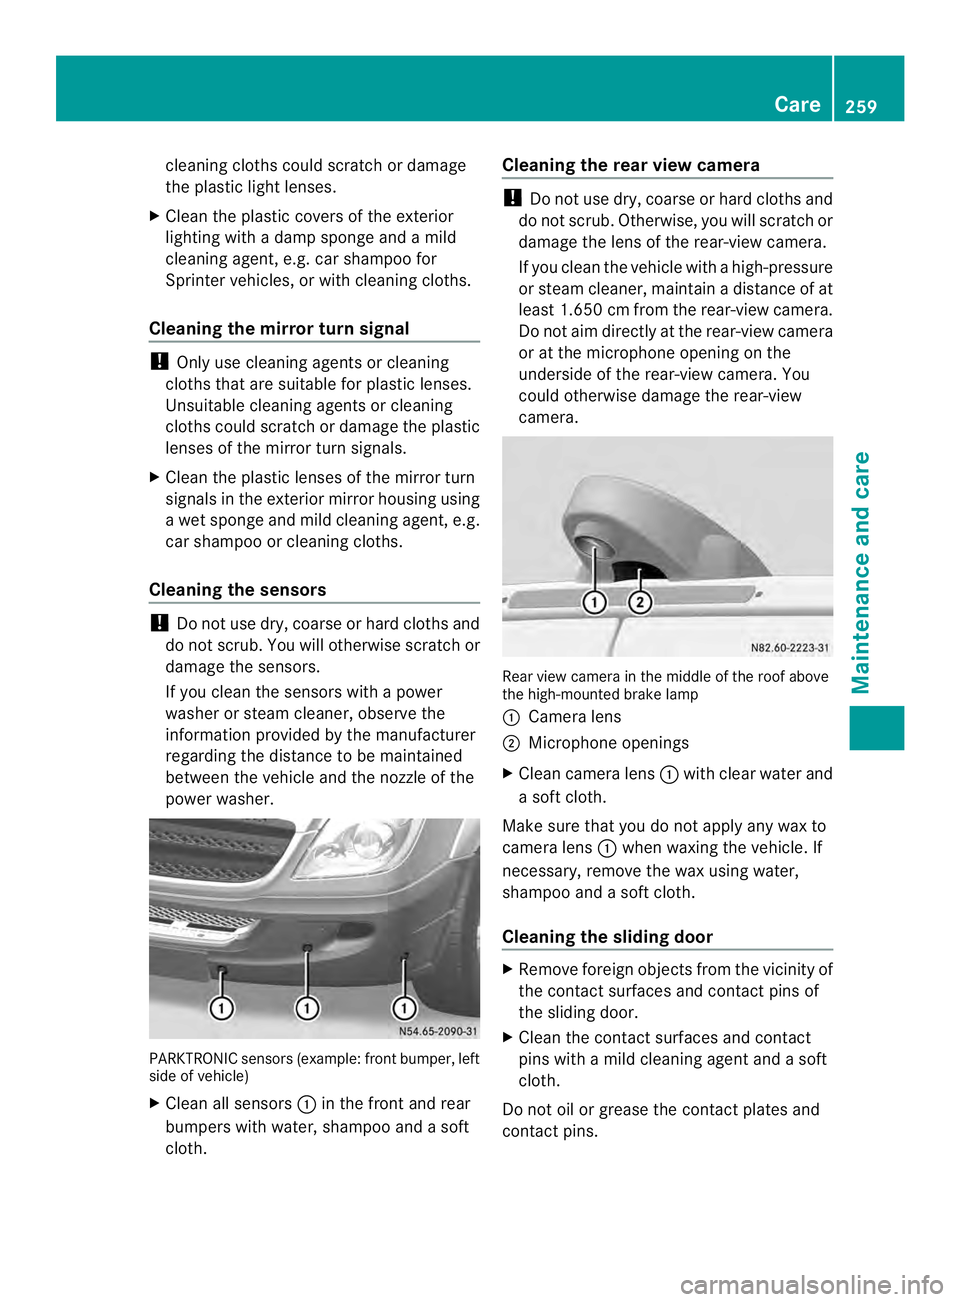
power washer. PARKTRONIC sensors (example: front bumper, left
side of vehicle)
X Cleana ll sensors 0005in the front and rear
bumpers with water, shampoo and a soft
cloth. Cleaning the rea
rview camera !
Do not use dry, coarse or hard cloths and
do not scrub. Otherwise, you will scratch or
damage the lens of the rear-view camera.
If you clean the vehicle with a high-pressure
or steam cleaner, maintain a distance of at
least 1.650 cm from the rear-view camera.
Do not aim directly at the rear-view camera
or at the microphone opening on the
underside of the rear-view camera. You
could otherwise damage the rear-view
camera. Rear view camera in the middle of the roof above
the high-mounted brake lamp
0005
Camera lens
0006 Microphone openings
X Clean camera lens 0005with clear water and
a soft cloth.
Make sure that you do not apply any wax to
camera lens 0005when waxing the vehicle. If
necessary, remove the wax using water,
shampoo and a soft cloth.
Cleaning the sliding door X
Remove foreign objects from the vicinity of
the contact surfaces and contact pins of
the sliding door.
X Clean the contact surfaces and contact
pins with a mild cleaning agent and a soft
cloth.
Do not oil or grease the contac tplates and
contact pins. Care
259Maintenance and care Z
Page 283 of 334
X
Read the tire pressure and compare it with
the recommended value on the loading
information table or th etire pressure table
(Y page 278).
X If the tire pressure is too low, increase it to
the recommended value.
X If the tire pressure is too high, release air
by pressing down the metal pin in the valve.
Use the tip of a pen, for example. Then,
chec kthe tire pressure again using the tire
pressure gauge.
X Screw the valve cap onto the valve.
X Repeatt he steps for the other tires. Tire pressure monitor
Important safety notes G
WARNING
Each tire, including the spare (if provided),
should be checked at least once a month
when cold and inflated to the pressure
recommended by the vehicle manufacturer
on the Tire and Loading Information placard
on the driver's door B-pillar or the tire
pressure label on the inside of the fuel filler
flap. If your vehicle has tires of a different size
than the size indicated on the Tire and Loading
Information placard or the tire pressure label,
you should determine the proper tire pressure
for those tires.
As an added safety feature, your vehicle has
been equipped with a tire pressure monitoring
system (TPMS) that illuminates a low tire
pressure telltale when one or more of your
tires are significantly underinflated.
Accordingly, when the low tire pressure
telltale illuminates, you should stop and check
your tires as soon as possible, and inflate
them to the proper pressure. Driving on a
significantly underinflated tire causes the tire
to overheat and can lead to tire failure.
Underinflation also reduces fuel efficiency
and tire tread life, and may affect the vehicle's
handling and stopping ability. Please note that the TPMS is not a substitute
for proper tire maintenance, and it is the
driver's responsibility to maintain correct tire
pressure, even if underinflation has not
reached the level to trigger illumination of the
TPMS low tire pressure telltale.
USA only:
Your vehicle has also been equipped with a
TPMS malfunction indicator to indicate if the
system is not operating properly. The TPMS
malfunction indicator is combined with the
low tire pressure telltale. When the system
detects a malfunction, the warning lamp will
flash for approximately a minute and then
remain continuously illuminated. This
sequence will be repeated every time the
vehicle is started as long as the malfunction
exists.
When the malfunction indicator is illuminated,
the system may not be able to detect or signal
low tire pressure as intended. TPMS
malfunctions may occur for a variety of
reasons, including the installation of
incompatible replacement or alternate tires
or wheels on the vehicle that prevent the
TPMS from functioning properly. Always
check the TPMS malfunction telltale after
replacing one or more tires or wheels on your
vehicle to ensure that the replacement or
alternate tires and wheels allow the TPMS to
continue to function properly.
Vehicles with a tire pressure monitor are
equipped with sensors in the wheels that
monitor the tire pressure of all four tires. The
tire pressure monitor monitors the pressure
in all four tires; you set this pressure when
you activate the tire pressure monitor. The
tire pressure monitor warns you when the
pressure drops in one or more of the tires. The
tire pressure monitor only functions if the
corresponding sensors are installed to all
wheels.
You should always adjust the tire pressure
according to the vehicle load. Restart the tire
pressure monitor if you change the tire
pressure. Tire pressure
281Wheels and tires Z
Page 310 of 334
X
Wheel with hub cap: position the opening
for the tire valve in the hub cap over the tire
valve.
X Push the edge of the hub cap with both
hands against the wheel until it clicks into
place. Make sure the hub cap retaining
catches engage on the steel wheel.
X Wheel with central hub cap: position the
retaining lugs of the central hub cap over
the wheel bolts.
X Hit the middle of the hub cap to engage it
on the wheel.
X Secure the faulty wheel in the spare wheel
bracket (Y page 309).
X Check the tire pressure of the newly
mounted wheel and adjust it if necessary.
Observe the recommended tire pressure
(Y page 278).
X Retighten the wheel bolts or wheel nuts to
the specified tightening torque after the
vehicle has been driven for 30 miles
(50 km).
When using a wheel/spare wheel with a new
or newly painted wheel rim, have the wheel
bolts/nuts retightened again after
approximately 600 to 3,000 miles (1,000 to
5,000 km). Observe the specified tightening
torque.
i Vehicles with the tire pressure monitor
system: all mounted wheels must be
equipped with functioning sensors. Wheel and tire combination
General notes
! Retreaded tires are neither tested nor
recommended for Sprinter vehicles, since
previous damage cannot always be
detected on retreaded tires. We can
therefore not guarantee driving safety. Do
not mount used tires if you have no
information about their previous usage. The recommended tire pressures can be
found:
R
on the Tire and Loading Information
placard 11
on the B-pillar on the driver's side
R on the tire pressure table on the B-pillar on
the driver's side
The recommended tire pressure can also be
found in the "Tire pressure table" section in
these Operating Instructions (Y page 285).
The wheel/tire combination for your vehicle
can be found on the tire pressure table.
Further information on wheel/tire
combination can be obtained at any qualified
specialist workshop.
Check tire pressures regularly and only when
the tires are cold. Observe the notes on the
recommended tire pressures (Y page 278).
Follow the maintenance recommendations in
the tire manufacturer's warranty book in your
vehicle documents.
Notes on the vehicle equipment –always
install the vehicle:
R with tires of the same size across an axle
(left/right)
R with the same type of tires on all wheels at
a given time (summer tires, winter tires) Spare wheel
Important safety notes
G
WARNING
Wheel and tire dimensions as well as the type
of tire can vary between the spare wheel and
the wheel to be replaced. When the spare
wheel is installed, driving characteristics may
be severely affected. There is a risk of an
accident.
In order to reduce risks:
R you should therefore adapt your driving
style and drive carefully.
R never install more than one spare wheel
that differs fro mthe wheel to be replaced.
11 Only for vehicles with a gross weight of less than 10,000 lbs(4,536 kg). 308
Spare wheelWheels and tires
Page 311 of 334
R
only use a spare wheel that differs from the
wheel to be replaced for a short time.
R do not deactivate ESP ®
.
R have a spare wheel that differs from the
wheel that has been changed replaced at
the nearest qualified specialist workshop.
You must observe the correc twheel and
tire dimensions as well as the wheel type.
When using a spare wheel of a different size,
do not exceed the maximum speed of
80 km/h. General notes
! Check the spare wheel regularly to see
that it is secure and has the prescribed tire
pressure.
The procedure for mounting the spare wheel
is described in "Mounting awheel"
(Y page 303).
The following should be checked regularly,
particularly prior to long journeys:
R the tire pressure of the spare wheel, which
should then be corrected if necessary
(Y page 278).
R the fastenings of the spare wheel bracket.
The spare wheel is located in a spare wheel
bracket under the rear of the vehicle.
Replace the tires after 6years at the latest,
regardless of wear. This also applies to the
spare wheel.
i If you have mounted a spare wheel, the
tire pressure monitor (Y page 281) will not
function for this wheel. The spare wheel is
not equipped with a sensor for monitoring
tire pressure. Removing and installing the spare
wheel
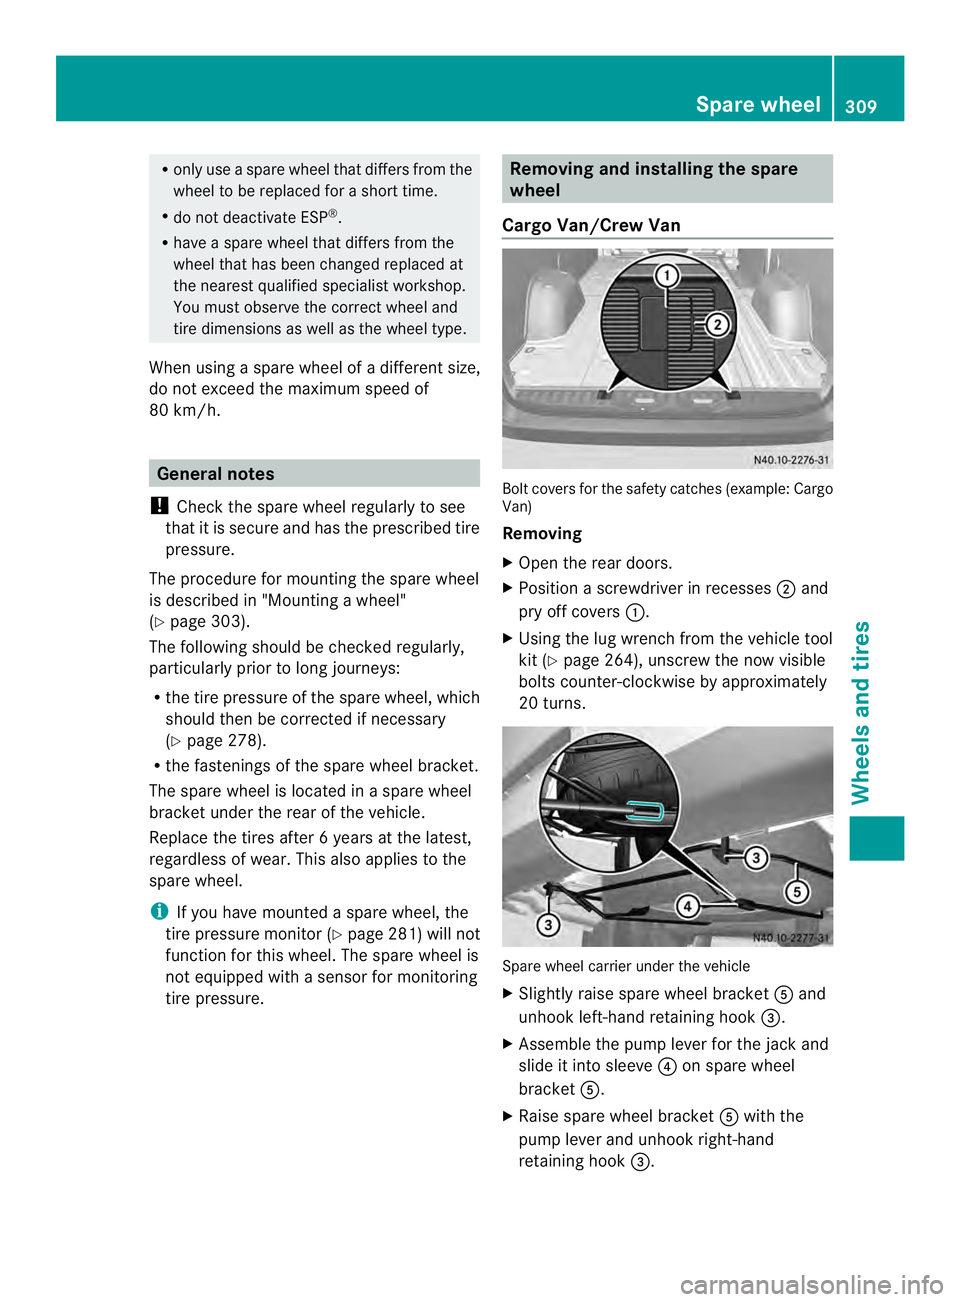
Cargo Van/Crew Van Bolt covers for the safety catches (example: Cargo
Van)
Removing
X
Open the rear doors.
X Position a screwdriver in recesses 0006and
pry off covers 0005.
X Using the lug wrench from the vehicle tool
kit (Y page 264), unscrew the now visible
bolts counter-clockwise by approximately
20 turns. Spare wheel carrier under the vehicle
X
Slightly raise spare wheel bracket 0023and
unhook left-hand retaining hook 0026.
X Assemble the pump lever for the jack and
slide it into sleeve 0025on spare wheel
bracket 0023.
X Raise spare wheel bracket 0023with the
pump lever and unhook right-hand
retaining hook 0026. Spare wheel
309Wheels and tires Z
Page 316 of 334
Genuine Sprinter parts
! Air bags and Emergency Tensioning
Devices, as well as control units and
sensors for these restraint systems, may be
installed in the following areas of your
vehicle:
R doors
R door pillars
R door sills
R seats
R cockpit
R instrument cluster
R center console
Do not install accessories such as audio
systems in these areas. Do not carry out
repairs or welding. You could impair the
operating efficiency of the restraint
systems.
Have aftermarket accessories installed at
a qualified specialist workshop. H
Environmental note
We supply reconditioned assembliesa nd
parts which are of the same quality as new
parts. The same New Vehicl eLimited
Warranty applies as for new parts.
We tes tgenuine Sprinter parts, as well as
conversion parts and accessories that have
been specifically approved for the type of
vehicle, for:
R reliability
R safety
R suitability
Despite ongoing market research, we are
unable to assess other parts. If individual or
official approval is given, we assume no
responsibility for use in Sprinter vehicles.
In some countries, certain parts are only
officially approved for installation or
modification if they comply with legal
requirements. All genuine Sprinter parts
satisfy these requirements. Make sure that all
parts are suitable for your vehicle. All authorized Sprinter Dealers maintain a
supply of genuine Sprinter parts for required
service and repair work. Also, the
strategically distributed parts delivery
centers provide quick and reliable parts
service.
Always specify the vehicle identification
number (VIN) and engin
enumbe rwhen
ordering genuine Sprinter parts
(Y page 315). Vehicle electronics
Tampering with the engine
electronics
G
WARNING
Always have work on the engine electronics
and related components carried out at a
qualified specialist workshop. Otherwise, the
vehicle's operating safety could be affected.
! Only have engine electronics and the
corresponding parts, such as control units,
sensors or connector leads, serviced in a
qualified specialist workshop. Otherwise,
the vehicle parts may wear more quickly.
This can lead to loss of the New Vehicle
Limited Warranty. Installing electrical or electronic
equipment
G
WARNING
You and others may damage your health due
to excessive electromagnetic radiation. By
using an external antenna, the possible health
risks of electromagnetic fields, which are
under discussion among the scientific
community, should be largely prevented.
Therefore, only have the exterior antenna
installed at a qualified specialist workshop.
Electrical and electronic devices may have a
detrimental effect on both the comfort and
the operating safety of the vehicle. If 314
Vehicle electronicsTechnical data