washer fluid MERCEDES-BENZ SPRINTER 2013 MY13 Operator’s Manual
[x] Cancel search | Manufacturer: MERCEDES-BENZ, Model Year: 2013, Model line: SPRINTER, Model: MERCEDES-BENZ SPRINTER 2013Pages: 334, PDF Size: 3.88 MB
Page 18 of 334
S
Safety Children in the vehicle .....................50
Child restraint systems ....................50
Safety systems
see Driving safety systems
Seat belts
Adjusting the height ......................... 48
Belt force limiters ............................ 50
Belt warning/warning lamp .............49
Cleaning ......................................... 261
Correct usage .................................. 47
Display message ............................ 201
Emergency Tensioning Devices ....... .50
Fastening ......................................... 48
Important safety guidelines .............47
Safety guidelines ............................. 43
Warning lamp ................................. 219
Seat heating ........................................ .85
Seats Adjusting lumbar support ................80
Adjusting the co-driver's seat ..........80
Adjusting the head restraint ............84
Armrest ............................................ 84
Cleaning the cover .........................261
Folding sea t..................................... 82
Important safety notes ....................80
Rea rbenchs eat............................... 83
Seat heating .................................... 85
Setting the driver's seat ................... 80
Swivel seat ....................................... 81
Twi nco-driver's seat ........................ 82
Securing loads
Important safety notes ..................234
Selector lever
Cleaning ......................................... 260
Sensors (cleaning instructions) .......259
Service Center see Qualified specialist workshop
Service interval display
Calling up the service due date ...... 249
Exceeding a service due date ........249
Notes ............................................. 249
Service due date (automatic
display) .......................................... 249Service products
Bio-diesel (FAME fuel ).................... 317
Brake fluid ............................. 245, 324
Coolant (engine) ............................ 324
Diese l............................................ 317
Diesel Exhaust Fluid (DEF) .............320
Engine oil ....................................... 321
Fuel ................................................ 317
Important safety notes ..................316
Power steering fluid .......................323
Refrigerant ..................................... 326
Transmission oil ............................. 323
Washer fluid .................................. .326
Settings
Resetting all (vehicles with
steering wheel buttons) .................183
Resetting submenus (vehicles
with steering wheel buttons) .........184
Setting the air distribution ...............113
Setting the airflow ............................114
Setting the clock Vehicles without steering wheel
buttons .......................................... 179
Vehicles with steering wheel
buttons .......................................... 186
Short journeys (diesel particle
filter) ................................................... 149
Side windows Cleaning ......................................... 257
Hinged sid ewindows ....................... 76
Important safety information ...........76
Opening/closing .............................. 76
Overview .......................................... 76
Problem (malfunction) .....................77
Resetting ......................................... 77
Sliding door
Child-proof locks .............................. 55
Cleaning ......................................... 259
Closing assist ................................... 72
Important safety notes ....................70
Opening/closing .............................. 70
SmartKey
Changing the battery .................66, 67
Changing the locking system
settings .......................................... 189
Checking the battery .......................66
Display message ............................ 209
Door central locking/unlocking .......64 16
Index
Page 23 of 334
Electrical ste
p................................ 219
ESP ®
.............................................. 210
ESP ®
function ................................ 213
Overview .......................................... 34
Seat bel t........................................ 219
Warning- and indicator lamps
ABS ................................................ 210
Air filter .......................................... 218
ASR ................................................ 210
BAS ................................................ 210
Battery charg e............................... 214
Brake wea r.................................... 214
Bulbs .............................................. 219
Doors ............................................. 219
Engine oil leve l............................... 214
Preglow .......................................... 217
Reserve fuel ................................... 216
Tire pressure monitor ....................218
Water separator ............................. 218
Windshield washer fluid .................219
Warning lamp .................................... 265
Warning triangle ................................ 265
Washer fluid Adding ........................................... 246
Capacities ...................................... 326
Display message ............................ 209
Indicator lamp ................................ 219
Notes ............................................. 326
Wiping with .................................... 103
Wheels
Changing awheel .......................... 302
Checking ........................................ 275
Cleaning ......................................... 258
Important safety notes ..................274
Interchanging/changing ................302
Mounting awheel .......................... 303
Removing and mounting the spare
wheel ............................................. 309
Storing ........................................... 303
Tightening torque ........................... 307
Window curtain air bag ....................... 46
Windows see Side windows
Windshiel dheating
Problem (malfunction) ...................115
Switching on/off ........................... 115Windshiel
dwasher fluid
Adding ........................................... 246
Indicator lamp ................................ 219
Windshiel dwipers
Problem (malfunction) ...................105
Rain and light sensor .....................103
Rea rwindow wiper ........................ 104
Replacing the wiper blades ....103, 104
Setting the sensitivity (vehicles
with steering wheel buttons and
rain/light sensor) ........................... 189
Switching on/off ........................... 103
Wiping with windshield washer
fluid ............................................... 103
Winte rdiesel ..................................... 318
Winte rdriving
Slippery roa dsurface s................... 152
Snow chains .................................. 277
Winter operation
General notes ................................ 276
Radiator cover ................................. 28
Winter tires
M+S tires ....................................... 276
Setting alimit speed ...................... 149
Wiper blades
Cleaning ......................................... 258
Replacing ....................................... 104
Workshop
see Qualified specialist workshop Index
21
Page 37 of 334
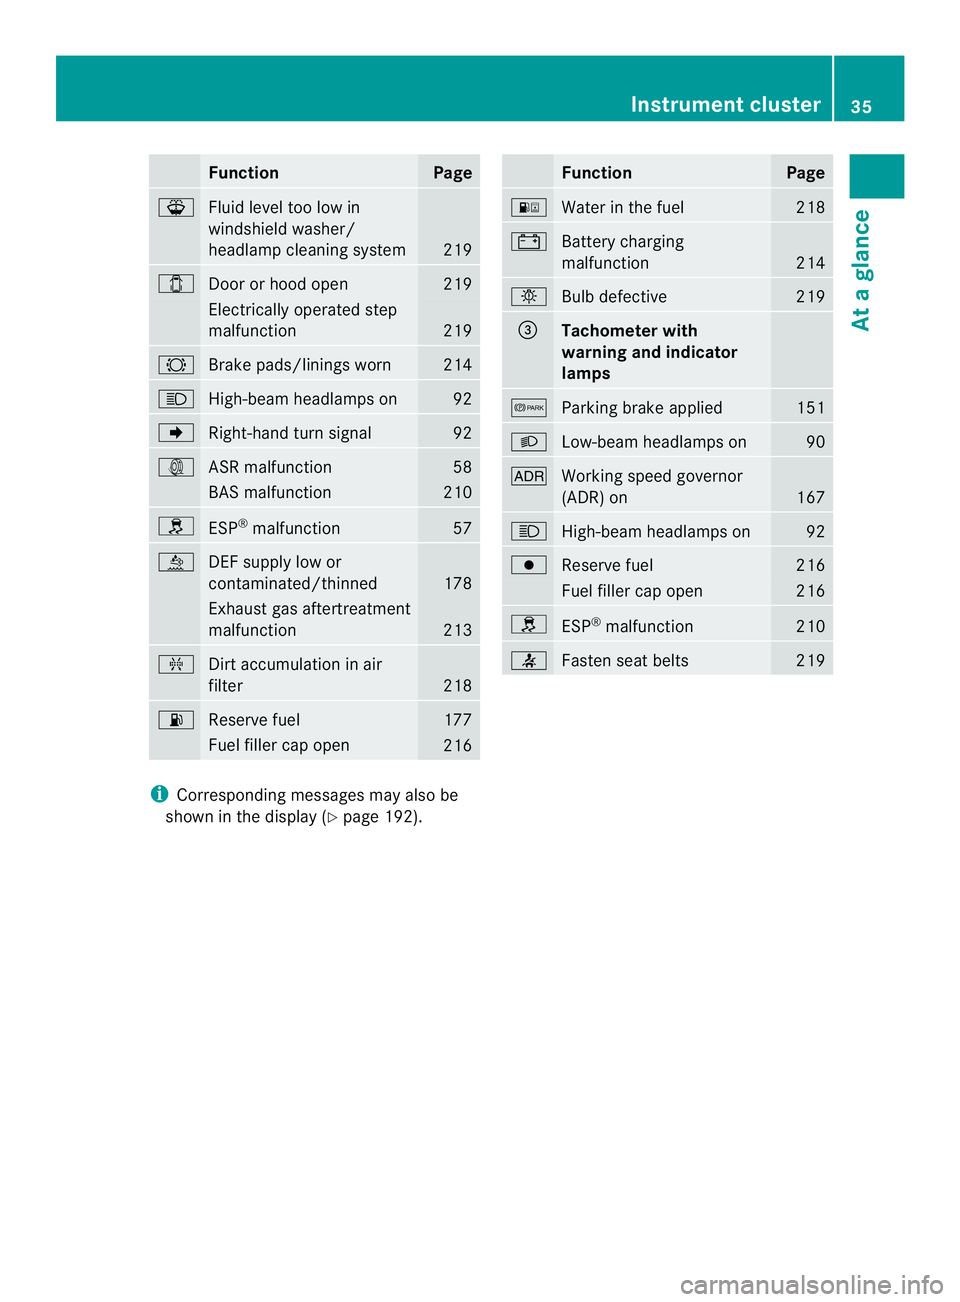
Function Page
000F
Fluid level too low in
windshield washer/
headlamp cleaning system
219
0004
Door or hood open 219
Electrically operated step
malfunction
219
0005
Brake pads/linings worn 214
0003
High-beam headlamps on 92
0003
Right-hand tur
nsignal 92
000A
ASR malfunction 58
BAS malfunction 210
0002
ESP
®
malfunction 57
0009
DE
Fs upply low or
contaminated/thinned 178
Exhaust gas aftertreatment
malfunction
213
0013
Dirt accumulation in air
filter
218
000A
Reserve fuel 177
Fuel fille
rcap open 216 Function Page
000E
Water in the fuel 218
0010
Battery charging
malfunction
214
0002
Bulb defective 219
0026
Tachometer with
warning and indicator
lamps
000B
Parking brake applied 151
0004
Low-beam headlamps on 90
0004
Working speed governor
(ADR) on
167
0003
High-beam headlamps on 92
0006
Reserve fuel 216
Fuel fille
rcap open 216
0002
ESP
®
malfunction 210
0014
Faste
nseat belts 219
i
Corresponding messages may also be
shown in the display (Y page 192). Instrument cluster
35At a glance
Page 96 of 334
signal lamps on the side of the vehicle
selected will light up.
The hazard warning lamps switch on
automatically if:
R
an air bag is deployed.
R you brake sharply and bring the vehicle to
a halt from a speed of more than 45 mph
(70 km/h).
If the hazard warning lamps have been
switched on automatically, press the 0011
hazard warning lamp switch to switch them
off.
i The hazard warning lamps work even
when the ignition is switched off. Headlamp cleaning system
The headlamps are cleaned automatically
with a high-pressure water jet if the "Wipe
with washer fluid" function is activated
(Y page 103) while the low-beam headlamps
are on and the engine is running.
Information on checking the washer fluid
level can be found in the "Maintenance and
care" (Y page 246) section. Headlamps fogged up on the inside
The headlamps may fog up on the inside if
there is high atmospheric humidity.
X Switch on the low-beam headlamps and
drive off.
The level of moisture diminishes,
depending on the length of the journey and
the weather conditions (humidity and
temperature).
If the level of moisture does not diminish:
X Have the headlamps checked at a qualified
specialist workshop. Interior lighting
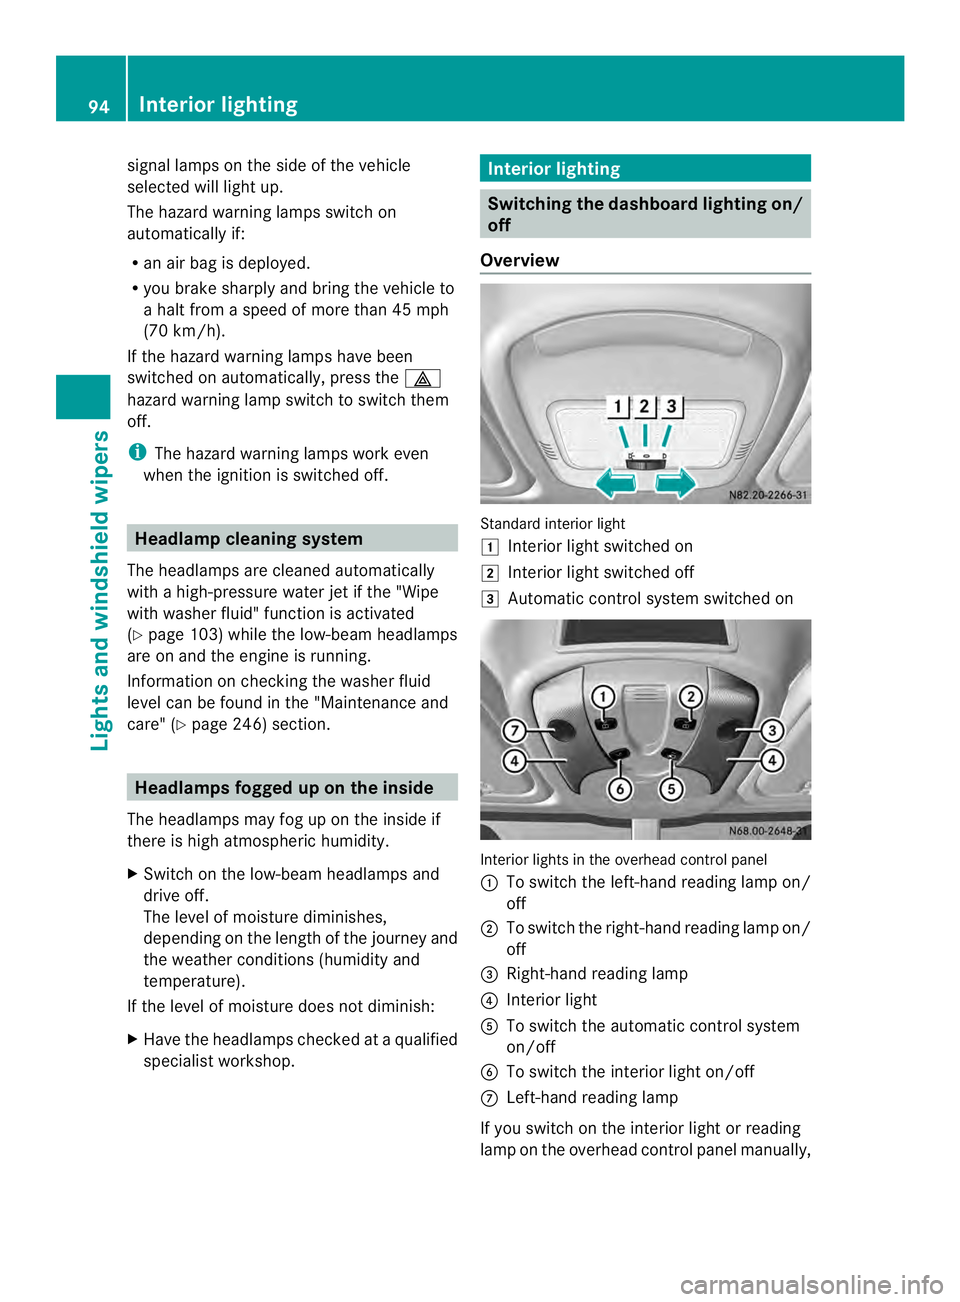
Switching the dashboard lighting on/
off
Overview Standard interior light
0008
Interior light switched on
0009 Interior light switched off
000A Automatic control system switched on Interior lights in the overhead control panel
0005 To switch the left-hand reading lamp on/
off
0006 To switch the right-hand reading lamp on/
off
0026 Right-hand reading lamp
0025 Interior light
0023 To switch the automatic control system
on/off
0024 To switch the interior light on/off
0018 Left-hand reading lamp
If you switch on the interior light or reading
lamp on the overhead control panel manually, 94
Interior lightingLights and windshield wipers
Page 105 of 334
X
Insert new bulb 0006.
X For interior lights withou taswitch, fold
back protective cover 0026.
X Align lamp housing 0005on the left-hand side
and engage.
i Vehicles with LED lighting: if an LED is
faulty, consult a qualified specialist
workshop.
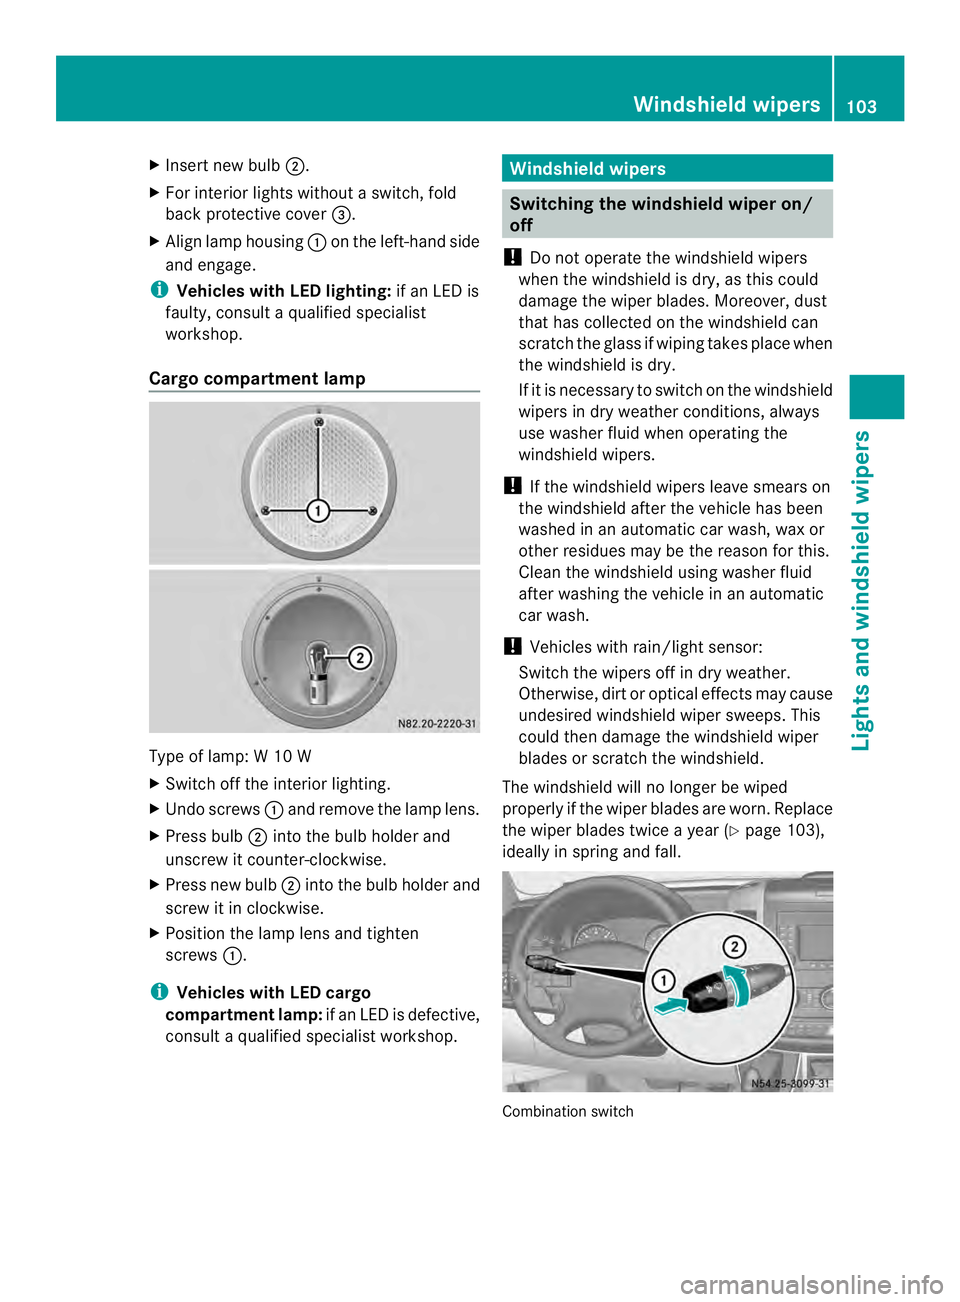
Cargo compartment lamp Type of lamp: W 10 W
X
Switch off the interior lighting.
X Undo screws 0005and remove the lamp lens.
X Press bulb 0006into the bulb holder and
unscrew it counter-clockwise.
X Press new bulb 0006into the bulb holder and
screw it in clockwise.
X Position the lamp lens and tighten
screws 0005.
i Vehicles with LED cargo
compartment lamp: if an LED is defective,
consult a qualified specialist workshop. Windshield wipers
Switching the windshield wiper on/
off
! Do not operate the windshieldw ipers
when the windshield is dry, as this could
damage the wiper blades. Moreover, dust
that has collected on the windshield can
scratch the glass if wiping takes place when
the windshield is dry.
If it is necessary to switch on the windshield
wipers in dry weathe rconditions, always
use washer fluid when operating the
windshield wipers.
! If the windshield wipers leave smears on
the windshield after the vehicle has been
washed in an automatic car wash, wax or
other residues may be the reason for this.
Clean the windshield using washer fluid
after washing the vehicle in an automatic
car wash.
! Vehicles with rain/light sensor:
Switch the wipers off in dry weather.
Otherwise, dirt or optical effects may cause
undesired windshield wiper sweeps. This
could then damage the windshield wiper
blades or scratch the windshield.
The windshield will no longer be wiped
properly if the wiper blades are worn. Replace
the wiper blades twice a year (Y page 103),
ideally in spring and fall. Combination switch Windshield wipers
103Lights and windshiel dwipers Z
Page 106 of 334
X
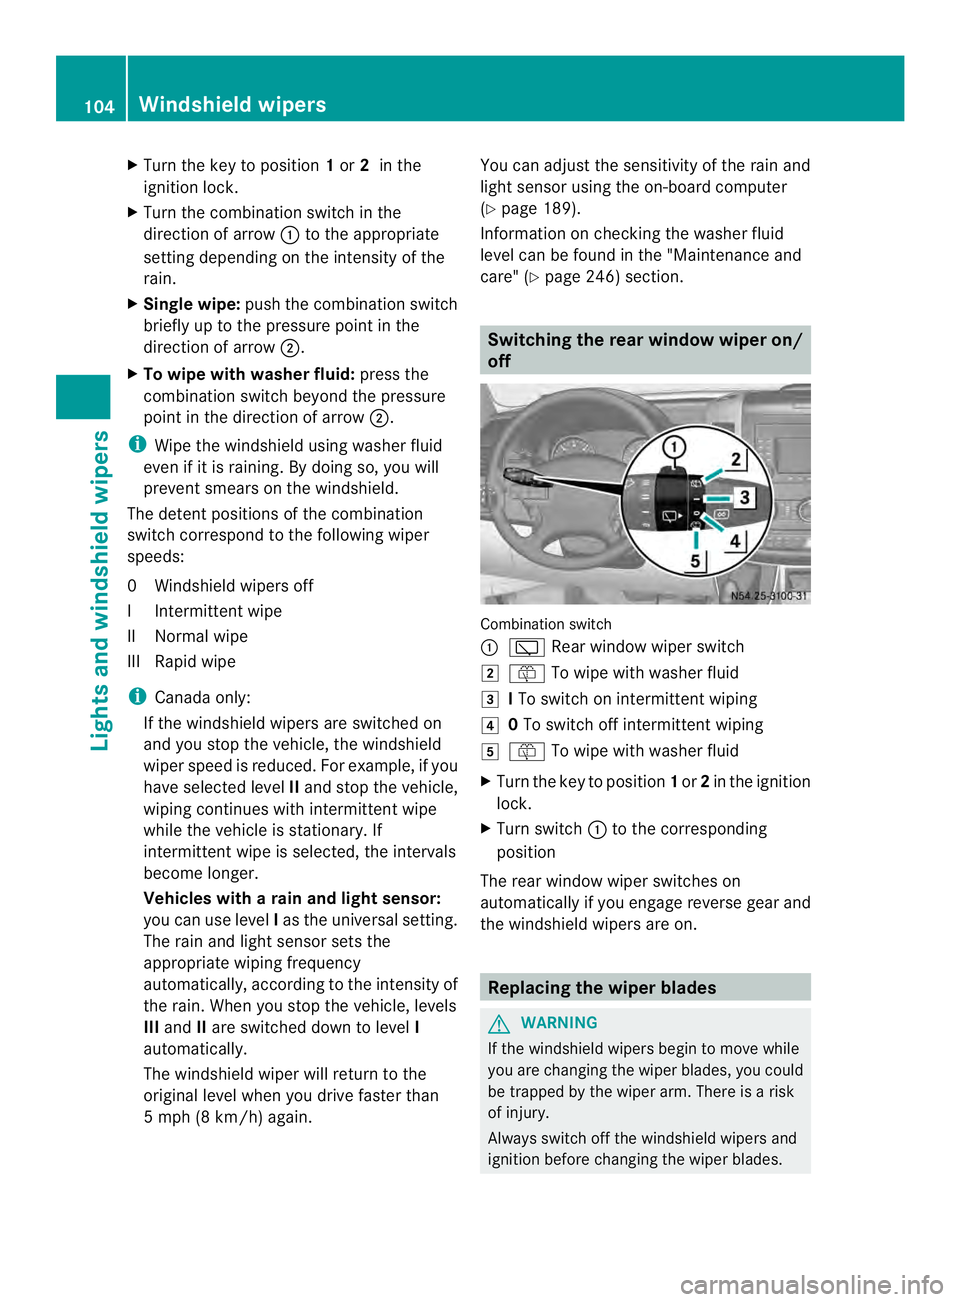
Turn the key to position 1or 2in the
ignition lock.
X Turn the combination switch in the
direction of arrow 0005to the appropriate
setting depending on the intensity of the
rain.
X Single wipe: push the combination switch
briefly up to the pressure point in the
direction of arrow 0006.
X To wipe with washer fluid: press the
combination switch beyond the pressure
point in the direction of arrow 0006.
i Wipe the windshield using washer fluid
even if it is raining. By doing so, you will
prevent smears on the windshield.
The detent positions of the combination
switch correspond to the following wiper
speeds:
0W indshield wipers off
II ntermittent wipe
II Normal wipe
III Rapid wipe
i Canada only:
If the windshield wipers are switched on
and you stop the vehicle, the windshield
wipe rspeed is reduced. For example, if you
have selected level IIand stop the vehicle,
wiping continues with intermitten twipe
while the vehicle is stationary. If
intermitten twipe is selected, the intervals
become longer.
Vehicles with arain and light sensor:
you can use level Ias the universal setting.
The rai nand light sensor sets the
appropriate wiping frequency
automatically, according to the intensity of
the rain. Whe nyou stop the vehicle, levels
III and IIare switched down to level I
automatically.
The windshield wiper will return to the
original level when you drive faster than
5 mph (8 km/h) again. You can adjust the sensitivity of the rain and
light sensor using the on-board computer
(Y
page 189).
Information on checking the washer fluid
level can be found in the "Maintenance and
care" (Y page 246) section. Switching the rear window wiper on/
off
Combination switch
0005
0001 Rear window wiper switch
0009 0006 To wipe with washer fluid
000A ITo switch on intermittent wiping
000E 0To switch off intermittent wiping
000F 0006 To wipe with washer fluid
X Turn the key to position 1or 2in the ignition
lock.
X Turn switch 0005to the corresponding
position
The rear window wiper switches on
automatically if you engage reverse gear and
the windshield wipers are on. Replacing the wiper blades
G
WARNING
If the windshield wipers begin to move while
you are changing the wiper blades, you could
be trapped by the wiper arm. There is a risk
of injury.
Always switch off the windshield wipers and
ignition before changing the wiper blades. 104
Windshield wipersLights and windshiel
dwipers
Page 211 of 334
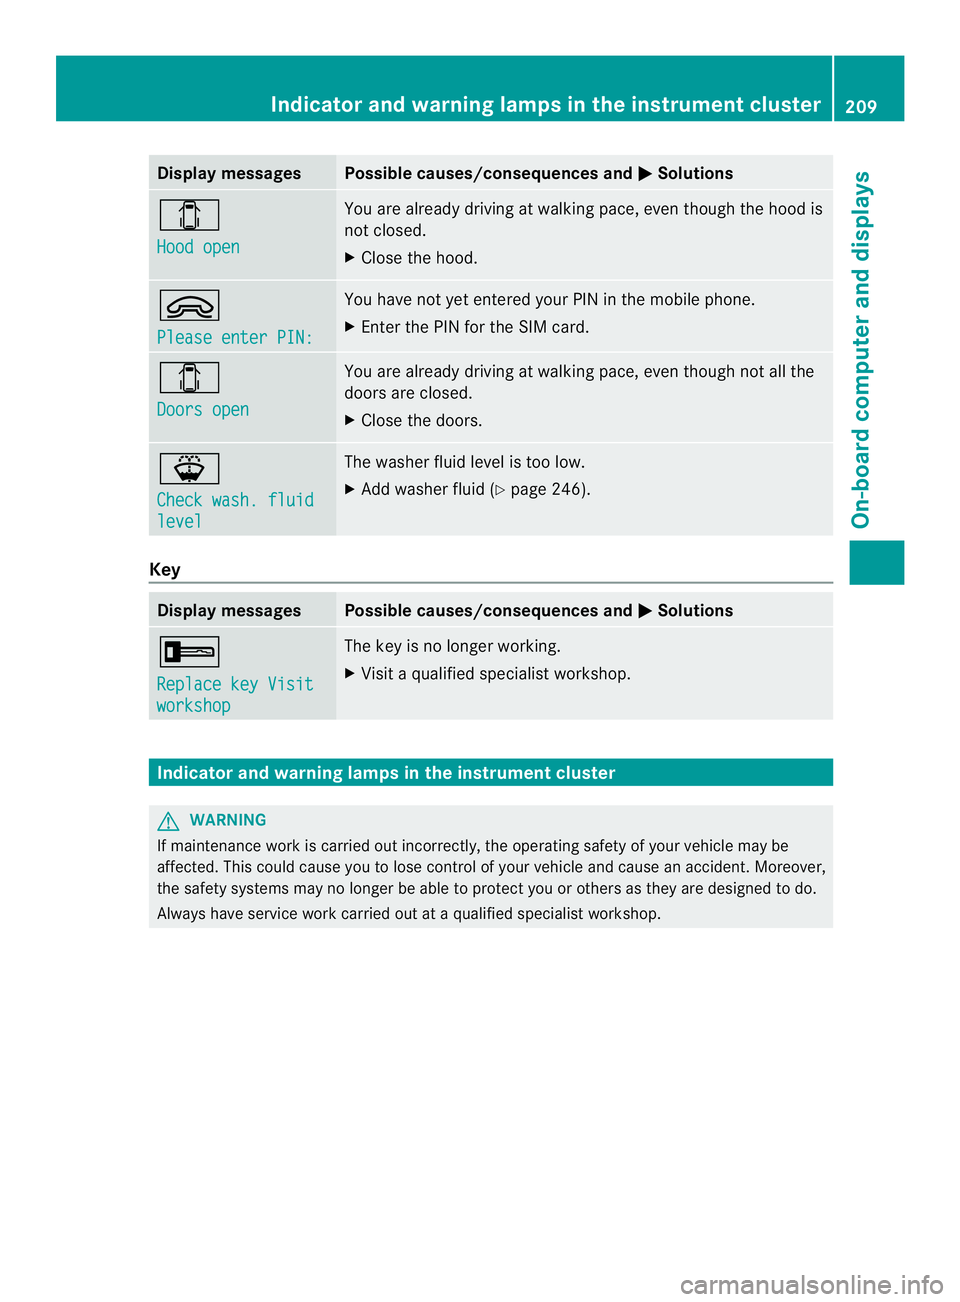
Display messages Possible causes/consequences and
0004 Solutions
0004
Hood open You are already driving at walking pace, eve
nthough the hood is
not closed.
X Close the hood. 0002
Please enter PIN: You have not yet entered your PIN in the mobile phone.
X
Enter the PIN for the SIM card. 0004
Doors open You are already driving at walking pace, even though not all the
doors are closed.
X
Close the doors. 000F
Check wash. fluid
level The washer fluid level is too low.
X
Add washer fluid (Y page 246).Key
Display messages Possible causes/consequences and
0004 Solutions
0005
Replace key Visit
workshop The key is no longer working.
X
Visit a qualified specialist workshop. Indicator and warning lamps in the instrument cluster
G
WARNING
If maintenance work is carried out incorrectly, the operating safety of your vehicle may be
affected. This could cause you to lose control of your vehicle and cause an accident. Moreover,
the safety systems may no longer be able to protect you or others as they are designed to do.
Always have service work carried out at a qualified specialist workshop. Indicator and warning lamps in the instrument cluster
209On-board computer and displays Z
Page 221 of 334
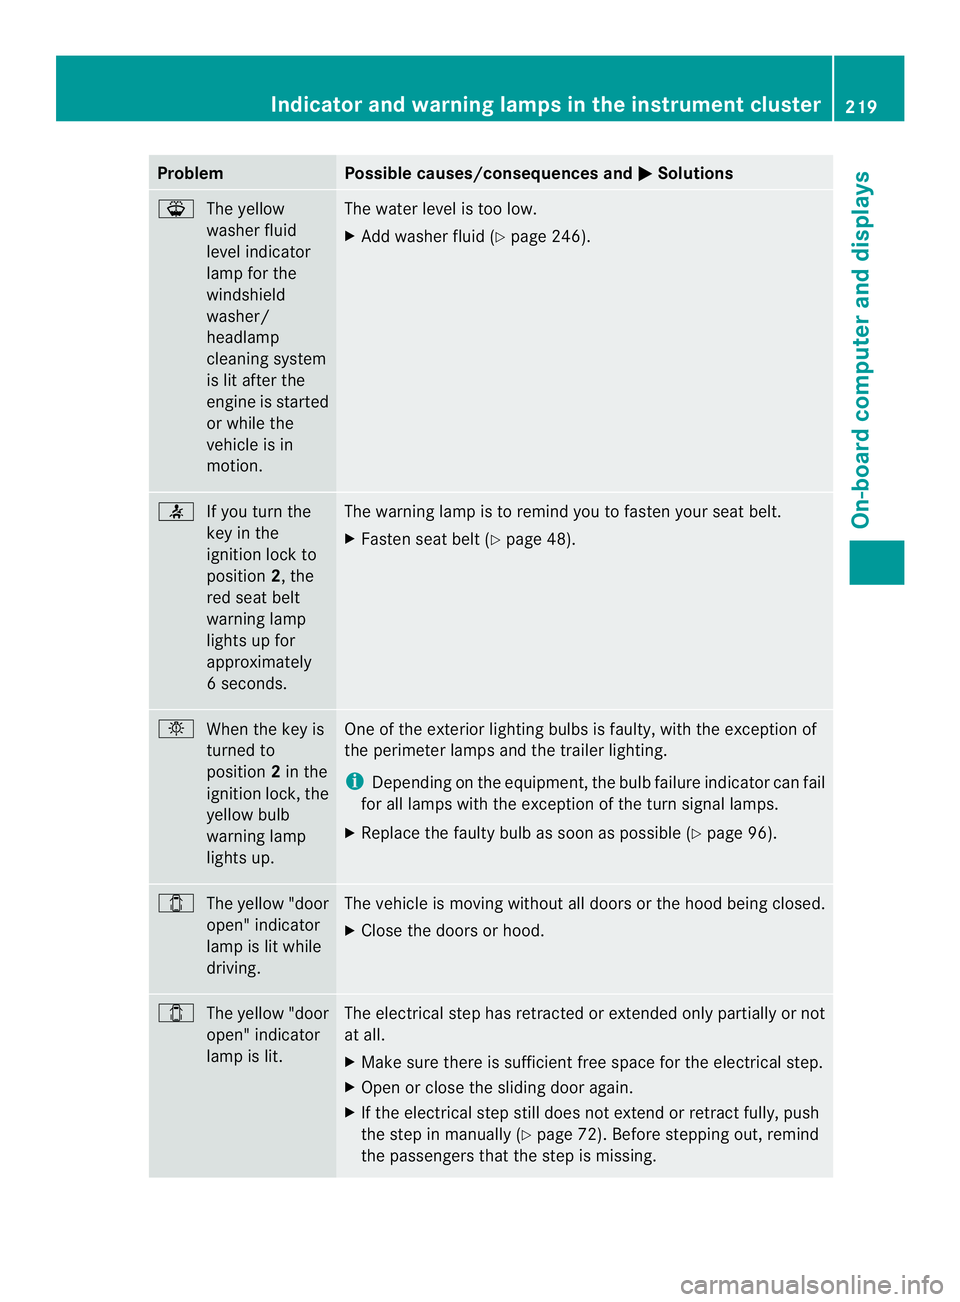
Problem Possible causes/consequences and
0004 Solutions
000F
The yellow
washer fluid
level indicator
lamp for the
windshield
washer/
headlamp
cleaning system
is lit after the
engine is started
or while the
vehicle is in
motion. The water level is too low.
X
Add washer fluid (Y page 246). 0014
If you turn the
key in the
ignition lock to
position 2, the
red seat belt
warning lamp
lights up for
approximately
6s econds. The warning lamp is to remind you to fasten your seat belt.
X
Fasten seat belt (Y page 48). 0002
When the key is
turned to
position 2in the
ignition lock, the
yellow bulb
warning lamp
lights up. One of the exterior lighting bulbs is faulty, with the exception of
the perimeter lamps and the trailer lighting.
i
Depending on the equipment, the bulb failure indicator can fail
for all lamps with the exception of the turn signal lamps.
X Replace the faulty bulb as soon as possible (Y page 96).0004
The yellow "door
open" indicator
lamp is lit while
driving. The vehicle is moving without all doors or the hood being closed.
X
Close the doors or hood. 0004
The yellow "door
open" indicator
lamp is lit. The electrical step has retracted or extended only partially or not
at all.
X Make sure there is sufficien tfree space for the electrical step.
X Open or close the sliding door again.
X If the electrical step still does not extend or retract fully, push
the step in manually (Y page 72). Before stepping out, remind
the passengers that the step is missing. Indicator and warnin
glamps in the instrument cluster
219On-board computer and displays Z
Page 248 of 334
Store brake fluid only in the original closed
container and keep it out of the reach of
children. Comply with safety regulations
when handling brake fluid.
! Brake fluid corrodes paint, plastic and
rubber .Ifpaint, plastic or rubbe rhas come
into contact with brake fluid, rinse with
wate rimmediately. G
WARNING
The brake fluid constantly absorbs moisture
from the air. This lowers the boiling point of
the brake fluid. If the boiling point of the brake
fluid is too low, vapo rpockets may form in the
brake system when the brakes are applied
hard. This would impair braking efficiency.
There is a risk of an accident.
You should have the brake fluid renewed at
the specified intervals.
! If the brake fluid level in the brake fluid
reservoir has fallen to the MIN mark or
below, check the brake system
immediately for leaks. Also check the
thickness of the brake linings. Visit a
qualified specialist workshop immediately.
Do not add brake fluid. This does not
correct the malfunction.
Have the brake fluid renewed every two
years.
Observe the information on brake fluid in the
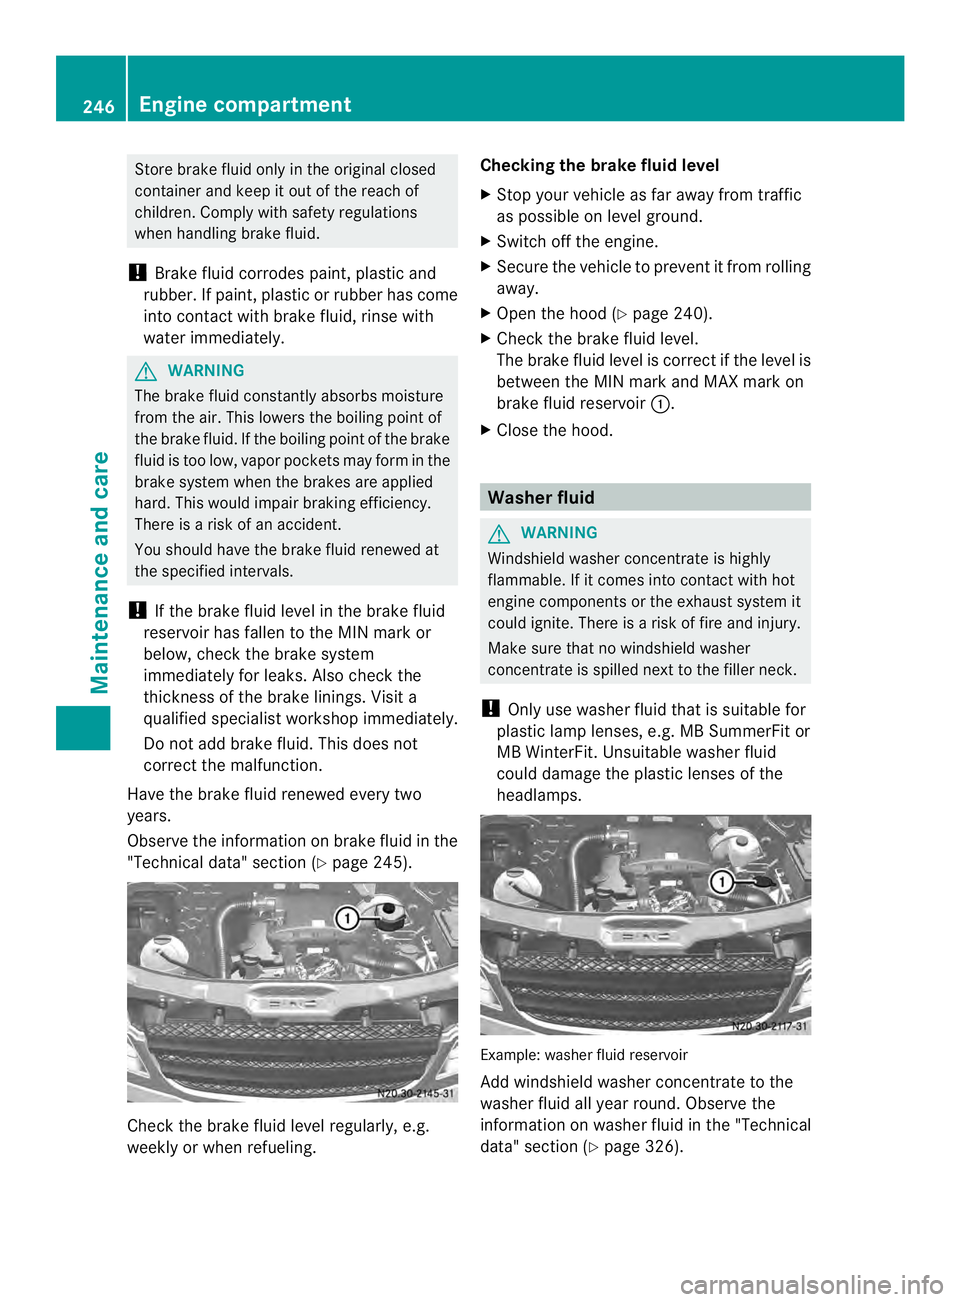
"Technical data" section ( Ypage 245). Check the brake fluid level regularly, e.g.
weekly or when refueling. Checking the brake fluid level
X
Stop your vehicle as far away from traffic
as possible on level ground.
X Switch off the engine.
X Secure the vehicle to prevent it from rolling
away.
X Open the hood (Y page 240).
X Check the brake fluid level.
The brake fluid level is correc tifthe level is
between the MIN mark and MAX mark on
brake fluid reservoir 0005.
X Close the hood. Washer fluid
G
WARNING
Windshield washer concentrate is highly
flammable. If it comes into contact with hot
engine components or the exhaust system it
could ignite. There is a risk of fire and injury.
Make sure that no windshield washer
concentrate is spilled next to the filler neck.
! Only use washer fluid that is suitable for
plastic lamp lenses, e.g. MB SummerFit or
MB WinterFit. Unsuitable washer fluid
could damage the plastic lenses of the
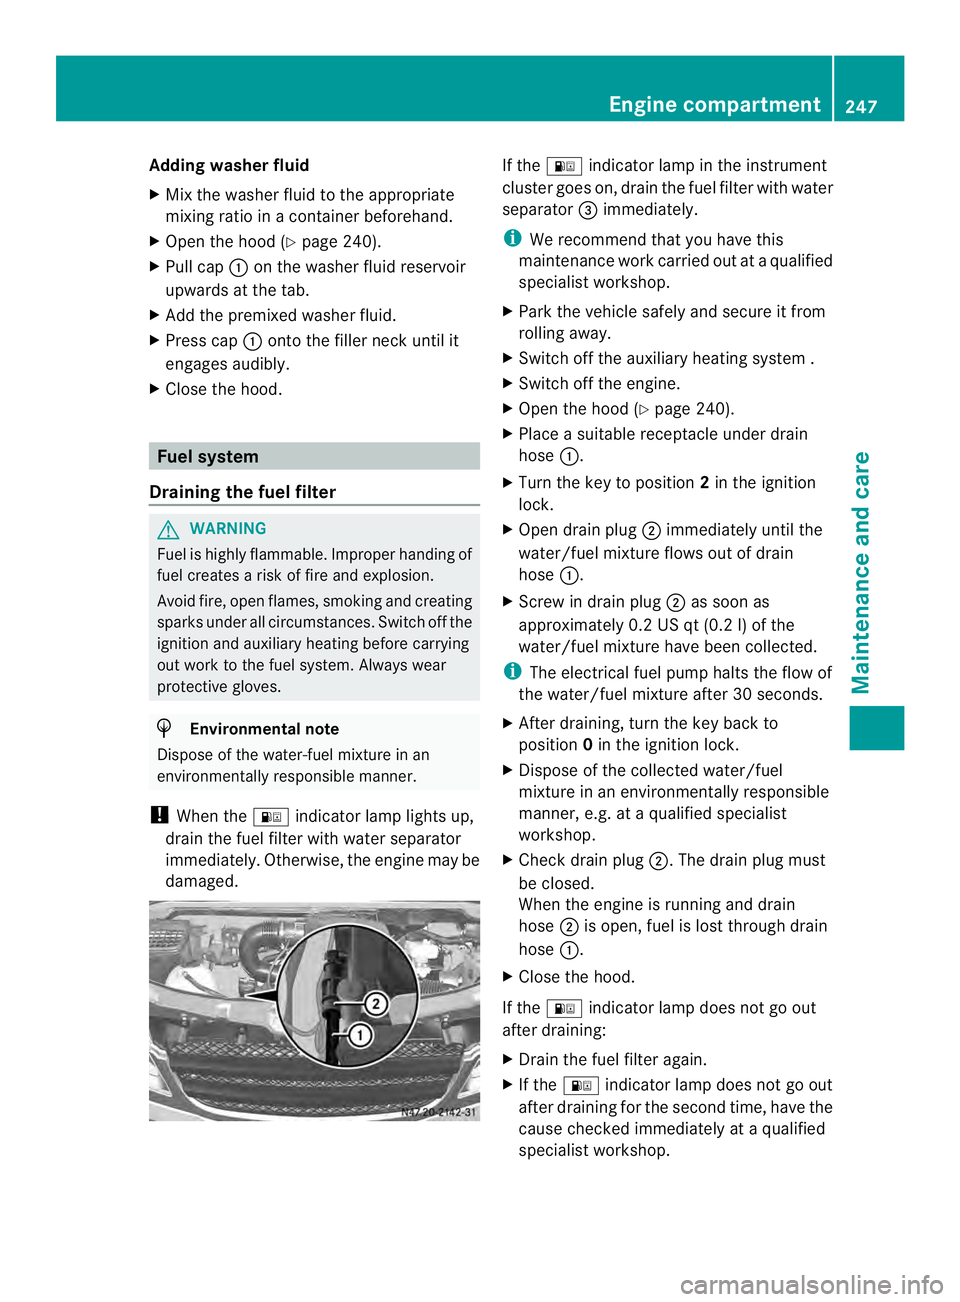
headlamps. Example: washer fluid reservoir
Add windshield washer concentrate to the
washer fluid all year round. Observe the
information on washer fluid in the "Technical
data" section (Y
page 326).246
Engine compartmentMaintenance and care
Page 249 of 334
Adding washer fluid
X
Mix the washe rfluid to the appropriate
mixing ratio in a container beforehand.
X Open the hood (Y page 240).
X Pull cap 0005on the washer fluid reservoir
upwards at the tab.
X Add the premixed washer fluid.
X Press cap 0005onto the filler neck until it
engages audibly.
X Close the hood. Fuel system
Draining the fuel filter G
WARNING
Fuel is highly flammable. Improper handing of
fuel creates a risk of fire and explosion.
Avoid fire, open flames ,smoking and creating
sparks under all circumstances. Switch off the
ignitio nand auxiliary heating before carrying
ou tw ork to the fuel system. Always wear
protective gloves. H
Environmental note
Dispose of the water-fuel mixture in an
environmentally responsible manner.
! When the 000Eindicator lamp lights up,
drain the fuel filter with water separator
immediately. Otherwise, the engine may be
damaged. If the
000E indicator lamp in the instrument
cluster goes on, drain the fuel filter with water
separator 0026immediately.
i We recommend that you have this
maintenance work carried out at a qualified
specialist workshop.
X Park the vehicle safely and secure it from
rolling away.
X Switch off the auxiliary heating system .
X Switch off the engine.
X Open the hood (Y page 240).
X Place a suitable receptacle under drain
hose 0005.
X Turn the key to position 2in the ignition
lock.
X Open drain plug 0006immediately until the
water/fuel mixture flows out of drain
hose 0005.
X Screw in drain plug 0006as soon as
approximately 0.2 US qt (0.2 l) of the
water/fuel mixture have been collected.
i The electrical fuel pump halts the flow of
the water/fuel mixture after 30 seconds.
X After draining, turn the key back to
position 0in the ignition lock.
X Dispose of the collected water/fuel
mixture in an environmentally responsible
manner, e.g. at a qualified specialist
workshop.
X Check drain plug 0006.The drain plug must
be closed.
When the engine is running and drain
hose 0006is open, fuel is lost through drain
hose 0005.
X Close the hood.
If the 000E indicator lamp does not go out
after draining:
X Drain the fuel filter again.
X If the 000E indicator lamp does not go out
after draining for the second time, have the
cause checked immediately at a qualified
specialist workshop. Engine compartment
247Maintenance and care Z