MERCEDES-BENZ SPRINTER 2014 MY14 Operator’s Manual
Manufacturer: MERCEDES-BENZ, Model Year: 2014, Model line: SPRINTER, Model: MERCEDES-BENZ SPRINTER 2014Pages: 338, PDF Size: 6.78 MB
Page 291 of 338
Always observe the maximum permissible
speed specified for the M+S tires you have
mounted.
If you mount M+S tires that have a lower max-
imum permissible speed than that of the vehi-
cle, affix a corresponding warning label in the
driver's field of vision. You can obtain this at
a qualified specialist workshop.
Once you have mounted the winter tires:
X Check the tire pressure (Y page 290).
X Reactivate the tire pressure moni-
tor*(Y page 295). Snow chains
G
WARNING
If you drive too fast with snow chains
mounted, they may snap. As a result, you
could injure others and damage the vehicle.
There is a risk of an accident.
Observe the maximum permissible speed for
operation with snow chains.
When driving with snow chains fitted, do not
exceed the maximum permissible speed of
30 mph (50 km/h). Observe the country-spe-
cific laws and regulations for operation with
snow chains.
! Check the snow chains for damage before
mounting them. Damaged or worn snow
chains may snap and damage the following
components:
R wheel
R wheel housing
R wheel suspension
For this reason, you must use only snow
chains that are free of defects. Observe the
manufacturer's mounting instructions.
! Vehicles with steel wheels: if you
mount snow chains on steel wheels, you
may damage the hub caps. Remove the hub
caps from the relevant wheels before
mounting the snow chains. Snow chains increase traction on roads in
wintry conditions.
For reasons of safety we only recommend
using snow chains or traction aids that are
approved for the Sprinter. The snow chains or
traction aids must be of class U or meet the
SAE type U specification. Information on
snow chains is available at any qualified spe-
cialist workshop.
When mounting snow chains, please bear the
following points in mind:
R Snow chains cannot be mounted on all
wheel/tire combinations. When mounting
the snow chains, note the permissible tire
and snow chain dimensions.
R Mount snow chains only in pairs and only
to the rear wheels. On vehicles with twin
tires, mount the snow chains to the outer
wheels. Observe the manufacturer's
mounting instructions.
R Only use snow chains when the road is cov-
ered by a layer of snow. Remove the snow
chains as soon as possible when you come
to a road that is not snow-covered.
R The use of snow chains may be restricted
by local regulations. Observe the appropri-
ate regulations before mounting snow
chains.
R When driving with snow chains fitted, do
not exceed the maximum permissible
speed of 30 mph (50 km/h).
R Check the tension of the chains after a dis-
tance of approximately 0.5 miles (1.0 km).
You can deactivate ASR (Y page 60) when
pulling away with snow chains mounted. This
allows the wheels to spin in a controlled man-
ner, achieving an increased driving force (cut-
ting action). Operation in winter
289Wheels and tires
* optional Z
Page 292 of 338
Tire pressure
Tire pressure specifications
Important safety notes G
WARNING
Underinflated or overinflated tires pose the
following risks:
R the tires may burst, especially as the load
and vehicle speed increase.
R the tires may wear excessively and/or
unevenly, which may greatly impair tire
traction.
R the driving characteristics, as well as steer-
ing and braking, may be greatly impaired.
There is a risk of an accident.
Follow recommended tire inflation pressures
and check the pressure of all the tires includ-
ing the spare wheel:
R monthly, at least
R if the load changes
R before beginning a long journey
R under different operating conditions, e.g.
off-road driving
If necessary, correct the tire pressure.
i The specifications shown on the sample
Tire and Loading Information placard and
tire pressure table are examples. Tire pres-
sure data are vehicle-specific and may devi-
ate from the data illustrated here. The tire
pressure data applicable to your vehicle
can be found on the Tire & Loading Infor-
mation placard or tire pressure plate of
your vehicle. H
Environmental note
Check the tire pressure regularly, at least
every 14 days. General notes You will find information on tire pressure for
the vehicle's factory-mounted tires on the
plates described here.
You will find a table of recommended tire
pressure on the Tire and Loading Information
placard
5
or on the tire pressure table on the
B-pillar on the driver's side of the vehicle.
Further information on tire pressure can be
obtained at a qualified specialist workshop.
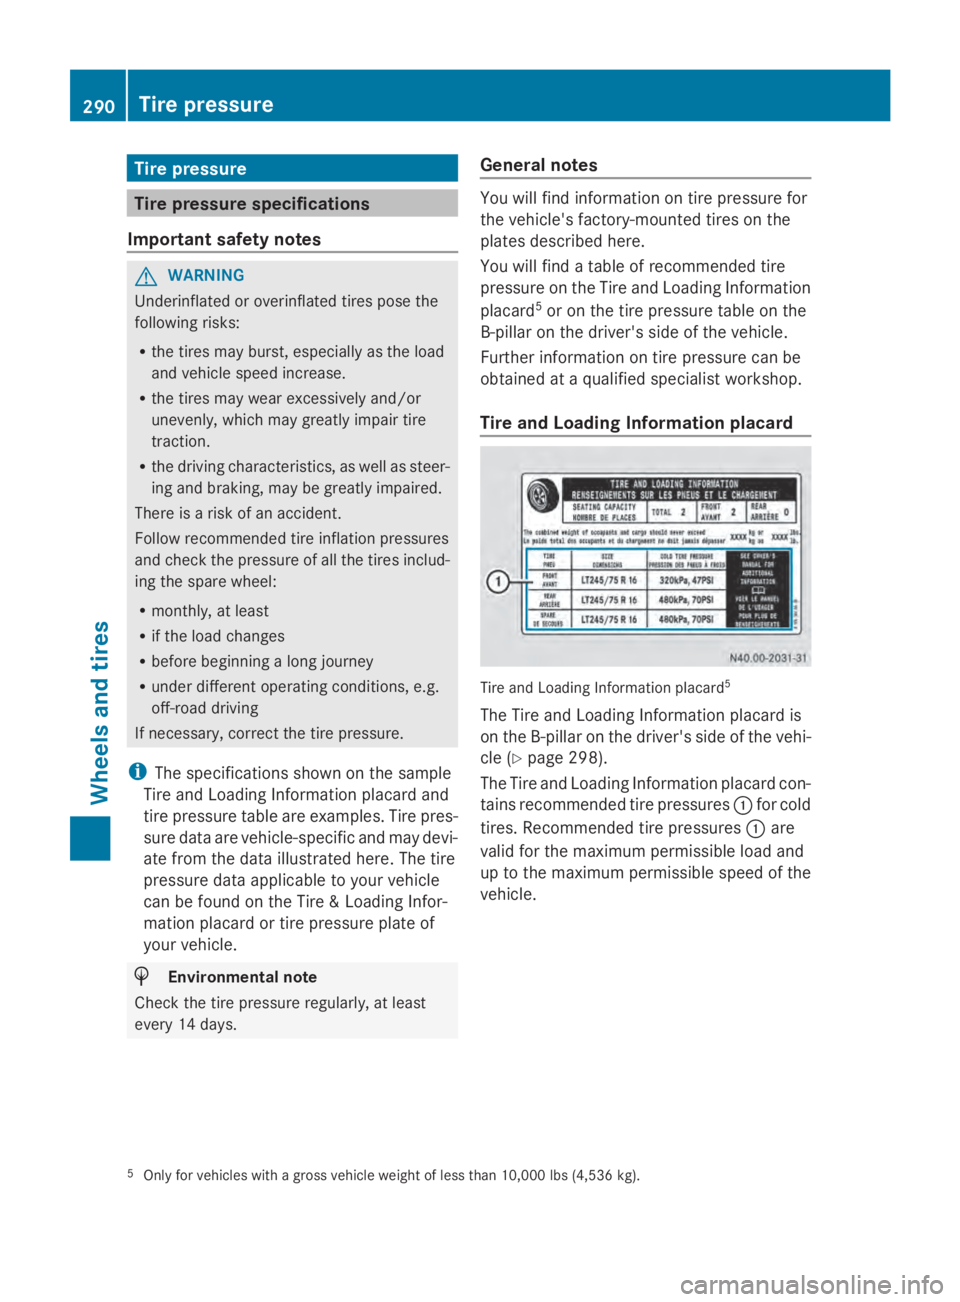
Tire and Loading Information placard Tire and Loading Information placard
5
The Tire and Loading Information placard is
on the B-pillar on the driver's side of the vehi-
cle (Y page 298).
The Tire and Loading Information placard con-
tains recommended tire pressures 0043for cold
tires. Recommended tire pressures 0043are
valid for the maximum permissible load and
up to the maximum permissible speed of the
vehicle.
5 Only for vehicles with a gross vehicle weight of less than 10,000 lbs (4,536 kg). 290
Tire pressureWheels and tires
Page 293 of 338
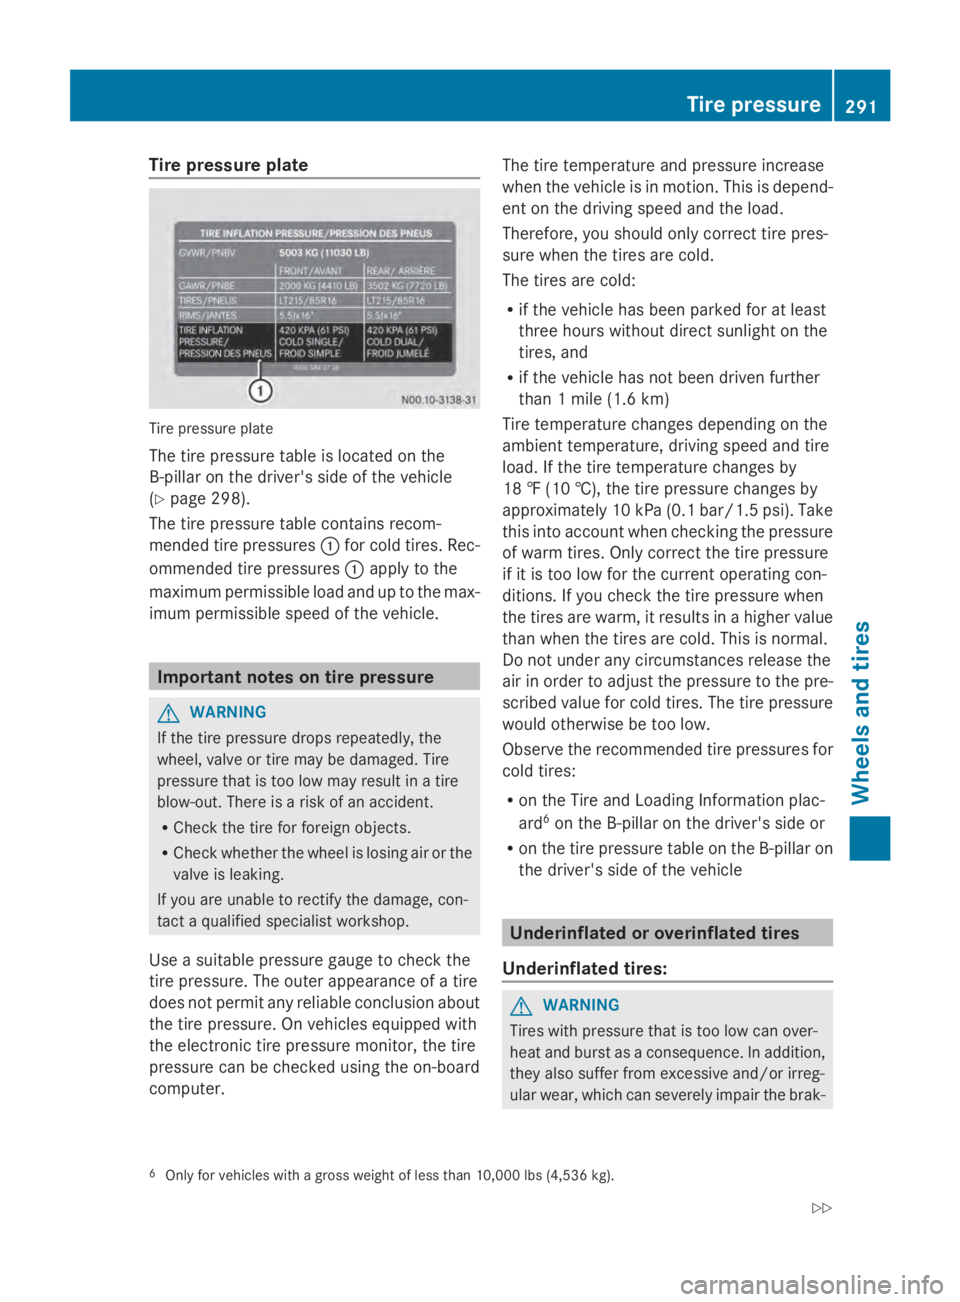
Tire pressure plate
Tire pressure plate
The tire pressure table is located on the
B-pillar on the driver's side of the vehicle
(Y page 298).
The tire pressure table contains recom-
mended tire pressures 0043for cold tires. Rec-
ommended tire pressures 0043apply to the
maximum permissible load and up to the max-
imum permissible speed of the vehicle. Important notes on tire pressure
G
WARNING
If the tire pressure drops repeatedly, the
wheel, valve or tire may be damaged. Tire
pressure that is too low may result in a tire
blow-out. There is a risk of an accident.
R Check the tire for foreign objects.
R Check whether the wheel is losing air or the
valve is leaking.
If you are unable to rectify the damage, con-
tact a qualified specialist workshop.
Use a suitable pressure gauge to check the
tire pressure. The outer appearance of a tire
does not permit any reliable conclusion about
the tire pressure. On vehicles equipped with
the electronic tire pressure monitor, the tire
pressure can be checked using the on-board
computer. The tire temperature and pressure increase
when the vehicle is in motion. This is depend-
ent on the driving speed and the load.
Therefore, you should only correct tire pres-
sure when the tires are cold.
The tires are cold:
R
if the vehicle has been parked for at least
three hours without direct sunlight on the
tires, and
R if the vehicle has not been driven further
than 1 mile (1.6 km)
Tire temperature changes depending on the
ambient temperature, driving speed and tire
load. If the tire temperature changes by
18 ‡ (10 †),the tire pressure changes by
approximately 10 kPa (0.1 ba r/1.5 psi). Take
this into account when checking the pressure
of warm tires. Only correct the tire pressure
if it is too low for the current operating con-
ditions. If you check the tire pressure when
the tires are warm, it results in a higher value
than when the tires are cold. This is normal.
Do not under any circumstances release the
air in order to adjust the pressure to the pre-
scribed value for cold tires. The tire pressure
would otherwise be too low.
Observe the recommended tire pressures for
cold tires:
R on the Tire and Loading Information plac-
ard 6
on the B-pillar on the driver's side or
R on the tire pressure table on the B-pillaron
the driver's side of the vehicle Underinflated or overinflated tires
Underinflated tires: G
WARNING
Tires with pressure that is too low can over-
heat and burst as a consequence. In addition,
they also suffer from excessive and/or irreg-
ular wear, which can severely impair the brak-
6 Only for vehicles with a gross weight of less than 10,000 lbs (4,536 kg). Tire pressure
291Wheels and tires
Z
Page 294 of 338
ing properties and the driving characteristics.
There is a risk of an accident.
Avoid tire pressures that are too low in all the
tires, including the spare wheel.
Underinflated tires can:
R fail from being overheated
R adversely affect handling
R wear excessively and/or unevenly
R have an adverse effect on fuel consumption
Overinflated tires G
WARNING
Tires with excessively high pressure can burst
because they are damaged more easily by
road debris, potholes etc. In addition, they
also suffer from irregular wear, which can
severely impair the braking properties and the
driving characteristics. There is a risk of an
accident.
Avoid tire pressures that are too high in all the
tires, including the spare wheel.
Overinflated tires can:
R increase the braking distance
R adversely affect handling
R wear excessively and/or unevenly
R adversely affect ride comfort
R be more susceptible to damage
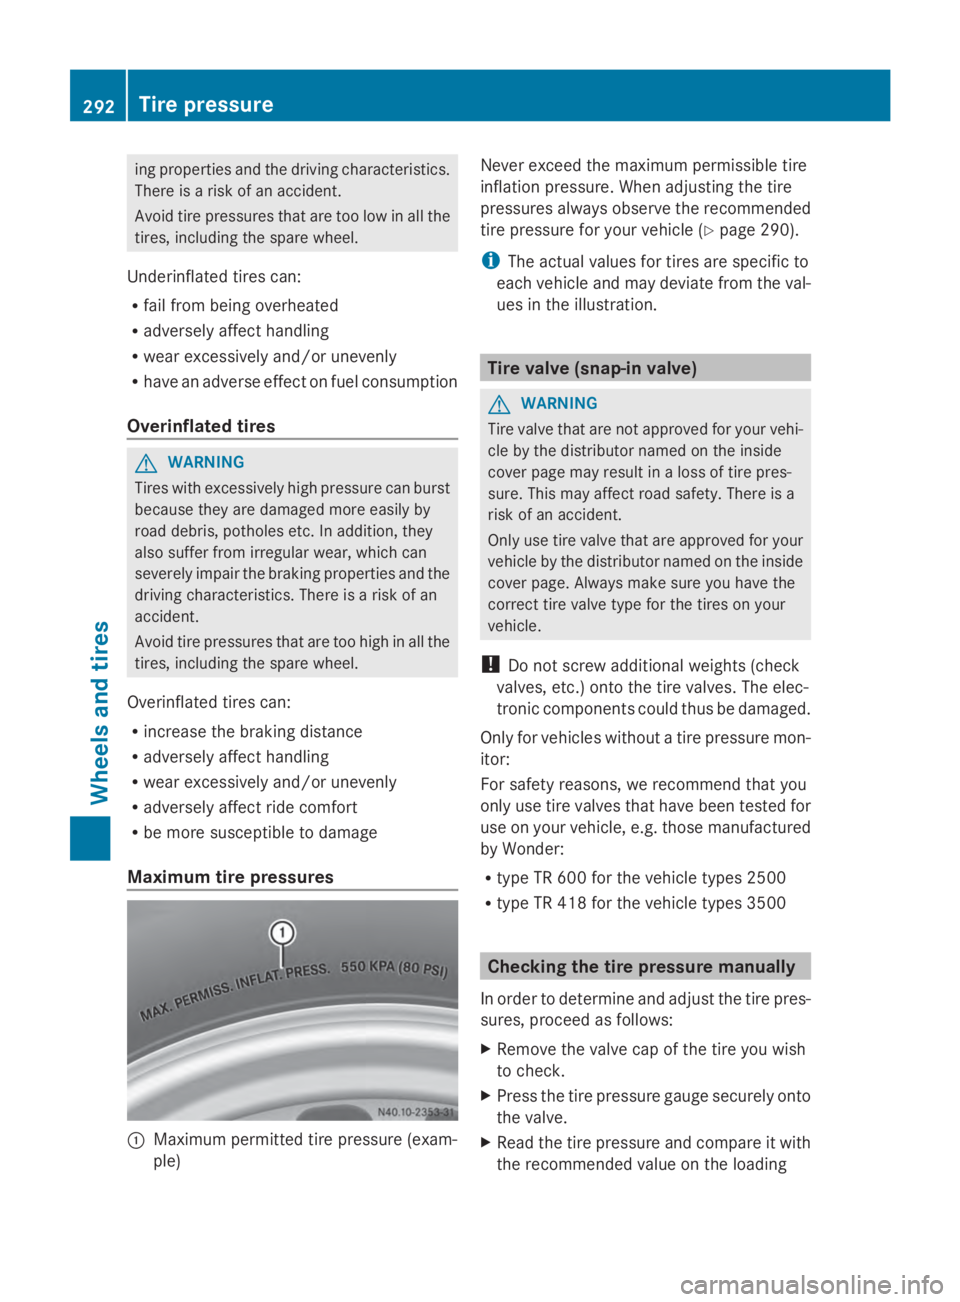
Maximum tire pressures 0043
Maximum permitted tire pressure (exam-
ple) Never exceed the maximum permissible tire
inflation pressure. When adjusting the tire
pressures always observe the recommended
tire pressure for your vehicle (Y
page 290).
i The actual values for tires are specific to
each vehicle and may deviate from the val-
ues in the illustration. Tire valve (snap-in valve)
G
WARNING
Tire valve that are not approved for your vehi-
cle by the distributor named on the inside
cover page may result in a loss of tire pres-
sure. This may affect road safety. There is a
risk of an accident.
Only use tire valve that are approved for your
vehicle by the distributor named on the inside
cover page. Always make sure you have the
correct tire valve type for the tires on your
vehicle.
! Do not screw additional weights (check
valves, etc.) onto the tire valves. The elec-
tronic components could thus be damaged.
Only for vehicles without a tire pressure mon-
itor:
For safety reasons, we recommend that you
only use tire valves that have been tested for
use on your vehicle, e.g. those manufactured
by Wonder:
R type TR 600 for the vehicle types 2500
R type TR 418 for the vehicle types 3500 Checking the tire pressure manually
In order to determine and adjust the tire pres-
sures, proceed as follows:
X Remove the valve cap of the tire you wish
to check.
X Press the tire pressure gauge securely onto
the valve.
X Read the tire pressure and compare it with
the recommended value on the loading 292
Tire pressureWheels and tires
Page 295 of 338
information table or the tire pressure table
(Y
page 290).
X If the tire pressure is too low, increase it to
the recommended value.
X If the tire pressure is too high, release air
by pressing down the metal pin in the valve.
Use the tip of a pen, for example. Then,
check the tire pressure again using the tire
pressure gauge.
X Screw the valve cap onto the valve.
X Repeat the steps for the other tires. Tire pressure monitor
Important safety notes G
WARNING
Each tire, including the spare (if provided),
should be checked at least once a month
when cold and inflated to the pressure rec-
ommended by the vehicle manufacturer on
the Tire and Loading Information placard on
the driver's door B-pillar or the tire pressure
label on the inside of the fuel filler flap. If your
vehicle has tires of a different size than the
size indicated on the Tire and Loading Infor-
mation placard or the tire pressure label, you
should determine the proper tire pressure for
those tires.
As an added safety feature, your vehicle has
been equipped with a tire pressure monitoring
system (TPMS) that illuminates a low tire pres-
sure telltale when one or more of your tires
are significantly underinflated. Accordingly,
when the low tire pressure telltale illuminates,
you should stop and check your tires as soon
as possible, and inflate them to the proper
pressure. Driving on a significantly underin-
flated tire causes the tire to overheat and can
lead to tire failure. Underinflation also
reduces fuel efficiency and tire tread life, and
may affect the vehicle's handling and stop-
ping ability.
Please note that the TPMS is not a substitute
for proper tire maintenance, and it is the driv-
er's responsibility to maintain correct tire pressure, even if underinflation has not
reached the level to trigger illumination of the
TPMS low tire pressure telltale.
USA only:
Your vehicle has also been equipped with a
TPMS malfunction indicator to indicate if the
system is not operating properly. The TPMS
malfunction indicator is combined with the
low tire pressure telltale. When the system
detects a malfunction, the warning lamp will
flash for approximately a minute and then
remain continuously illuminated. This
sequence will be repeated every time the vehi-
cle is started as long as the malfunction
exists.
When the malfunction indicator is illuminated,
the system may not be able to detect or signal
low tire pressure as intended. TPMS malfunc-
tions may occur for a variety of reasons,
including the mounting of incompatible
replacement or alternate tires or wheels on
the vehicle that prevent the TPMS from func-
tioning properly. Always check the TPMS mal-
function telltale after replacing one or more
tires or wheels on your vehicle to ensure that
the replacement or alternate tires and wheels
allow the TPMS to continue to function prop-
erly.
Vehicles with a tire pressure monitor are
equipped with sensors in the wheels that
monitor the tire pressure of all four tires. The
tire pressure monitor monitors the pressure
in all four tires; you set this pressure when
you activate the tire pressure monitor. The
tire pressure monitor warns you when the
pressure drops in one or more of the tires. The
tire pressure monitor only functions if the
corresponding sensors are installed to all
wheels.
You should always adjust the tire pressure
according to the vehicle load. Restart the tire
pressure monitor if you change the tire pres-
sure.
The tire pressure monitor does not warn you
if a tire pressure is incorrect. Observe the Tire pressure
293Wheels and tires Z
Page 296 of 338
notes on the recommended tire pressure
(Y
page 290).
The tire pressure monitor is not able to warn
you of a sudden loss of pressure, e.g. follow-
ing penetration by a foreign object. In this
event, brake the vehicle until it comes to a
standstill. Do not carry out any sudden steer-
ing maneuvers.
The tire pressure monitor has a yellow 0077
warning lamp in the instrument cluster for
indicating pressure loss/malfunctions (USA)
or pressure loss (Canada). Depending on how
the warning lamp flashes or lights up, an
underinflated tire or a malfunction in the tire
pressure monitor is displayed:
R if the 0077 warning lamp is lit continuously,
the tire pressure on one or more tires is
significantly too low. The tire pressure mon-
itor is not malfunctioning.
R USA only: if the 0077warning lamp flashes
for 60 seconds and then remains lit con-
stantly, the tire pressure monitor is mal-
functioning.
Only vehicles with steering wheel buttons: the
on-board computer displays information on
tire pressure. After a few minutes of driving,
the current tire pressure of each tire is shown
in the on-board computer.
USA only: if the tire pressure monitor is mal-
functioning, it may be more than 10 minutes
before the malfunction is shown. The 0077
tire pressure warning lamp flashes for
60 seconds and then remains lit. When the
malfunction has been rectified, the 0077tire
pressure warning lamp goes out after a few
minutes of driving.
The tire pressure values indicated by the on-
board computer may differ from those meas-
ured at a gas station with a pressure gauge.
The tire pressures shown by the on-board
computer refer to those measured at sea
level. At high altitudes, the tire pressure value
indicated by a pressure gauge are higher than
those shown by the on-board computer. In
this case, do not reduce the tire pressures. If radio transmitting equipment (e.g. wireless
headphones, two-way radios) is operated
inside the vehicle or in the vicinity of the vehi-
cle, this can interfere with the operation of
the tire pressure monitor.
Checking the tire pressure electroni-
cally (vehicles with steering wheel but-
tons) Tire pressure display
Using the steering wheel buttons
X
Turn the key to position 2in the ignition
lock.
X Press the 0080or007F button repeatedly
until the standard display is shown
(Y page 189).
X Press the 0041or0068 button repeatedly
until the current pressure of the individual
tires is shown in the display.
If the vehicle is parked for longer than
20 minutes or you then drive at less than
18 mph (30 km/h), the Tire pres. dis‐
Tire pres. dis‐
played after driving for several played after driving for several
minutes minutes message appears.
i The tire pressure value shown in the dis-
play may differ from those measured at a
gas station using a pressure gauge. The on-
board computer will generally give you a
more exact value.
Tire pressure loss warning system Vehicles with steering wheel buttons
If the tire pressure monitor detects a signifi-
cant pressure loss on one or more tires, the
on-board computer displays a warning mes-
sage. The 0077tire pressure loss warning 294
Tire pressureWheels and tires
Page 297 of 338
lamp in the instrument cluster (Y
page 229)
lights up.
The tire pressure is shown in 2 red rectangles.
The pressure of the tire concerned is shown
in one of the two rectangles (Y page 199).
Additionally, a warning tone sounds.
Each tire that is affected by a significant loss
of pressure is highlighted in the pressure dis-
play.
Restarting the tire pressure monitor When you restart the tire pressure monitor,
the currently set tire pressure are taken as
reference values for monitoring.
In most cases, the tire pressure monitor
detects the new reference values automati-
cally, e.g. after you have:
R changed the tire pressure
R mounted
R mounted new wheels or tires
However, you can also define reference val-
ues manually as described here.
Before restarting the tire pressure moni-
tor:
X Set the tire pressure to the value recom-
mended on the Tire and Loading Informa-
tion placard or the tire pressure table on
the B-pillar on the driver's side
(Y page 290).
Observe the notes on tire pressure when
doing so (Y page 290).
X Make sure that the tire pressure is correct
on all four wheels. Restarting the tire pressure monitor
(vehicles without steering wheel but-
tons):
X
Turn the key to position 2in the ignition
lock.
X Press the 0079menu button on the instru-
ment cluster repeatedly until the display
shows the following message:
+CAL- TPMS
+CAL- TPMS
X Press the 0074button on the instrument clus-
ter.
The display shows:
OK TPMS OK TPMS
The tire pressure monitor activation proc-
ess has begun. The tire pressures meas-
ured for the individual wheels are stored as
the new reference values, provided that the
tire pressure monitor considers them to be
plausible.
If you wish to cancel the restart:
X Press the 0075button or the 0079menu button
on the instrument cluster.
The activation process is canceled auto-
matically if 30 seconds elapse without
input.
Restarting the tire pressure monitor
(vehicles with steering wheel buttons):
X Turn the key to position 2in the ignition
lock.
X Press the 0080or007F button on the steer-
ing wheel repeatedly until the standard dis-
play is shown ( Ypage 189).
X Press the 0041or0068 button on the steer-
ing wheel repeatedly until the current pres-
sure of the individual tires is displayed or
the display shows the following message:
Tire Tire pres.
pres. displayed
displayed after
afterdriving
driving
for several minutes
for several minutes
X Press the 0045reset button on the instru-
ment cluster.
The display shows the following message: Tire pressure
295Wheels and tires Z
Page 298 of 338
Monitor current tire pressure?
Monitor current tire pressure?
X Press the 0081button on the steering
wheel.
The display shows the following message:
Tire pres. monitor reactivated Tire pres. monitor reactivated
The tire pressure monitor activation proc-
ess has begun. The tire pressures meas-
ured for the individual wheels are stored as
the new reference values, provided that the
tire pressure monitor considers them to be
plausible.
If you wish to cancel the restart:
X Press the 0082button on the steering
wheel. 296
Tire pressureWheels and tires
Page 299 of 338
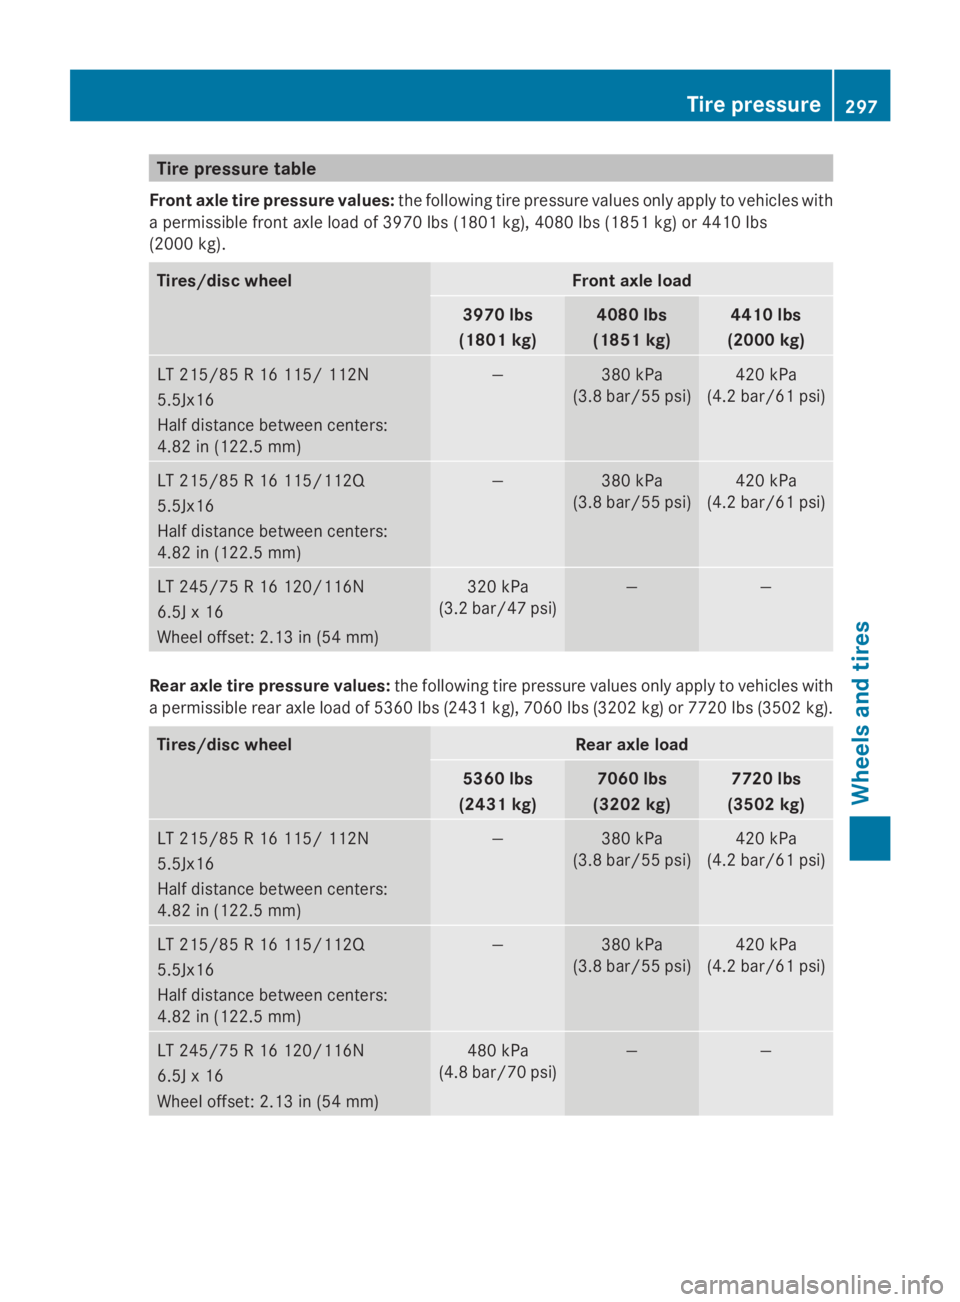
Tire pressure table
Front axle tire pressure values: the following tire pressure values only apply to vehicles with
a permissible front axle load of 3970 lbs (1801 kg), 4080 lbs (1851 kg) or 4410 lbs
(2000 kg). Tires/disc wheel Front axle load
3970 lbs
(1801 kg) 4080 lbs
(1851 kg) 4410 lbs
(2000 kg) LT 215/85 R 16 115/ 112N
5.5Jx16
Half distance between centers:
4.82 in (122.5 mm) — 380 kPa
(3.8 bar/55 psi) 420 kPa
(4.2 bar/61 psi) LT 215/85 R 16 115/112Q
5.5Jx16
Half distance between centers:
4.82 in (122.5 mm) — 380 kPa
(3.8 bar/55 psi) 420 kPa
(4.2 bar/61 psi) LT 245/75 R 16 120/116N
6.5J x 16
Wheel offset: 2.13 in (54 mm) 320 kPa
(3.2 bar/47 psi) — —
Rear axle tire pressure values:
the following tire pressure values only apply to vehicles with
a permissible rear axle load of 5360 lb s (2431 kg), 7060 lbs (3202 kg) or 7720 lbs (3502 kg). Tires/disc wheel Rear axle load
5360 lbs
(2431 kg) 7060 lbs
(3202 kg) 7720 lbs
(3502 kg) LT 215/85 R 16 115/ 112N
5.5Jx16
Half distance between centers:
4.82 in (122.5 mm) — 380 kPa
(3.8 bar/55 psi) 420 kPa
(4.2 bar/61 psi) LT 215/85 R 16 115/112Q
5.5Jx16
Half distance between centers:
4.82 in (122.5 mm) — 380 kPa
(3.8 bar/55 psi) 420 kPa
(4.2 bar/61 psi) LT 245/75 R 16 120/116N
6.5J x 16
Wheel offset: 2.13 in (54 mm) 480 kPa
(4.8 bar/70 psi) — —Tire pressure
297Wheels and tires Z
Page 300 of 338
Loading the vehicle
Instruction labels for tires and loads
G
WARNING
Overloaded tires can overheat, causing a
blowout. Overloaded tires can also impair the
steering and driving characteristics and lead
to brake failure. There is a risk of accident.
Observe the load rating of the tires. The load
rating must be at least half of the GAWR of
your vehicle. Never overload the tires by
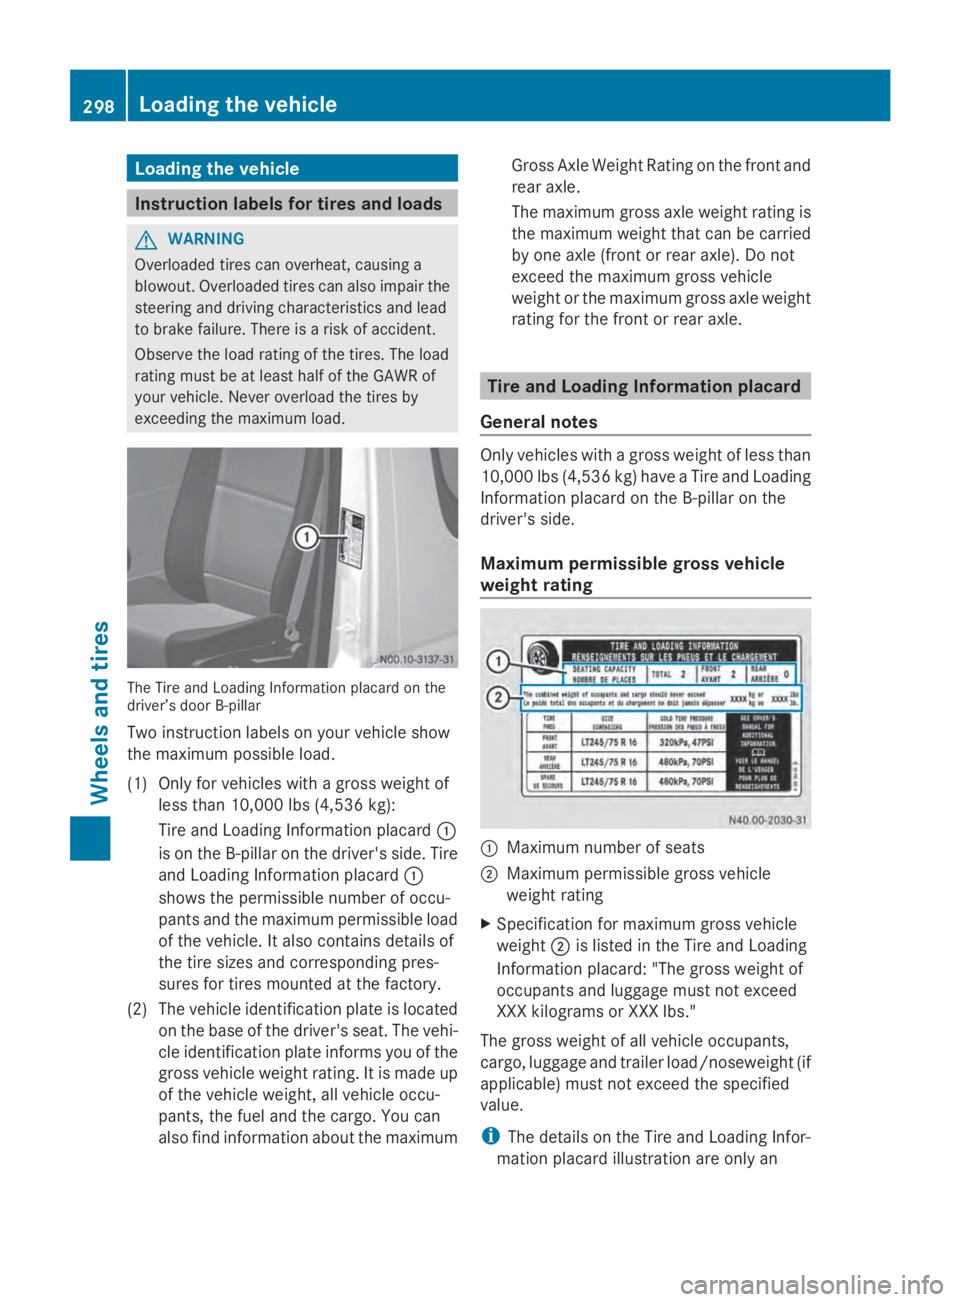
exceeding the maximum load. The Tire and Loading Information placard on the
driver’s door B-pillar
Two instruction labels on your vehicle show
the maximum possible load.
(1) Only for vehicles with a gross weight of
less than 10,000 lbs (4,536 kg):
Tire and Loading Information placard 0043
is on the B-pillar on the driver's side. Tire
and Loading Information placard 0043
shows the permissible number of occu-
pants and the maximum permissible load
of the vehicle. It also contains details of
the tire sizes and corresponding pres-
sures for tires mounted at the factory.
(2) The vehicle identification plate is located on the base of the driver's seat. The vehi-
cle identification plate informs you of the
gross vehicle weight rating. It is made up
of the vehicle weight, all vehicle occu-
pants, the fuel and the cargo. You can
also find information about the maximum Gross Axle Weight Rating on the front and
rear axle.
The maximum gross axle weight rating is
the maximum weight that can be carried
by one axle (front or rear axle). Do not
exceed the maximum gross vehicle
weight or the maximum gross axle weight
rating for the front or rear axle.
Tire and Loading Information placard
General notes Only vehicles with a gross weight of less than
10,000 lbs (4,536 kg) have a Tire and Loading
Information placard on the B-pillar on the
driver's side.
Maximum permissible gross vehicle
weight rating
0043
Maximum number of seats
0044 Maximum permissible gross vehicle
weight rating
X Specification for maximum gross vehicle
weight 0044is listed in the Tire and Loading
Information placard: "The gross weight of
occupants and luggage must not exceed
XXX kilograms or XXX lbs."
The gross weight of all vehicle occupants,
cargo, luggage and trailer load/noseweight (if
applicable) must not exceed the specified
value.
i The details on the Tire and Loading Infor-
mation placard illustration are only an 298
Loading the vehicleWheels and tires