weight MERCEDES-BENZ SPRINTER 2015 MY15 Operator’s Manual
[x] Cancel search | Manufacturer: MERCEDES-BENZ, Model Year: 2015, Model line: SPRINTER, Model: MERCEDES-BENZ SPRINTER 2015Pages: 334, PDF Size: 5.94 MB
Page 13 of 334
F
Fire extinguisher .............................. .276
First-aid kit ......................................... 275
Flat tire
Changing a wheel/mounting the
spare wheel ................................... 306
General notes ................................ 305
Fog lamps
Switching on/off .............................. 93
Fogged-up windows
see Climate control
Folding seat ......................................... 85
Folding table
In the twin co-driver's seat ............ 234
Frequencies
Mobile phone ................................. 316
Two-way radio ................................ 316
Front fog lamps
Switching on/off .............................. 93
Front interior light
Replacing bulbs ............................ .105
Front windshield
see Windshield
Fuel
Additives (diesel )........................... 320
Consumption information .............. 320
Consumption statistics .................. 195
Diesel at very low outside temper-
atures ............................................ 319
Display message ............................ 212
Driving tips .................................... 152
Fuel gaug e..................................... 181
Important safety notes .................. 318
Problem (malfunction) ................... 147
Quality (diesel )............................... 319
Refueling ........................................ 145
Showing the range (on-board
computer with steering wheel but-
tons) .............................................. 195
Showing the range (vehicles with
steering wheel buttons) ................. 195
Tank content/reserve fue l............. 319
Fuel filter with water separator
draining ......................................... 255
Indicator lamp ................................ 226
Fuel gauge ......................................... 181 Fuel tank
Problem (malfunction) ................... 147
Fuel tank content
Reserve, display message .............. 212
Fuses .................................................. 280 G
Gasoline Reserve fuel warning lamp ............. 224
General driving tips
Driving short distances .................. 153
Genuine parts ...................................... 27
Glove box ........................................... 230
GTW (Gross Trailer Weight) (defini-
tion) .................................................... 303
Guarantee ............................................ 28 H
Handbrake see Parking brake
Hazard warning lamps ........................ 95
Head restraints
Adjusting ......................................... 86
Adjusting (rear) ................................ 86
Headlamps
Adding fluid to cleaning system ..... 255
Cleaning system (function) .............. 95
Fogging up ....................................... 97
see Automatic headlamp mode
Headliner (cleaning instructions) .... 271
Heating
see Climate control
High-beam headlamps
Highbeam Assist .............................. 96
Replacing bulb s............................. 100
Switching on/of f.............................. 94
Highbeam Assist
Function/note s................................ 96
Switching Highbeam Assist on/
off .................................................. 192
Hood
Closing ........................................... 249
Display message ............................ 217
Important safety notes .................. 248
Indicator lamp ................................ 227
Opening ......................................... 248 Index
11
Page 20 of 334
Switching the surround lighting
on/off (on-board computer)
.............193
Swivel seat .......................................... .84T
Tachometer ........................................ 181
Tail lamps
Changing ....................................... 104
Replacing bulb s............................. 103
see Lights
Tail lamps (Chassis Cab)
Replacing bulb s............................. 104
Tank content
Fuel gaug e..................................... 181
Range (vehicles with steering
wheel buttons) ............................... 195
Reserve fuel warning lamp ............. 224
Technical data
Capacities ...................................... 318
Cargo tie-down points .................... 327
Cargo tie-down rings ...................... 327
Loading rails .................................. 328
Roof carrier .................................... 328
Tires/wheels ......................... 294, 311
Trailer tow hitch ............................. 328
Vehicle data ................................... 327
Telephone .......................................... 236
Telephone (on-board computer)
Accepting an incoming cal l............ 196
Display messages .......................... 217
Numbers from the phone book ...... 196
Operating ....................................... 196
Redialing ........................................ 197
Rejecting or ending a call .............. 196
Temperature
Outside temperature ...................... 181
Setting (climate control )................ 117
Setting the unit (vehicles with
steering wheel buttons) ................. 189
Theft deterrent systems
ATA (Anti-Theft Alarm system) ......... 61
Immobilizer ...................................... 61
Tow-away alarm ............................... 62
Thoraxbag ............................................ 48
Tightening torques for wheel nuts/
wheel bolts ........................................ 310 Time
Setting the time (vehicles with
steering wheel buttons) ................. 191
Setting the time (vehicles without steering wheel buttons) ................. 183
Timer
Activating ....................................... 128
Important safety notes .................. 127
Overview ........................................ 127
Setting the heating level (auxiliary
heating) ......................................... 129
Setting the preselection time
(auxiliary heating) .......................... 129
Setting weekday, time and oper-
ating duration (auxiliary heating) ... 128
Switching immediate heating
mode on/off (auxiliary heating) ..... 128
Tire pressure
Calling up (on-board computer) ..... 291
Checking manually ........................ 290
Display messages (vehicles with
steering wheel buttons) ................. 215
Display messages (vehicles with-
out steering wheel buttons) ........... 199
Maximum ....................................... 290
Notes ............................................. 289
Recommended ............................... 288
Setting the unit (vehicles with
steering wheel buttons) ................. 191
Tire labe l................................ 288, 289
Tire pressure loss warning system .. 292
Tire pressure monitor
Checking the tire pressure elec-
tronically ........................................ 292
Display message ............................ 215
Function/note s............................. 291
Indicator lamp ................................ 226
Restarting ...................................... 293
Warning lamp ................................. 292
Tire pressure table ............................ 294
Tires
Aspect ratio (definition) ................. 304
Average weight of the vehicle
occupants (definition) .................... 303
Bar (definition) ............................... 302
Changing a whee l.......................... 305
Characteristics .............................. 302
Checking ........................................ 285 18
Index
Page 21 of 334
Curb weight (definition
)................. 304
Definition of terms ......................... 302
Direction of rotation ...................... 306
Distribution of the vehicle occu-
pants (definition) ............................ 305
DOT (Department of Transporta-
tion) (definition) ............................. 303
DOT, Tire Identification Number
(TIN) ............................................... 302
GAWR (Gross Axle Weight Rating)
(definition) ..................................... 303
GTW (Gross Trailer Weight) (defi-
nition) ............................................ 303
GVW (Gross Vehicle Weight) (def-
inition) ........................................... 303
GVWR (Gross Vehicle Weight Rat-
ing) (definition) .............................. 303
Important safety notes .................. 284
Increased vehicle weight due to
optional equipment (definition) ...... 303
Information on driving .................... 284
Kilopascal (kPa) (definition) ........... 303
Labeling (overview) ........................ 299
Load bearing index (definition) ...... 304
Load index ..................................... 301
Load index (definition) ................... 304
M+S tire s....................................... 286
Maximum load on a tire (defini-
tion) ............................................... 304
Maximum loaded vehicle weight
(definition) ..................................... 303
Maximum permissible tire pres-
sure (definition) ............................. 304
Maximum tire load ......................... 301
Maximum tire load (definition) ....... 304
Optional equipment weight (defi-
nition) ............................................ 304
PSI (pounds per square inch) (def-
inition) ........................................... 304
Replacing ....................................... 305
Service life ..................................... 286
Sidewall (definition) ....................... 304
Snow chains .................................. 287
Speed rating (definition) ................ 303
Storing ........................................... 306
Structure and characteristics
(definition) ..................................... 302
Summer tire s................................. 286 TIN (Tire Identification Number)
(definition) ..................................... 304
Tire bead (definition) ...................... 304
Tire pressure (definition) ................ 304
Tire pressures (recommended) ...... 303
Tire size (data) ....................... 294, 311
Tire size designation, load-bearing capacity, speed rating .................... 300
Tire tread ....................................... 285
Tire tread (definition) ..................... 304
Total load limit (definition) ............. 305
Traction (definition) ....................... 304
TWR (permissible trailer drawbar
noseweight) (definition) ................. 305
Uniform Tire Quality Grading
Standards (definition) .................... 303
valve, Snap-In ................................ 290
Wear indicator (definition) ............. 305
Wheel rim (definition) .................... 303
Top Tether ............................................ 54
Touchshift (automatic transmis-
sion) .................................................... 143
Tow-away alarm
Arming/deactivating ........................ 62
Deactivating ..................................... 62
Operation ......................................... 62
Tow-starting
Emergency engine starting ............ 280
Important safety notes .................. 277
Towing
If the vehicle is stuck ..................... 280
Installing/removing the towing
eye ................................................. 278
With a raised front or rear axle ...... 279
Towing a trailer
Axle load, permissibl e.................... 330
Cleaning the trailer tow hitch ......... 270
Coupling up a traile r...................... 175
Decoupling a trailer ....................... 177
Driving tip s.................................... 173
Important safety notes .................. 173
Notes on retrofitting ...................... 328
Power supply ................................. 178
Trailer load s................................... 330
Towing away
Important safety guidelines ........... 277
In the event of malfunctions .......... 279
With both axles on the ground ....... 279 Index
19
Page 22 of 334
Trailer
Brake force booster malfunction ... 219
Trailer coupling
see Towing a trailer
Trailer loads and drawbar nose-
weights .............................................. .177
Trailer towing
Blind Spot Assist ............................ 165
PARKTRONIC ................................. 170
Permissible trailer loads and
drawbar noseweights ..................... 177
Transmission
see Automatic transmission
Transmission oil ................................ 324
Transport
Loading guidelines ......................... 240
Vehicle .......................................... .280
Transport by rail ................................ 154
Transportation
Rail ................................................ 154
Transporting
Load distribution ............................ 242
Securing a load .............................. 242
Trim pieces (cleaning instruc-
tions) ................................................. .270
Trip computer (on-board com-
puter) ................................................. .195
Trip meter
see Trip odometer
Trip odometer
Display (vehicles with steering
wheel buttons) ............................... 187
Display (vehicles without steeringwheel buttons) ............................... 182
Resetting ....................................... 181
see Trip computer (on-board computer)
Turn signals
Replacing bulbs (front) ................... 102
Replacing bulbs (rear) .................... 103
Switching on/off .............................. 94
Turn signals (Chassis Cab)
Replacing bulbs (rear) .................... 104
Twin co-driver's seat
Folding table .................................. 234
Stowage compartment .................. 232
Two-way radios
Type approval/frequency .............. 316 TWR (Tongue Weight Rating) (defi-
nition)
................................................. 305 U
Unlocking From inside the vehicle (central
unlocking button) ............................ .71
USB port .............................................2 38 V
Vehicle Data acquisition ............................... 29
Display message ............................ 216
Electronics ..................................... 316
Equipment ....................................... 22
Individual settings (vehicles with
steering wheel buttons) ................. 188
Limited Warranty ............................ .22
Loading .......................................... 295
Locking (SmartKey) .......................... 66
Lowering ........................................ 310
Maintenance .................................... 28
Parking for a long period ................ 151
Pulling away ................................... 140
Raising ........................................... 307
Registration ............................... 25, 28
Reporting problems ......................... 28
Securing from rolling away ............ 149
Towing away .................................. 277
Transporting .................................. 280
Unlocking (SmartKey )...................... 66
Vehicle battery
see Battery (vehicle)
Vehicle bodies
Body/equipment mounting direc-
tives for trucks ................................. 26
Vehicle data ....................................... 327
Vehicle identification number .......... 316
Vehicle identification plate .............. 316
Vehicle tool kit .................................. 274
Vents
see Air vents
Voltage supply
Fuses ............................................. 280 20
Index
Page 25 of 334
G
WARNING
Gases and fluids from substances that con-
stitute a health hazard or react aggressively
can escape even from securely closed con-
tainers. When transporting such substances
in the vehicle interior, your ability to concen-
trate or your health could be affected during
the journey. Malfunctions, short circuits or
electrical component system failures may
also result. There is a risk of an accident and
fire.
Do not store or transport any substances in
the vehicle interior which are hazardous to
health or react aggressively.
These instructions must also be observed for
vehicles where the cargo compartment is not fully separated from the driver's cab.
Partition with door/window: always keep thedoor/window in the partition closed during
transport.
Examples of substances that are hazardous
to health and/or react aggressively:
R Solvents
R Fuel
R Oil and grease
R Cleaning agents
R Acids Protection of the environment
Economic and environmentally aware
driving H
Environmental note
Daimler's declared policy is one of compre-
hensive environmental protection.
The objectives are for the natural resources
that form the basis of our existence on this
planet to be used sparingly and in a manner
that takes the requirements of both nature
and humanity into account.
You too can help to protect the environment
by operating your vehicle in an environmen-
tally responsible manner. Fuel consumption and the rate of engine,
transmission, brake and tire wear are affected
by these factors:
R operating conditions of your vehicle
R your personal driving style
You can influence both factors. You should
bear the following in mind:
Operating conditions:
R avoid short trips as these increase fuel con-
sumption.
R always make sure that the tire pressures
are correct.
R do not carry any unnecessary weight.
R remove roof racks once you no longer need
them.
R a regularly serviced vehicle will contribute
to environmental protection. You should
therefore adhere to the service intervals.
R always have service work carried out at a
qualified specialist workshop.
Personal driving style:
R do not depress the accelerator pedal when
starting the engine.
R do not warm up the engine when the vehicle
is stationary.
R drive carefully and maintain a safe distance
from the vehicle in front.
R avoid frequent, sudden acceleration and
braking.
R change gear in good time and use each gear
only up to 00C3of its maximum engine speed.
R switch off the engine in stationary traffic.
R keep an eye on the vehicle's fuel consump-
tion. Environmental issues and recommen-
dations
When prompted by this Operator's Manual to dispose of materials, please try to regenerate
and recycle these materials. Observe all rel-
evant environmental guidelines and regula- Introduction
23 Z
Page 46 of 334
triggered independently of the lock status of
the seat belt.
Important safety notes The use of seat belts and child restraint sys-
tems is required by law in:
R all 50 states
R the U.S. territories
R the District of Columbia
R all Canadian provinces
Even where this is not required by law, all
vehicle occupants should correctly fasten
their seat belts before starting the journey. G
WARNING
If the seat belt is incorrectly fastened, it can-
not protect as intended. Furthermore, an
incorrectly fastened seat belt can cause addi- tional injury, for example, in an accident, dur-
ing braking or when abruptly changing direc-
tion. This poses an increased risk of injury or
even fatal injury.
Make sure that all vehicle occupants are
seated properly with a correctly fastened seat belt. G
WARNING
The seat belt does not offer the intended level of protection if you have not moved the back-
rest to an almost vertical position. When brak-
ing or in the event of an accident, you could
slide underneath the seat belt and sustain
abdomen or neck injuries, for example. This
poses an increased risk of injury or even fatal injury.
Adjust the seat properly before beginning
your journey. Always ensure that the backrest
is in an almost vertical position and that the
shoulder section of your seat belt is routed
across the center of your shoulder. G
WARNING
Persons under 5 ft (1.50 m) in heightcannot
fasten the seat belt correctly without an addi- tional suitable restraint system. If the seat belt is incorrectly fastened, it cannot protect
as intended. Furthermore, an incorrectly fas-
tened seat belt can cause additional injury, for example, in an accident, during braking or an
abrupt change of direction. This poses an
increased risk of injury or even fatal injury.
For this reason, always secure persons under
5 ft (1.50 m) in height in suitable restraint
systems.
If a child younger than 12 years and under 5 ft
(1.50 m) in height is traveling in the vehicle:
R always secure the child in a child restraint
system suitable for this vehicle. The child
restraint system must be appropriate to the
age, weight and size of the child
R always observe the instructions and safety
notes in the "Children in the vehicle" sec-
tion of this Operator's Manual
(Y page 51) in addition to the child
restraint system manufacturer's installa-
tion instructions G
WARNING
The seat belts may not perform their intended protective function if:
R they are damaged, modified, extremely
dirty, bleach or dyed
R the seat belt buckle is damaged or
extremely dirty
R the Emergency Tensioning Devices, belt
anchorages or inertia reels have been modi-
fied
Seat belts may sustain non-visible damage in an accident, e.g. due to glass splinters. Modi-
fied or damaged seat belts may tear or fail,
e.g. in an accident. Modified Emergency Ten-
sioning Devices could accidentally trigger or
fail to deploy when necessary. This poses an
increased risk of injury or even fatal injury.
Never modify the seat belts, Emergency Ten-
sioning Devices, belt anchorages or inertia
reels. Make sure that the seat belts are
undamaged, not worn out and clean. Follow-
ing an accident, have the seat belts checked 44
Occupant safetySafety
Page 53 of 334
If the restraint system control unit detects a
side impact or that the vehicle is rolling over, the relevant restraint system components areactivated independently of one another
depending on the apparent type of accident.
If the system determines a need for additional
protection for the vehicle occupants, the
Emergency Tensioning Devices are triggered.
R Thorax bag on the side of impact, inde-
pendently of the Emergency Tensioning
Device and the use of the seat belt
R Window curtain air bag on the side of
impact, independently of the use of the
seat belt and independently of whether the
front-passenger seat is occupied
i Not all air bags are deployed in an acci-
dent. The different air bag systems work
independently of each other.
How the air bag system works is deter-
mined by the severity of the accident detec- ted, especially the vehicle deceleration or
acceleration and the apparent type of acci-
dent:
R frontal collision
R side impact Children in the vehicle
Important safety notes
Accident statistics show that children
secured in the rear seats are safer than chil-
dren secured in the front-passenger seat. For this reason, we strongly advise that you install
a child restraint system on a rear seat. Chil-
dren are generally better protected there.
If a child younger than 12 years and under 5 ft
(1.50 m) in height is traveling in the vehicle:
R always secure the child in a child restraint
system suitable for this vehicle. The child
restraint system must be appropriate to the
age, weight and size of the child
R be sure to observe the instructions and
safety notes in this section in addition to the child restraint system manufacturer's
installation instructions G
WARNING
If you leave children unsupervised in the vehi- cle, they could set it in motion by, for example:
R release the parking brake.
R shift the automatic transmission out of the
parking position P.
R start the engine.
In addition, they may operate vehicle equip-
ment and become trapped. There is a risk of
an accident and injury.
When leaving the vehicle, always take the
SmartKey with you and lock the vehicle. Never
leave children unsupervised in the vehicle. G
WARNING
If persons, particularly children are subjected to prolonged exposure to extreme heat or
cold, there is a risk of injury, possibly even
fatal. Never leave children unattended in the
vehicle. G
WARNING
If the child restraint system is subjected to
direct sunlight, parts may get very hot. Chil-
dren may burn themselves on these parts,
particularly on the metal parts of the child
restraint system. There is a risk of injury.
If you leave the vehicle, taking the child with
you, always ensure that the child restraint
system is not exposed to direct sunlight. Pro- tect it with a blanket, for example. If the child
restraint system has been exposed to direct
sunlight, let it cool down before securing the
child in it. Never leave children unattended in the vehicle.
Always ensure that all vehicle occupants have
their seat belts fastened correctly and are sit- ting properly. Particular attention must be
paid to children.
Observe the safety notes on the seat belt
(Y page 44) and the notes on correct use of
seat belts (Y page 45). Children in the vehicle
51Safety Z
Page 55 of 334
sudden change in direction. The child
restraint system could be thrown about, strik- ing vehicle occupants. There is an increased
risk of injury, possibly even fatal.
Always install child restraint systems prop-
erly, even if they are not being used. Make
sure that you observe the child restraint sys-
tem manufacturer's installation instructions.
You will find further information on stowing
objects, luggage or loads under "Loading
guidelines" (Y page 240). G
WARNING
Child restraint systems or their securing sys-
tems which have been damaged or subjected to a load in an accident can no longer protect
as intended. The child cannot then be
restrained in the event of an accident, heavy
braking or sudden changes of direction. There is an increased risk of injury, possibly even
fatal.
Replace child restraint systems which have
been damaged or subjected to a load in an
accident as soon as possible. Have the secur-
ing systems on the child restraint system
checked at a qualified specialist workshop,
before you install a child restraint system
again.
The securing systems of child restraint sys-
tems are:
R the seat belt system
R the LATCH-type (ISOFIX) securing rings
R the Top Tether anchorages
i If it is absolutely necessary to carry a child
on the front-passenger seat, be sure to
observe the information on "Child restraint
systems on the front-passenger seat"
(Y page 55).
All child restraint systems must meet the fol- lowing standards:
R U.S. Federal Motor Vehicle Safety Stand-
ards 213 and 225
R Canadian Motor Vehicle Safety Standards
213 and 210.2 Confirmation that the child restraint system
corresponds to the standards can be found
on an instruction label on the child restraint
system. This confirmation can also be found
in the installation instructions that are inclu-
ded with the child restraint system.
Observe the warning labels in the vehicle inte-
rior and on the child restraint system. LATCH-type (ISOFIX) child seat secur-
ing system G
WARNING
LATCH-type (ISOFIX) child restraint systems
do not offer sufficient protective effect for
children whose weight is greater than 48 lbs
(22 kg) who are secured using the safety belt integrated in the child restraint system. In the
event of an accident, a child might not be
restrained correctly. This poses an increased
risk of injury or even fatal injury.
If the child weighs more than 48 lbs (22 kg),
only use LATCH-type (ISOFIX) child restraint
systems with which the child is also secured
with the vehicle seat belt. Also secure the
child restraint system with the Top Tether
belt, if available.
Always comply with the manufacturer's
installation and operating instructions for the child restraint system used.
Before every trip, make sure that the LATCH- type (ISOFIX) child restraint system is
engaged correctly in both LATCH-type (ISO-
FIX) securing rings
! When installing the child restraint system,
make sure that the seat belt for the middle seat does not get trapped. The seat belt
could otherwise be damaged. Children in the vehicle
53Safety Z
Page 60 of 334
Braking
If ABS intervenes when braking, you will feel a
pulsating in the brake pedal.
The pulsating brake pedal can be an indica-
tion of hazardous road conditions and func-
tions as a reminder to take extra care while
driving.
X If ABS intervenes: continue to depress the
brake pedal with force until the braking sit-
uation is over.
X To make a full brake application:
depress the brake pedal with full force. ASR (acceleration skid control)
General notes Important safety notes
Observe the important safety guidelines for
the driving safety system (Y
page 57).
ASR can neither reduce the risk of an accident nor suspend the laws of physics if the driver
does not pay attention when pulling away or
accelerating. ASR is only an aid. Always adapt
your driving style to suit the prevailing road
and weather conditions.
Vehicles without steering wheel buttons: if
ASR is malfunctioning, the 003Dindicator
lamp lights up while the engine is running and the engine power may be reduced
(Y page 218).
ASR significantly improves traction, i.e. the
transmission of power from the tires to the
road surface, and thus increases the vehicle's driving stability. If the driving wheels start to
spin, ASR brakes individual drive wheels and
limits the engine torque. ASR thus signifi-
cantly assists you when pulling away and
accelerating, especially on wet or slippery
roads.
If traction on the road surface is not sufficient,
even ASR will not allow you to pull away with- out difficulty. The type of tires and total
weight of the vehicle as well as the gradient of
the road also play a crucial role. If ASR intervenes, the
0072warning lamp in
the instrument cluster flashes.
Activating/deactivating ASR G
WARNING
If deactivated, ASR will not attempt to stabi-
lize the vehicle during pulling away and accel- eration. There is an increased risk of skiddingand of an accident.
Only deactivate ASR in the situations descri-
bed in the following.
! If you deactivate ASR, ESP ®
will still inter-
vene to stabilize the vehicle. Frequent brak-
ing automatically triggered by ESP ®
can
damage the brake system.
For this reason, deactivate ASR only briefly and when absolutely necessary. When ESP
®
is intervening and the 0072warn-
ing lamp in the instrument cluster is flashing,
leave ASR on. In this case, only depress the
accelerator pedal as far as required when
pulling away.
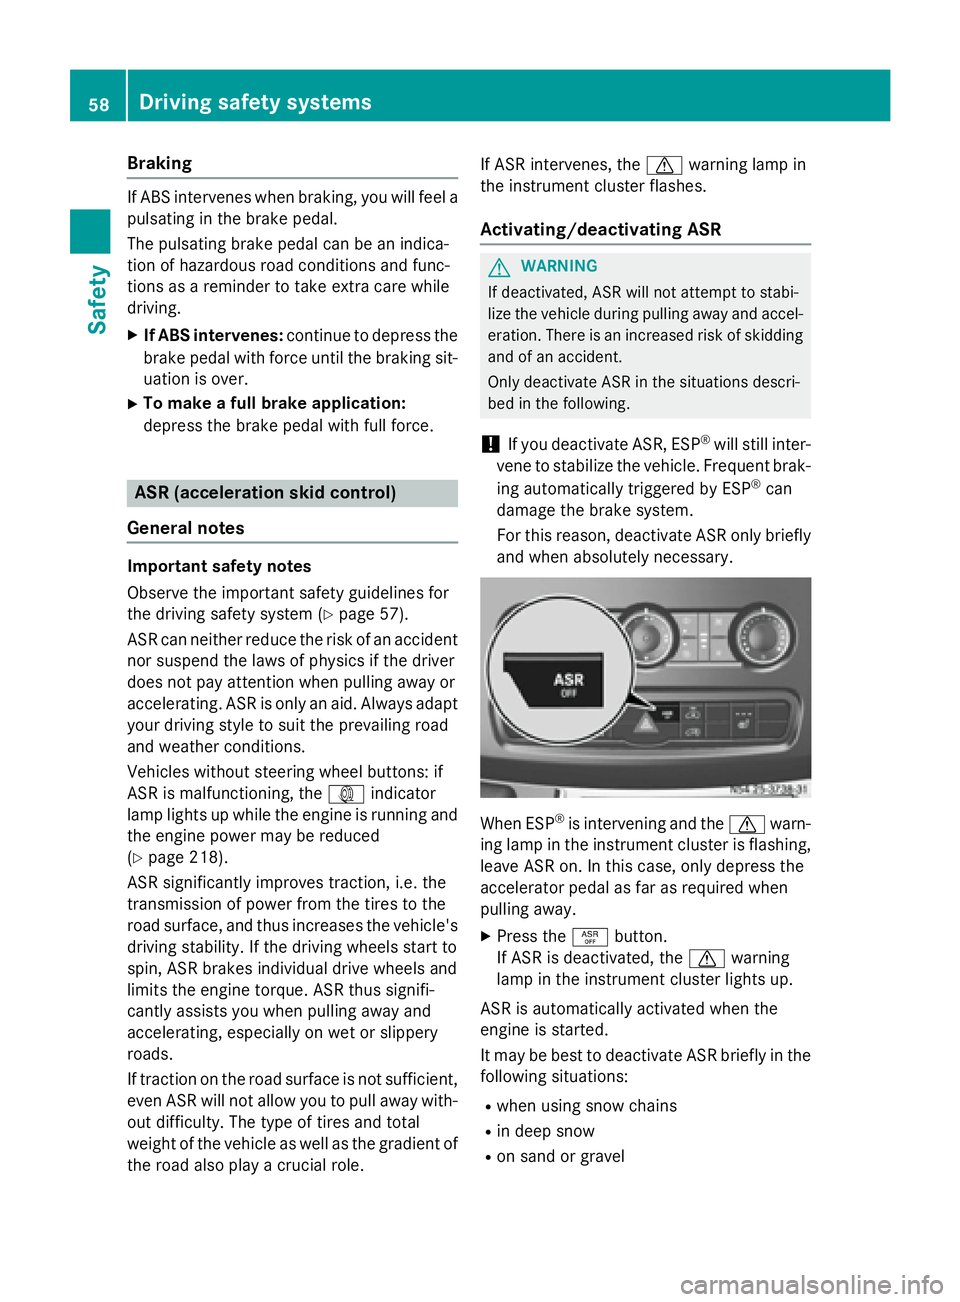
X Press the 00E3button.
If ASR is deactivated, the 0072warning
lamp in the instrument cluster lights up.
ASR is automatically activated when the
engine is started.
It may be best to deactivate ASR briefly in the
following situations:
R when using snow chains
R in deep snow
R on sand or gravel 58
Driving safety systemsSafety
Page 86 of 334
The seat suspension must be adapted to your
body weight. Adjust the seat suspension only while the seat is unoccupied.
X To adjust the seat suspension: take your
weight off the seat.
X Using handwheel 0084, set your body weight
(40 to 120 kg) for optimum seat suspen-
sion.
The seat suspension will become more rigid the higher you set the weight. It will then
not move as far.
If the seat moves up and down frequently and
to a great extent, you can lock the seat in the lower range.
X To engage the seat suspension lock:
turn lever 006Bupwards.
When it next moves, the seat will lock in
position.
X To release the seat suspension lock:
turn lever 006Bto the right.
The seat can now move up and down again. Swiveling front seats
G
WARNING
If the driver's and co-driver's seats are not
engaged facing the direction of travel while
driving, the restraint systems may not be able to provide the intended protection. There is an
increased risk of injury, possibly even fatal.
Engage the driver's and co-driver's seats so
they are facing the direction of travel before
starting the engine.
! When rotating the seats, make sure that
there is sufficient space to do so.
Move the seat forward or back first. This
will help to avoid contact with other parts of
the interior.
Push the handbrake lever down to the stop.
The parking brake or handbrake lever could
otherwise be damaged. Seat release (example: co-driver's seat)
The driver's seat and co-driver's seat can be
rotated by 50° and 180°.
The seats engage when facing in the direction of travel as well as when facing in the oppositedirection and also engage at an angle of 50°
to the door.
X Make sure that the parking brake has been
engaged and that the handbrake lever has
been pushed down to the stop
(Y page 150).
X Adjust the steering wheel to provide the
necessary space to rotate and adjust the
driver's seat (Y page 88).
X Before rotating, push the co-driver's seat
forwards (Y page 83).
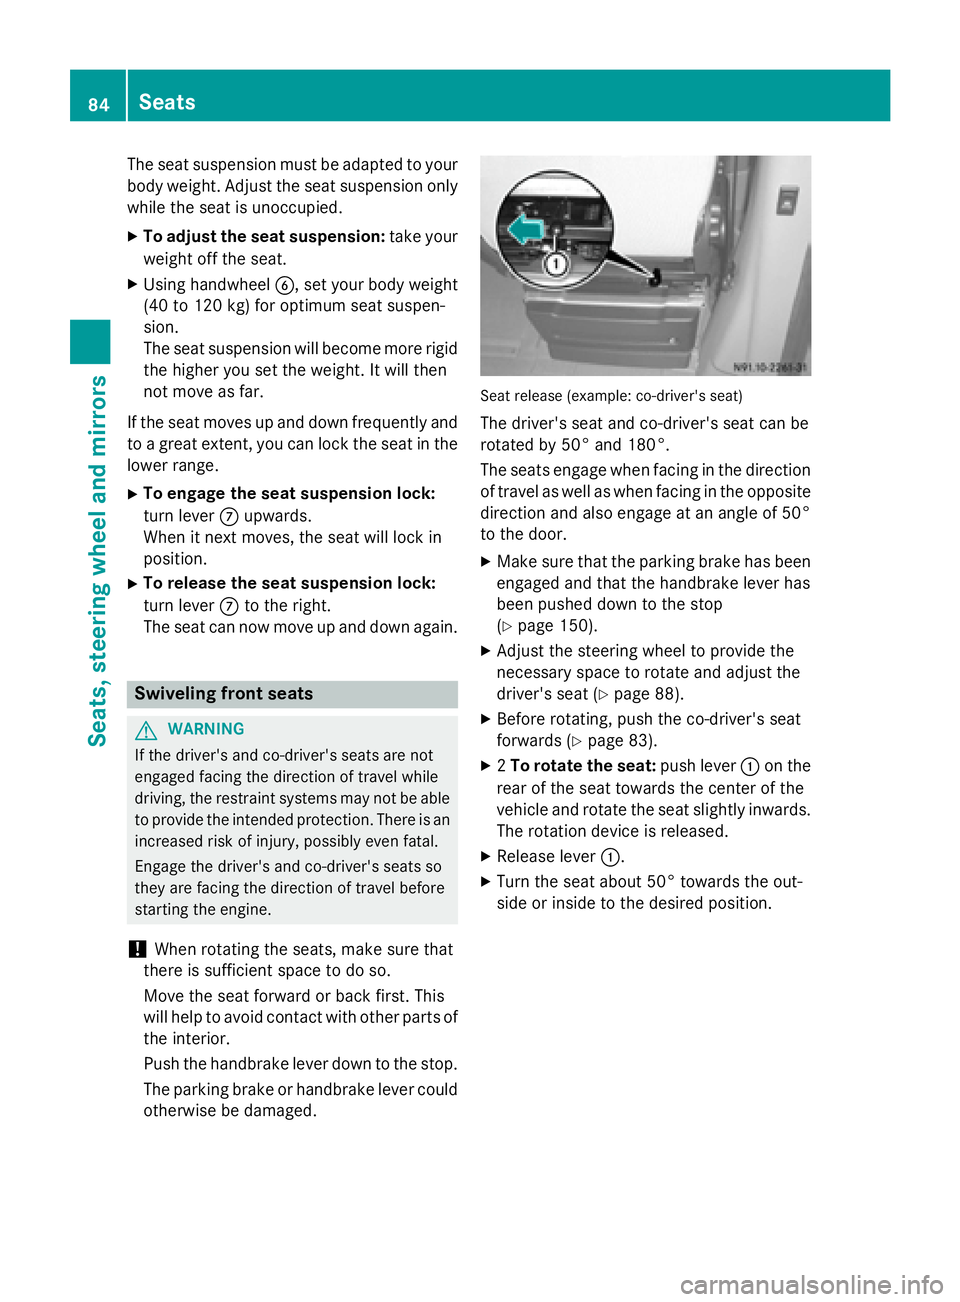
X 2To rotate the seat: push lever0043on the
rear of the seat towards the center of the
vehicle and rotate the seat slightly inwards. The rotation device is released.
X Release lever 0043.
X Turn the seat about 50° towards the out-
side or inside to the desired position. 84
SeatsSeats, steering wheel and mirrors