MERCEDES-BENZ SPRINTER 2017 MY17 Operator’s Manual
Manufacturer: MERCEDES-BENZ, Model Year: 2017, Model line: SPRINTER, Model: MERCEDES-BENZ SPRINTER 2017Pages: 286, PDF Size: 4.36 MB
Page 61 of 286
Useful information
This Operator's Manual describes all models as
well as standard and optional equipment of your
vehicle that were available at the time of going
to print. Country-specific variations are possi-
ble. Note that your vehicle may not be equipped
with all of the described functions. This also
applies to systems and functions relevant to
safety.
Read the information on qualified specialist
workshops (
Ypage 27).
Key
Important safety notes
GWARNING
When the double locks are activated, the
doors can no longer be opened from the
inside. People in the vehicle can no longer get
out, e.g. in hazardous situations. There is a
risk of injury.
Therefore, do not leave any people unsuper-
vised in the vehicle, particularly children, eld-
erly people or people in need of special assis-
tance. Do not activate the double lock when
people are in the vehicle.
GWARNING
If you leave children unsupervised in the vehi-
cle, they could set it in motion by, for example:
Rrelease the parking brake.
Rshift the automatic transmission out of park
position Por shift manual transmission into
neutral.
Rstart the engine.
In addition, they may operate vehicle equip-
ment and become trapped. There is a risk of
an accident and injury.
When leaving the vehicle, always take the
SmartKey with you and lock the vehicle. Never
leave children unsupervised in the vehicle.
GWARNING
If you attach heavy or large objects to the
SmartKey, the SmartKey could be uninten-
tionally turned in the ignition lock. This could
cause the engine to be switched off. There is a risk of an accident.
Do not attach any heavy or large objects to the
SmartKey. Remove any bulky key rings before
inserting the SmartKey into the ignition lock.
Do not keep the key with remote control:
Rwith electronic devices, e.g. a mobile phone
or another key with remote control
Rwith metallic objects, e.g. coins or metal foil
Rin metallic objects, e.g. metal cases
This can affect the key's functionality.
Key functions of the remote control
General notes
The vehicle is equipped with either 2 or 4 remote
controls with a folding key, or 4 mechanical
keys. In this Operator's Manual, both the
mechanical keys and the keys with remote con-
trol are referred to as keys. The remote control
key has a range of up to 32 ft (10 m). Use the
remote control of the key only when in immedi-
ate proximity of the vehicle. This prevents theft.
Remote controls that are not included in the
scope of delivery for the vehicle must be pro-
grammed before use. Further information can
be obtained at any authorized Sprinter Dealer.
The key's remote control locks/unlocks the
driver's door and/or the following centrally if
the factory settings have not been changed:
Rthe driver's and the front-passenger door
Rthe sliding doors
Rthe rear doors
iIf the driver's or front-passenger door is not
closed, the corresponding door is not locked.
If a sliding door or a rear door is not closed
properly, none of the rear doors are locked.
If there is a key is in the ignition lock, the remote
control is inoperative. When locking or unlock-
ing the vehicle with the remote control, always
pay attention to the indicator lamp signaling.
Also check the locking knobs of the doors.
Key59
Opening and closing
Z
Page 62 of 286
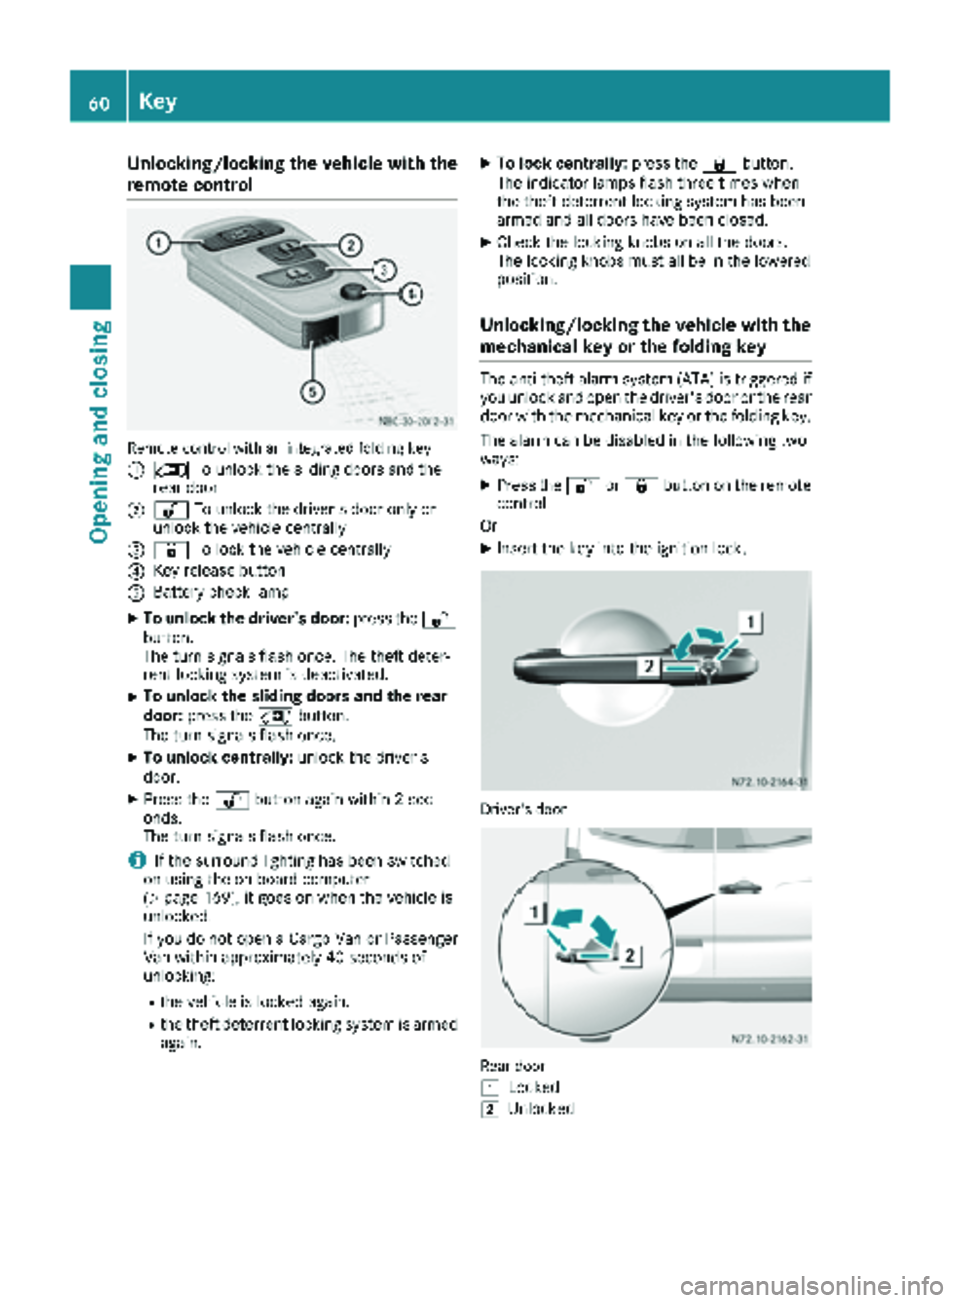
Unlocking/locking the vehicle with the
remote control
Remote control with an integrated folding key
:
5To unlock the sliding doors and the
rear door
;% To unlock the driver's door only or
unlock the vehicle centrally
=& To lock the vehicle centrally
?Key release button
ABattery check lamp
XTo unlock the driver's door: press the%
button.
The turn signals flash once. The theft deter-
rent locking system is deactivated.
XTo unlock the sliding doors and the rear
door: press the 5button.
The turn signals flash once.
XTo unlock centrally: unlock the driver's
door.
XPress the %button again within 2 sec-
onds.
The turn signals flash once.
iIf the surround lighting has been switched
on using the on-board computer
(
Ypage 169), it goes on when the vehicle is
unlocked.
If you do not open a Cargo Van or Passenger
Van within approximately 40 seconds of
unlocking:
Rthe vehicle is locked again.
Rthe theft deterrent locking system is armed
again.
XTo lock centrally: press the&button.
The indicator lamps flash three times when
the theft deterrent locking system has been
armed and all doors have been closed.
XCheck the locking knobs on all the doors.
The locking knobs must all be in the lowered
position.
Unlocking/locking the vehicle with the
mechanical key or the folding key
The anti-theft alarm system (ATA) is triggered if you unlock and open the driver's door or the rear
door with the mechanical key or the folding key.
The alarm can be disabled in the following two
ways:
XPress the %or& button on the remote
control.
Or
XInsert the key into the ignition lock.
Driver's door
Rear door
1
Locked
2Unlocked
60Key
Opening and closing
Page 63 of 286
XTo unlock the driver's or rear door:press
the key release button on the remote control.
The key folds out.
XInsert the key fully into the door lock and turn it to position 2.
The door is unlocked.
XTo lock the vehicle: lock all doors except the
driver's door and, if necessary the rear door,
from inside. To do this, press down the door
locking buttons.
XPress the key release button on the remote
control.
The key folds out.
XInsert the key fully into the driver's door lock
and turn it to position 1.
The driver's door is locked.
Remote control battery
Important safety notes
GWARNING
Batteries contain toxic and corrosive substan- ces. If batteries are swallowed, it can result in
severe health problems. There is a risk of fatalinjury.
Keep batteries out of the reach of children. If
a battery is swallowed, seek medical attention immediately.
HEnvironmental note
Batteries contain dangerous
substances. It is against the
law to dispose of them with
the household rubbish. They
must be collected separatelyand recycled to protect the
environment.
Dispose of batteries in an
environmentally friendly
manner. Take discharged
batteries to a qualified spe-
cialist workshop or a special
collection point for used bat-
teries.
The key batteries contain perchlorate material,
which may require special handling and regard for the environment. Check with your local gov-
ernment’s disposal guidelines. California resi-
dents, see
www.dtsc.ca.gov/
HazardousWaste/Perchlorate/index.cfm .
We recommend that you have batteries
changed at a qualified specialist workshop.
Checking the batteries
XPress the %or& button for longer than
two seconds.
If battery indicator lamp (
Ypage 59 )lights up
briefly, the batteries in the remote control still
have sufficient charge. Otherwise, change the
batteries immediately.
iIf the remote control is checked within the
signal reception range of the vehicle, pressing
the & or% button:
Rlock or
Runlock the vehicle
Changing batteries
You need a CR 2025 2 3 V cell battery, which can
be obtained from any qualified specialist work-
shop.
When changing the batteries, do not press any
of the buttons on the remote control.
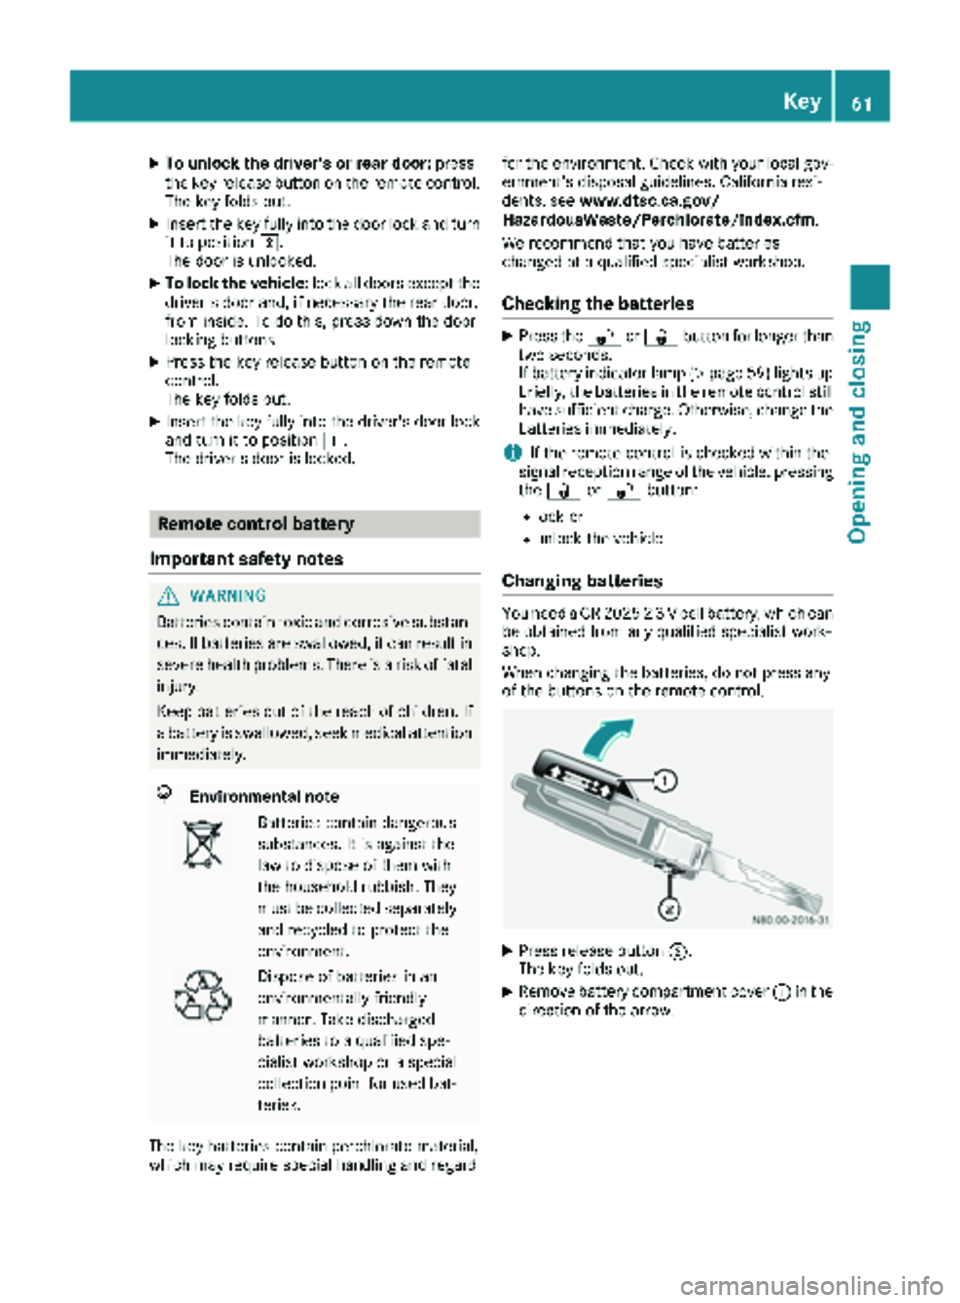
XPress release button ;.
The key folds out.
XRemove battery compartment cover :in the
direction of the arrow.
Key61
Opening and closing
Z
Page 64 of 286
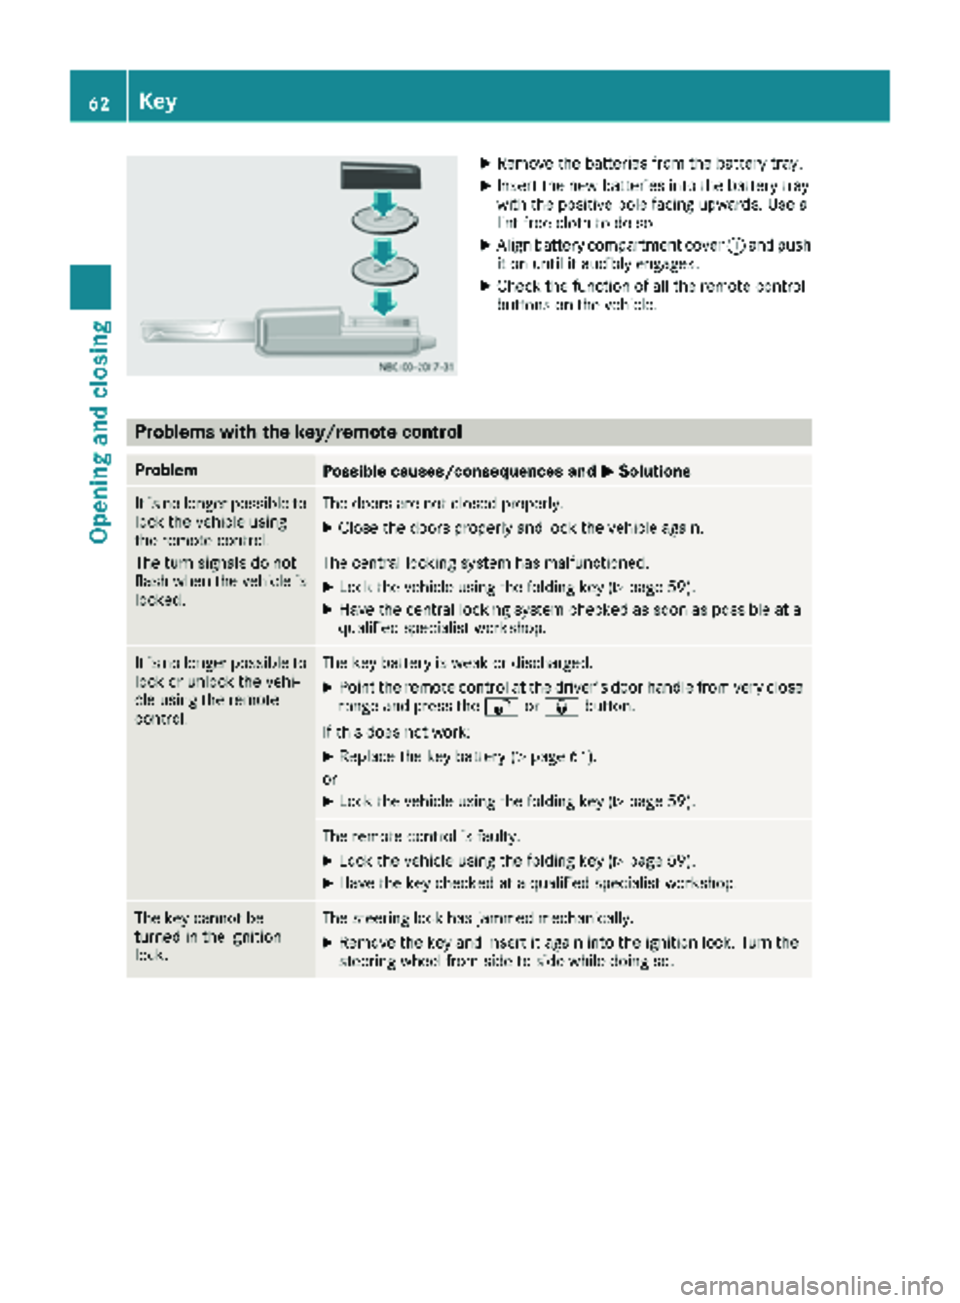
XRemove thebatterie sfrom th ebattery tray.
XInser tth ene wbatterie sint oth ebattery tray
wit hth epositive pole facing upwards. Use a
lint-free cloth to do so.
XAlign battery compartmen tcover :and push
it on until it audibly engages.
XChec kth efunction of all th eremot econtrol
buttons on th evehicle.
Problems with the key/remote control
ProblemPossible causes/consequences and MSolutions
It is no longer possibleto
loc kth evehicl eusin g
th eremot econtrol .
The tur nsignals do no t
flas hwhen th evehicl eis
locked.The door sare no tclosed properly.
XClose th edoor sproperly and loc kth evehicl eagain .
The central lockin gsystem has malfunctioned.
XLoc kth evehicl eusin gth efoldin gke y (Ypage 59).
XHav eth ecentral lockin gsystem checke das soo nas possibl eat a
qualified specialist workshop.
It is no longer possibl eto
loc kor unlock th evehi-
cle usin gth eremot e
control .The keybattery is weak or discharged.
XPoin tth eremot econtrol at th edriver' sdoor handle from ver yclose
range and press th e% or& button.
If this does no twork:
XReplac eth eke ybattery (Ypage 61).
or
XLoc kth evehicl eusin gth efoldin gke y (Ypage 59).
The remot econtrol is faulty.
XLoc kth evehicl eusin gth efoldin gke y (Ypage 59).
XHav eth eke ychecke dat aqualified specialist workshop.
The ke ycanno tbe
turne din th eignition
lock.The steering loc khas jammed mechanically.
XRemove th eke yand insert it again int oth eignition lock. Turn th e
steering whee lfrom side to side while doin gso.
62Key
Opening and closing
Page 65 of 286
ProblemPossible causes/consequences andMSolutions
The engine cannot be
started using the key.The on-board voltage is too low.
XSwitch off all non-essential consumers, such as interior lighting, and
try to start the engine again.
If this does not work:
XCheck the starter battery and charge it if necessary (Ypage 228).
or
XJump-start the vehicle (Ypage 238).
or
XConsult a qualified specialist workshop.
You have lost a key.XHave the key deactivated at a qualified specialist workshop.
XReport the loss immediately to the vehicle insurers.
XIf necessary, have the mechanical locks replaced.
Central locking
Important safety notes
GWARNING
If children are left unsupervised in the vehicle,
they could:
Ropen the doors, thus endangering other
people or road users.
Rget out and disrupt traffic.
Roperate the vehicle's equipment.
Additionally, children could set the vehicle in
motion if, for example, they:
Rrelease the parking brake.
Rshifting the automatic transmission out of
park position P
RStart the engine.
There is a risk of an accident and injury.
When leaving the vehicle, always take the
SmartKey with you and lock the vehicle. Never
leave children or animals unattended in the
vehicle. Always keep the SmartKey out of
reach of children.
GWARNING
If persons, particularly children are subjected to prolonged exposure to extreme heat or
cold, there is a risk of injury, possibly even
fatal. Never leave children unattended in the
vehicle.
You can open a locked front door from the inside
at any time. You can open a locked sliding door
or rear door from the inside if it has been previ-
ously unlocked from inside.
Locking and unlocking manually
Central locking buttons
Use the central locking buttons to centrally
lock/unlock either the entire vehicle or just the sliding doors and rear doors from the inside.
Central locking63
Opening and closing
Z
Page 66 of 286
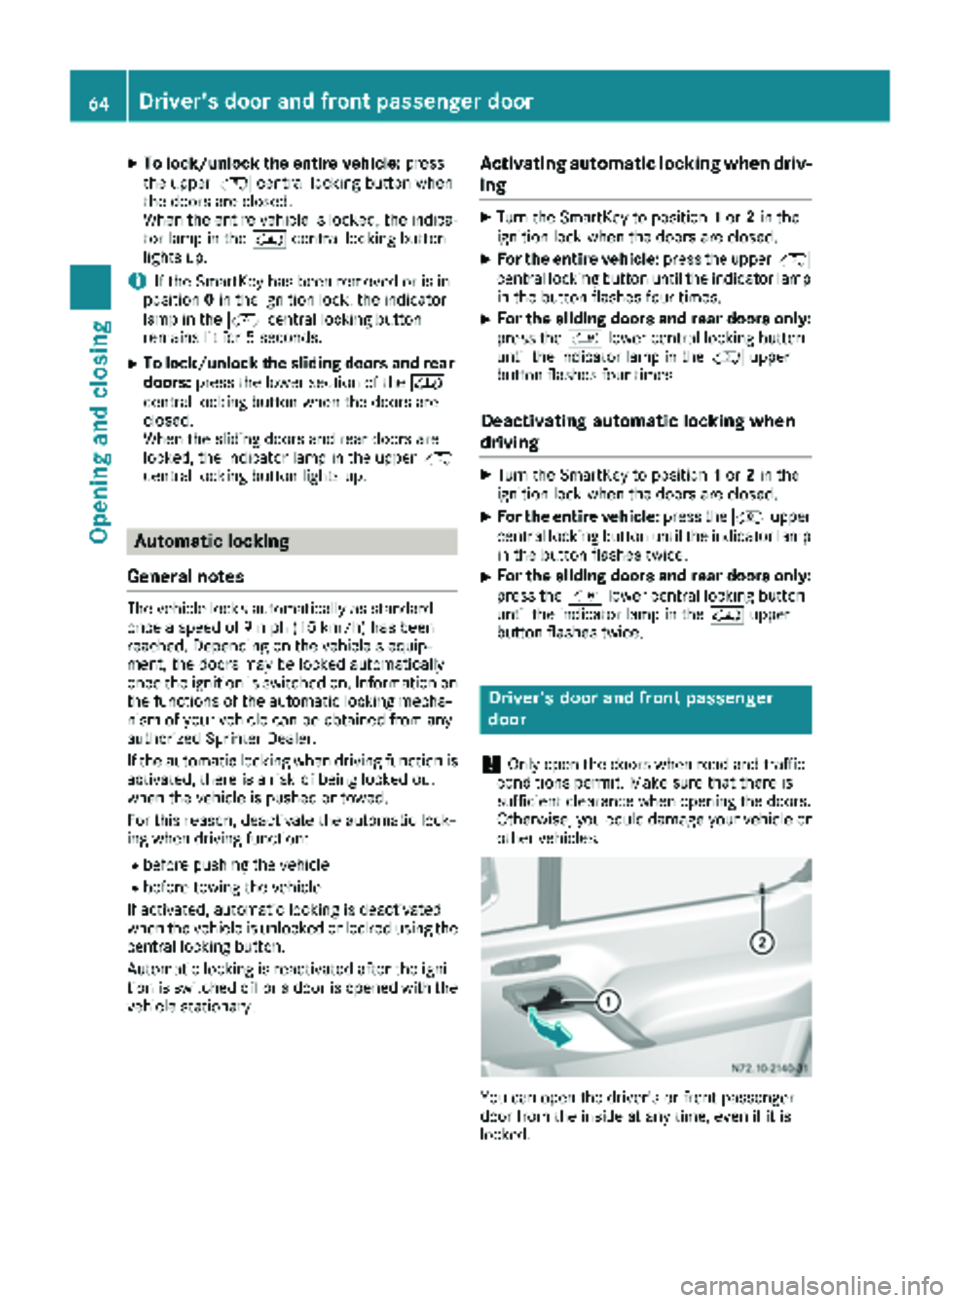
XTo lock/unlock the entire vehicle:press
the upper Ãcentral locking button when
the doors are closed.
When the entire vehicle is locked, the indica- tor lamp in the Ãcentral locking button
lights up.
iIf the SmartKey has been removed or is in
position 0in the ignition lock, the indicator
lamp in the Ãcentral locking button
remains lit for 5 seconds.
XTo lock/unlock the sliding doors and rear
doors: press the lower section of the Ä
central locking button when the doors are
closed.
When the sliding doors and rear doors are
locked, the indicator lamp in the upper Ã
central locking button lights up.
Automatic locking
General notes
The vehicle locks automatically as standard
once a speed of 9 mph (15 km/h) has been
reached. Depending on the vehicle's equip-
ment, the doors may be locked automatically
once the ignition is switched on. Information on
the functions of the automatic locking mecha-
nism of your vehicle can be obtained from any
authorized Sprinter Dealer.
If the automatic locking when driving function is
activated, there is a risk of being locked out
when the vehicle is pushed or towed.
For this reason, deactivate the automatic lock-
ing when driving function:
Rbefore pushing the vehicle
Rbefore towing the vehicle
If activated, automatic locking is deactivated
when the vehicle is unlocked or locked using the
central locking button.
Automatic locking is reactivated after the igni-
tion is switched off or a door is opened with the
vehicle stationary.
Activating automatic locking when driv-
ing
XTurn the SmartKey to position 1or 2in the
ignition lock when the doors are closed.
XFor the entire vehicle: press the upperÃ
central locking button until the indicator lamp
in the button flashes four times.
XFor the sliding doors and rear doors only:
press the Älower central locking button
until the indicator lamp in the Ãupper
button flashes four times.
Deactivating automatic locking when
driving
XTurn the SmartKey to position 1or 2in the
ignition lock when the doors are closed.
XFor the entire vehicle: press theÃupper
central locking button until the indicator lamp
in the button flashes twice.
XFor the sliding doors and rear doors only:
press the Älower central locking button
until the indicator lamp in the Ãupper
button flashes twice.
Driver's door and front passenger
door
!
Only open the doors when road and traffic
conditions permit. Make sure that there is
sufficient clearance when opening the doors.
Otherwise, you could damage your vehicle or
other vehicles.
You can open the driver's or front-passenger
door from the inside at any time, even if it is
locked.
64Driver's door and front passenger door
Opening and closing
Page 67 of 286
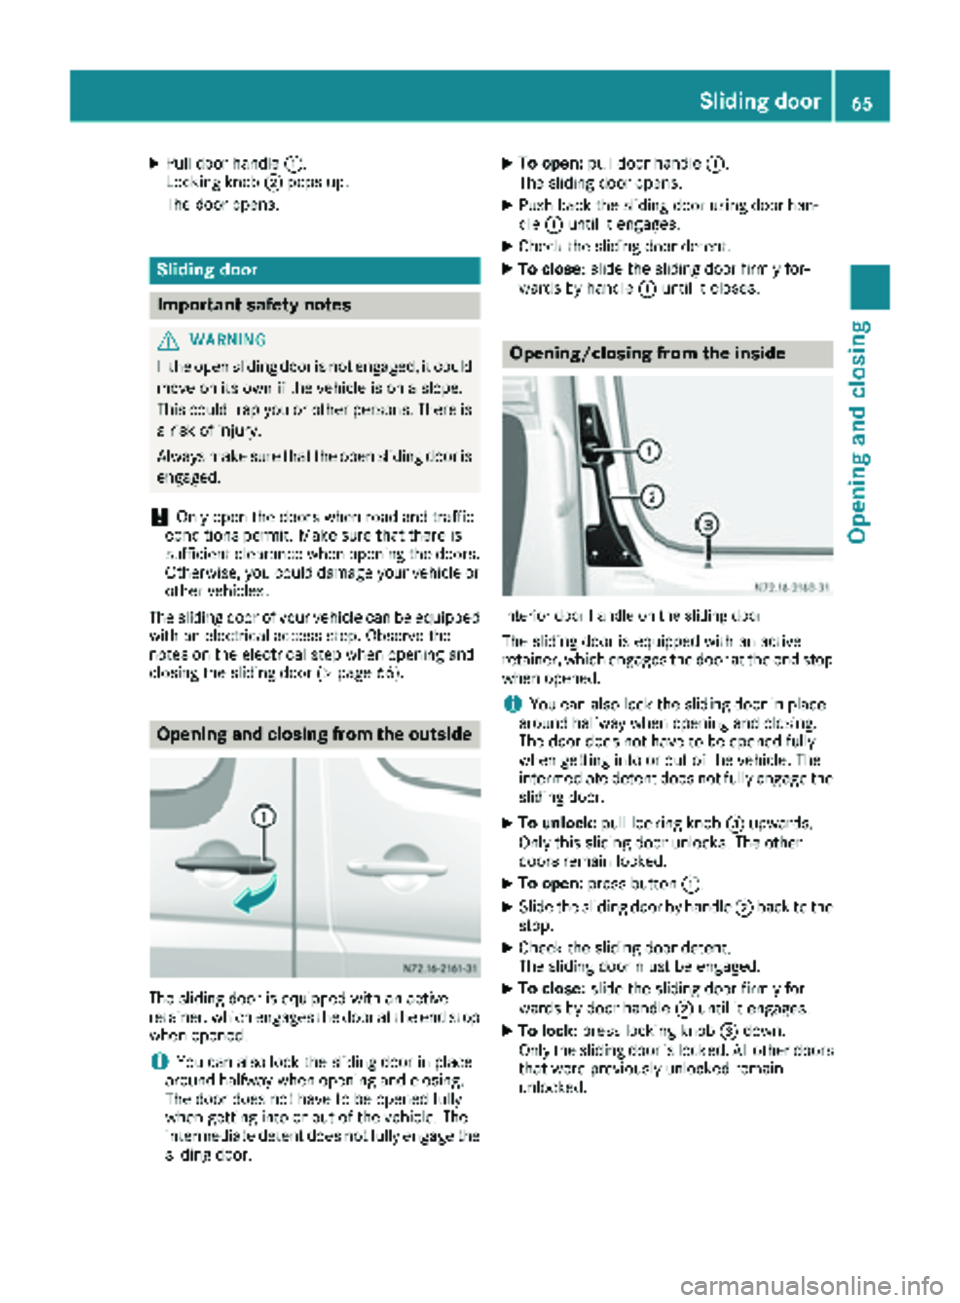
XPull door handle:.
Locking knob ;pops up.
The door opens.
Sliding door
Important safety notes
GWARNING
If the open sliding door is not engaged, it could
move on its own if the vehicle is on a slope.
This could trap you or other persons. There is a risk of injury.
Always make sure that the open sliding door is
engaged.
!Only open the doors when road and traffic
conditions permit. Make sure that there is
sufficient clearance when opening the doors.
Otherwise, you could damage your vehicle or other vehicles.
The sliding door of your vehicle can be equipped
with an electrical access step. Observe the
notes on the electrical step when opening and
closing the sliding door (
Ypage 66).
Opening and closing from the outside
The sliding door is equipped with an active
retainer, which engages the door at the end stop
when opened.
iYou can also lock the sliding door in place
around halfway when opening and closing.
The door does not have to be opened fully
when getting into or out of the vehicle. The
intermediate detent does not fully engage the
sliding door.
XTo open: pull door handle :.
The sliding door opens.
XPush back the sliding door using door han-
dle :until it engages.
XCheck the sliding door detent.
XTo close: slide the sliding door firmly for-
wards by handle :until it closes.
Opening/closing from the inside
Interior door handle on the sliding door
The sliding door is equipped with an active
retainer, which engages the door at the end stop
when opened.
iYou can also lock the sliding door in place
around halfway when opening and closing.
The door does not have to be opened fully
when getting into or out of the vehicle. The
intermediate detent does not fully engage the
sliding door.
XTo unlock: pull locking knob =upwards.
Only this sliding door unlocks. The other
doors remain locked.
XTo open: press button :.
XSlide the sliding door by handle ;back to the
stop.
XCheck the sliding door detent.
The sliding door must be engaged.
XTo close: slide the sliding door firmly for-
wards by door handle ;until it engages.
XTo lock: press locking knob =down.
Only the sliding door is locked. All other doors that were previously unlocked remain
unlocked.
Sliding door65
Opening and closing
Z
Page 68 of 286
Electrical closing assist
If your vehicle is equipped with electrical closing
assist, you will require less force to close the
sliding door.
Electrical step
Important safety notes
!
Always observe the ground clearance of the
vehicle and avoid obstacles. On vehicles with a step, ground clearance is further restricted.
Obstacles can damage the vehicle.
If you must drive over obstacles, drive espe-
cially slowly and carefully. If necessary, have
another person direct you.
If you do not use the grab handle and the step,
you could injure yourself when getting in and out
of the vehicle.
In order to reduce risks:
Rdraw the passengers' attention to the electri-
cal step. Wait until the electrical step is fully
extended.
Rdo not jump out of the vehicle.
Ronly use the grab handle and step. Only they
are designed for such a load.
Rkeep grab handles, access steps and entry
sills free from dirt, e.g. mud, clay, snow and
ice.
Operation and obstacle detection
Electrical step
The sliding door of your vehicle can be equipped
with an electrical step.
XWhen getting in and out of the vehicle, use the grab handles and electrical step :.Electrical step
:automatically extends when
the sliding door is opened and retracts when it is
closed.
Electrical step :is equipped with an obstruc-
tion detection device on the front side. If the
step comes into contact with an obstacle while
it is extending, it stops.
After you have removed the obstacle, you must
first close the sliding door and open it once
again so that the step can extend completely.
iIf the electrical step obstructs loading, you
can prevent the step from extending when
opening the sliding door via obstacle detec-
tion. The electrical step can then remain
retracted and a forklift or other lifting equip-
ment can be moved nearer to the cargo com-
partment.
Vehicles without steering-wheel buttons: if
the 1 indicator lamp in the instrument clus-
ter lights up and a warning tone sounds, elec-
trical step :is malfunctioning (
Ypage 199).
Vehicles with steering wheel buttons: if the
Electrical
Stepmessage is shown in the dis-
play and a warning tone sounds, electrical
step :is malfunctioning (
Ypage 189).
If electrical step :is malfunctioning, the step
may only partially extend/retract or may not
extend/retract at all. If a malfunction does
occur, you will have to retract and lock electrical
step :manually before continuing the journey
(
Ypage 66).
Before passengers get out of the vehicle, let
them know that electrical step :might not be
extended.
Emergency release
!
Driving with the step extended may result in
it being damaged.
If the electrical step does not retract auto-
matically, you will have to push it in and lock it
into place manually before continuing your
journey.
66Electrical step
Opening and closing
Page 69 of 286
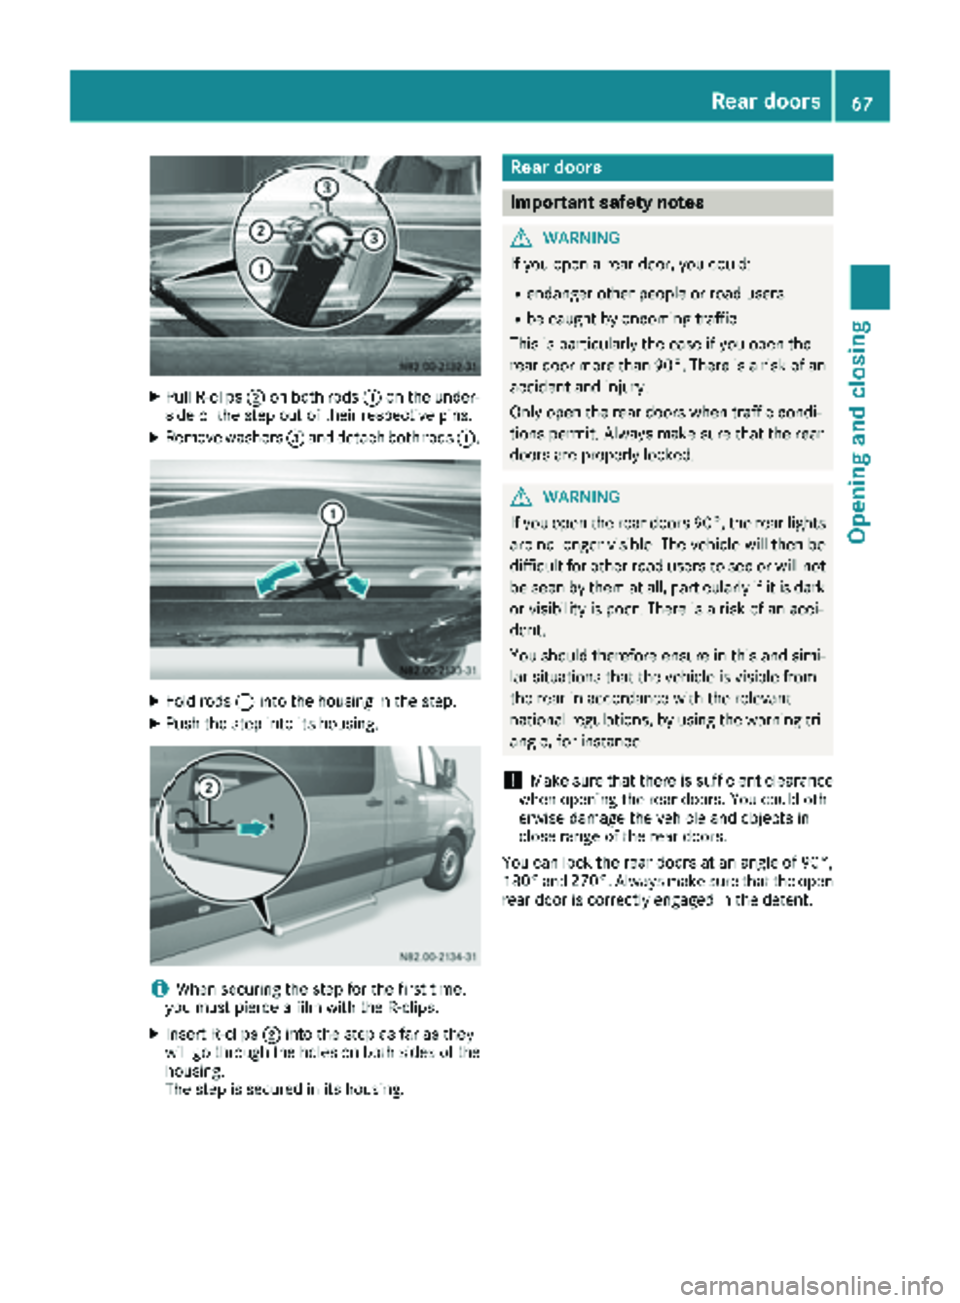
XPull R-clips;on both rods :on the under-
side of the step out of their respective pins.
XRemove washers =and detach both rods :.
XFold rods:into the housing in the step.
XPush the step into its housing.
iWhen securing the step for the first time,
you must pierce a film with the R-clips.
XInsert R-clips ;into the step as far as they
will go through the holes on both sides of the
housing.
The step is secured in its housing.
Rear doors
Important safety notes
GWARNING
If you open a rear door, you could:
Rendanger other people or road users
Rbe caught by oncoming traffic
This is particularly the case if you open the
rear door more than 90°. There is a risk of an
accident and injury.
Only open the rear doors when traffic condi-
tions permit. Always make sure that the rear
doors are properly locked.
GWARNING
If you open the rear doors 90°, the rear lights are no longer visible. The vehicle will then be
difficult for other road users to see or will not
be seen by them at all, particularly if it is dark
or visibility is poor. There is a risk of an acci-
dent.
You should therefore ensure in this and simi-
lar situations that the vehicle is visible from
the rear in accordance with the relevant
national regulations, by using the warning tri-
angle, for instance.
!Make sure that there is sufficient clearance
when opening the rear doors. You could oth-
erwise damage the vehicle and objects in
close range of the rear doors.
You can lock the rear doors at an angle of 90°,
180° and 270°. Always make sure that the open
rear door is correctly engaged in the detent.
Rear doors67
Opening and closing
Z
Page 70 of 286
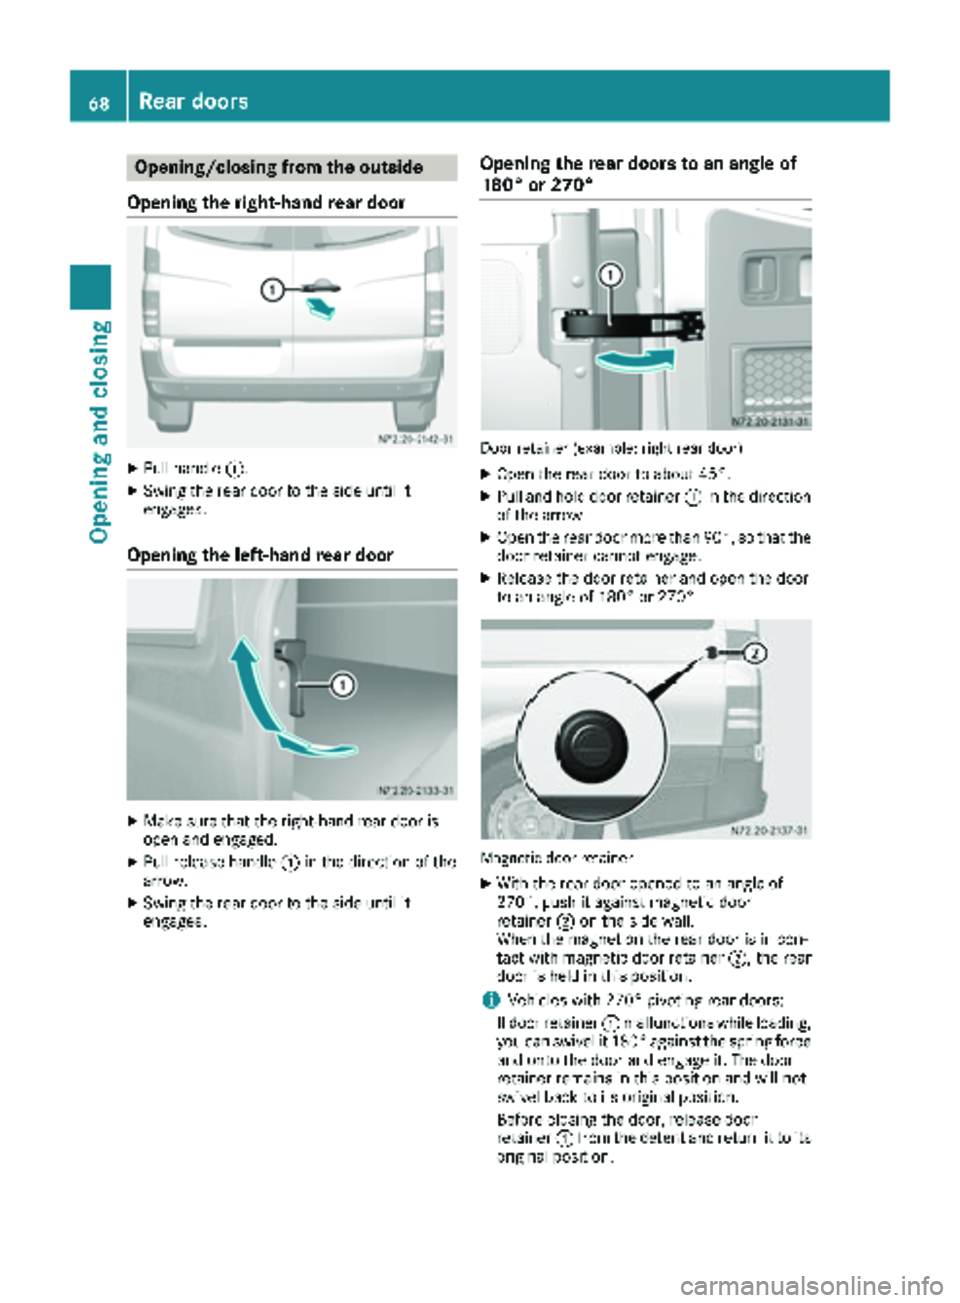
Opening/closing from the outside
Opening the right-hand rear door
XPull handle :.
XSwing the rear door to the side until it
engages.
Opening the left-hand rear door
XMake sure that the right-hand rear door is
open and engaged.
XPull release handle :in the direction of the
arrow.
XSwing the rear door to the side until it
engages.
Opening the rear doors to an angle of
180° or 270°
Door retainer (example: right rear door)
XOpen the rear door to about 45°.
XPull and hold door retainer :in the direction
of the arrow.
XOpen the rear door more than 90°, so that the door retainer cannot engage.
XRelease the door retainer and open the door
to an angle of 180° or 270°.
Magnetic door retainer
XWith the rear door opened to an angle of
270°, push it against magnetic door
retainer ;on the side wall.
When the magnet on the rear door is in con-
tact with magnetic door retainer ;, the rear
door is held in this position.
iVehicles with 270° pivoting rear doors:
If door retainer :malfunctions while loading,
you can swivel it 180° against the spring force and onto the door and engage it. The door
retainer remains in this position and will not
swivel back to its original position.
Before closing the door, release door
retainer :from the detent and return it to its
original position.
68Rear doors
Opening and closing