engine overheat MERCEDES-BENZ SPRINTER 2018 MY18 Operator’s Manual
[x] Cancel search | Manufacturer: MERCEDES-BENZ, Model Year: 2018, Model line: SPRINTER, Model: MERCEDES-BENZ SPRINTER 2018Pages: 294, PDF Size: 4.36 MB
Page 81 of 294
XTo set the armrest angle:fold the armrest
upwards by more than 45° ;.
The armrest is released.
XFold armrest =forwards to the stop.
XSlowly fold the armrest upwards to the
desired position.
XTo fold the armrest up: if necessary, fold the
armrest upwards :by more than 90°.
Seat heating
GWARNING
Repeatedly switching on the seat heating can
cause the seat cushion and backrest pads to
become very hot. The health of persons with
limited temperature sensitivity or a limited
ability to react to high temperatures may be
affected or they may even suffer burn-like
injuries. There is a risk of injury.
Therefore, do not switch the seat heating on
repeatedly.
!When you leave your seat, do not place any-
thing on the seat and switch off the seat heat-
ing. Do not switch the seat heating on when
the seat is not occupied, e.g. when driving
without a front passenger. The seat heating
may otherwise overheat, causing damage to
the seat.
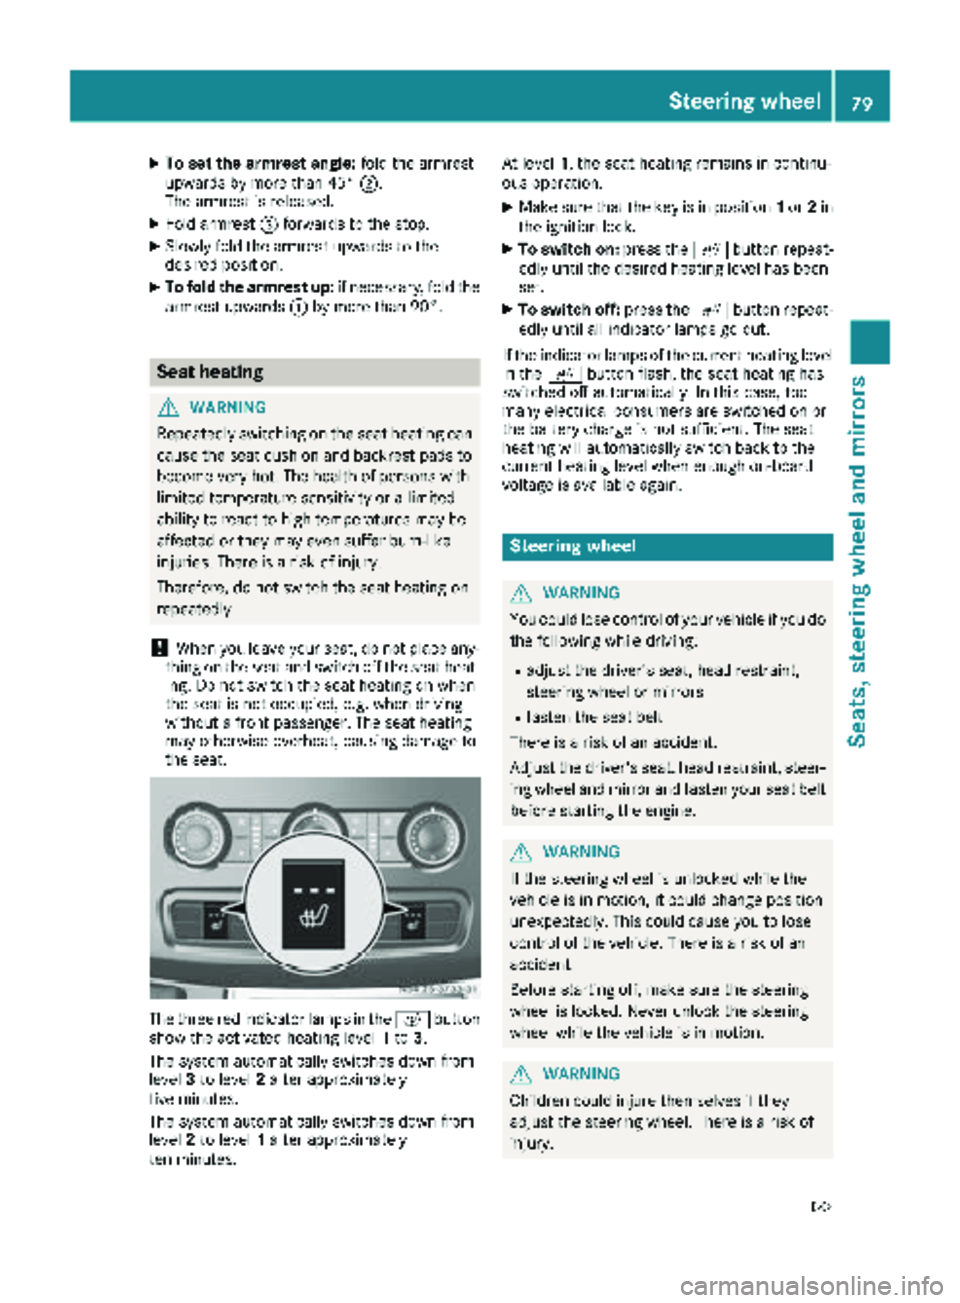
The three red indicator lamps in the cbutton
show the activated heating level 1to 3.
The system automatically switches down from
level 3to level 2after approximately
five minutes.
The system automatically switches down from
level 2to level 1after approximately
ten minutes. At level
1, the seat heating remains in continu-
ous operation.
XMake sure that the key is in position 1or 2in
the ignition lock.
XTo switch on: press thecbutton repeat-
edly until the desired heating level has been
set.
XTo switch off: press thecbutton repeat-
edly until all indicator lamps go out.
If the indicator lamps of the current heating level
in the cbutton flash, the seat heating has
switched off automatically. In this case, too
many electrical consumers are switched on or
the battery charge is not sufficient. The seat
heating will automatically switch back to the
current heating level when enough on-board
voltage is available again.
Steering wheel
GWARNING
You could lose control of your vehicle if you do the following while driving:
Radjust the driver's seat, head restraint,
steering wheel or mirrors
Rfasten the seat belt
There is a risk of an accident.
Adjust the driver's seat, head restraint, steer-
ing wheel and mirror and fasten your seat belt before starting the engine.
GWARNING
If the steering wheel is unlocked while the
vehicle is in motion, it could change position
unexpectedly. This could cause you to lose
control of the vehicle. There is a risk of an
accident.
Before starting off, make sure the steering
wheel is locked. Never unlock the steering
wheel while the vehicle is in motion.
GWARNING
Children could injure themselves if they
adjust the steering wheel. There is a risk of
injury.
Steering wheel79
Seats, steering wheel and mirrors
Z
Page 110 of 294
GWARNING
When the auxiliary heating is switched on,
parts of the vehicle can become very hot, e.g.
the exhaust system.
Flammable materials such as leaves, grass or
twigs may ignite if they come into contact
with:
Rhot parts of the exhaust system
Rthe exhaust gas itself
There is a risk of fire.
When the auxiliary heating is switched on,
make sure that:
Rno flammable materials come into contact
with hot vehicle components
Rthe exhaust gas can escape from the
exhaust pipe unhindered
Rthe exhaust gas does not come into contact
with flammable materials.
!Turn on the auxiliary heating at least once a
month for approximately 10 minutes. The
auxiliary heating could otherwise be dam-
aged.
!Make sure that the flow of hot air is not
blocked. The auxiliary heating will otherwise
overheat and switch off.
Your vehicle may be equipped with either an
auxiliary hot-water heater or an auxiliary warm-
air heater. Adjustment and operation of the:
Rhot-water auxiliary heater is done via the on-
board computer and with the auxiliary heating
button in the control panel (
Ypage 109) or
with the remote control (Ypage 110).
Rauxiliary warm-air heater is done via the timer
above the overhead control panel
(
Ypage 114).
The auxiliary heating works independently of the
engine and supplements the climate control
system in the vehicle. The auxiliary heating
heats the air in the vehicle interior to the tem-
perature set.
If your vehicle is equipped with a hot-water aux-
iliary heater, the auxiliary heating also keeps the
coolant warm. This way, the load on the engine
is minimized and fuel is saved.
The heater booster function (
Ypage 112) of the
auxiliary heating supports the climate control system when the engine is running and the out-
side temperature is low.
You can use the auxiliary heating at an outside
temperature of up to 39 ‡ (4 †). At an outside
temperature above 39 ‡ (4 †) the auxiliary
heating system and the heater booster function
switch off automatically.
Hot-water auxiliary heating
Heating time
The heating time when operating the auxiliary
heating with the vehicle is stationary without the
engine running depends on the outside temper-
ature and the electrical consumers switched on.
Outside
tempera-
tureHeating
timePossible startup
procedures
Above 23‡
(Ò5 †)Approx.
20 minutes6
23 ‡
(Ò5 †) to
5 ‡
( Ò15 †)Approx.
40 minutes3
Below 5‡
( Ò 15 †)Approx.
50 minutes2
You can then switch on the auxiliary heating
again.
If you do not start the engine for a while, the total
duration of heating is limited to a maximum of
120 minutes to protect the starter battery.
Switching on the auxiliary heating is then auto-
matically disabled. You can, for example, switch
on the auxiliary heating a maximum of two times
without the engine running if the outside tem-
perature is Ò5 ‡ (Ò20 †). If you attempt to do it
again, the indicator lamps in the y
(
Ypage 109) button flash alternately for about
two minutes indicating restarting lock. The aux-
iliary heating cannot be switched on without
starting the engine.
When the condition of charge of the starter bat-
tery is sufficient again, the switch-on interlock
will be deactivated. To charge the starter bat-
tery, let the engine run. The engine run time
required to reach the necessary condition of
charge depends on the outside temperature and
on the electrical consumers switched on.
108Operating the auxiliary heating system
Climate control
Page 120 of 294
Useful information
This Operator's Manual describes all models as
well as standard and optional equipment of your
vehicle that were available at the time of going
to print. Country-specific variations are possi-
ble. Note that your vehicle may not be equipped
with all of the described functions. This also
applies to systems and functions relevant to
safety.
Read the information on qualified specialist
workshops (
Ypage 27).
Breaking-in notes
The first 1000 miles (1500 km)
New or replaced brake pads and brake disks
only reach their optimum braking effect after a
few 100 miles (a few 100 kilometers). Until then,
compensate for this by applying greater force to
the brake pedal.
For the service life and economy of your vehicle
it is crucial that you break in the engine with due
care.
RTherefore, protect the engine for the first
1000 miles (1500 km) by driving at varying
vehicle and engine speeds.
RAvoid overstraining the vehicle and high
engine speeds during this period, e.g. driving
at full throttle. Do not exceed Øof the max-
imum speed for each gear.
RDo not change down a gear manually in order to brake.
RTry to avoid depressing the accelerator pedal
beyond the point of resistance (kickdown).
RThe shift ranges 3,2or 1should only be
engaged when driving slowly, e.g. when driv-
ing in mountainous terrain.
After 1000 miles (1500 km), you can increase
the engine speed gradually and accelerate the
vehicle to full speed.
iYou should also observe these notes on
breaking-in if the engine or parts of the drive
train on your vehicle have been replaced.
Driving
Important safety notes
GWARNING
If you switch off the ignition while driving,
safety-relevant functions are only available
with limitations, or not at all. This could affect, for example, the power steering and the brake
boosting effect. You will require considerably
more effort to steer and brake. There is a risk
of an accident.
Do not switch off the ignition while driving.
GWARNING
If the parking brake has not been fully
released when driving, the parking brake can:
Roverheat and cause a fire
Rlose its hold function.
There is a risk of fire and an accident. Release
the parking brake fully before driving off.
If you park the vehicle for more than
three weeks:
Rconnect the batteries to a trickle charger or
Rdisconnect the vehicle's starter battery or
Rswitch off the electrical system using the bat-
tery main switch (Ypage 118) and
Rdisconnect the vehicle's auxiliary battery
Otherwise, you need to check the battery's con-
dition of charge every 3 weeks, since standby
power consumption can drain the battery. If the
battery voltage is lower than 12.2 V, the battery
must be charged. Otherwise, the battery may be damaged by exhaustive discharging.
Be sure to observe the notes on disconnecting
and charging the batteries under "Battery"
(
Ypage 228). You can obtain information about
trickle chargers from a qualified specialist work-
shop.
Battery isolating switch
Important safety notes
!Make sure that the key is in position 0in the
ignition lock and that at least five minutes
have passed before removing or reconnecting
118Driving
Driving and parking
Page 129 of 294
and that it is not swallowed. Do not inhale fuelvapors. Keep fuel away from children.
If you or others come into contact with fuel,
observe the following:
RWash away fuel from skin immediately
using soap and water.
RIf fuel comes into contact with your eyes,
immediately rinse them thoroughly with
clean water. Seek medical assistance with-
out delay.
RIf fuel is swallowed, seek medical assis-
tance without delay. Do not induce vomit-
ing.
RImmediately change out of clothing which
has come into contact with fuel.
GWARNING
If you mix diesel fuel with gasoline, the flash
point is lower than that of pure diesel fuel.
When the engine is running, exhaust system
components could overheat without being
noticed. There is a risk of fire.
Never refuel with gasoline. Never mix gasoline with diesel fuel.
HEnvironmental note
If fuels are handled improperly, they pose a
danger to persons and the environment. Do
not allow fuels to run into the sewage system,
the surface waters, the ground water or into
the ground.
!Do not use gasoline to refuel vehicles with a
diesel engine. Even small amounts of gasoline
will cause damage to the fuel system and
engine.
!Do not switch on the ignition if you acciden-
tally refuel with the wrong fuel. Otherwise, the
fuel will enter the fuel lines. Notify a qualified
specialist workshop and have the fuel tank
and fuel lines drained completely.
!Overfilling the fuel tank could damage the
fuel system.
!Take care not to spill any fuel on painted
surfaces. You could otherwise damage the
paintwork.
!Filter the fuel before transferring it to the
vehicle if you are refueling the vehicle from
barrels or containers.
This will prevent malfunctions in the fuel sys-
tem due to contaminated fuel.
Further information on fuel and on fuel grades
can be found in the "Technical data" section
(
Ypage 278).
Refueling procedure
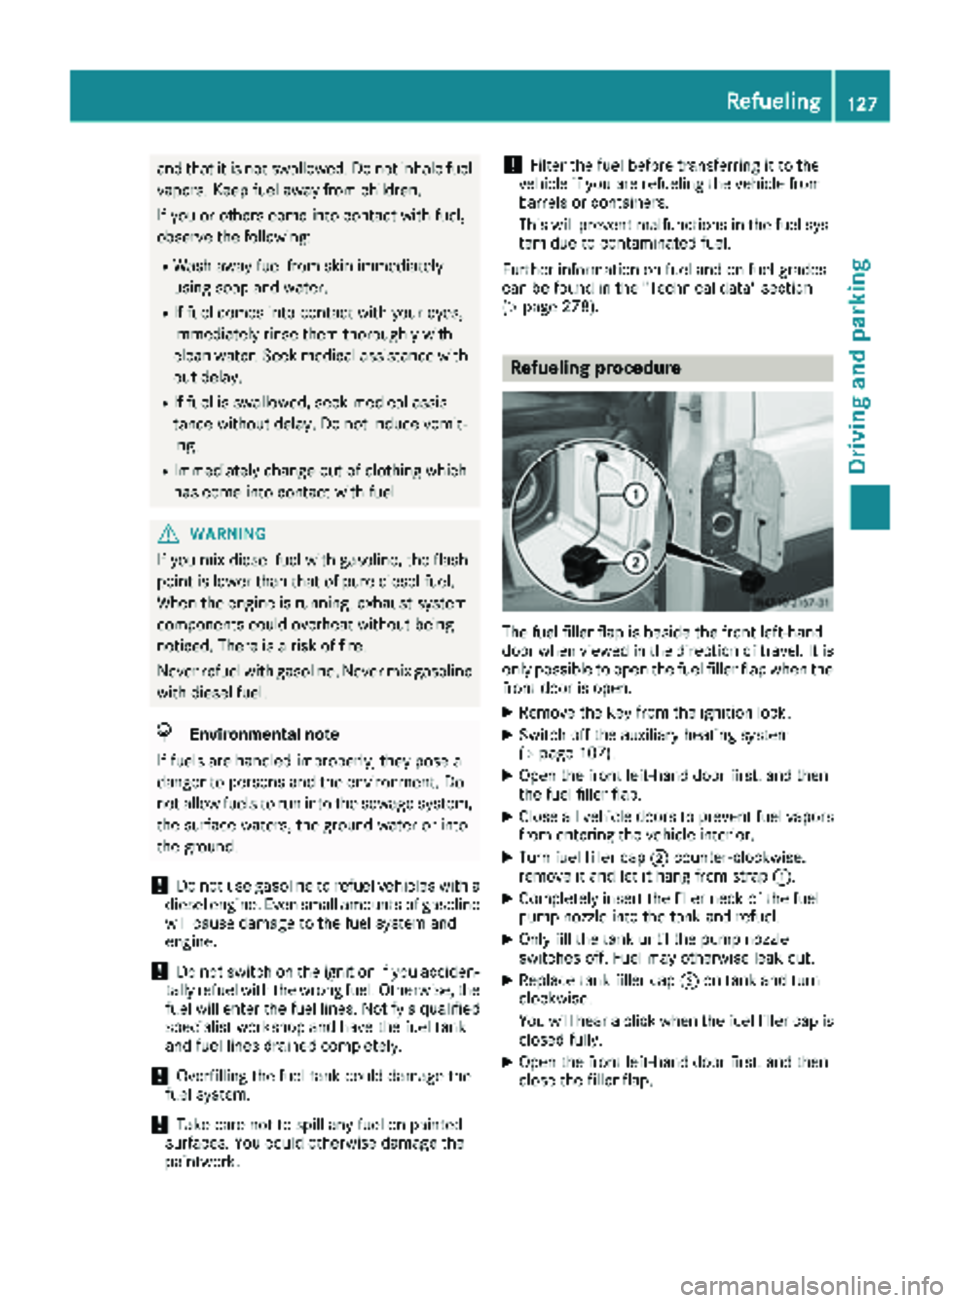
The fuel filler flap is beside the front left-hand
door when viewed in the direction of travel. It is
only possible to open the fuel filler flap when the front door is open.
XRemove the key from the ignition lock.
XSwitch off the auxiliary heating system
(Ypage 107).
XOpen the front left-hand door first, and then
the fuel filler flap.
XClose all vehicle doors to prevent fuel vaporsfrom entering the vehicle interior.
XTurn fuel filler cap ;counter-clockwise,
remove it and let it hang from strap :.
XCompletely insert the filler neck of the fuel
pump nozzle into the tank and refuel.
XOnly fill the tank until the pump nozzle
switches off. Fuel may otherwise leak out.
XReplace tank filler cap;on tank and turn
clockwise.
You will hear a click when the fuel filler cap is
closed fully.
XOpen the front left-hand door first, and then
close the filler flap.
Refueling127
Driving and parking
Z
Page 136 of 294
Low-beam headlamps
When driving in countries in which traffic drives
on the opposite side of the road to the country
where the vehicle is registered, the halogen
headlamps must be partially masked. This pre-
vents glare to oncoming traffic and no longer
illuminates the edge of the road to the same
height and distance.
Have the halogen headlamps masked at a quali-fied specialist workshop before you cross the
border, but as close to it as possible.
When returning from your journey, remove the
adhesive surfaces from the halogen headlamps
as close to the border as possible. Clean the
glass of the headlamps if necessary.
It is not necessary to adjust Bi-Xenon head-
lamps. Legal requirements are fulfilled even
without adjustment.
Transport by rail
Transporting your vehicle by rail may be subject
to certain restrictions or require special meas-
ures to be taken in some countries due to vary-ing tunnel heights and loading standards.
You can obtain further information from any
authorized Sprinter dealer.
Braking
Important safety notes
GWARNING
If you shift down on a slippery road surface in an attempt to increase the engine's braking
effect, the drive wheels could lose their grip.
There is an increased danger of skidding and
accidents.
Do not shift down for additional engine brak-
ing on a slippery road surface.
GWARNING
If you rest your foot on the brake pedal while
driving, the braking system can overheat. This increases the stopping distance and can even
cause the braking system to fail. There is a
risk of an accident.
Never use the brake pedal as a footrest. Never
depress the brake pedal and the accelerator
pedal at the same time.
!Depressing the brake pedal constantly
results in excessive and premature wear to
the brake pads.
Downhill gradients
!Depressing the brake pedal constantly
results in excessive and premature wear to
the brake pads.
On long and steep downhill gradients, you
should change down to shift range 2or1 in
good time. This should be observed in particular
when driving with a laden vehicle and when tow-
ing a trailer.
iYou must also change the shift range in
good time when cruise control is switched on.
You thereby make use of the braking effect of
the engine and do not have to brake as often to
maintain the speed. This relieves the load on the
service brake and prevents the brakes from
overheating and wearing too quickly.
Heavy and light loads
GWARNING
If you rest your foot on the brake pedal while
driving, the braking system can overheat. This increases the stopping distance and can even
cause the braking system to fail. There is a
risk of an accident.
Never use the brake pedal as a footrest. Never
depress the brake pedal and the accelerator
pedal at the same time.
!Depressing the brake pedal constantly
results in excessive and premature wear to
the brake pads.
If the brakes have been subjected to a heavy
load, do not stop the vehicle immediately. Drive
on for a short while. The brakes are cooled down
more quickly in the airflow.
134Driving tips
Driving and parking
Page 158 of 294
iThis also applies if cruise control is activa-
ted.
This enables you to utilize the engine's braking
effect and you do not need to brake so heavily to
keep the correct speed. This relieves the load on
the brake system and prevents the brakes from
overheating and wearing too quickly. If you need
to brake additionally, to not depress the brake
pedal constantly, but periodically.
Driving tips
If the trailer begins to swing from side to side:
XDo not accelerate.
XDo not counter-steer.
XBrake if necessary.
iYou can reduce the risk of the trailer swing-
ing and rocking by retrofitting anti-roll bars or trailer stability programs. More information is
available from your authorized Sprinter
Dealer.
RMaintain a greater distance than you would
when driving without towing a trailer.
RAvoid sudden braking. Apply the brakes gen-
tly at first to allow the trailer brake to overrun.
Then, increase the brake force quickly.
RThe figures for the gradient climbing capabil-
ities from a standstill refer to sea level. When
driving in mountainous areas, note that the
power output of the engine, and with it its
gradient climbing capability, decrease with
increasing altitude.
Coupling up a trailer
Trailer coupled ready for use
XMake sure the selector lever of the automatic
transmission is in position P.
XApply the vehicle's parking brake.
XClose all doors.
XPosition the trailer horizontally behind your
vehicle.
iThe height of the ball neck changes accord-
ing to the load on the vehicle. In this case, use
a trailer with a height-adjustable trailer draw-
bar.
XCouple the trailer.
XEstablish all electrical and other connections to the trailer. When doing so, hook the break-
away cable of the trailer into eyelet :on the
ball coupling.
XRemove the objects that are preventing the
trailer from rolling, e.g. wheel chocks.
XRelease the trailer parking brake.
iThe subharness of the vehicle has a cable
connection to the brake lamp indicator lamp.
Observe the maximum permissible trailer
dimensions (width and length).
Most federal states and all Canadian provinces
require by law:
Rsafety chains between the towing vehicle and the trailer. The chains should be cross-wound
under the trailer drawbar. They must be fas-
tened to the vehicle's trailer coupling, not to
the bumper or the axle.
Leave enough slack in the chains. This allows
you to drive round tight corners.
Ra separate brake system for certain types of
trailer.
Ra safety shut-off for braked trailers. Find out
the specific requirements according to the
applicable laws.
If the trailer becomes detached from the tow-
ing vehicle, the safety feature triggers the
trailer brakes.
Towing a trailer
There are numerous legal requirements con-
cerning the towing of a trailer, e.g. speed restric-tions.
Many states require a separate functional brak-
ing system for your trailer once a certain weight
limit is exceeded. For your safety, it is recom-
mended to use a separate functional braking
system on any towed vehicle.
Make sure your vehicle/trailer combination
complies with local laws. This not only means
where you live, but also anywhere you are driv-
156Towing a trailer
Driving and parking
Page 159 of 294
ing to. Information is available from the police
and local authorities.
Observe the following when towing a trailer:
RPractice driving around bends, stopping and
backing up at a place where there is no traffic.This enables you to gain experience and get
used to the new handling characteristics.
RBefore driving, check:
-that the trailer tow hitch and ball coupling
are secure
-that the safety switch for a braked trailer is
functioning properly
-that the safety chains are secure and not
damaged
-that the electrical connections are secure
-that the lights are working
-that the wheels are in good order and the
tire pressure is correct
RAdjust the exterior mirrors to provide an
unobstructed view of the rear section of the
trailer.
RIf the trailer is equipped with an individual
braking system, check before each journey
whether the brakes are functioning correctly.
RIf the trailer has electronically controlled
brakes, pull the vehicle/trailer combination
away carefully. Brake manually using the
brake controller and check that the brakes
are working.
RSecure the load on the trailer according to the
applicable specifications and current stand-
ards on securing loads (
Ypage 215).
RWhen driving with a trailer, check at regular
intervals that the load is secured and that the
brakes and lights are working.
RBear in mind that the handling will be less
stable when towing a trailer than when driving
without one. Avoid sudden steering move-
ments.
RThe vehicle/trailer combination is heavier,
accelerates more slowly and has a decreased
gradient climbing capability and a long er
brak
ing distance.
It is more susceptible to crosswinds and
requires cautious steering.
RIf possible, do not brake suddenly, but rather
moderately at first so that the trailer can acti-
vate its brakes. Then increase the force on the
brake pedal.
RIf the automatic transmission repeatedly
shifts between gears when driving on inclines, restrict the shift range. Select shift range
4,3,
2 or 1.
Driving in a low gear and at a low speed
reduces the risk of damaging the engine.
RWhen driving on a downhill gradient, shift to a
low gear and take advantage of the engine's
braking effect.
Avoid continuous brake application as this
may overheat the vehicle brakes and, if instal-
led, the trailer brakes.
RIf the coolant temperature increases dramat-
ically while the air-conditioning system is
switched on, switch off the air-conditioning
system.
Coolant heat can also be dissipated by
switching the airflow and the temperature of
the heater/air conditioning to the maximum
level. Open the windows if necessary.
RWhen overtaking, pay particular attention to
the extended length of your vehicle/trailer
combination.
Due to the length of your vehicle/trailer com-
bination you need an additional distance
before you can return to your original lane.
Uncoupling a trailer
GWARNING
If you uncouple a trailer with the overrun
brake engaged, you could trap your hand
between the vehicle and the trailer drawbar.
There is a risk of injury.
Do not uncouple a trailer if the overrun brake
is engaged.
!Do not disconnect a trailer with an engaged
overrun brake. Otherwise, your vehicle could
be damaged by the rebounding of the overrun
brake.
XMake sure the selector lever of the automatic
transmission is in position P.
XApply the parking brake of the vehicle.
XClose all doors.
XApply the parking brake of the trailer.
XIn addition, secure the trailer against rolling
away with a wheel chock or similar object.
XRemove the trailer cable and safety chains
and decouple the trailer.
Towing a trailer157
Driving and parking
Z
Page 192 of 294
Engine
Display messagesPossible causes/consequences andMSolutions
?
Coolant Stop, turnengine off
The coolant temperature is too high.
If the vehicle is stopped after being subjected to extreme loads, the
coolant warning lamp may come on when the ignition is switched on
or the engine is restarted. Such loads can be, for example, driving in
mountainous terrain or driving with a trailer.
XLet the engine run at idling speed for approximately one minute.
XConsult a qualified specialist workshop if the display message con-
tinues to be shown.
*
Coolant Check level
The coolant level is too low.
Never run the engine if the coolant level is too low. The engine could
overheat and be damaged.
XStop the vehicle as soon as possible, paying attention to road and
traffic conditions.
XSwitch off the engine and let it cool down.
XAdd coolant and be sure to observe the warning notes
(Ypage 285).
XIf you need to add coolant frequently, have the engine cooling sys-
tem checked at a qualified specialist workshop.
7
Reserve fuel Driveto a filling stat.
The fuel level has fallen into the reserve range.
XRefuel at the nearest gas station (Ypage 126).
:
WaterinfuelVisitworkshop
The water that has collected in the water separator has reached the
maximum level.
XDrain the water separator (Ypage 225).
m
Fuel filter Visitworkshop
The fuel filter is dirty.
XHave the fuel filter element replaced as soon as possible at a quali-
fied specialist workshop.
4
Engine oil Add 1.0quart(Canada: 1.0liter)
The oil level is too low.
XCheck the oil level the next time you refuel (Ypage 221), and add
oil.
4
Engine oil levelNot when eng. run‐ning
You want to check the engine oil level even though the engine is still
running.
XSwitch off the engine.
XCheck the oil level (Ypage 221).
190Display messages
On-board computer and displays
Page 198 of 294
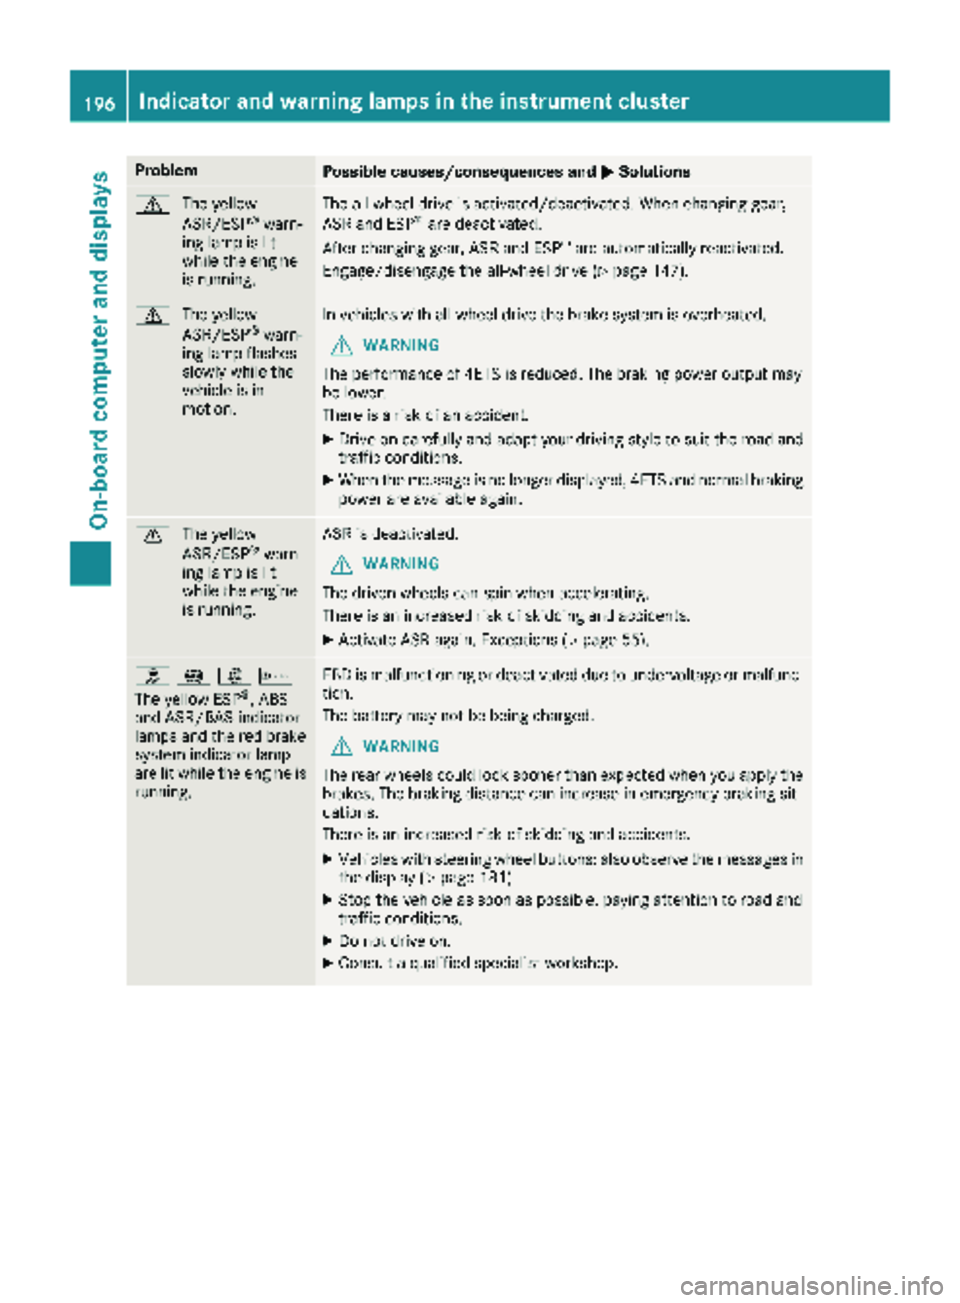
ProblemPossible causes/consequences andMSolutions
d
The yellow
ASR/ESP®warn-
ing lamp is lit
while the engine
is running.
The all-wheel drive is activated/deactivated. When changing gear,
ASR and ESP®are deactivated.
After changing gear, ASR and ESP®are automatically reactivated.
Engage/disengage the all-wheel drive (
Ypage 147).
d The yellow
ASR/ESP®warn-
ing lamp flashes
slowly while the
vehicle is in
motion.
In vehicles with all-wheel drive the brake system is overheated.
GWARNING
The performance of 4ETS is reduced. The braking power output may
be lower.
There is a risk of an accident.
XDrive on carefully and adapt your driving style to suit the road and
traffic conditions.
XWhen the message is no longer displayed, 4ETS and normal braking
power are available again.
d The yellow
ASR/ESP®warn-
ing lamp is lit
while the engine
is running.
ASR is deactivated.
GWARNING
The driven wheels can spin when accelerating.
There is an increased risk of skidding and accidents.
XActivate ASR again. Exceptions (Ypage 55).
h !:b
The yellow ESP®, ABS
and ASR/BAS indicator
lamps and the red brake
system indicator lamp
are lit while the engine is
running.
EBD is malfunctioning or deactivated due to undervoltage or malfunc-
tion.
The battery may not be being charged.
GWARNING
The rear wheels could lock sooner than expected when you apply the
brakes. The braking distance can increase in emergency braking sit-
uations.
There is an increased risk of skidding and accidents.
XVehicles with steering wheel buttons: also observe the messages in
the display (Ypage 181).
XStop the vehicle as soon as possible, paying attention to road and
traffic conditions.
XDo not drive on.
XConsult a qualified specialist workshop.
196Indicator and warning lamps in the instrument cluster
On-board computer and displays
Page 202 of 294
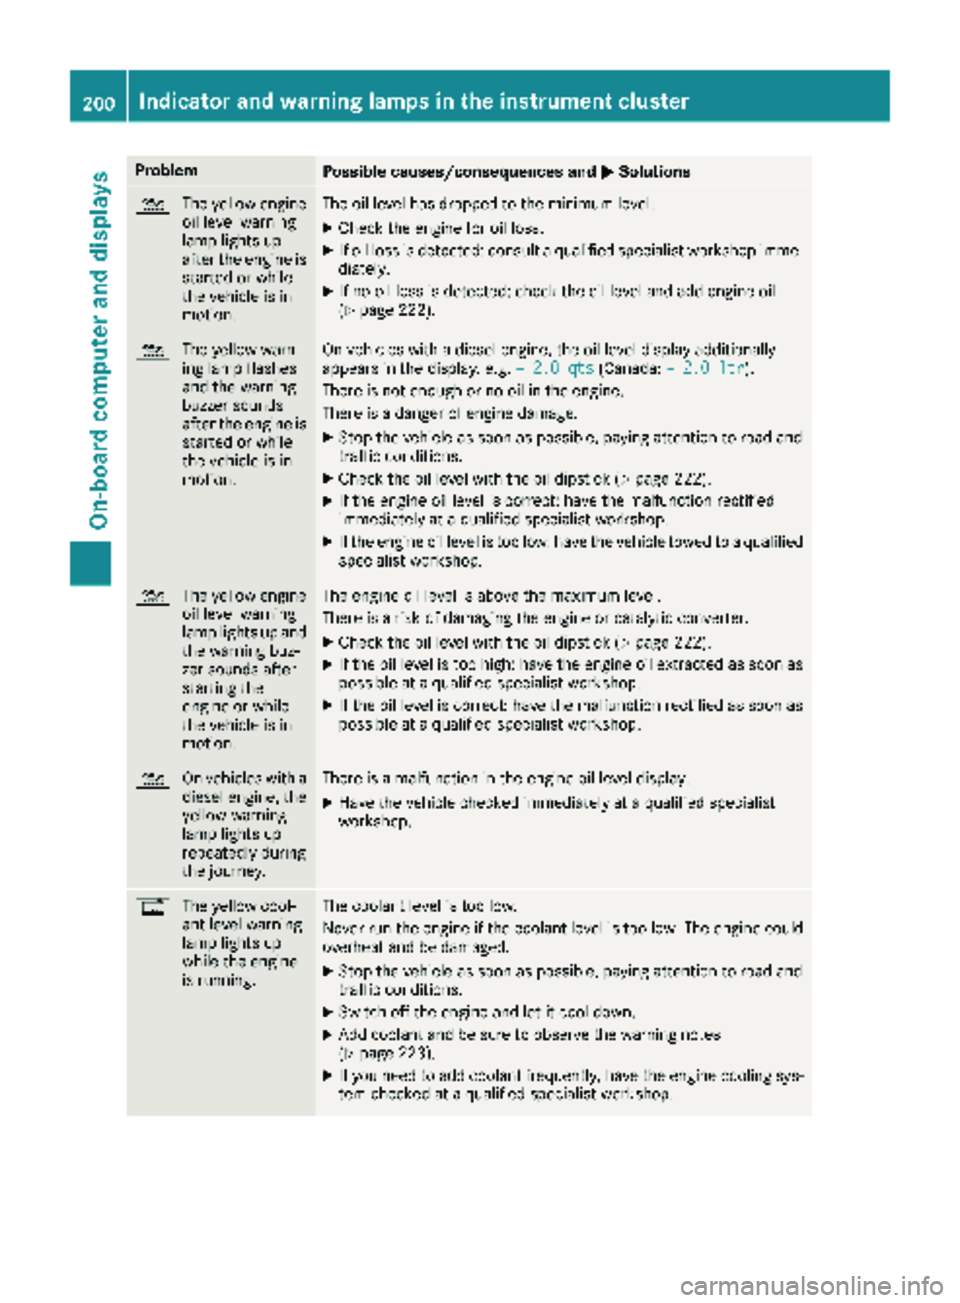
ProblemPossible causes/consequences andMSolutions
4
The yellow engine
oil level warning
lamp lights up
after the engine is
started or while
the vehicle is in
motion.The oil level has dropped to the minimum level.
XCheck the engine for oil loss.
XIf oil loss is detected: consult a qualified specialist workshop imme-
diately.
XIf no oil loss is detected: check the oil level and add engine oil
(Ypage 222).
4 The yellow warn-
ing lamp flashes
and the warning
buzzer sounds
after the engine is
started or while
the vehicle is in
motion.On vehicles with a diesel engine, the oil level display additionally
appears in the display, e.g. – 2.0 qts(Canada:– 2.0 ltr).
There is not enough or no oil in the engine.
There is a danger of engine damage.
XStop the vehicle as soon as possible, paying attention to road and
traffic conditions.
XCheck the oil level with the oil dipstick (Ypage 222).
XIf the engine oil level is correct: have the malfunction rectified
immediately at a qualified specialist workshop.
XIf the engine oil level is too low: have the vehicle towed to a qualified
specialist workshop.
4 The yellow engine
oil level warning
lamp lights up and
the warning buz-
zer sounds after
starting the
engine or while
the vehicle is in
motion.The engine oil level is above the maximum level.
There is a risk of damaging the engine or catalytic converter.
XCheck the oil level with the oil dipstick (Ypage 222).
XIf the oil level is too high: have the engine oil extracted as soon as
possible at a qualified specialist workshop.
XIf the oil level is correct: have the malfunction rectified as soon as
possible at a qualified specialist workshop.
4 On vehicles with a
diesel engine, the
yellow warning
lamp lights up
repeatedly during
the journey.There is a malfunction in the engine oil level display.
XHave the vehicle checked immediately at a qualified specialist
workshop.
%The yellow cool-
ant level warning
lamp lights up
while the engine
is running.The coolant level is too low.
Never run the engine if the coolant level is too low. The engine could
overheat and be damaged.
XStop the vehicle as soon as possible, paying attention to road and
traffic conditions.
XSwitch off the engine and let it cool down.
XAdd coolant and be sure to observe the warning notes
(Ypage 223).
XIf you need to add coolant frequently, have the engine cooling sys-
tem checked at a qualified specialist workshop.
200Indicator and warning lamps in the instrument cluster
On-board computer and displays