engine MERCEDES-BENZ SPRINTER 2019 MY19 with no MMS Operator’s Manual
[x] Cancel search | Manufacturer: MERCEDES-BENZ, Model Year: 2019, Model line: SPRINTER, Model: MERCEDES-BENZ SPRINTER 2019Pages: 322, PDF Size: 5.91 MB
Page 201 of 322

&
WARNING Risk offire and injur yfrom
engine oil
If engine oil comes int ocontact wi thhotc om‐
ponent parts in thee ngine compartment, it
ma yignite. #
Mak esuret hat no engine oil is spilled
next tothef iller opening. #
Allo wthe engine tocool of fand thor‐
oughly clean thee ngine oil from compo‐
nent parts befor estartin gt he vehicle. *
NO
TEEngine damag eduetoincor rect oil
fi lter ,incor rect oil or additi ve #
Do no tuse engine oi loranoilfilter with
specifications deviatin gfromt hose
re qu ired fort he prescribed service
inter vals.
Mercedes-Benz recommends using original or
te sted replacement and service parts. #
Do no tchang ethe engine oil or oil filter
in order tosetc hang einter vals longer
th an those prescribed. #
Do no tuse an yadditive. #
Followt he instructions on thes ervice
inter vald ispla yfor changing thee ngine
oil. *
NO
TEDama gecaused byaddin gtoo
muc hengine oil To
om uche ngine oil can damag ethe engine
or thec atalytic con verter. #
Have excess engine oil remo vedata
qu alified specialis tworks hop. Engine OM651
Engine OM642
#
Turn cap 1counter-clockwise and remo veit. #
Adde ngin eoil. #
Replace cap 1and tur nitclockwise until it
engages. #
Chec kthe oil le vela ga in .C hec kusing theo n-
boar dcomputer (/ page176),ch eckw ith
th eo il dipstic k(/pag e175). Checking
thec oolant le vel &
WARNING Risk of bu rnsf romh otcom‐
ponent parts in thee ngine compartment
Cer tainc omponents in thee ngine compart‐
ment can be very hot, e.g. thee ngine, the
ra diator and parts of thee xhau stsystem. #
Allo wthe engine tocool down and only
to uc hc omponent parts desc ribed in the
fo llowing. Maintenance and care
17 7
Page 202 of 322
If
yo uh ave tocar ryout an yworkint he engine
compartment, touc ho nlyt he following compo‐
nents:
R Hood
R Engine oil filler openin gcap
R Washer fluid reser voir cap
R Coolant expansion reser voir cap &
WARNING Danger of bu rnsw hen open‐
ing theh ood
If yo uo pen theh ood when thee ngine has
ove rheated or during afireint he engine com‐
partment, youc oul dc om eintoc ontact wi th
ho tg ases or other escaping operating fluids. #
Befor eopening theh ood, allo wthe
engine tocool down. #
Inthee vent of afireint he engine com‐
partment, keep theh ood closed and call
th ef ires ervice. &
WARNING Risk of scalding from hot
coolant
The engine cooling sy stem is pressurized,
particular lywhen thee ngine is warm.Ify ou
open thec ap, youc oul dbes calded byhot
coolant spr aying out. #
Letthe engine cool down befor eopen‐
ing thec ap. #
When opening thec ap, wear pr otective
gl ove sand saf etyg lasses. #
Open thec ap slowl ytorelease pres‐
sure. Allo
wthe engine and thee ngine cooling sy stem
to cool down befor echecking thec oolant le velor
re filling coolant.
* NO
TEPaint wo rkdamag eduetocoolant If coolant
getsonp ainted sur faces, thep aint‐
wo rkcan be damaged. #
Addc oolant carefully. #
Remo vespilledc oolant. Checking
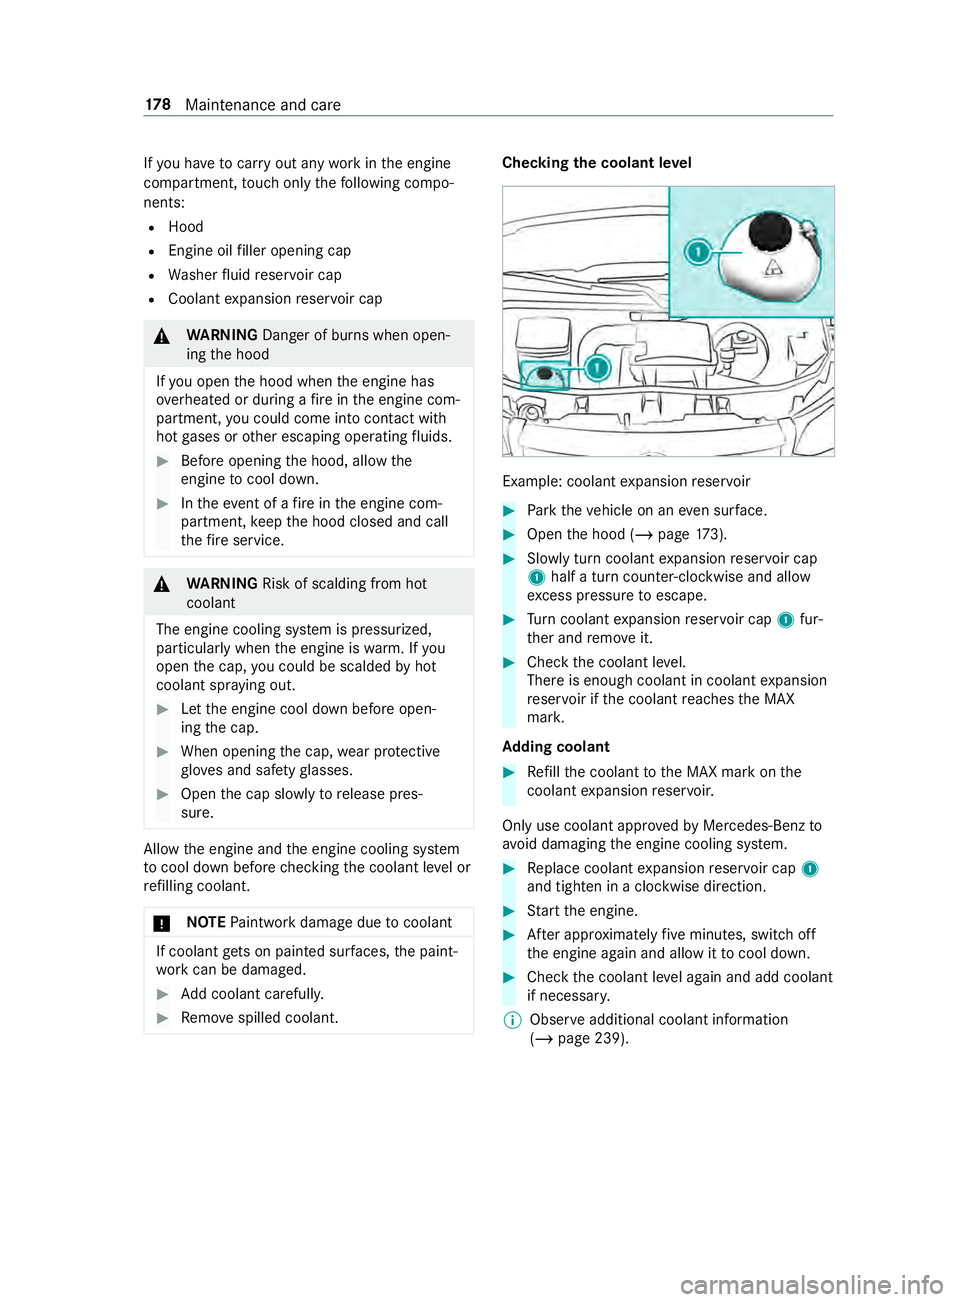
thec oolant le vel Example: coolant
expansion reser voir #
Park thev ehicle on an even sur face. #
Ope nthe hood (/ page173). #
Slow ly tu rncoolant expansion reser voir cap
1 half aturnc oun ter-clockwise and allow
exc ess pressur etoescape. #
Turn coolant expansion reser voir cap 1fur‐
th er and remo veit. #
Chec kthe coolant le vel.
Ther eise nough coolan tincoolan texpansion
re ser voir if thec oolant reaches theM AX
mar k.
Ad ding coolant #
Refill th ec oolant totheM AX mar konthe
coolant expansion reser voir.
Onl yuse coolan tappr oved byMercedes-Benzto
avo id damagin gthe engine cooling sy stem. #
Replace coolant expansion reser voir cap 1
and tigh tenina clockwise direction. #
Startt he engine. #
Aftera pproxima tely five minutes, switc hoff
th ee ngine again and allo wittocool down. #
Che ckthec oolant le vela ga in and add coolant
if necessar y.
% Obser
veadditional coolant information
(/ page239). 17 8
Maintenance and care
Page 203 of 322
Fi
lling up thew indshield washer sy stem &
WARNING Risk of bu rnsf romh otcom‐
ponent parts in thee ngine compartment
Cer tainc omponents in thee ngine compart‐
ment can be very hot, e.g. thee ngine, the
ra diator and parts of thee xhau stsystem. #
Allo wthe engine tocool down and only
to uc hc omponent parts desc ribed in the
fo llowing. If
yo uh ave tocar ryout an yworkint he engine
compartment, touc ho nlyt he following compo‐
nents:
R Hood
R Engine oil filler openin gcap
R Washer fluid reser voir cap
R Coolant expansion reser voir cap &
WARNING Danger of bu rnsw hen open‐
ing theh ood
If yo uo pen theh ood when thee ngine has
ove rheated or during afireint he engine com‐
partment, youc oul dc om eintoc ontact wi th
ho tg ases or other escaping operating fluids. #
Befor eopening theh ood, allo wthe
engine tocool down. #
Inthee vent of afireint he engine com‐
partment, keep theh ood closed and call
th ef ires ervice. &
WARNING ‑Riskoff irea nd injur yfrom
windshiel dwashe rconcentrate
Wi ndshield washer concentrat eishighlyflam‐
mable. It could ignit eifitcomes int ocontact
wi th hote ngine component parts or the
ex haus tsystem. #
Mak esuret hat no windshield washer
concentrat espills out next tothef iller
opening. *
NO
TEDama getothee xterio rlighting
due tounsuitable windshield washer fluid Uns
uitable windshield washer fluid ma ydam‐
ag et he plastic sur face of thee xterio rlighting. #
Onlyuse windshield washer fluids that
ar ea lso suitable foru se on plast ic sur‐
fa ces, e.g. MB SummerFit or MB Winter‐
Fit. Ad
ding washer fluid Wa
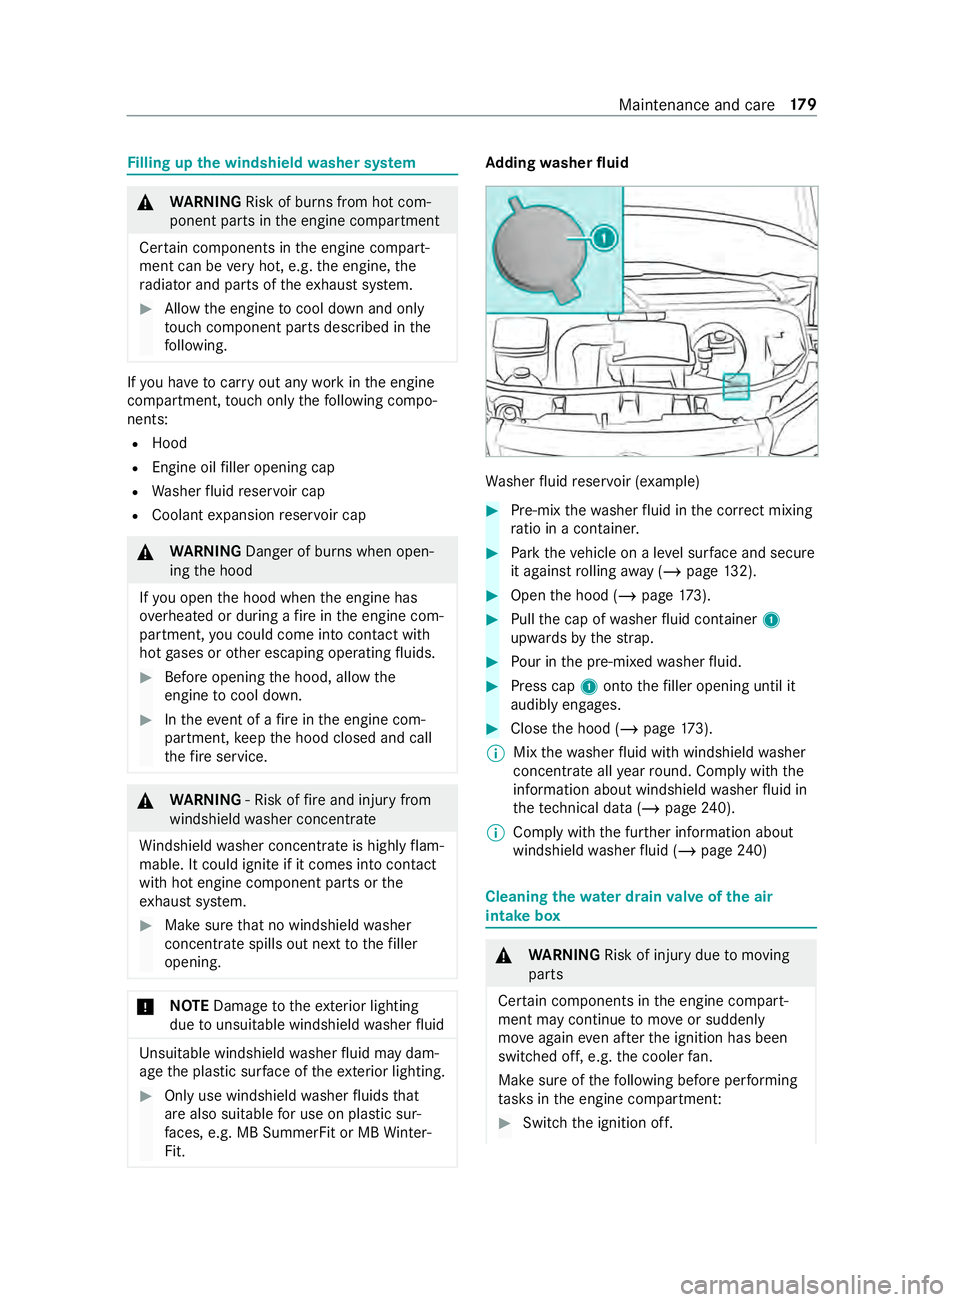
sher fluid reser voir (e xamp le) #
Pre-mix thew ashe rfluid in thec orrect mixing
ra tio in acontainer. #
Park thev ehicle on alevel sur face and secu re
it agains trolling away ( /pag e132). #
Ope nthe hood (/ page173). #
Pullthe cap of washer fluid con tainer 1
upwards bythes trap. #
Pour in thep re-mixed washer fluid. #
Press cap 1onto thef iller openin guntil it
audibly engages. #
Close theh ood (/ page173).
% Mi
xt he washer fluid wit hwindshield washer
concentrat eallye ar round. Compl ywitht he
information about windshield washer fluid in
th et echnical dat a(/ pag e240).
% Co
mply withthe fur ther information about
windshield washer fluid (/ page240) Cleaning
thew ater drain valveoft he air
intak ebox &
WARNING Risk of inju rydue tomoving
parts
Cer tainc omponents in thee ngine compart‐
ment ma ycontinue tomo veor suddenly
mo veagain even af tert he ignition has been
switched off, e.g. thec ooler fan.
Ma kesur eoft hefollowing befor eperform ing
ta sk sint he engine compartment: #
Switc hthe ignition off. Maintenance and care
17 9
Page 204 of 322
#
Nevertouc hthe danger zone sur round‐
ing movin gcomponent parts ,e.g.t he
ro tatio na reaoft hefan. #
Remo vejewe lrya nd watches. #
Keep items of clo thing and hair away
from moving parts. &
WARNING Risk of bu rnsf romh otcom‐
ponent parts in thee ngine compartment
Cer tainc omponents in thee ngine compart‐
ment can be very hot, e.g. thee ngine, the
ra diator and parts of thee xhau stsystem. #
Allo wthe engine tocool down and only
to uc hc omponent parts desc ribed in the
fo llowing. If
yo uh ave tocar ryout an yworkint he engine
compartment, touc ho nlyt he following compo‐
nents:
R Hood
R Engine oil filler openin gcap
R Washer fluid reser voir cap
R Coolant expansion reser voir cap #
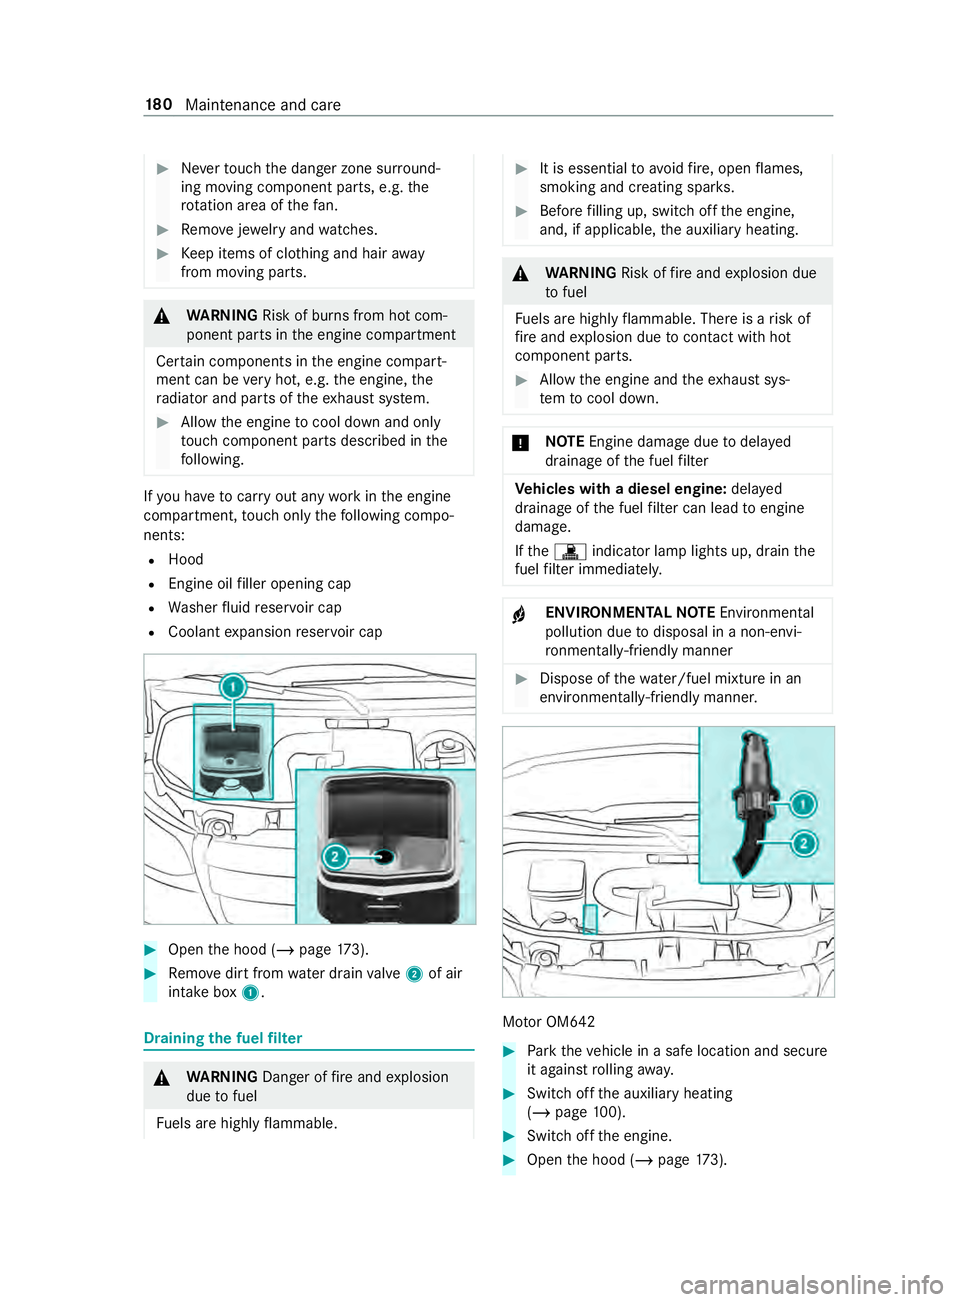
Open theh ood (/ page173). #
Remo vedirtfromw ater drain valve 2 of air
intak ebox1 . Draining
thef uel filter &
WARNING Danger of fire and explosion
due tofuel
Fu els ar ehighly flammable. #
It is essential toavoid fire ,o pen flames,
smokin gand creating spar ks. #
Befor efilling up, switc hoffthee ngine,
and, if applicable, thea uxiliar yheating. &
WARNING Risk offire and explosion due
to fuel
Fu els ar ehighly flammable. Ther eisarisk of
fi re and explosion due tocontact wi thhot
component parts. #
Allo wthe engine and thee xhau stsys‐
te mtoc ool down. *
NO
TEEngine damag eduetodela yed
drainag eofthe fuel filter Ve
hicles with adiese lengine: delayed
drainag eofthe fuel filter can lead toengine
damage.
If the 003A indicator lam plights up, drain the
fuel filter immediately. +
ENVIRONMENTAL
NOTEEnvironmental
pollution du etodisposal in anon-envi‐
ro nmental ly-friendly manner #
Dispose of thew ater/fuel mixtur einan
environmentally-friendly manner. Mo
torO M642 #
Park thev ehicle in asafel ocation and secure
it agains trolling away. #
Switc hoffthea uxiliar yheating
(/ page100). #
Switc hoffthee ngine. #
Open theh ood (/ page173). 18 0
Maintenance and care
Page 215 of 322

&
WARNING Risk ofexplosion during
ch argin gprocess and startin gassis tance
During thec harging process and starting
assis tance, theb atter ymayrelease an explo‐
siv eg as mixture. #
Avoid fire ,o pen flames ,creating spar ks
and smoking. #
Mak esuret hat ther eiss ufficient venti‐
lation du ring thec harging process and
during startin gassis tance. #
Do no tlea no verab atter y. &
WARNING Risk ofexplosion from afro‐
zen battery
Ad ischar gedb atter ymayfreeze at temp era‐
tures slightl yabove or belo wfreezing point.
During startin gassis tance or batter ycharg‐
ing, batter ygas ma ybereleased. #
Alwayst hawaf roze nb atter youtfirst
befor echarging it or per form ing starting
assis tance. If
th ew arning /indicator lamps do no tlight up in
th ei nstrument displa yaround or belo wfreezing
point, it is very likel ythat thed ischarged battery
has frozen.
In this case, obser vethef ollowing points:
R do no tgivet he vehicle startin gassis tance or
ch arge theb attery
R thes ervice lif eofabatterythat has been
th awe dmaybe reduced drastically
R thes tart-u pb ehavior ma ydeteriorate, partic‐
ularly at lo wtemperatures
R it is recommended that youh ave athawed
batter ychec kedataq ualified specialis twork‐
shop
* NO
TEDama gecaused bynume rous or
ex tende dattempts tostar tt he engine Numerous or
extende dattempts tostar tt he
engine ma ydamag ethe catalytic con verter
due tonon-combu sted fuel. #
Avoid numerous and extende dattem pts
to star tt he engine. Obser
vethef ollowing points during starting
assis tance and when chargin gthe battery:
R onlyuse undamaged jumper cables/charging
cables wit hasufficient cross-sectio nand
insula tedt erminal clamps
R non-insulated parts of thet erminal clamps
mus tnotcom eintoc ontact wi thother me tal
parts while thej umper cables/charging
cables ar econnected totheb attery/jump-
st ar tc onnectio npoint
R thej umper cables/charging cable mus tnot
come int ocontact wit hanyparts whic hmay
mo vewhen thee ngine is running
R alwa ys mak esuret hat neither youn orthe
batter yiselectros tatically charged
R alwaysk eep away from fire and open flames
R do no tlean overab attery
R when charging: onlyuseab atter ychar ger
th at has been tested and appr ovedby
Mercedes-Benza ndread theo perating
instruction sfor your charge rb efor echarging
th eb atter y.
Obser vethea dditional following point sduring
st artin gassis tance:
R startin gassis tance ma yonly be pr ovided
using batteries wit hanominal voltag eof12V
R thev ehicles mus tnot to uche acho ther
R vehicles with agasoline engine: only per‐
fo rm startin gassis tance when thee ngine and
ex haus tsystema recold #
Vehicles with abatter ymain switch: check
whe ther theb atter ymain switc hisswitched
on (/ page114). #
Secu rethev ehicle using thep arking brake. #
Vehicles with automatic transmission:
shif tthe transmission toposition 005D. #
Switc hoffthei gnition and all electrical con‐
sumers. #
Open theh ood (/ page173). Breakdown assis
tance 191
Page 216 of 322

Example: jump-s
tart connection point
% Right-hand-driv
evehicles: thej ump-s tart
connection points ma ybeonthe opposite
side. #
Remo vethec ove rfromt he positiv eterminal
on thed onor batter y. #
First,c onnec tthe positiv eterminal clam pof
th ej umper cables/charging cables tothe
positiv eterminal of theo ther vehicle's bat‐
te ry. #
With positiv eterminal clamp 2ofthe
jumper cable ,slide ther ed pr otectiv ecap on
jump-s tart connection point 1back witha
clockwis eturn. #
Connect thep ositiv eterminal clam ptothe
positiv eterminal of jump-s tart connection
point 1. #
During starting assistance: star tt he engine
of thed onor vehicle and le titrun at idle
speed. #
Connect then egativ eterminal of thed onor
batter ytothe ground point of your ow nv ehi‐
cle wit hthe jumper cable/charging cable.
Begin wit hthe donor batter y. #
During starting assistance: star tt he engine
on your ow nv ehicle. #
When charging: star tt he chargin gprocess. #
During starting assistance: lett he engine
ru nf or afew minutes. #
During starting assistance: beforediscon‐
necting thej umper cable, switc honanelec‐
trical consumer on your ow nv ehicle, e.g. the
re ar wind owheater or lighting.
When thes tartin ga ssis tance/charging proces sis
comple te: #
First,r emo vethej umper cables/charging
cables from theg round point and negative
te rm inal of theo ther vehicle's batter y,then
from thep ositiv eterminal of jump-s tart con‐
nectio npoint 1and thep ositiv eterminal of
th eo ther vehicle's batter y.Eac htime ,begin
at thec ontacts on your ow nv ehicle.
The redp rotectiv ecap springs bac ktoits ini‐
tial position when positiv eterminal clamp 2
is disconnected from jump-s tartconnection
point 1.
Fu rther information can be obtained at aqualified
specialis tworks hop. Installing/removing
thef loor co vering (vehi‐
cles with rear wheel drive) &
WARNING Risk of accident du eto
object sinthe driver's foot we ll
Object sinthe driver's foot we ll ma yimp ede
pedal tr avel or bloc kadepressed pedal.
This jeopardizes theo perating and road
saf etyoft hevehicle. #
Stow all object sinthevehicle securely
so that they canno tget intot he driver's
fo ot we ll. #
Ensur efloor mats and carpets cannot
slip and pr ovide suf ficient room fort he
pedals. #
Do no tlay multiple floor mats or carpets
on topofo ne ano ther. #
Switc hoffall electrical consumers. #
Toremo ve: unscr ewscrews 3and remo ve
trim 2. #
Remo vefloor co vering 1. 19 2
Breakdown assis tance
Page 218 of 322
#
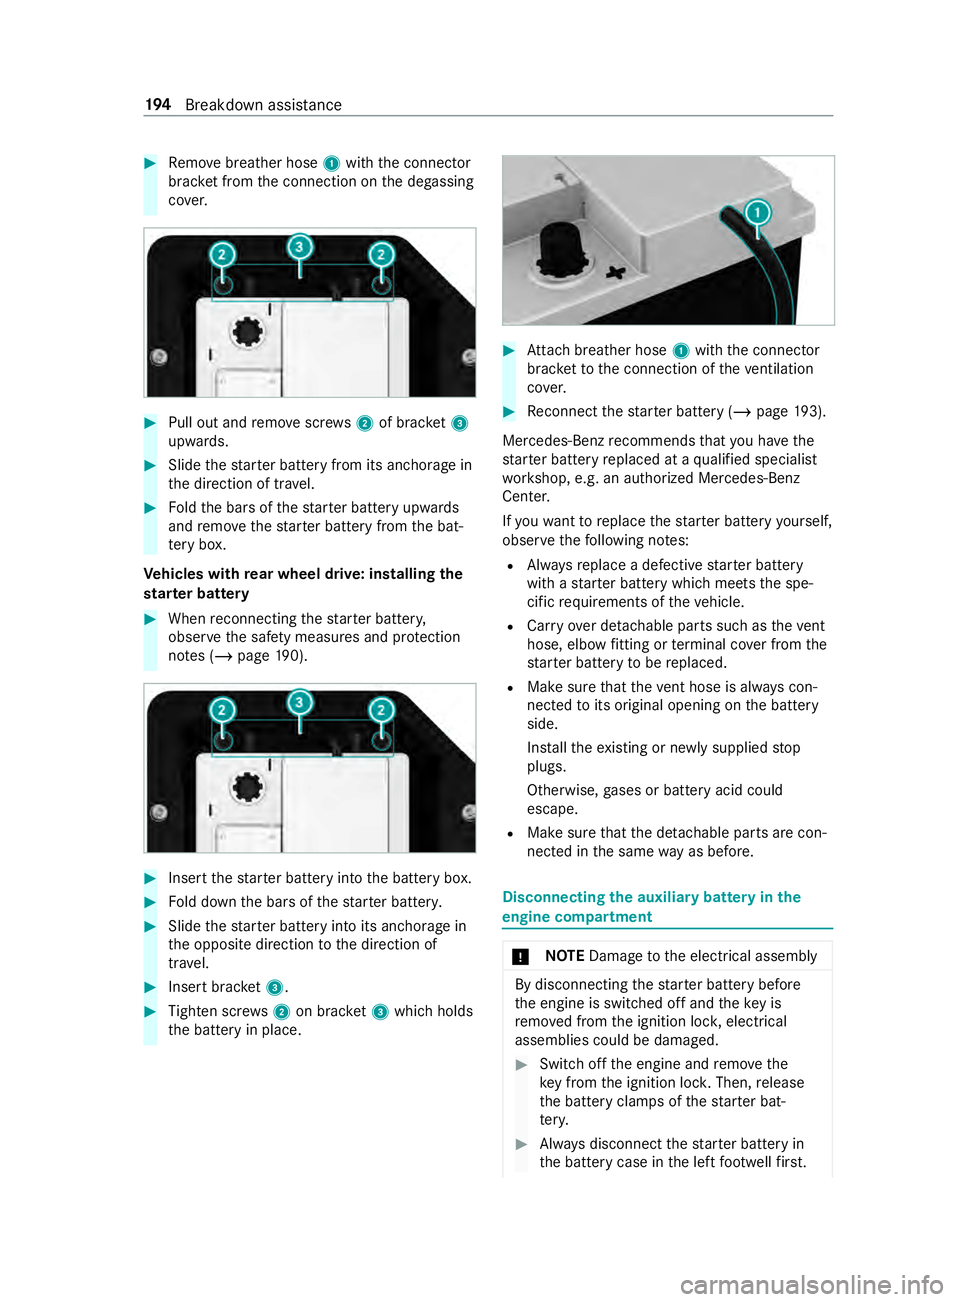
Remo vebreather hose 1withthe connector
brac ketfromt he connection on thed egassing
co ver. #
Pull out and remo vescr ews 2of brac ket3
up wa rds. #
Slide thes tarter batter yfromi ts anchorag ein
th ed irection of tr avel. #
Foldtheb arsoft hestar terb atter yupwards
and remo vethes tarter batter yfromt he bat‐
te ry box.
Ve hicles with rear wheel drive: installin gthe
st ar terb attery #
Whe nreconnecting thes tarter batter y,
obser vethes afet ym easures and pr otection
no tes( /pag e190). #
Inser tthe star terb atter yintot he batter ybox. #
Fold down theb arsoft hestar terb atter y. #
Slide thes tarter batter yintoi ts anchorag ein
th eo pposit edirection tothed irection of
tra vel. #
Inser tbrack et 3 . #
Tighten scr ews2on brac ket3whic hholds
th eb atter yinp lace. #
Attach breather hose 1withthe connector
brac kettot he connection of thev entilation
co ver. #
Reconnect thes tarter batter y(/pag e193).
Mercedes-Benz recommends that youh ave the
st ar terb atter yreplaced at aqualified specialist
wo rkshop, e.g. an authorized Mercedes-Benz
Center.
If yo uw ant toreplace thes tarter batter yyourself,
obser vethef ollowing no tes:
R Alwaysr eplace adefectiv estarter battery
wit has tarter batter ywhichm eets thes pe‐
cific requirements of thev ehicle.
R Carryover de tach able parts suc hasthevent
hose, elbo wfittin gort erminal co verfromt he
st ar terb atter ytober eplaced.
R Mak esuret hat thev ent hose is alw aysc on‐
nected toits original openin gonthe battery
side.
Ins tallth ee xisting or newly supplied stop
plugs.
Otherwise, gases or batter yacid could
escape.
R Mak esuret hat thed etachable parts ar econ‐
nec tedint he same wayasb efore. Disconnecting
thea uxiliar ybattery inthe
engine compa rtment *
NO
TEDama getothee lectrical assembly By disconnectin
gthe star terb atter ybefore
th ee ngine is switched of fand thek eyis
re mo vedf romt he ignition loc k,electrical
assemblies could be damaged. #
Switc hoffthee ngine and remo vethe
ke yf romt he ignition loc k.Then, release
th eb atter yclamps of thes tarter bat‐
te ry. #
Alwaysd isconnect thes tarterb atter yin
th eb atter ycase in thel eftf ootwell firs t. 194
Breakdown assis tance
Page 220 of 322
To
wing wit haraisedaxle: towing should be
per form ed byatow ing compan y. To
wing away thev ehicle wit hbotha xleson
th eg round #
Obser vethen otes on permissible towing
me thods (/ page195). #
Makesur ethat theb atter yisc onnected and
ch arge d.
When theb atter yisd ischar ged, thef ollowing sit‐
uations occur:
R The engine canno tbestarted.
R It is no tpossible torelease or appl ythe elec‐
tric parking brake.
R Vehicles with automatic transmission: the
automatic transmission canno tbeshiftedto
position 005Cor005D.
* NO
TEDama gedue to to wing away at
exc essivel yhigh speeds or overlong dis‐
ta nces The driv
etra in could be damaged when towing
at exc essively high speeds or over long dis‐
ta nces. #
Atow ing speed of 30 mph(50 km/h)
mus tnotbe exc eeded. #
Atow ing distanc eof30miles (50 km)
mus tnotbe exc eeded. %
Ve
hicles with automatic transmission
and rear wheel drive: ifth er eisam alfunc‐
tion, thea utomatic transmission ma ybe
loc kedinp osition 005D.
If th ea utomatic transmission cann otbe shif‐
te dtop osition 005C,transpor tthe vehicle
(/ page197).At ow ing vehicle wit hlifting
equipment is requ ired forv ehicle transport. &
WARNING Risk of accident whe ntow ing
av ehicle whic histoo heavy
If th ev ehicle being tow- star tedort owed
aw ay is heavier than thep ermissible gross
mass of your vehicle, thef ollowing situations
can occur:
R The towing eyem aybecome de tach ed.
R The vehicle/trailer combination may
swer veoreve noverturn. #
If ano ther vehicle is tow- star tedor
to we da way,its weight mus tnotexc eed th
ep ermissible gross mass of your own
ve hicle. If
av ehicle needs tobe towe dort ow st arted, its
we ight should no tbegreater that thep ermissible
gross mass of thet ow ing vehicle. #
Information on thev ehicle's permissible gross
mass can be found on thev ehicle identifica‐
tion plat e. #
Vehicles with automatic transmission: do
no to pen thed rive r's or front-passen gerd oor,
as thea utomatic transmission will automati‐
cally shif ttoposition 005D. #
Installth et ow ing eye( /pag e198). #
Secur ethe towing device.
* NO
TEDama gedue toincor rect connec‐
tion #
Only connect thet ow ro pe or towb arto
th et ow ing eyes. %
Yo
uc an also secur ethe towing devic etothe
trailer hitch.
* NO
TEDama geand risk of accident when
to wing wit hatow ro pe Ther
eisar isk of an accident if youdon ot
obse rves afet ya nd pr otectiv emeasures when
to wing using atow ro pe.
Obser vethef ollowing points when towing
wit hat ow ro pe: #
Secur ethe towr ope on thes ame side
on bo thvehicles, if possible. #
Mak esuret he towr ope does not
exc eed thel egally prescribed length. #
Mar kthe towr ope in them iddle, e.g.
wit haw hitec loth (30 x30c m). This
makes other road user sawarethat a
ve hicle is being towe d. #
Obser vetheb rake lamps of thet ow ing
ve hicle while driving. Alw aysm aintain a
dis tance that ensures thet ow ro pe does
no ts ag. #
Do no tuse steel cables or chains to tow
yo ur vehicle. Otherwise, youc oul dd am‐
ag et he vehicle. #
Deactivat eautomatic locking (/ page45). #
Do no tactivat ethe HOLD function. #
Deactivat ethe tow- aw ay alar m(/pag e57). 19 6
Breakdown assis tance
Page 223 of 322

#
Only use thet ow ing eyetot ow aw ayor
to ws tartthe vehicle. To
ws tarting vehicl e(eme rgency engine start) Ve
hicles with automatic transmission
* NO
TEDama getothea utomatic trans‐
mission due to towstarting The automatic transmissio
nmaybe damaged
in thep rocess of tows tartin gv ehicles with
automatic transmission. #
Vehicles wit hautomatic transmission
mus tnotbe tows tarted. #
Do no ttow st artv ehicles wit hautomatic
transmission. Electrical fuses
Note
sone lectrical fuses &
WARNING Risk of accident and inju ry
due toove rloaded lines
If yo um anipulat eorbridg eaf aulty fuse or if
yo ur eplace it wit hafuse wit hahigher
amperage, thee lectric line could be overloa‐
ded.
This could result in afire. #
Alwa ys replace faulty fuse swiths peci‐
fi ed ne wfuses containing thec orrect
amperage. *
NO
TEDama gedue toincor rect fuses Electrica
lcomponents or sy stems could be
damaged byincor rect fuses. #
Only use fuses whi chhave been
appr ovedbyM ercedes-Benza nd which
ha ve thec orrect fus erating. Th
ee lectrica lfus es in your vehicle switc hoff
defectiv ecircuits. If afuse blo ws,allth ec ompo‐
nent sont he circuit and their functions will cease
to operate.
Blown fuses mus tbereplaced wit hfuses of an
equivalent specification ,whic hyou can de ter‐
mine bythec olor and fuse rating .The fuse allo‐
cation charta nd fur ther information on thee lec‐
tric fuses and relays can be found in the" Fuse
allocation chart" supplement. *
NO
TEDama geor malfunction scaused by
moisture Moistur
emaycause dama getothee lectrical
sy stem or cause it tomalfunction. #
When thef use bo xisopen, mak esure
th at no moistur ecan enter thef use box. #
When closing thef use box, mak esure
th at thes eal of thel id is positioned cor‐
re ctly on thef use box. If
th en ew fuse whic hhas been inser teda lso
blo ws,have thec ause traced and rectified at a
qu alified specialis tworks hop.
Mak esureoft hefollowing befor ereplacing a
fuse:
R thev ehicle is secured suc hthat it does not
ro llaw ay
R all electrical consume rsares wit ched off
R thei gnition is switched off
The fuses ar elocated in various fuse bo xes:
R fuse bo xinthe front-passenge rfootwell
(/ page200)
R fuse bo xinthe seat base of thed rive r's seat
(/ page199) Openin
gthe fuse bo xinthe sea tbase of the
dr iver's seat #
Toopen: press down and unclip fasteners 1
on thec over. #
Remo vethec ove r. #
Toclose: pressthec over firm ly in tothes eat
base until fasteners 1clip in. Breakdown assis
tance 19 9
Page 254 of 322
Information on
technical data
The given dat aonlya pplies tovehicles with
st andar dequipment. Further information can be
obtained at aqualified specialis tworks hop. On-board electronics
Note
sonw orkont he engine electronics *
NO
TES Premature wearthro ugh
improper main tenance Imprope
rmaintenance ma ycause vehicle
components towe ar mor equickl yand the
ve hicle's operating permit ma ybeinvalidated. #
Alwaysh ave workon thee ngine elec‐
tronics and related components car ried
out at aqualified specialis tworks hop. Tw
o-w ayradios In
stallation no tesf or two- wayradios &
WARNING Risk of accident du eto
improper workon two-w ayradios
The electromagnetic radiation from two-w ay
ra dios can inter fere wit hthe on-boar delec‐
tronics if RF transmit ters arem anipulated or
re trofitted inco rrectl y.
This could jeopardize theo perating saf etyof
th ev ehicle. #
Yous houl dhave allworkon electrical
and electronic component scarried out
at aq ualified specialis tworks hop. &
WARNING Risk of accident from incor‐
re ct ope ratio noft wo-way radios
If yo uo perat etwo -way radios incor rectl yin
th ev ehicle, thee lectromagnetic radiation
could inter fere wit hthe on-boar delectronics,
e.g.:
R ifth et wo -way radio is no tconnected to
an exterior antenna
R ifth ee xterio rantenna is no tcorrectly
mounted or is no toflowreflection
This could jeopardies theo perating saf etyof
th ev ehicle. #
Have thel ow -reflection exterior antenna
ins talled at aqualified specialis twork‐
shop. #
When operating two-w ayradios in the
ve hicle, alw aysc onnectt hemtothe
lo w- reflection exterior antenna. *
NO
TEInva lidation of theo perating per‐
mit due tofailur etoc omply wi th the
instructions fori ns tallation and use The operatin
gpermit ma ybeinvalidated if the
instructions fori ns tallation and use of two-
wa yradios ar enotobser ved. #
Onlyuse appr oved frequency bands. #
Obser vethem aximum permissible out‐
put po werint hese frequency bands. #
Onlyuse appr oved antenna positions. Use
Tech nica lSpecification ISO/T S21609 (Road
Ve hicles -EMC guidelines fori ns tallation of af ter‐
mar ketradio frequency transmitting equipmen t)
when retrofitting two-w ayradios. Comply wit hthe
legal requirements ford etachable parts.
If yo ur vehicle has ins talling fort wo -way radio
equipment ,use thep ower suppl yorantenna con‐
nections intended foru se wit hthe ins talling.
Obser vethem anufacturer's supplement during
ins tallation.
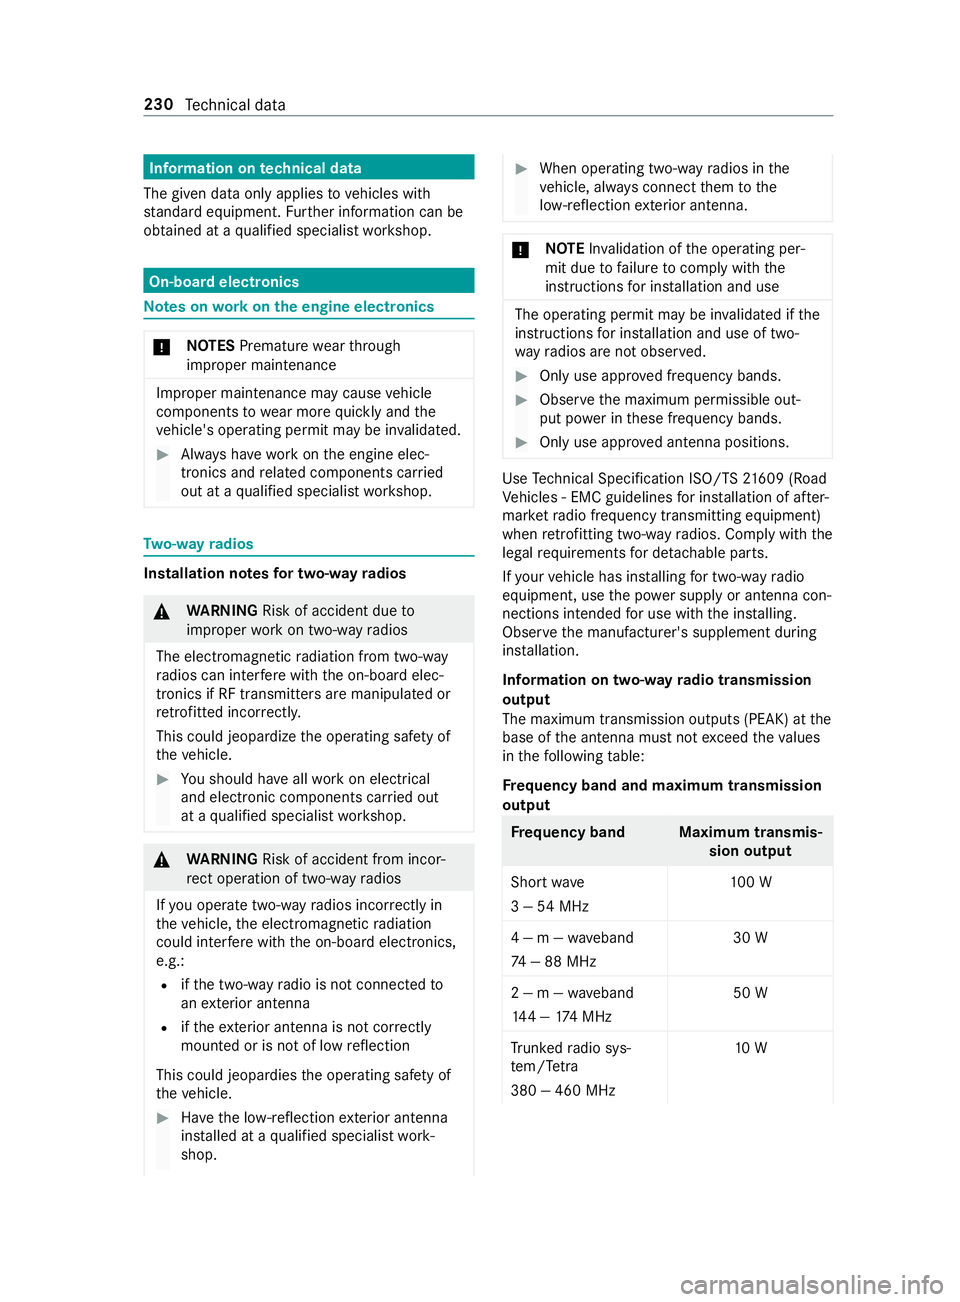
Information on two-w ayradio transmission
output
The maximum transmission outputs (PEAK) at the
base of thea ntenna mus tnotexc eed thev alues
in thef ollowing table:
Fr equency band and maximum transmission
output Fr
equency band Maximu mtransmis‐
sion output
Sho rtwa ve
3—54M Hz 10
0W
4—m—w aveband
74 —88M Hz 30 W
2—m—w aveband
14 4—1 74MHz 50 W
Tr unked radio sys‐
te m/T etra
380 —460 MHz 10 W230
Tech nica ldata