display MERCEDES-BENZ V-CLASS MPV 2021 Owners Manual
[x] Cancel search | Manufacturer: MERCEDES-BENZ, Model Year: 2021, Model line: V-CLASS MPV, Model: MERCEDES-BENZ V-CLASS MPV 2021Pages: 337, PDF Size: 9.88 MB
Page 6 of 337
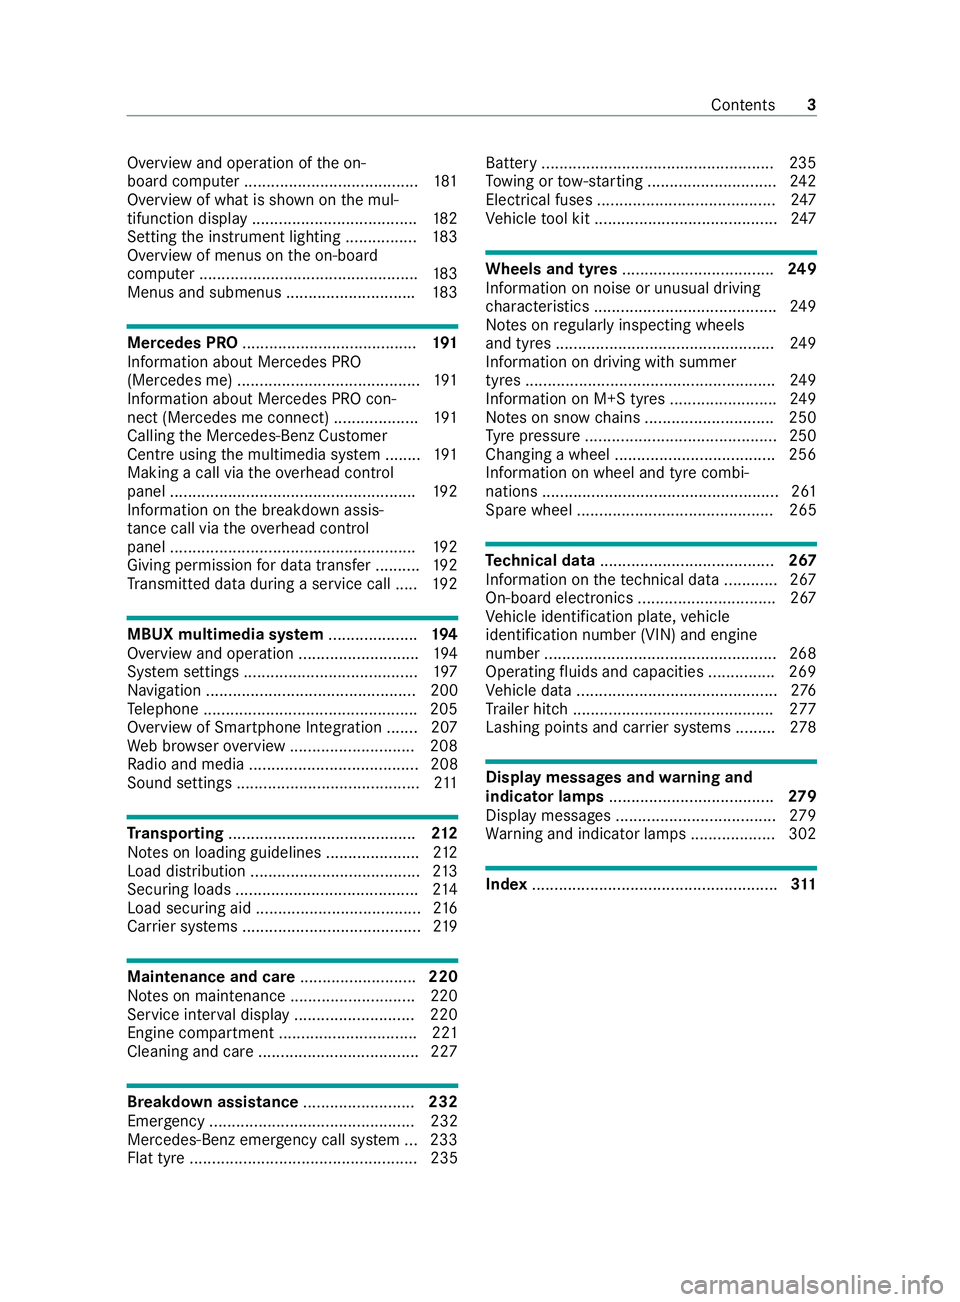
Overview and operation of
the on-
board computer ....................................... 181
Overview of what is shown on the mul‐
tifunction display .....................................1 82
Setting the instrument lighting ................1 83
Overview of menus on the on-board
computer .................................................1 83
Menus and submenus ............................ .183 Mercedes PRO
....................................... 191
Information about Mercedes PRO
(Mercedes me) ......................................... 191
Information about Mercedes PRO con‐
nect (Mercedes me connect) ................... 191
Calling the Mercedes-Benz Cus tomer
Centre using the multimedia sy stem ........ 191
Making a call via theove rhead control
panel .......................................................1 92
Information on the breakdown assis‐
ta nce call via theove rhead control
panel .......................................................1 92
Giving permission for data transfer .......... 19 2
Tr ansmit ted data during a service call .....1 92MBUX multimedia sy
stem .................... 194
Overview and operation ........................... 194
Sy stem settings ....................................... 197
Na vigation ............................................... 200
Te lephone ................................................ 205
Overview of Smartphone Integration ...... .207
We b br owser overview ............................ 208
Ra dio and media ...................................... 208
Sound settings .........................................2 11Tr
anspo rting .......................................... 212
No tes on loading guidelines ..................... 212
Load distribution ...................................... 213
Secu ring loads ......................................... 214
Load securing aid ..................................... 216
Car rier sy stems ........................................2 19Maintenance and care
..........................220
No tes on maintenance ............................2 20
Service inter val display .......................... .220
Engine compartment ............................... 221
Cleaning and care ................................... .227 Breakdown assistance
.........................232
Emergency .............................................. 232
Mercedes-Benz eme rgency call sy stem ... 233
Flat tyre ................................................... 235 Battery ....................................................2
35
To wing or tow- starting ............................ .242
Electrical fuses ........................................ 247
Ve hicle tool kit ......................................... 247 Wheels and tyres
.................................. 249
Information on noise or unusual driving
ch aracteristics ........................................ .249
No tes on regular lyinspecting wheels
and tyres ................................................ .249
Information on driving with summer
tyres ........................................................ 24 9
Information on M+S tyres ........................ 24 9
No tes on snow chains ............................ .250
Ty re pressure ...........................................2 50
Changing a wheel ................................... .256
Information on wheel and tyre combi‐
nations ..................................................... 261
Spare wheel ............................................ 265 Te
ch nical data ....................................... 267
Information on thete ch nical da ta............ 267
On-board electronics ............................... 267
Ve hicle identification plate, vehicle
identification number (VIN) and engine
number ....................................................2 68
Operating fluids and capacities .............. .269
Ve hicle data ............................................. 276
Tr ailer hit ch............................................. 277
Lashing points and car rier sy stems ......... 278 Display messages and
warning and
indicator lamps ..................................... 279
Displ aymessa ges .................................... 279
Wa rning and indicator lamps .................. .302 Index
....................................................... 311 Con
tents 3
Page 7 of 337
In
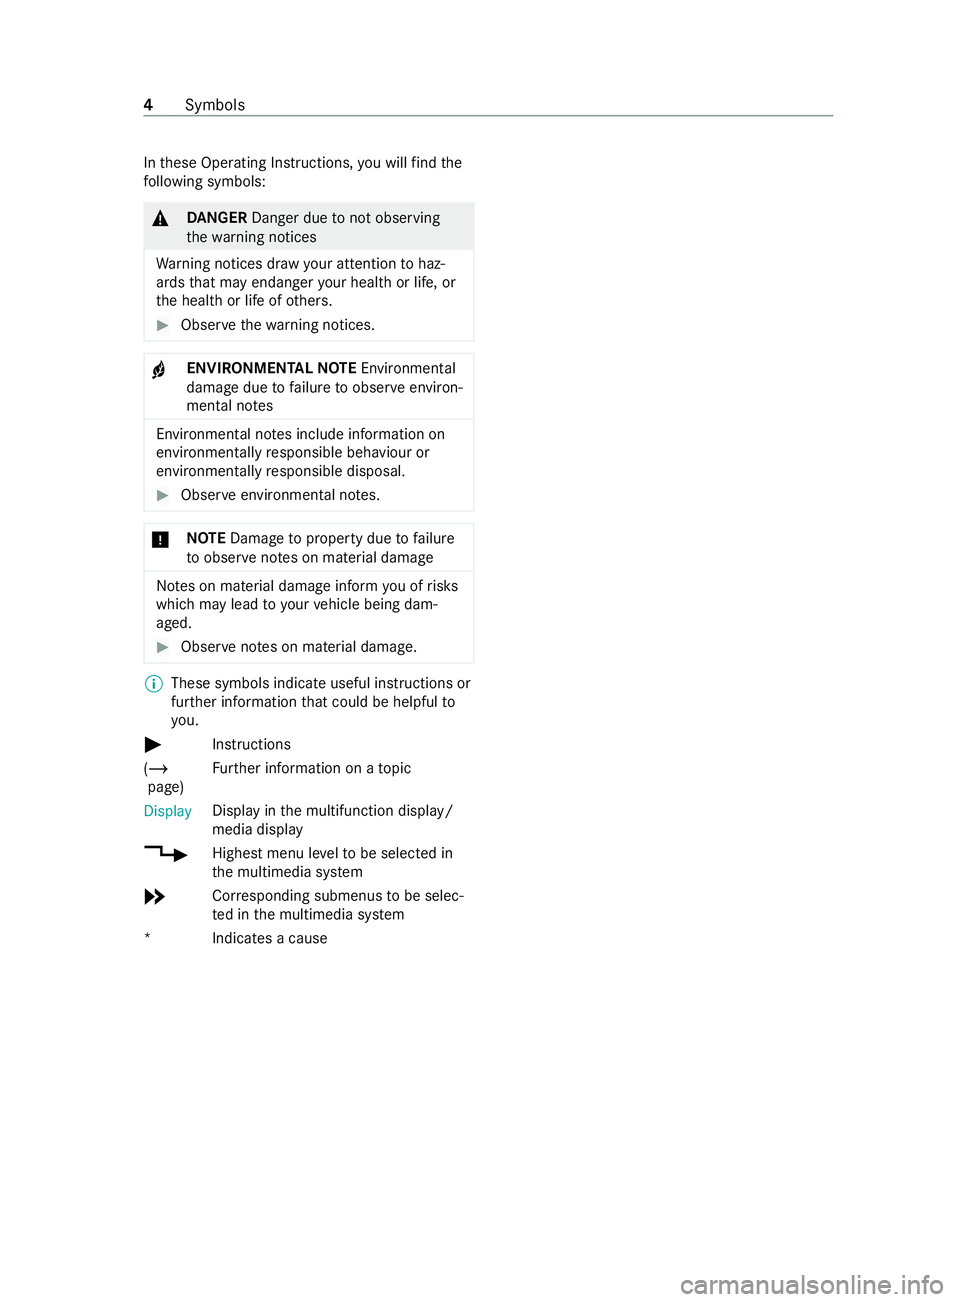
these Operating Instructions, you will find the
fo llowing symbols: &
DANG ER Dan ger due tonot observing
th ewa rning notices
Wa rning notices dr awyour attention tohaz‐
ards that may endanger your health or life, or
th e health or life of others. #
Obser vethewa rning notices. +
ENVIRONMENTAL
NOTEEnvironmental
damage due tofailure toobser veenviron‐
mental no tes Environmental no
tes include information on
environmentally responsible behaviour or
environmentally responsible disposal. #
Obser veenvironmen tal no tes. *
NO
TEDama getoproperty due tofailure
to obser venotes on material damage No
tes on material damage inform you of risks
which may lead to yourvehicle being dam‐
aged. #
Obser venotes on material damage. %
These symbols indicate useful instructions or
fur
ther information that could be helpful to
yo u.
# Instru ctions
(/ pa ge) Fu
rther information on a topic
Display Display in
the multifunction display/
media display
4 Highest menu le velto be selected in
th e multimedia sy stem
5 Corresponding submenus tobe selec‐
te d in the multimedia sy stem
*I ndicates a cause 4
Symbols
Page 9 of 337
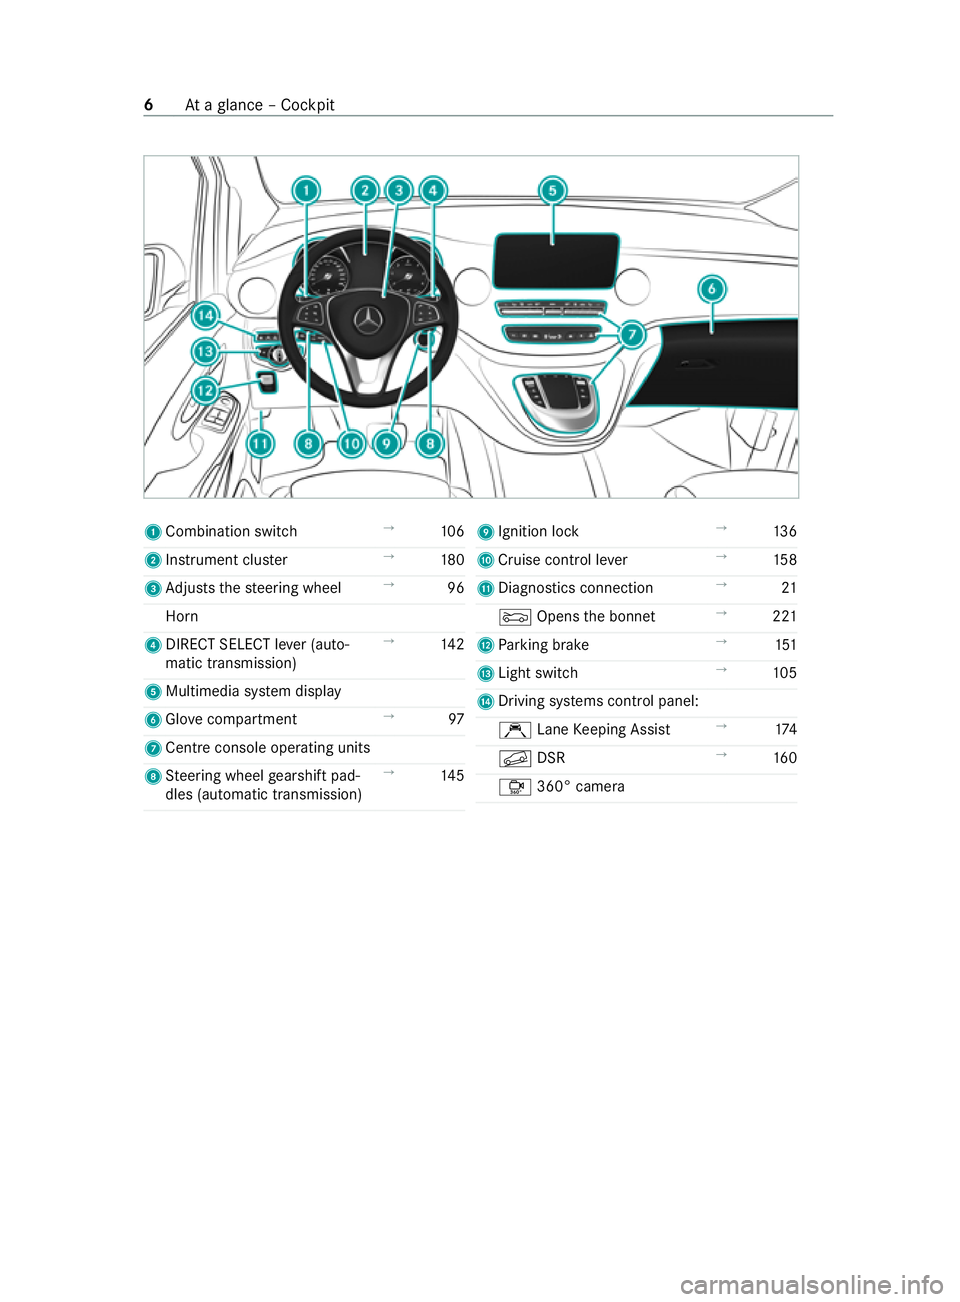
1
Combination swit ch→
106
2 Instrument clus ter →
180
3 Adjusts thesteering wheel →
96
Horn
4 DIRECT SELECT le ver (auto‐
matic transmission) →
14 2
5 Multimedia sy stem display
6 Glo vecompa rtment →
97
7 Cent reconsole ope rating units
8 Steering wheel gearshift pad‐
dles (automatic transmission) →
14 5 9
Ignition lock →
13 6
A Cruise control le ver→
15 8
B Diagnostics connection →
21
0083 Opens the bonn et →
221
C Parking brake →
151
D Light switch →
105
E Driving sy stems cont rol panel:
Ç LaneKeeping Assist →
174
0092 DSR →
16 0
Ô 360° camera 6
Ataglance – Cockpit
Page 11 of 337

1
Multifunction display →
182
2 0076 Ends or declines calls/
ex its the phone book or redial
memory →
188
0061 Makes or accepts calls/
switches tothere dial memory
00810082 Adjusts thevo lume
0063 Mutes
00E3 Activates LING UATRONIC 3
00E2 Calls up the main menu →
181
00630064 Selects a menu or
submenu or scrolls thro ugh
lists
0076 Confirm s a selection/
hides display messages
0038 Back
00E1 Deactivates LINGUA‐
TRONIC 8
Ataglance – Steering wheel with buttons
Page 12 of 337
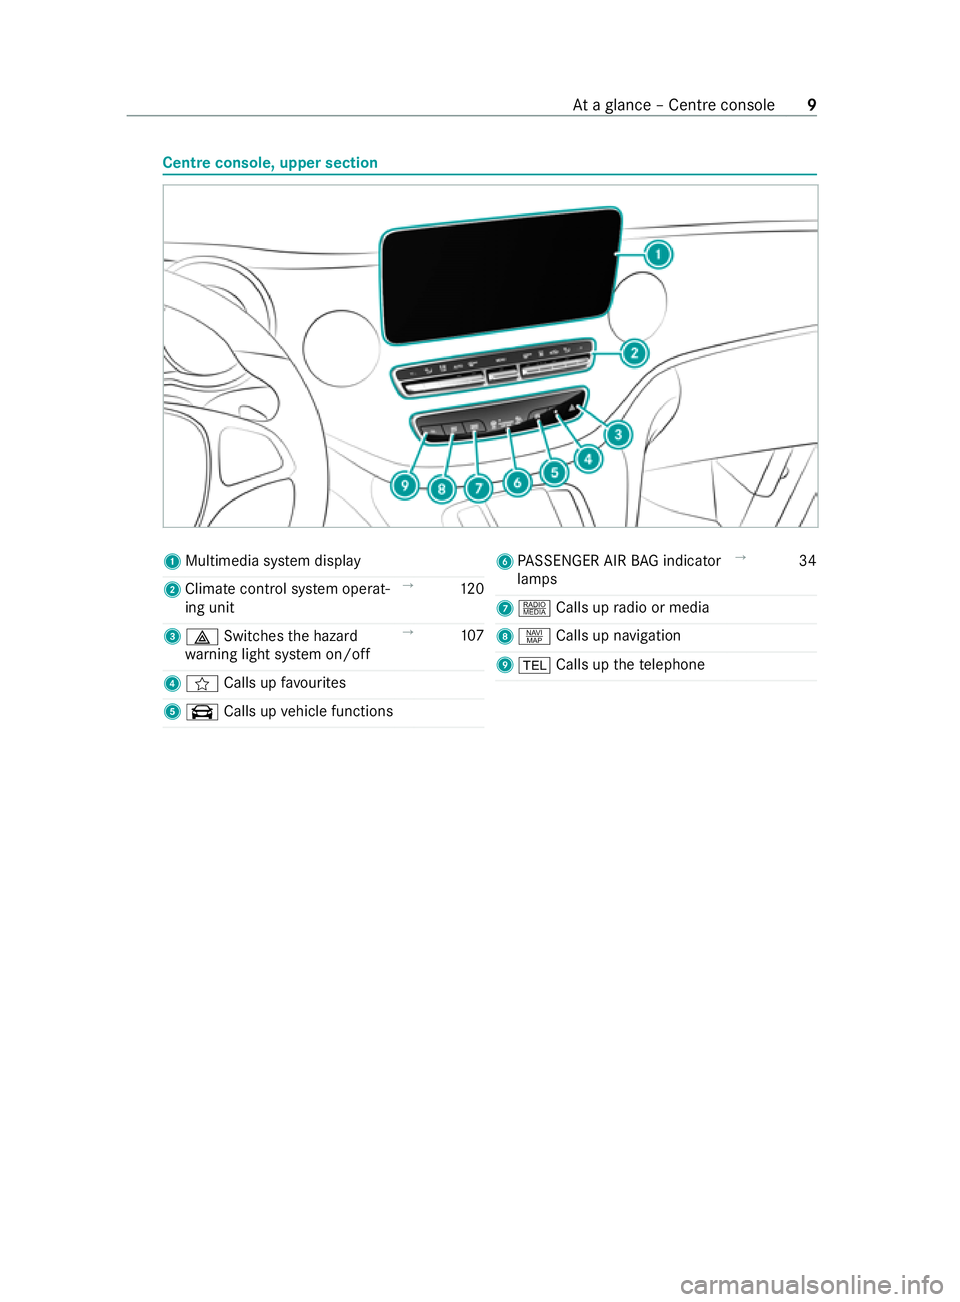
Centre console, upper section
1
Multimedia sy stem display
2 Climate cont rol sy stem operat‐
ing unit →
12 0
3 002F Switches the hazard
wa rning light sy stem on/o ff→
107
4 f Calls up favo urites
5 \ Calls up vehicle functions 6
PASSENGER AIR BAG indicator
lamps →
34
7 | Calls up radio or media
8 z Calls up navigation
9 002B Calls up thete lephone At
aglance – Cent reconsole 9
Page 19 of 337
Environmental pr
otection
+ ENVIRONMENTAL
NOTEEnvironmental
damage due tooperating conditions and
personal driving style The pollutant emission of
theve hicle is
directly related totheve hicle's operation.
Operate theve hicle in an environmentally
re sponsible manner tomake a contribution to
environmen tal pr otection. Todo this, obser ve
th efo llowing recommendations on opera ting
conditions and your personal driving style.
Operating conditions: #
Make sure that the tyre pressures are
alw ays cor rect. #
Do not transport any unnecessa ry
we ight (e.g. a roof rack which is no lon‐
ge rre qu ired). #
Obser vethe service inter vals.
A regularly serviced vehicle will contri b‐
ute toenvironmen tal pr otection. #
Always ha vemaintenance workcar ried
out at a qualified specialist workshop.
Pe rsonal driving style: #
Do not depress the accelera tor pedal
when starting the engine. #
Do not warm upthe engine while sta‐
tionar y. #
Drive carefully and maintain a su fficient
dis tance to ot hervehicles. #
Avoid frequent, sudden acceleration and
braking. #
Shift gears in good time and use each
ge ar only up to00C3 of its maximum
engine speed. #
Switch off the engine in stationary traf‐
fi c, e.g. use the ECO start/ stop func‐
tion. #
Drive in a fuel-ef ficient manne r.Pay
attention tothe ECO display for a fuel-
ef ficient driving style. Ta
ke -back of end-of-life vehicles
EU countries onl y:
Mercedes-Benz will take back your end-of-life
ve hicle for environment-friendly disposal in accordance with
the European Union (EU) End-Of-
Life Vehicles Directive.
A network of vehicle take -ba ckpoints and dis‐
mantlers has been es tablished foryo uto return
yo ur vehicle. You can lea veit at any of these
points free of charge . This makes an impor tant
contribution toclosing there cycling circle and
conserving resources.
Fo r fur ther information about there cycling and
disposal of end-of-life vehicles, and theta ke -ba ck
conditions, please visit the national
Mercedes-Benz website foryo ur countr y. Mercedes-Benz GenuineParts
+ ENVIRONMENTAL
NOTEEnvironmental
damage caused bynot using recycled
re conditioned components Mercedes‑Benz
AGoffers recycled recondi‐
tioned components and pa rts with the same
qu ality as new parts. The same entitlement
from the implied warranty is valid as for new
parts. #
Recycled reconditioned components
and pa rts from Mercedes‑Benz AG. *
NO
TEImpairment of the operating ef fi‐
ciency of there stra int sy stems from
ins talling accessory parts or from repairs
or we lding Airbags and seat belt
tensioners, as well as
control units and sensors forth ere stra int
sy stems, may be ins talled in thefo llowing
areas of your vehicle:
R doors
R door pillars
R door sills
R seats
R cockpit
R instrument clus ter
R centre console #
Do not ins tall accessories such as audio
sy stems in these areas. #
Do not car ryout repairs or welding. #
Have accesso ryparts retrofitted at a
qu alified specialist workshop. 16
General no tes
Page 27 of 337

Only ha
verepairs and maintenance workinthe
area of thefo llowing components car ried out by a
qu alified specialist workshop:
R vehicle components car rying live voltage
R transmission aerials
R multimedia sy stem and sound sy stem
If yo u ha veany queries or suggestions, consult a
qu alified specialist workshop. Implied
warranty
* NO
TEDama getotheve hicle arising from
violation of these operating instructions. Damage
totheve hicle can arise from viola‐
tion of these operating instructions.
Such damage is not co veredby either the
Limited Warranty or the new or used-vehicle
wa rrant y. #
Obser vethe instructions in these oper‐
ating instructions on proper operation
of your vehicle as well as rega rding pos‐
sible vehicle damage. QR codes
forre scue card
The QR code sticke rs are af fixe dto the B-pillar on
th e driver's and co-driver's side. In theeve nt of
an accident, emergency services can use the QR
code toquickly de term ine the cor responding res‐
cue card foryo ur vehicle. The cur rent rescue card
contains, in compact form ,th e most impor tant
information about your vehicle e.g. thero uting of
electric cables.
Fu rther information can be obtained at https://
www.mercedes-benz.de/qr-code. Data
storage Data processing in
theve hicle Electronic control units
Electronic control units are
fitted in your vehicle.
Control units process data which, forex ample,
th ey receive from vehicle sensors, generate
th emselves or exch ange between themselves.
Some contro l units arerequ ired forth e safe oper‐
ation of your vehicle, some assist you when driv‐
ing, such as driver assis tance sy stems, while oth‐
ers enable comfort or inf otainment functions. The
following pr ovides you with general informa‐
tion rega rding data processing in theve hicle.
Ad ditional information rega rding exactly which
data in your vehicle are collected, sa ved and
transmit tedto third parties, and for what pur‐
pose, can be found in the information directly
re lated tothe functional characteristics in ques‐
tion in their respective operating instructions.
This information is also available online and,
depending on theve hicle equipment, digitally.
Pe rsonal data
Every vehicle is identified bya unique vehicle
identification number. Depending on the count ry,
th is vehicle identification number can be used by,
fo rex ample, go vernmental authorities todeter‐
mine the identity of theow ner. The reare other
possibilities for using data collected from the
ve hicle toidentify theow ner or driver, su chas
th e licence plate number.
Therefore, data generated or processed bycon‐
trol units may be attributa bletoa person or,
under cer tain conditions, become att ributable to
a person. Depending on which vehicle data are
av ailable, it may be possible tomake inferences
about, forex ample, your driving behaviour, your
location, your route or your use pat tern s.
Legal requirements rega rding the disclosure
of data
If legally requ ired todo so, manufacturers are, in
individual cases, legally obliged toprov ide gov‐
ernmental entities, upon request and tothe
ex tent requ ired, data stored bythe manufacturer.
Fo rex ample, this may be the case during the
in ve stigation of a criminal of fence.
Go vernmental entities are themselves, in individ‐
ual cases and within the applicable legal frame‐
wo rk, authorised toread out data from theve hi‐
cle. In the case of an accident, information that
can help with an in vestigation can, therefore, be
ta ke n from the airbag cont rol unit, forex ample.
Operational data in theve hicle
This is data rega rding the operation of theve hi‐
cle, which ha vebeen processed bycontrol units.
This includes thefo llowing data, forex ample:
R vehicle status information such as the speed,
longitudinal acceleration, lateral acceleration,
number of wheel revo lutions or thefast ened
seat belts display
R ambient conditions, such as temp erature, rain
sensor or dis tance sensor 24
General no tes
Page 33 of 337
*
NO
TEDama gecaused bytrapping the
seat belt If an unused seat belt is not fully
retracted, it
may become trapped in the door or in the
seat mechanism. #
Always ensure that an unused seat belt
is fully retracted. Fa
stening and adjust ing seat belts If
th e seat belt is pulled quickly or sharpl y,the
seat belt retractor lo cks. The seat belt stra p can‐
not be pulled out any fur ther. #
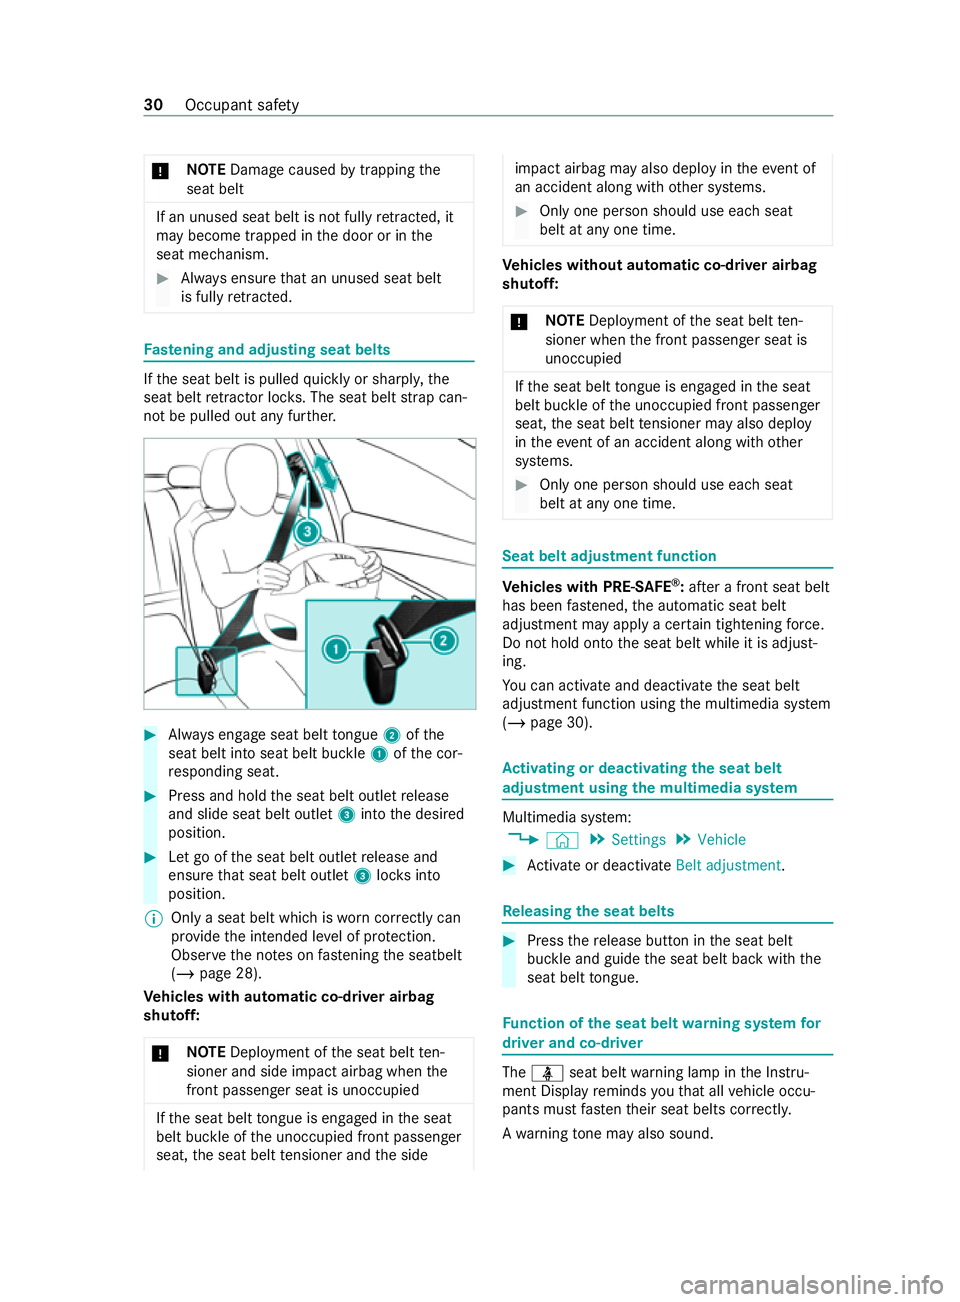
Always engage seat belt tongue 2ofthe
seat belt into seat belt buckle 1ofthe cor‐
re sponding seat. #
Press and hold the seat belt outlet release
and slide seat belt outlet 3into the desired
position. #
Let go of the seat belt outlet release and
ensure that seat belt outlet 3locksinto
position.
% Only a seat belt which is
worncor rectly can
pr ov ide the intended le vel of pr otection.
Obser vethe no tes on fastening the seatbelt
(/ page 28).
Ve hicles with automatic co-driver airbag
shutoff:
* NO
TEDepl oyment of the seat belt ten‐
sioner and side impact airbag when the
front passenger seat is unoccupied If
th e seat belt tongue is engaged in the seat
belt buckle of the unoccupied front passenger
seat, the seat belt tensioner and the side impact airbag may also deploy in
theeve nt of
an accident along with other sy stems. #
Only one person should use each seat
belt at any one time. Ve
hicles without automatic co-driver airbag
shutoff:
* NO
TEDepl oyment of the seat belt ten‐
sioner when the front passenger seat is
unoccupied If
th e seat belt tongue is engaged in the seat
belt buckle of the unoccupied front passenger
seat, the seat belt tensioner may also depl oy
in theev ent of an accident along with other
sy stems. #
Only one person should use each seat
belt at any one time. Seat belt adjustment function
Ve
hicles with PRE-SAFE ®
:af te r a front seat belt
has been fastened, the automatic seat belt
adjustment may apply a cer tain tigh tening forc e.
Do not hold onto the seat belt while it is adjust‐
ing.
Yo u can activate and deactivate the seat belt
adjustment function using the multimedia sy stem
(/ page 30). Ac
tivating or deactivating the seat belt
adjustment using the multimedia sy stem Multimedia sy
stem:
4 © 5
Settings 5
Vehicle #
Activate or deacti vate Belt adjustment . Re
leasing the seat belts #
Press there lease button in the seat belt
buckle and guide the seat belt back with the
seat belt tongue. Fu
nction of the seat belt warning sy stem for
driver and co-driver The
00E9 seat belt warning lamp in the Instru‐
ment Display reminds youth at all vehicle occu‐
pants must fastentheir seat belts cor rectl y.
A wa rning tone may also sound. 30
Occupant safe ty
Page 58 of 337

#
Make sure that no body parts are in the
closing area.
If someone becomes trapped, take thefo llow‐
ing actions:
R press the0042 button on theke y or
R pull theex terior door handle or
R press the appropriate sliding door button
in the cent reconsole or
R press the button on the door sill or
R pull therock er switch on the door handle &
WARNING Risk of becoming trapped due
to sliding door opening towa rdsth ere ar
When you open the sliding door, the sliding
door could hit other people as it mo ves
to wa rdsth ere ar of theve hicle. #
Only open the sliding door when tra ffic
conditions permit. *
NO
TEDama getothe sliding door due to
incor rect use Using
the lo wer guide of the sliding door (car‐
ri age) as a step can result in damage tothe
trim and/or mechanical components of the
sliding door. #
Do not use the lo wer guide of the sliding
door (car riage) as a step. Yo
u must reset the electric sliding door if there
has been a malfunction or a drop in voltage
(/ page 57).
Yo ur vehicle can be equipped with an electric
sliding door on the left and/or right-hand side.
Yo u can open and close the sliding door with
th ese cont rols:
R Sliding door buttons on the cent reconsole
R Sliding door button on the door sill (B-pillar)
R Door handle (inside or outside)
R Key
The sliding door is equipped with automatic
bloc kage detection with reve rsing function. If a
solid object bloc ksorrestricts the sliding door
during the automatic closing process, the sliding
door opens again automaticall y.Ifth e sliding
door is obstructed during the opening procedure,
it mo ves back a few centim etre s in the opposite
direction and stops. The automatic bloc
kage detection with reve rsing
function is only an aid. It is not a substitute for
yo ur attentiveness when closing the electrical
sliding door.
If an obs tacle is de tected, the display sho wsthe
Left-hand electric sliding door Obstruction detec-
ted message, forex ample, and five wa rning tones
sound.
% In unf
avourable operating conditions, e.g.
frost, ice or heavy soiling, press and hold the
appropriate sliding door button. The electric
sliding door mo ves with increased forc e.
Obser vethat in such circum stances, the
bloc kage detection is less sensitive. Tostop
th e mo vement, release the sliding door but‐
to n. Opening and closing the electrical sliding
door from the inside
&
WARNING Risk of becoming trapped due
to sliding door opening towa rdsth ere ar
When you open the sliding door, the sliding
door could hit other people as it mo ves
to wa rdsth ere ar of theve hicle. #
Only open the sliding door when tra ffic
conditions permit. Opening and closing
55
Page 59 of 337

Opening
1
Sliding door button forth e sliding door on the
left-hand side
2 Sliding door button forth e sliding door on the
ri ght-hand side
3 Rocker switch
4 Locking knob
5 Sliding door button in the door sill
Yo u can on lyopen a sliding door with sliding door
button 5inthe door sill or with rocker switch
3 onthe door handle if thech ild-proof lock has
not been activated.
The sliding door is equipped with an active
re tainer, which engages the door at the end stop
when opened. #
Brief lypress appropriate sliding door button
1 or2 inthe cent reconsole.
or #
Press sliding door button 5inthe door sill.
or #
Brief lypull back rocker switch 3.
If th e door is loc ked, locking knob 4pops
up. The sliding door unloc ks, automatic oper‐
ation is star ted and the sliding door opens. If
yo u use sliding door button 1or2 inthe
centre console you will hear two warning sig‐
nals during the opening procedure.
The indicator lamp in sliding door button 1
or 2 inthe cent reconsole flashes forthe
duration of automatic operation.
The indicator lamp in sliding door button 1
or 2 inthe cent reconsole is lit whene ver
th e appropriate sliding door is open. Depend‐
ing on theve hicle equipment, the display can
also show theSliding door open message.
Closing #
Brief lypress appropriate sliding door button
1 or2 inthe cent reconsole.
or #
Press sliding door button 5inthe door sill.
or #
Brief lypush rocker switch 3forw ards.
The sliding door is released from its lock and
automatic operation is star ted. The sliding
door closes.
If yo u use sliding door button 1or2 inthe
centre console you will hear two warning sig‐
nals during the closing procedure.
The indicator lamp in sliding door button 1
or 2 inthe cent reconsole goes out when‐
eve rth e cor responding sliding door is closed.
Inter rupting automatic operation #
Press cor responding sliding door button 1
or 2 inthe cent reconsole again.
or #
Press sliding door button 5inthe door sill
again.
or #
Brief lypull back rocker switch 3. Opening/closing
the electric sliding door
with thekey %
If
th eve hicle is fitted wi thtwo sliding doors,
th e0042 button on theke y can only be used
to open or close one of the two sliding doors
(/ page 57). #
Tounlo ck:brie fly press the0042 button on
th ekey. #
Toopen: press and hold the0042 button on
th eke yfo r longer than 0.5 seconds.
Yo u will hear two acoustic signals and the
sliding door will open automaticall y.56
Opening and closing