display Mercury Mountaineer 2008 Pioneer Navigation System Supplement
[x] Cancel search | Manufacturer: MERCURY, Model Year: 2008, Model line: Mountaineer, Model: Mercury Mountaineer 2008Pages: 164, PDF Size: 4.44 MB
Page 23 of 164
Radio Display Condition Action Required
NO SIGNAL Loss of signal from
the SIRIUS satellite or
SIRIUS tower to the
vehicle antenna.You are in a location
that is blocking the
SIRIUS signal (i.e.,
tunnel, under an
overpass, dense foliage,
etc). The system is
working properly. When
you move into an open
area, the signal should
return.
UPDATING Update of channel
programming in
progress.No action required. The
process may take up to
three minutes.
CALL SIRIUS
1–888–539–7474Satellite service has
been deactivated by
SIRIUS Satellite
Radio.Call SIRIUS at
1–888–539–7474 to
re-activate or resolve
subscription issues.
CD
To load a CD:
1. Press LOAD.
Note: CD units are designed to play commercially pressed 4.75 in
(12 cm) audio compact discs only. Due to technical
incompatibility, certain recordable and re-recordable compact
discs may not function correctly when used in CD players.
Irregular shaped CDs, CDs with a scratch protection film
attached, and CDs with homemade paper (adhesive) labels should
not be inserted into the CD player. The label may peel and cause
the CD to become jammed. It is recommended that homemade
CDs be identified with permanent felt tip marker rather than
adhesive labels. Ballpoint pens may damage CDs. Please contact
your authorized dealer for further information.
2. Select the desired slot by
pressing the corresponding memory
preset button (1–6).
2008(nv1)
Supplement
USA(fus)
Audio features
21
Page 24 of 164
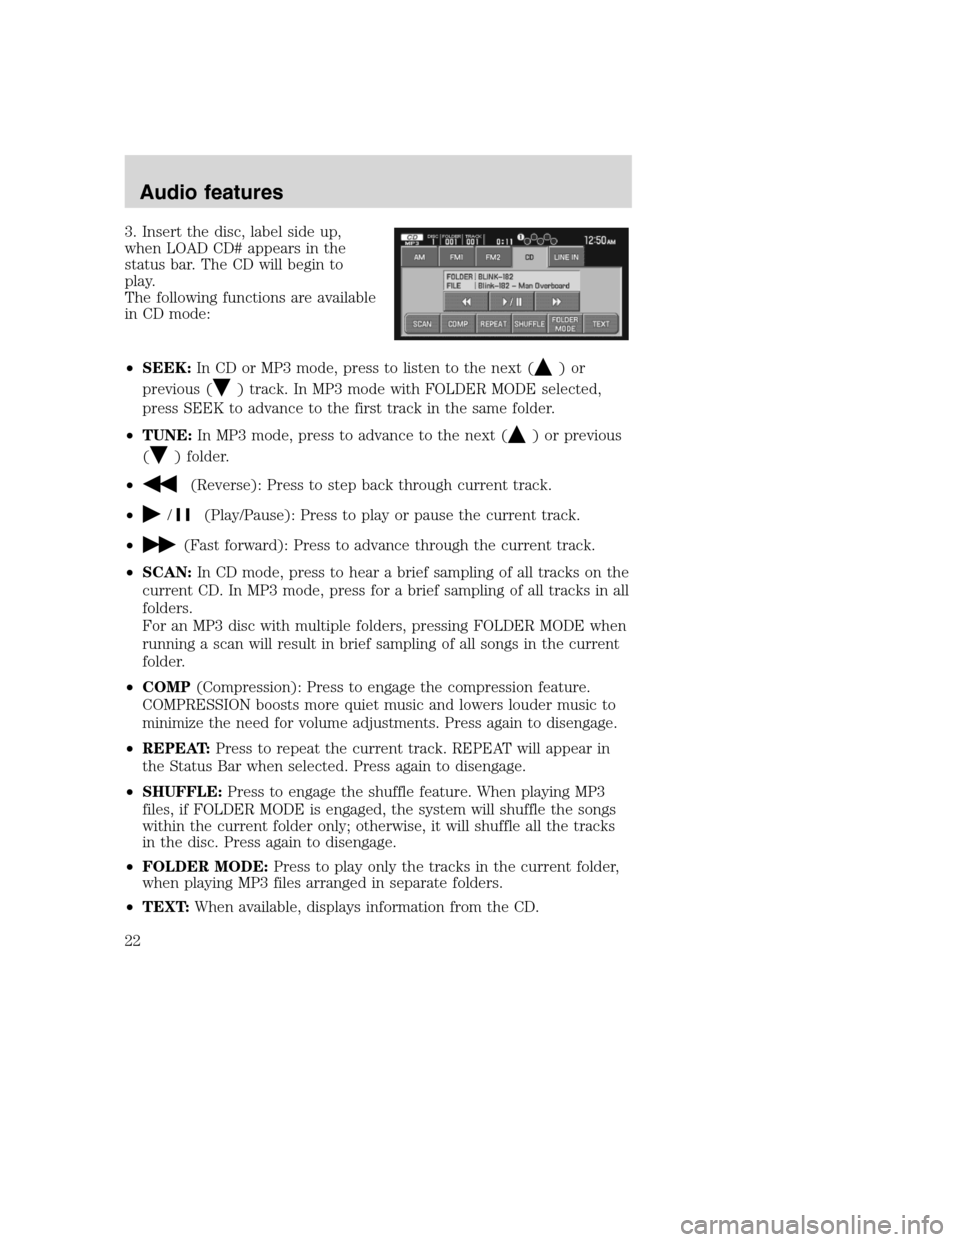
3. Insert the disc, label side up,
when LOAD CD# appears in the
status bar. The CD will begin to
play.
The following functions are available
in CD mode:
•SEEK:In CD or MP3 mode, press to listen to the next (
)or
previous (
) track. In MP3 mode with FOLDER MODE selected,
press SEEK to advance to the first track in the same folder.
•TUNE:In MP3 mode, press to advance to the next (
) or previous
(
) folder.
•
(Reverse): Press to step back through current track.
•
/(Play/Pause): Press to play or pause the current track.
•
(Fast forward): Press to advance through the current track.
•SCAN:In CD mode, press to hear a brief sampling of all tracks on the
current CD. In MP3 mode, press for a brief sampling of all tracks in all
folders.
For an MP3 disc with multiple folders, pressing FOLDER MODE when
running a scan will result in brief sampling of all songs in the current
folder.
•COMP(Compression): Press to engage the compression feature.
COMPRESSION boosts more quiet music and lowers louder music to
minimize the need for volume adjustments. Press again to disengage.
•REPEAT:Press to repeat the current track. REPEAT will appear in
the Status Bar when selected. Press again to disengage.
•SHUFFLE:Press to engage the shuffle feature. When playing MP3
files, if FOLDER MODE is engaged, the system will shuffle the songs
within the current folder only; otherwise, it will shuffle all the tracks
in the disc. Press again to disengage.
•FOLDER MODE:Press to play only the tracks in the current folder,
when playing MP3 files arranged in separate folders.
•TEXT:When available, displays information from the CD.
2008(nv1)
Supplement
USA(fus)
Audio features
22
Page 27 of 164
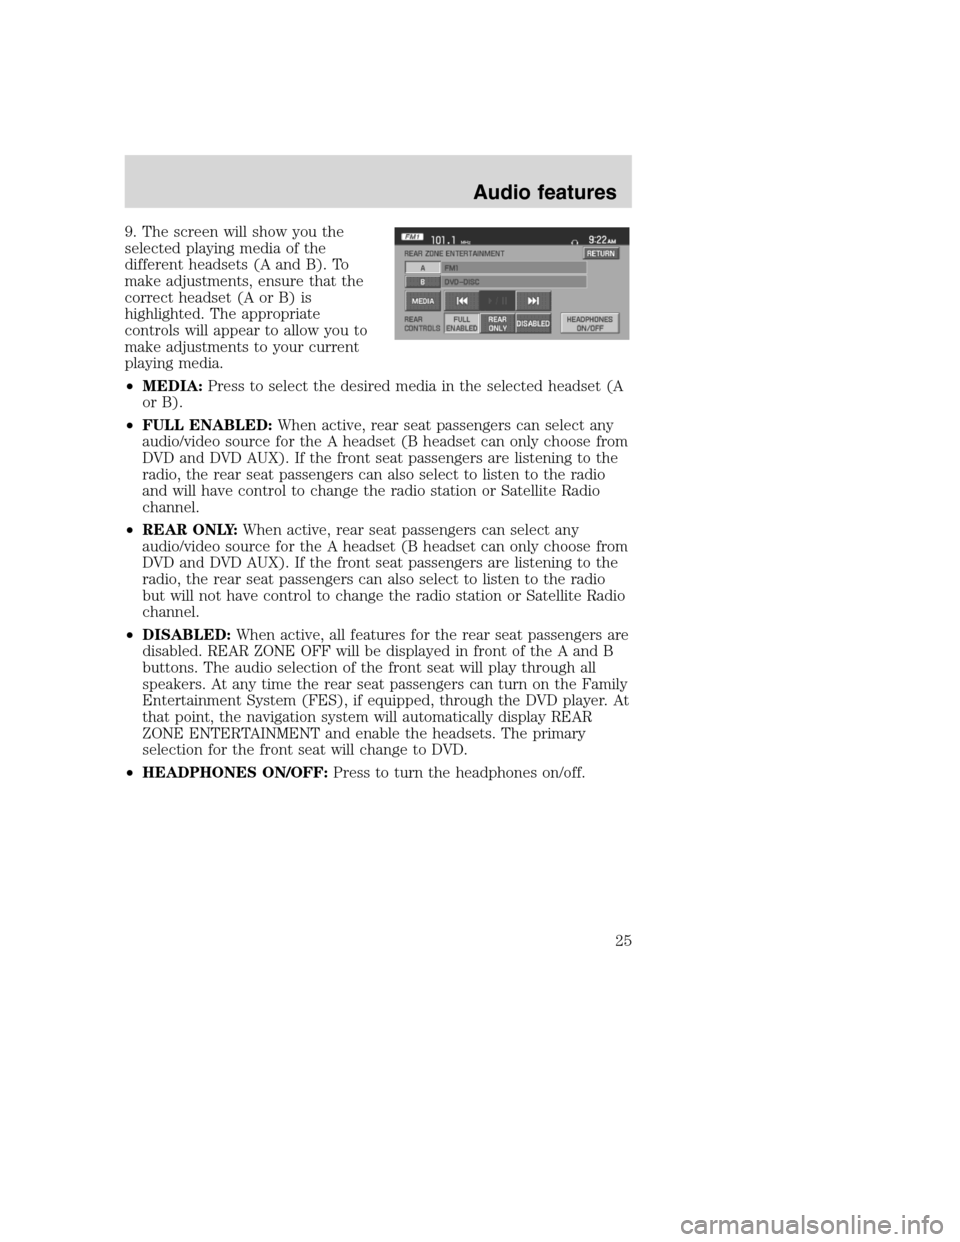
9. The screen will show you the
selected playing media of the
different headsets (A and B). To
make adjustments, ensure that the
correct headset (A or B) is
highlighted. The appropriate
controls will appear to allow you to
make adjustments to your current
playing media.
•MEDIA:Press to select the desired media in the selected headset (A
or B).
•FULL ENABLED:When active, rear seat passengers can select any
audio/video source for the A headset (B headset can only choose from
DVD and DVD AUX). If the front seat passengers are listening to the
radio, the rear seat passengers can also select to listen to the radio
and will have control to change the radio station or Satellite Radio
channel.
•REAR ONLY:When active, rear seat passengers can select any
audio/video source for the A headset (B headset can only choose from
DVD and DVD AUX). If the front seat passengers are listening to the
radio, the rear seat passengers can also select to listen to the radio
but will not have control to change the radio station or Satellite Radio
channel.
•DISABLED:When active, all features for the rear seat passengers are
disabled. REAR ZONE OFF will be displayed in front of the A and B
buttons. The audio selection of the front seat will play through all
speakers. At any time the rear seat passengers can turn on the Family
Entertainment System (FES), if equipped, through the DVD player. At
that point, the navigation system will automatically display REAR
ZONE ENTERTAINMENT and enable the headsets. The primary
selection for the front seat will change to DVD.
•HEADPHONES ON/OFF:Press to turn the headphones on/off.
2008(nv1)
Supplement
USA(fus)
Audio features
25
Page 31 of 164
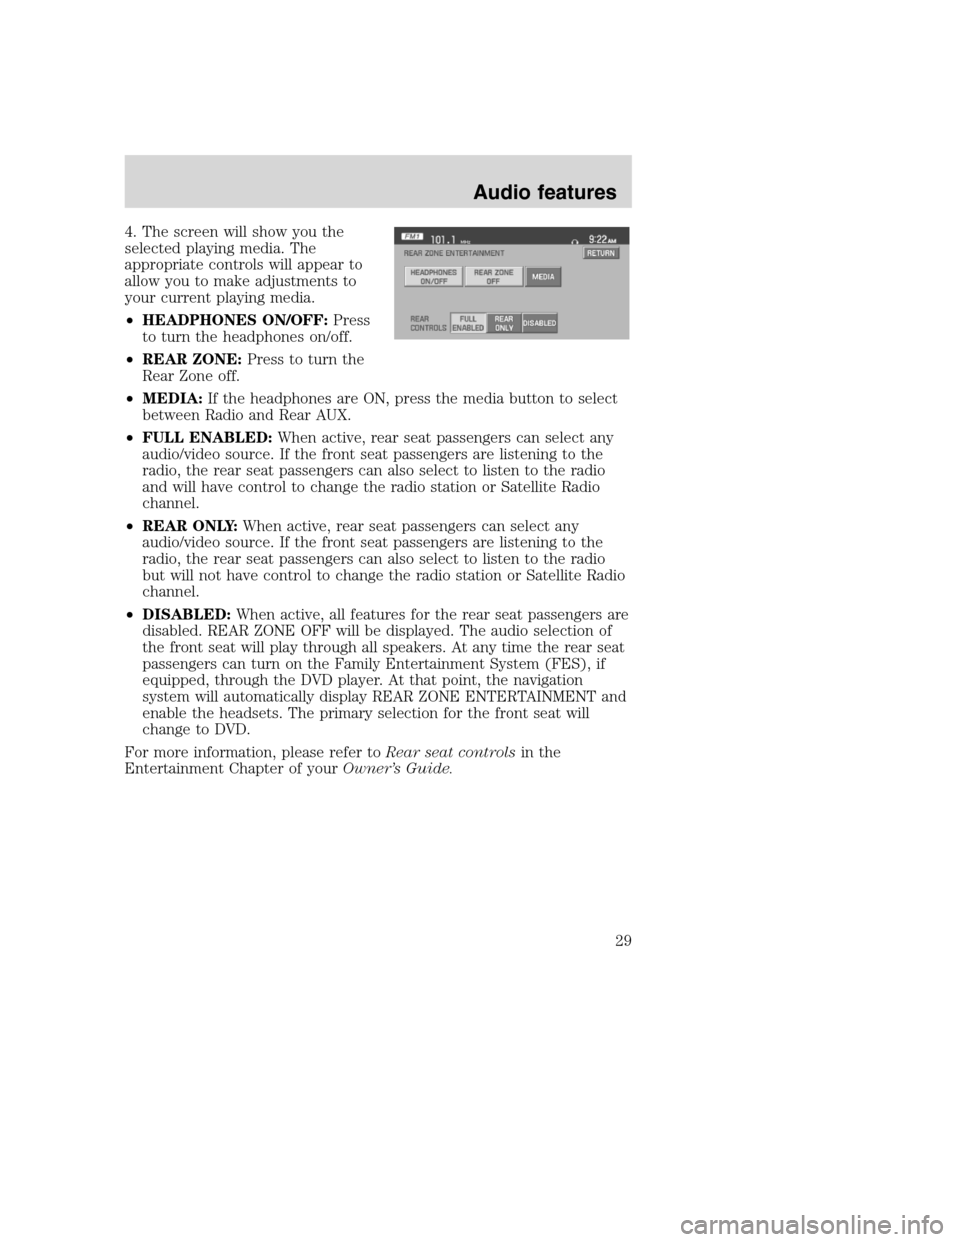
4. The screen will show you the
selected playing media. The
appropriate controls will appear to
allow you to make adjustments to
your current playing media.
•HEADPHONES ON/OFF:Press
to turn the headphones on/off.
•REAR ZONE:Press to turn the
Rear Zone off.
•MEDIA:If the headphones are ON, press the media button to select
between Radio and Rear AUX.
•FULL ENABLED:When active, rear seat passengers can select any
audio/video source. If the front seat passengers are listening to the
radio, the rear seat passengers can also select to listen to the radio
and will have control to change the radio station or Satellite Radio
channel.
•REAR ONLY:When active, rear seat passengers can select any
audio/video source. If the front seat passengers are listening to the
radio, the rear seat passengers can also select to listen to the radio
but will not have control to change the radio station or Satellite Radio
channel.
•DISABLED:When active, all features for the rear seat passengers are
disabled. REAR ZONE OFF will be displayed. The audio selection of
the front seat will play through all speakers. At any time the rear seat
passengers can turn on the Family Entertainment System (FES), if
equipped, through the DVD player. At that point, the navigation
system will automatically display REAR ZONE ENTERTAINMENT and
enable the headsets. The primary selection for the front seat will
change to DVD.
For more information, please refer toRear seat controlsin the
Entertainment Chapter of yourOwner’s Guide.
2008(nv1)
Supplement
USA(fus)
Audio features
29
Page 32 of 164
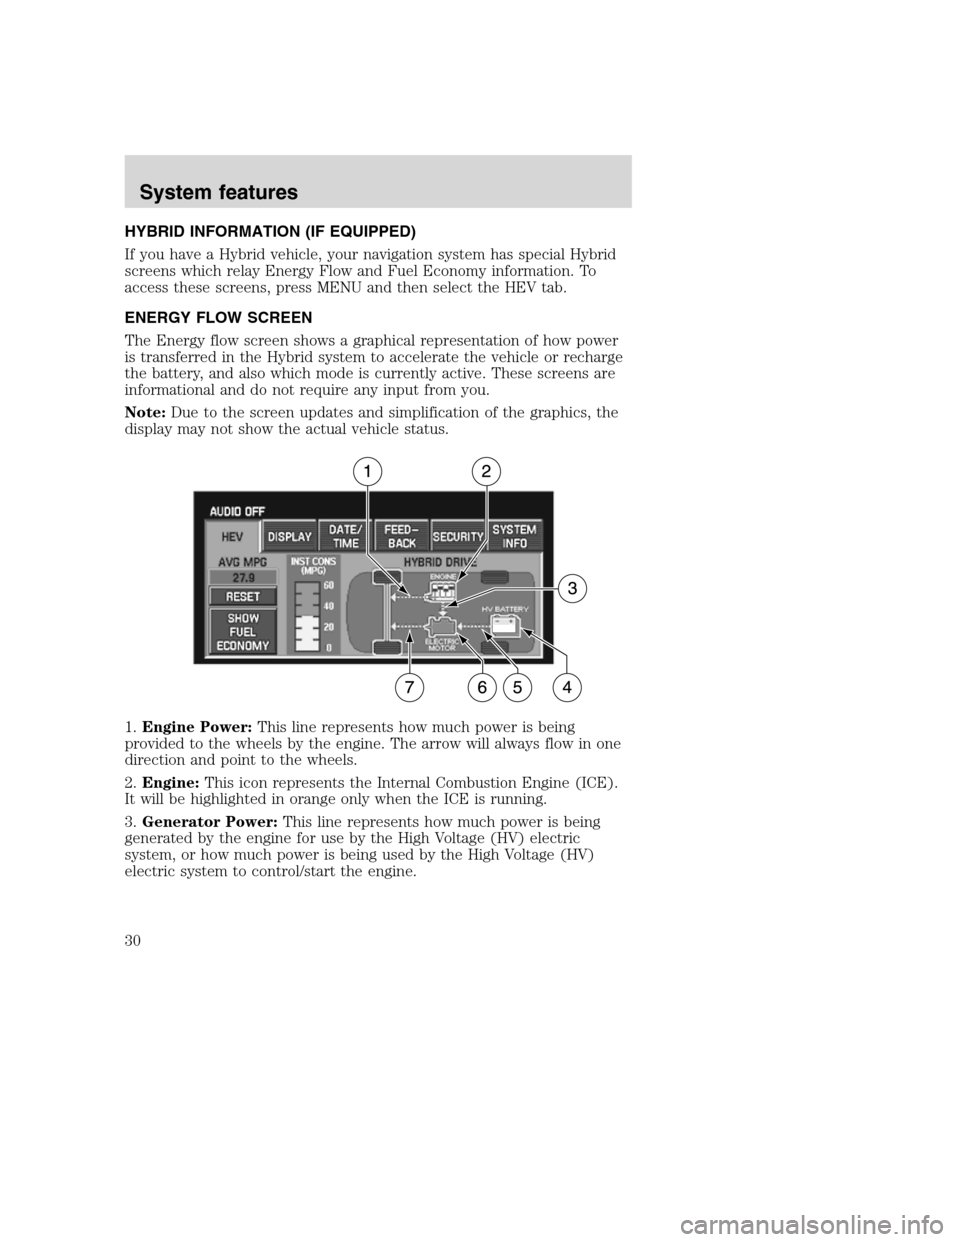
HYBRID INFORMATION (IF EQUIPPED)
If you have a Hybrid vehicle, your navigation system has special Hybrid
screens which relay Energy Flow and Fuel Economy information. To
access these screens, press MENU and then select the HEV tab.
ENERGY FLOW SCREEN
The Energy flow screen shows a graphical representation of how power
is transferred in the Hybrid system to accelerate the vehicle or recharge
the battery, and also which mode is currently active. These screens are
informational and do not require any input from you.
Note:Due to the screen updates and simplification of the graphics, the
display may not show the actual vehicle status.
1.Engine Power:This line represents how much power is being
provided to the wheels by the engine. The arrow will always flow in one
direction and point to the wheels.
2.Engine:This icon represents the Internal Combustion Engine (ICE).
It will be highlighted in orange only when the ICE is running.
3.Generator Power:This line represents how much power is being
generated by the engine for use by the High Voltage (HV) electric
system, or how much power is being used by the High Voltage (HV)
electric system to control/start the engine.
2008(nv1)
Supplement
USA(fus)
System features
30
Page 35 of 164
FUEL ECONOMY SCREEN
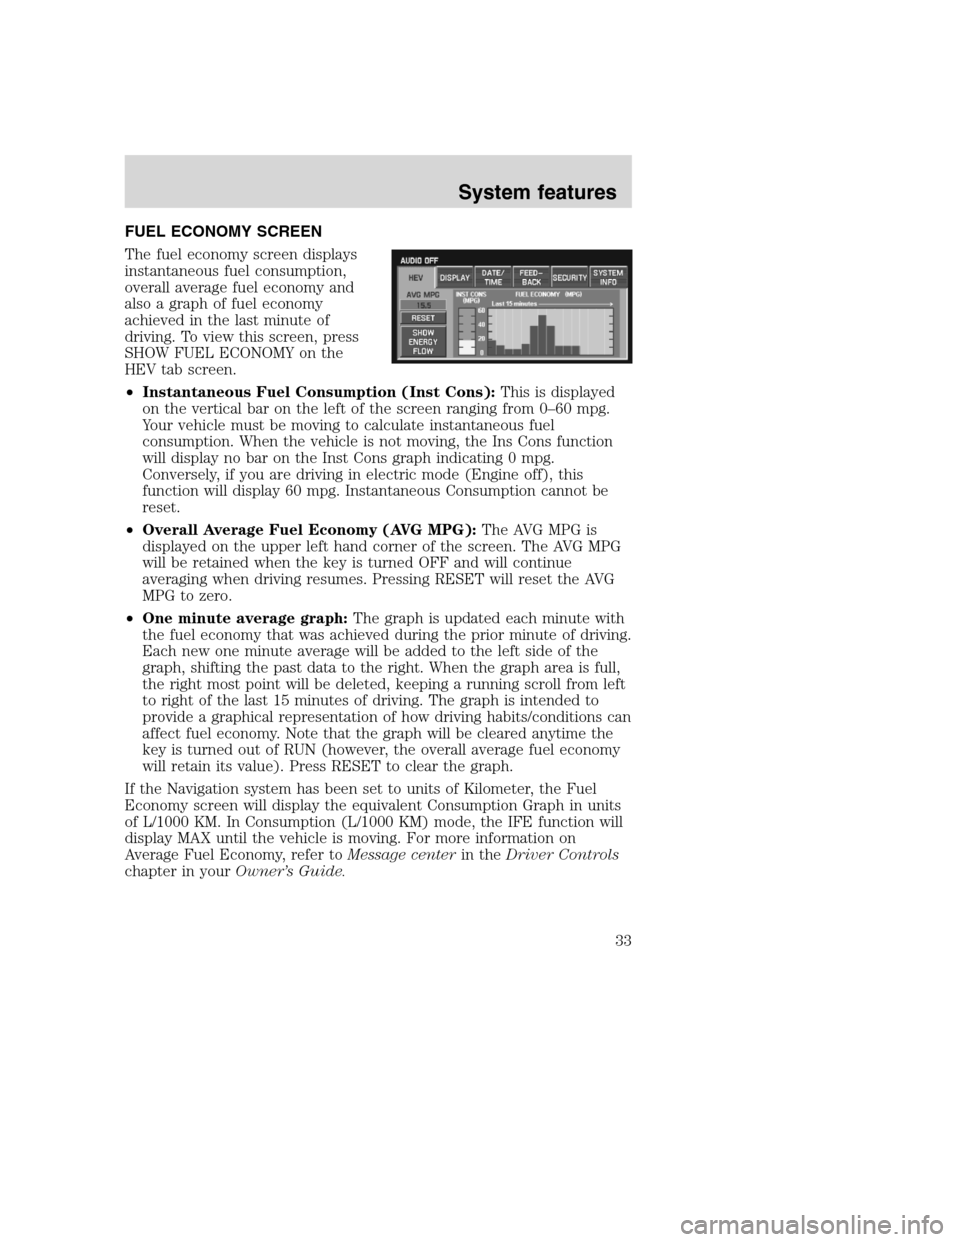
The fuel economy screen displays
instantaneous fuel consumption,
overall average fuel economy and
also a graph of fuel economy
achieved in the last minute of
driving. To view this screen, press
SHOW FUEL ECONOMY on the
HEV tab screen.
•Instantaneous Fuel Consumption (Inst Cons):This is displayed
on the vertical bar on the left of the screen ranging from 0–60 mpg.
Your vehicle must be moving to calculate instantaneous fuel
consumption. When the vehicle is not moving, the Ins Cons function
will display no bar on the Inst Cons graph indicating 0 mpg.
Conversely, if you are driving in electric mode (Engine off), this
function will display 60 mpg. Instantaneous Consumption cannot be
reset.
•Overall Average Fuel Economy (AVG MPG):The AVG MPG is
displayed on the upper left hand corner of the screen. The AVG MPG
will be retained when the key is turned OFF and will continue
averaging when driving resumes. Pressing RESET will reset the AVG
MPG to zero.
•One minute average graph:The graph is updated each minute with
the fuel economy that was achieved during the prior minute of driving.
Each new one minute average will be added to the left side of the
graph, shifting the past data to the right. When the graph area is full,
the right most point will be deleted, keeping a running scroll from left
to right of the last 15 minutes of driving. The graph is intended to
provide a graphical representation of how driving habits/conditions can
affect fuel economy. Note that the graph will be cleared anytime the
key is turned out of RUN (however, the overall average fuel economy
will retain its value). Press RESET to clear the graph.
If the Navigation system has been set to units of Kilometer, the Fuel
Economy screen will display the equivalent Consumption Graph in units
of L/1000 KM. In Consumption (L/1000 KM) mode, the IFE function will
display MAX until the vehicle is moving. For more information on
Average Fuel Economy, refer toMessage centerin theDriver Controls
chapter in yourOwner’s Guide.
2008(nv1)
Supplement
USA(fus)
System features
33
Page 36 of 164
DISPLAY
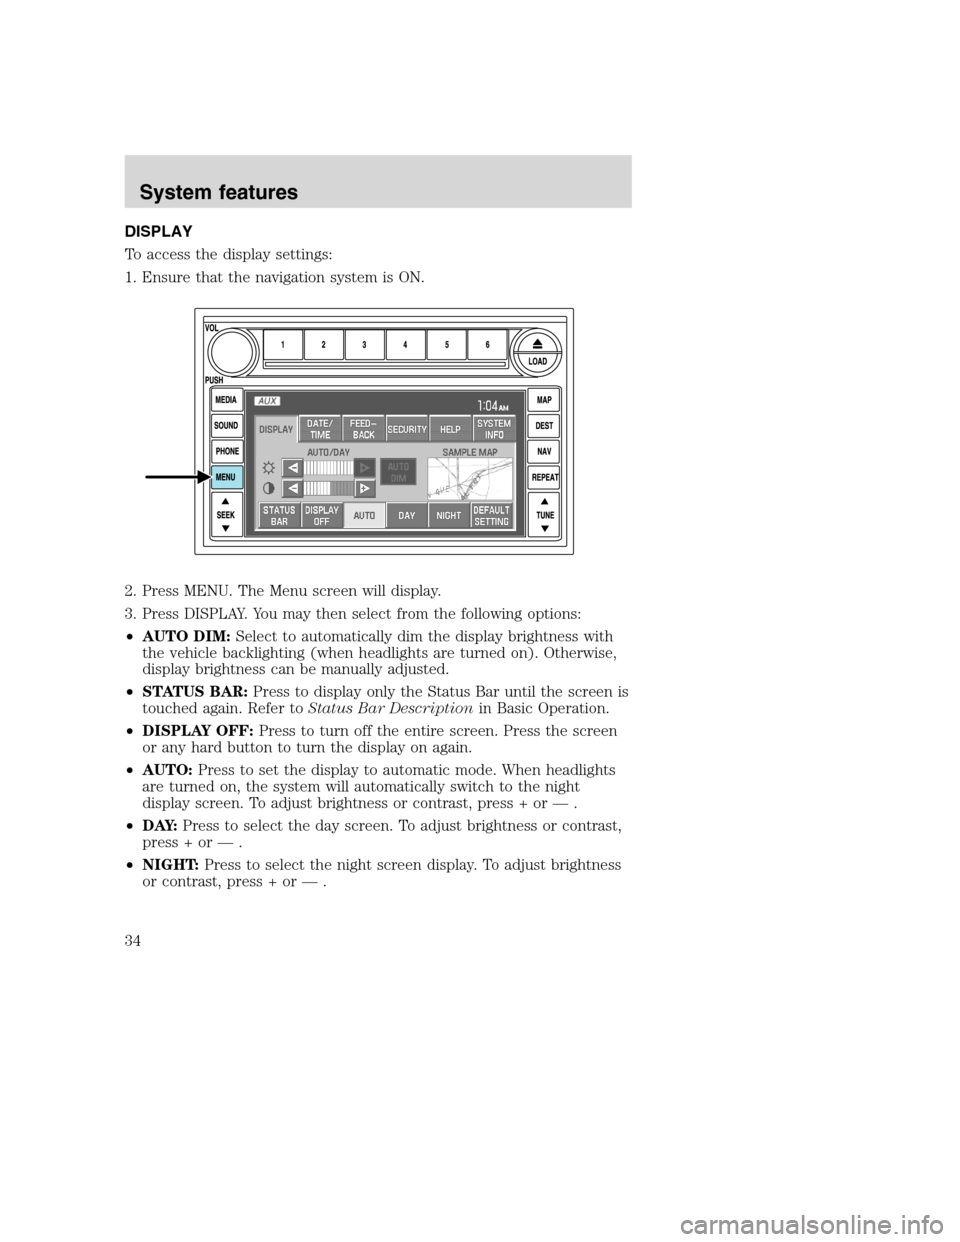
To access the display settings:
1. Ensure that the navigation system is ON.
2. Press MENU. The Menu screen will display.
3. Press DISPLAY. You may then select from the following options:
•AUTO DIM:Select to automatically dim the display brightness with
the vehicle backlighting (when headlights are turned on). Otherwise,
display brightness can be manually adjusted.
•STATUS BAR:Press to display only the Status Bar until the screen is
touched again. Refer toStatus Bar Descriptionin Basic Operation.
•DISPLAY OFF:Press to turn off the entire screen. Press the screen
or any hard button to turn the display on again.
•AUTO:Press to set the display to automatic mode. When headlights
are turned on, the system will automatically switch to the night
display screen. To adjust brightness or contrast, press + or — .
•D AY:Press to select the day screen. To adjust brightness or contrast,
press + or — .
•NIGHT:Press to select the night screen display. To adjust brightness
or contrast, press + or — .
2008(nv1)
Supplement
USA(fus)
System features
34
Page 37 of 164
•DEFAULT SETTING:Press to clear any current settings and return
to the system default.
•SAMPLE MAP:Shows you how the map will appear with the current
settings
DATE/TIME
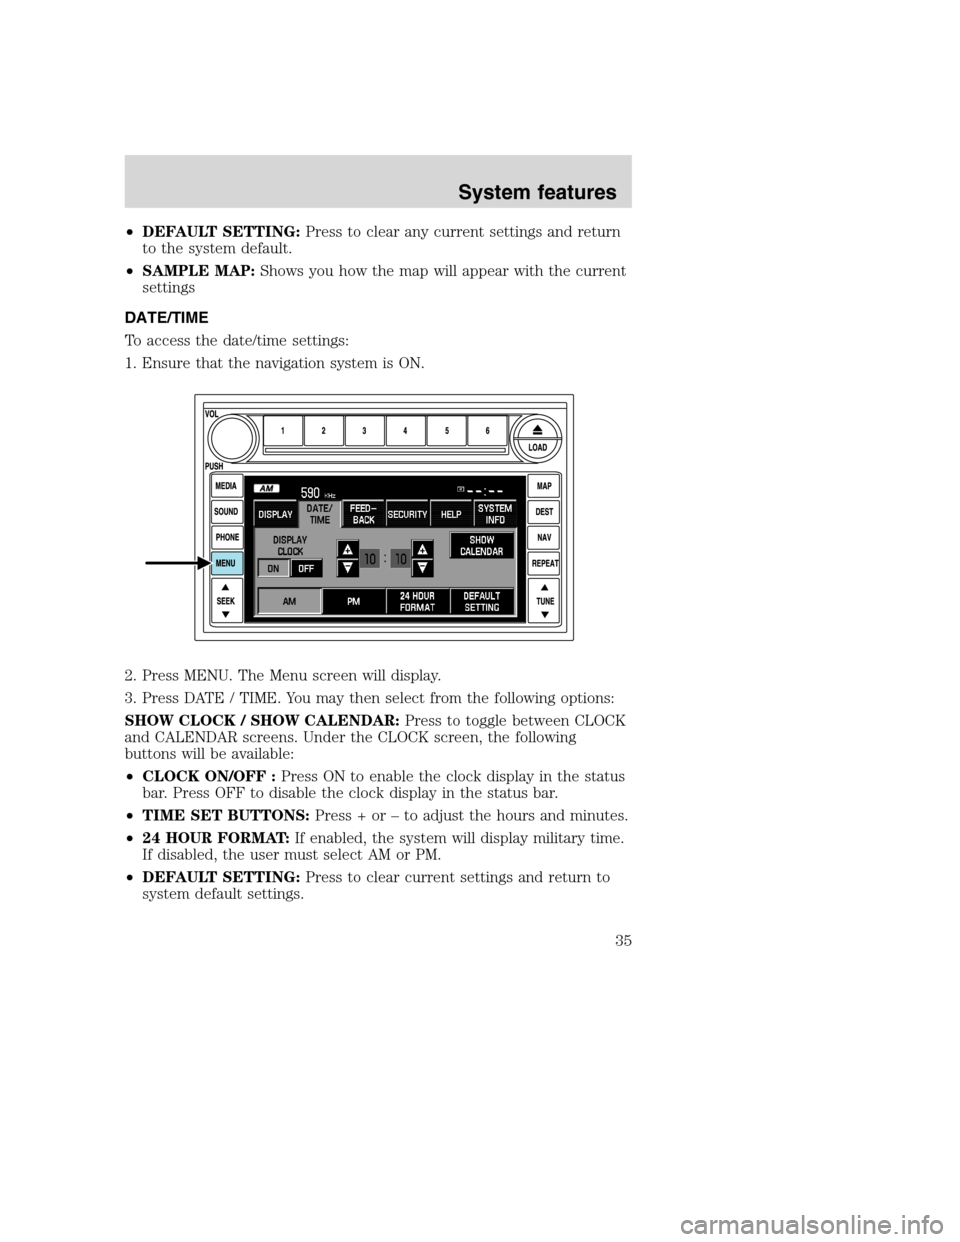
To access the date/time settings:
1. Ensure that the navigation system is ON.
2. Press MENU. The Menu screen will display.
3. Press DATE / TIME. You may then select from the following options:
SHOW CLOCK / SHOW CALENDAR:Press to toggle between CLOCK
and CALENDAR screens. Under the CLOCK screen, the following
buttons will be available:
•CLOCK ON/OFF :Press ON to enable the clock display in the status
bar. Press OFF to disable the clock display in the status bar.
•TIME SET BUTTONS:Press + or – to adjust the hours and minutes.
•24 HOUR FORMAT:If enabled, the system will display military time.
If disabled, the user must select AM or PM.
•DEFAULT SETTING:Press to clear current settings and return to
system default settings.
2008(nv1)
Supplement
USA(fus)
System features
35
Page 38 of 164
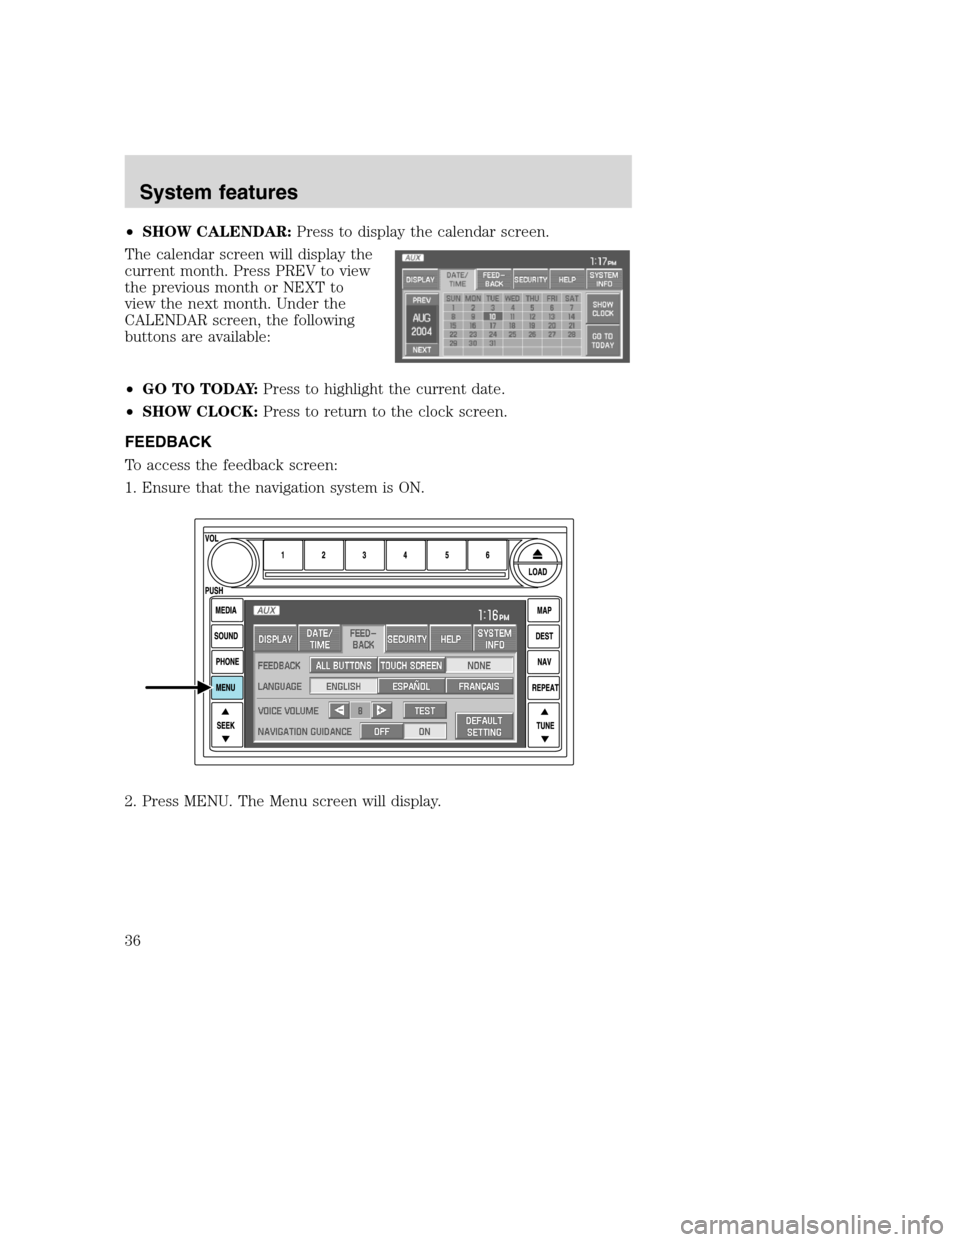
•SHOW CALENDAR:Press to display the calendar screen.
The calendar screen will display the
current month. Press PREV to view
the previous month or NEXT to
view the next month. Under the
CALENDAR screen, the following
buttons are available:
•GO TO TODAY:Press to highlight the current date.
•SHOW CLOCK:Press to return to the clock screen.
FEEDBACK
To access the feedback screen:
1. Ensure that the navigation system is ON.
2. Press MENU. The Menu screen will display.
2008(nv1)
Supplement
USA(fus)
System features
36
Page 43 of 164
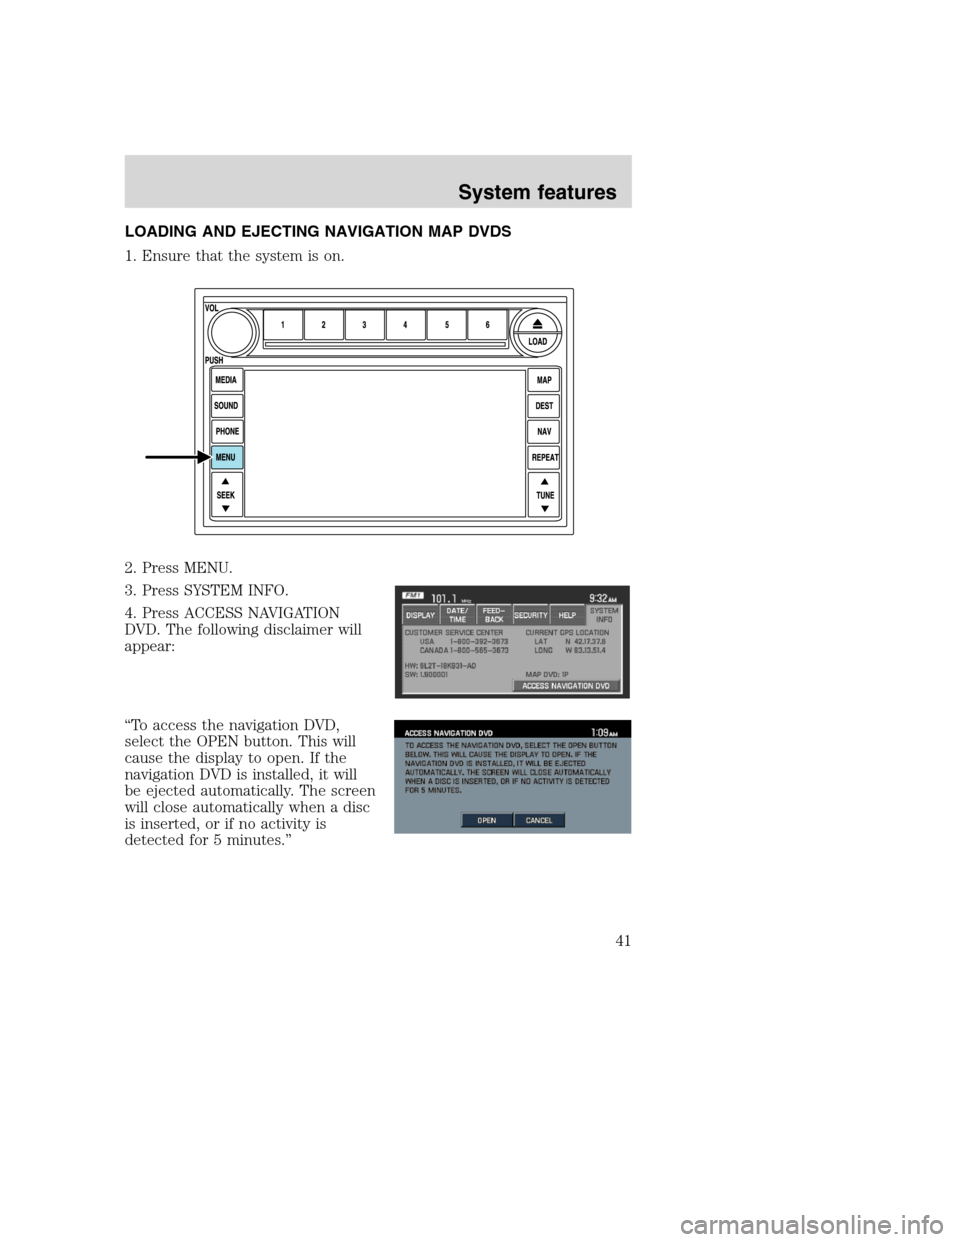
LOADING AND EJECTING NAVIGATION MAP DVDS
1. Ensure that the system is on.
2. Press MENU.
3. Press SYSTEM INFO.
4. Press ACCESS NAVIGATION
DVD. The following disclaimer will
appear:
“To access the navigation DVD,
select the OPEN button. This will
cause the display to open. If the
navigation DVD is installed, it will
be ejected automatically. The screen
will close automatically when a disc
is inserted, or if no activity is
detected for 5 minutes.”
2008(nv1)
Supplement
USA(fus)
System features
41