Mercury Villager 1999 Owner's Manuals
Manufacturer: MERCURY, Model Year: 1999, Model line: Villager, Model: Mercury Villager 1999Pages: 264, PDF Size: 2.19 MB
Page 141 of 264

Installing child safety seats in the lap belt seating positions
1. Lengthen the lap belt. To lengthen the belt, hold the tongue so that its
bottom is perpendicular to the direction of webbing while sliding the
tongue up the webbing.
2. Place the child safety seat in the center seating position.
3. Route the tongue and webbing through the child seat according to the
child seat manufacturer's instructions.
4. Insert the belt tongue into the proper buckle for the center seating
position until you hear a snap and feel it latch. Make sure the tongue is
securely fastened to the buckle by pulling on tongue.
5. Push down on the child seat while pulling on the loose end of the lap
belt webbing to tighten the belt.
6. Before placing the child into the child seat, forcibly tilt the child seat
from side to side and in forward direction to make sure that the seat is
held securely in place. If the child seat moves excessively, repeat steps 5
through 6, or properly install the child seat in a different position.
Attaching safety seats with tether straps
Some manufacturers make safety seats that include a tether strap that
goes over the back of the vehicle seat and attaches to an anchoring
point. Other manufacturers offer the tether strap as an accessory.
Contact the manufacturer of your child safety seat for information about
ordering a tether strap.
Children should be placed in the rear in an appropriate child
safety seat that is properly secured to the vehicle.
Rear-facing infant seats must always be secured in the rear seat.
In vehicles without a rear seat, a rear-facing infant seat should
be secured in the front seat only if your vehicle does not have a
passenger side air bag or your vehicle is equipped with a passenger air
bag deactivate switch and the switch is turned to ªOFF.º
When using forward-facing child safety seats in vehicles with
only two seating positions so the forward-facing child safety seat
cannot be placed in the rear of the vehicle, move the passenger seat as
far back from the instrument panel as possible.
Seating and safety restraints
141
Page 142 of 264
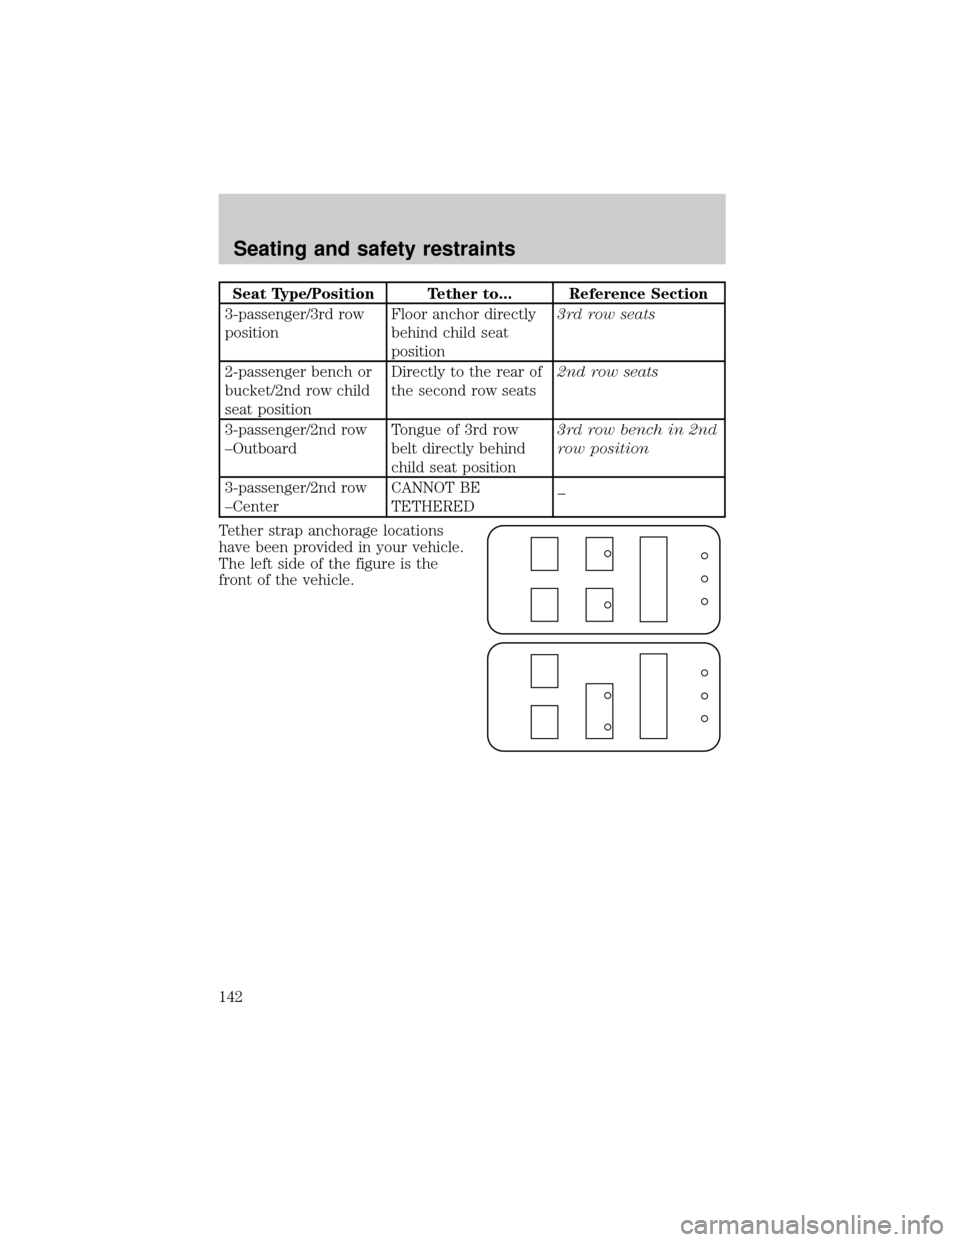
Seat Type/Position Tether to... Reference Section
3-passenger/3rd row
positionFloor anchor directly
behind child seat
position3rd row seats
2-passenger bench or
bucket/2nd row child
seat positionDirectly to the rear of
the second row seats2nd row seats
3-passenger/2nd row
±OutboardTongue of 3rd row
belt directly behind
child seat position3rd row bench in 2nd
row position
3-passenger/2nd row
±CenterCANNOT BE
TETHERED_
Tether strap anchorage locations
have been provided in your vehicle.
The left side of the figure is the
front of the vehicle.
Seating and safety restraints
142
Page 143 of 264
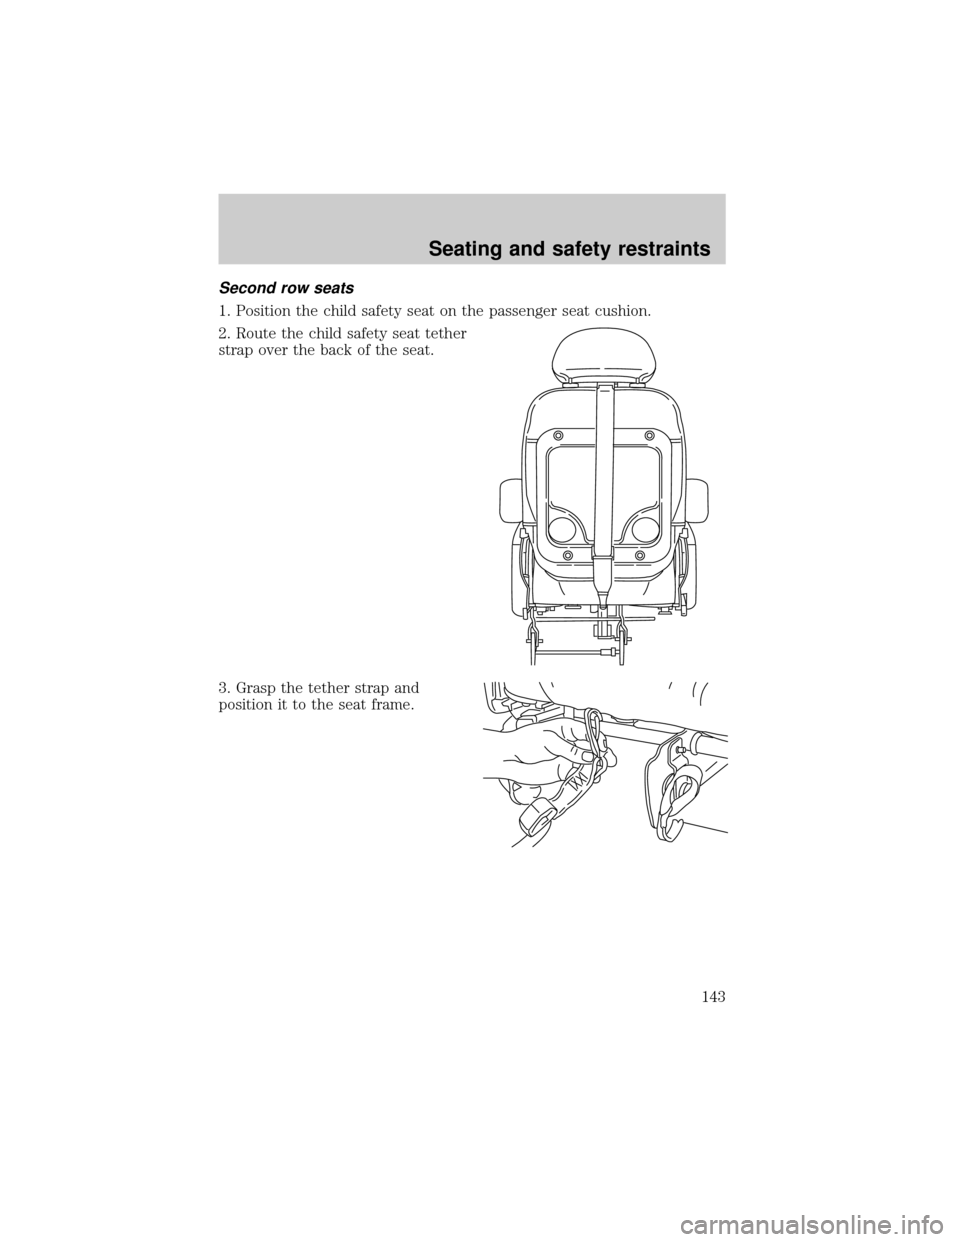
Second row seats
1. Position the child safety seat on the passenger seat cushion.
2. Route the child safety seat tether
strap over the back of the seat.
3. Grasp the tether strap and
position it to the seat frame.
Seating and safety restraints
143
Page 144 of 264
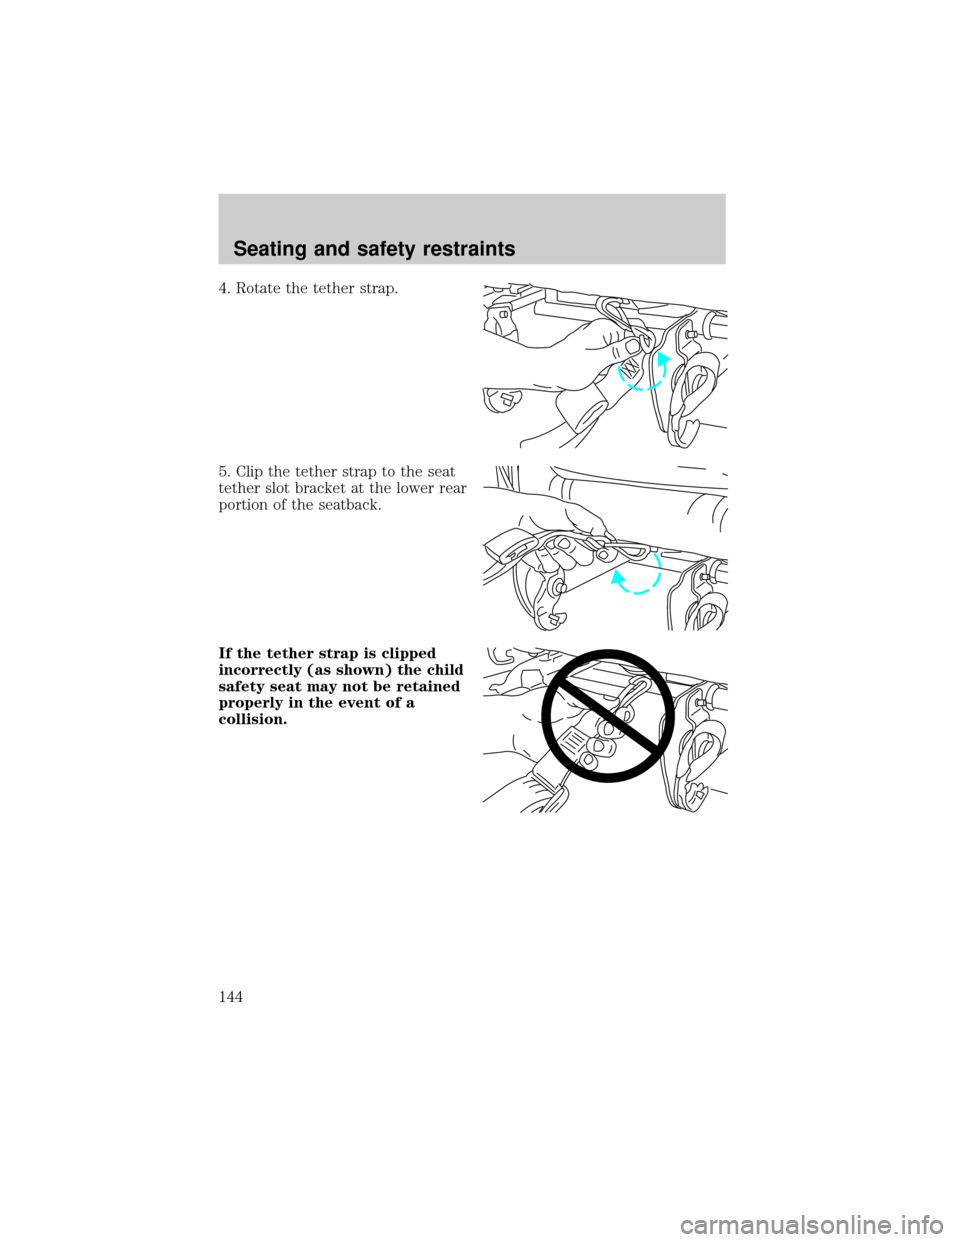
4. Rotate the tether strap.
5. Clip the tether strap to the seat
tether slot bracket at the lower rear
portion of the seatback.
If the tether strap is clipped
incorrectly (as shown) the child
safety seat may not be retained
properly in the event of a
collision.
Seating and safety restraints
144
Page 145 of 264
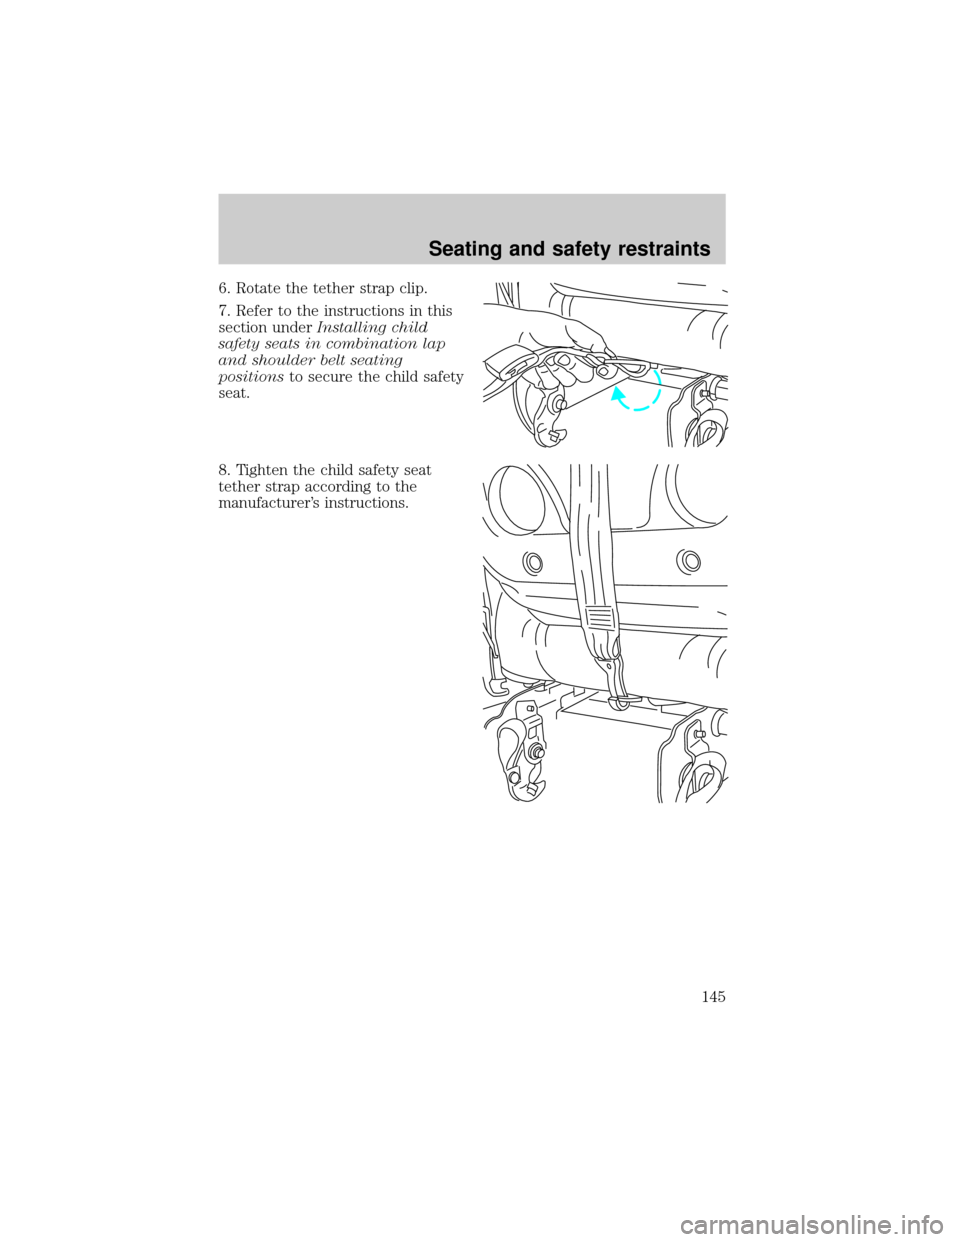
6. Rotate the tether strap clip.
7. Refer to the instructions in this
section underInstalling child
safety seats in combination lap
and shoulder belt seating
positionsto secure the child safety
seat.
8. Tighten the child safety seat
tether strap according to the
manufacturer's instructions.
Seating and safety restraints
145
Page 146 of 264
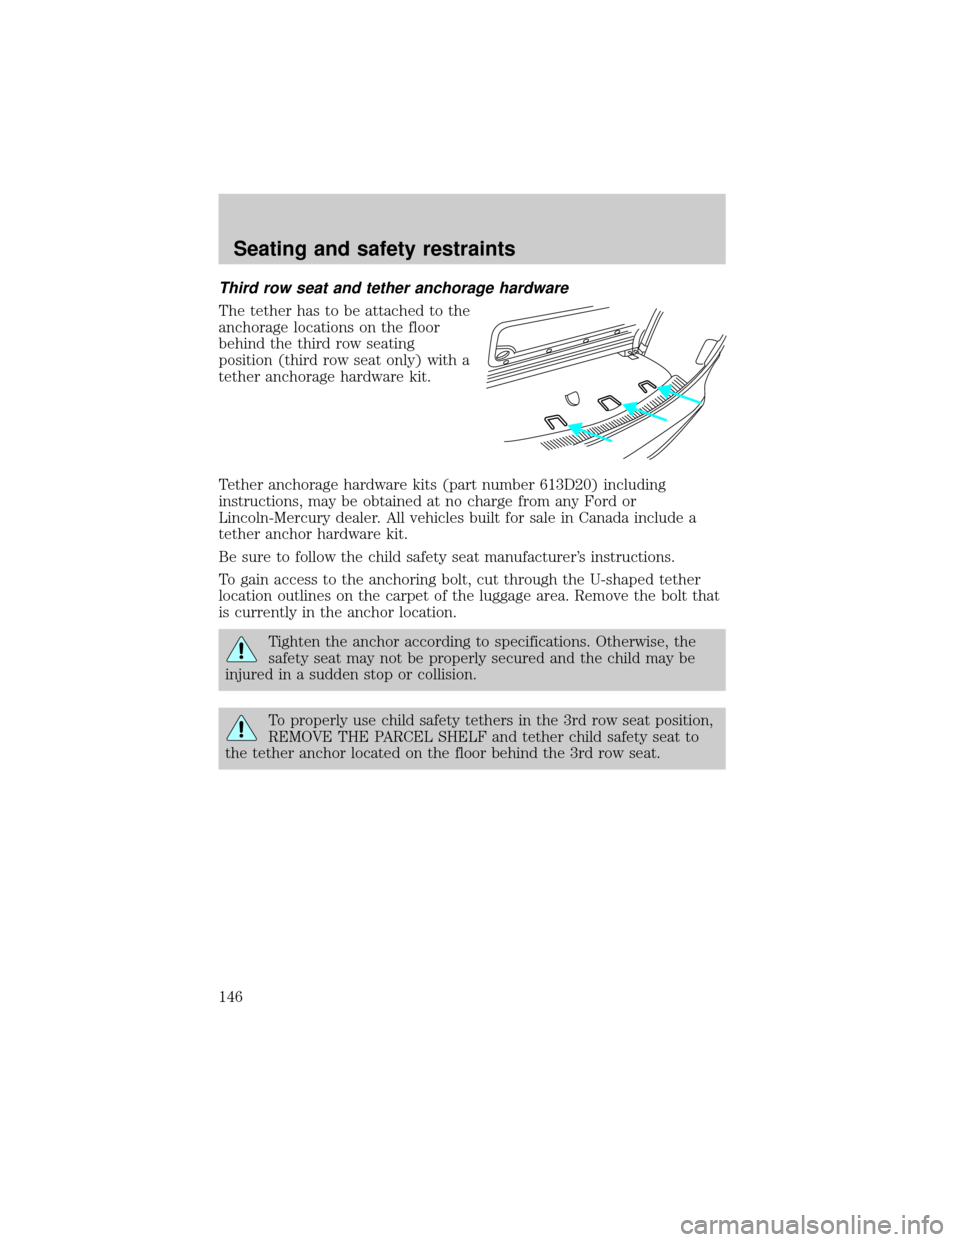
Third row seat and tether anchorage hardware
The tether has to be attached to the
anchorage locations on the floor
behind the third row seating
position (third row seat only) with a
tether anchorage hardware kit.
Tether anchorage hardware kits (part number 613D20) including
instructions, may be obtained at no charge from any Ford or
Lincoln-Mercury dealer. All vehicles built for sale in Canada include a
tether anchor hardware kit.
Be sure to follow the child safety seat manufacturer's instructions.
To gain access to the anchoring bolt, cut through the U-shaped tether
location outlines on the carpet of the luggage area. Remove the bolt that
is currently in the anchor location.
Tighten the anchor according to specifications. Otherwise, the
safety seat may not be properly secured and the child may be
injured in a sudden stop or collision.
To properly use child safety tethers in the 3rd row seat position,
REMOVE THE PARCEL SHELF and tether child safety seat to
the tether anchor located on the floor behind the 3rd row seat.
Seating and safety restraints
146
Page 147 of 264

Third row bench in second row position
To attach a tether strap to a lap/shoulder belt:
1. Route the tether strap under the
head restraint and between the
head restraint supports.
2. Hook the tether strap hook into
the large hole at the end of the seat
belt tongue of the lap/shoulder belt
directly behind the child seat
position.
3. Adjust the tether strap length until the hook is about one foot behind
the seatback.
4. Pull the shoulder belt until all of the belt is fully extended and a click
is heard. At this time the belt is in automatic locking mode (child
restraint mode).
5. Let the retractor wind up the slack from the lap/shoulder belt. A
clicking sound should be heard as the belt retracts, indicating that the
retractor is in automatic locking mode. Tighten the tether strap to
remove any slack.
6. Before placing a child in the child restraint, use force to tilt the child
restraint from side to side and tug it forward to make sure it is securely
held in place.
7. Check that the retractor is in automatic locking mode by trying to pull
more belt out of the retractor. If you cannot pull any more belt webbing
out of the retractor, the belt is in automatic locking mode.
8. Check to make sure the child restraint is properly secured prior to
each use. If the belt is not locked, repeat steps 4 through 7.
For additional important safety information on the proper use of
seatbelts, child seats and infant seats, please read the entireSeating
and safety restraintschapter in this owner's guide.
Seating and safety restraints
147
Page 148 of 264
BUILT-IN CHILD SEATS
Built-in child safety seat (if equipped)
The 2nd row seat may include a built-in child seat. This child seat
conforms to all Federal and local motor vehicle safety standards. Read
the labels located on the child seat cushion for information on the
built-in child seat.
Use the built-in child seatonlyif the child is at least 1 year old, weighs
10±27 kg (22±60 lb) and the child's shoulders (top) are below the
shoulder harness slots in the built-in child seat.
Children not meeting these requirements should be secured in an
approved aftermarket seat. Refer toChild and infant or child safety
seatsin this chapter.
Built-in child seat retractors
The belts on built-in child seats are equipped with a retractor that locks
when both tongues are latched into the crotch safety belt buckle. The
retractor will automatically snug the belts around the child. If the belts
do not remain snug, take the vehicle to the dealer for child seat repair.
The belts will not snug during a collision.
Placing your child in the built-in child seat
Failure to follow all of the instructions on the use of this child
restraint system can result in your child striking the vehicle's
interior during a sudden stop or crash.
Never use the Built-In Child Seat as a booster cushion with the
adult safety belts. A child using the adult belts could slide
forward and out from under the safety belts.
The rear seatback must be fully locked before operating the
child restraint system.
Seating and safety restraints
148
Page 149 of 264
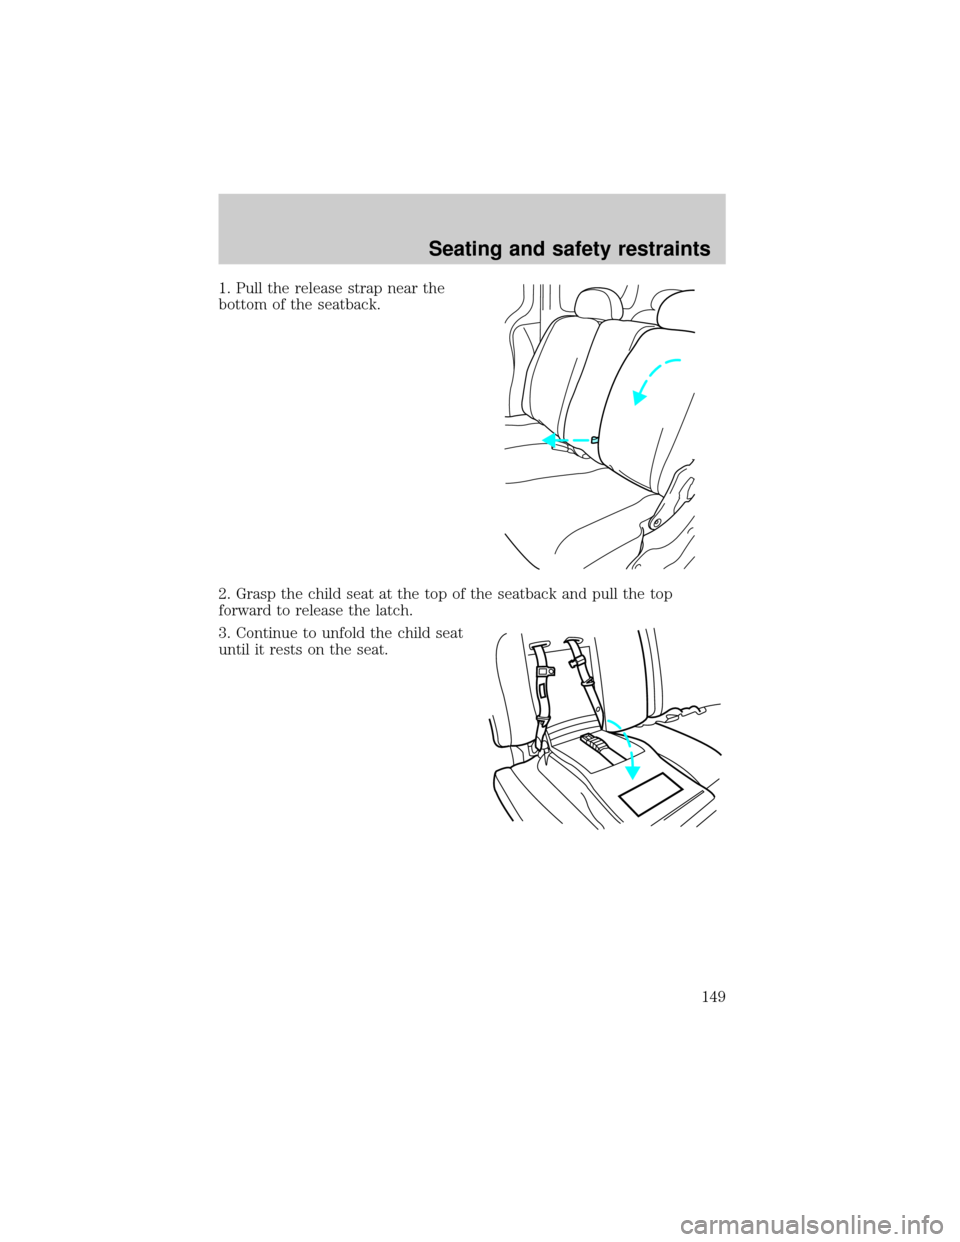
1. Pull the release strap near the
bottom of the seatback.
2. Grasp the child seat at the top of the seatback and pull the top
forward to release the latch.
3. Continue to unfold the child seat
until it rests on the seat.
Seating and safety restraints
149
Page 150 of 264

4. Read all information and warnings
on the child seat cushion and
shoulder safety belt. The child seat
is to be used only by children who:
²are at least one year old
²weigh between 10 and 27 kg (22
and 60 lbs.)
²shoulders must be below the
shoulder harness slots
5. If connected, squeeze the top and the bottom of the right half of the
chest clip and pull to separate both halves and unbuckle the two safety
belt tongues from the crotch belt buckle.
6. Place the child on the child seat and position the shoulder belts over
each shoulder.
7. Insert either the left or the right
safety belt tongue into the single
opening of the crotch safety belt
buckle (it doesn't matter which
tongue is inserted first). Insert other
tongue. The color green must
appear in the indicator window on
the crotch safety belt buckle when
buckled. Allow belts to retract and
fit snugly.
8. Fasten both halves of the chest
clip below the child's shoulders and
adjust it to comfortably hold the
shoulder belts in place on the child's
chest. The color green must appear
in the indicator window when fastened.
9. Pull the shoulder belts toward you to make sure the crotch safety belt
buckle is properly fastened and the retractor is locked.
Seating and safety restraints
150