MINI Hardtop 2 Door 2007 Manual PDF
Manufacturer: MINI, Model Year: 2007, Model line: Hardtop 2 Door, Model: MINI Hardtop 2 Door 2007Pages: 148, PDF Size: 2.43 MB
Page 71 of 148

ReferenceAt a glance Controls Driving tips Mobility
69
Practical interior accessories
Integrated universal
remote control*
The concept
The integrated universal remote control can
replace as many as three hand-held transmitters
for various remote-controlled devices, such as
door openers and house alarm systems. The
integrated universal remote control registers
and stores signals from the original hand-held
transmitters.
The signal of an original hand-held transmitter
can be programmed on one of the three mem-
ory buttons1. The system in question can then
be operated by means of the programmed
memory button1. The LED2 flashes to confirm
transmission of the signal.
If you decide to sell your vehicle one day, in the
interest of your own security, remember to clear
the stored programs before the vehicle leaves
your possession, page70.
To prevent possible damage or injury,
before programming or using the inte-
grated universal remote control, always inspect
the immediate area to make certain that no
people, animals or objects are within the pivot-
ing or travel range of the device being operated.
Comply also with the safety instructions supplied
with the original hand-held transmitter.<
Checking compatibility
If this symbol appears on the package
or in the instructions supplied with the
original hand-held transmitter, you can
assume that the radio remote control device will
be compatible with the integrated universal
remote control.
For additional information, please contact your
MINI Dealer or call: 1-800-355-3515.
You can also obtain information on the Internet
at:
www.MINI.com or
www.homelink.com.HomeLink is a registered trademark of Johnson
Controls, Inc.<
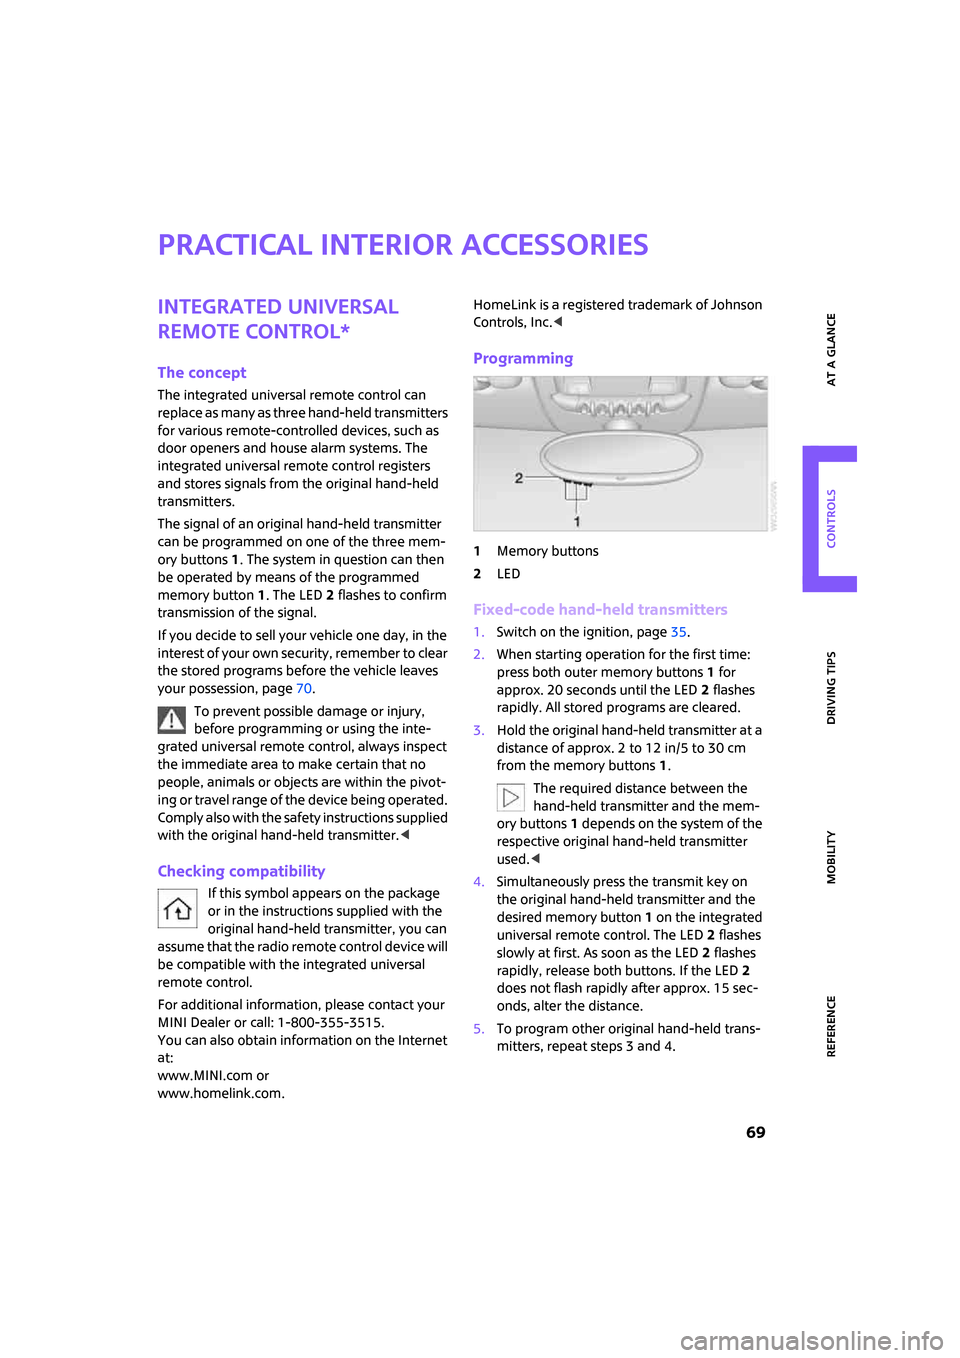
Programming
1Memory buttons
2LED
Fixed-code hand-held transmitters
1.Switch on the ignition, page35.
2.When starting operation for the first time:
press both outer memory buttons1 for
approx. 20 seconds until the LED2 flashes
rapidly. All stored programs are cleared.
3.Hold the original hand-held transmitter at a
distance of approx. 2 to 12 in/5 to 30 cm
from the memory buttons1.
The required distance between the
hand-held transmitter and the mem-
ory buttons1 depends on the system of the
respective original hand-held transmitter
used.<
4.Simultaneously press the transmit key on
the original hand-held transmitter and the
desired memory button 1 on the integrated
universal remote control. The LED 2 flashes
slowly at first. As soon as the LED2 flashes
rapidly, release both buttons. If the LED2
does not flash rapidly after approx. 15 sec-
onds, alter the distance.
5.To program other original hand-held trans-
mitters, repeat steps 3 and 4.
Page 72 of 148

Practical interior accessories
70
The corresponding memory button 1 is now
programmed with the signal of the original
hand-held transmitter.
You can operate the system with the engine
running or with the ignition switched on.
If the system fails to function even after
repeated programming, check whether
the original hand-held transmitter uses an alter-
nating-code system. To do so, either read the
instructions for the original hand-held transmit-
ter or hold down the programmed memory
button1 of the integrated universal remote con-
trol. If the LED2 on the integrated universal
remote control flashes rapidly for a short while
and then remains lit for about two seconds, the
original hand-held transmitter uses an alternat-
ing-code system. If it uses an alternating-code
system, program the memory buttons1 as
described under Alternating-code hand-held
transmitters.<
Alternating-code hand-held
transmitters
To program the integrated universal remote
control, consult the operating instructions for
the device to be set. You will find information
there on the possibilities for synchronization.
When programming hand-held transmitters that
employ an alternating code, please observe the
following supplementary instructions:
Programming will be easier with the aid of
a second person.<
1.Park your vehicle within the range of the
remote-controlled device.
2.Program the integrated universal remote
control as described above in the section
Fixed-code hand-held transmitters.
3.Locate the button on the receiver of the
device to be set, e.g. on the drive unit.
4.Press the button on the receiver of the
device to be set. After step 4, you have
approx. 30 seconds for the next step 5.
5.Press the programmed memory button1 of
the integrated universal remote control
three times.The corresponding memory button 1 is now
programmed with the signal of the original
hand-held transmitter.
Clearing stored programs
Press both outer memory buttons1 for approx.
20 seconds until the LED2 flashes: all stored
programs are cleared.
It is not possible to clear individual programs.
Glove compartment
Opening
Press the button to open the cover.
The light in the glove compartment comes on.
Closing
Fold cover up.
To prevent injury in the event of an acci-
dent, close the glove compartment after
use while the vehicle is being driven.<
Ventilation*
Depending on your vehicle's equipment, it may
be possible to ventilate the glove compartment.
Page 73 of 148

ReferenceAt a glance Controls Driving tips Mobility
71
Opening
Turn the switch to the horizontal position, see
arrow.
Closing
Turn the switch to the vertical position.
Depending on the temperature setting of the air
conditioning or the automatic climate control,
high temperatures may result in the glove com-
partment.
Center armrest*
Storage compartment
The center armrest between the front seats con-
tains either a compartment or the cover for the
mobile phone base plate
* or the snap-in
adapter
*.
Opening
The cover slides along guide rails and can be
opened fully by pushing it back and lifting it.
Closing
Push the cover forwards.
Connection for external
audio device
You can connect an external audio device such
as a CD or MP3 player and play audio recordings
over the vehicle loudspeakers. The volume and
tone settings can be adjusted via the car radio,
refer to the Owner's Manual for Radio.
>Connection for audio playback:
3.5 mm jack
>Power supply for the additional device via
the cigarette lighter socket or the socket in
the center console, page72
Storage compartments
inside the vehicle
Depending on your vehicle's equipment, you
will find storage compartments in the doors,
next to the rear seats and in the center console
*.
Nets
* are located in the passenger footwell and
on the backs of the front seat backrests.
Page 74 of 148

Practical interior accessories
72
Storage compartment on the front
passenger side*
Opening
Briefly press the bottom edge of the cover.
Closing
Push the cover back into its original position.
To prevent injury in the event of an acci-
dent, close the storage compartment after
use while the vehicle is being driven.<
Clothes hooks
There are clothes hooks on the grab handles in
the rear passenger compartment.
Items of clothing hung from the hooks
must not obstruct the driver's view. Do not
hang heavy objects from the hooks, otherwise
they could endanger the car's occupants, e.g. in
case of heavy braking or sudden swerving.<
Cup holders and ash-
tray*
Cup holders
Two cup holders are located in the front of the
center console, another is in the rear at the back
of the center console.
Do not place glass containers in the cup
holders, as this increases the risk of injury
in the event of an accident.<
Ashtray*
The ashtray is located in one of the cup holders
in the center console.
Emptying
Remove the entire ashtray.
Lighter
With the engine running or the ignition switched
on, press in the cigarette lighter.
The lighter can be pulled out as soon as it pops
back out.
Hold or touch the hot cigarette lighter by
the knob only. Holding or touching it in
other areas could result in burns.
When leaving the car, always remove the key so
that children cannot operate the cigarette
lighter and burn themselves.<
Connecting electrical
appliances
In your MINI, you can use electrical devices such
as a flashlight, car vacuum cleaner, etc., up to
approx. 200 watts at 12 volts, as long as one of
the following sockets is available. Avoid damag-
ing the sockets by attempting to insert plugs of
unsuitable shape or size.
Cigarette lighter socket
Remove the lighter* or cover from the socket.
Socket in the cargo area
Pull out the cover.
Page 75 of 148

ReferenceAt a glance Controls Driving tips Mobility
73
Page 76 of 148

Page 77 of 148

At a glance
Controls
Driving tips
Mobility
Reference Driving tips
Page 78 of 148

Things to remember when driving
76
Things to remember when driving
Break-in period
Moving parts need breaking-in time to adjust to
each other. Please follow the instructions below
in order to achieve the optimal service life and
economy of operation for your vehicle.
Engine and differential
Always obey all official speed limits.
Up to 1,200 miles/2,000 km
Drive at varying engine and road speeds, but do
not exceed the following:
>4,500/min or 100 mph/160 km/h
Avoid full-throttle operation and use of the
transmission's kick-down mode.
After driving 1,200 miles/2,000 km
Engine and vehicle speeds can be gradually
increased.
Tires
Due to technical factors associated with their
manufacture, tires do not achieve their full trac-
tion potential until after an initial break-in
period. Therefore, drive cautiously during the
first 200 miles/300 km.
Brake system
Brakes require an initial break-in period of
approx. 300 miles/500 km to achieve optimized
contact and wear patterns between brake pads
and rotors. Drive cautiously during this break-in
period.
Clutch
The function of the clutch reaches its optimal
level only after a distance driven of approx.
300 miles/500 km. During this break-in period,
engage the clutch gently.
Following part replacement
The same break-in procedures should be
observed if any of the components mentioned
above have to be renewed in the course of the
vehicle's operating life.
General driving notes
Close the tailgate
Drive the vehicle only when the tailgate is
closed. Otherwise, exhaust fumes could
penetrate the interior of the vehicle.<
If special circumstances make it absolutely nec-
essary to drive with the tailgate open:
1.Close all windows and the glass sunroof.
2.Increase the air flow rate of the air condi-
tioner or automatic climate control consid-
erably, page65 or66.
Hot exhaust system
In all vehicles, extremely high tempera-
tures are generated in the exhaust sys-
tem. Do not remove the heat shields installed
adjacent to various sections of the exhaust sys-
tem, and never apply undercoating to them.
When driving, standing at idle and while park-
ing, take care to avoid possible contact between
the hot exhaust system and any highly flamma-
ble materials such as hay, leaves, grass, etc. Such
contact could lead to a fire, with the risk of seri-
ous personal injuries and property damage. Do
not touch hot exhaust tail pipes. Otherwise
there is a risk of burns.<
Mobile phones in the vehicle
The manufacturer of your MINI recom-
mends that you do not use mobile
devices, e.g. mobile phones, inside the vehicle
without directly connecting them to an outside
antenna. Otherwise, the vehicle electronics and
mobile communications device can influence
one another. In addition, there is no assurance
Page 79 of 148

ReferenceAt a glance Controls Driving tips Mobility
77
that the radiation which results from transmis-
sion will be dissipated from the vehicle inte-
rior.<
Hydroplaning
When driving on wet or slushy roads,
reduce road speed. If you do not, a wedge
of water can form between tires and road sur-
face. This situation, known as hydroplaning, can
cause partial or complete loss of tire contact
with the road surface, so that the car cannot be
steered or braked properly.<
The risk of hydroplaning increases with declining
tread depth on the tires, refer also to Tread
depth on page91.
Driving through water
Drive through water on the road only if it is
not deeper than 1 ft/30 cm, and then only
at walking speed at the most. Otherwise, the
vehicle's engine, the electrical systems and the
transmission may be damaged.<
Parking brake on inclines
On inclines, do not hold the vehicle with
the clutch; use the parking brake. Other-
wise greater clutch wear will result.<
For information on driving off using Hill Start
Assist
*, refer to page55.
Braking safely
Your MINI is equipped with ABS. If you are in a
situation which requires full braking, it is best to
brake using maximum brake pressure. Since the
vehicle maintains steering responsiveness, you
can still avoid possible obstacles with a mini-
mum of steering effort.
The pulsation of the brake pedal, together with
the sound of hydraulic regulation, indicates that
ABS is actively taking effect.
Driving in wet conditions
When roads are wet or there is heavy rain, briefly
exert gentle pressure on the brake pedal every
few miles. Monitor traffic conditions to ensure
that this maneuver does not endanger other
road users. The heat generated in this process helps dry the pads and rotors to ensure that
Then full braking force will be immediately avail-
able when it is needed.
Hills
To prevent overheating and the resulting
reduced efficiency of the brake system,
drive long or steep downhill gradients in the
gear in which the least braking is required. Even
light but consistent brake pressure can lead to
high temperatures, brake wear and possibly
even brake failure.<
You can increase the engine's braking effect by
shifting down, all the way to first gear if neces-
sary. This strategy helps you avoid placing
excessive loads on the brake system. Downshift-
ing in manual mode of the automatic transmis-
sion, page38.
Never drive with the clutch held down,
with the transmission in idle or with the
engine switched off; otherwise, engine braking
action will not be present or there will be no
power assistance to the brakes or steering.
Never allow floor mats, carpets or any other
objects to protrude into the area around the
pedals, otherwise pedal function could be
impaired.<
Corrosion on brake rotors
When the vehicle is driven only occasionally,
during extended periods when the vehicle is not
used at all, and in operating conditions where
brake applications are less frequent, there is an
increased tendency for corrosion to form on
rotors, while contaminants accumulate on the
brake pads. This occurs because the minimum
pressure which must be exerted by the pads
during brake applications to clean the rotors is
not reached.
Should corrosion form on the brake rotors, the
brakes will tend to respond with a pulsating
effect that even extended application will fail to
cure.
When the vehicle is parked
Condensation forms while the automatic climate
control is in operation, and then exits under the
Page 80 of 148

Things to remember when driving
78
vehicle. Traces of condensed water under the
vehicle are therefore normal.
In the Cooper S, the coolant pump may continue
to run for some time after the engine is switched
off. This will generate noise in the engine com-
partment.
Before driving into a car wash
For general information about vehicle care for
your MINI, refer to the chapter beginning on
page100.
With convenient access and automatic
transmission
Insert the key into the ignition lock.
The engine can be switched off when the selec-
tor lever is in position N. Refer also to page25.
Cargo loading
To avoid loading the tires beyond their
approved carrying capacity, never over-
load the vehicle. Overloading can lead to over-
heating and increases the rate at which damage
develops inside the tires. The ultimate result can
assume the form of a sudden blow-out.<
Cargo area cover
When the tailgate is opened, the cargo area
cover is raised.
Do not place any objects on the cover,
otherwise they could endanger the car's
occupants, e.g. in the case of braking or sudden
swerving.<
Removing
To load bulky luggage, the cargo area cover can
be removed.1.Unhook the lift straps from the tailgate.
2.Pull the cover out of the holders toward the
rear.
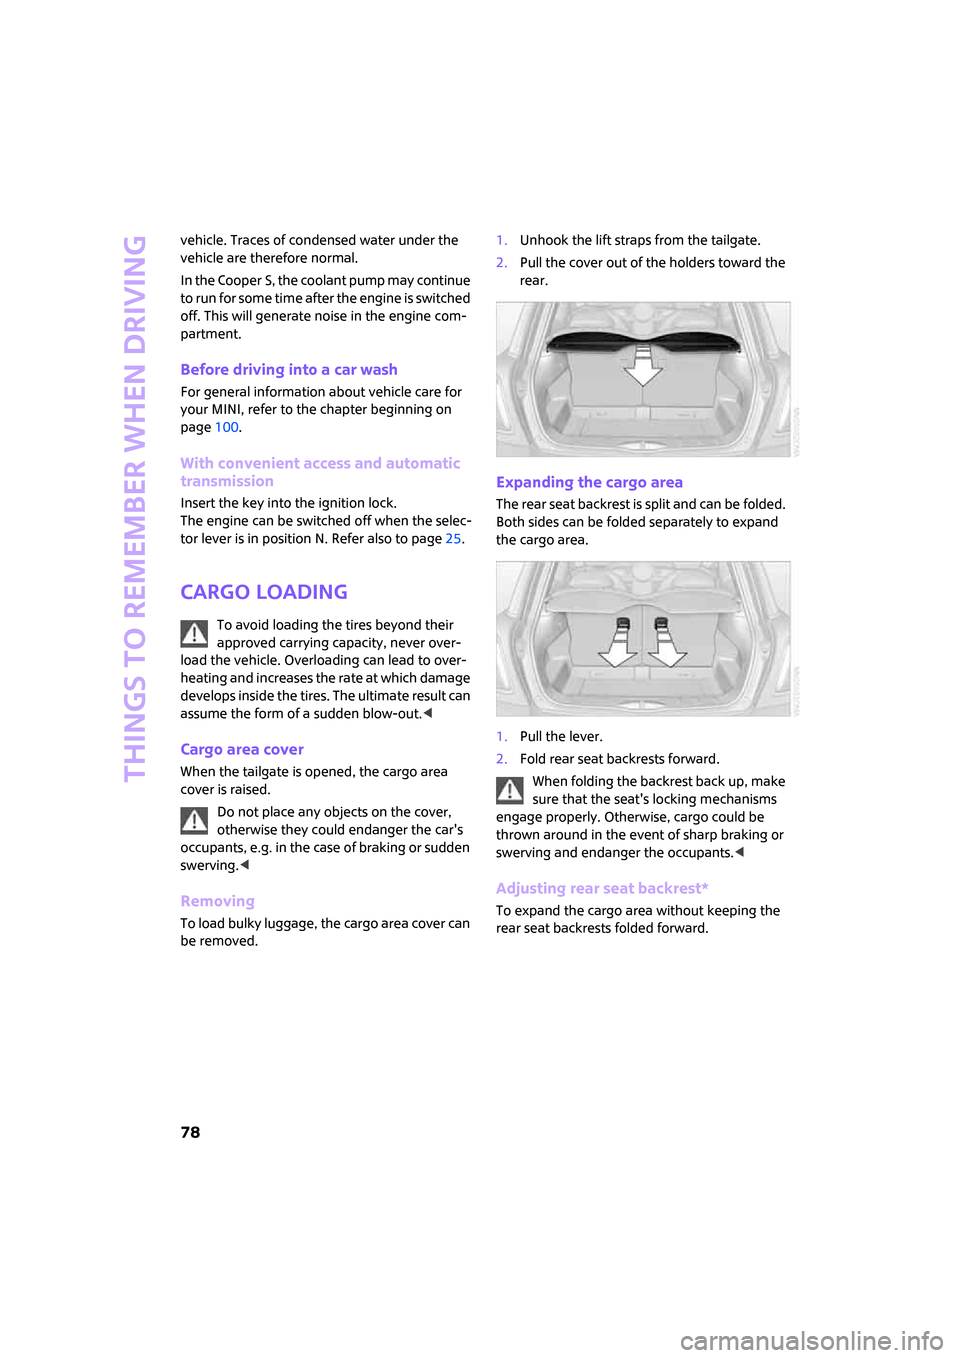
Expanding the cargo area
The rear seat backrest is split and can be folded.
Both sides can be folded separately to expand
the cargo area.
1.Pull the lever.
2.Fold rear seat backrests forward.
When folding the backrest back up, make
sure that the seat's locking mechanisms
engage properly. Otherwise, cargo could be
thrown around in the event of sharp braking or
swerving and endanger the occupants.<
Adjusting rear seat backrest*
To expand the cargo area without keeping the
rear seat backrests folded forward.