radio MINI Hardtop 2 Door 2015 Owner's Manual
[x] Cancel search | Manufacturer: MINI, Model Year: 2015, Model line: Hardtop 2 Door, Model: MINI Hardtop 2 Door 2015Pages: 251, PDF Size: 11.4 MB
Page 9 of 251
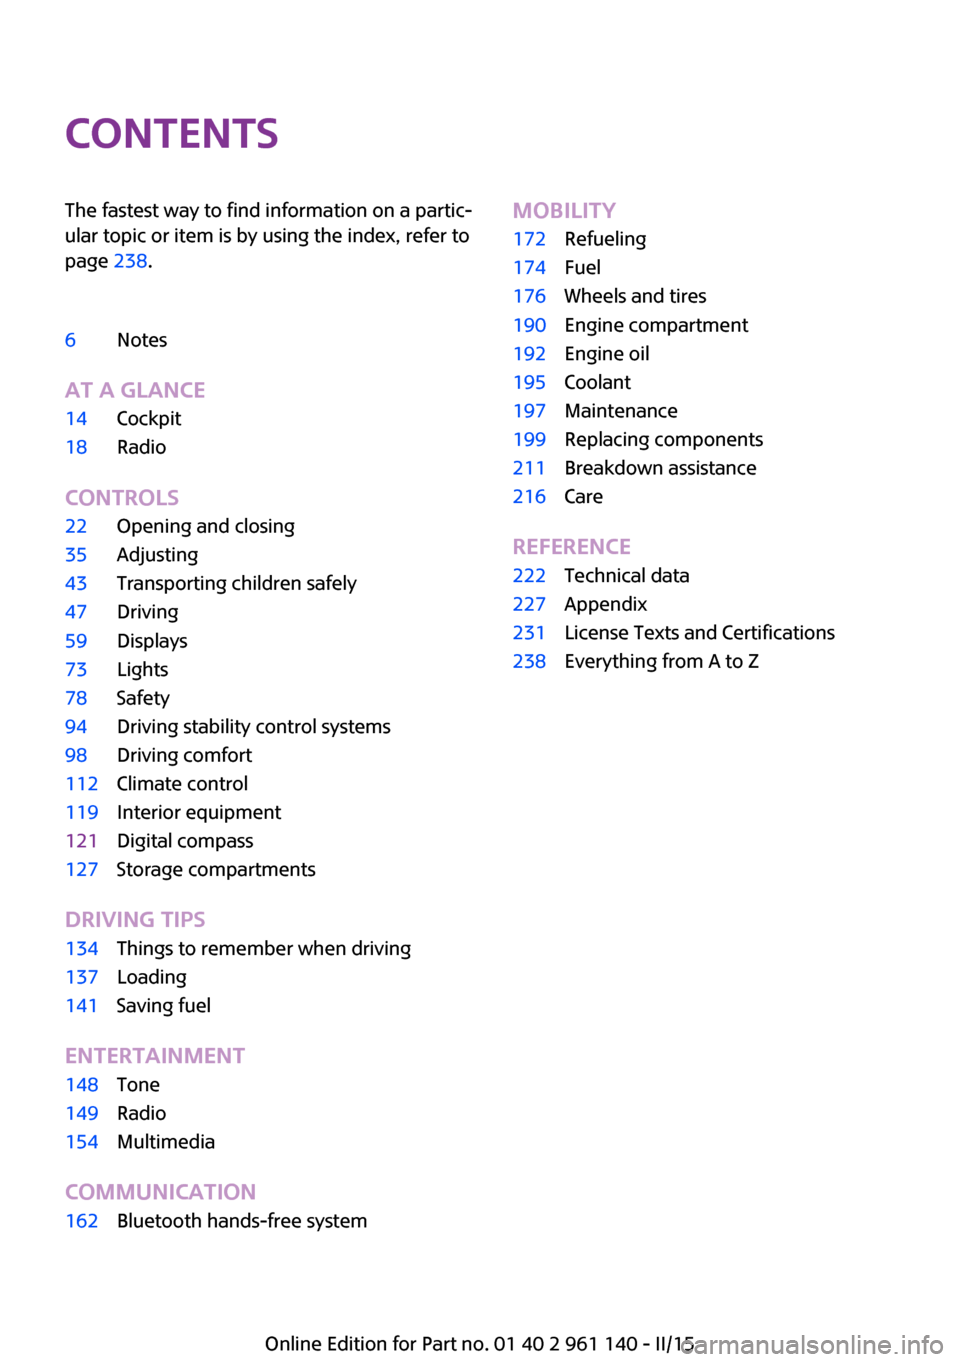
ContentsThe fastest way to find information on a partic‐
ular topic or item is by using the index, refer to
page 238.6Notes
AT A GLANCE
14Cockpit18Radio
CONTROLS
22Opening and closing35Adjusting43Transporting children safely47Driving59Displays73Lights78Safety94Driving stability control systems98Driving comfort112Climate control119Interior equipment121Digital compass127Storage compartments
DRIVING TIPS
134Things to remember when driving137Loading141Saving fuel
ENTERTAINMENT
148Tone149Radio154Multimedia
COMMUNICATION
162Bluetooth hands-free systemMOBILITY172Refueling174Fuel176Wheels and tires190Engine compartment192Engine oil195Coolant197Maintenance199Replacing components211Breakdown assistance216Care
REFERENCE
222Technical data227Appendix231License Texts and Certifications238Everything from A to Z
Online Edition for Part no. 01 40 2 961 140 - II/15
Page 10 of 251

NotesUsing this Owner's
Manual
The fastest way to find information on a partic‐
ular topic is by using the index.
An initial overview of the vehicle is provided in
the first chapter.
Updates made after the editorialdeadline
Any updates made after the editorial deadline
can be found in the appendix of the printed
Owner's Handbook for Vehicle.
Additional sources of information
Should you have any questions, your service
center will be glad to advise you at any time.
Information about MINI, e.g., on technology, is
available on the Internet: www.miniusa.com
Symbols
Indicates precautions that must be followed
precisely in order to avoid the possibility of
personal injury and serious damage to the
vehicle.
◄ Marks the end of a specific item of
information.
"..." Identifies radio display texts used to select
individual functions.
Refers to measures that can be taken to
help protect the environment.
Symbols on vehicle components
Indicates that you should consult the
relevant section of this Owner's Manual for
information on a particular part or assembly.
Vehicle features and op‐
tions
This Owner's Manual describes all models and
all standard, country-specific and optional
equipment that is offered in the model series.
Therefore, in this Owner's Manual, we also de‐
scribe and illustrate features that are not avail‐
able in your vehicle, e.g., because of the se‐
lected optional features or the country-specific
version.
This also applies to safety-related functions and
systems.
The respectively applicable country provisions
must be observed when using the respective
features and systems.
For any options and equipment not described
in this Owner's Handbook, refer to the Supple‐
mentary Owner's Handbooks.
On right-hand drive vehicles, some controls are
arranged differently from what is shown in the
illustrations.
Status of the Owner's
Manual
Basic information
The manufacturer of your vehicle pursues a
policy of constant development that is con‐
ceived to ensure that our vehicles continue to
embody the highest quality and safety stan‐
dards. In rare cases, therefore, the features de‐
scribed in this Owner's Manual may differ from
those in your vehicle.Seite 6Notes6
Online Edition for Part no. 01 40 2 961 140 - II/15
Page 11 of 251

Updates made after the editorial
deadline
Any updates made after the editorial deadline
can be found in the appendix of the printed
Owner's Handbook for Vehicle.
Own safety
Manufacturer
The manufacturer of this MINI is Bayerische
Motoren Werke Aktionengesellschaft, BMW AG.
Warranty Your vehicle is technically configured for the
operating conditions and registration require‐
ments applying in the country of first delivery -
homologation. If your vehicle is to be operated
in a different country it might be necessary to
adapt your vehicle to potentially differing oper‐
ating conditions and permit requirements. If
your vehicle does not comply with the homolo‐
gation requirements in a certain country you
cannot lodge warranty claims for your vehicle
there. Further information can be obtained
from your Service Centre.
Maintenance and repairs
Advanced technology, e.g., the use of modern
materials and high-performance electronics,
requires suitable maintenance and repair work.
Therefore, have this work performed only by a
MINI service center or a workshop that works
according to the manufacturer's repair proce‐
dures for the MINI with respectively trained
personnel.
If work is not carried out properly, there is a
danger of subsequent damage and related
safety hazards.
Parts and Accessories For your own safety, it is recommended that
you use genuine parts and accessories ap‐
proved by MINI. When you purchase accesso‐ries tested and approved by MINI and Genuine
MINI Parts, you simultaneously acquire the as‐
surance that they have been thoroughly tested
by MINI to ensure optimum performance when
installed on your vehicle. MINI warrants these
parts to be free from defects in material and
workmanship. MINI will not accept any liability
for damage resulting from installation of parts
and accessories not approved by MINI. MINI
cannot test every product made by other man‐
ufacturers to verify if it can be used on a MINI
safely and without risk to either the vehicle, its
operation, or its occupants. Genuine MINI Parts,
MINI Accessories and other products approved
by MINI, together with professional advice on
using these items, are available from all MINI
centers. Installation and operation of non-MINI
approved accessories such as alarms, radios,
amplifiers, radar detectors, wheels, suspension
components, brake dust shields, telephones,
including operation of any mobile phone from
within the vehicle without using an externally
mounted antenna, or transceiver equipment,
for instance, CBs, walkie-talkies, ham radios or
similar accessories, may cause extensive dam‐
age to the vehicle, compromise its safety, inter‐
fere with the vehicle's electrical system or af‐
fect the validity of the MINI Limited Warranty.
See your MINI center for additional informa‐
tion. Maintenance, replacement, or repair of
the emission control devices and systems may
be performed by any automotive repair estab‐
lishment or individual using any certified auto‐
motive part.
California Proposition 65 Warning California laws require us to state the following
warning:
Engine exhaust and a wide variety of automo‐
bile components and parts, including compo‐
nents found in the interior furnishings in a vehi‐
cle, contain or emit chemicals known to the
State of California to cause cancer and birth de‐
fects and reproductive harm. In addition, cer‐
tain fluids contained in vehicles and certain
products of component wear contain or emitSeite 7Notes7
Online Edition for Part no. 01 40 2 961 140 - II/15
Page 20 of 251

All around the center console1Hazard warning system 211Intelligent Safety 862Radio 1493Glove compartment 1274Climate control 1125PDC Park Distance Control 106DSC Dynamic Stability Con‐
trol 94Start/stop the engine and switch
the ignition on/off 50Auto Start/Stop function 496Steptronic transmission selector lever 55
Manual transmission selector lever 557Parking brake 518Driving Dynamics Control 96Seite 16AT A GLANCECockpit16
Online Edition for Part no. 01 40 2 961 140 - II/15
Page 22 of 251
RadioVehicle features and op‐
tions
This chapter describes all standard, country-
specific and optional features offered with the
series. It also describes features that are notnecessarily available in your car, e. g., due to
the selected options or country versions. This
also applies to safety-related functions and sys‐
tems. The respectively applicable country provi‐
sions must be observed when using the respec‐
tive features and systems.
Overview
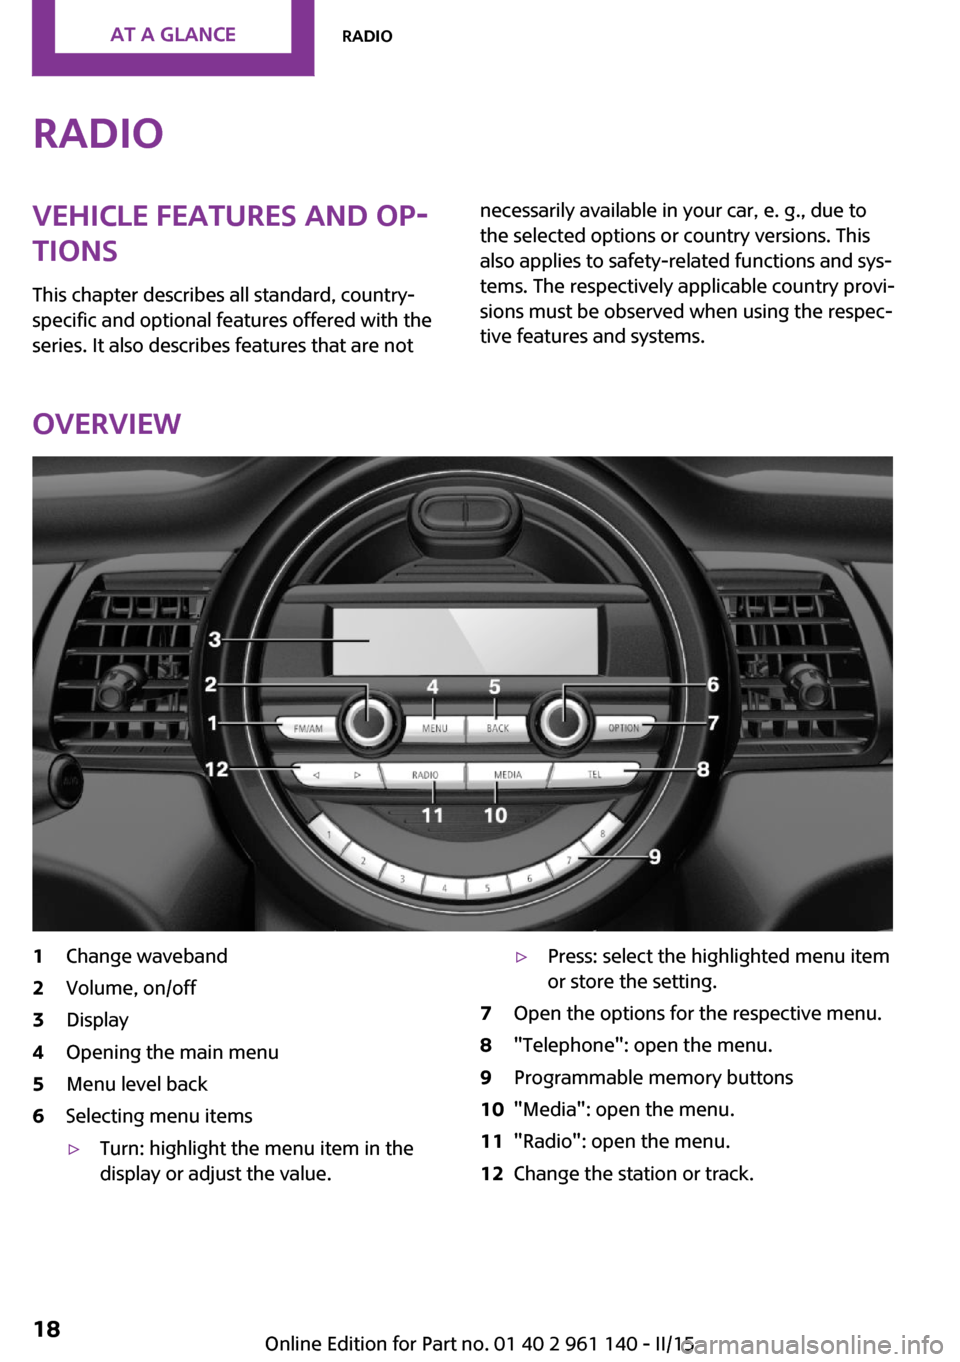
1Change waveband2Volume, on/off3Display4Opening the main menu5Menu level back6Selecting menu items▷Turn: highlight the menu item in the
display or adjust the value.▷Press: select the highlighted menu item
or store the setting.7Open the options for the respective menu.8"Telephone": open the menu.9Programmable memory buttons10"Media": open the menu.11"Radio": open the menu.12Change the station or track.Seite 18AT A GLANCERadio18
Online Edition for Part no. 01 40 2 961 140 - II/15
Page 23 of 251
FunctionsAudio functions and vehicle functions can be
operated, adjusted and displayed on the radio.▷Radio.▷Multimedia.▷Telephone.▷Vehicle settings.▷Check Control messages.
Menu navigation
All functions of the radio can be called up via
the main menu. Some menus can also be called
up directly via the buttons on the radio.
Selecting menu items
Menu items can be selected if they are high‐
lighted.
1. Press button.2.Turn the right-hand knob until the desired
menu item is highlighted, e.g.,"Radio".3.Press the right-hand knob again to confirm
the highlighted menu item.
Representation in the Owner's Manual
In the Owner's Manual, menu items that can be
selected are set in quotation marks, e.g.,
"Radio".
Symbols in the status field
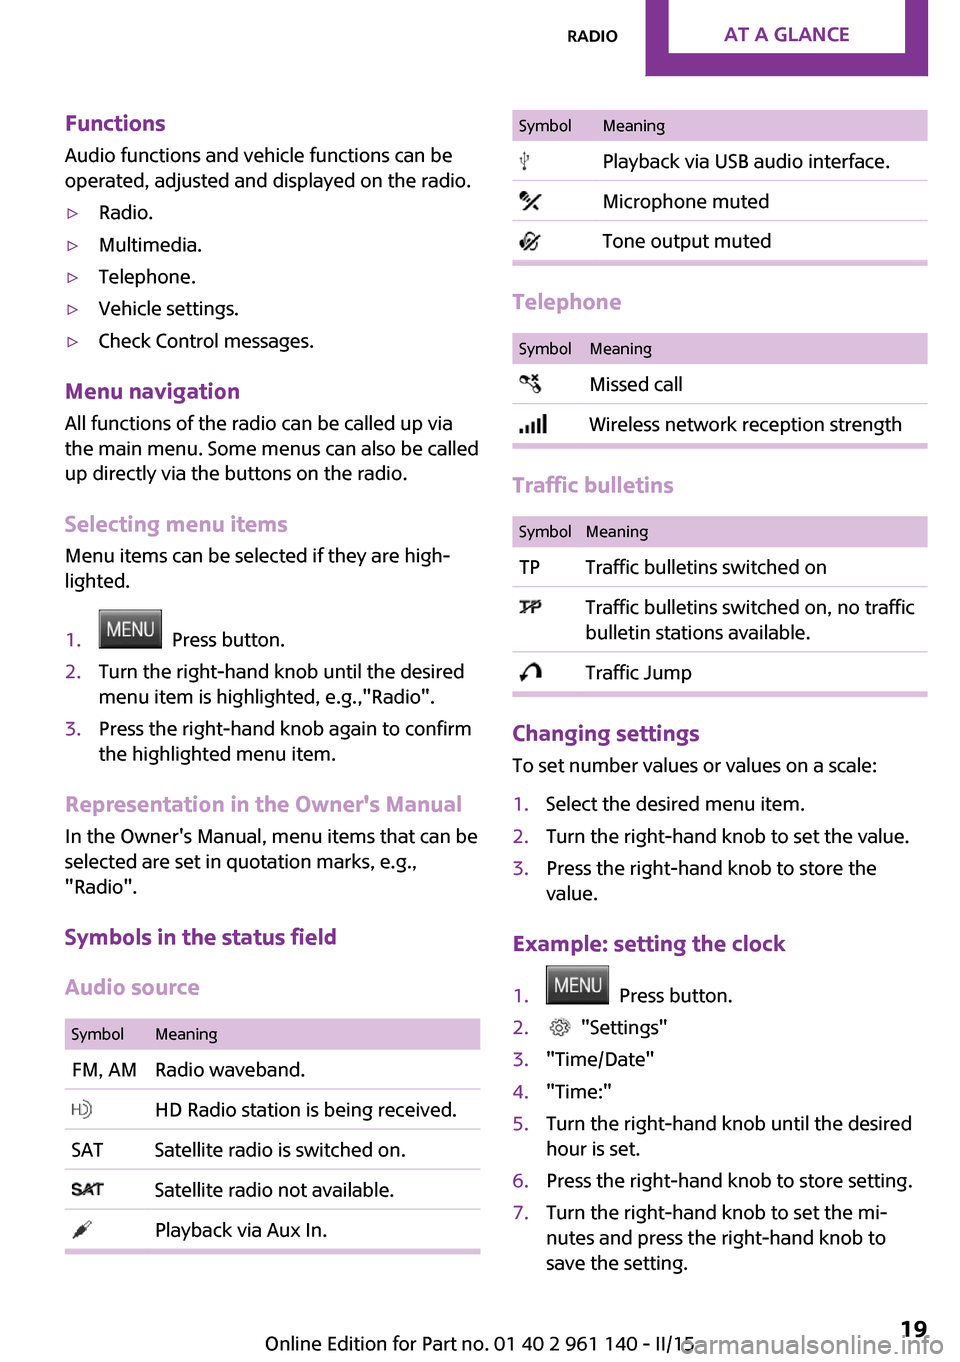
Audio source
SymbolMeaningFM, AMRadio waveband. HD Radio station is being received.SATSatellite radio is switched on. Satellite radio not available. Playback via Aux In.SymbolMeaning Playback via USB audio interface. Microphone muted Tone output muted
Telephone
SymbolMeaning Missed call Wireless network reception strength
Traffic bulletins
SymbolMeaningTPTraffic bulletins switched on Traffic bulletins switched on, no traffic
bulletin stations available. Traffic Jump
Changing settings
To set number values or values on a scale:
1.Select the desired menu item.2.Turn the right-hand knob to set the value.3.Press the right-hand knob to store the
value.
Example: setting the clock
1. Press button.2. "Settings"3."Time/Date"4."Time:"5.Turn the right-hand knob until the desired
hour is set.6.Press the right-hand knob to store setting.7.Turn the right-hand knob to set the mi‐
nutes and press the right-hand knob to
save the setting.Seite 19RadioAT A GLANCE19
Online Edition for Part no. 01 40 2 961 140 - II/15
Page 27 of 251
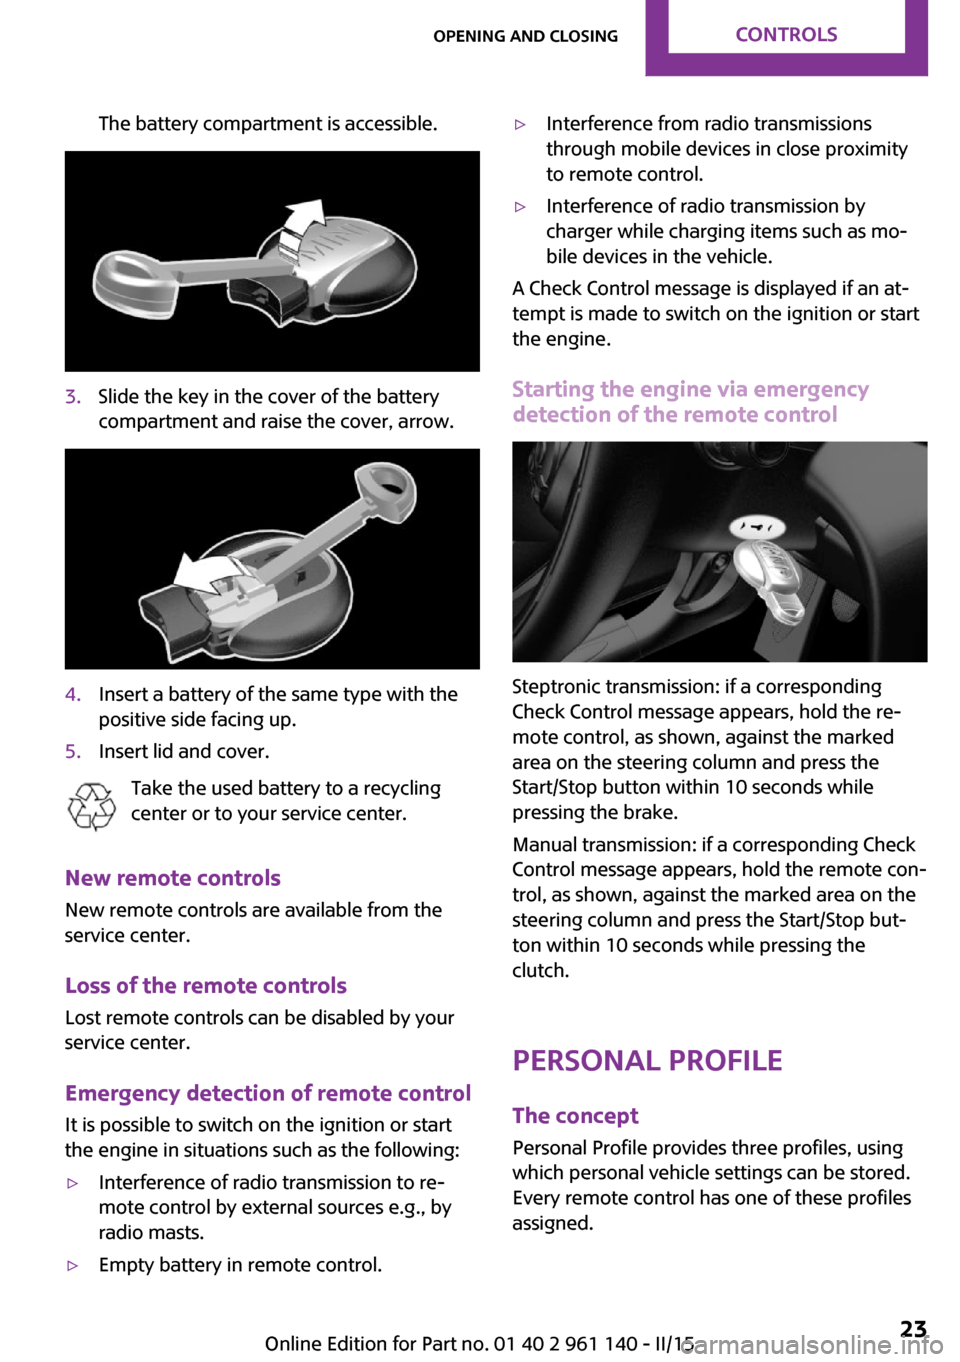
The battery compartment is accessible.3.Slide the key in the cover of the battery
compartment and raise the cover, arrow.4.Insert a battery of the same type with the
positive side facing up.5.Insert lid and cover.
Take the used battery to a recycling
center or to your service center.
New remote controls
New remote controls are available from the
service center.
Loss of the remote controls Lost remote controls can be disabled by your
service center.
Emergency detection of remote control
It is possible to switch on the ignition or start
the engine in situations such as the following:
▷Interference of radio transmission to re‐
mote control by external sources e.g., by
radio masts.▷Empty battery in remote control.▷Interference from radio transmissions
through mobile devices in close proximity
to remote control.▷Interference of radio transmission by
charger while charging items such as mo‐
bile devices in the vehicle.
A Check Control message is displayed if an at‐
tempt is made to switch on the ignition or start
the engine.
Starting the engine via emergencydetection of the remote control
Steptronic transmission: if a corresponding
Check Control message appears, hold the re‐
mote control, as shown, against the marked
area on the steering column and press the
Start/Stop button within 10 seconds while
pressing the brake.
Manual transmission: if a corresponding Check
Control message appears, hold the remote con‐
trol, as shown, against the marked area on the
steering column and press the Start/Stop but‐
ton within 10 seconds while pressing the
clutch.
Personal Profile The concept
Personal Profile provides three profiles, using
which personal vehicle settings can be stored.
Every remote control has one of these profiles
assigned.
Seite 23Opening and closingCONTROLS23
Online Edition for Part no. 01 40 2 961 140 - II/15
Page 28 of 251

If the vehicle is unlocked using a remote con‐
trol, the assigned personal profile will be acti‐
vated. All settings stored in the profile are auto‐
matically applied.
If several drivers use their own remote control,
the vehicle will adjust the personal settings dur‐
ing unlocking. These settings are also restored,
if the vehicle has been used in the meantime
by a person with a different remote control.
Changes to the settings are automatically saved
in the personal profile.
Adjusting
The settings for the following systems and func‐
tions are saved in the active profile. The scope
of storable settings is country- and equipment-
dependable.▷Unlocking and locking.▷Lights.▷Radio.▷Instrument cluster.▷Climate control.▷Park Distance Control PDC.▷Driving Dynamics Control.▷Cruise control.▷Intelligent Safety.
Using the remote con‐
trol
Note Take the remote control with you
People or animals left unattended in a
parked vehicle can lock the doors from the in‐
side. Always take the remote control with you
when leaving the vehicle so that the vehicle
can then be opened from the outside. ◀
Unlocking
Press button on the remote control.▷The vehicle is unlocked.▷Interior lamps and courtesy lamps are acti‐
vated. This function is not available, if the
interior lamps were switched off manually.▷The welcome lamps are switched on, if this
function was activated.▷Exterior mirrors folded through convenient
closing are folded open.
You can set how the vehicle is to be unlocked.
Create the settings, refer to page 29.
The alarm system, refer to page 30, is dis‐
armed.
Convenient opening Press and hold this button on the re‐
mote control after unlocking.
The windows and the glass sunroof are opened,
as long as the button on the remote control is
pressed.
Locking Locking from the outside
Do not lock the vehicle from the outside
with people inside the car, as the vehicle can‐
not be unlocked from inside without special
knowledge. ◀
The driver's door must be closed. Press button on the remote control.
The alarm system, refer to page 30, is armed.
If the vehicle horn honks twice when you lock
the car, this means that the engine or ignition is
still switched on. In this case, the engine or ig‐
nition must be switched off by means of the
Start/Stop button.
Seite 24CONTROLSOpening and closing24
Online Edition for Part no. 01 40 2 961 140 - II/15
Page 29 of 251
Switching on interior lights and
courtesy lights
Press button on the remote control
with the vehicle locked.
This function is not available, if the interior
lamps were switched off manually.
If the button is pressed within 10 seconds of
when the vehicle was locked Interior motion
sensor and tilt alarm sensor of the anti-theft
warning system, refer to page 31, are turned
off. After locking, wait 10 seconds before press‐
ing the button again.
Panic mode
You can trigger the alarm system if you find
yourself in a dangerous situation.
Press button on the remote control for
at least 3 seconds.
To switch off the alarm: press any button.
Unlock the tailgate Press button on the remote control forapprox. 1 second.
The tailgate opens slightly, regardless of
whether the vehicle was previously locked or
unlocked.
Depending on the features and the country
version, it is also possible to have door un‐
locked. Create the settings, refer to page 29.
If the doors were not unlocked, the tailgate is
locked again as soon as it closes.
Do not place the remote control in the
cargo area
Take the remote control with you and do not
leave it in the cargo area; otherwise, the re‐
mote control is locked inside the vehicle when
the tailgate is closed. ◀Provide edge protection
Sharp objects or those with edges can hit
the rear window while driving and damage the
heat conductors of the rear window. Provide
edge protection. ◀
Malfunction Remote control detection by the vehicle can
among others be malfunctioning under the fol‐
lowing circumstances:▷The battery of the remote control is dis‐
charged. Replace the battery, refer to
page 22.▷Interference of the radio connection from
transmission towers or other equipment
with high transmit power.▷Shielding of the remote control due to
metal objects.▷Interference of the radio connection from
mobile phones or other electronic devices
in direct proximity.
Do not transport the remote control together
with metal objects or electronic devices.
In the case of a malfunction, unlock and lock
the vehicle using the integrated key, refer to
page 26.
For US owners only The transmitter and receiver units comply with
part 15 of the FCC/Federal Communication
Commission regulations. Operation is governed by the following:
FCC ID:
▷LX8766S.▷LX8766E.▷LX8CAS.▷LX8CAS2.▷MYTCAS4.
Compliance statement:
Seite 25Opening and closingCONTROLS25
Online Edition for Part no. 01 40 2 961 140 - II/15
Page 33 of 251
▷Interference of the radio connection from
transmission towers or other equipment
with high transmit power.▷Shielding of the remote control due to
metal objects.▷Interference of the radio connection from
mobile phones or other electronic devices
in direct proximity.
Do not transport the remote control together
with metal objects or electronic devices.
In the case of a malfunction, unlock and lock
the vehicle using the buttons of the remote
control or using the integrated key, refer to
page 26.
Adjusting Unlocking The settings are saved in the active profile. Per‐
sonal Profile, refer to page 23.
Doors
1. Press button.2. "Settings"3."Doors/Key"4. Select the symbol.5.Select the desired function.▷"All doors"
The entire vehicle is unlocked.▷"Driver's door"
Only the driver's door and the fuel filler
flap are unlocked. Pressing again un‐
locks the entire vehicle.Tailgate
Depending on optional features and country
version, this setting is not offered in some
cases.1. Press button.2. "Settings"3."Doors/Key"4. Select the symbol.5.Select the desired function.▷"Tailgate"
Only the tailgate is unlocked.▷"Tailgate + door(s)"
The tailgate and the doors are un‐
locked.
Locking
The settings are saved in the active profile. Per‐
sonal Profile, refer to page 23.
1. Press button.2. "Settings"3."Doors/Key"4.Select desired setting.▷"Lock if no door is opened"
The vehicle locks automatically after a
short period of time if no door is
opened.▷"Lock after starting to drive"
The vehicle locks automatically after
you drive off.
Confirmation signals from the vehicle
1. Press button.2. "Settings"3."Doors/Key"4.Select desired setting.▷"Flash for lock/unlock"Seite 29Opening and closingCONTROLS29
Online Edition for Part no. 01 40 2 961 140 - II/15