length MITSUBISHI 3000GT 1991 User Guide
[x] Cancel search | Manufacturer: MITSUBISHI, Model Year: 1991, Model line: 3000GT, Model: MITSUBISHI 3000GT 1991Pages: 1146, PDF Size: 76.68 MB
Page 87 of 1146
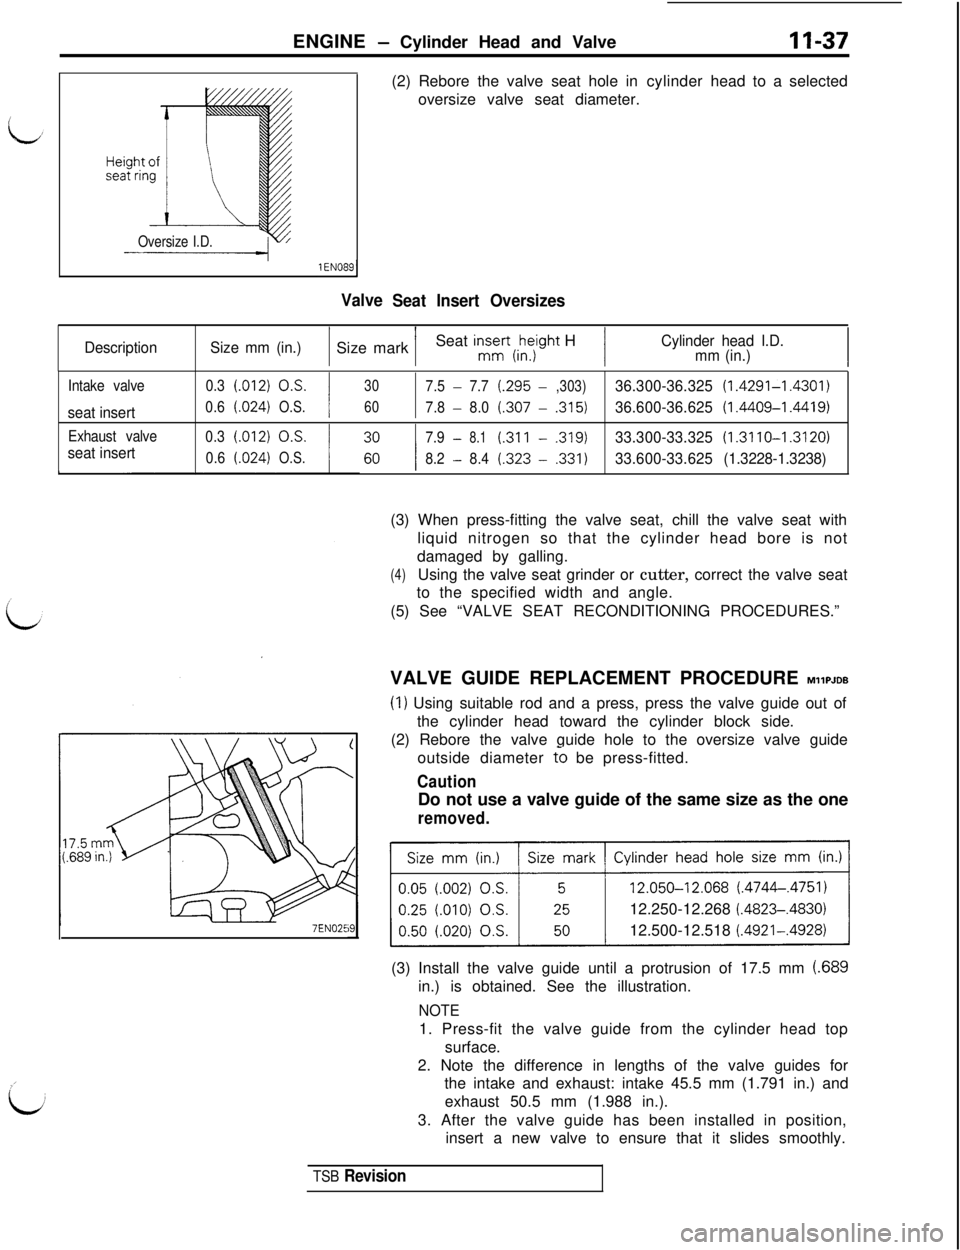
ENGINE - Cylinder Head and Valve
Oversize I.D.
Valve(2) Rebore the valve seat hole in
oversize valve seat diameter.Seat Insert Oversizescylinderhead to a selected
DescriptionSize mm (in.)1 Size mark /Seat insEt(,ke;ght H/Cylinder head I.D.
mm (in.)
Intake valve0.3i.012)0,s.
I
30
I
7.5-7.7(.295-,303)36.300-36.325(1.4291-1.4301)
seat insert
0.6(.024)O.S.607.8-8.0(.307-,315)36.600-36.625(1.4409-1.4419)
Exhaust valve
seat insert
0.3l.012)0,s.7.9-8.1(.311-.319)33.300-33.325(1.3110-1.3120)
0.6(.024)O.S.8.2-8.4t.323-,331)33.600-33.625(1.3228-1.3238)
7EN02E(3) When press-fitting the valve seat, chill the valve seat with
liquid nitrogen so that the cylinder head bore is not
damaged by galling.
(4)Using the valve seat grinder or cutter, correct the valve seat
to the specified width and angle.
(5) See “VALVE SEAT RECONDITIONING PROCEDURES.”
VALVE GUIDE REPLACEMENT PROCEDURE
MllPJDB
(1) Using suitable rod and a press, press the valve guide out of
the cylinder head toward the cylinder block side.
(2) Rebore the valve guide hole to the oversize valve guide
outside diameter
to be press-fitted.
CautionDo not use a valve guide of the same size as the one
removed.12.250-12.268
(.4823-.4830)12.500-12.518
(.4921-.4928)(3) Install the valve guide until a protrusion of 17.5 mm
(.689in.) is obtained. See the illustration.
NOTE1. Press-fit the valve guide from the cylinder head top
surface.
2. Note the difference in lengths of the valve guides for
the intake and exhaust: intake 45.5 mm (1.791 in.) and
exhaust 50.5 mm (1.988 in.).
3. After the valve guide has been installed in position,
insert a new valve to ensure that it slides smoothly.
TSB Revision
Page 101 of 1146
ENGINE - Crankshaft. Flvwheel and Drive Plate11-51
id
PLASTIGAGE METHODMllUlAA
Plastigage may be used to measure the clearance.
(1) Remove oil and grease and any other dirt from bearings and
journals.(2) Cut plastigage to the same length as the width of the
bearing and place it in parallel with the journal, off oil holes.
(3) Install the crankshaft, bearings and caps and tighten them
to the specified torques. During this operation, do NOT turn
the crankshaft. Remove the caps. Measure the width-of the
plastigage at the widest part by using a scale printed on the
plastigage sleeve.
If the clearance exceeds the repair limit, the bearing should
be replaced.
Should the standard clearance not be obtained even after
bearing replacement, replace the crankshaft.
SERVICE POINTS OF INSTALLATIONMllUDAM
16. INSTALLATION OF CRANKSHAFT BEARING (UPPER) /
15.10. THRUST BEARING A / 14.11. THRUST BEARING
B
/ 12. CRANKSHAFT BEARING (LOWER)
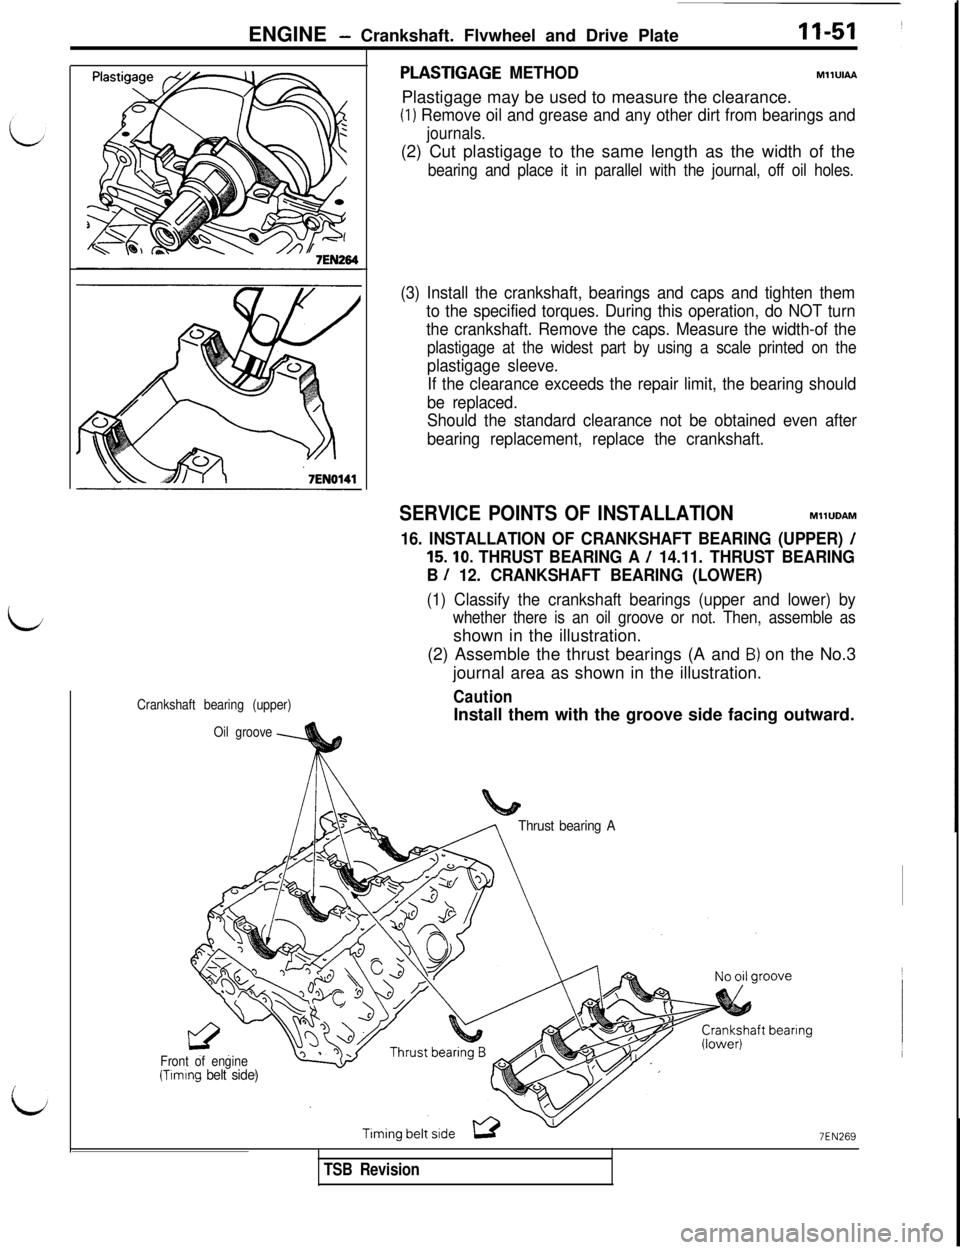
(1) Classify the crankshaft bearings (upper and lower) by
whether there is an oil groove or not. Then, assemble asshown in the illustration.
(2) Assemble the thrust bearings (A and
B) on the No.3
journal area as shown in the illustration.
CautionInstall them with the groove side facing outward.Crankshaft bearing (upper)
Oil groove
Thrust bearing A
Front of engine(Tlmlng belt side)
EN269
TSB Revision
Page 371 of 1146
CLUTCH - Clutch Control21-13
14UOO6514U006t14GOO50
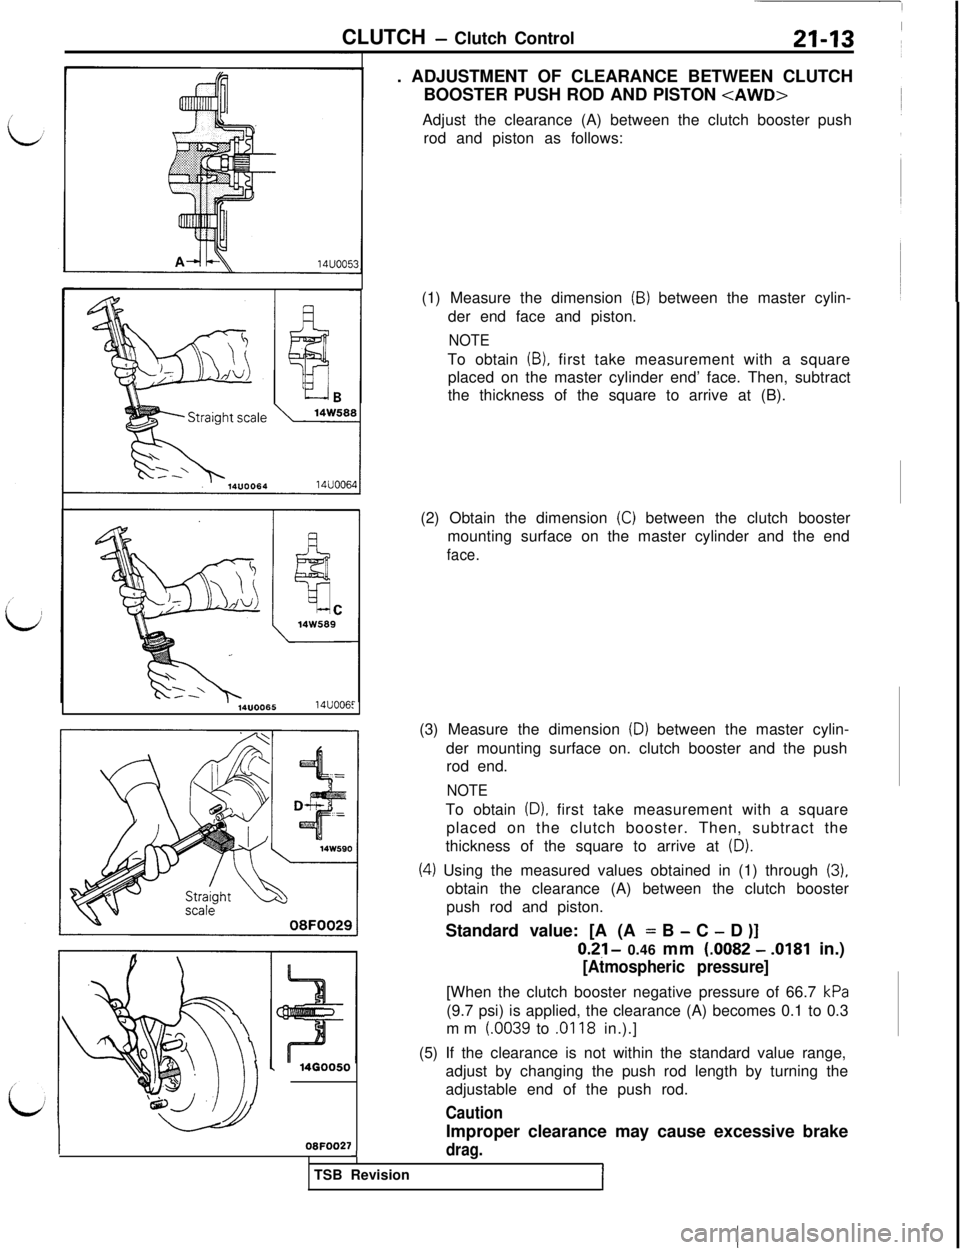
08FOO27. ADJUSTMENT OF CLEARANCE BETWEEN CLUTCH
BOOSTER PUSH ROD AND PISTON
rod and piston as follows:
(1) Measure the dimension
(B) between the master cylin-
der end face and piston.
NOTETo obtain
(B), first take measurement with a square
placed on the master cylinder end’ face. Then, subtract
the thickness of the square to arrive at (B).
(2) Obtain the dimension
(C) between the clutch booster
mounting surface on the master cylinder and the end
face.(3) Measure the dimension
(D) between the master cylin-
der mounting surface on. clutch booster and the push
rod end.
NOTETo obtain
(D). first take measurement with a square
placed on the clutch booster. Then, subtract the
thickness of the square to arrive at
(D).
(4) Using the measured values obtained in (1) through (3).obtain the clearance (A) between the clutch booster
push rod and piston.
Standard value: [A (A = B
- C - D )]
0.2j - 0.46 mm (.0082 - .0181 in.)
[Atmospheric pressure][When the clutch booster negative pressure of 66.7
kPa(9.7 psi) is applied, the clearance (A) becomes 0.1 to 0.3
mm
(.0039 to .0118 in.).]
(5) If the clearance is not within the standard value range,
adjust by changing the push rod length by turning the
adjustable end of the push rod.
CautionImproper clearance may cause excessive brake
drag.JTSB Revision
I
Page 405 of 1146
MANUAL TRANSAXLE
22-25
L
Slit
#Jl
Spring pin
/
II-+Shift rail1 I I201034
er
2150008
MD998325-01
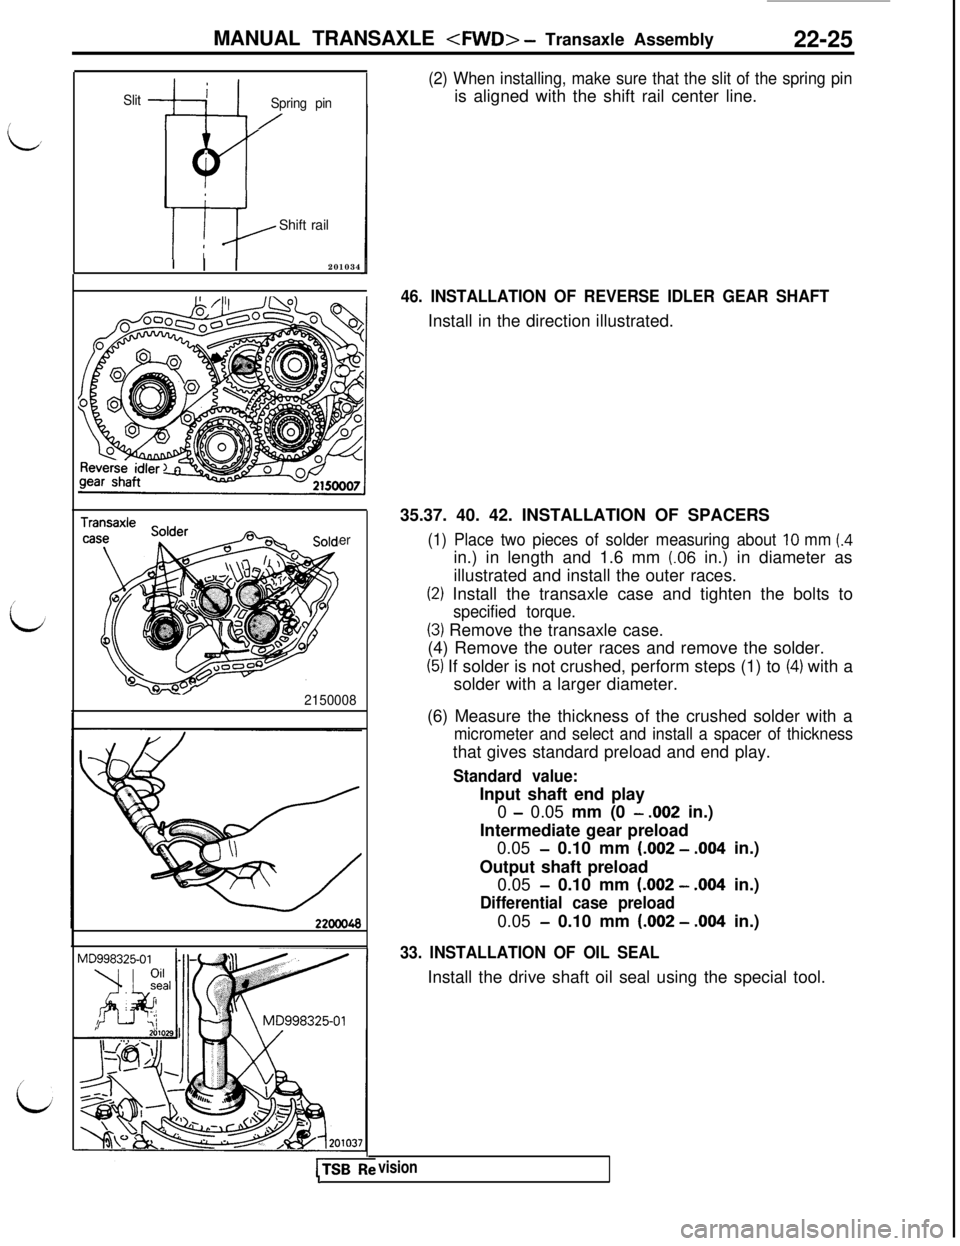
(2) When installing, make sure that the slit of the spring pinis aligned with the shift rail center line.
46. INSTALLATION OF REVERSE IDLER GEAR SHAFTInstall in the direction illustrated.
35.37. 40. 42. INSTALLATION OF SPACERS
(1) Place two pieces of solder measuring about 10 mm (.4in.) in length and 1.6 mm
(.06 in.) in diameter as
illustrated and install the outer races.
(2) Install the transaxle case and tighten the bolts to
specified torque.
(3) Remove the transaxle case.
(4) Remove the outer races and remove the solder.
(5) If solder is not crushed, perform steps (1) to (4) with a
solder with a larger diameter.
(6) Measure the thickness of the crushed solder with a
micrometer and select and install a spacer of thicknessthat gives standard preload and end play.
Standard value:Input shaft end play
0
- 0.05 mm (0 - .002 in.)
Intermediate gear preload
0.05
- 0.10 mm (.002 - .004 in.)
Output shaft preload
0.05
- 0.10 mm (.002 - .004 in.)
Differential case preload0.05
- 0.10 mm (.002 - .004 in.)
33. INSTALLATION OF OIL SEALInstall the drive shaft oil seal using the special tool.
visionI
Page 440 of 1146
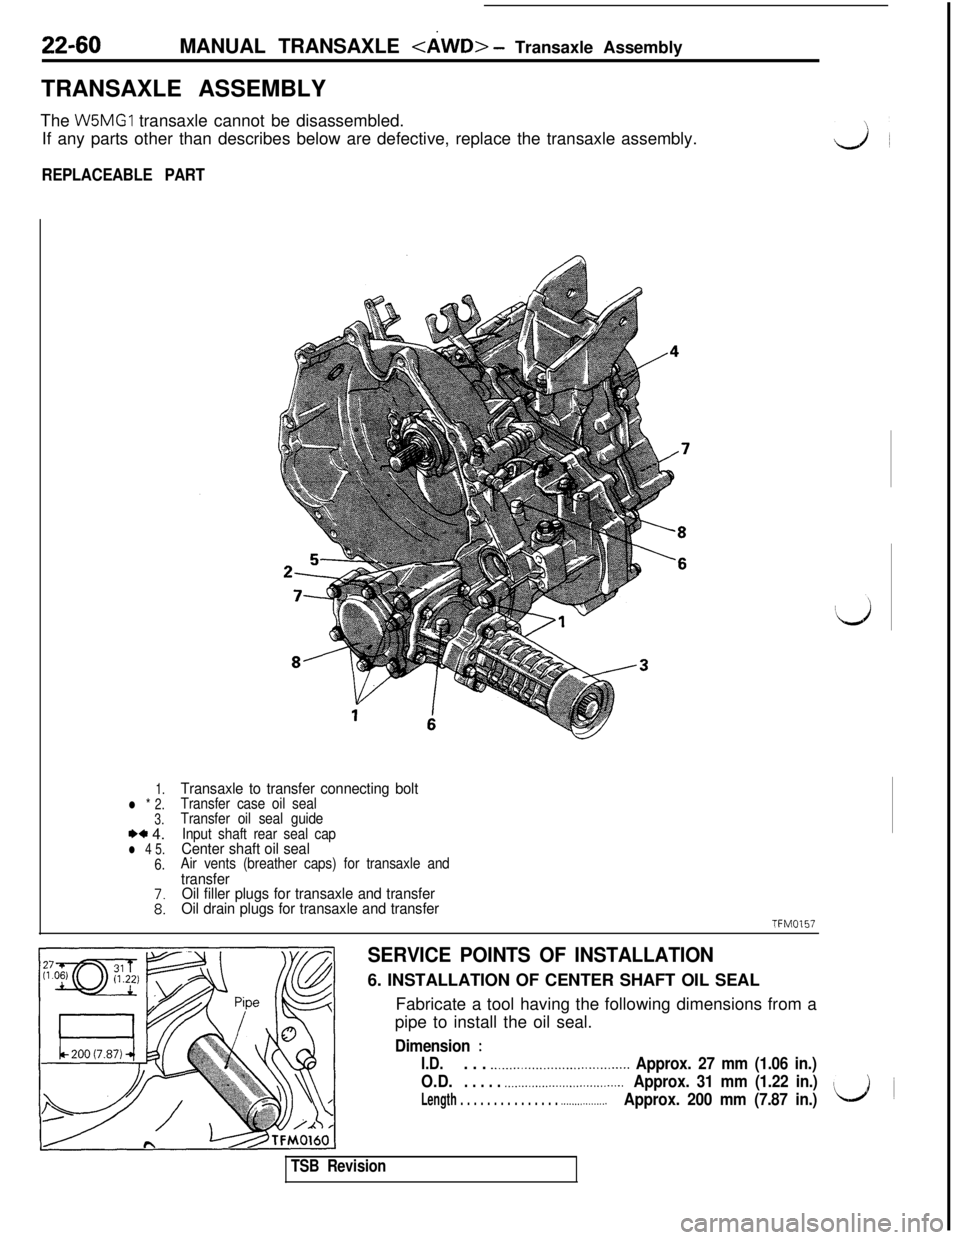
22-60MANUAL TRANSAXLE
TRANSAXLE ASSEMBLY
The W5MGl transaxle cannot be disassembled.
If any parts other than describes below are defective, replace the transaxle assembly.
REPLACEABLE PART
1.l * 2.
3.
*a 4.l 4 5.6.
Transaxle to transfer connecting boltTransfer case oil seal
Transfer oil seal guide
Input shaft rear seal cap
Center shaft oil sealAir vents (breather caps) for transaxle and
transfer
Oil filler plugs for transaxle and transfer
Oil drain plugs for transaxle and transfer
TFM0157
SERVICE POINTS OF INSTALLATION6. INSTALLATION OF CENTER SHAFT OIL SEAL
Fabricate a tool having the following dimensions from a
pipe to install the oil seal.
Dimension :
I.D.. . . ..___........._...................... Approx. 27 mm (1.06 in.)
O.D.
. . . . . .._...........___............_.....Approx. 31 mm (1.22 in.)
Length . . . . . . . . . . . . . . . ..__......._____.Approx. 200 mm (7.87 in.)
TSB Revision
Page 465 of 1146
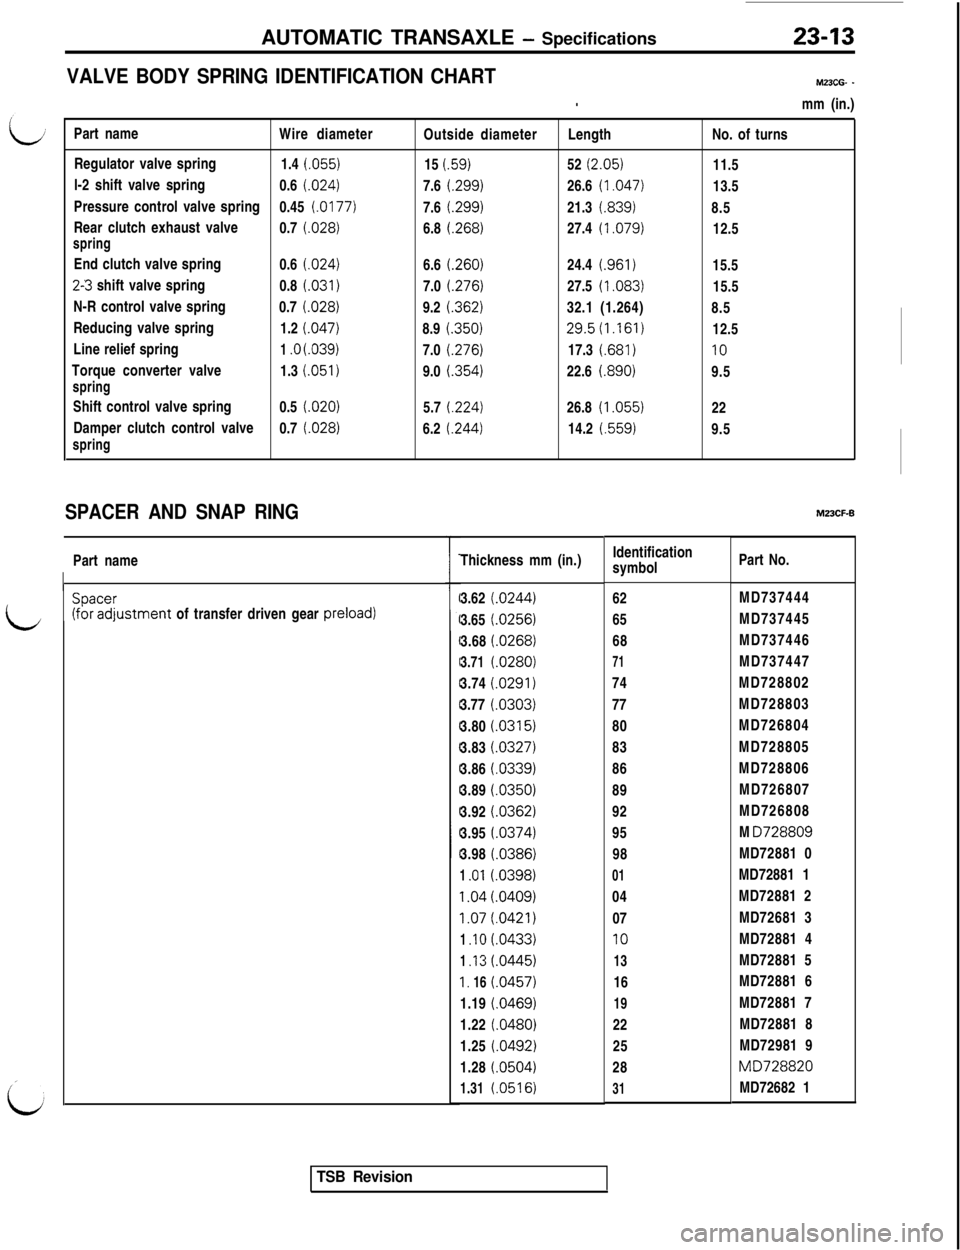
AUTOMATIC TRANSAXLE - Specifications23-13
VALVE BODY SPRING IDENTIFICATION CHARTMZJCG- -
.mm (in.)
Part name
Wire diameter
Outside diameterLengthNo. of turns
Regulator valve spring
1.4 (.055)
15
(59)52 (2.05)
11.5
l-2 shift valve spring
0.6
(024)7.6 (.299)26.6 (1.047)13.5
Pressure control valve spring
0.45
(.0177)7.6 f.299)21.3 (.839)8.5
Rear clutch exhaust valve
0.7
(028)6.8 (268)27.4 (1.079)12.5springEnd clutch valve spring
0.6
(024)6.6 (260)24.4 (.961)15.5
23 shift valve spring
0.8 (031)7.0 (.276)27.5 (1.083)15.5
N-R control valve spring
0.7 (.028)
9.2 (.362)32.1 (1.264)
8.5
Reducing valve spring
1.2 (.047)
8.9
(350)29.5(1.161)12.5
Line relief spring
1 .o (.039)
7.0 (276)17.3 (.681)10Torque converter valve
1.3 (.051)
9.0 (.354)22.6
f.890)9.5springShift control valve spring
0.5 (.020)
5.7 (.224)26.8
(1.055)22
Damper clutch control valve
0.7 (.028)
6.2 (.244)14.2 t.559)
9.5
spring
SPACER AND SNAP RINGPart name
id??$%justment of transfer driven gear preload)Thickness mm (in.)Identification
symbol
3.62(.0244)62
3.65
(.0256)65
3.68
(.0268)68
3.71(0280)713.74
(.0291)74
3.77
(.0303)77
3.80
(.0315)80
3.83
(.0327)83
3.86
l.0339)86
3.89
(0350)89
3.92
(0362)92
3.95
(.0374)95
3.98
(0386)98
1 .Ol(.0398)01
1.04(.0409)041.07
(.0421)07
1 .I0(.0433)10
1 .I3(.0445)13
I. 16(.0457)16
1.19
f.0469)191.22
(.0480)22
1.25
(.0492)25
1.28
(.0504)28
1.31(.0516)31Part No.
MD737444
MD737445
MD737446
MD737447
MD728802
MD728803
MD726804
MD728805
MD728806
MD726807
MD726808
M
D726809MD72881 0
MD72881 1
MD72881 2
MD72681 3
MD72881 4
MD72881 5
MD72881 6
MD72881 7
MD72881 8
MD72981 9
MD729820MD72682 1
TSB Revision
Page 501 of 1146
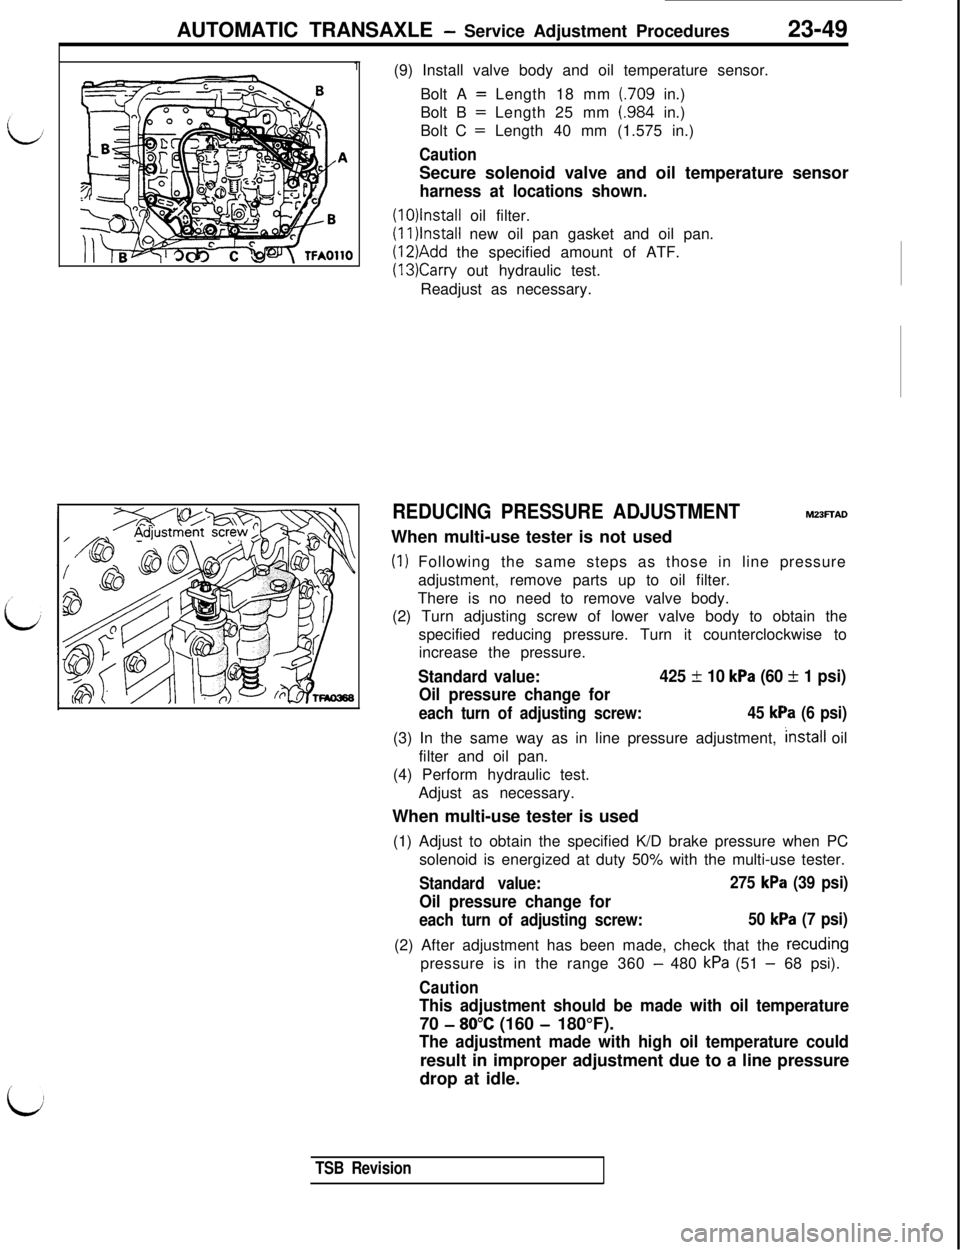
AUTOMATIC TRANSAXLE - Service Adjustment Procedures23-49
1(9) Install valve body and oil temperature sensor.
Bolt A
= Length 18 mm (.709 in.)
Bolt B
= Length 25 mm (.984 in.)
Bolt C
= Length 40 mm (1.575 in.)
CautionSecure solenoid valve and oil temperature sensor
harness at locations shown.
(1O)lnstall oil filter.(1l)lnstall new oil pan gasket and oil pan.
(12)Add the specified amount of ATF.
(13)Carry out hydraulic test.
Readjust as necessary.
REDUCING PRESSURE ADJUSTMENTh323FfADWhen multi-use tester is not used
(1) Following the same steps as those in line pressure
adjustment, remove parts up to oil filter.
There is no need to remove valve body.
(2) Turn adjusting screw of lower valve body to obtain the
specified reducing pressure. Turn it counterclockwise to
increase the pressure.
Standard value:425 f 10 kPa (60 f 1 psi)
Oil pressure change for
each turn of adjusting screw:45 kPa (6 psi)(3) In the same way as in line pressure adjustment,
/nstall oil
filter and oil pan.
(4) Perform hydraulic test.
Adjust as necessary.
When multi-use tester is used
(1) Adjust to obtain the specified K/D brake pressure when PC
solenoid is energized at duty 50% with the multi-use tester.
Standard value:275 kPa (39 psi)
Oil pressure change for
each turn of adjusting screw:50 kPa (7 psi)(2) After adjustment has been made, check that the recuding
pressure is in the range 360
- 480 kPa (51 - 68 psi).
Caution
This adjustment should be made with oil temperature70
- 80°C (160 - 180°F).
The adjustment made with high oil temperature couldresult in improper adjustment due to a line pressure
drop at idle.
TSB Revision
Page 566 of 1146
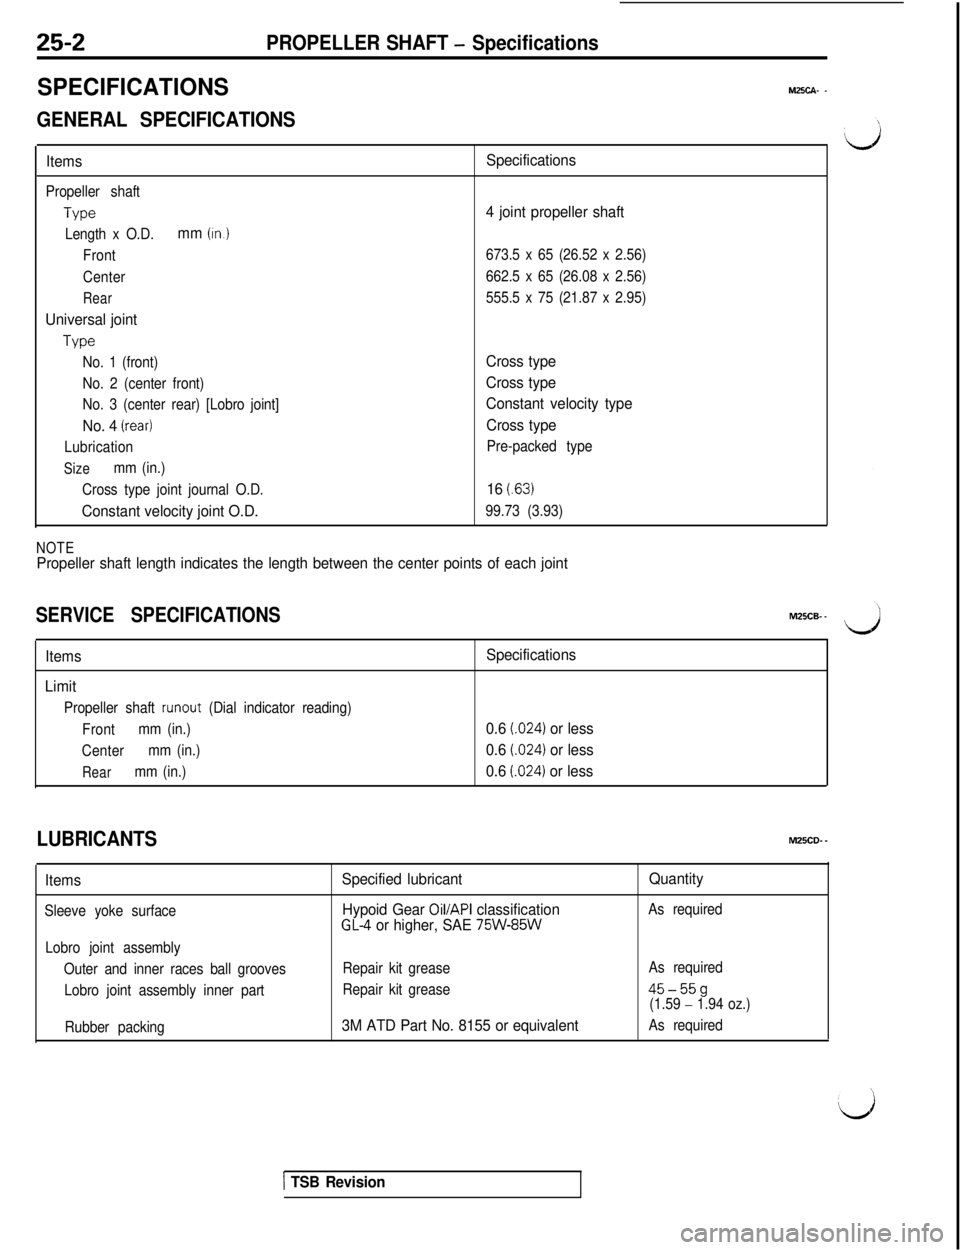
25-2PROPELLER SHAFT - Specifications
SPECIFICATIONSM25CA- -
GENERAL SPECIFICATIONS
Items
Propeller shaft
Type
Length x O.D.
mm (In.)
Front
Center
Rear
Universal joint
Type
No. 1 (front)
No. 2 (center front)
No. 3 (center rear) [Lobro joint]
No. 4 (rear)
Lubrication
Sizemm (in.)
Cross type joint journal O.D.
Constant velocity joint O.D.Specifications
4 joint propeller shaft
673.5 x 65 (26.52 x 2.56)
662.5 x 65 (26.08 x 2.56)
555.5 x 75 (21.87 x 2.95)
Cross type
Cross type
Constant velocity type
Cross type
Pre-packed type
16 t.63)
99.73 (3.93)
NOTEPropeller shaft length indicates the length between the center points of each joint
SERVICE SPECIFICATIONSM25CE -d
Items
Limit
Propeller shaft runout (Dial indicator reading)
Frontmm (in.)
Centermm (in.)
Rearmm (in.)
Specifications
0.6
l.024) or less
0.6
i.024) or less
0.6
t.024) or less
LUBRICANTSM25CD..
Items
Sleeve yoke surface
Lobro joint assembly
Outer and inner races ball grooves
Lobro joint assembly inner part
Rubber packing
Specified lubricant
Hypoid Gear
Oil/API classificationGL-4 or higher, SAE 75W-85W
Repair kit grease
Repair kit grease
3M ATD Part No. 8155 or equivalentQuantity
As required
As required
45-55g(1.59 - 1.94 oz.)
As required
1 TSB Revision
Page 578 of 1146
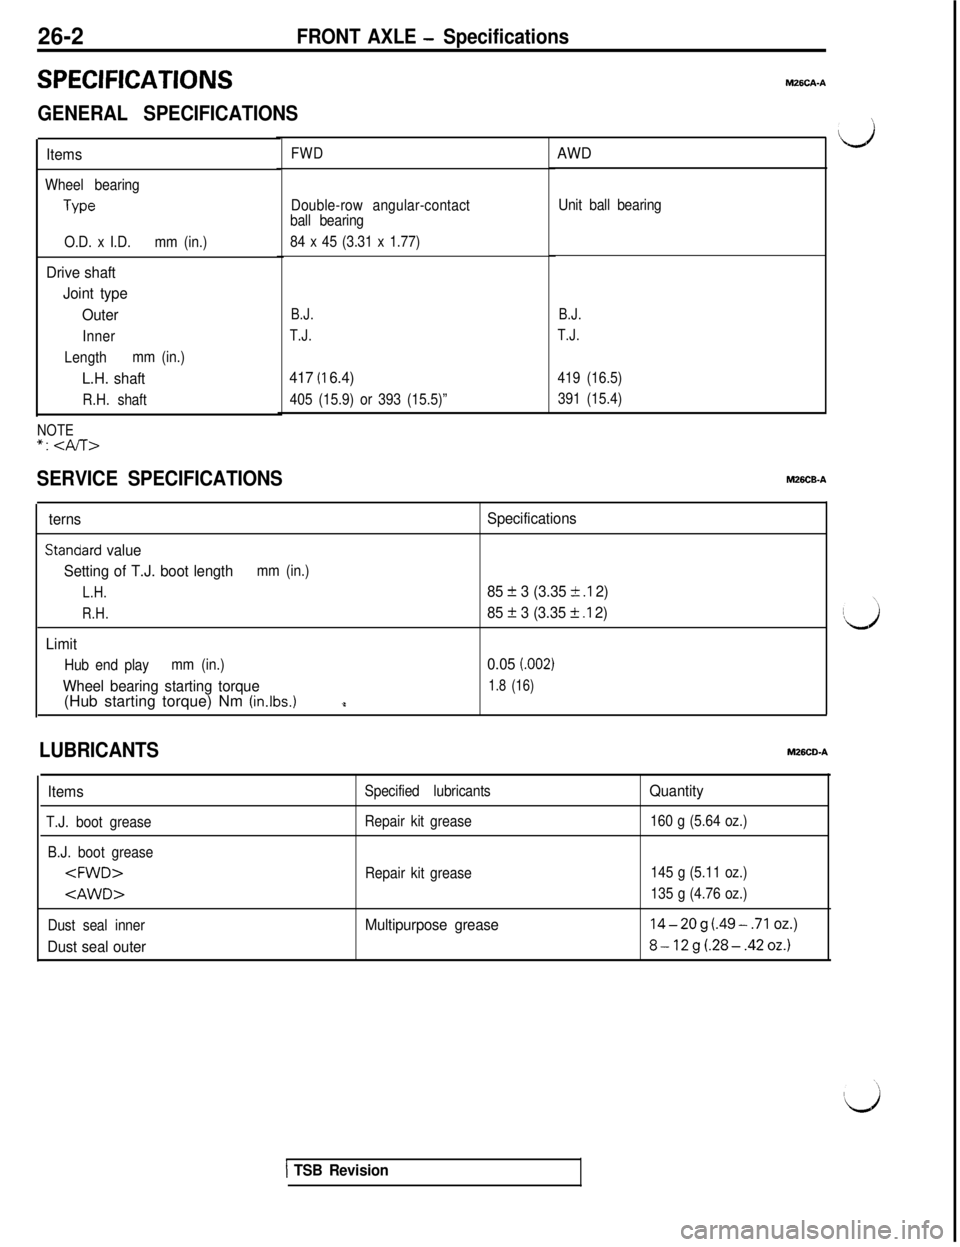
26-2FRONT AXLE - Specifications
SERVICE SPECIFICATIONS
FWD
SPECIFICATIONS
GENERAL SPECIFICATIONS
Items
Wheel bearing
TypeDouble-row angular-contact
ball bearing
O.D. x I.D.mm (in.)
Drive shaft
Joint type
Outer
Inner
Lengthmm (in.)
L.H. shaft
R.H. shaft84 x 45 (3.31 x 1.77)
B.J.
T.J.
417 (I 6.4)
405 (15.9) or 393 (15.5)”
NOTE“1
AWD
Unit ball bearing
B.J.
T.J.
419 (16.5)
391 (15.4)
M26CB-A
terns
standard value
Setting of T.J. boot length
mm (in.)
L.H.
R.H.
Limit
Hub end playmm (in.)
Wheel bearing starting torque(Hub starting torque) Nm (in.lbs.)
Specifications
85
f 3 (3.35 k .I 2)
85
+ 3 (3.35 +- .I 2)
0.05
(.002)
1.8 (16)
LUBRICANTSM26CO-A
Items
T.J. boot grease
B.J. boot grease
Dust seal inner
Dust seal outer
Specified lubricants
Repair kit grease
Repair kit grease
Multipurpose greaseQuantity
160 g (5.64 oz.)
145 g (5.11 oz.)
135 g (4.76 oz.)
14-2og (.49-.71 oz.)
8-12g(.28-.42oz.)
1 TSB Revision
Page 602 of 1146
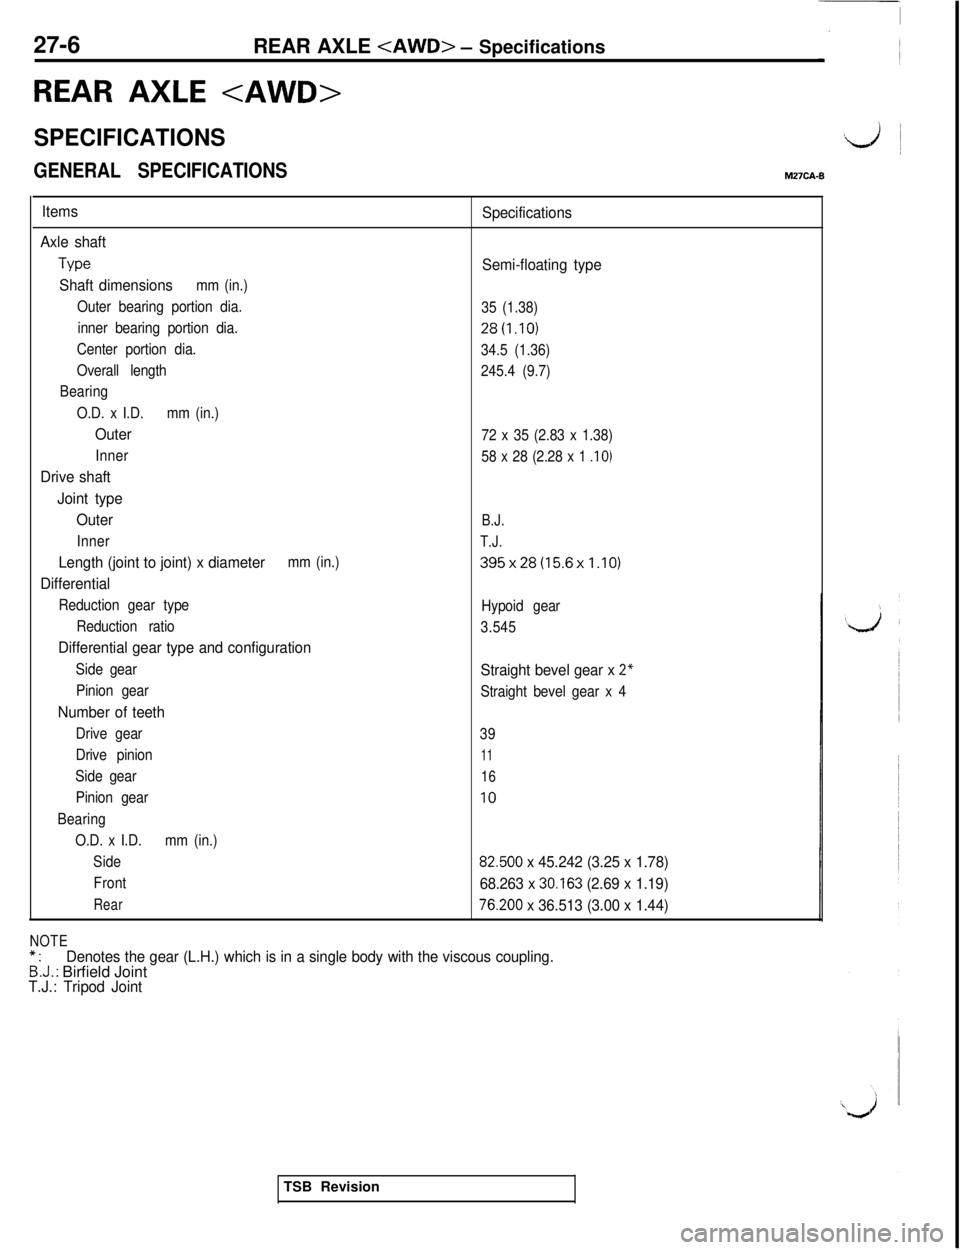
27-6
REAR AXLE tAWD> - Specifications
REAR AXLE
SPECIFICATIONS&L/j ~
GENERAL SPECIFICATIONSM27CA-8
Items
Axle shaft
We
Shaft dimensionsmm (in.)
Outer bearing portion dia.
inner bearing portion dia.
Center portion dia.
Overall length
Bearing
O.D. x I.D.mm (in.)
Outer
Inner
Drive shaft
Joint type
Outer
Inner
Length (joint to joint) x diametermm (in.)
Differential
Reduction gear type
Reduction ratio
Differential gear type and configuration
Side gear
Pinion gear
Number of teeth
Drive gear
Drive pinion
Side gear
Pinion gear
Bearing
O.D. x I.D.mm (in.)
Side
Front
Rear
Specifications
Semi-floating type
35 (1.38)
28(1.10)
34.5 (1.36)
245.4 (9.7)
72 x 35 (2.83 x 1.38)
58 x 28 (2.28 x 1
.I 0)
B.J.
T.J.
395x28(15.6x1.10)
Hypoid gear
3.545
Straight bevel gear x 2”
Straight bevel gear x 4
39
11
16
IO
82.500 x 45.242 (3.25 x 1.78)
68.263 x
30.163 (2.69 x 1.19)
76.200 x 36.513 (3.00 x 1.44)
NOTE*.Denotes the gear (L.H.) which is in a single body with the viscous coupling.B:J.: Birfield JointT.J.: Tripod JointTSB Revision