switch MITSUBISHI 3000GT 1995 2.G Workshop Manual
[x] Cancel search | Manufacturer: MITSUBISHI, Model Year: 1995, Model line: 3000GT, Model: MITSUBISHI 3000GT 1995 2.GPages: 738, PDF Size: 35.06 MB
Page 590 of 738
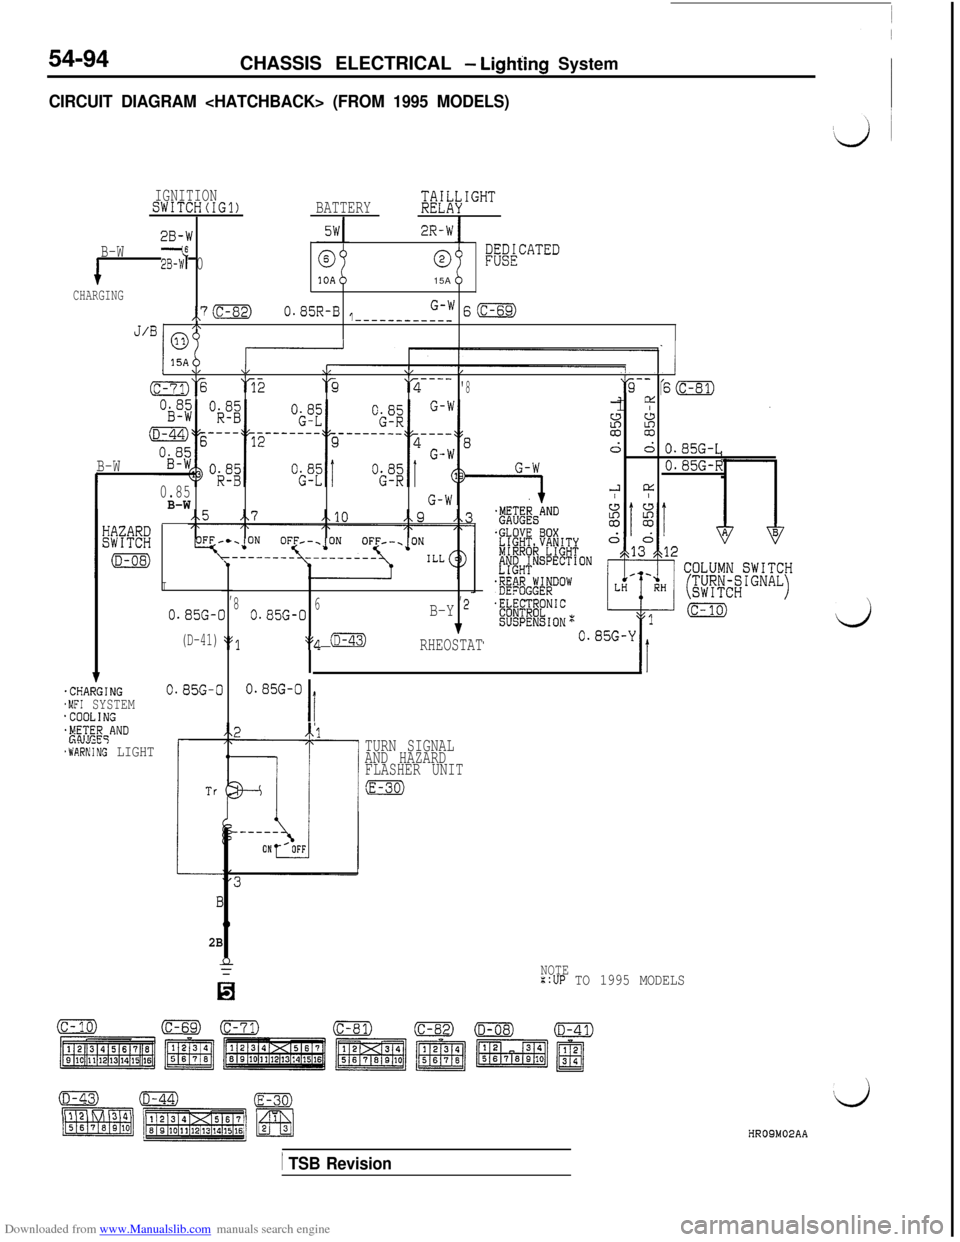
Downloaded from www.Manualslib.com manuals search engine 54-94CHASSIS ELECTRICAL - Lighting System
CIRCUIT DIAGRAM
IGNITIONSWITCH(IG1)BATTERY;di\IGHT
28-W2R-W
B-W2B-W6 00l;akCATED15A
CHARGING
,,7(c-82)0.85R-B1G-WS(c-69)-----------_/\J’BI no
1.CHARGING.MFI SYSTEM'COOLING$F!;E$qAND
.WARNIiG LIGHT
I,,
0.85G-C810.85G-06B-Y 2
(D-41)::q (D-43)1
‘$1RHEOSTAT
0.85G-00.85G-0
Ii
I \"w\/\/b/---- -------- --------a‘% ‘52‘3---_‘2'8"9-- '6m2 DiI I2
si
d: O.BSG-L
B-W0.85G-R
0.852 L1:
B-W/ I
2B
TURN SIGNAL
AND HAZARD
FLASHER UNIT
:E-30)
NOTE::UP TO 1995 MODELS
dHROSM02AA
/ TSB Revision
Page 591 of 738
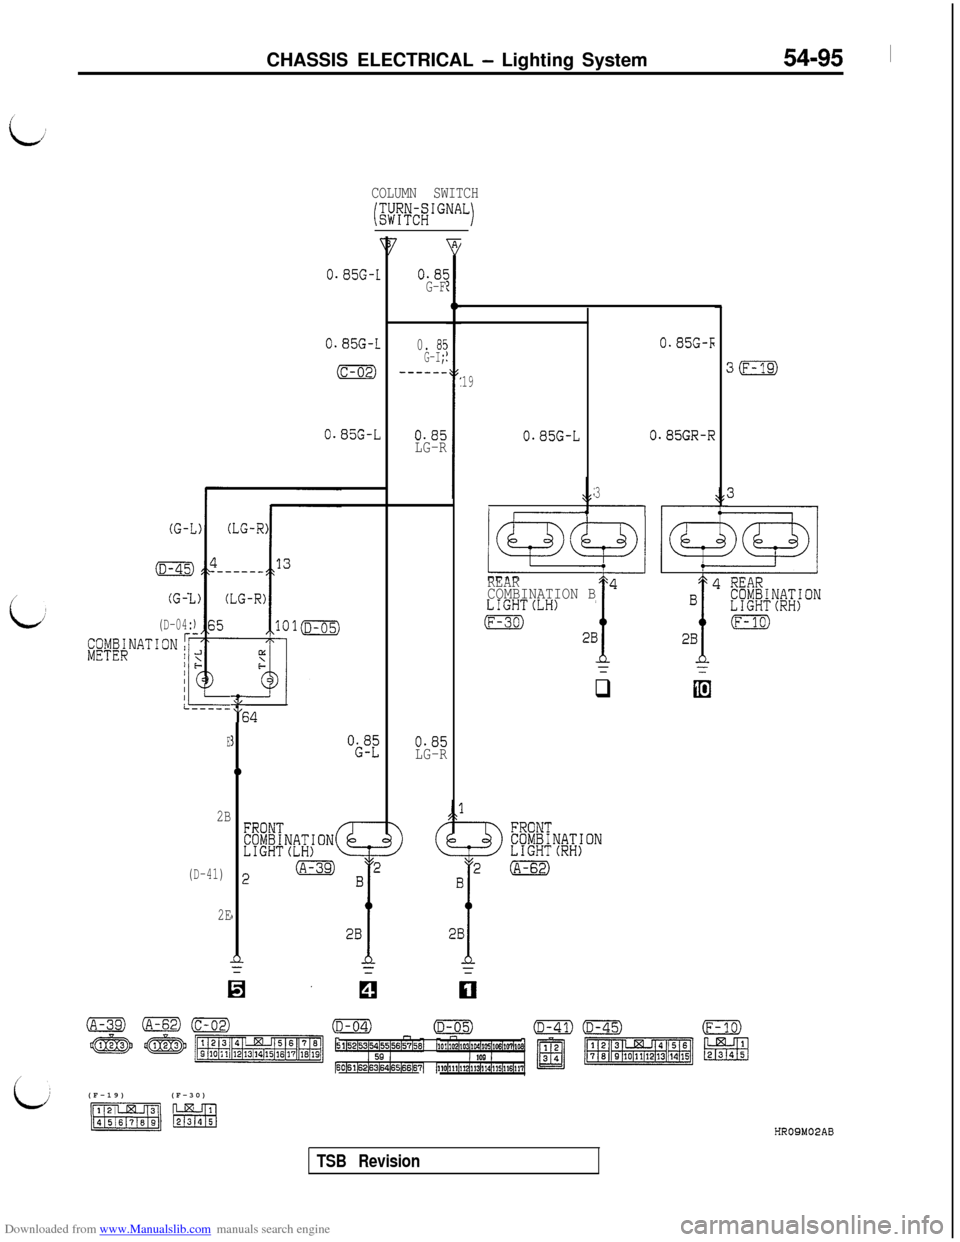
Downloaded from www.Manualslib.com manuals search engine CHASSIS ELECTRICAL - Lighting System54-95 1
COLUMN SWITCH
!$;fyi$IGNALi
(G-l
iD-45)
(G-Z
(D-04:
0.85G-1
0.85G-L
(c-02)
0.85G-L
E
2B
(D-41)
-cAL
“‘t
I
0
I
f
;
,
nz
2E
;4
"i;!,5-
0.8:
G-F
0.
8FG-I;-_-___
0.85
LG-R
0.85LG-R
19
0.85G-L
I-
3
=A
wREARCOMBINATION B4LIGHTCLH)
(F-30) 2B
d=
q
0.85G-F
0.85GR-R
30(F-19)(F-30)HROSM02AB
TSB Revision
Page 592 of 738
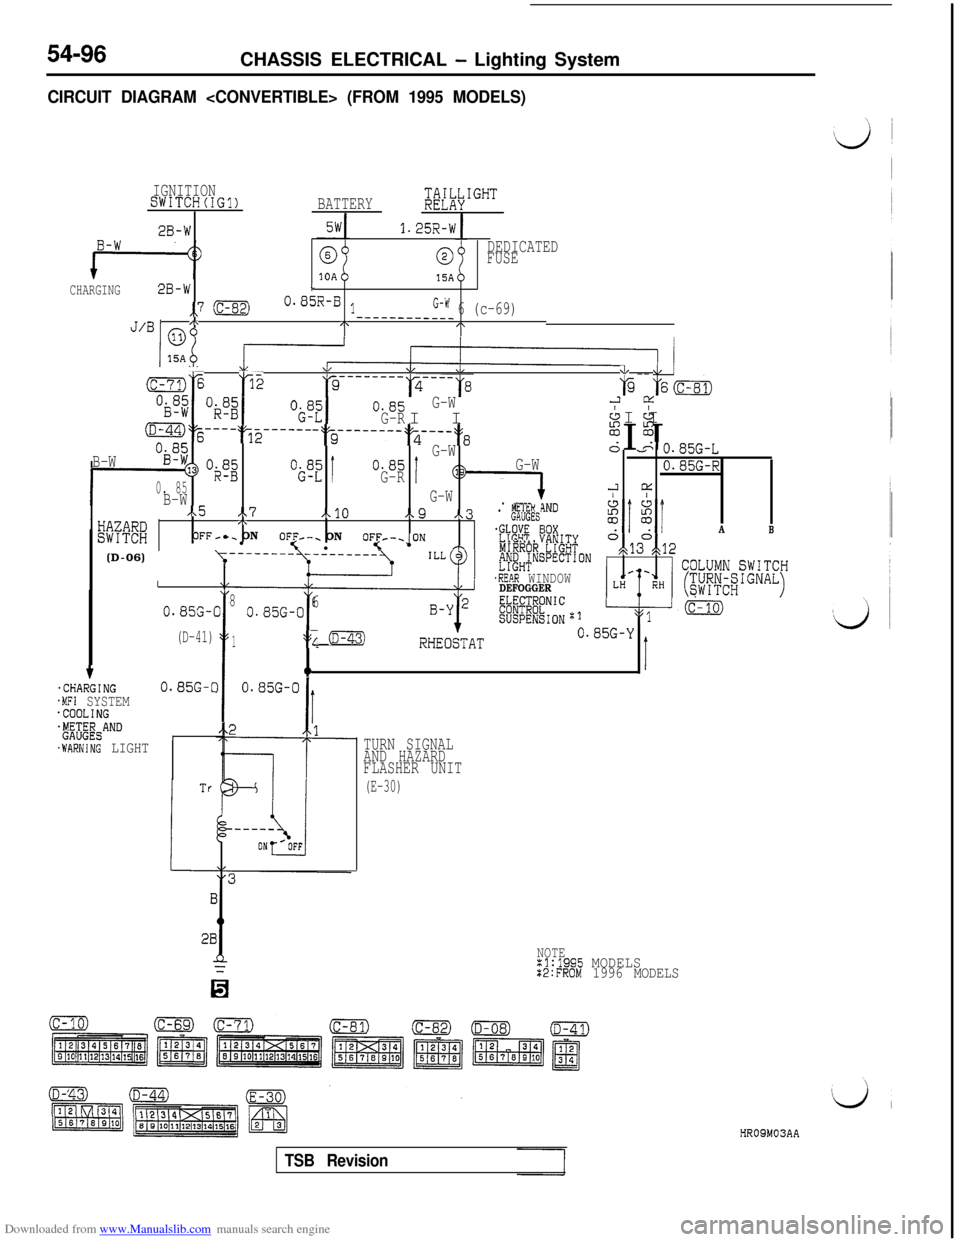
Downloaded from www.Manualslib.com manuals search engine 54-96CHASSIS ELECTRICAL - Lighting System
CIRCUIT DIAGRAM
IGNITIONSWITCH(IG?)BATTERY;&IGHT
2B-W1.25R-W
0DEDICATED
FUSE
15ACHARGING2B-wL
,,7 :c-82)0.85R-B lG-W 6 (c-69)/\J’BI mo
-___----____/\I\
B-W
f-
D-44)% ---- :T2 ------ -$~e---m--.~s---:~8%I I&
Og;G-WA&n
*3> “$2“i;“=!0.85
0. 85G-RI
B-WG-W
I/x5 .\7A10e9 x.3wmj,\. p!&'
OFF-c. ON
lOFF--. ON5 loF1;F-~oN m'R% thnrnnnb
G-W
1. .----iND
- - v.85G-L
0.85G-R
2 cc/ I.
E(D-06)IOX
'E%T'~~~J~~SPECTION
.REAR WINDOWDEFOGGERE#@;.NIC
SUSPENSIONzl
A
o,d3°gt12
B
\y---- --------
:c-?:,jE p2w
*\L &I--
a-7j% 166
“$ZI0.85G-W
G-RI I2 CL
& &I I
I
0.8%-(
(D-41)
38
I
0.85G-06
1:s; (D-43)RHEObAT0.85G-Y
qIt.CHARGING0.85G-C.MFI SYSTEM.COOLING+&$&ANDI.WARNING LIGHT
28
TURN SIGNAL
AND HAZARD
FLASHER UNIT
(E-30)
NOTEx1:1995 MODELSX2:FROM 1996 MODELS
HR09M03AA
TSB Revision
Page 593 of 738
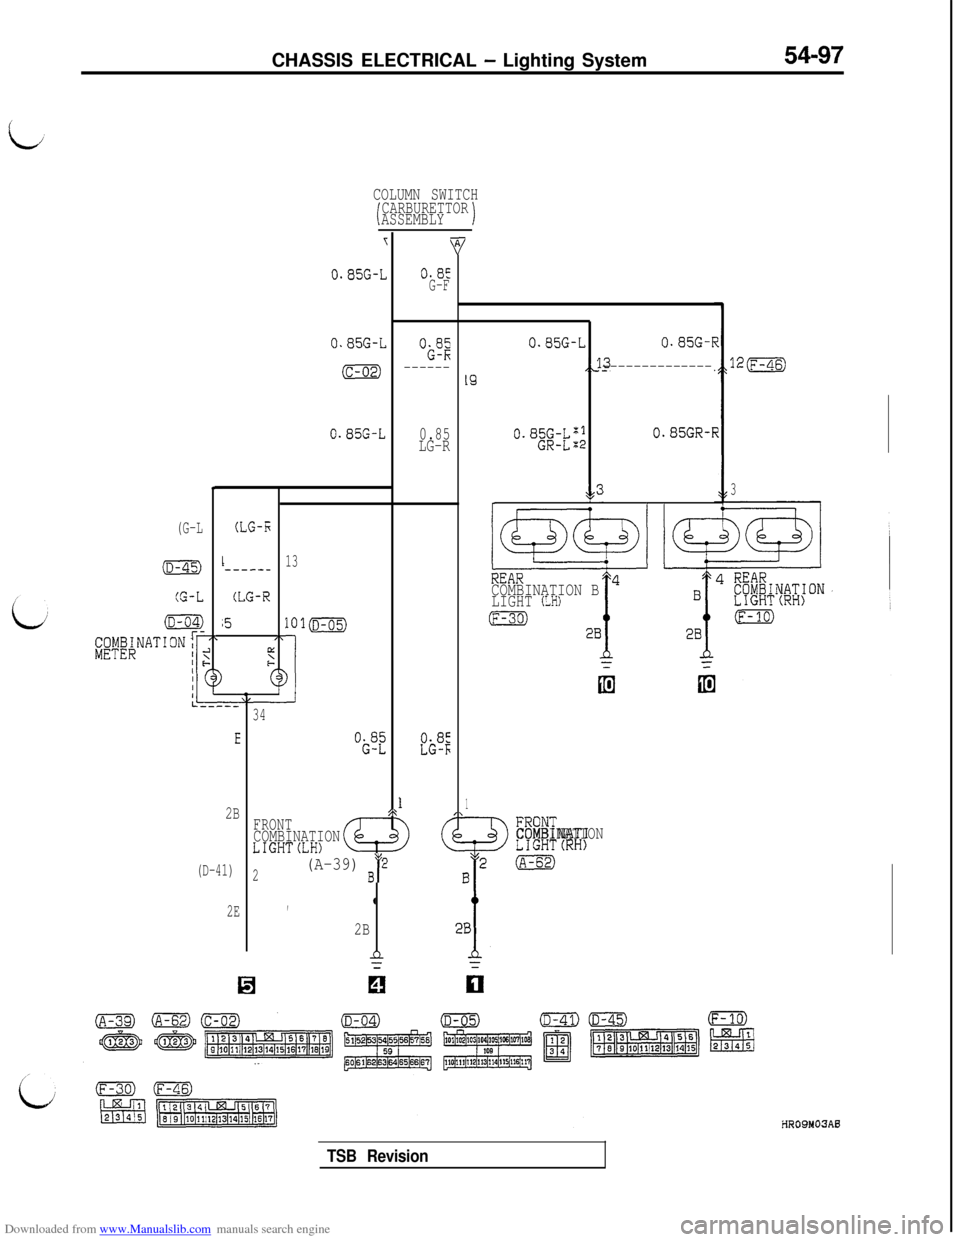
Downloaded from www.Manualslib.com manuals search engine CHASSIS ELECTRICAL - Lighting System54-97
COLUMN SWITCH
iCARBURETTOR
ASSEMBLY1
(G-L(LG-E
0.85G-L
0.85G-L
(c-02)
0.85G-L
L-----_
(LG-R
;5
2B
(D-41)
2E13
101m
I)
34
1.
,4
2B
nz
0.8EG-F
0.85G-R
------
0.85
LG-R
0.85G-L0.85G-f
,J3--------------19
0.85G-Lx10.85GR-IGR-L*2
r-y3I /
wCOMBINATION B4LIGHT (LH)
(F-30) 2B
!
1
COMBINATION
12m
3
TSB Revision
Page 596 of 738
Downloaded from www.Manualslib.com manuals search engine 54-100CHASSIS ELECTRICAL - Lighting System
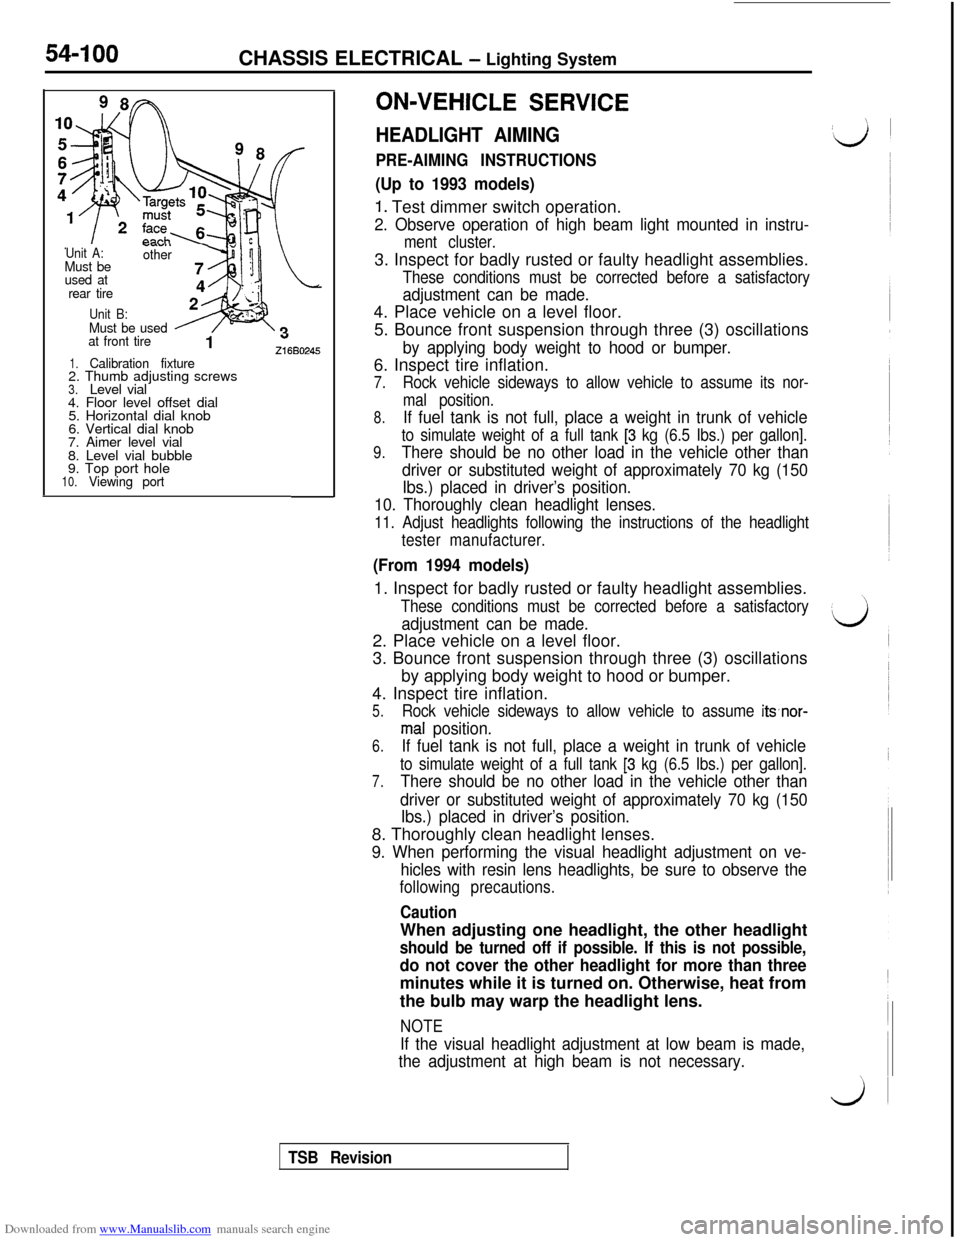
Unit A:Must be
used at
rear tire
“..“I. .other
Unit B:Must be used
at front tire1 -216802451.Calibration fixture2. Thumb adjusting screws
3.Level vial
4. Floor level offset dial
5. Horizontal dial knob
6. Vertical dial knob
7. Aimer level vial
8. Level vial bubble
9. Top port hole
10.Viewing portON-VEHICLE
SERVICE
HEADLIGHT AIMING
PRE-AIMING INSTRUCTIONS
(Up to 1993 models)
1. Test dimmer switch operation.
2. Observe operation of high beam light mounted in instru-
ment cluster.3. Inspect for badly rusted or faulty headlight assemblies.
These conditions must be corrected before a satisfactory
adjustment can be made.4. Place vehicle on a level floor.
5. Bounce front suspension through three (3) oscillations
by applying body weight to hood or bumper.6. Inspect tire inflation.
7.Rock vehicle sideways to allow vehicle to assume its nor-
mal position.
8.If fuel tank is not full, place a weight in trunk of vehicle
9.
to simulate weight of a full tank [3 kg (6.5 Ibs.) per gallon].
There should be no other load in the vehicle other than
driver or substituted weight of approximately 70 kg (150
Ibs.) placed in driver’s position.
10. Thoroughly clean headlight lenses.
11. Adjust headlights following the instructions of the headlight
tester manufacturer.
(From 1994 models)1. Inspect for badly rusted or faulty headlight assemblies.
These conditions must be corrected before a satisfactory
adjustment can be made.2. Place vehicle on a level floor.
3. Bounce front suspension through three (3) oscillations
by applying body weight to hood or bumper.
4. Inspect tire inflation.
5.Rock vehicle sideways to allow vehicle to assume it.snor-
mal position.
6.If fuel tank is not full, place a weight in trunk of vehicle
7.
to simulate weight of a full tank [3 kg (6.5 Ibs.) per gallon].
There should be no other load in the vehicle other than
driver or substituted weight of approximately 70 kg (150
Ibs.) placed in driver’s position.8. Thoroughly clean headlight lenses.
9. When performing the visual headlight adjustment on ve-
hicles with resin lens headlights, be sure to observe the
following precautions.
CautionWhen adjusting one headlight, the other headlight
should be turned off if possible. If this is not possible,
do not cover the other headlight for more than threeminutes while it is turned on. Otherwise, heat from
the bulb may warp the headlight lens.
NOTE
If the visual headlight adjustment at low beam is made,
the adjustment at high beam is not necessary.
TSB Revision
Page 599 of 738
Downloaded from www.Manualslib.com manuals search engine HEADLIGHT
CHASSIS ELECTRICAL - Lighting System54-103
REMOVAL AND INSTALLATION
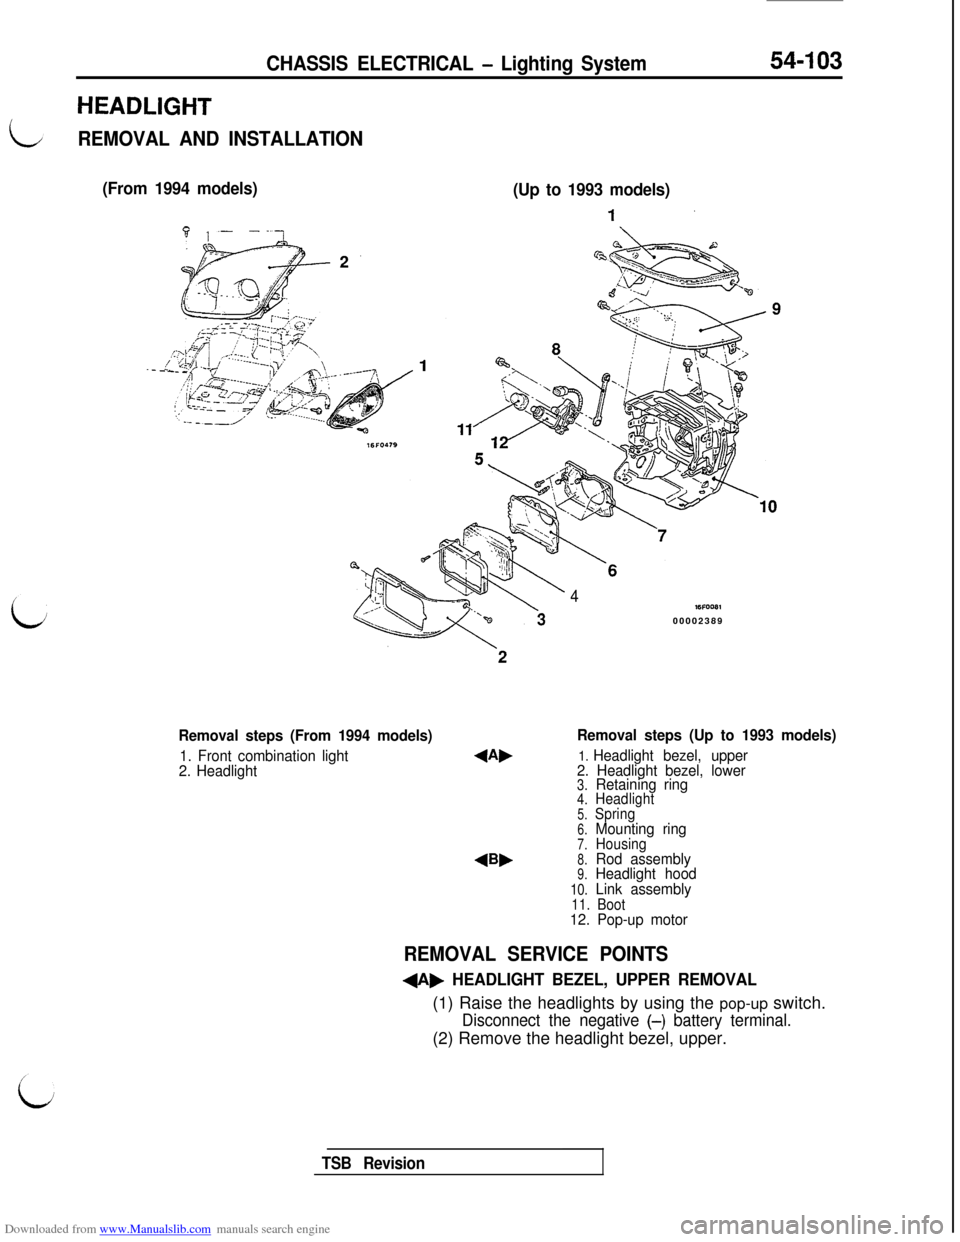
(From 1994 models)
(Up to 1993 models)
Removal steps (From 1994 models)
1. Front combination light
2. Headlight
4Bb
4WFOOB100002389
Removal steps (Up to 1993 models)
1. Headlight bezel, upper
2. Headlight bezel, lower
3.Retaining ring4.Headlight5.Spring6.Mounting ring7.Housing8.Rod assembly9.Headlight hood
10.Link assembly11. Boot12. Pop-up motor
REMOVAL SERVICE POINTS
+A, HEADLIGHT BEZEL, UPPER REMOVAL(1) Raise the headlights by using the pop-up switch.
Disconnect the negative (-) battery terminal.(2) Remove the headlight bezel, upper.
TSB Revision
Page 605 of 738
Downloaded from www.Manualslib.com manuals search engine CHASSIS ELECTRICAL - Lighting System54-109
POP-UP SWITCH* AND FOG LIGHT SWITCH
i
LREMOVAL AND INSTALLATION
bZ16FO220
b
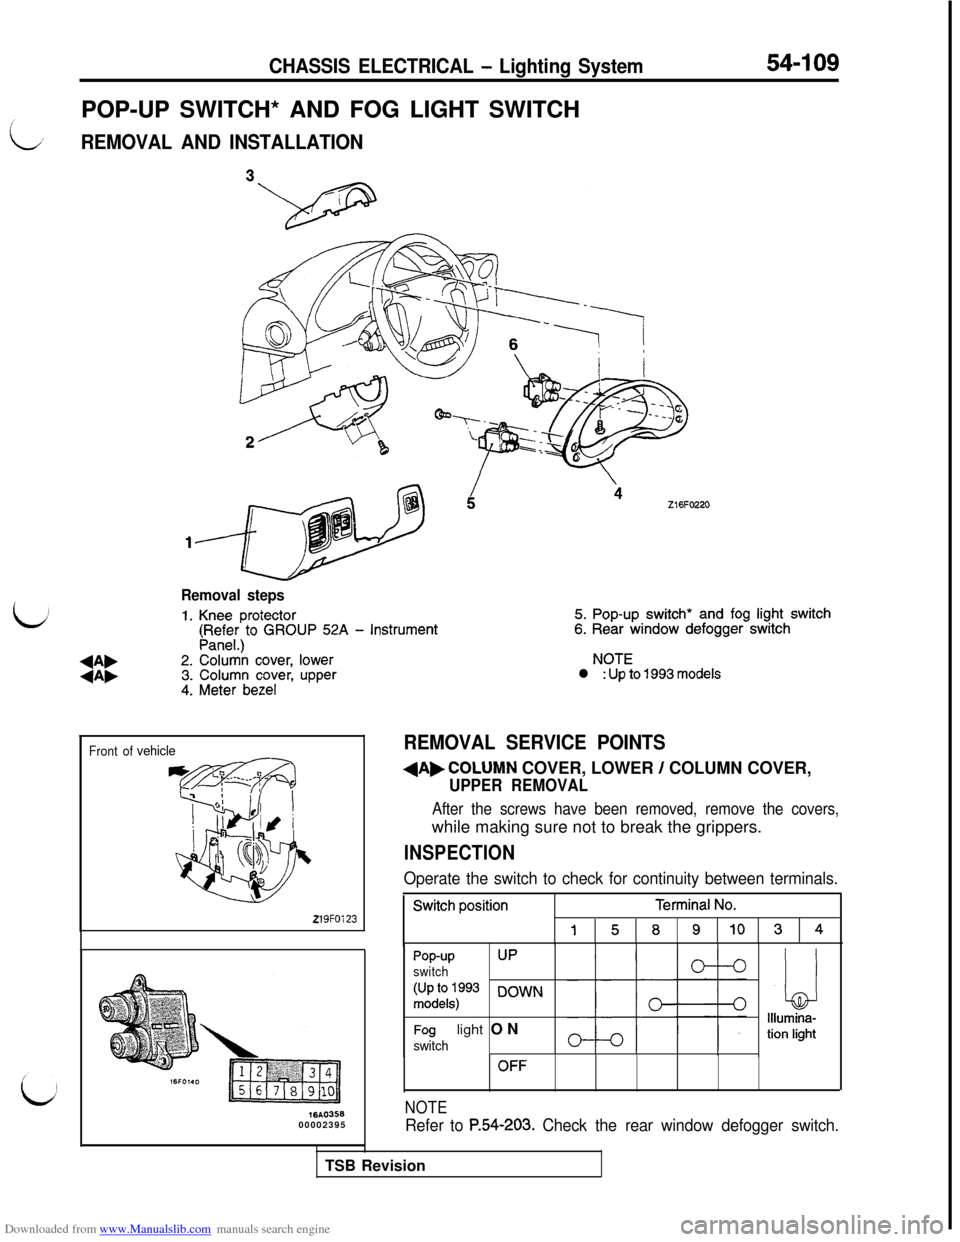
Removal steps
1. Knee protector5. Pop-up switch* and fog light switch
(pR,;$)to GROUP 52A - Instrument6. Rear window defogger switch
+A,2. Colur& cover, lowerNOTE
+A,3. Column cover, upperl : Up to 1993 models
4. Meter bezel
Front ofvehicle
219FO123
lbA035600002395
REMOVAL SERVICE POINTS
dAbCOLUMN COVER, LOWER / COLUMN COVER,
UPPER REMOVAL
After the screws have been removed, remove the covers,while making sure not to break the grippers.
INSPECTION
Operate the switch to check for continuity between terminals.
Switch positionTerminal No.
15891034
Pop-upUP
switch
:;;1kq:p93 DOWN
Foglight ONswitch
OFF
NOTE
Refer to P.54-203. Check the rear window defogger switch.TSB Revision
Page 606 of 738
Downloaded from www.Manualslib.com manuals search engine 54-110CHASSIS ELECTRICAL - Lighting System
1
16FO121
16FO12600002396
I‘VA1 I\ Air outlet assembly _I
RHEOSTAT\
INSPECTIONJL
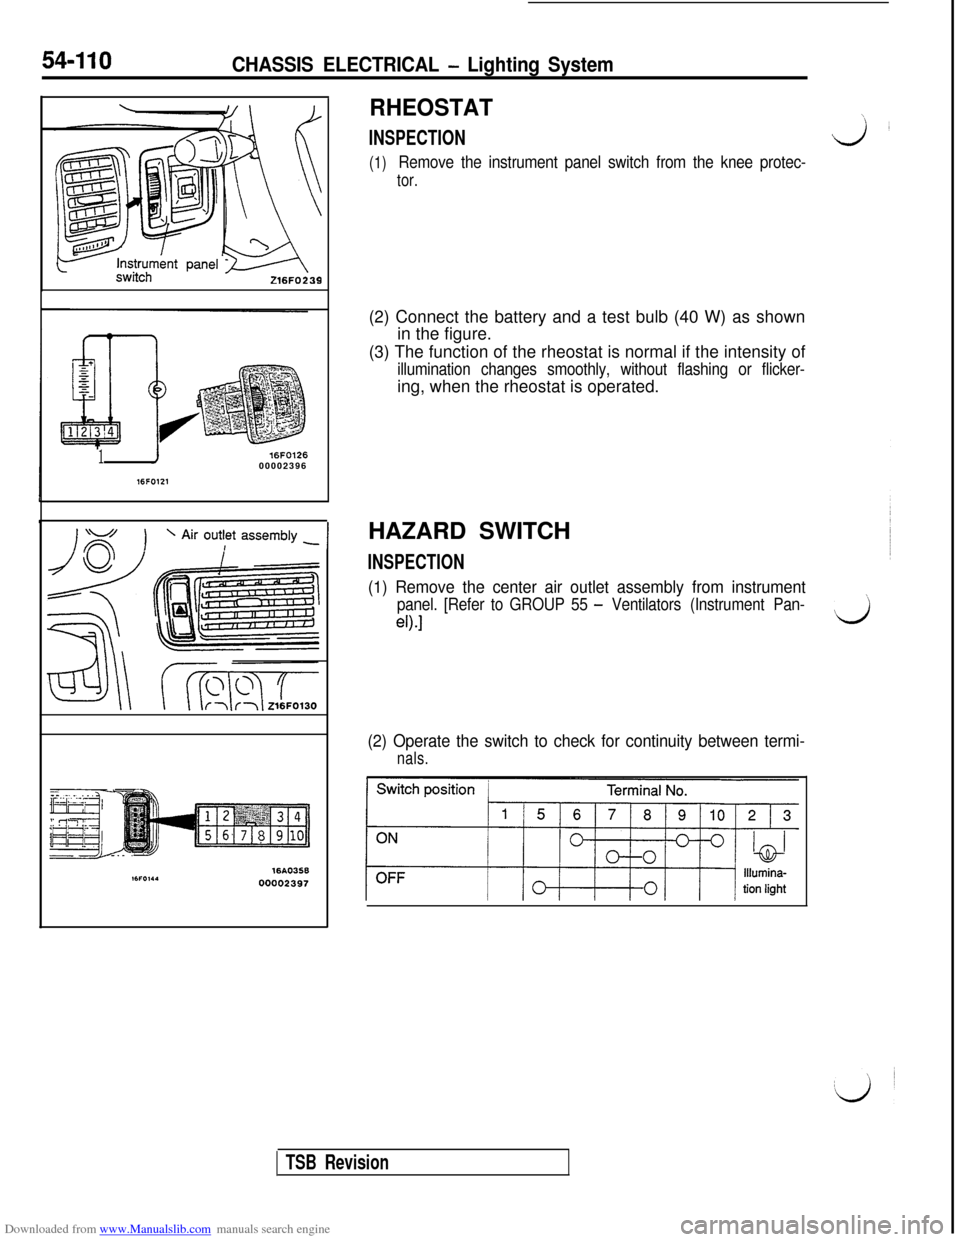
(1)Remove the instrument panel switch from the knee protec-
tor.(2) Connect the battery and a test bulb (40 W) as shown
in the figure.
(3) The function of the rheostat is normal if the intensity of
illumination changes smoothly, without flashing or flicker-ing, when the rheostat is operated.
HAZARD SWITCH
INSPECTION
(1) Remove the center air outlet assembly from instrument
panel. [Refer to GROUP 55 - Ventilators (Instrument Pan-’
eO.1d
(2) Operate the switch to check for continuity between termi-
nals.
TSB Revision
Page 607 of 738
Downloaded from www.Manualslib.com manuals search engine CHASSIS ELECTRICAL - Column Switch
COLUMN SWITCH
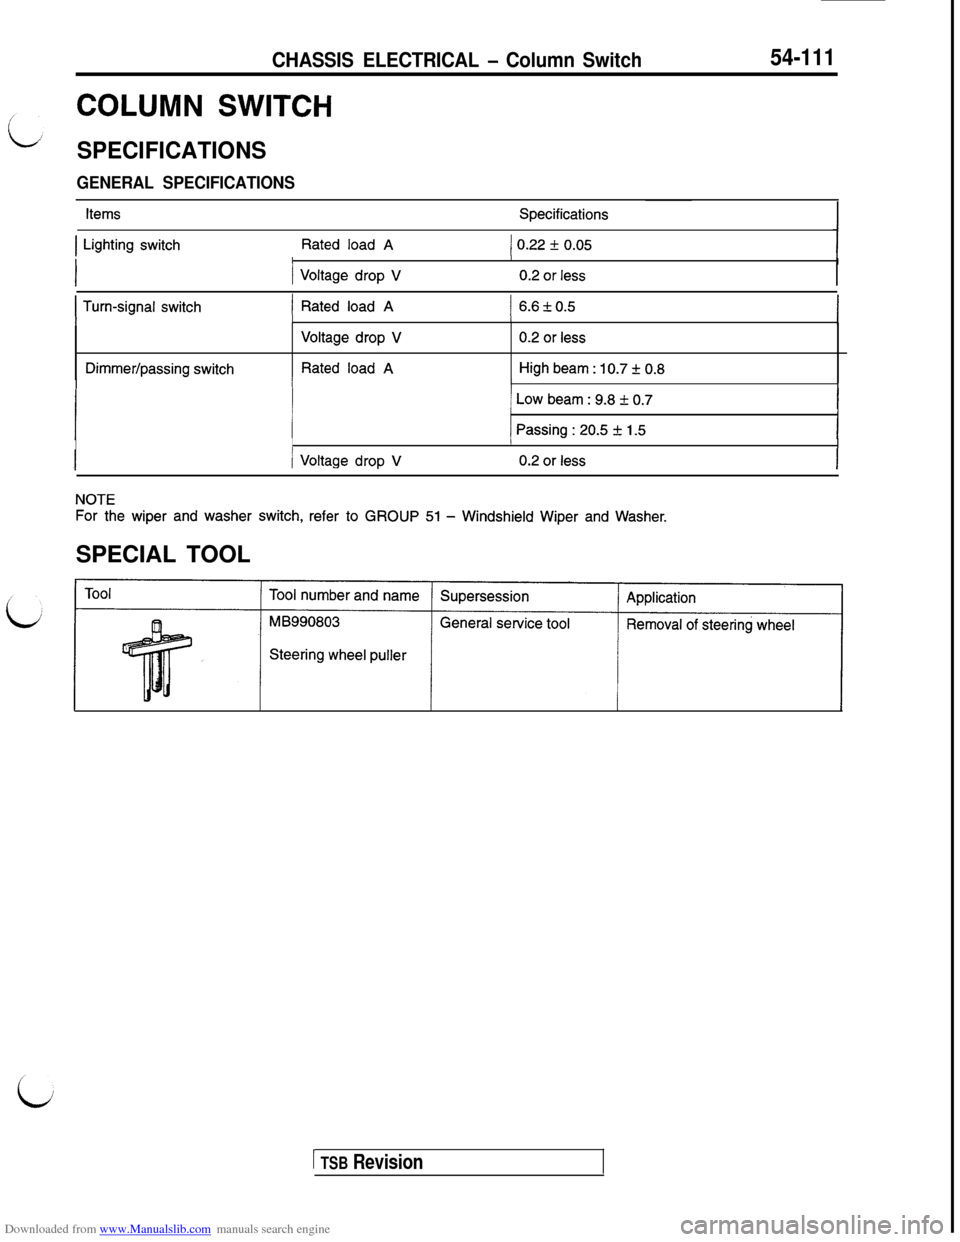
SPECIFICATIONS
GENERAL SPECIFICATIONS
54-111
ItemsSpecifications
1 Lighting switchRated load A1 0.22 f 0.05IIII
1 Voltage drop V0.2 or less
I Turn-signal switch) Rated load A1 6.6kO.5III/I
Dimmer/passing switch
Voltage drop V
Rated load A
0.2 or less
High beam : 10.7 + 0.8IIII
1 Low beam : 9.8 f 0.7IIII
j Passing : 20.5 + 1.5IIII
/ Voltage drop V0.2 or less
NOTE
For the wiper and washer switch, refer to GROUP 51 - Windshield Wiper and Washer.SPECIAL TOOL
Steering wheel puller
1 TSB Revision
Page 608 of 738
Downloaded from www.Manualslib.com manuals search engine 54-112CHASSIS ELECTRICAL - Column SwitchCOLUMN SWITCH
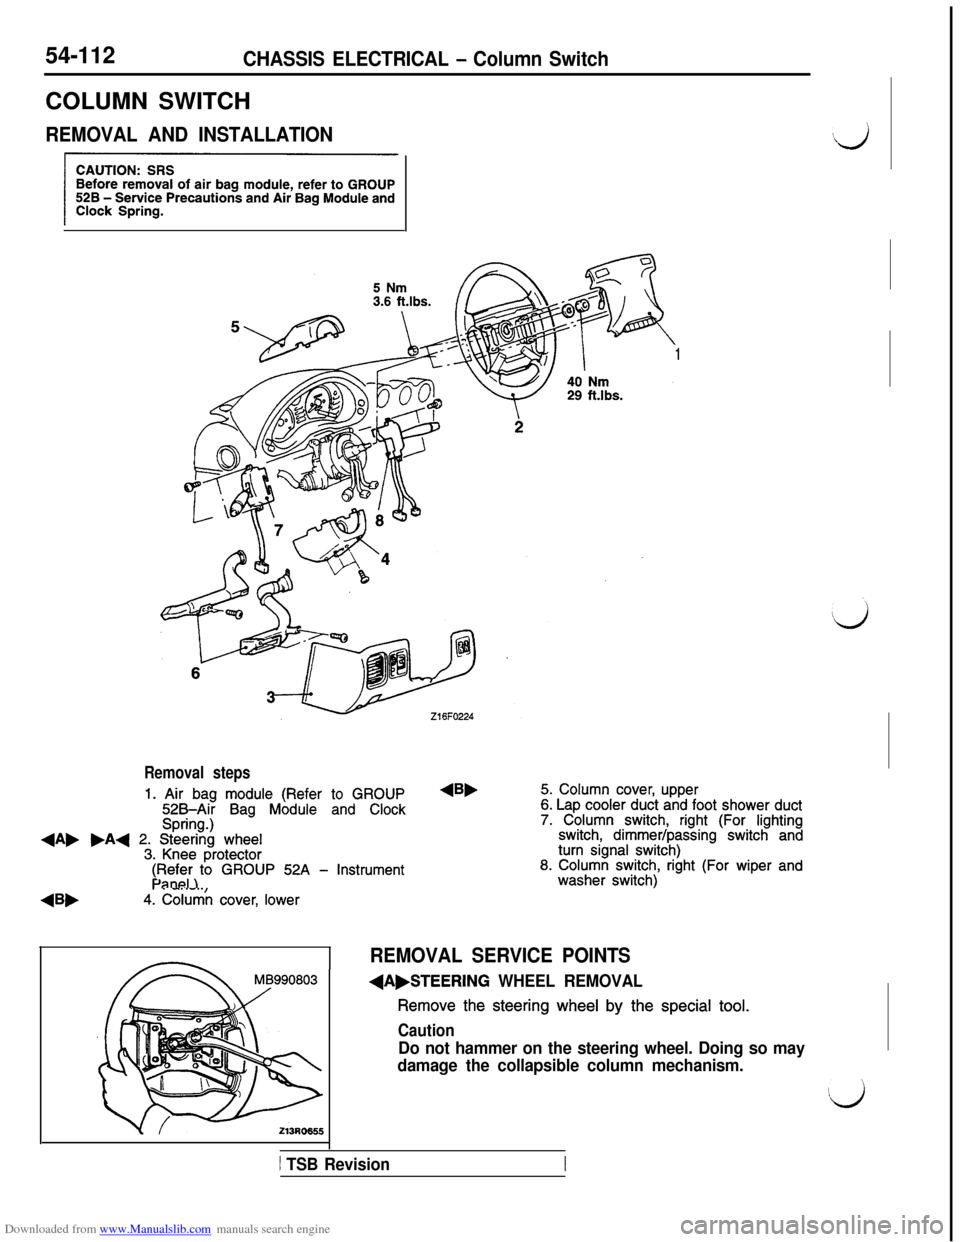
REMOVAL AND INSTALLATION
1
Removal steps
1. Air bag module (Refer to GROUP525Air Bag Module and ClockSpring.)+A, .A+ 2. Steering wheel3. Knee protector
4Bb
$F$i;)to GROUP 52A - Instrument
4. Column cover, lower
4B,5. Column cover, upper6. Lap cooler duct and foot shower duct7. Column switch, right (For lightingswitch, dimmer/passing switch andturn signal switch)8. Column switch, right (For wiper andwasher switch)
REMOVAL SERVICE POINTS
(A,STEERING WHEEL REMOVAL
Remove the steering wheel by the special tool.
Caution
Do not hammer on the steering wheel. Doing so may
damage the collapsible column mechanism.
1 TSB Revision