MITSUBISHI COLT 2008 Owner's Manual (in English)
Manufacturer: MITSUBISHI, Model Year: 2008, Model line: COLT, Model: MITSUBISHI COLT 2008Pages: 450, PDF Size: 14.57 MB
Page 151 of 450
Instruments and controls3-31
3
Combination headlamp
s and dipper switch
E00506000923
Headlamps
NOTE●Do not leave the headlamps and other lamps on for a long
time while the engine is stationary (not running). A run-
down battery could result.
● When it rains, or when the vehicle has been washed, the
inside of the lens sometime s becomes foggy. This is the
same phenomenon as when window glass mists up on a
humid day, and does not indicate a functional problem.
When the lamp is switched on, the heat will remove the
fog. However, if water gathers inside the lamp, we recom-
mend you to have it checked.
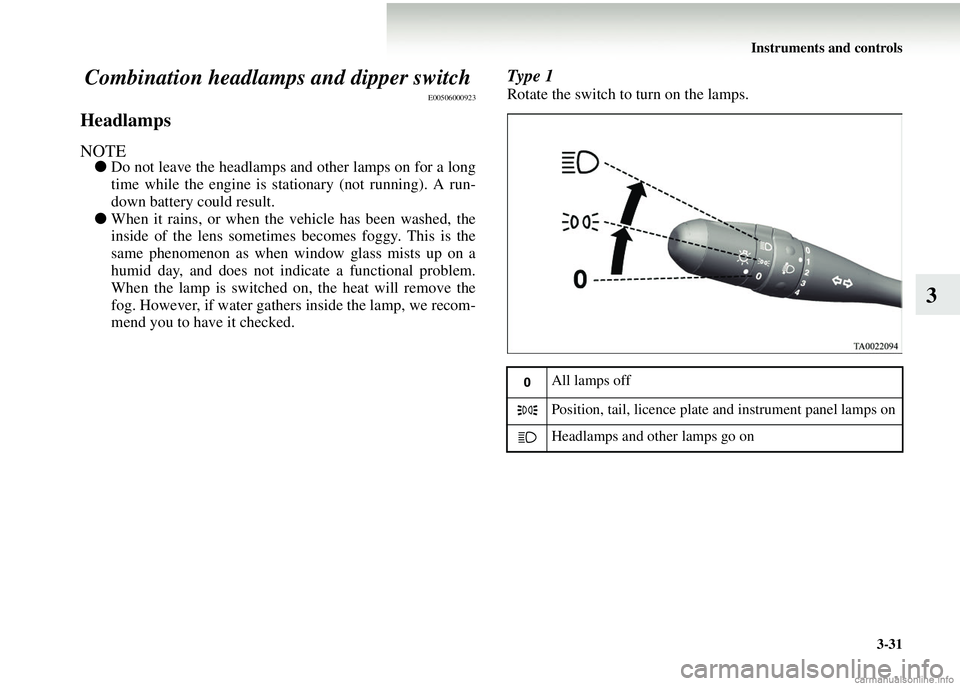
Type 1
Rotate the switch to turn on the lamps.
All lamps off
Position, tail, licence plate and instrument panel lamps on
Headlamps and other lamps go on
Page 152 of 450
3-32 Instruments and controls
3
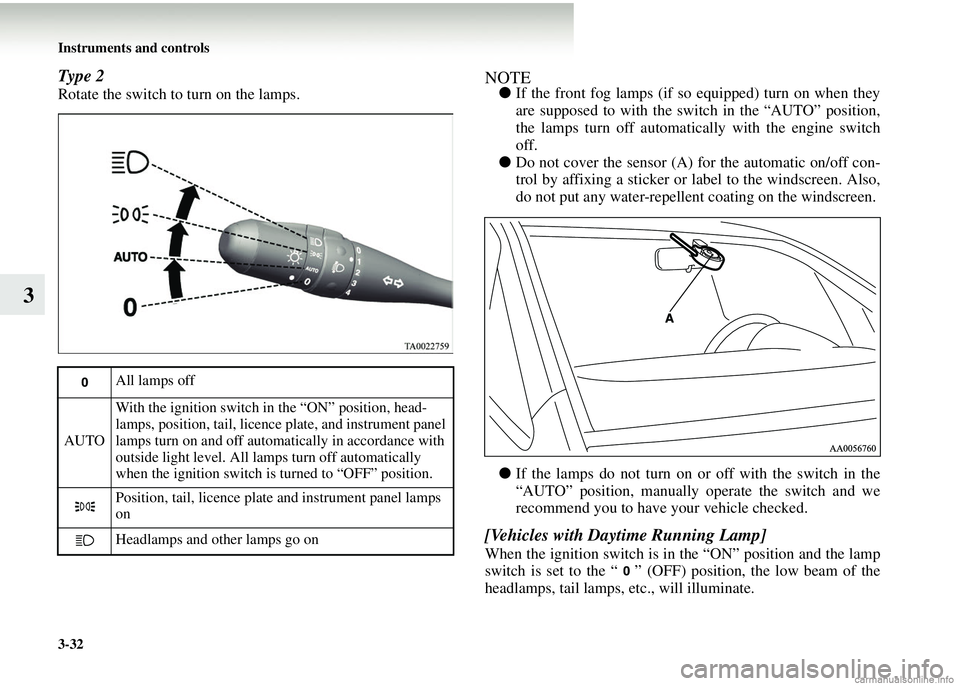
Type 2
Rotate the switch to turn on the lamps.
NOTE●If the front fog lamps (if so equipped) turn on when they
are supposed to with the switch in the “AUTO” position,
the lamps turn off automatically with the engine switch
off.
● Do not cover the sensor (A) for the automatic on/off con-
trol by affixing a sticker or label to the windscreen. Also,
do not put any water-repellent coating on the windscreen.
● If the lamps do not turn on or off with the switch in the
“AUTO” position, manually operate the switch and we
recommend you to have your vehicle checked.
[Vehicles with Daytime Running Lamp]
When the ignition switch is in the “ON” position and the lamp
switch is set to the “ ” (OFF) position, the low beam of the
headlamps, tail lamps, etc., will illuminate.
All lamps off
AUTO With the ignition switch in the “ON” position, head-
lamps, position, tail, licence plate, and instrument panel
lamps turn on and off automatically in accordance with
outside light level. All lamps turn off automatically
when the ignition switch is turned to “OFF” position.
Position, tail, licence plate and instrument panel lamps
on
Headlamps and other lamps go on
Page 153 of 450
Instruments and controls3-33
3
Lamp monitor buzzerE00506100067
If the driver’s door is opened when the ignition key is in the
“LOCK” or “ACC” position or removed from the ignition
switch while the lamps are on, a buzzer will sound to remind
the driver to turn off the lamps. Turn off the lamp switch to
stop the buzzer.
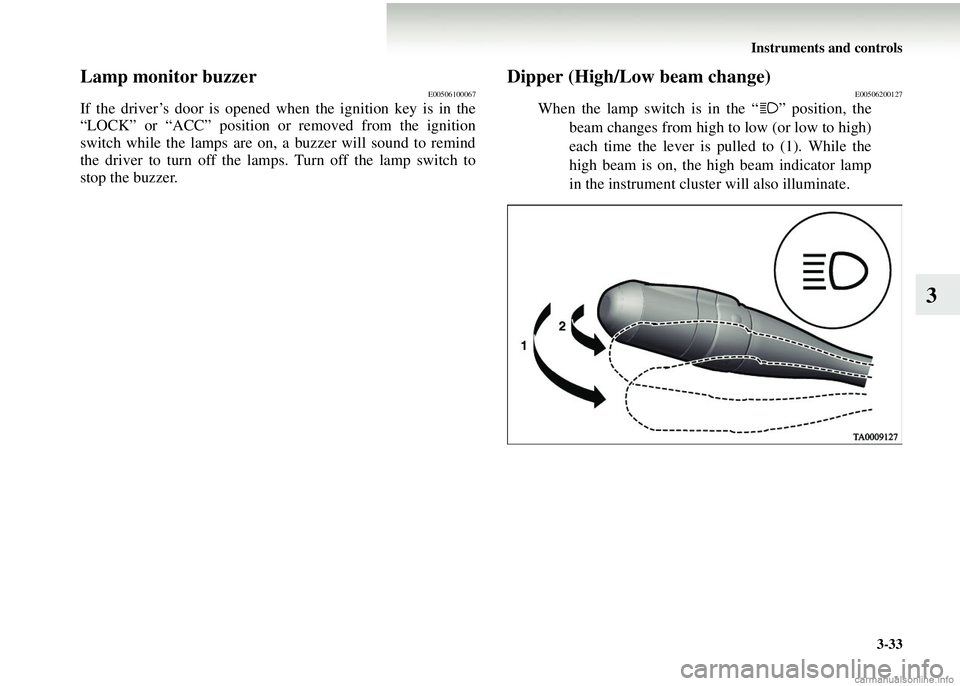
Dipper (High/Low beam change)E00506200127
When the lamp switch is in the “ ” position, thebeam changes from high to low (or low to high)
each time the lever is pul led to (1). While the
high beam is on, the high beam indicator lamp
in the instrument cluster will also illuminate.
Page 154 of 450
3-34 Instruments and controls
3
Headlamp flasherE00506300043
The high beams flash when the lever is pulled slightly to (2),
and will go off when it is released.
When the high beam is on, the high beam indicator lamp in the
instrument cluster will also illuminate.
NOTE● The high beams can also flash when the lamp switch is
OFF.
● If you turn the lamps off with the headlamps set to high-
beam illumination, the h eadlamps are automatically
returned to their low-beam setting when the lamp switch
is next turned to the “ ” position.
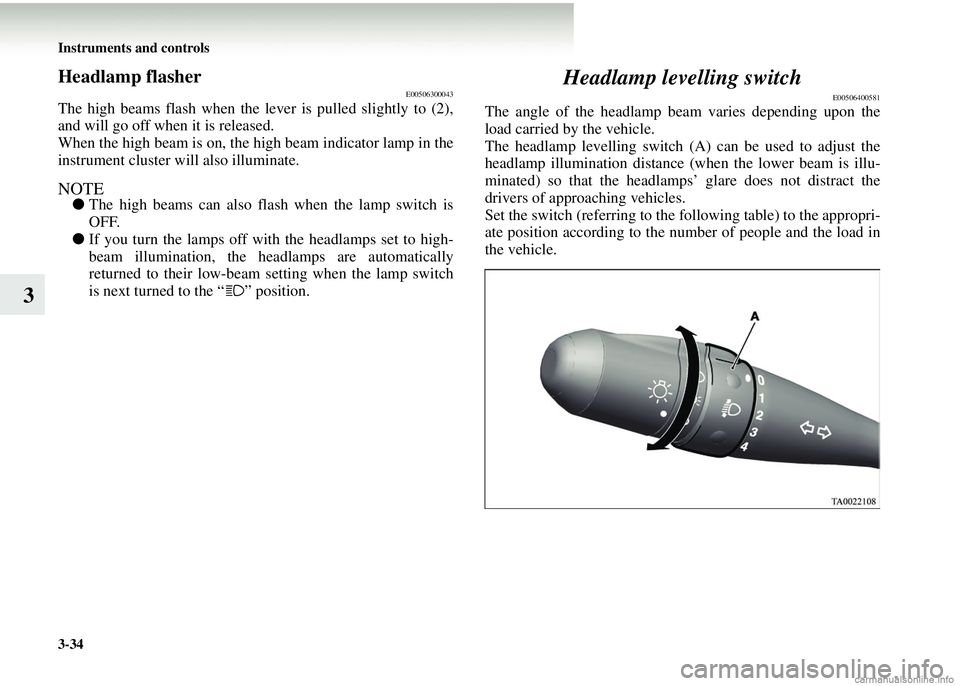
Headlamp levelling switch
E00506400581
The angle of the headlamp b eam varies depending upon the
load carried by the vehicle.
The headlamp levelling switch (A) can be used to adjust the
headlamp illumination distance (when the lower beam is illu-
minated) so that the headlamps’ glare does not distract the
drivers of approaching vehicles.
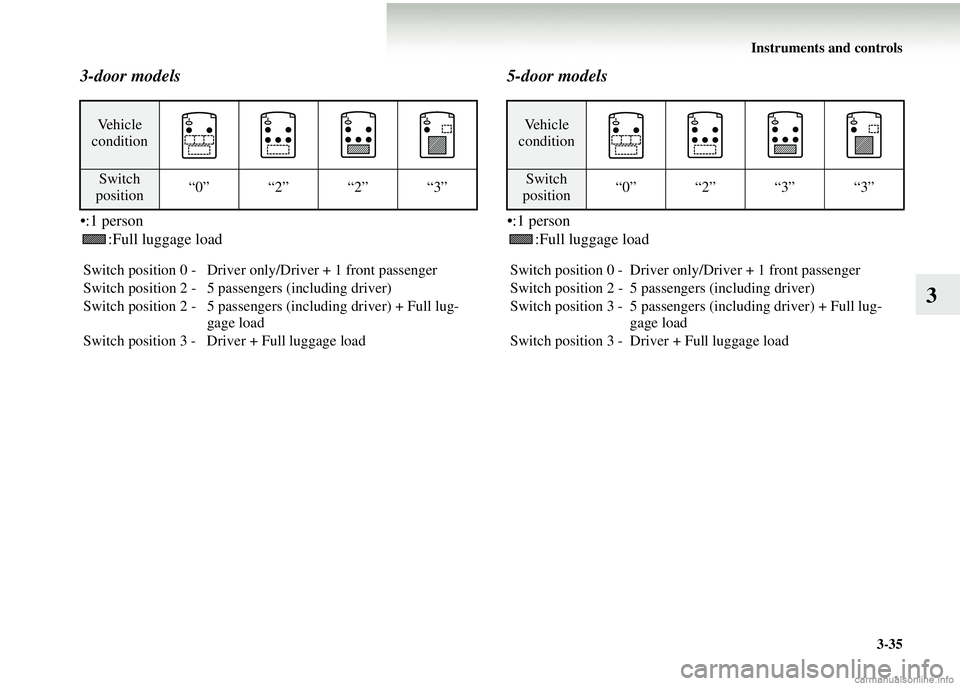
Set the switch (referring to the following table) to the appropri-
ate position according to the numb er of people and the load in
the vehicle.
Page 155 of 450
Instruments and controls3-35
3
3-door models
•:1 person:Full luggage load
5-door models
•:1 person:Full luggage load
Vehicle
condition
Switch
position “0” “2” “2” “3”
Switch position 0 - Driver only/Driver + 1 front passenger
Switch position 2 - 5 passengers (including driver)
Switch position 2 - 5 passengers (including driver) + Full lug- gage load
Switch position 3 - Driver + Full luggage load
Vehicle
condition
Switch
position “0” “2” “3” “3”
Switch position 0 - Driver only/Driver + 1 front passenger
Switch position 2 - 5 passengers (including driver)
Switch position 3 - 5 passengers (including driver) + Full lug- gage load
Switch position 3 - Driver + Full luggage load
Page 156 of 450
3-36 Instruments and controls
3Turn-signal lever
E00506500537
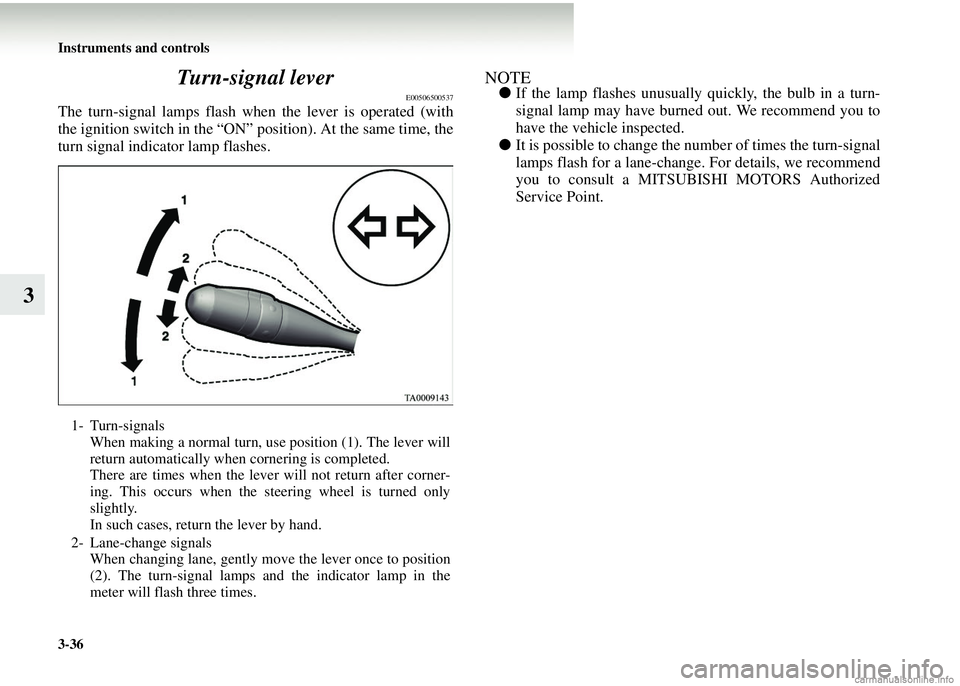
The turn-signal lamps flash when the lever is operated (with
the ignition switch in the “ON” position). At the same time, the
turn signal indicator lamp flashes.
NOTE●
If the lamp flashes unusually quickly, the bulb in a turn-
signal lamp may have burned out. We recommend you to
have the vehicle inspected.
● It is possible to change the number of times the turn-signal
lamps flash for a lane-change. For details, we recommend
you to consult a MITSUBISHI MOTORS Authorized
Service Point.
1- Turn-signals
When making a normal turn, use position (1). The lever will
return automatically when cornering is completed.
There are times when the lever will not return after corner-
ing. This occurs when the steering wheel is turned only
slightly.
In such cases, return the lever by hand.
2- Lane-change signals When changing lane, gently move the lever once to position
(2). The turn-signal lamps and the indicator lamp in the
meter will flash three times.
Page 157 of 450
Instruments and controls3-37
3
Hazard warning flasher switch
E00506600088
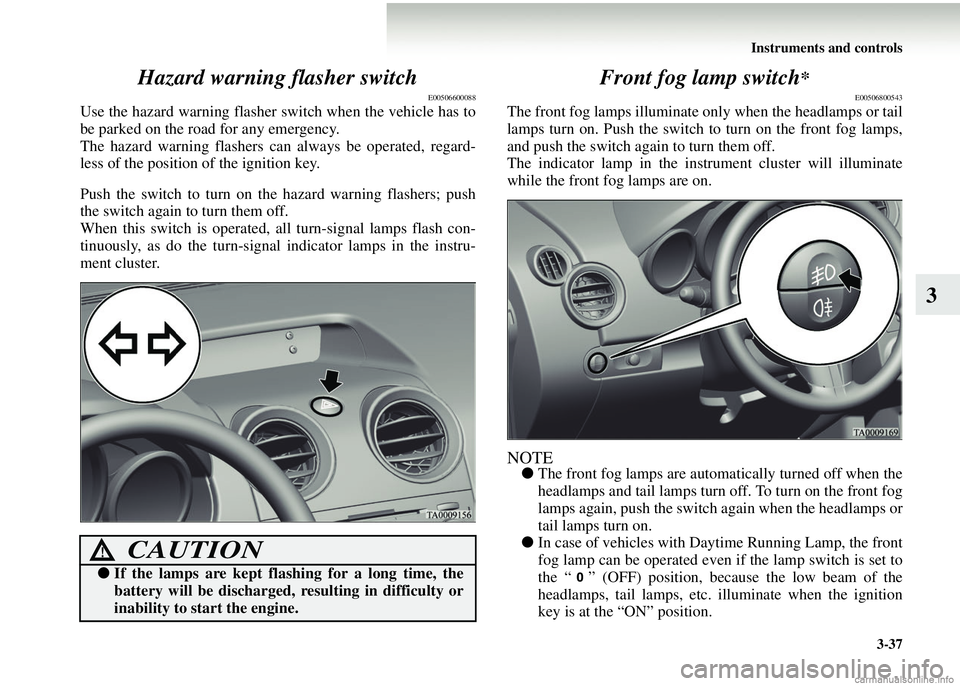
Use the hazard warning flasher switch when the vehicle has to
be parked on the road for any emergency.
The hazard warning flashers can always be operated, regard-
less of the position of the ignition key.
Push the switch to turn on the hazard warning flashers; push
the switch again to turn them off.
When this switch is operated, all turn-signal lamps flash con-
tinuously, as do the turn-signal indicator lamps in the instru-
ment cluster.
Front fog lamp switch*
E00506800543
The front fog lamps illuminate only when the headlamps or tail
lamps turn on. Push the switch to turn on the front fog lamps,
and push the switch again to turn them off.
The indicator lamp in the instrument cluster will illuminate
while the front fog lamps are on.
NOTE●
The front fog lamps are automa tically turned off when the
headlamps and tail lamps turn off. To turn on the front fog
lamps again, push the switch again when the headlamps or
tail lamps turn on.
● In case of vehicles with Daytime Running Lamp, the front
fog lamp can be operated even if the lamp switch is set to
the “ ” (OFF) position, becau se the low beam of the
headlamps, tail lamps, etc. illuminate when the ignition
key is at the “ON” position.
CAUTION!
● If the lamps are kept flashing for a long time, the
battery will be discharged, resulting in difficulty or
inability to start the engine.
Page 158 of 450
3-38 Instruments and controls
3Rear fog lamp switch
E00506900238
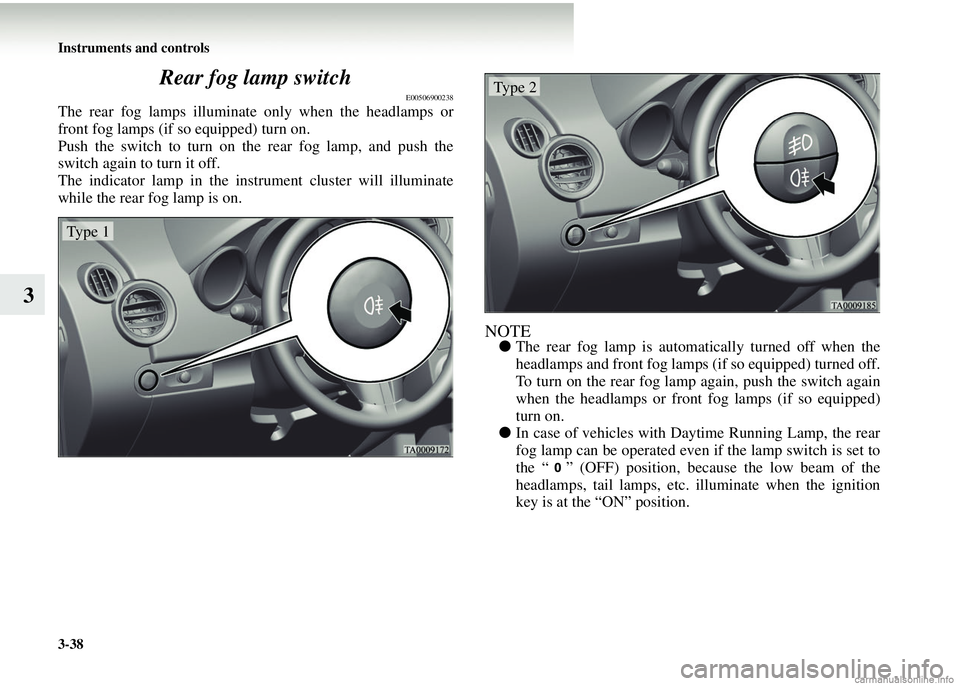
The rear fog lamps illuminate
only when the headlamps or
front fog lamps (if so equipped) turn on.
Push the switch to turn on the rear fog lamp, and push the
switch again to turn it off.
The indicator lamp in the instrument cluster will illuminate
while the rear fog lamp is on.
NOTE● The rear fog lamp is automa tically turned off when the
headlamps and front fog lamps (if so equipped) turned off.
To turn on the rear fog lamp again, push the switch again
when the headlamps or front fog lamps (if so equipped)
turn on.
● In case of vehicles with Daytime Running Lamp, the rear
fog lamp can be operated even if the lamp switch is set to
the “ ” (OFF) position, becau se the low beam of the
headlamps, tail lamps, etc. illuminate when the ignition
key is at the “ON” position.
Type 1
Type 2
Page 159 of 450
Instruments and controls3-39
3
Wiper and washer switch
E00507100820
Windscreen wipersE00516900013
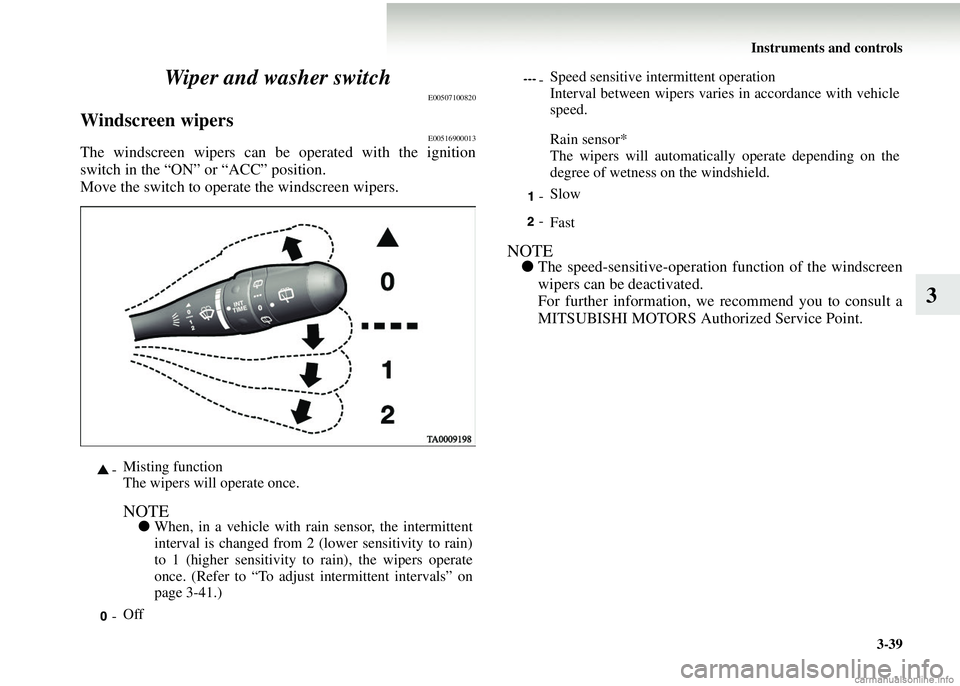
The windscreen wipers can be operated with the ignition
switch in the “ON” or “ACC” position.
Move the switch to operate the windscreen wipers.
NOTE●
The speed-sensitive-operation function of the windscreen
wipers can be deactivated.
For further information, we recommend you to consult a
MITSUBISHI MOTORS Auth orized Service Point.
-Misting function
The wipers w
ill operate once.
NOTE●When, in a vehicle with rain sensor, the intermittent
interval is changed from 2 (lower sensitivity to rain)
to 1 (higher sensitivity to rain), the wipers operate
once. (Refer to “To adjust intermittent intervals” on
page 3-41.)
- Off
-Speed sensitive intermittent operation
Interval between wipers varies in accordance with vehicle
speed.
Rain sensor*
The wipers will automatically operate depending on the
degree of wetness on the windshield.
- Slow
- Fast
Page 160 of 450
3-40 Instruments and controls
3
Rain sensor*E00517000011
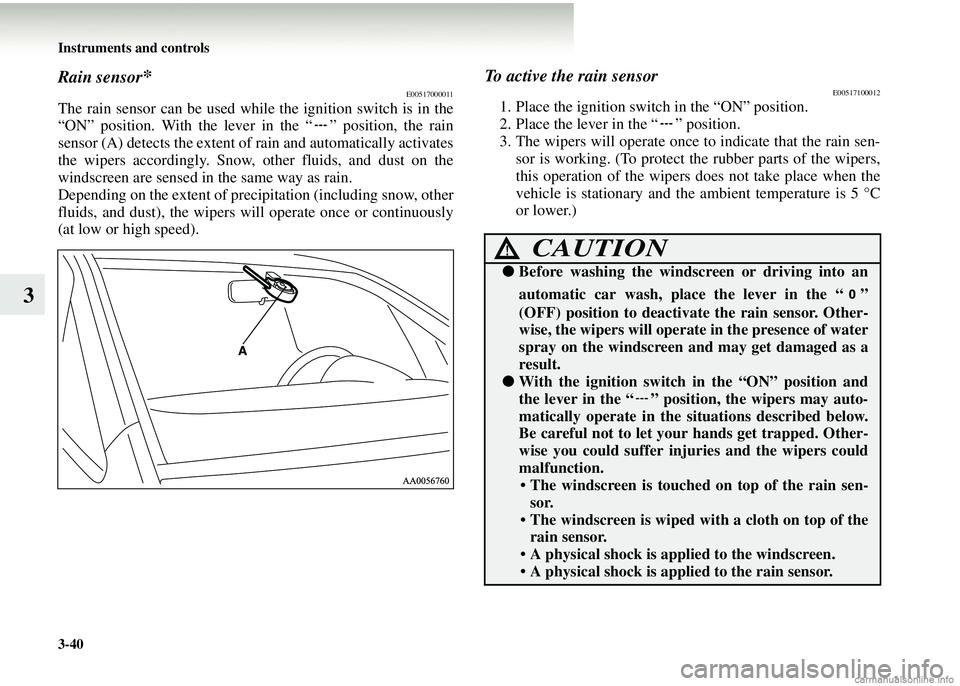
The rain sensor can be used while the ignition switch is in the
“ON” position. With the lever in the “ ” position, the rain
sensor (A) detects the extent of rain and automatically activates
the wipers accordingly. Snow, other fluids, and dust on the
windscreen are sensed in the same way as rain.
Depending on the extent of precipitation (including snow, other
fluids, and dust), the wipers will operate once or continuously
(at low or high speed).
To active the rain sensorE00517100012
1. Place the ignition switch in the “ON” position.
2. Place the lever in the “ ” position.
3. The wipers will operate once to indicate that the rain sen-
sor is working. (To protect the rubber parts of the wipers,
this operation of the wipers does not take place when the
vehicle is stationary and th e ambient temperature is 5 °C
or lower.)
CAUTION!
● Before washing the windscreen or driving into an
automatic car wash, pla ce the lever in the “ ”
(OFF) position to deactivate the rain sensor. Other-
wise, the wipers will operate in the presence of water
spray on the windscreen and may get damaged as a
result.
● With the ignition switch in the “ON” position and
the lever in the “ ” positi on, the wipers may auto-
matically operate in the si tuations described below.
Be careful not to let your hands get trapped. Other-
wise you could suffer injuri es and the wipers could
malfunction.
• The windscreen is touched on top of the rain sen-
sor.
• The windscreen is wiped with a cloth on top of the rain sensor.
• A physical shock is applied to the windscreen.
• A physical shock is applied to the rain sensor.