MITSUBISHI COLT 2008 Owner's Manual (in English)
Manufacturer: MITSUBISHI, Model Year: 2008, Model line: COLT, Model: MITSUBISHI COLT 2008Pages: 450, PDF Size: 14.57 MB
Page 361 of 450
Maintenance8-19
8
Tyres
E01001300226
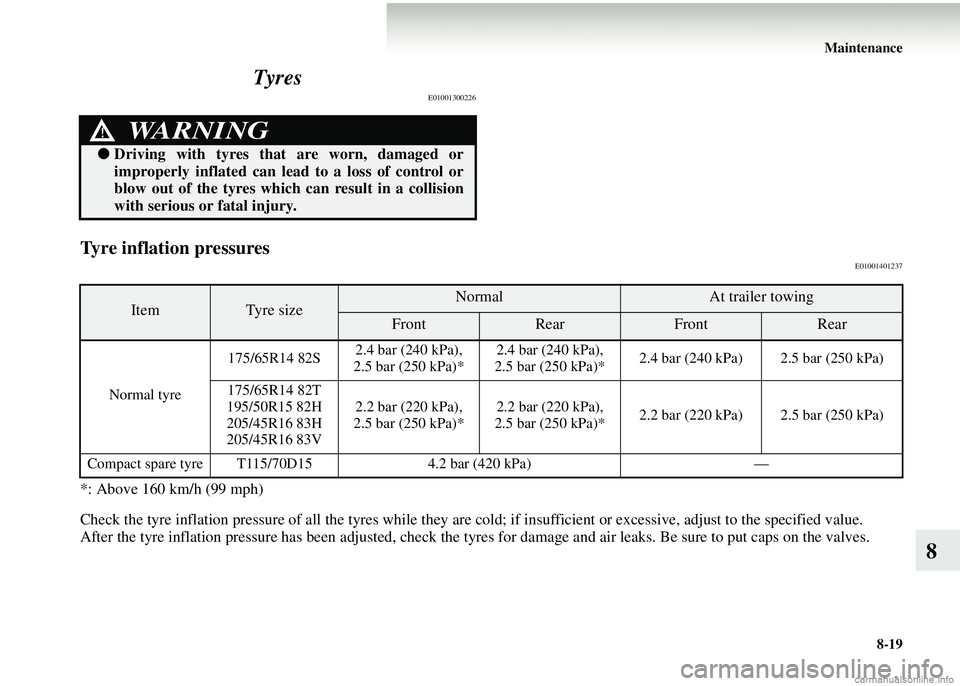
Tyre inflation pressuresE01001401237
*: Above 160 km/h (99 mph)
Check the tyre inflation pressure of all th
e tyres while they are cold; if insufficient or excessive, adjust to the specified v alue.
After the tyre inflation pressure has been adjusted, check the tyres for damage and ai r leaks. Be sure to put caps on the valves.
WARNING!
●Driving with tyres that are worn, damaged or
improperly inflated can lead to a loss of control or
blow out of the tyres which can result in a collision
with serious or fatal injury.
ItemTy r e s i z eNormalAt trailer towing
FrontRearFrontRear
Normal tyre 175/65R14 82S
2.4 bar (240 kPa),
2.5 bar (250 kPa)* 2.4 bar (240 kPa),
2.5 bar (250 kPa)* 2.4 bar (240 kPa) 2.5 bar (250 kPa)
175/65R14 82T
195/50R15 82H
205/45R16 83H
205/45R16 83V 2.2 bar (220 kPa),
2.5 bar (250 kPa)* 2.2 bar (220 kPa),
2.5 bar (250 kPa)* 2.2 bar (220 kPa) 2.5 bar (250 kPa)
Compact spare tyre T115/70D15 4.2 bar (420 kPa)—
Page 362 of 450
8-20 Maintenance
8
Wheel conditionE01001800407
Check the tyres for cuts, cracks and other damage. Replace the
tyres if there are deep cuts or cracks. Also check each tyre for
pieces of metal or pebbles.
The use of worn tyres can be very dangerous because of the
greater chance of skidding or h ydroplaning. The tread depth of
the tyres must exceed 1.6 mm in order for the tyres to meet the
minimum requirement for use.
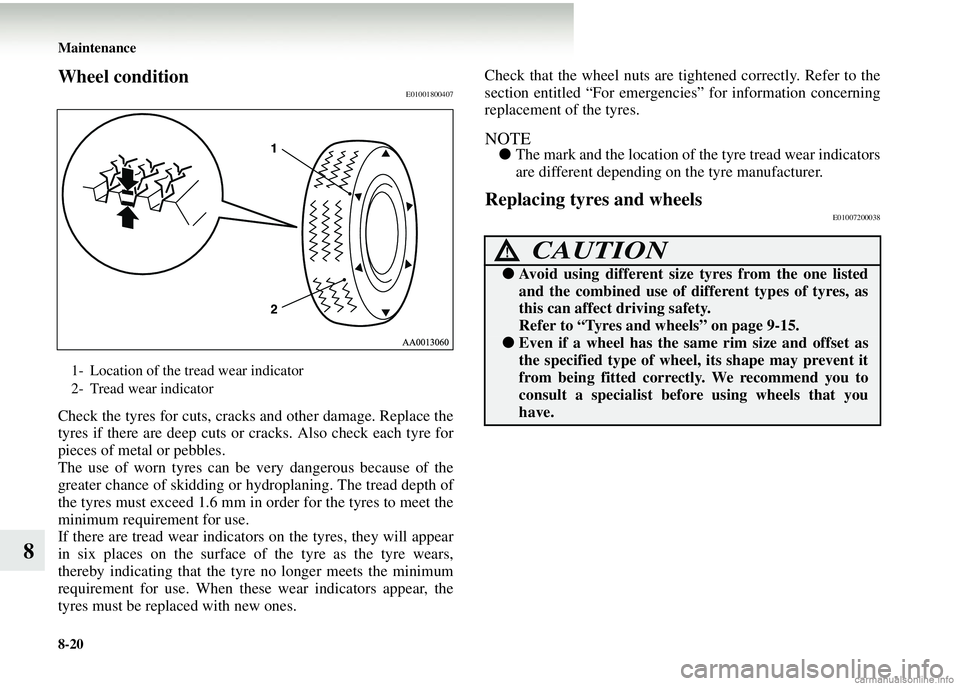
If there are tread wear indicator s on the tyres, they will appear
in six places on the surface of the tyre as the tyre wears,
thereby indicating that the tyre no longer meets the minimum
requirement for use. When thes e wear indicators appear, the
tyres must be replaced with new ones. Check that the wheel nuts are ti
ghtened correctly. Refer to the
section entitled “For emergencies” for information concerning
replacement of the tyres.
NOTE● The mark and the location of th e tyre tread wear indicators
are different depending on the tyre manufacturer.
Replacing tyres and wheelsE01007200038
1- Location of the tread wear indicator
2- Tread wear indicator
CAUTION!
●Avoid using different size tyres from the one listed
and the combined use of di fferent types of tyres, as
this can affect driving safety.
Refer to “Tyres and wheels” on page 9-15.
● Even if a wheel has the sa me rim size and offset as
the specified type of wheel , its shape may prevent it
from being fitted correct ly. We recommend you to
consult a specialist befo re using wheels that you
have.
Page 363 of 450
Maintenance8-21
8
Tyre rotationE01001900121
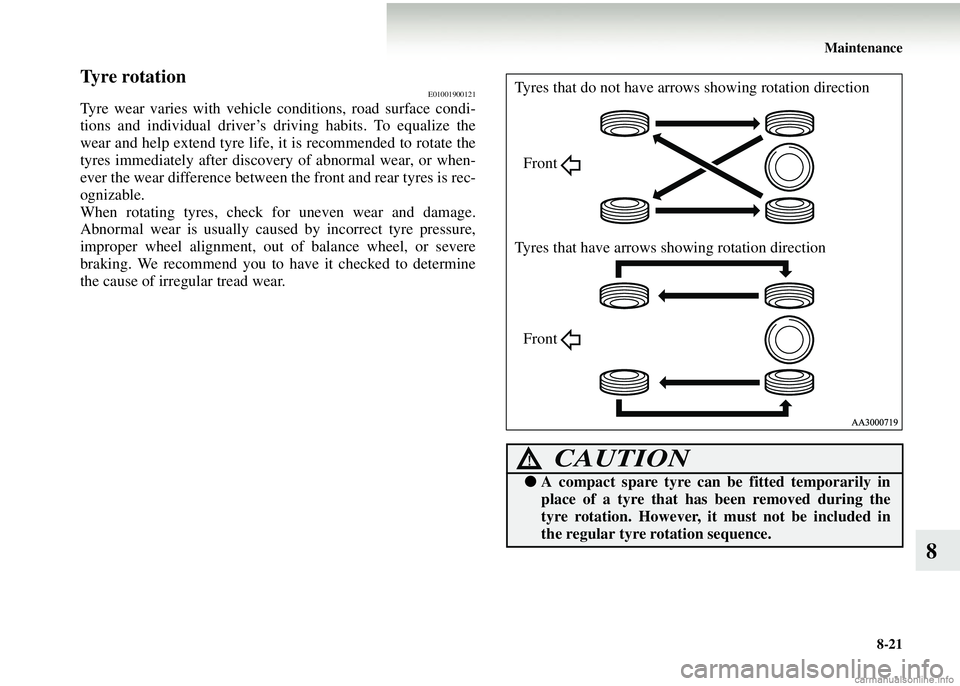
Tyre wear varies with vehicl e conditions, road surface condi-
tions and individual driver’s driving habits. To equalize the
wear and help extend tyre life, it is recommended to rotate the
tyres immediately after discovery of abnormal wear, or when-
ever the wear difference between the front and rear tyres is rec-
ognizable.
When rotating tyres, check fo r uneven wear and damage.
Abnormal wear is usually cause d by incorrect tyre pressure,
improper wheel alignment, ou t of balance wheel, or severe
braking. We recommend you to have it checked to determine
the cause of irregular tread wear.
CAUTION!
● A compact spare tyre can be fitted temporarily in
place of a tyre that has been removed during the
tyre rotation. However, it must not be included in
the regular tyre rotation sequence.
Tyres that do not have arrows showing rotation direction
Tyres that have arrows sh owing rotation direction
Front
Front
Page 364 of 450
8-22 Maintenance
8
Snow tyresE01002000549
The use of snow tyres is recommended for driving on snow and
ice. To preserve driving stability, mount snow tyres of the same
size and tread pattern on all four wheels.
Snow tyres worn more than 50 % are no longer suitable for use
as snow tyres.
Snow tyres which do not meet the specifications must not be
used.
NOTE● The laws and regulations concerning snow tyres (driving
speed, required use, type, etc.) vary. Find out and comply
with the laws and regulations in the area you intend to
drive in.
● If flange nuts are used on your vehicle, change to tapered
nuts when steel wheels are used.
Tyre chains E01002101039
If tyre chains have to be used, ensure that they are fitted only
on the drive wheels (front).
Use only tyre chains which are designed for use with the tyres
mounted on the vehicle: use of the incorrect size or type of
chain could result in damage to the vehicle body.
Before fitting tyre chains, we recommend that you consult a
MITSUBISHI MOTORS Authorized Service Point. The Max.
chain height is as follows.
CAUTION!
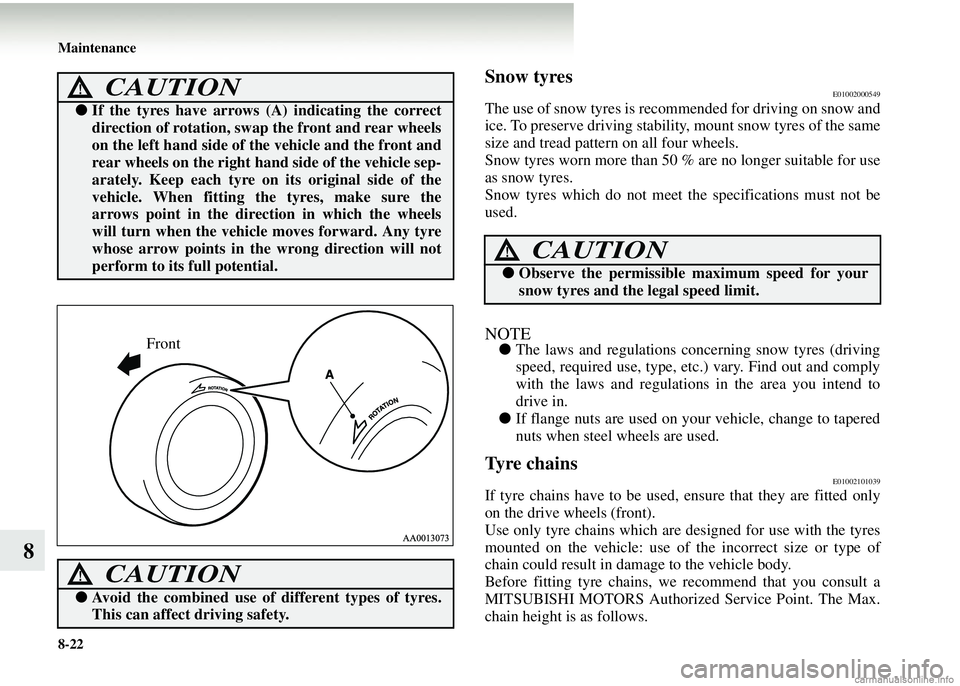
● If the tyres have arrows (A) indicating the correct
direction of rotation, swap the front and rear wheels
on the left hand side of th e vehicle and the front and
rear wheels on the right hand side of the vehicle sep-
arately. Keep each tyre on its original side of the
vehicle. When fitting the tyres, make sure the
arrows point in the dir ection in which the wheels
will turn when the vehicle moves forward. Any tyre
whose arrow points in the wrong direction will not
perform to its full potential.
CAUTION!
● Avoid the combined use of different types of tyres.
This can affect driving safety.
Front
CAUTION!
●Observe the permissible maximum speed for your
snow tyres and the legal speed limit.
Page 365 of 450
![MITSUBISHI COLT 2008 Owners Manual (in English) Maintenance8-23
8
The speed limit for tyre chains is 50 km/h (31 mph). Remove
the tyre chains as soon as possible on snow-free roads.
Ty r e s i z eWheel sizeMax. chain height [mm]
175/65R14*1, *214x MITSUBISHI COLT 2008 Owners Manual (in English) Maintenance8-23
8
The speed limit for tyre chains is 50 km/h (31 mph). Remove
the tyre chains as soon as possible on snow-free roads.
Ty r e s i z eWheel sizeMax. chain height [mm]
175/65R14*1, *214x](/img/19/34848/w960_34848-364.png)
Maintenance8-23
8
The speed limit for tyre chains is 50 km/h (31 mph). Remove
the tyre chains as soon as possible on snow-free roads.
Ty r e s i z eWheel sizeMax. chain height [mm]
175/65R14*1, *214x5.5 J 12
185/55R15*
315x6.0 J
*
1: Petrol-powered vehicles with turbocharger have 15-inch
brakes, so 14-inch tyres and wheels cannot be used on them.
*
2: Use only 175/65R14 snow tyres (M + S) with the 1500 mod-
els of the petrol-powered vehicles without turbocharger
*
3: Snow tyres (M + S) only
CAUTION!
●
For vehicle with 195/50R15 or 205/45R16 tyres,
chains should not be us ed. The clearance between
the chains and the body is small, and the body might
be damaged.
However, if chains must be used on vehicles with
195/50R15 or 205/45R16 tyres, because of adverse
road conditions such as sn ow or ice, proceed as fol-
lows:
Change all the original tyres (including wheels) to
175/65R14 tyres (14 x 5.5 J wheels) or 185/55R15 M
+ S tyres (15 x 6.0 J wheels) and then use the chains
on the front wheels.
WARNING!
● DO NOT use a jack when fitting the chains, as in the
conditions, the tyres may sl ip on the icy road, caus-
ing the vehicle to slip off the jack.
CAUTION!
● Practice fitting the chains before you need them.
Don’t expect help from ot her people in the cold.
●Choose a clear straight stretch of road where you
can pull off and still be seen while you are fitting the
chains.
● Do not fit chains before you need them. This will
wear out your tyres and the road surface.
●After driving for about 100-300 metres, stop and
retighten the chains.
●Care should be taken with extremes of steering lock
to prevent possible contac t between the chains and
the vehicle body.
● Drive carefully and do no t exceed 50 km/h (31 mph).
Remember, fitting chains is not going to stop acci-
dents from happening.
● When tyre chains are instal led, take care that they
do not damage the disc wheel or body.
Page 366 of 450
8-24 Maintenance
8
NOTE●Laws and regulations concerning the use of tyre chains
vary. Find out and comply with the laws and regulations
in your driving area.
In most countries, it is prohibited by law to use tyre chains
on roads without snow.
Parking brake lever stroke
E01005800173
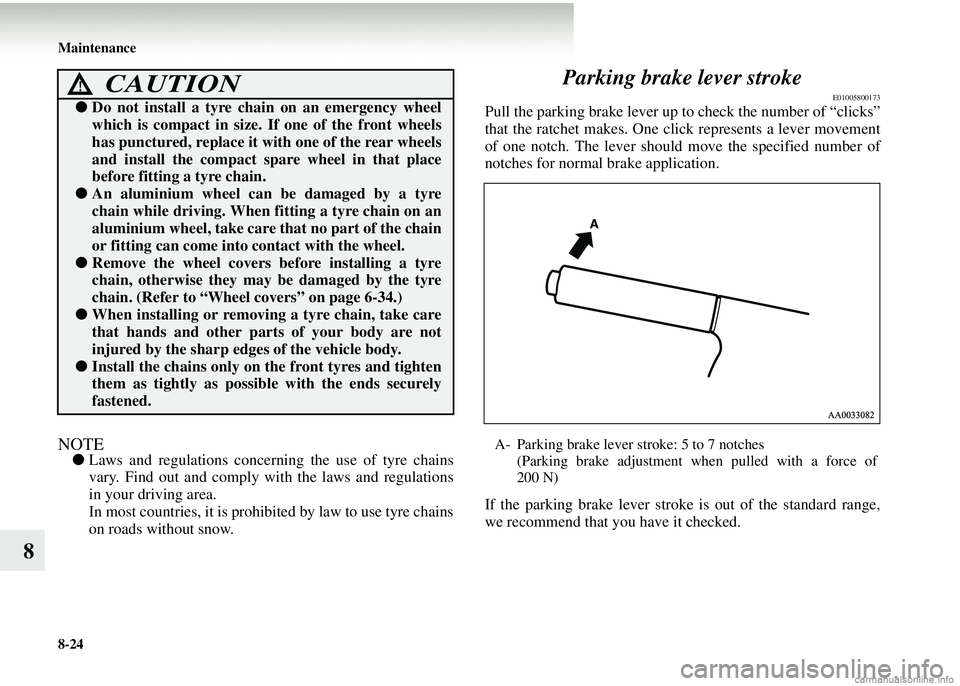
Pull the parking brake lever up to check the number of “clicks”
that the ratchet makes. One click represents a lever movement
of one notch. The lever should move the specified number of
notches for normal brake application.
If the parking brake lever stroke is out of the standard range,
we recommend that you have it checked.● Do not install a tyre chain on an emergency wheel
which is compact in size. If one of the front wheels
has punctured, replace it wi th one of the rear wheels
and install the compact sp are wheel in that place
before fitting a tyre chain.
● An aluminium wheel can be damaged by a tyre
chain while driving. When fitting a tyre chain on an
aluminium wheel, take care th at no part of the chain
or fitting can come into contact with the wheel.
●Remove the wheel covers before installing a tyre
chain, otherwise they m ay be damaged by the tyre
chain. (Refer to “Wheel covers” on page 6-34.)
● When installing or removing a tyre chain, take care
that hands and other part s of your body are not
injured by the sharp edges of the vehicle body.
● Install the chains only on the front tyres and tighten
them as tightly as possibl e with the ends securely
fastened.
CAUTION!
A- Parking brake lever stroke: 5 to 7 notches (Parking brake adjustment when pulled with a force of
200 N)
Page 367 of 450
Maintenance8-25
8
Wiper blades
E01002600301
If the blades are frozen to th
e windscreen or rear window, do
not operate the wipers until th e ice has melted and the blades
are freed, otherwise the wiper motor may be damaged.
NOTE● Under icy conditions, do not have high impact on the
wiper blade by slamming it on th e glass. In extremely low
temperatures, the plastic wiper blade is vulnerable to such
shock and may be damaged because of its less plasticity.
Wiper blade rubber replacement
Windscreen wiper blades (driver’s side)
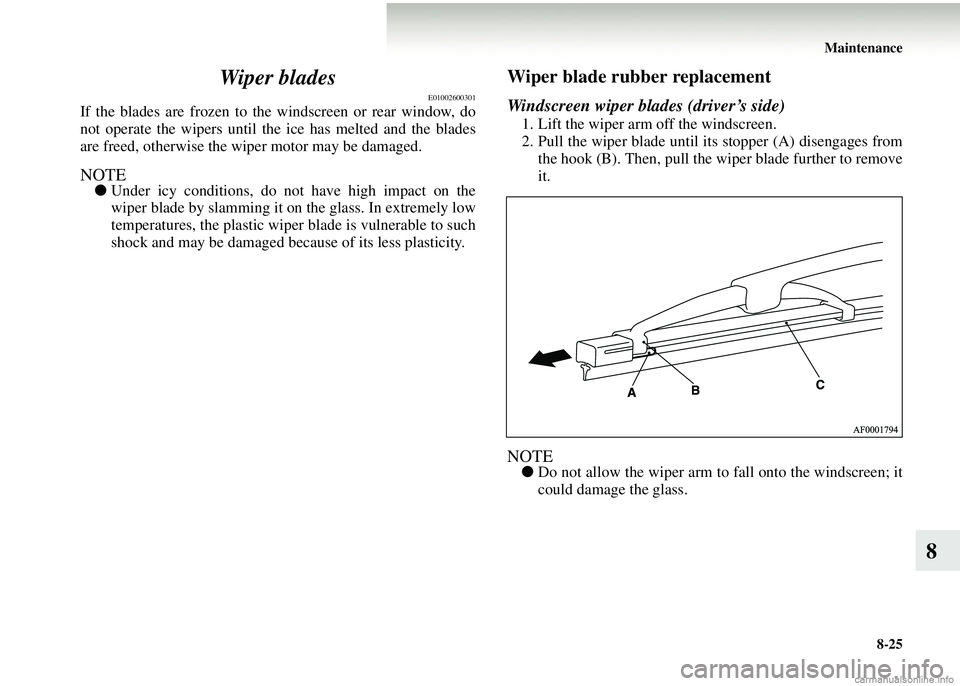
1. Lift the wiper arm off the windscreen.
2. Pull the wiper blade until its stopper (A) disengages from the hook (B). Then, pull the wiper blade further to remove
it.
NOTE● Do not allow the wiper arm to fall onto the windscreen; it
could damage the glass.
Page 368 of 450
8-26 Maintenance
8
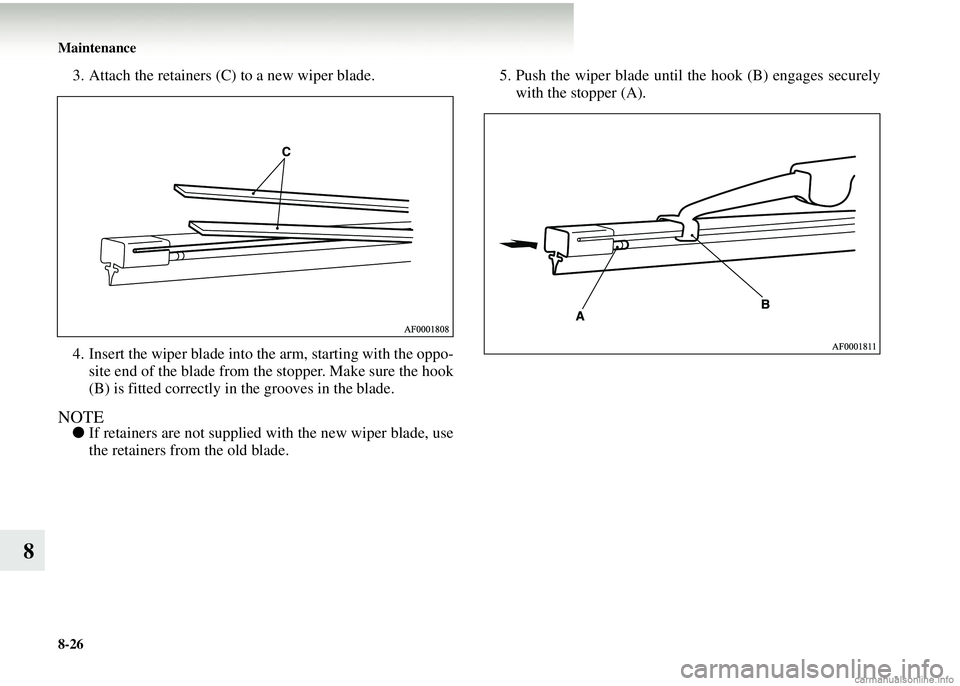
3. Attach the retainers (C) to a new wiper blade.
4. Insert the wiper blade into the arm, starting with the oppo-site end of the blade from the stopper. Make sure the hook
(B) is fitted correctly in the grooves in the blade.
NOTE● If retainers are not supplied with the new wiper blade, use
the retainers from the old blade. 5. Push the wiper blade until
the hook (B) engages securely
with the stopper (A).
Page 369 of 450
Maintenance8-27
8
Windscreen wiper blades (passenger’s side)
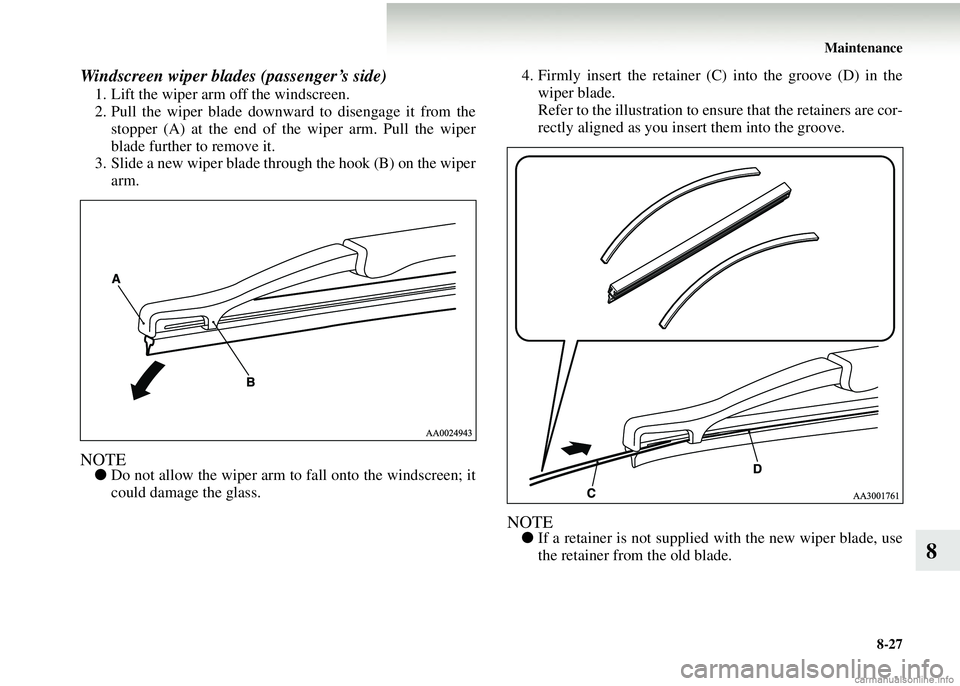
1. Lift the wiper arm off the windscreen.
2. Pull the wiper blade downward to disengage it from thestopper (A) at the end of the wiper arm. Pull the wiper
blade further to remove it.
3. Slide a new wiper blade through the hook (B) on the wiper arm.
NOTE● Do not allow the wiper arm to fall onto the windscreen; it
could damage the glass. 4. Firmly insert the retainer (C) into the groove (D) in the
wiper blade.
Refer to the illustration to ensure that the retainers are cor-
rectly aligned as you insert them into the groove.
NOTE● If a retainer is not supplied with the new wiper blade, use
the retainer from the old blade.
Page 370 of 450
8-28 Maintenance
8
Rear window wiper blades
The rear window wiper uses a wiper arm and wiper blade
designed specially for that wipe r. If replacement becomes nec-
essary, please consult a MITSUBISHI MOTORS Authorized
Service Point or another specialist.General maintenance
E01002700113
Fuel, engine coolant, o il and exhaust gas leakage
Look under the body of your vehicle to check for fuel, engine
coolant, oil and exhaust gas leaks.
Exterior and interior lamp operation
Operate the combination lamp sw itch to check that all lamps
are functioning properly.
If the lamps do not illuminate, the probable cause is a blown
fuse or defective lamp bulb. Check the fuses first. If there is no
blown fuses, check the lamp bulbs.
For information regarding th e inspection and replacement of
the fuses and the lamp bulbs, refer to “Fuses” on page 8-30 and
“Replacement of lamp bu lbs” on page 8-40.
If the fuses and bulbs are all OK, we recommend you to have
your vehicle checked and repaired.
WARNING!
● If you see a suspicious fuel leak or if you smell fuel,
do not operate the vehicle; we recommend you to
call for assistance.