MITSUBISHI COLT 2011 Owner's Manual (in English)
Manufacturer: MITSUBISHI, Model Year: 2011, Model line: COLT, Model: MITSUBISHI COLT 2011Pages: 274, PDF Size: 17.88 MB
Page 121 of 274
lTo avoid grinding noises when shifting into
reverse, wait approximately 3 seconds with
the clutch depressed when the vehicle is sta-
tionary.Changing gears E00610600240
Always take care to change the gear with the vehi-
cle speed matched to the engine speed. Proper shift-
ing will improve fuel economy and prolong engine
life.
Avoid shifting down at high speed, as this may
cause excessive engine speed (the tachometer nee-
dle into the red zone) and damage the engine.
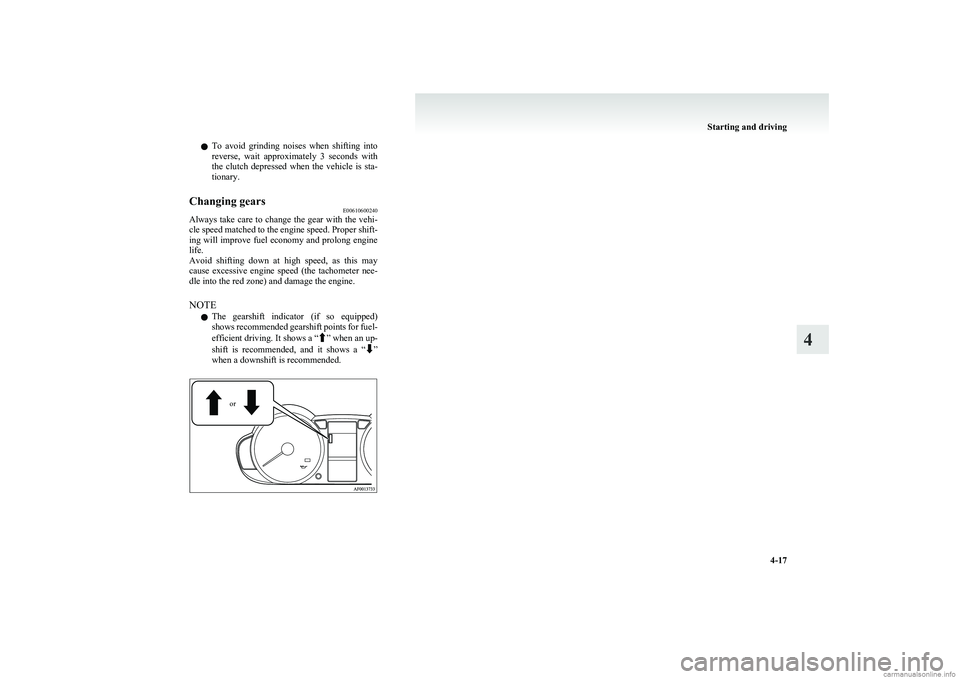
NOTE l The gearshift indicator (if so equipped)
shows recommended gearshift points for fuel-
efficient driving. It shows a “
” when an up-
shift is recommended, and it shows a “”
when a downshift is recommended.
or
Starting and driving
4-17
4
Page 122 of 274
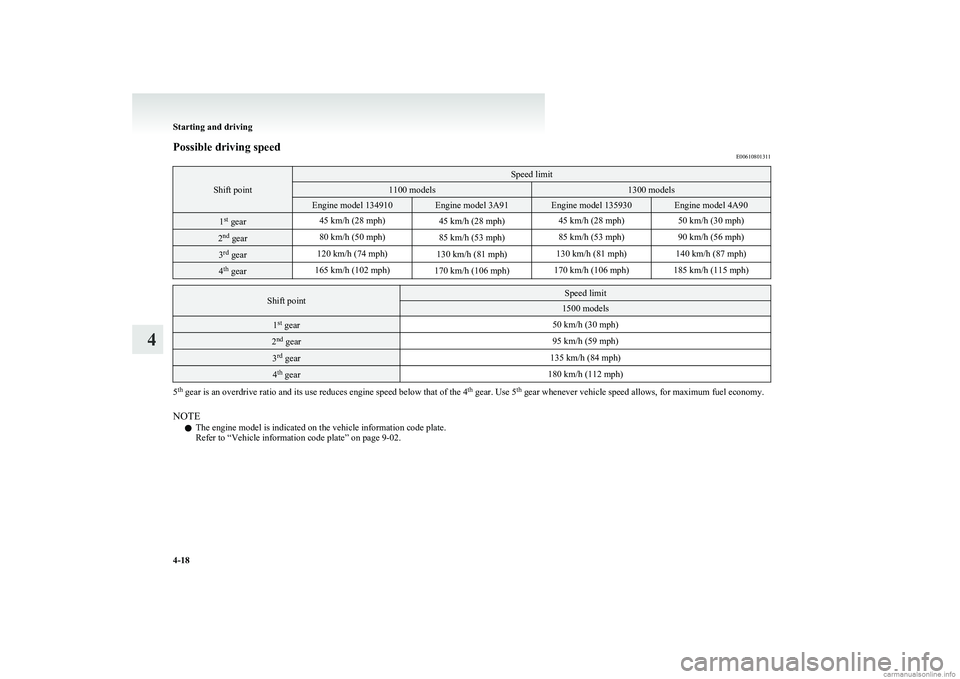
Possible driving speedE00610801311
Shift point
Speed limit1100 models1300 modelsEngine model 134910Engine model 3A91Engine model 135930Engine model 4A901st
gear45 km/h (28 mph)45 km/h (28 mph)45 km/h (28 mph)50 km/h (30 mph)2nd
gear80 km/h (50 mph)85 km/h (53 mph)85 km/h (53 mph)90 km/h (56 mph)3rd
gear120 km/h (74 mph)130 km/h (81 mph)130 km/h (81 mph)140 km/h (87 mph)4th
gear165 km/h (102 mph)170 km/h (106 mph)170 km/h (106 mph)185 km/h (115 mph)Shift pointSpeed limit1500 models1st
gear50 km/h (30 mph)2nd
gear95 km/h (59 mph)3rd
gear135 km/h (84 mph)4th
gear180 km/h (112 mph)
5th
gear is an overdrive ratio and its use reduces engine speed below that of the 4 th
gear. Use 5 th
gear whenever vehicle speed allows, for maximum fuel economy.
NOTE l The engine model is indicated on the vehicle information code plate.
Refer to “Vehicle information code plate” on page 9-02.
Starting and driving
4-18
4
Page 123 of 274
Automated manual transmissionE00612500038
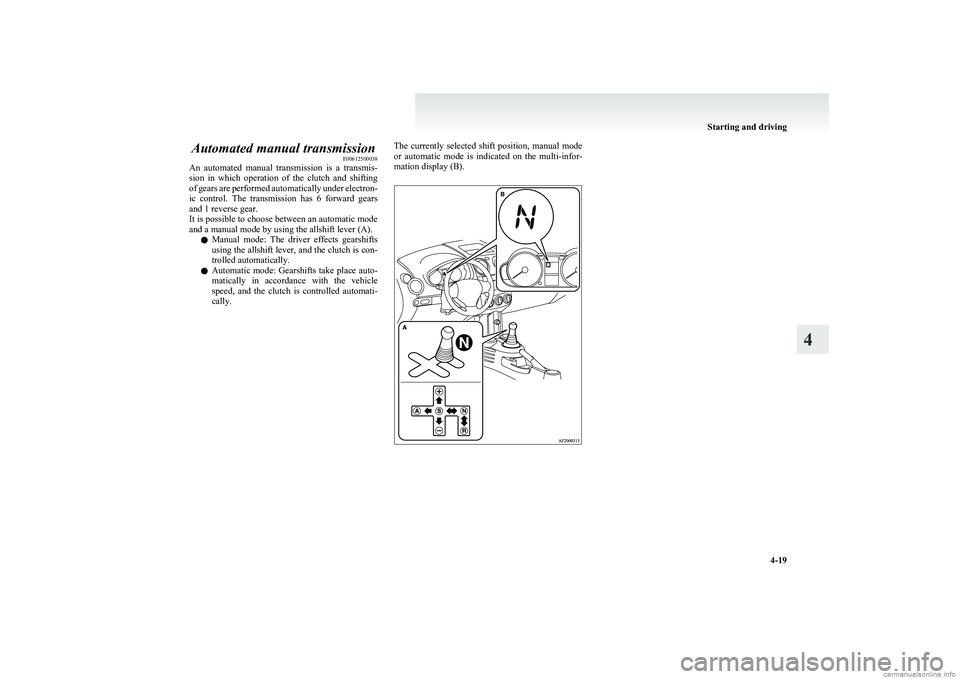
An automated manual transmission is a transmis-
sion in which operation of the clutch and shifting
of gears are performed automatically under electron-
ic control. The transmission has 6 forward gears
and 1 reverse gear.
It is possible to choose between an automatic mode
and a manual mode by using the allshift lever (A).
l Manual mode: The driver effects gearshifts
using the allshift lever, and the clutch is con-
trolled automatically.
l Automatic mode: Gearshifts take place auto-
matically in accordance with the vehicle
speed, and the clutch is controlled automati-
cally.The currently selected shift position, manual mode
or automatic mode is indicated on the multi-infor-
mation display (B).
Starting and driving
4-19
4
Page 124 of 274
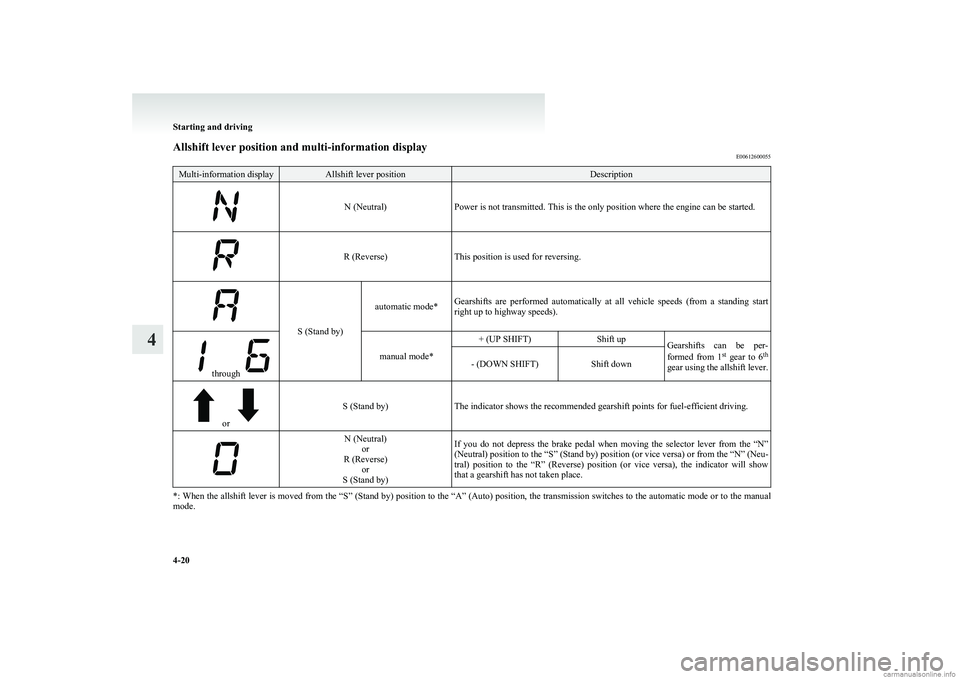
Allshift lever position and multi-information displayE00612600055Multi-information displayAllshift lever positionDescription
N (Neutral)Power is not transmitted. This is the only position where the engine can be started.R (Reverse)This position is used for reversing.
S (Stand by)
automatic mode*Gearshifts are performed automatically at all vehicle speeds (from a standing start
right up to highway speeds).
through
manual mode*
+ (UP SHIFT)Shift upGearshifts can be per-
formed from 1 st
gear to 6 th
gear using the allshift lever.- (DOWN SHIFT)Shift down
or
S (Stand by)The indicator shows the recommended gearshift points for fuel-efficient driving.
N (Neutral) or
R (Reverse) or
S (Stand by)If you do not depress the brake pedal when moving the selector lever from the “N”
(Neutral) position to the “S” (Stand by) position (or vice versa) or from the “N” (Neu-
tral) position to the “R” (Reverse) position (or vice versa), the indicator will show
that a gearshift has not taken place.
*: When the allshift lever is moved from the “S” (Stand by) position to the “A” (Auto) position, the transmission switches to the automatic mode or to the manual
mode.
Starting and driving
4-20
4
Page 125 of 274
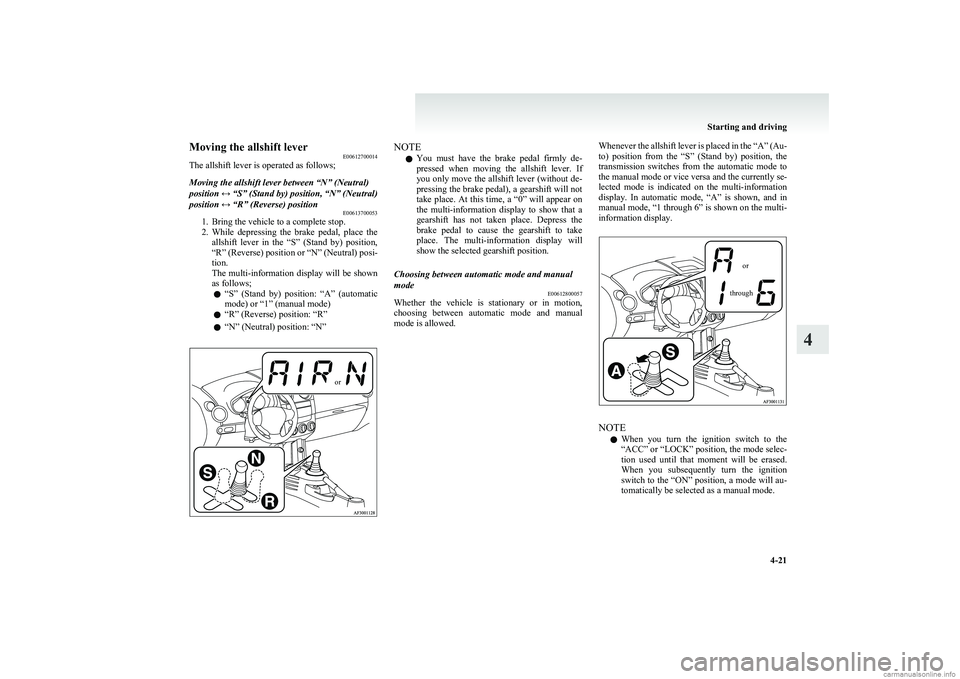
Moving the allshift leverE00612700014
The allshift lever is operated as follows;Moving the allshift lever between “N” (Neutral)
position ↔ “S” (Stand by) position, “N” (Neutral)
position ↔ “R” (Reverse) position E00613700053
1. Bring the vehicle to a complete stop.
2. While depressing the brake pedal, place the
allshift lever in the “S” (Stand by) position,
“R” (Reverse) position or “N” (Neutral) posi-
tion.
The multi-information display will be shown
as follows;
l “
S” (Stand by) position: “A” (automatic
mode) or “1” (manual mode)
l “R” (Reverse) position: “R”
l “N” (Neutral) position: “N”
orNOTE
l You must have the brake pedal firmly de-
pressed when moving the allshift lever. If
you only move the allshift lever (without de-
pressing the brake pedal), a gearshift will not
take place. At this time, a “0” will appear on
the multi-information display to show that a
gearshift has not taken place. Depress the
brake pedal to cause the gearshift to take
place. The multi-information display will
show the selected gearshift position.Choosing between automatic mode and manual
mode E00612800057
Whether the vehicle is stationary or in motion,
choosing between automatic mode and manual
mode is allowed.
Whenever the allshift lever is placed in the “A” (Au-
to) position from the “S” (Stand by) position, the
transmission switches from the automatic mode to
the manual mode or vice versa and the currently se-
lected mode is indicated on the multi-information
display. In automatic mode, “A” is shown, and in
manual mode, “1 through 6” is shown on the multi-
information display.orthrough
NOTE
l When you turn the ignition switch to the
“ACC” or “LOCK” position, the mode selec-
tion used until that moment will be erased.
When you subsequently turn the ignition
switch to the “ON” position, a mode will au-
tomatically be selected as a manual mode.
Starting and driving
4-21
4
Page 126 of 274
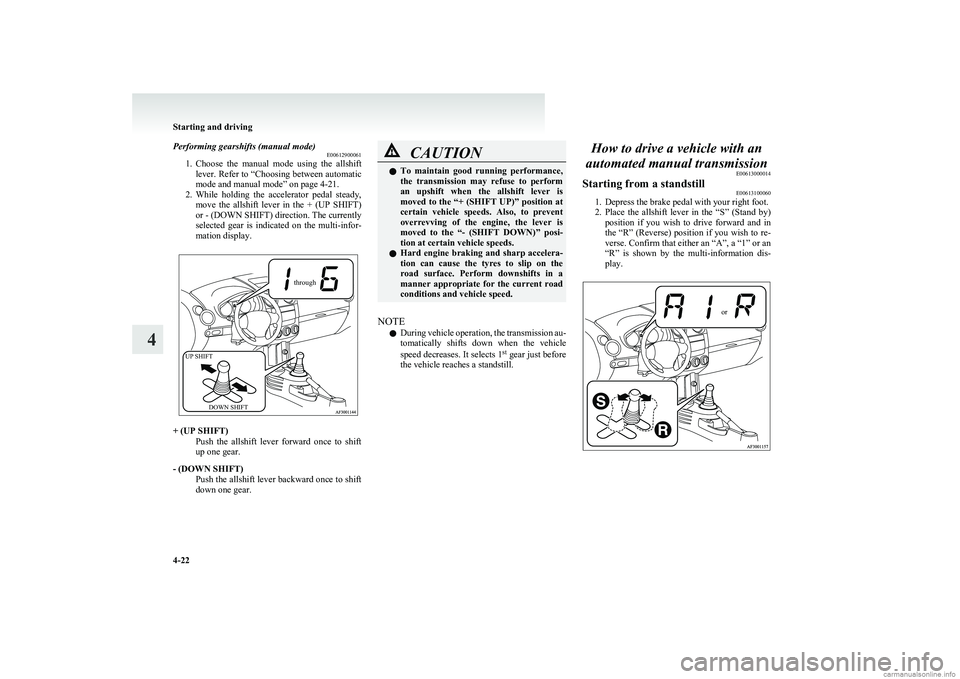
Performing gearshifts (manual mode)E00612900061
1. Choose the manual mode using the allshift
lever. Refer to “Choosing between automatic
mode and manual mode” on page 4-21.
2. While holding the accelerator pedal steady,
move the allshift lever in the + (UP SHIFT)
or - (DOWN SHIFT) direction. The currently
selected gear is indicated on the multi-infor-
mation display.throughUP SHIFTDOWN SHIFT
+ (UP SHIFT)
Push the allshift lever forward once to shift
up one gear.
- (DOWN SHIFT) Push the allshift lever backward once to shift
down one gear.
CAUTIONl To maintain good running performance,
the transmission may refuse to perform
an upshift when the allshift lever is
moved to the “+ (SHIFT UP)” position at
certain vehicle speeds. Also, to prevent
overrevving of the engine, the lever is
moved to the “- (SHIFT DOWN)” posi-
tion at certain vehicle speeds.
l Hard engine braking and sharp accelera-
tion can cause the tyres to slip on the
road surface. Perform downshifts in a
manner appropriate for the current road
conditions and vehicle speed.
NOTE
l During vehicle operation, the transmission au-
tomatically shifts down when the vehicle
speed decreases. It selects 1 st
gear just before
the vehicle reaches a standstill.
How to drive a vehicle with an
automated manual transmission E00613000014Starting from a standstill E00613100060
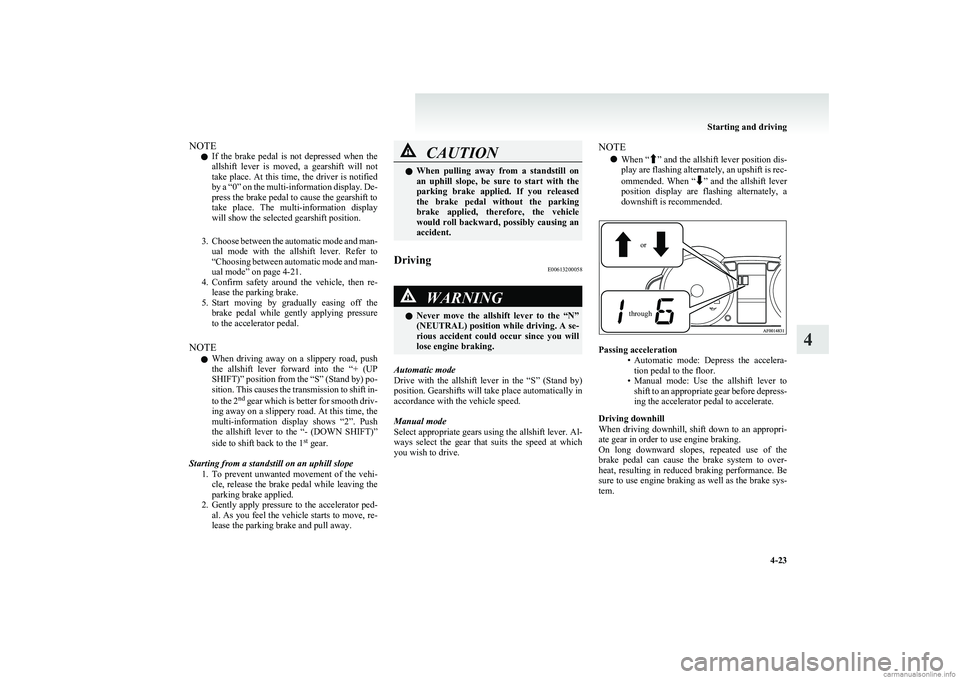
1. Depress the brake pedal with your right foot.
2. Place the allshift lever in the “S” (Stand by)
position if you wish to drive forward and in
the “R” (Reverse) position if you wish to re-
verse. Confirm that either an “A”, a “1” or an
“R” is shown by the multi-information dis-
play.
or
Starting and driving
4-22
4
Page 127 of 274
NOTEl If the brake pedal is not depressed when the
allshift lever is moved, a gearshift will not
take place. At this time, the driver is notified
by a “0” on the multi-information display. De-
press the brake pedal to cause the gearshift to
take place. The multi-information display
will show the selected gearshift position.
3. Choose between the automatic mode and man-
ual mode with the allshift lever. Refer to
“ Choosing between automatic mode and man-
ual mode” on page 4-21.
4. Confirm safety around the vehicle, then re-
lease the parking brake.
5. Start moving by gradually easing off the
brake pedal while gently applying pressure
to the accelerator pedal.
NOTE l When driving away on a slippery road, push
the allshift lever forward into the “+ (UP
SHIFT)” position from the “S” (Stand by) po-
sition. This causes the transmission to shift in-
to the 2 nd
gear which is better for smooth driv-
ing away on a slippery road. At this time, the
multi-information display shows “2”. Push
the allshift lever to the “- (DOWN SHIFT)”
side to shift back to the 1 st
gear.
Starting from a standstill on an uphill slope 1.To prevent unwanted movement of the vehi-
cle, release the brake pedal while leaving the
parking brake applied.
2. Gently apply pressure to the accelerator ped-
al. As you feel the vehicle starts to move, re-
lease the parking brake and pull away.CAUTIONl When pulling away from a standstill on
an uphill slope, be sure to start with the
parking brake applied. If you released
the brake pedal without the parking
brake applied, therefore, the vehicle
would roll backward, possibly causing an
accident.Driving E00613200058WARNINGlNever move the allshift lever to the “N”
(NEUTRAL) position while driving. A se-
rious accident could occur since you will
lose engine braking.
Automatic mode
Drive with the allshift lever in the “S” (Stand by)
position. Gearshifts will take place automatically in
accordance with the vehicle speed.
Manual mode
Select appropriate gears using the allshift lever. Al-
ways select the gear that suits the speed at which
you wish to drive.
NOTE
l When “
”
and the allshift lever position dis-
play are flashing alternately, an upshift is rec-
ommended. When “
” and the allshift lever
position display are flashing alternately, a
downshift is recommended.
orthrough
Passing acceleration
•Automatic mode: Depress the accelera-
tion pedal to the floor.
• Manual mode: Use the allshift lever to
shift to an appropriate gear before depress-
ing the accelerator pedal to accelerate.
Driving downhill
When driving downhill, shift down to an appropri-
ate gear in order to use engine braking.
On long downward slopes, repeated use of the
brake pedal can cause the brake system to over-
heat, resulting in reduced braking performance. Be
sure to use engine braking as well as the brake sys-
tem.
Starting and driving
4-23
4
Page 128 of 274
WARNINGlHard engine braking can cause the tyres
to slip on the road surface, possibly lead-
ing to a serious accident.Waiting E00613300059
1.With the allshift lever in the “S” (Stand by)
position, firmly depress the brake pedal.
2. If necessary, apply the parking brake.
CAUTIONl On an uphill slope, the transmission’s
creep effect may not stop the vehicle from
rolling backward if the brakes are not ap-
plied. There is no creep effect while
2 nd
gear is selected. When stopping, be
sure to depress the brake pedal and se-
curely apply the parking brake.
l Do not attempt to hold the vehicle in
place on an uphill road in 1st
gear by de-
pressing on the accelerator pedal. The
transmission could malfunction if you do.
3. When you are stationary for a long period
(for example, when stuck in a traffic jam),
place the allshift lever in the “N” (Neutral)
position.
CAUTIONl Continue to pay attention to the vehicle
while stationary. If you allow your atten-
tion to wander and the allshift lever is in
any position other than “N” (Neutral),
the vehicle could move suddenly and un-
expectedly.
4. When you are ready to start moving again,
first confirm that the allshift lever is in the
“S” (Stand by) position or “R” (Reverse) po-
sition and that an “A”, “1”, or “R” is shown
on the multi-information display.
NOTE l During vehicle operation, the transmission au-
tomatically shifts down when the vehicle
speed decreases. It selects 1st
gear just before
the vehicle reaches a standstill.
CAUTIONl The actions described below cause rapid
clutch wear and can cause clutch dam-
age. Do not perform them. •Depressing the brake and accelerator
pedals at the same time.
• Holding the vehicle in place on an up-
hill road by depressing the accelerator
pedal (and not depressing the brake
pedal) with 1 st
gear selected.Parking
E00613400034
1. Bring the vehicle to a complete stop.
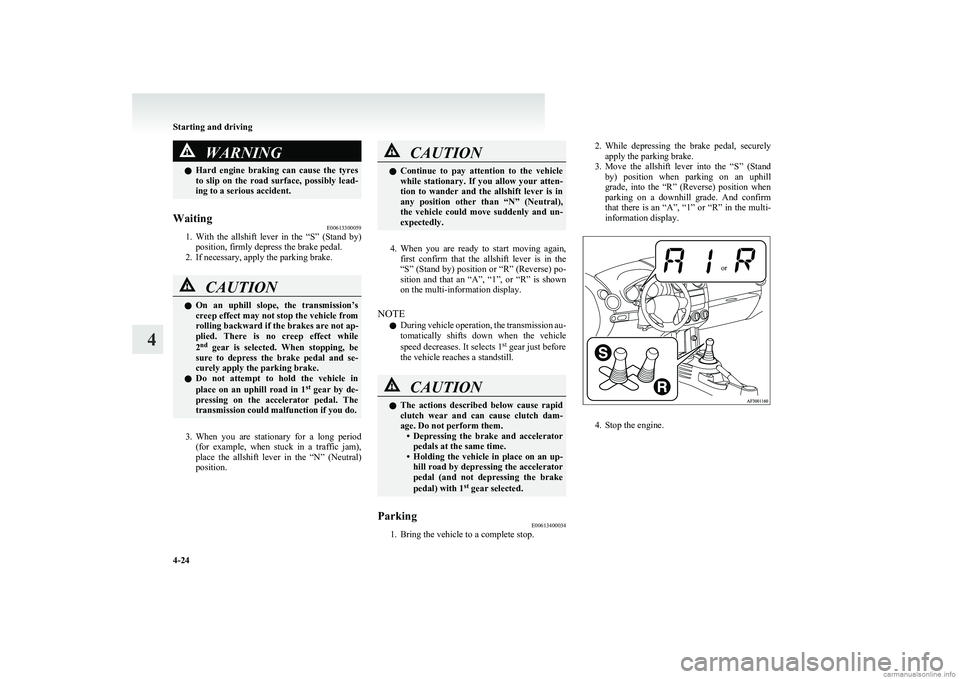
2.While depressing the brake pedal, securely
apply the parking brake.
3. Move the allshift lever into the “S” (Stand
by) position when parking on an uphill
grade, into the “R” (Reverse) position when
parking on a downhill grade. And confirm
that there is an “A”, “1” or “R” in the multi-
information display.or
4. Stop the engine.
Starting and driving
4-24
4
Page 129 of 274
CAUTIONlWhen leaving the vehicle, be sure to stop
the engine and remove the key from the
ignition switch. If you were to leave the en-
gine running with the allshift lever in the
“S” (Stand by) or “R” position, the trans-
mission’s creep effect could cause the ve-
hicle to move by itself. Also, the vehicle
could suddenly move if you accidentally
pressed the accelerator pedal when get-
ting back in the vehicle.
NOTE
l Sit in the correct position for driving even if
you plan to move just a short distance. Make
sure you are able to depress the brake pedal
and accelerator pedal properly.
l Reversing involves twisting to look rearward
in a position that makes operation of the ped-
als more difficult. Make sure you are able to
depress the brake pedal.
Braking E00607001801
All the parts of the brake system are critical to safe-
ty. We recommend you to have the vehicle
checked at regular intervals according to the serv-
ice booklet.CAUTIONl Avoid driving habits that cause heavy
braking and never “ride” the brakes by
resting your foot on the brake pedal
while driving.
It causes brake overheating and fade.
Brake system
The service brake is divided into two brake cir-
cuits. And your vehicle is equipped with power
brakes. If one brake circuit fails, the other is availa-
ble to stop the vehicle. If you should lose the pow-
er assist for some reason, the brakes will still work.
In these situations, even if the brake pedal moves
down to the very end of its possible stroke or re-
sists being depressed, keep depressing the brake ped-
al down harder and further than usual; stop driving
as soon as possible and have the brake system re-
paired.
WARNINGl Do not turn off the engine while your ve-
hicle is in motion. If you turn off the en-
gine while driving, the power assistance
for the braking system will stop working
and your brakes will not work effectively.WARNINGl If the power assist is lost or if either
brake hydraulic system stops working
properly, have your vehicle checked im-
mediately.
Warning lamp
The brake warning lamp illuminates to indicate a
fault in the braking system. Read “Brake warning
lamp” on page 3-17.
When brakes are wet
Check the brake system while driving at a low
speed immediately after starting, especially when
the brakes are wet, to confirm they work normally.
A film of water can be formed on the brake discs
or brake drums and prevent normal braking after
driving in heavy rain or through large puddles, or
after the vehicle is washed. If this occurs, dry the
brakes out by driving slowly while lightly depress-
ing the brake pedal.
When driving downhill
It is important to take advantage of the engine brak-
ing by shifting to a lower shift position while driv-
ing on steep downhill roads in order to prevent the
brakes from overheating.
Starting and driving
4-25
4
Page 130 of 274
WARNINGlDo not leave any objects near the brake
pedal or let a floor mat slide under it; do-
ing so could prevent the full pedal stroke
that would be necessary in an emergency.
Make sure that the pedal can be operated
freely at all times. Make sure the floor
mat is securely held in place.
Brake pads and linings
l With new brake pads or linings, avoid where
possible sudden full application of the brakes
for the first 200 km (124 miles) of driving.
l The disc brakes are provided with a warning
device which emits a shrieking metallic
sound while braking if the brake pads have
reached their wear limit.
If you hear this sound, have the brake pads re-
placed immediately.
WARNINGl Driving with worn brake pads will make
it harder to stop, and can cause an acci-
dent.Emergency stop signal system E00626000021
This is a device that reduces the possibility of rear
end collisions by the rapid and automatic blinking
of the hazard warning lamps to alert vehicles ap-
proaching from behind during sudden braking.
When the emergency stop signal system operates,
the hazard warning indication lamp in the instru-
ment cluster blinks rapidly at the same time.CAUTIONl If the ABS warning lamp or TCL/ASC in-
dication lamp is illuminated, the emergen-
cy stop signal system may not operate. Re-
fer to “ABS warning lamp” on page
4-28.
Refer to “Traction control system (TCL)/
Active stability control system (ASC) indi-
cation lamp” on page 4-31.
NOTE
l [
Activating condition for the emergency stop
signal system]
It activates when all of the following condi-
tions are met. •The vehicle speed is approximately
55 km/h (34 mph) or higher.
• The brake pedal has been depressed, and
the system judges that it was sudden brak-
ing from the vehicle deceleration and the
operating condition of the anti-lock brake
system (ABS).
[ Deactivating condition for the emergency
stop signal system]
It deactivates when one of the following con-
ditions is met. • The brake pedal is released.
• The hazard warning flasher switch is
pressed.
• The system judges that it was not sudden
braking from the vehicle deceleration and
the operating condition of the anti-lock
brake system (ABS).
Starting and driving
4-26
4