tow MITSUBISHI COLT 2011 (in English) User Guide
[x] Cancel search | Manufacturer: MITSUBISHI, Model Year: 2011, Model line: COLT, Model: MITSUBISHI COLT 2011Pages: 274, PDF Size: 17.88 MB
Page 96 of 274
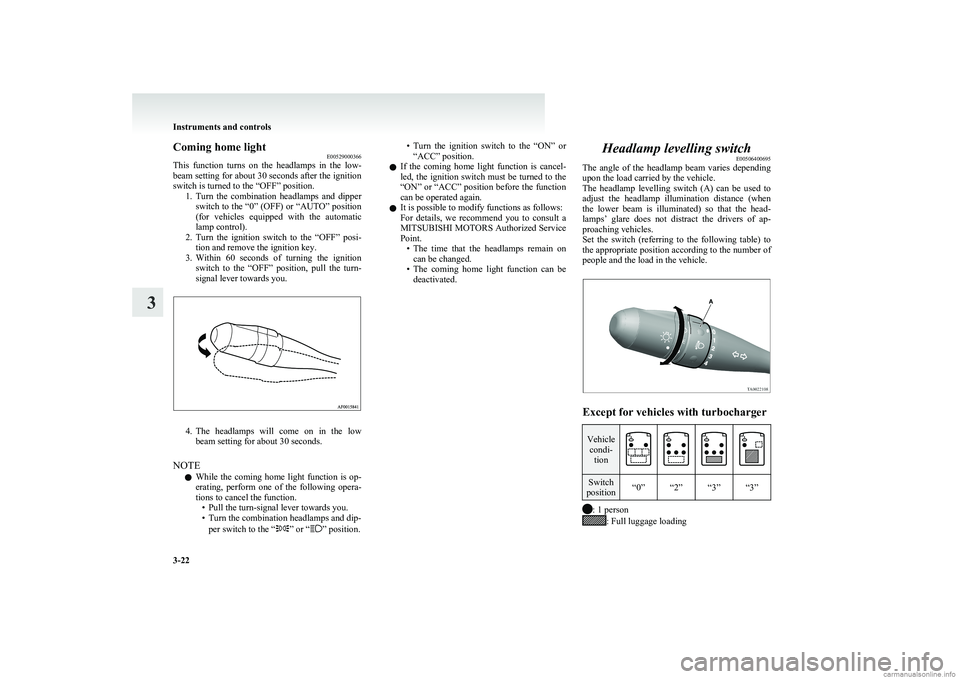
Coming home lightE00529000366
This function turns on the headlamps in the low-
beam setting for about 30 seconds after the ignition
switch is turned to the “OFF” position. 1.Turn the combination headlamps and dipper
switch to the “0” (OFF) or “AUTO” position
(for vehicles equipped with the automatic
lamp control).
2. Turn the ignition switch to the “OFF” posi-
tion and remove the ignition key.
3. Within 60 seconds of turning the ignition
switch to the “OFF” position, pull the turn-
signal lever towards you.
4. The headlamps will come on in the low
beam setting for about 30 seconds.
NOTE l While the coming home light function is op-
erating, perform one of the following opera-
tions to cancel the function. • Pull the turn-signal lever towards you.
• Turn the combination headlamps and dip-
per switch to the “
” or “” position.
•Turn the ignition switch to the “ON” or
“ACC” position.
l If the coming home light function is cancel-
led, the ignition switch must be turned to the
“ON” or “ACC” position before the function
can be operated again.
l It is possible to modify functions as follows:
For details, we recommend you to consult a
MITSUBISHI MOTORS Authorized Service
Point. •The time that the headlamps remain on
can be changed.
• The coming home light function can be
deactivated.Headlamp levelling switch E00506400695
The angle of the headlamp beam varies depending
upon the load carried by the vehicle.
The headlamp levelling switch (A) can be used to
adjust the headlamp illumination distance (when
the lower beam is illuminated) so that the head-
lamps’ glare does not distract the drivers of ap-
proaching vehicles.
Set the switch (referring to the following table) to
the appropriate position according to the number of
people and the load in the vehicle.
Except for vehicles with turbocharger
Vehicle condi- tionSwitch
position“0”“2”“3”“3”
: 1 person: Full luggage loading
Instruments and controls
3-22
3
Page 102 of 274
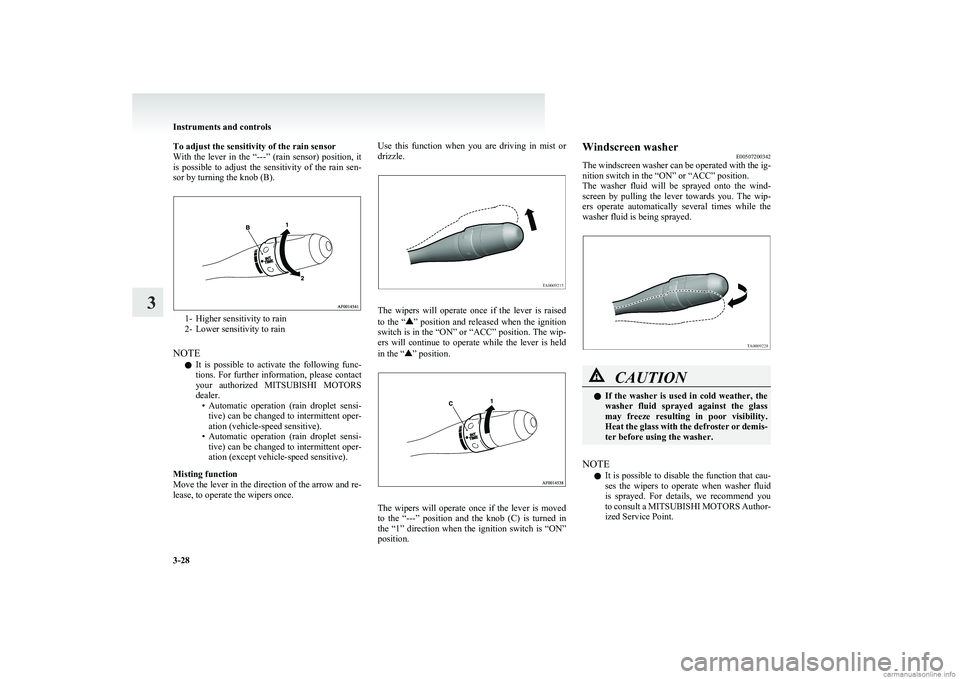
To adjust the sensitivity of the rain sensor
With the lever in the “---” (rain sensor) position, it
is possible to adjust the sensitivity of the rain sen-
sor by turning the knob (B).
1- Higher sensitivity to rain
2- Lower sensitivity to rain
NOTE l It is possible to activate the following func-
tions. For further information, please contact
your authorized MITSUBISHI MOTORS
dealer. •Automatic operation (rain droplet sensi-
tive) can be changed to intermittent oper-
ation (vehicle-speed sensitive).
• Automatic operation (rain droplet sensi-
tive) can be changed to intermittent oper-
ation (except vehicle-speed sensitive).
Misting function
Move the lever in the direction of the arrow and re-
lease, to operate the wipers once.
Use this function when you are driving in mist or
drizzle.
The wipers will operate once if the lever is raised
to the “” position and released when the ignition
switch is in the “ON” or “ACC” position. The wip-
ers will continue to operate while the lever is held
in the “
” position.
The wipers will operate once if the lever is moved
to the “---” position and the knob (C) is turned in
the “1” direction when the ignition switch is “ON”
position.
Windscreen washer E00507200342
The windscreen washer can be operated with the ig-
nition switch in the “ON” or “ACC” position.
The washer fluid will be sprayed onto the wind-
screen by pulling the lever towards you. The wip-
ers operate automatically several times while the
washer fluid is being sprayed.CAUTIONl If the washer is used in cold weather, the
washer fluid sprayed against the glass
may freeze resulting in poor visibility.
Heat the glass with the defroster or demis-
ter before using the washer.
NOTE
l It is possible to disable the function that cau-
ses the wipers to operate when washer fluid
is sprayed. For details, we recommend you
to consult a MITSUBISHI MOTORS Author-
ized Service Point.
Instruments and controls
3-28
3
Page 105 of 274
Economical driving.......................................................................4-02
Driving, alcohol and drugs ........................................................... 4-02
Safe driving techniques ................................................................ 4-03
Running-in recommendations.......................................................4-04
Parking brake ................................................................................ 4-06
Parking .......................................................................................... 4-07
Steering wheel height adjustment .................................................4-07
Inside rear-view mirror ................................................................. 4-08
Outside rear-view mirrors ............................................................. 4-08
Ignition switch .............................................................................. 4-10
Steering wheel lock ...................................................................... 4-11
Starting..........................................................................................4-11
Auto Stop & Go (AS&G) system* ...............................................4-13
Manual transmission ..................................................................... 4-16
Automated manual transmission ..................................................4-19
How to drive a vehicle with an automated manual trans- mission......................................................................................4-22
Braking ......................................................................................... 4-25
Emergency stop signal system ...................................................... 4-26
Brake assist system ....................................................................... 4-27
Anti-lock brake system (ABS) ..................................................... 4-27
Electric power steering system ..................................................... 4-29
Traction control system (TCL)/Active stability control system (ASC)* ......................................................................... 4-30
Cruise control* ............................................................................. 4-32
Cargo loads ................................................................................... 4-36
Trailer towing ............................................................................... 4-36Starting and driving4
Page 108 of 274
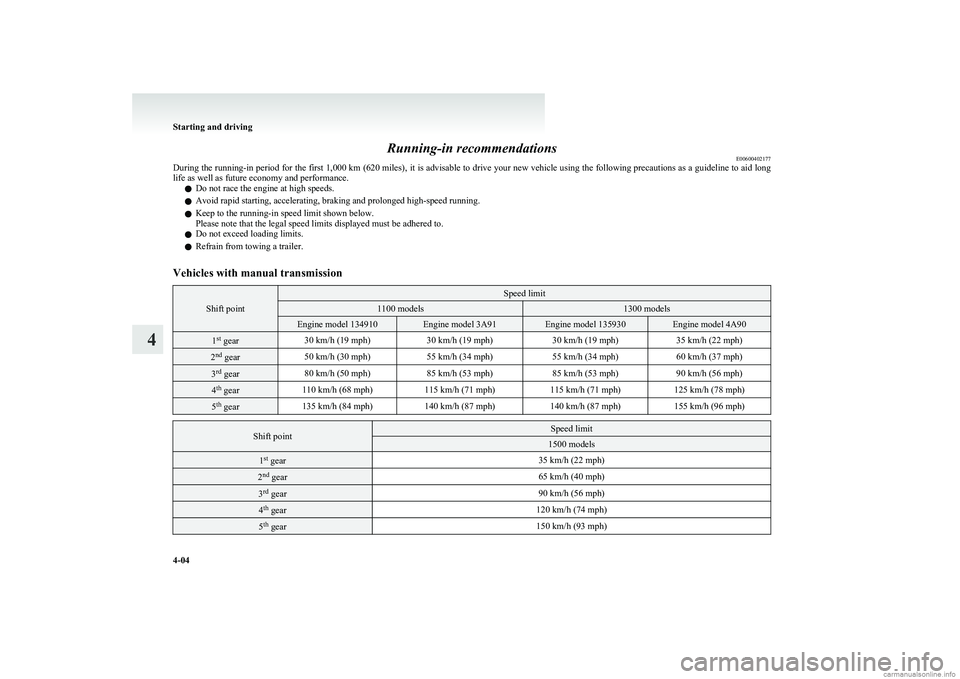
Running-in recommendationsE00600402177
During the running-in period for the first 1,000 km (620 miles), it is advisable to drive your new vehicle using the following precautions as a guideline to aid long
life as well as future economy and performance.
l Do not race the engine at high speeds.
l Avoid rapid starting, accelerating, braking and prolonged high-speed running.
l Keep to the running-in speed limit shown below.
Please note that the legal speed limits displayed must be adhered to.
l Do not exceed loading limits.
l Refrain from towing a trailer.Vehicles with manual transmission
Shift point
Speed limit1100 models1300 modelsEngine model 134910Engine model 3A91Engine model 135930Engine model 4A901st
gear30 km/h (19 mph)30 km/h (19 mph)30 km/h (19 mph)35 km/h (22 mph)2nd
gear50 km/h (30 mph)55 km/h (34 mph)55 km/h (34 mph)60 km/h (37 mph)3rd
gear80 km/h (50 mph)85 km/h (53 mph)85 km/h (53 mph)90 km/h (56 mph)4th
gear110 km/h (68 mph)115 km/h (71 mph)115 km/h (71 mph)125 km/h (78 mph)5th
gear135 km/h (84 mph)140 km/h (87 mph)140 km/h (87 mph)155 km/h (96 mph)Shift pointSpeed limit1500 models1st
gear35 km/h (22 mph)2nd
gear65 km/h (40 mph)3rd
gear90 km/h (56 mph)4th
gear120 km/h (74 mph)5th
gear150 km/h (93 mph)
Starting and driving
4-04
4
Page 111 of 274
ParkingE00600601521
Parking on a hill
To prevent the vehicle from rolling, follow these
procedures:
Parking on a downhill slope
Turn the front wheels towards the kerb and move
the vehicle forward until the kerb side wheel gently
touches the kerb.
Apply the parking brake and place the gearshift lev-
er into the “R” (Reverse) position (with manual
transmission) or the allshift lever into the “R” (Re-
verse) position (with automated manual transmis-
sion).
If necessary, apply chocks to wheels.
Parking on an uphill slope
Turn the front wheels away from the kerb and
move the vehicle back until the kerb side wheel gen-
tly touches the kerb.
Apply the parking brake and place the gearshift lev-
er into the 1 st
position (with manual transmission)
or the allshift lever into the “S” (Stand by) position
(with automated manual transmission).
If necessary, apply chocks to wheels.
NOTE l If your vehicle has an automated manual trans-
mission, place the allshift lever in the “S”
(Stand by) position or “R” (Reverse) position
before stopping the engine.
If you move the allshift lever after stopping
the engine, a gearshift will not take place.Parking with the engine running
Never leave the engine running while you take a
short sleep/rest. Also, never leave the engine run-
ning in a closed or poorly ventilated place.WARNINGl Leaving the engine running risks injury
or death from accidentally moving the
gearshift lever (manual transmission) or
the allshift lever (automated manual trans-
mission) or the accumulation of toxic ex-
haust fumes on the passenger compart-
ment.
Where you park
Your front bumper can be damaged if you scrape it
over kerbs or parking stop blocks. Be careful when
travelling up or down steep slopes where your bump-
er can scrape the road.
WARNINGl Do not park your vehicle in areas where
combustible materials such as dry grass
or leaves can come in contact with a hot
exhaust, since a fire could occur.
When leaving the vehicle
Always remove the key from the ignition switch
and lock all doors and the tailgate when leaving the
vehicle unattended.
Always try to park your vehicle in a well lit area.
Steering wheel height adjustment E00600700466
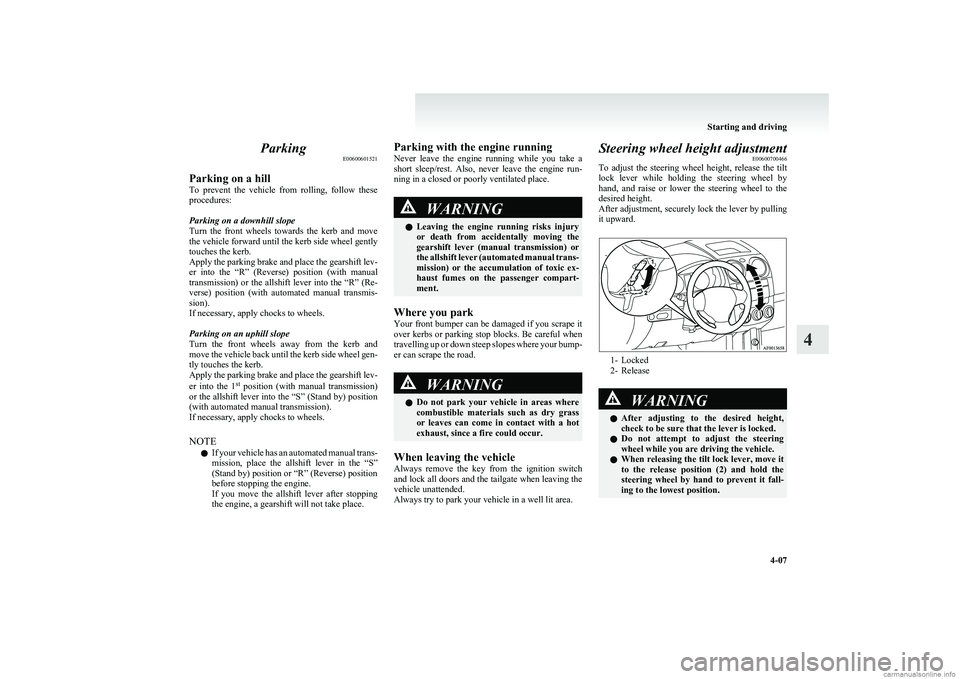
To adjust the steering wheel height, release the tilt
lock lever while holding the steering wheel by
hand, and raise or lower the steering wheel to the
desired height.
After adjustment, securely lock the lever by pulling
it upward.
1- Locked
2- Release
WARNINGl After adjusting to the desired height,
check to be sure that the lever is locked.
l Do not attempt to adjust the steering
wheel while you are driving the vehicle.
l When releasing the tilt lock lever, move it
to the release position (2) and hold the
steering wheel by hand to prevent it fall-
ing to the lowest position.
Starting and driving
4-07
4
Page 113 of 274
Manual remote-controlled outside rear-view mir-
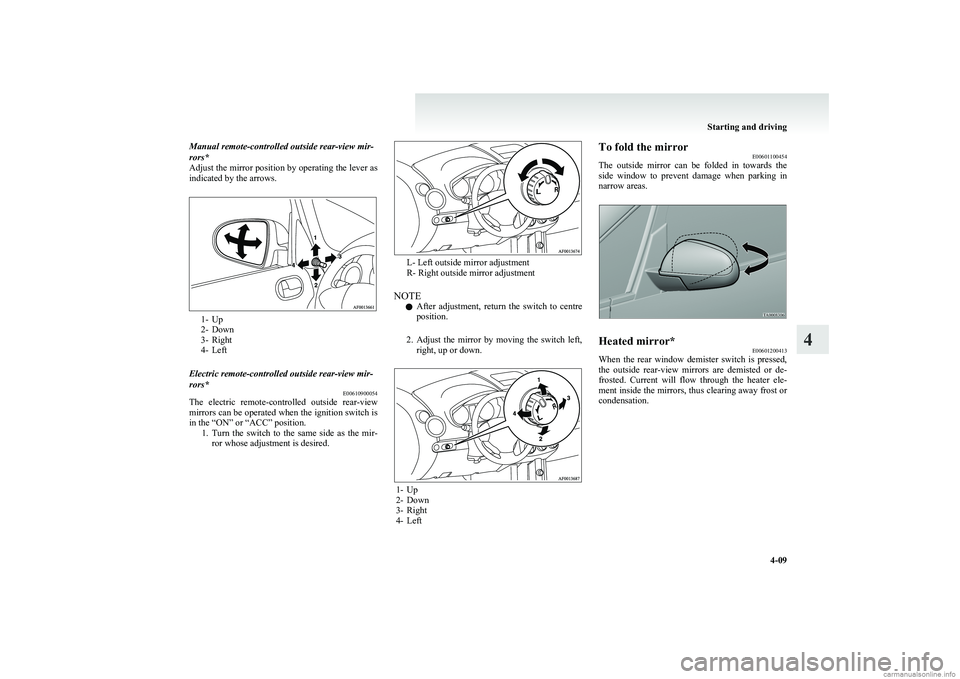
rors*
Adjust the mirror position by operating the lever as
indicated by the arrows.
1- Up
2- Down
3- Right
4- Left
Electric remote-controlled outside rear-view mir-
rors* E00610900054
The electric remote-controlled outside rear-view
mirrors can be operated when the ignition switch is
in the “ON” or “ACC” position. 1.Turn the switch to the same side as the mir-
ror whose adjustment is desired.
L- Left outside mirror adjustment
R- Right outside mirror adjustment
NOTE l After adjustment, return the switch to centre
position.
2. Adjust the mirror by moving the switch left,
right, up or down.
1- Up
2- Down
3- Right
4- Left
To fold the mirror E00601100454
The outside mirror can be folded in towards the
side window to prevent damage when parking in
narrow areas.Heated mirror* E00601200413
When the rear window demister switch is pressed,
the outside rear-view mirrors are demisted or de-
frosted. Current will flow through the heater ele-
ment inside the mirrors, thus clearing away frost or
condensation.
Starting and driving
4-09
4
Page 135 of 274
CAUTIONlWhen driving a vehicle on a snowy or icy
road, be sure to install snow tyres and
drive the vehicle at moderate speeds.
NOTE
l When moving out of mud or fresh snow, press-
ing the accelerator pedal may not allow the
engine speed to increase.
Active stability control system (ASC) E00612000091
The Active Stability Control system (ASC) is de-
signed to help maintain the vehicle’s control in slip-
pery conditions, or during rapid steering manoeu-
vres. It works by controlling the engine output and
brake on each wheel.
NOTE l The Active Stability Control system (ASC)
functions at speeds of approximately
10 km/h (6 mph) or higher.
Traction control system (TCL)/Active
stability control system (ASC) indica-
tion lamp E00612100119
The Traction Control System (TCL) and Active Sta-
bility Control system (ASC) share the same indica-
tion lamp.
The indication lamp should illuminate when the ig-
nition switch is turned to the “ON” position, and
should go off after a few seconds. Always make
sure that the lamp goes off before begining to drive.
If the indication lamp stays on or does not illumi-
nate when the ignition switch is turned to the “ON”
position, we recommend you to consult a
MITSUBISHI MOTORS Authorized Service Point.
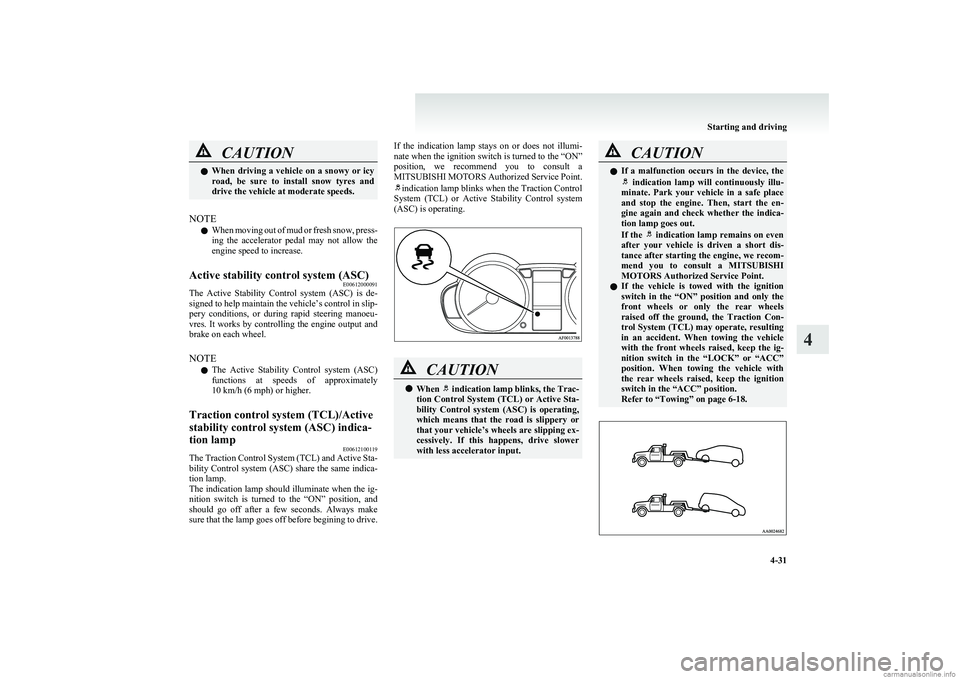
indication lamp blinks when the Traction Control
System (TCL) or Active Stability Control system
(ASC) is operating.
CAUTIONl When indication lamp blinks, the Trac-
tion Control System (TCL) or Active Sta-
bility Control system (ASC) is operating,
which means that the road is slippery or
that your vehicle’s wheels are slipping ex-
cessively. If this happens, drive slower
with less accelerator input.CAUTIONl If a malfunction occurs in the device, the indication lamp will continuously illu-
minate. Park your vehicle in a safe place
and stop the engine. Then, start the en-
gine again and check whether the indica-
tion lamp goes out.
If the
indication lamp remains on even
after your vehicle is driven a short dis-
tance after starting the engine, we recom-
mend you to consult a MITSUBISHI
MOTORS Authorized Service Point.
l If the vehicle is towed with the ignition
switch in the “ON” position and only the
front wheels or only the rear wheels
raised off the ground, the Traction Con-
trol System (TCL) may operate, resulting
in an accident. When towing the vehicle
with the front wheels raised, keep the ig-
nition switch in the “LOCK” or “ACC”
position. When towing the vehicle with
the rear wheels raised, keep the ignition
switch in the “ACC” position.
Refer to “Towing” on page 6-18.
Starting and driving
4-31
4
Page 140 of 274
l“CRUISE” indication lamp is turned OFF.Cargo loads
E00609901240
Cargo loads precautionsCAUTIONl When loading luggage, be careful to the
following. •Stow cargo and luggage in the luggage
compartment whenever possible.
• Distribute cargo or luggage evenly not
to be unbalanced in weight of a load.
• Do not place cargo or luggage on the
instrument panel.
Also, do not stack up cargo or luggage
on the front passenger’s seat or the
rear seats.
Having the driver’s vision blocked,
and your cargo being thrown inside
the cabin if you suddenly have to
brake can cause a serious accident or
injury.Trailer towing E00610000488
In order to tow a trailer with your vehicle, have a
trailer towing device that meets all relevant regula-
tions in your area, mounted consult a
MITSUBISHI MOTORS Authorized Service Point.
The regulations concerning the towing of a trailer
may differ from country to country. You are ad-
vised to obey the regulations in each area.CAUTIONl Danger of Accident!
A towing bar should be fitted according
to MITSUBISHI MOTORS guidelines.
NOTE
l If you are going to tow a trailer, pay careful
attention to the following points.
Maximum towable weight with brake
and maximum trailer-nose weight
Never exceed the maximum towable weight with
brake and the maximum trailer-nose weight as lis-
ted in the specifications.
(Refer to page 9-07.)
If you tow a trailer at an altitude of more than
1,000 m above sea-level, reduce your weight by
10 % of the gross combination weight for every in-
crease of 1,000 m above sea-level, as the engine out-
put is lowered owing to decrease in atmospheric
pressure.
Starting and driving
4-36
4
Page 141 of 274
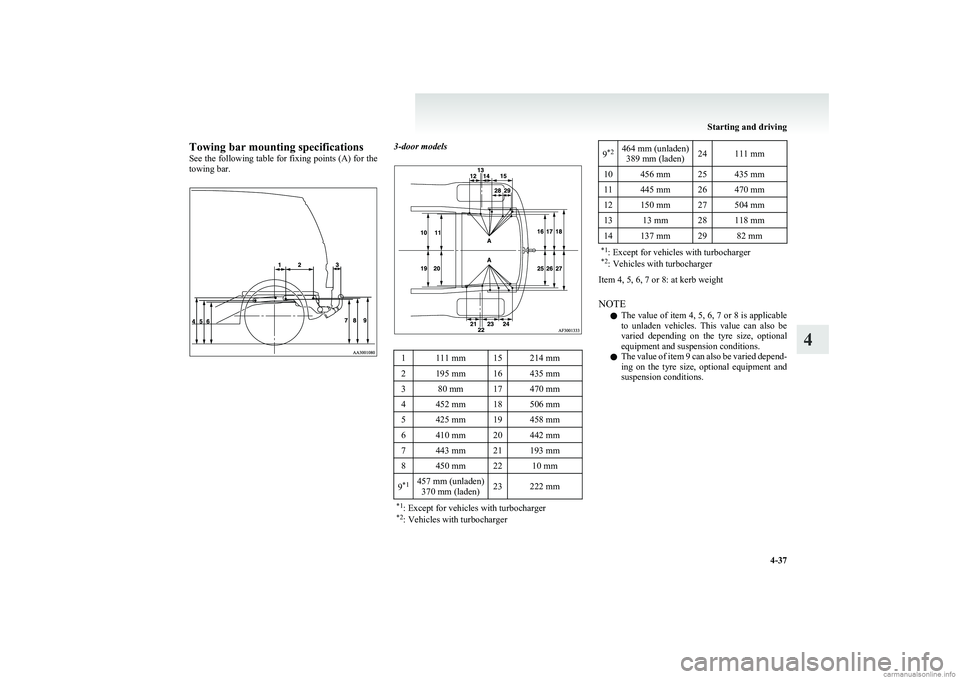
Towing bar mounting specifications
See the following table for fixing points (A) for the
towing bar.3-door models1111 mm15214 mm2195 mm16435 mm380 mm17470 mm4452 mm18506 mm5425 mm19458 mm6410 mm20442 mm7443 mm21193 mm8450 mm2210 mm9 *1457 mm (unladen)
370 mm (laden)23222 mm*1 : Except for vehicles with turbocharger
*2 : Vehicles with turbocharger9*2464 mm (unladen)
389 mm (laden)24111 mm10456 mm25435 mm11445 mm26470 mm12150 mm27504 mm1313 mm28118 mm14137 mm2982 mm*1 : Except for vehicles with turbocharger
*2 : Vehicles with turbocharger
Item 4, 5, 6, 7 or 8: at kerb weight
NOTE l The value of item 4, 5, 6, 7 or 8 is applicable
to unladen vehicles. This value can also be
varied depending on the tyre size, optional
equipment and suspension conditions.
l The value of item 9 can also be varied depend-
ing on the tyre size, optional equipment and
suspension conditions.
Starting and driving
4-37
4
Page 142 of 274
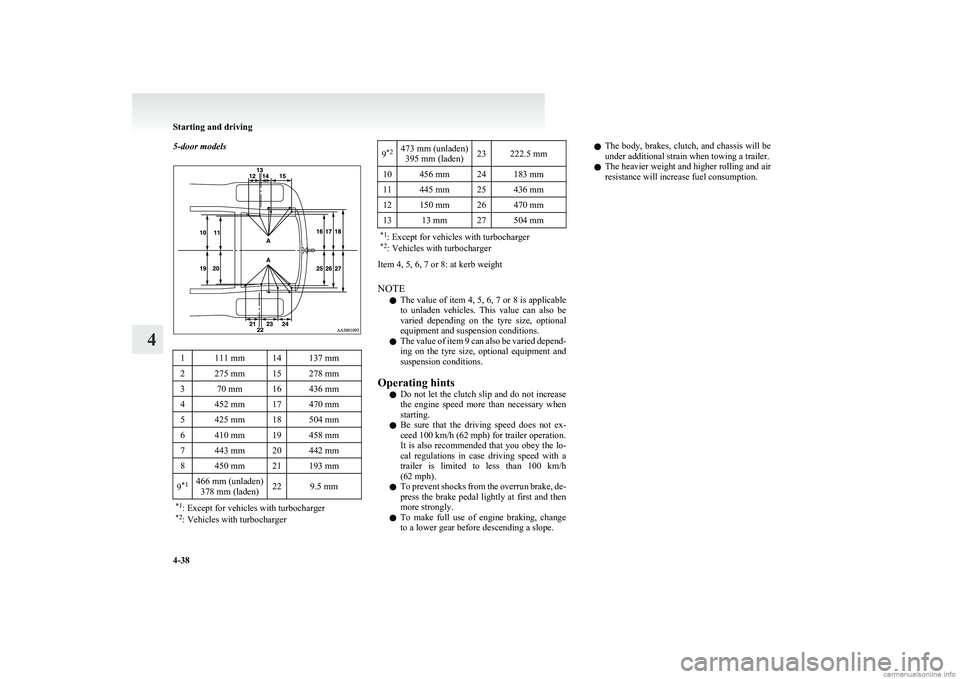
5-door models1111 mm14137 mm2275 mm15278 mm370 mm16436 mm4452 mm17470 mm5425 mm18504 mm6410 mm19458 mm7443 mm20442 mm8450 mm21193 mm9*1466 mm (unladen)
378 mm (laden)229.5 mm*1 : Except for vehicles with turbocharger
*2 : Vehicles with turbocharger9*2473 mm (unladen)
395 mm (laden)23222.5 mm10456 mm24183 mm11445 mm25436 mm12150 mm26470 mm1313 mm27504 mm*1 : Except for vehicles with turbocharger
*2 : Vehicles with turbocharger
Item 4, 5, 6, 7 or 8: at kerb weight
NOTE l The value of item 4, 5, 6, 7 or 8 is applicable
to unladen vehicles. This value can also be
varied depending on the tyre size, optional
equipment and suspension conditions.
l The value of item 9 can also be varied depend-
ing on the tyre size, optional equipment and
suspension conditions.
Operating hints l Do not let the clutch slip and do not increase
the engine speed more than necessary when
starting.
l Be sure that the driving speed does not ex-
ceed 100 km/h (62 mph) for trailer operation.
It is also recommended that you obey the lo-
cal regulations in case driving speed with a
trailer is limited to less than 100 km/h
(62 mph).
l To prevent shocks from the overrun brake, de-
press the brake pedal lightly at first and then
more strongly.
l To make full use of engine braking, change
to a lower gear before descending a slope.
l The body, brakes, clutch, and chassis will be
under additional strain when towing a trailer.
l The heavier weight and higher rolling and air
resistance will increase fuel consumption.
Starting and driving
4-38
4