recommended oil MITSUBISHI DIAMANTE 1900 Owner's Manual
[x] Cancel search | Manufacturer: MITSUBISHI, Model Year: 1900, Model line: DIAMANTE, Model: MITSUBISHI DIAMANTE 1900Pages: 408, PDF Size: 71.03 MB
Page 128 of 408
ENGINEANDENGINEOVERHAUL 3-67
CONNECTING ROD
You should have the connecting rod checked for
StraiQhtness at a machine shop. If the connecting rod
is bent, it will unevenly wear the bearing and piston,
as well as place greater stress on these components.
Any bent or twisted connecting rods must be re-
placed. If the rods are straight and the wrist pin clear-
ance is within specifications, then only the bearing
end of the rod need be checked. Place the connecting
rod into a vice, with the bearing inserts in place, in-
stall the cap to the rod and torque the fasteners to
specifications. Use a telescoping gauge and carefully
measure the inside diameter of the bearings. Com-
pare this reading to the rods original crankshaft jour-
nal diameter measurement. The difference is the oil
clearance. If the oil clearance is not within specifica-
tions, install new bearings in the rod and take another
.
specifica- L
need to
shop as the pistons must be installed in the con measurement. it the Clearance is still out of :
tions, and the crankshaft is not, the rod will
be reconditioned by a machine shop.
*You can also use Plastigage’
@to check the
bearing clearances. The assen- . ...= - _______
Mm sectinn has complete instructions on its use.
Camshaft
Inspect the camshaft and lifters/followers as de
scribed earlier in this section.
Bearings
All of the enaine bearinos should be visuallv in-
~~~ I~ .- - -- ..-_-..,
spected for we; and/or damage. The bearing should
look evenly worn all around with no deep scores or
pits. If the bearing is severely worn, scored, pitted or
heat blued, then the bearing, and the components
that use it, should be brought to a machine shop for
block. ,ect
relationshipto the rod or engine damage can occur,
Pistons and Connecting Rods
I
b See Fiaute 264 --- --*------
Only pistons with the wrist pin retained by C-clips
are serviceable by the home-mechanic. Press fit pis-
tons require special presses and/or heaters to re- I”
rr
rove/install the connecting rod and should only be
PC srformed by a machine shop.
All pistons will have a mark indicating the direc-
tir 9n to the front of the engine and the must be in-
stalled into the engine in that manner. Usually it is a
notch or arrow on the top of the piston, or it may be
the letter F cast or stamped into the piston.
ASEtiBlY
1
crankshaft. Replace any freeze or oil galley plugs
which were removed during disassembly.
Crankshaft
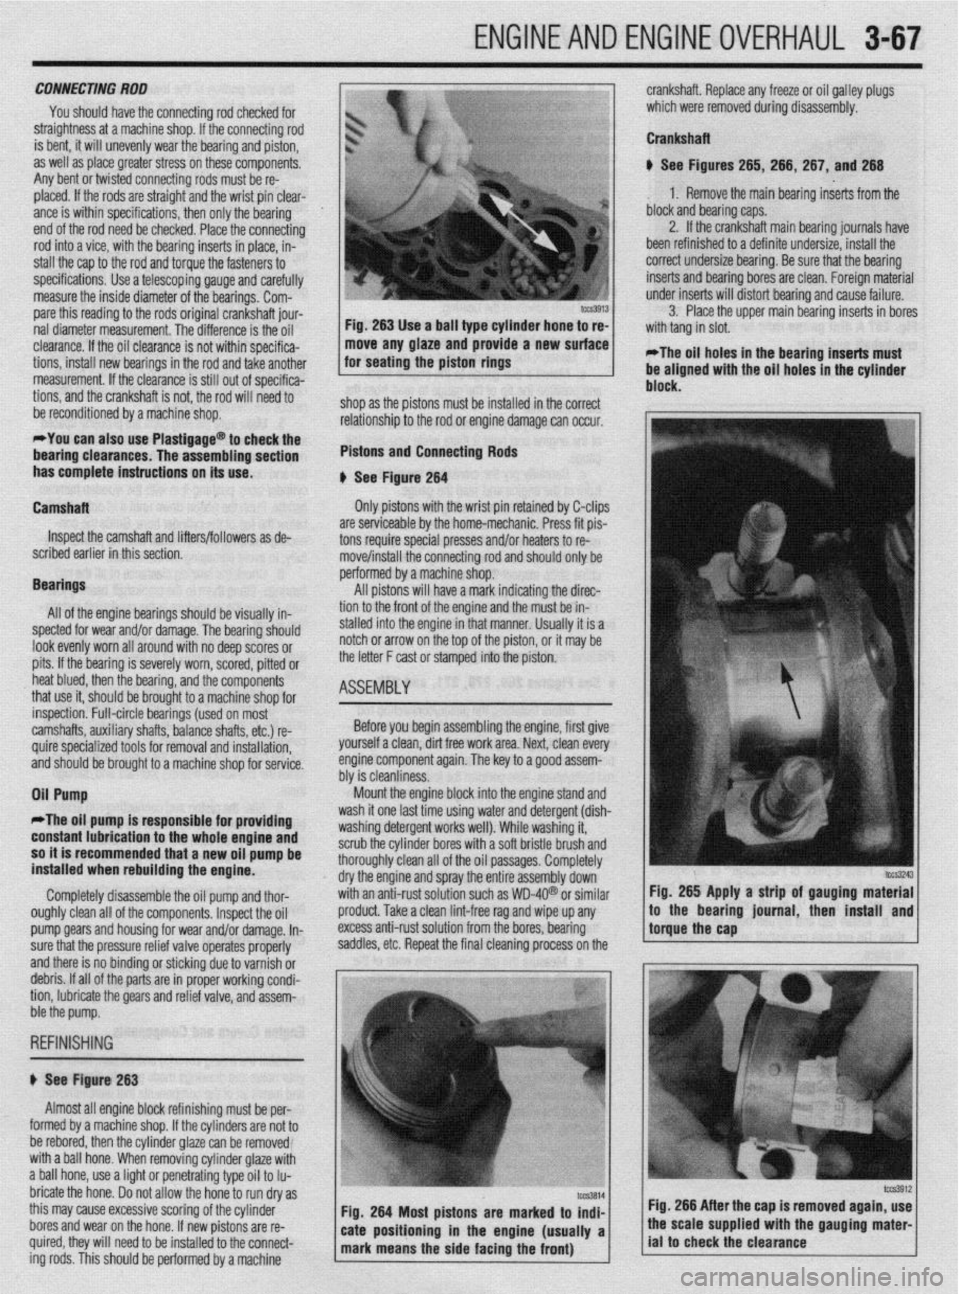
u See Figures 265, 266, 267, and 266
1. Remove the main bearing inserts from the
block and bearing caps.
2. If the crankshaft main bearing journals have
been refinished to a definite undersize, install the
correct undersize bearina. Be sure that the bearina
inserts and bearing bores are clean. Foreign mateiial
under inserts will distort bearinq and cause failure.
3. Place the upper main bearing inserts in bores
*The oil holes in the bearing inserts must
be aligned with the oil holes in the cylinder
. . .
inspection. Full-circle bearings (used on most
camshafts, auxiliary shafts, balance shafts, etc.) re-
quire specialized tools for removal and installation, ’
and should be brought to a machine shop for service.
Oil Pump Before you begin assembling the engine, first give
yourself a clean, dirt free work area. Next, clean every
engine component again. The key to a QOOd assem-
hhr io da~nlinmw “‘I Ia ~rGiOllll,lc7.Ja. Mount the engine block into the engine stand and
II
*The oil pump is responsible fo
r providing wasn It one last time usmg water and detergent (dish-
unrhinn rldarnant ~nrirc well), While washing it, with a soft bristle brush and
: oil oassaoes. Comoletelv constant lubrication to the whole engine and 1ILl.M 0, ,y “GSGl ycx II ““1 n
so it is recommended that a new oil pump be scrub the cylinder bore:
installed when rebuilding the engine. thoroughly clean all oft
dry the engine and spra
Completely disassemble the oil pump and thor- with an anti-rust solutio
oughly clean all of the components. Inspect the oil
pro
pump Qears and housing for wear and/or damage. In- exe
sure that the pressure relief valve operates properly sac
and there is no binding or sticking due to varnish or
debris. If all of the parts are in proper working condi-
tion, lubricate the gears and relief valve, and assem-
r
j ht
y the entire assembly down’
in such as WD-4Q@ or similar Fig. 265 Apply a strip of gauging material
Iduct. Take a clean lint-free rag and wipe up any
less anti-rust solution from the bores, bearing
Idles, etc. Repeat the final cleaning process on the !torguethe~~p * ,’ / to the bearmg lournal, then mstall and
ble the pump.
REFINISHING
# See Figure 263
Almost all engine block refinishing must be per-
I
IUIIII~U uy a macnme snap. ir me cynnoers are nor ro
be rebored, then the cylinder glaze can be removed
with a ball hone. When removing cylinder glaze with
a ball hone, use a light or penetrating type oil to Iu-
bricate the hone. Do not allow the hone to run dry as
this may cause excessive scoring of the cylinder
bores and wear on the hone. If new pistons are re-
quired, they will need to be installed to the connect-
ing rods. This should be oerformed bv a machine Fig. 266 After the cap is removed again, use
Page 389 of 408
TROUBLESHOOiNG 11-7
4. Starter motor spins, but does not engage
a. Check the starter motor for a seized or binding pinion gear.
b. Remove the flywheel inspection plate and check for a damaged ring gear.
Gasoline Engines
1. Engine runs poor/y, hesiiates
a. Check the engine ignition system operation and adjust if possible, or replace defective
parts.
b. Check for restricted fuel injectors and replace as necessary.
c. Check the fuel pump output and delivery. Inspect fuel lines for restrictions. If the fuel
pump pressure is below specification, replace the fuel pump.
d. Check the operation of the engine management system and repair as necessary.
2. Enfline lacks power
a. Check the engine’s tune-up status. Note the tune-up specifications and check for items
such as severely worn spark plugs; adjust or replace as needed. On vehicles with
manually adjusted valve clearances, check for tight valves and adjust to specification.
b. Check the air filter and air intake system. Replace the air filter if it is dirty or contami-
nated. Check the fresh air intake system for restrictions or blockage.
c. Check the operation of the engine fuel and ignition management systems. Check the
sensor operation and wiring. Check for low fuel pump pressure and repair or replace
components as necessary.
d. Check the throttle linkage adjustments. Check to make sure the linkage is fully open-
ing the throttle. Replace any worn or defective bushings or linkages.
e. Check for a restricted exhaust system. Check for bent or crimped exhaust pipes, or in-
ternally restricted mufflers or catalytic converters. Compare inlet and outlet tempera-
tures for the converter or muffler. If the inlet is hot, but outlet cold, the component is
restricted.
f. Check for a loose or defective knock sensor. A loose, improperly torqued or defective
knock sensor will decrease spark advance and reduce power. Replace defective knock
sensors and install using the recommended torque specification.
g. Check for engine mechanical conditions such as low compression, worn piston rings,
worn valves, worn camshafts and related parts. An engine which has severe mechani-
cal wear, or has suffered internal mechanical damage must be rebuilt or replaced to re-
store lost power.
h. Check the engine oil level for being overfilled. Adjust the engine’s oil level, or change
the engine oil and filter, and top off to the correct level.
i. Check for an intake manifold or vacuum hose leak. Replace leaking gaskets or worn
vacuum hoses.
j. Check for dragging brakes and replace or repair as necessary.
k. Check tire air pressure and tire wear. Adjust the pressure to the recommended set-
tings. Check the tire wear for possible alignment problems causing increased rolling
resistance, decreased acceleration and increased fuel usage.
I. Check the octane rating of the fuel used during refilling, and use a higher octane rated
fuel.
3. Poor fuel economy
a. Inspect the air filter and check for any air restrictions going into the air filter housing.
Replace the air filter if it is dirty or contaminated.
b. Check the engine for tune-up and related adjustments. Replace worn ignition parts,
check the engine ignition timing and fuel mixture, and set to specifications if possible.
c. Check the tire size, tire wear, alignment and tire pressure. Large tires create more
rolling resistance, smaller tires require more engine speed to maintain a vehicle’s road
speed. Excessive tire wear can be caused by incorrect tire pressure, incorrect wheel
alignment or a suspension problem. All of these conditions create increased rolling
resistance, causing the engine to work harder to accelerate and maintain a vehicle’s
speed.
d. Inspect the brakes for binding or excessive drag. A sticking brake caliper, overly ad-
justed brake shoe, broken brake shoe return spring, or binding parking brake cable or
linkage can create a significant drag, brake wear and loss of fuel economy. Check the
brake system operation and repair as necessary.
4. Engine runs on (diesels) when turned off
a. Check for idle speed set too high and readjust to specification.
b. Check the operation of the idle control valve, and replace if defective.
c. Check the ignition timing and adjust to recommended settings.
Check for defective
sensors or related components and replace if defective.
d. Check for a vacuum leak at the intake manifold or vacuum hose
and replace defective
gaskets or hoses.
e. Check the engine for excessive carbon build-up in the combustion chamber. Use a
recommended decarbonizing fuel additive or disassemble the cylinder head to remove
the carbon.
f. Check the operation of the engine fuel management system and replace defective sen-
sors or control units.
g. Check the engine operating temperature for overheating and repair as necessary. 5. Engine knocks and pinfls during heavy accele/ation, and on steep hills
a. Check the octane rating of the fuel used during refilling, and use a higher octane rated
fuel.
b. Check the ignition timing and adjust to recommended settings. Check for defective
sensors or related components and replace if defective.
c. Check the engine for excessive carbon build-up in the combustion chamber. Use a
recommended decarbonizing fuel additive or disassemble the cylinder head to remove
the carbon.
d. Check the spark plugs for the correct type, electrode gap and heat range. Replace worn
or damaged spark plugs. For severe or continuous high speed use, install a spark plug
that is one heat range colder.
e. Check the operation of the engine fuel management system and replace defective sen-
sors or control units.
f. Check for a restricted exhaust system. Check for bent or crimped exhaust pipes, or in-
ternally restricted mufflers or catalytic converters. Compare inlet and outlet tempera-
tures for the converter or muffler. If the inlet is hot, but outlet cold, the component is
restricted.
6. Engine atxelerates, but vehicle does not gain speed
a. On manual transmission vehicles, check for causes of a slipping clutch. Refer to the
clutch troubleshooting section for additional information.
b. On automatic transmission vehicles, check for a slipping transmission” Check the
transmission fluid level and condition. If the fluid level is too high, adjust to the cor-
rect level. If the fluid level is low, top off using the recommended fluid type. If the fluid
exhibits a burning odor, the transmission has been slipping internally. Changing the
fluid and filter may help temporarily, however in this situation a transmission may re-
quire overhauling to ensure long-term reliability.
Diesel Engines
1. Engine runs pOOr!y a. Check the injection pump timing and adjust to specification.
b. Check for air in the fuel lines or leaks, and bleed the air from the fuel system.
c. Check the fuel filter, fuel feed and return lines for a restriction and repair as necessary.
d. Check the fuel for contamination, drain and flush the fuel tank and replenish with fresh
fuel.
2. Enfline lacks power
a. Inspect the air intake system and air filter for restrictions and, if necessary, replace the
air filter.
b. Verify the injection pump timing and reset if out of specification.
c. Check the exhaust for an internal restriction and replace failed parts.
d. Check for a restricted fuel filter and, if restricted, replace the filter.
e. Inspect the fuel filler cap vent. When removing the filler cap, listen for excessive hiss-
ing noises indicating a blockage in the fuel filler cap vents, If the filler cap vents are
blocked, replace the cap.
f. Check the fuel system for restrictions and repair as necessary.
g. Check for low engine compression and inspect for external leakage at the glow plugs
or nozzles. If no external leakage is noted, repair or replace the engine.
ENGINE PERFORMANCE TROUBLESHOOTING HINTS When troubleshooting an engine running or performance condition, the mechanical
condition of the engine should be determined before lengthy troubleshooting procedures
are performed.
The engine fuel management systems in fuel injected vehicles rely on electronic sen-
sors to provide information to the engine control unit for precise fuel metering. Unlike
carburetors, which use the incoming air speed to draw fuel through the fuel metering jets
in order to provide a proper fuel-to-air ratio, a fuel injection system provides a specific
amount of fuel which is introduced by the fuel injectors into the intake manifold or intake
port, based on the information provided by electronic sensors.
The sensors monitor the engine’s operating temperature, ambient temperature and the
amount of air entering the engine, engine speed and throttle position to provide informa-
tion to the engine control unit, which, in turn, operates the fuel injectors by electrical
pulses. The sensors provide information to the engine control unit using low voltage
electrical signals. As a result, an unplugged sensor or a poor electrical contact could
cause a poor running condition similar to a failed sensor.
When troubleshooting a fuel related engine condition on fuel injected vehicles, care-
fully inspect the wiring and electrical connectors to the related components. Make sure
the electrical connectors are fully connected, clean and not physically damaged. If neces-
sary, clean the electrical contacts using electrical contact cleaner. The use of cleaning
agents not specifically designed for electrical contacts should not be used, as they could
leave a surface film or damage the insulation of the wiring.
The engine electrical system provides the necessary electrical power to operate the ve-
hicle’s electrical accessories, electronic control units and sensors. Because engine man-
agement systems are sensitive to voltage changes, an alternator which over or under-
charges could cause engine running problems or component failure. Most alternators
utilize internal voltage regulators which cannot be adjusted and must be replaced indi-
vidually or as a unit with the alternator.
Page 390 of 408
11-8 TROUBLESHOOTING
Ignition systems may be controlled by, or linked to, the engine fuel management sys-
tem. Similar to the fuel injection system, these ignition systems rely on electronic sen-
sors for information to determine the optimum ignition timing for a given engine speed
and load. Some ignition systems no longer allow the ignition timing to be adjusted.
Feedback from low voltage electrical sensors provide information to the control unit to
determine the amount of ignition advance. On these systems, if a failure occurs the failed
component must be replaced. Before replacing suspected failed electrical components,
carefully inspect the wiring and electrical connectors to the related components. Make
sure the electrical connectors are fully connected, clean and not physically damaged. If
necessary, clean the electrical contacts using electrical contact cleaner. The use of clean-
ing agents not specifically designed for electrical contacts should be avoided, as they
could leave a surface film or damage the insulation of the wiring.
1. Engine makes a knocking or pinging noise when accelerating
a. Check the octane rating of the fuel being used. Depending on the type of driving or
driving conditions, it may be necessary to use a higher octane fuel.
b. Verify the ignition system settings and operation. Improperly adjusted ignition timing
or a failed component, such as a knock sensor, may cause the ignition timing to ad-
vance excessively or prematurely. Check the ignition system operation and adjust, or
replace components as needed.
c. Check the spark plug gap, heat range and condition. If the vehicle is operated in se-
vere operating conditions or at continuous high speeds, use a colder heat range spark
plug. Adjust the spark plug gap to the manufacturer’s recommended specification and
replace worn or damaged spark plugs.
2. Sfarter motor grinds when used
a. Examine the starter pinion gear and the engine ring gear for damage, and replace dam-
aged parts.
b. Check the starter mounting bolts and housing. If the housing is cracked or damaged
replace the starter motor and check the mounting bolts for tightness.
3. Engine makes a screeching noise
a. Check the accessory drive belts for looseness and adjust as necessary.
b. Check the accessory drive belt tensioners for seizing or excessive bearing noises and
replace if loose, binding, or excessively noisy.
c. Check for a seizing water pump. The pump may not be leaking; however, the bearing
may be faulty or the impeller loose and jammed. Replace the water pump.
4. Engine makes a growling noise
a. Check for a loose or failing water pump. Replace the pump and engine coolant.
b. Check the accessory drive belt tensioners for excessive bearing noises and replace if
loose or excessively noisy.
5. Engine makes a ticking or tapping noise
a. On vehicles with hydraulic lash adjusters, check for low or dirty engine oil and top off
or replace the engine oil and filter.
b. On vehicles with hydraulic lash adjusters, check for collapsed lifters and replace failed
components.
c. On vehicles with hydraulic lash adjusters, check for low oil pressure caused by a re-
stricted oil filter, worn engine oil pump, or oil pressure relief valve.
d. On vehicles with manually adjusted valves, check for excessive valve clearance or
worn valve train parts. Adjust the valves to specification or replace worn and defective
parts.
e. Check for a loose or improperly tensioned timing belt or timing chain and adjust or re-
place parts as necessary.
f. Check for a bent or sticking exhaust or intake valve. Remove the engine cylinder head
to access and replace.
6. Engine makes a heavy knocking noise
a. Check for a loose crankshaft pulley or flywheel; replace and torque the mounting
bolt(s) to specification.
b. Check for a bent connecting rod caused by a hydro-lock condition. Engine disassem-
bly is necessary to inspect for damaged and needed replacement parts.
c. Check for excessive engine rod bearing wear or damage. This condition is also asso-
ciated with low engine oil pressure and will require engine disassembly to inspect for
damaged and needed replacement parts,
7. Vehicle has a fuel odor when driven ’ a. Check the fuel gauge level. If the fuel gauge registers full, it is possible that the odor is
caused by being filled beyond capacity, or some spillage occurred during refueling.
The odor should clear after driving an hour, or twenty miles, allowing the vapor canis-
ter to purge.
b. Check the fuel filler cap for looseness or seepage. Check the cap tightness and, if
loose, properly secure. If seepage is noted, replace the filler cap.
c. Check for loose hose clamps, cracked or damaged fuel delivery and return lines, or
leaking components or seals, and replace or repair as necessary. d. Check the vehicle’s fuel economy. If fuel consumption has increased due to a failed
component, or if the fuel is not properly ignited due to an ignition related failure, the
catalytic converter may become contaminated. This condition may also trigger the
check engine warning light. Check the spark plugs for a dark, rich condition or verify
the condition by testing the vehicle’s emissions. Replace fuel fouled spark plugs, and
test and replace failed components as necessary.
5. Vehicle has a rotten egg odor when driven
a. Check for a leaking intake gasket or vacuum leak causing a lean running condition. A
lean mixture may result in increased exhaust temperatures, causing the catalytic con-
verter to run hotter than normal. This condition may also trigger the check engine
warning light. Check and repair the vacuum leaks as necessary.
b. Check the vehicle’s alternator and battery condition. If the alternator is overcharging,
the battery electrolyte can be boiled from the battery, and the battery casing may begin
to crack, swell or bulge, damaging or shorting the battery internally. If this has oc-
curred, neutralize the battery mounting area with a suitable baking soda and water
mixture or equivalent, and replace the alternator or voltage regulator. Inspect, service,
and load test the battery, and replace if necessary.
9. Vehicle has a sweet odor when driven
a. Check for an engine coolant leak caused by a seeping radiator cap, loose hose clamp,
weeping cooling system seal, gasket or cooling system hose and replace or repair as
needed.
b. Check for a coolant leak from the radiator, coolant reservoir, heater control valve or
under the dashboard from the heater core, and replace the failed part as necessary.
c. Check the engine’s exhaust for white smoke in addition to a sweet odor. The presence
of white, steamy smoke with a sweet odor indicates coolant leaking into the combus-
tion chamber. Possible causes include a failed head gasket, cracked engine block or
cylinder head. Other symptoms of this condition include a white paste build-up on the
inside of the oil filler cap, and softened, deformed or bulging radiator hoses.
19. Engine vibraies when idling
a. Check for loose, collapsed, or damaged engine or transmission mounts and repair or
replace as necessary.
b. Check for loose or damaged engine covers or shields and secure or replace as neces-
sary.
11. Engine vibrates during acceleration
a. Check for missing, loose or damaged exhaust system hangers and mounts; replace or
repair as necessary.
b. Check the exhaust system routing and fit for adequate clearance or potential rubbing;
repair or adjust as necessary.
7. Battery goes dead while driving
a. Check the battery condition. Replace the battery if the battery will not hold a charge or
fails a battery load test. If the battery loses fluid while driving, check for an overcharg-
ing condition. If the alternator is overcharging, replace the alternator or voltage regula-
tor. (A voltage regulator is typically built into the alternator, necessitating alternator re-
placement or overhaul.)
b. Check the battery cable condition. Clean or replace corroded cables and clean the bat-
tery terminals.
c. Check the alternator and voltage regulator operation. If the charging system is over or
undercharging, replace the alternator or voltage regulator, or both.
d. Inspect the wiring and wire connectors at the alternator for looseness, a missing .
ground or defective terminal, and repair as necessary.
e. Inspect the alternator drive belt tension, tensioners and condition. Properly tension the
drive belt, replace weak or broken tensioners, and replace the drive belt if worn or
cracked.
2. Battery goes dead overnight
a. Check the battery condition. Replace the battery if the battery will not hold a charge or
fails a battery load test.
b. Check for a voltage draw, such as a trunk light, interior light or glove box light staying
on. Check light switch position and operation, and replace if defective.
c. Check the alternator for an internally failed diode, and replace the alternator if defec-
tive.
1. Engine overheats
a. Check the coolant level. Set the heater temperature to full hot and check for internal air
pockets, bleed the cooling system and inspect for leakage. Top off the cooling system
with the correct coolant mixture.
b. Pressure test the cooling system and radiator cap for leaks. Check for seepage caused
by loose hose clamps, failed coolant hoses, and cooling system components such as
the heater control valve, heater core, radiator, radiator cap, and water pump. Replace
defective parts and fill the cooling system with the recommended coolant mixture.