ECO mode MITSUBISHI DIAMANTE 1900 Owner's Guide
[x] Cancel search | Manufacturer: MITSUBISHI, Model Year: 1900, Model line: DIAMANTE, Model: MITSUBISHI DIAMANTE 1900Pages: 408, PDF Size: 71.03 MB
Page 327 of 408
I
SUSPENSION AND STEERING 8-31
11. Install lap cooler and foot shower duct work.
1.’ Disconnect the negative battery cable. 11.
12. Install the upper and lower steering column Back the tie rod and jam nut out one full turn
2. Remove the wheel and tire assembly. until the reference line is in the same position as be-
covers.
3. Remove the cotter pin and the castellated nut
fore.
13. Install the knee protector and switches.
12. Place the outer tie rod end stud into the steer-
14. Install the hood release handle. from the outer tie rod end. Discard the cotter pin.
4. Separate the outer tie rod end from the steer-
15. Install the steering wheel, as outlined earlier
ing knuckle using an appropriate tie rod end remover. ing knuckle. Set the front wheels in a straight ahead
in this section. position.
16. Connect the negative battery cable and check 5. Mark the outer tie rod jam nut on one side 13. Connect the outer tie rod end to the steering
with a reference line for installation.
all functions of column-mounted switches and the ig-
Hold the outer tie rod end with a wrench and knuckle and install the castle nut. Tighten the nut to
6.
nition switch for proper operation,
loosen the tie rod end jam nut. 25 ft. Ibs. (34 Nm) on Mirage models and 21 ft. Ibs.
(29 Nm) on the Galant and Diamante models.
7. Back the tie rod end jam nut off ONE FULL
TURN ONLY. 14. Continue to tighten the castellated nut until a
new cotter pin can be inserted through the hole in the
8. Remove the outer tie rod end from the inner
REMOVAL&INSTALLATION
Tie Rod Ends tie rod spindle.
To install:
9. Clean the threads on the inner tie rod spindle
(front wheel spindle connecting rod).
10. Thread the new outer tie rod end onto the in- stud. Install a new cotter pin.
15. If required, repeat the procedure for the oppo-
site side,
16. Reinstall the wheel and tire a&embly. Tighten
the lug nuts to 65-80 ft. Ibs. (90-l 10 Nm).
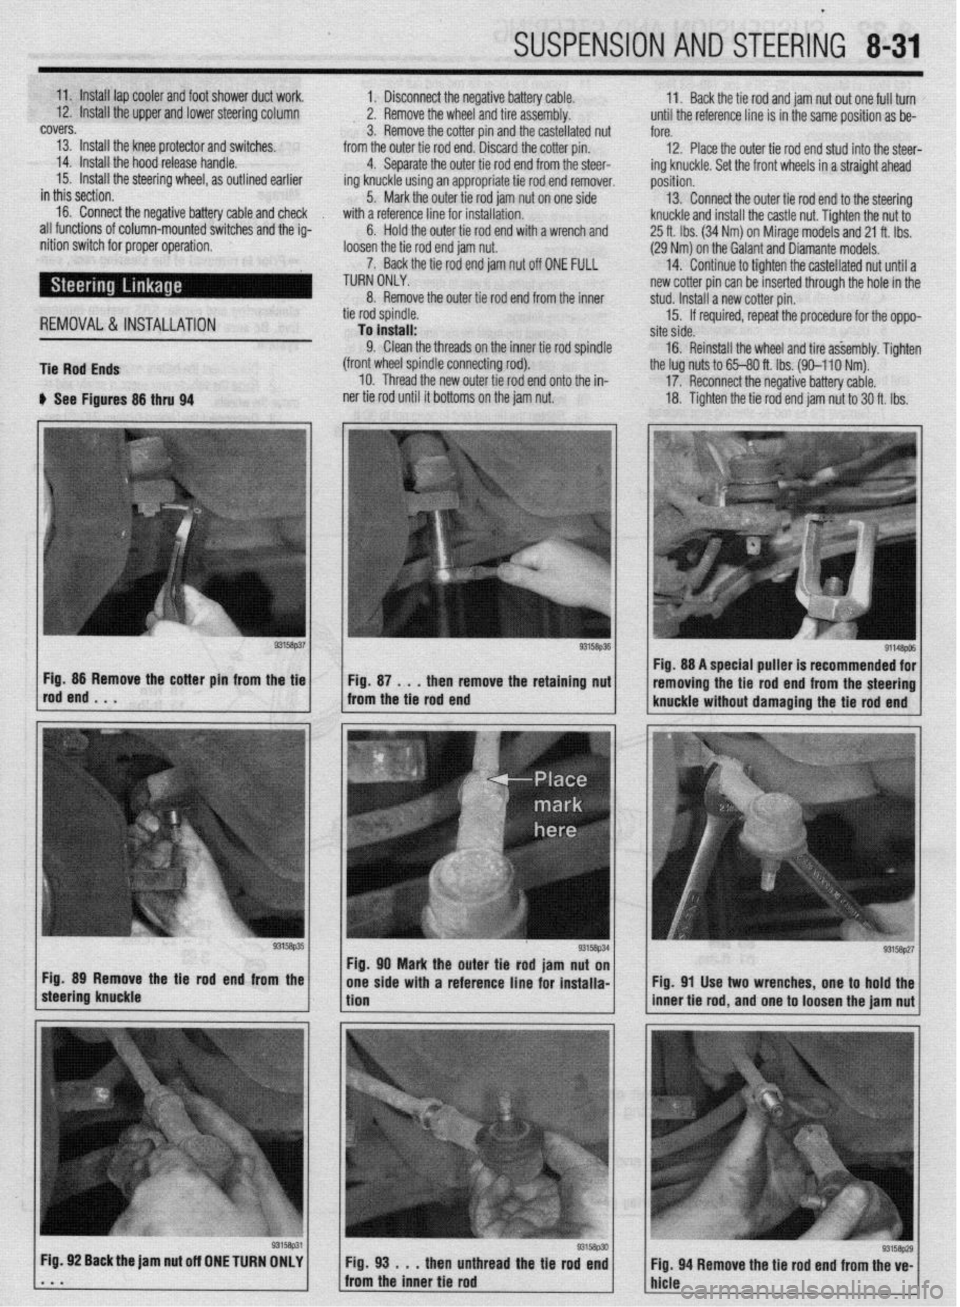
u See Figures 86 thru 94 ner tie rod until it bottoms on the jam nut. 17. Reconnect the negative battery cable.
18. Tighten the tie rod end jam nut to 30 ft. Ibs.
g3’5a~51 Fig. 89 Remove the Be rod end from the
steering knuckle *
Fig. 92 Back the jam nut off ONE TURN OMLY
. * m Fig. 98 . . .
then unthread the tie rod end
Fig. 94 Remove the tie rod end from the ve-
from the inner tie rod
hicle Fig. 88 A special puller is recommended for
removing the tie rod end from the steering
knuckle without damaging the tie rod end
Fig. 91 Use two wrenches, one to hold the
inner tie rod, and one to loosen the jam nut
93158p29
Page 338 of 408
9-2 BRAKES
Hydraulic systems are used to actuate the brakes
of all modern automobiles. The system transports the
power required to force the frictional surfaces of the
braking system together from the pedal to the indi-
vidual brake units at each wheel. A hydraulic system
is used for two reasons.
First, fluid under pressure can be carried to all
parts of an automobile by small pipes and flexible
hoses without taking up a significant amount of room
or posing routing problems.
Second, a great mechanical advantage can be
given to the brake pedal end of the system, and the
foot pressure required to actuate the brakes can be
reduced by making the surface area of the master
cylinder pistons smaller than that of any of the pis-
tons in the wheel cylinders or calipers.
The master cylinder consists of a fluid reservoir
along with a double cylinder and piston assembly.
Double type master cylinders are designed to sepa-
rate the front and rear braking systems hydraulically
in case of a leak. The master cylinder converts me-
chanical motion from the pedal into hydraulic pres-
sure within the lines. This pressure is translated back
into mechanical motion at the wheels by either the
wheel cylinder (drum brakes) or the caliper (disc
brakes).
Steel lines carry the brake fluid to a point on the
vehicle’s frame near each of the vehicle’s wheels. The
fluid is then carried to the calipers and wheel cylin-
ders by flexible tubes in order to allow for suspen-
sion and steering movements.
In drum brake systems, each wheel cylinder con-
tains two pistons, one at either end, which push out-
ward in opposite directions and force the brake shoe
into contact with the drum.
In disc brake systems, the cylinders are part of the
calipers. At least one cylinder in each caliper is used
to force the brake pads against the disc.
All pistons employ some type of seal, usually
made of rubber, to minimize fluid leakage. A rubber
dust boot seals the outer end of the cylinder against
dust and dirt. The boot fits around the outer end of
the piston on disc brake calipers, and around the
brake actuating rod on wheel cylinders.
The hydraulic system operates as follows: When at
rest, the entire system, from the piston(s) in the mas-
ter cylinder to those in the wheel cylinders or
calipers, is full of brake fluid. Upon application of the
brake pedal, fluid trapped in front of the master cylin-
der piston(s) is forced through the lines to the wheel
cylinders. Here, it forces the pistons outward, in the
case of drum brakes, and inward toward the disc, in
the case of disc brakes. The motion of the pistons is
opposed by return springs mounted outside the
cylinders in drum brakes, and by spring seals, in disc
brakes.
Upon release of the brake pedal, a spring located
inside the master cylinder immediately returns the
master cylinder pistons to the normal position. The
pistons contain check valves and the master cylinder
I
has compensating ports drilled in it. These are un-
covered as the pistons reach their normal position.
The piston check valves allow fluid to flow toward the
wheel cylinders or calipers as the pistons withdraw.
Then, as the return springs force the brake pads or
shoes into the released position, the excess fluid
reservoir through the compensating ports. It is during the time the pedal is in the released position that any
fluid that has leaked out of the system will be re-
placed through the compensating ports.
Dual circuit master cylinders employ two pistons,
located one behind the other, in the same cylinder.
The primary piston is actuated directly by mechanical
linkage from the brake pedal through the power
booster. The secondary piston is actuated by fluid
trapped between the two pistons. If a leak develops in
front of the secondary piston, it moves forward until it
bottoms against the front of the master cylinder, and
the fluid trapped between the pistons will operate the
rear brakes. If the rear brakes develop a leak, the pri-
mary piston will move forward until direct contact
with the secondary piston takes place, and it will
force the secondary piston to actuate the front brakes.
In either case, the brake pedal moves farther when the
brakes are applied, and less braking power is avail-
able.
All dual circuit systems use a switch to warn the
driver when only half of the brake system is opera-
tional. This switch is usually located in a valve body
which is mounted on the firewall or the frame below
the master cylinder. A hydraulic piston receives pres-
sure from both circuits, each circuits pressure being
applied to one end of the piston. When the pressures
are in balance, the piston remains stationary. When
one circuit has a leak, however, the greater pressure
in that circuit during application of the brakes will
push the piston to one side, closing the switch and
activating the brake warning light.
In disc brake systems, this valve body also con-
tains a metering valve and, in some cases, a propor-
tioning valve. The metering valve keeps pressure
from traveling to the disc brakes on the front wheels
until the brake shoes on the rear wheels have con-
tacted the drums, ensuring that the front brakes will
never be used alone. The proportioning valve con-
trols the pressure to the rear brakes to lessen the
chance of rear wheel lock-up during very hard brak-
ing.
Warning lights may be tested by depressing the
brake pedal and holding it while opening one of the
wheel cylinder bleeder screws. If this does not cause
the light to go on, substitute a new lamp, make conti-
nuity checks, and, finally, replace the switch as nec-
essary.
The hydraulic system may
be checked for leaks by applying pressure to the pedal gradually and steadily.
If the pedal sinks very slowly to the floor, the system
has a leak. This is not to be confused with a springy
or spongy feel due to the compression of air within
the lines. If the system leaks, there will be a gradual
change in the position of the pedal with a constant
pressure.
Check for leaks along all lines and at wheel cylin-
ders. If no external leaks are apparent, the problem is
inside the master cylinder,
DISC BRAKES
Instead of the traditional expanding brakes that
press outward against a circular drum, disc brake
systems utilize a disc (rotor) with brake pads posi-
tioned on either side of it. An easily-seen analogy is
the hand brake arrangement on a bicycle. The pads
squeeze onto the rim of the bike wheel, slowing its
motion. Automobile disc brakes use the identical principle but apply the braking effort to a separate
disc instead of the wheel.
The disc (rotor) is a casting, usually equipped with
cooling fins between the two braking surfaces. This
enables air to circulate between the braking surfaces
making them less sensitive to heat buildup and more
resistant to fade. Dirt and water do not drastically af-
fect braking action since contaminants are thrown off
by the centrifugal action of the rotor or scraped off
the by the pads. Also, the equal clamping action of
the two brake pads tends to ensure uniform, straight
line stops. Disc brakes are inherently self-adjusting.
There are three general types of disc brake:
1. A fixed caliper.
2. A floating caliper.
3. A sliding caliper.
The fixed caliper design uses two pistons
mounted on either side of the rotor (in each side of
the caliper). The caliper is mounted rigidly and does
not move.
The sliding and floating designs are quite similar.
In fact, these two types are often lumped together. In
both designs, the pad on the inside of the rotor is
moved into contact with the rotor by hydraulic force.
The caliper, which is not held in a fixed position,
moves slightly, bringing the outside pad into contact
with the rotor. There are various methods of attaching
floating calipers. Some pivot at the bottom or top,
and some slide on mounting bolts. In any event, the
end result is the same.
DRUM BRAKES
Drum brakes employ two brake shoes mounted on
a stationary backing plate. These shoes are posi-
tioned inside a circular drum which rotates with the
wheel assembly. The shoes are held in place by
springs. This allows them to slide toward the drums
(when they are applied) while keeping the linings and
drums in alignment. The shoes are actuated by a
wheel cylinder which is mounted at the top of the
backing plate. When the brakes are applied, hydraulic
pressure forces the wheel cylinder’s actuating links
outward. Since these links bear directly against the
top of the brake shoes, the tops of the shoes are then
forced against the inner side of the drum. This action
forces the bottoms of the two shoes to contact the
brake drum by rotating the entire assembly slightly
(known as servo action). When pressure within the
wheel cylinder is relaxed, return springs pull the
shoes back away from the drum.
Most modern drum brakes are designed to self-
adjust themselves during application when the vehi-
cle is moving in reverse. This motion causes both
shoes to rotate very slightly with the drum, rocking
an adjusting lever, thereby causing rotation of the ad-
justing screw. Some drum brake systems are de-
signed to self-adjust during application whenever the
brakes are applied. This on-board adjustment system
reduces the need for maintenance adjustments and
keeps both the brake function and pedal feel satisfac-
tory.
POWER BOOSTERS
Virtually all modern vehicles use a vacuum as-
sisted power brake system to multiply the braking
force and reduce pedal effort. Since vacuum is always
available when the engine is operating, the system is
Page 341 of 408
BRAKES 9-5
Inspect brake pedal free-play
firm that the amount of movement before resistance
is felt is within 0.1-0.3 in. (3-8mm).
3. If the free-play is less than desired, confirm
that the brake light switch is in proper adjustment.
4. If there is excessive free-play, look for wear or
play in the clevis pin and brake pedal arm. Replace
worn parts as required and recheck brake pedal free-
Play*
REMOVAL &INSTALLATION '
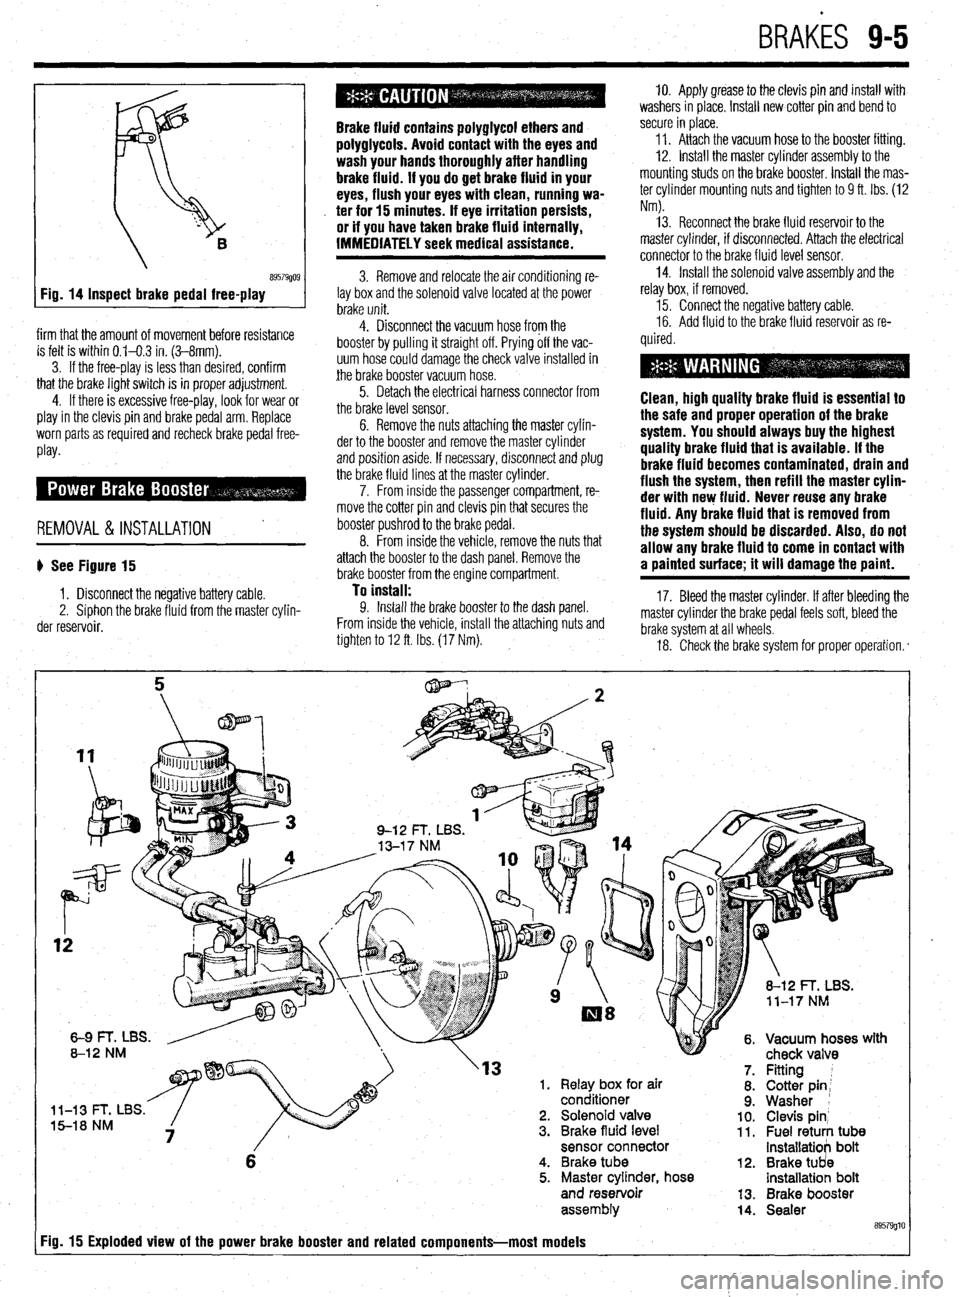
b See Figure 15
1. Disconnect the negative battery cable.
2. Siphon the brake fluid from the master cylin-
der reservoir.
Brake fluid contains polyglycol ethers and
polyglycols. Avoid contact with the eyes and
wash your hands thoroughly after handling
brake fluid. If you do get brake fluid in your
eyes, flush your eyes with clean, running wa-
. ter for 15 minutes. If eye irritation persists,
or if you have taken brake fluid internally,
IMMEDIATELY seek medical assistance.
3. Remove and relocate the air conditioning re-
lay box and the solenoid valve located at the power
brake unit.
4. Disconnect the vacuum hose from the
booster by pulling it straight off. Prying off the vac-
uum hose could damage the check valve installed in
the brake booster vacuum hose.
5. Detach the electrical harness connector from
the brake level sensor.
6. Remove the nuts attaching the master cylin-
der to the booster and remove the master cylinder
and position aside. If necessary, disconnect and plug
the brake fluid lines at the master cylinder.
7. From inside the passenger compartment, re-
move the cotter pin and clevis pin that secures the
booster pushrod to the brake pedal.
8. From inside the vehicle, remove the nuts that
attach the booster to the dash panel. Remove the
brake booster from the engine compartment.
To install: 9. Install the brake booster to the dash panel.
From inside the vehicle, install the attaching nuts and
tighten to 12 ft. Ibs. (17 Nm). 10. Apply grease to the clevis pin and install with
washers in place. Install new cotter pin and bend to
secure in place.
11. Attach the vacuum hose to the booster fitting.
12. Install the master cylinder assembly to the
mounting studs on the brake booster. Install the mas-
ter cylinder mounting nuts and tighten to 9 ft. Ibs. (12
Nm).
13. Reconnect the brake fluid reservoir to the
master cylinder, if disconnected. Attach the electrical
connector to the brake fluid level sensor.
14. Install the solenoid valve assembly and the
relay box, if removed.
15. Connect the negative battery cable.
16. Add fluid to the brake fluid reservoir as re-
quired.
Clean, high quality brake fluid is essentlal to
the safe and proper operation of the brake
system. You should always buy the highest
quality brake fluid that is available. If the
brake fluid becomes contaminated, drain and
flush the system, then refill the master cylin-
der with new fluid. Never reuse any brake
fluid. Any brake fluid that is removed from
the system should be discarded. Also, do not
allow any brake fluid to come in contact with
a painted surface; it will damage the paint.
17. Bleed the master cylinder. If after bleeding the
master cylinder the brake pedal feels soft, bleed the
brake system at all wheels.
18. Check the brake system for proper operation. *
rn( mr
'13 1. Relay box for air
conditioner
l-13 t- I, Ltx5. 5-18 NM 2. Solenoid valve
3. Brake fluid level
sensor connector
6 4. Brake tube
5. Master cylinder, hose
and reservoir
assem biy
Fig. 15 Exploded view of the power brake booster and related components-most models
12.
13.
14. Fitting 1
Cotter pin;
Washer 1
Clevis pin’ Fuel retuti tub8 installatiob bolt
Brake tUd8 installatioh bolt
Brake booster
Sealer
89579glt
Page 347 of 408
BRAK& 9-11
1, Disconnect the battery negative cable.
2. Raise the vehicle and support safely.
3. Remove the appropriate tire and wheel as-
---L,:--
SeIIIUIIM. 4. Loosen the parking brake cable adjustment
from inside the vehicle.
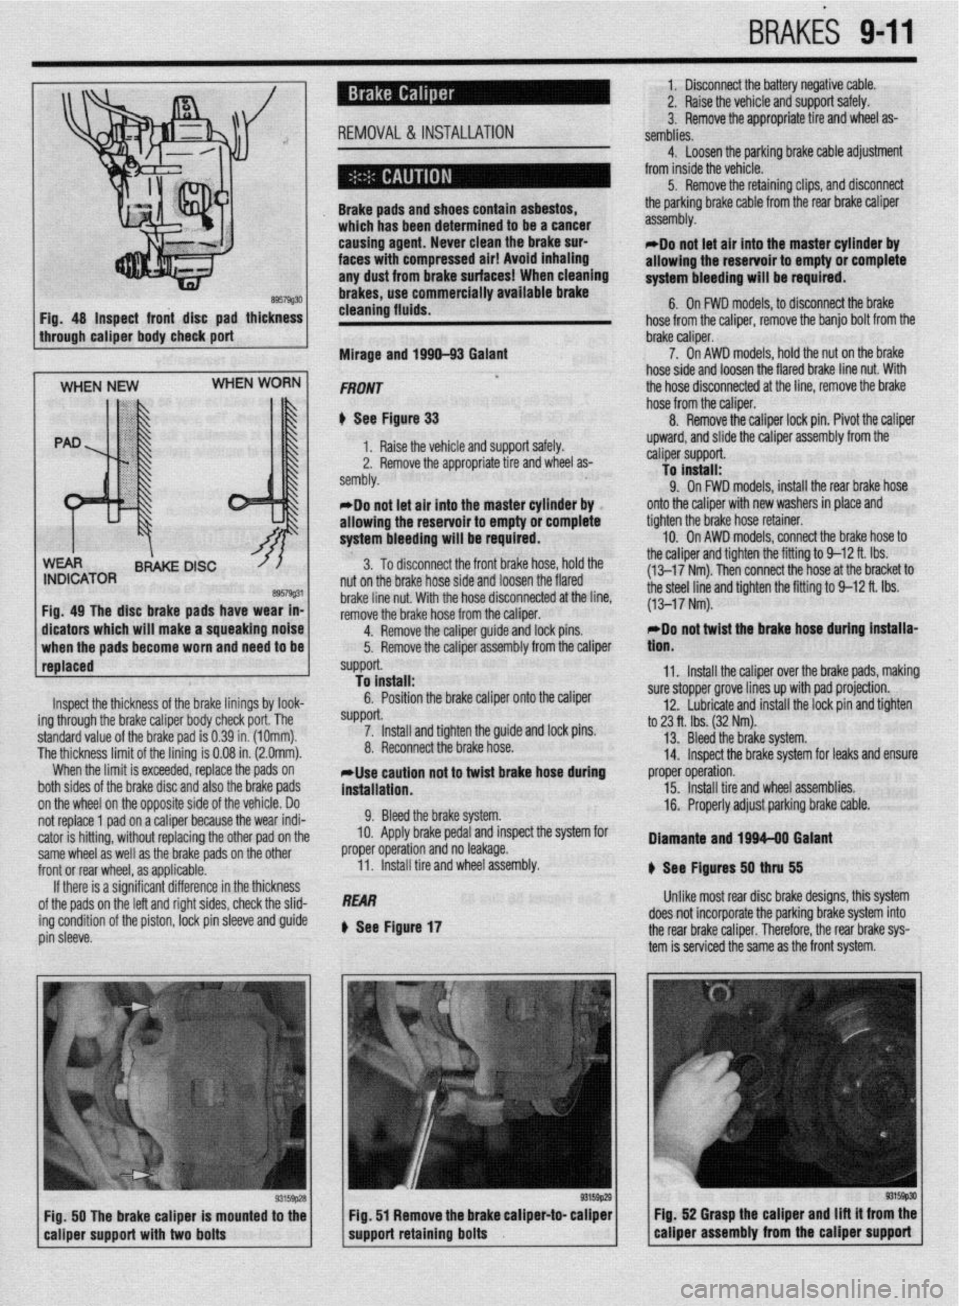
B957wJ FIQ. 48 Inspect front disc pad thickness Brake pads an
which has bee
causing agent
faces with con
any dust fmm
brakes, use cf Id shoes contaln
asbestos, !n determined to be a cancer
. Never clean the brake SUP
npressed air! Avoid inhaling
brake surfaces! When cleaning
lmmercially available brake
c
cleaning fluid 5. Remove the retaining clips, and disconnect
the parking brake cable from the rear brake caliper
assembly.
rflo not let ali into the master cylinder by
allowing the reservoir to empty or complete
system bleeding will be required.
6. On FWD models, to disconnect the brake
nose rrom me canoer. remove me
oamo
DOII nom me
through caliper body check port
Mirage and 199Q-93 Galant brake caliper. ’
7. On AWD models, hold the nut on the brake
hose side and loosen the flared brake line nut. With
the hose disconnected at the line, remove the brake
hose from the caliper.
8. Remove the caliper lock pin. Pivot the caliper
Inspect the thickness of the brake linings by look-
ing through the brake caliper body check port. The
standard value of the brake pad is 0.39 in. (1Omm).
The thickness limit of the lining is 0.08 in. (2.0mm).
When the limit is exceeded, replace the pads on
both sides of the brake disc and also the brake pads
on the wheel on the opposite side of the vehicle. Do
not replace 1 pad on a caliper because the wear indi-
cator is hitting, without replacing the other pad on the
same wheel as well as the brake pads on the other
front or rear wheel, as applicable.
If there is a significant difference in the thickness
of the pads on the left and right sides, check the slid-
ing condition of the piston,
IDCk pin sleeve and guide
pin sleeve. *Do not let air into the master cylinder by
allowing the reservoir to empty or complete
system bleeding will be required.
3. To disconnect the front brake hose, hold the
nut on the brake hose side and loosen the flared
brake line nut. With the hose disconnected at the line,
remove the brake hose from the caliper.
4.
RfXIIDVe the caliper guide and lock pins.
5. Remove the caliper assembly from the caliper
support.
To install:
6. Position the brake caliper onto the caliper
SUppOrt. 7. Install and tighten the guide and lock pins.
8. Reconnect the brake hose.
*Use caution not to twist brake hose during
installation.
9. Bleed the brake system.
10. Apply brake pedal and inspect the system for
proper operation and no leakage.
11. Install tire and wheel assembly.
REAR
Q See Figure 17 upward, and slide the caliper assembly from the
caliper support.
To install:
9. On FWD models, install the rear brake hose
onto the caliper with new washers in place and
tighten the brake hose retainer.
10. On AWD models, connect the brake hose to
the caliper and tighten the fitting to 9-12 ft. Ibs.
(13-17 Nm). Then connect the hose at the bracket to
the steel line and tighten the fitting to 9-12 ft. Ibs.
(13-17 Nm).
rDo not twist the brake hose during installa-
tlon.
11. Install the caliper over the brake pads, making
sure stopper grove lines up with pad projection.
12. Lubricate and install the lock pin and tighten
to 23 ft. tbs. (32 Nm).
13. Bleed the brake system.
14. Inspect the brake system for leaks and ensure
proper operation.
15. Install tire and wheel assemblies.
16. Properly adjust parking brake cable.
Diamante and 1994-08 Galant
8 See Ffgures 50
thN 55
Unlike most rear disc brake designs, this system
does not incorporate the parking brake system into
the rear brake caliper. Therefore, the rear brake sys-
tem is serviced the same as the front system.
FiQ. 50 The brake caliper is mounted to the Fig. 52 Grasp the caliper and Ilft it from the
eaiiper support with two bolts support retaining bolts caliper assembly from the caliper support
Page 348 of 408
l
942 BRAKES
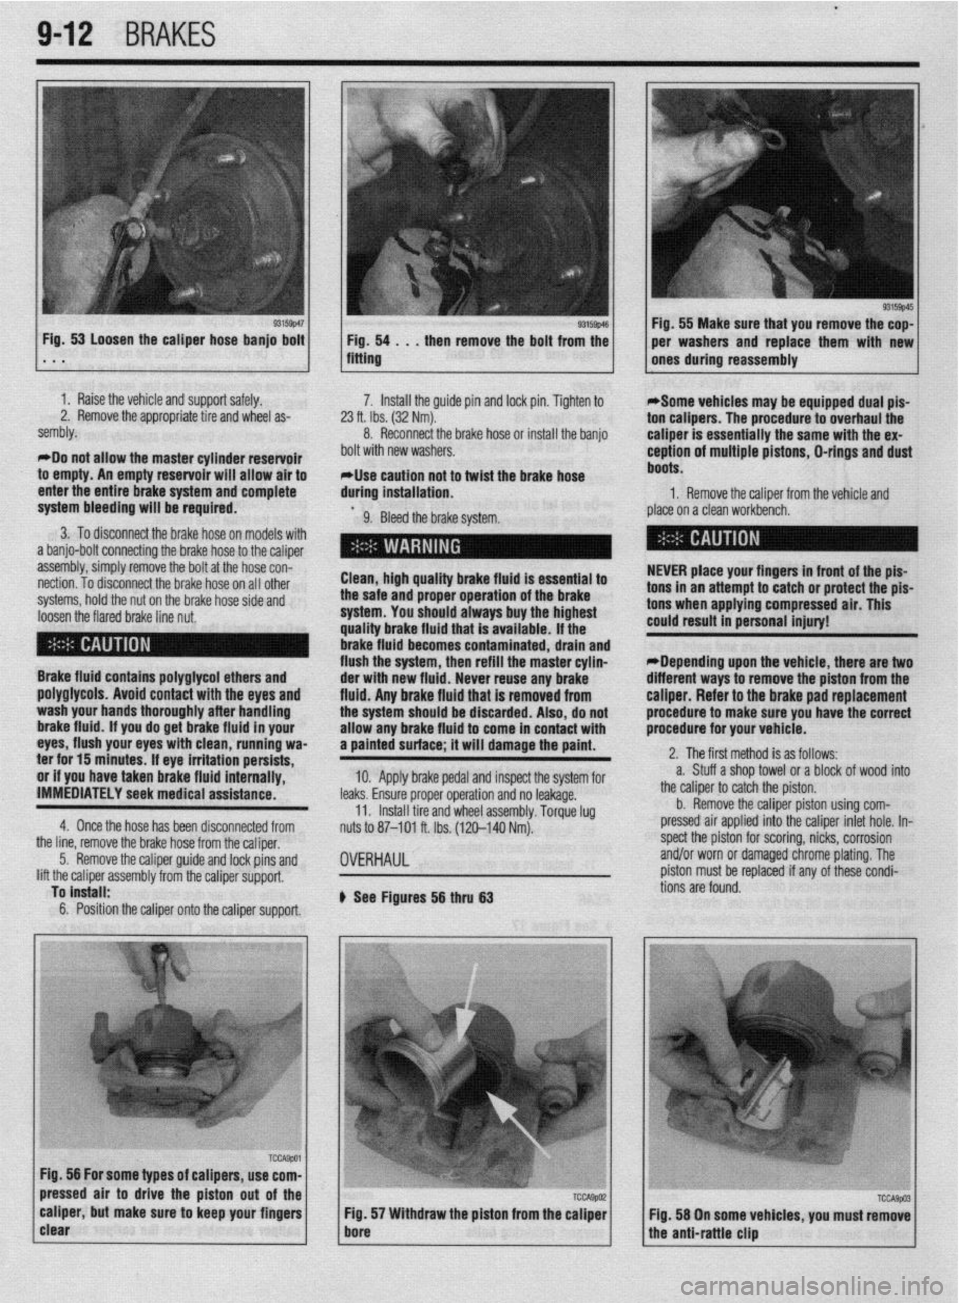
I 93155~46 Fig, 53 Loosen the caliper hose banjo bolt
1 Fig. 54 . . , then remove the bolt from the . * . fitting
1 I Raise the vehicle and support safely.
2. Remove the appropriate tire and wheel as-
sembly.
*Do not allow the master cylinder reservoir
to empty. An empty reservoir will allow air to
enter the entire brake system and complete 7. Install the guide pin and lock pin. Tighten to
23 ft. Ibs. (32 Nm).
8. Reconnect the brake hose of install the banjo
bolt with new washers.
*Use caution not to twist the brake hose
during installation.
system bleeding will be required.
9. Bleed the brake system.
3. To disconnect the brake hose on models with
a banjo-bolt connecting the brake hose to the caliper
assembly, simply remove the bolt at the hose con-
nection. To disconnect the brake hose on all other
systems, hold the nut on the brake hose side and
loosen the flared brake line nut. Clean, high quality brake fluid is essential to
the safe and proper operation of the brake
system. You should always buy the highest
quality brake fluid that is available. If the
brake fluid becomes contaminated, drain and
flush the system, then refill the master cylin-
Brake fluid contains polyglycol ethers and
poly~lycols. Avoid contact with the eves and
wash your hands thoroughly after handling
brake fluid. if you do get brake fluid In your
eyes, flush your eyes with clean, running wa-
ter for 15 minutes. If eye irritation persists,
or if you have taken brake fluid internally,
IMMEDIATELY seek medical assistance.
4. Once the hose has been disconnected from der with new fluid. Never reuse any brake
fluid. Anv brake fluid that is removed from
the systum should be discarded. Also, do not
allow any brake fluid to come in contact with
a painted surface; it will damage the paint.
10. Apply brake pedal and inspect the system for
leaks. Ensure proper operation and no leakage.
11. Install tire and wheel assembly. Torque lug
nuts to 87-101 ft. Ibs. (120-140 Nm).
the line, remove the brake hose from the caliper,
5. Remove the caliper guide and lock pins and
lift the caliper assembly from the caliper support,
To install:
6. Position the caliper onto the caliper support.
OVERHAUL
b See Figures 56 thru 63 1 Fig. 55 Make sure that you remove the cop-
per washers and replace them with new
ones during reassembly
*Some vehicles may be equipped dual pis-
ton calipers. The procedure to overhaul the
caliper is essentially the same with the ex-
ception of multiple pistons, D-rings and dust
boots.
1. Remove the caliper from the vehicle and
place on a clean workbench.
NEVER place your fingers in front of the pis-
tons in an attempt to catch or protect the pis-
tons when applying compressed air. This
could result in personal injury!
*Depending upon the vehicle, there are two
different ways to remove the piston from the
caliper. Refer to the brake pad replacement
procedure to make sure you have the correct
procedure for your vehicle.
2. The first method is as follows:
a. Stuff a shop towel or a block of wood into
the caliper to catch the piston.
b. Remove the caliper piston using com-
pressed air applied into the caliper inlet hole. In-
spect the piston for scoring, nicks, corrosion
and/or worn or damaged chrome plating. The
piston must be replaced if any of these condi-
tions are found.
Page 350 of 408
l
9-14 BRAKES
-
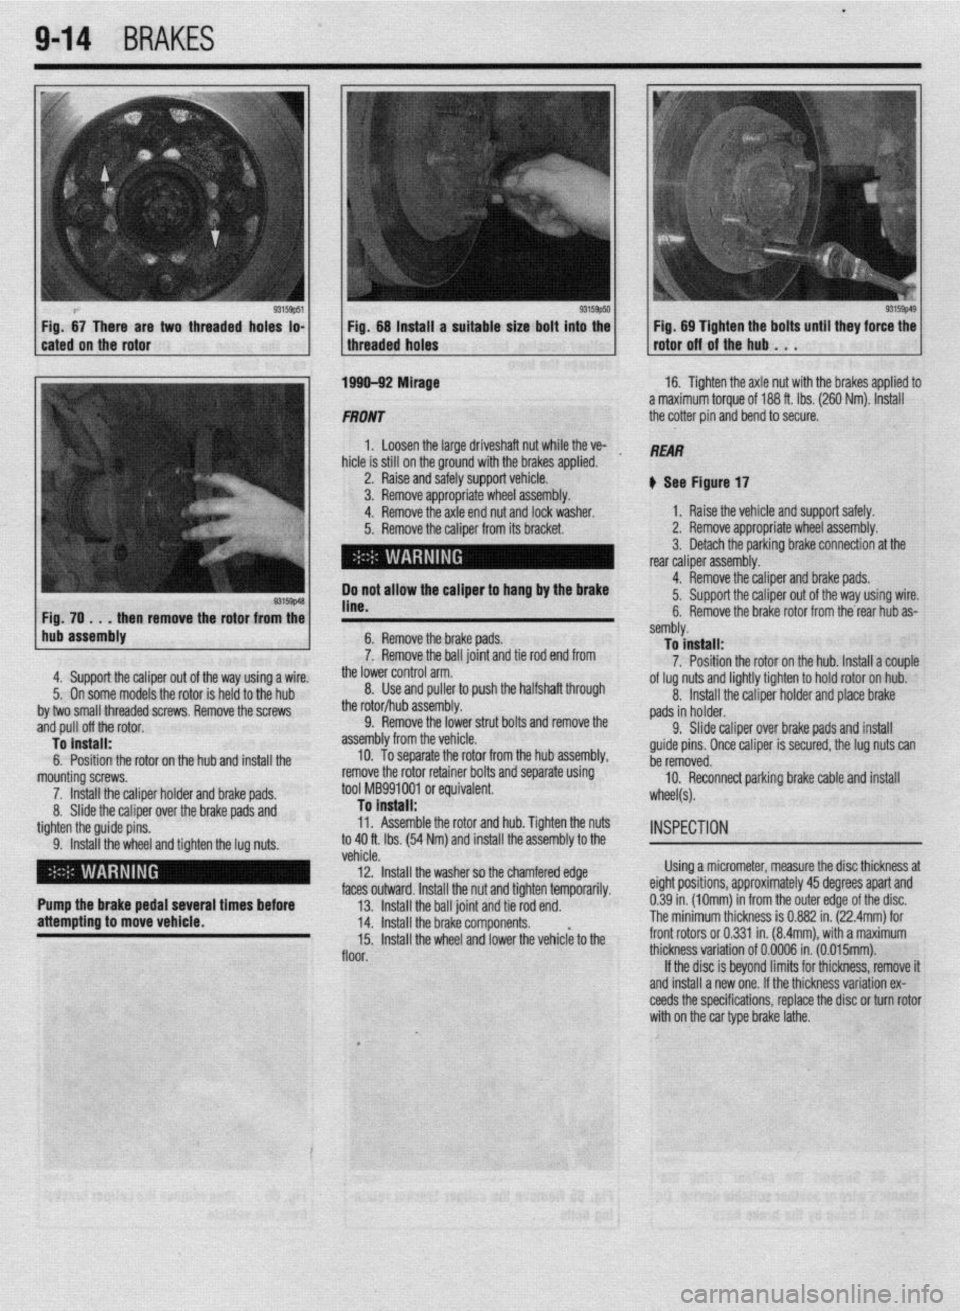
two threaded hoks to- Fig. 68 tnstatt a suitable size bolt into the Fig. 69 Tighten the bolts until they force the
threaded holes rotor off of the hub . . .
1 hub assembly
4. Support the caliper out o
5. On some models the rote
by two small threaded screws. Remove the screws
.mrl n,,ll nff thn rntnr
6. Remove the brake pads.
7. Remove the ball joint and tie rod end from
., 3
me lower control arm.
8. Use and puller to push the halfshaft through f the way using a wire.
)r is held to the hub
ml” p”” “II crw l”L”l. To install:
6. Position the rotor on the hub and install the
mounting screws.
7. Install the caliper holder and brake pads.
8. Slide the caliper over the brake pads and
tighten the guide pins.
9. Install the wheel and tighten the lug nuts. the rotor/hub assembly.
9. Remove the lower strut bolts and remove the
bly from the vehicle.
To separate the rotor from the hub assembly,
sallluly. To install:
7. Position the rotor on the hub. Install a couple
of lug nuts and lightly tighten to hold rotor on hub.
asseml
10.
remove the rotor retainer bolts and separate using
tool MB991001 or equivalent.
To Install:
11. Assemble the rotor and hub. Tighten the nuts
to 40 ft. Ibs. (54 Nm) and install the assembly to the 8. Install the caliper holder and place brake
pads in holder.
9. Slide caliper over brake paAl- --,I inr+*.rli
guide pins. Once caliper is secure1
ho
mmnmrl
I”> a, I” II 13m11
YI, the lug nuts can
U” IUIII”“““.
10. Reconnect parking brake cable and install
wheel(s).
INSPECTION
venae.
12. Install the washer so the chamfered edge Using a micrometer, measure the disc thickness at
.I LL- *.* 1 I
faces outward. Install the nut and tighten temporarily. eignr posmons, approxlmarely
43 aegrees apan ana
Pump the brake pedal several times before
13. Install the ball joint and tie rod end. 0.39 in. (10mm) in from the outer edge of the disc.
attempting to move vehicle.
14. Install the brake components. The minimum thickness is 0.882 in. (22.4mm) for
15. Install the wheel and lower the vehiclk to the front rotors or 0.331 in. (8.4mm), with a maximum
floor. thickness variation of 0.0006 in. (0.015mm).
If the disc is beyond limits for thickness, remove it
and install a new one. If the thickness variation ex-
ceeds the specifications, replace the disc or turn rotor
with on the car type brake lathe.
I
_,
Page 358 of 408
--7 9-22
BRAKES
7. Unfasten any other frame retainers and re-
move the cables.
To install: 8. Install the cable to the rear actuator. Secure in ’
place with the parking brake cable clip and retainer
spring. b. Remove the shifter trim panel.
c. Remove the center instrument panel.
d. Remove the panel box from the console
assembly.
e. Remove the two screws from the center of
the console.
9. Install the brake shoes and drum.
10. Position the cable and loosely install the re-
tainers.
Il. Reattach the parking brake cables to the actu-
ator inside the vehicle.
12. Tighten the adjusting nut until the proper ten-
sion is placed on the cable.
13. Adjust the parking brake stroke using appro-
priate method.
14. Secure all cable retainers. Apply and release
the parking brake a number of times once all adjust-
ments have been made.
15. Assemble the interior components which
were removed.
16. Adjust the rear brakes and parking brake ca-
bles.
17. Connect the negative battery cable.
18. Check the rear wheels to confirm that the rear
brakes are not dragging.
19. Check that the parking brake holds the vehi-
cle on an incline.
WITH REAR DISC BRAKES
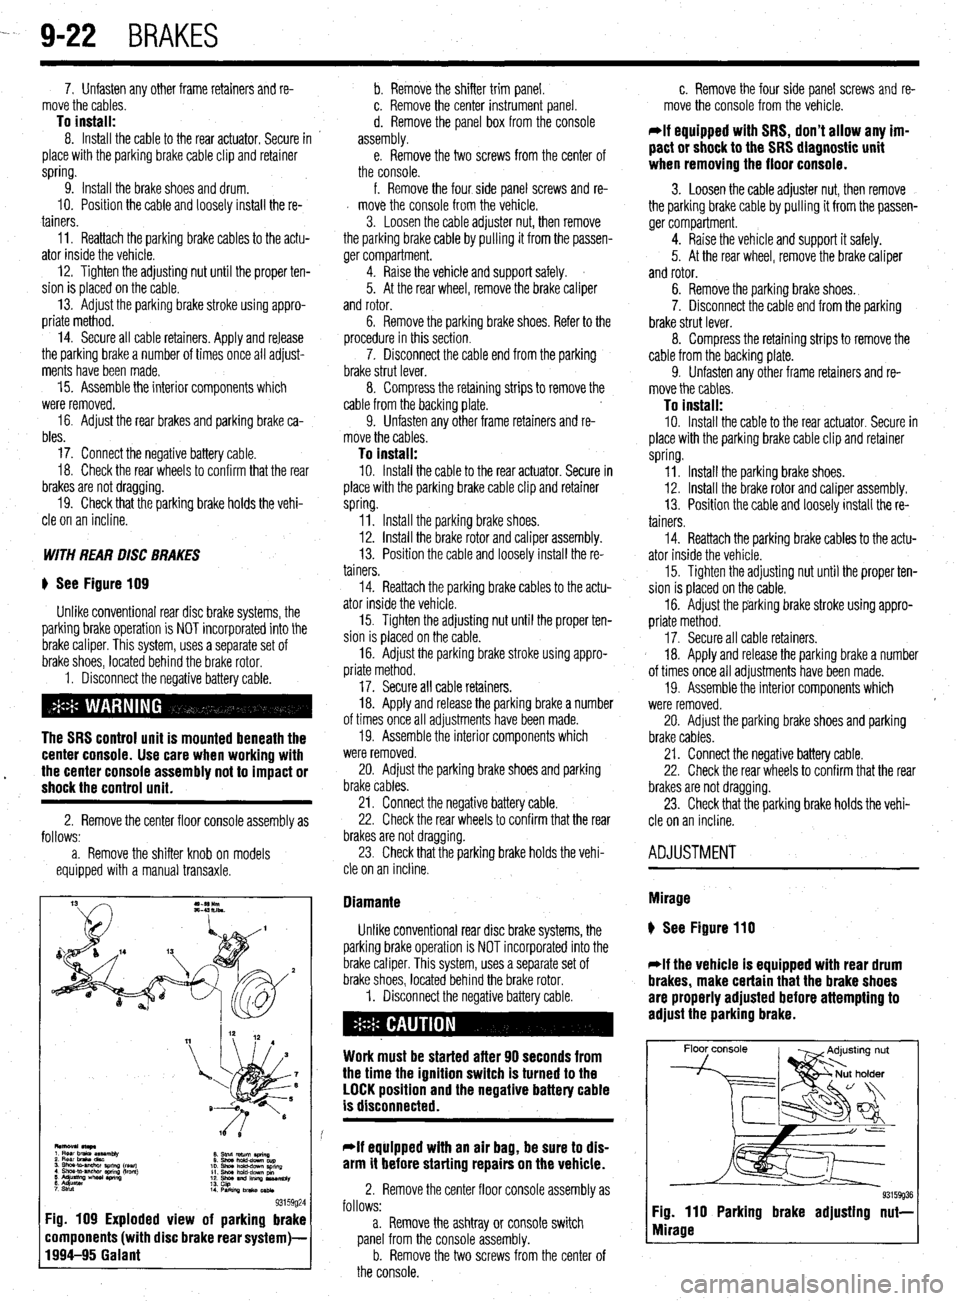
) See Figure 109
Unlike conventional rear disc brake systems, the
parking brake operation is NOT incorporated into the
brake caliper. This system, uses a separate set of
brake shoes, located behind the brake rotor.
1. Disconnect the negative battery cable.
The SRS control unit is mounted beneath the
center console. Use care when working with
17. Secure all cable retainers.
18. Apply and release the parking brake a number
of times once all adjustments have been made.
19. Assemble the interior components which
were removed.
l the center console assembly not to impact or 20. Adjust the parking brake shoes and parking shock the control unit. brake cables.
2. Remove the center floor console assembly as
follows:
a. Remove the shifter knob on models
equipped with a manual transaxle. 21. Connect the negative battery cable.
22. Check the rear wheels to confirm that the rear
brakes are not dragging.
23. Check that the parking brake holds the vehi-
cle on an incline.
8. Stnd return aring
0 Shwhdd-downcup
10. shna hchd-dPwn SpnnQ
11. Shm hold-dcwn pm
12. shoe and lllllnp us*mbly
13.
14 cap
PwkilvJbnko~
93159g24 Fig. 109 Exploded view of parking brake
components (with disc brake rear system)-
1994-95 Galant
f. Remove the four side panel screws and re-
d move the console from the vehicle.
3. Loosen the cable adjuster nut, then remove
the parking brake cable by pulling it from the passen-
ger compartment.
4. Raise the vehicle and support safely.
5. At the rear wheel, remove the brake caliper
and rotor.
6. Remove the parking brake shoes. Refer to the
procedure in this section.
7. Disconnect the cable end from the parking
brake strut lever.
8. Compress the retaining strips to remove the
cable from the backing plate.
9. Unfasten any other frame retainers and re-
move the cables.
To install: IO. Install the cable to the rear actuator. Secure in
place with the parking brake cable clip and retainer
spring.
Il. Install the parking brake shoes.
12. Install the brake rotor and caliper assembly.
13. Position the cable and loosely install the re-
tainers.
14. Reattach the parking brake cables to the actu-
ator inside the vehicle.
15. Tighten the adjusting nut until the proper ten-
sion is placed on the cable.
16. Adjust the parking brake stroke using appro-
priate method.
Diamante
Unlike conventional rear disc brake systems, the
parking brake operation is NOT incorporated into the
brake caliper. This system, uses a separate set of
brake shoes, located behind the brake rotor.
1. Disconnect the negative battery cable.
Work must be started after 90 seconds from
the time the ignition switch is turned to the
LOCK position and the negative battery cable
is disconnected.
*If equipped with an air bag, be sure to dis-
arm it before starting repairs on the vehicle.
2. Remove the center floor console assembly as
follows:
a. Remove the ashtray or console switch
panel from the console assembly.
b. Remove the two screws from the center of
the console. c. Remove the four side panel screws and re-
move the console from the vehicle.
*If equipped with SRS, don’t allow any im-
pact or shock to the SRS diagnostic unit
when removing the floor console.
3. Loosen the cable adjuster nut, then remove
the parking brake cable by pulling it from the passen-
ger compartment.
4. Raise the vehicle and support it safely.
5. At the rear wheel, remove the brake caliper
and rotor.
6. Remove the parking brake shoes.
7. Disconnect the cable end from the parking
brake strut lever.
8. Compress the retaining strips to remove the
cable from the backing plate.
9. Unfasten any other frame retainers and re-
move the cables.
To install: 10. Install the cable to the rear actuator. Secure in
place with the parking brake cable clip and retainer
spring.
11. Install the parking brake shoes.
12. Install the brake rotor and caliper assembly.
13. Position the cable and loosely install the re-
tainers.
14. Reattach the parking brake cables to the actu-
ator inside the vehicle.
15. Tighten the adjusting nut until the proper ten-
sion is placed on the cable.
16. Adjust the parking brake stroke using appro-
priate method.
17. Secure all cable retainers.
18. Apply and release the parking brake a number
of times once all adjustments have been made.
19. Assemble the interior components which
were removed.
20. Adjust the parking brake shoes and parking
brake cables.
21. Connect the negative battery cable.
22. Check the rear wheels to confirm that the rear
brakes are not dragging.
23. Check that the parking brake holds the vehi-
cle on an incline.
ADJUSTMENT
Mirage
) See Figure 110
*If the vehicle is equipped with rear drum
brakes, make certain that the brake shoes
are properly adjusted before attempting to
adjust the parking brake.
Floor console
93159936 Fig. 110 Parking brake adjusting nut-
Mirage
Page 365 of 408
BRAKES 9-29
8. Reinstall the sensor harness with its clamps
and bolts.
9. Reconnect the speed sensor connector.
IO. Install the fender splash shield.
11. Reinstall the tire and wheel, safely lower the
vehicle, and reconnect the negative battery cable. To install: 7. Install the speed sensor and torque to 9 ft.
Ibs. (12 Nm).
8. Install the clips holding the sensor harness.
9. Connect the speed sensor connector.
IO. Connect the negative battery cable.
REAR REAR
) See Figure 131 and 132
1. Disconnect the negative battery cable. Wait at
least 90 seconds before performing any work.
2. Raise and safely support the vehicle. Remove
the necessary tire and wheel assembly.
3. Detach the ABS speed sensor connector.
4. Remove the sensor harness clamp bolts and
clamps.
I) See Figure 133
1. Disconnect the negative battery cable.
5. Remove the ABS speed sensor mounting bolt
and the sensor.
Work must be started after 90 seconds from
the time the ignition switch is turned to the
LOCK position and the negative battery cable
is disconnected.
To install:
6. Install the ABS speed sensor with its mounting
bolt.
*The clearance between the wheel speed
sensor and the rotor’s toothed surface is not
adjustable, but measure the distance be-
tween the sensor installation surface and the
rotor’s toothed surface. Standard value is:
1.11-l .I2 in. (28.2-28.4mm). If not within
specifications, replace the speed sensor or
the toothed rotor.
2. Raise and safely support the vehicle.
3. Detach the speed sensor connector.
4. Remove the clips holding the sensor harness.
5. On AWD models, remove the cable band.
6. Remove the mounting bolt and the speed
sensor with the O-ring.
To install: 7. Install the speed sensor with the O-ring and
torque to 9 ft. Ibs. (12 Nm).
8. Install the clips holding the sensor harness.
9. Install the cable band.
10. Install the sensor wire harness and connect
the connector.
7. Reinstall the sensor harness with its clamps
and bolts.
8. Reconnect the speed sensor connector.
9. Reinstall the tire and wheel, safely lower the
vehicle, and reconnect the negative battery cable.
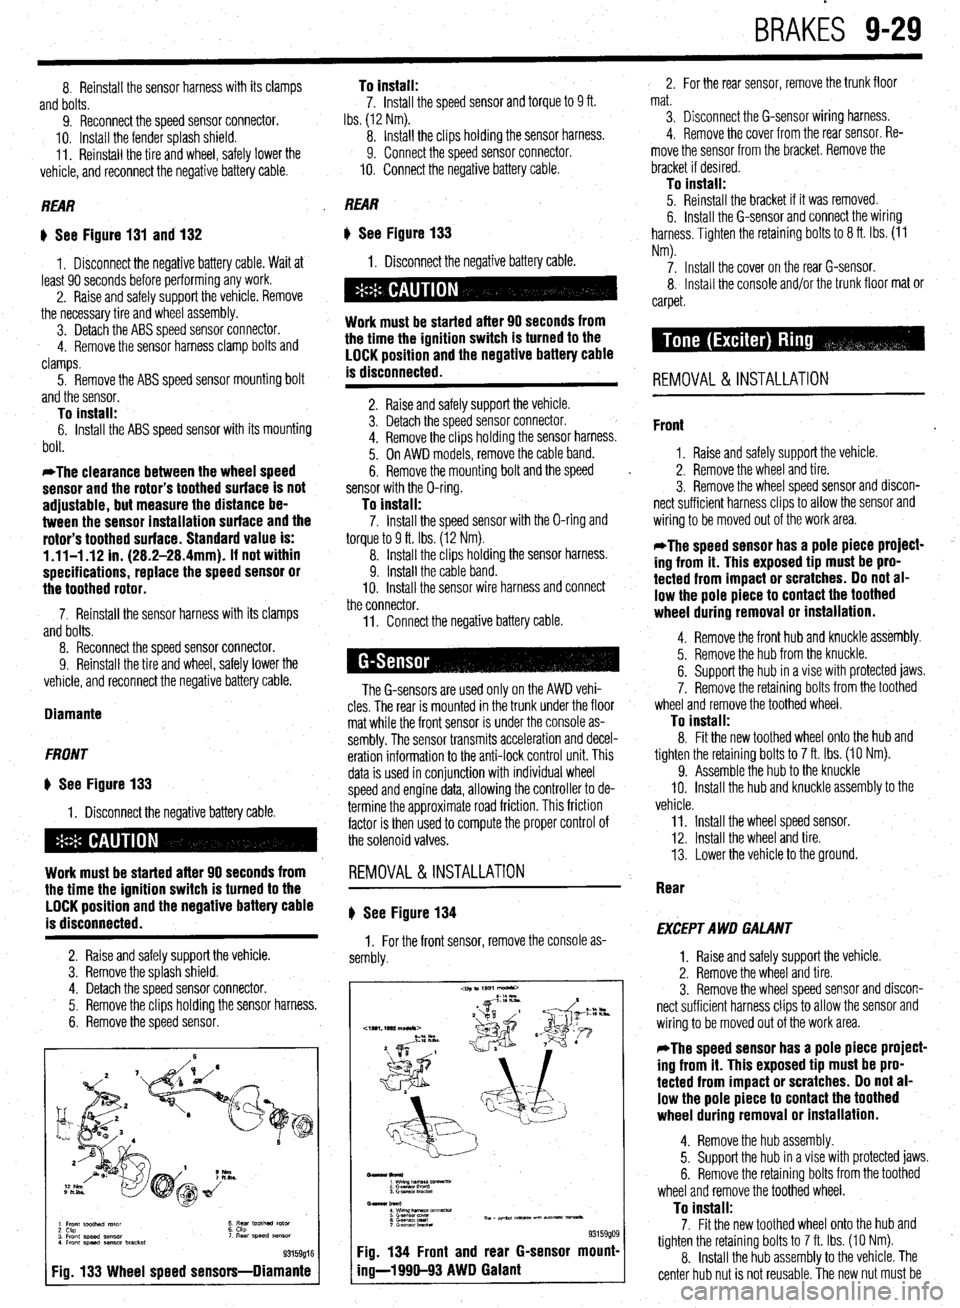
Diamante
FRONT
* See Figure 133
1. Disconnect the negative battery cable.
Work must be started after 90 seconds from
the time the ignition switch is turned to the
LOCK position and the negative battery cable
is disconnected.
2. Raise and safely support the vehicle.
3. Remove the splash shield.
4. Detach the speed sensor connector.
5. Remove the clips holding the sensor harness.
6. Remove the speed sensor.
1 Front toothed rotor
2 Ckp
3 Front speed sensor
4 Front speed aenmr bracket t ;5’ toothed rotor ‘I Rear speed SB"SO,
93159016
Fig. 133 Wheel speed sensors-Diamante
11. Connect the negative battery cable.
The G-sensors are used only on the AWD vehi-
cles. The rear is mounted in the trunk under the floor
mat while the front sensor is under the console as-
sembly. The sensor transmits acceleration and decel-
eration information to the anti-lock control unit. This
data is used in conjunction with individual wheel
speed and engine data, allowing the controller to de-
termine the approximate road friction. This friction
factor is then used to compute the proper control of
the solenoid valves.
REMOVAL&INSTALLATION
# See Figure 134
1. For the front sensor, remove the console as-
sembly.
-lkol*)
1 wimp--vx
2 Gasnan I‘m”0
3. Gmwor LmcM
Bmar burl
: wwzh&T&m~mm-
6 G.smsol Ired Th, - ape.24 m-5 un Nt- vmsa*.
7 c-.elwnbRcta
93159909 Fig. 134 Front and rear G-sensor mount-
ing-l 990-93 AWD Galant
2. For the rear sensor, remove the trunk floor
mat.
3. Disconnect the G-sensor wiring harness.
4. Remove the cover from the rear sensor. Re-
move the sensor from the bracket. Remove the
bracket if desired.
To install: 5. Reinstall the bracket if it was removed.
6. Install the G-sensor and connect the wiring
harness. Tighten the retaining bolts to 8 ft. Ibs. (11
Nm).
7. Install the cover on the rear G-sensor.
8, Install the console and/or the trunk floor mat or
carpet.
REMOVAL & INSTALLATION
Front
1. Raise and safely support the vehicle.
2. Remove the wheel and tire.
3. Remove the wheel speed sensor and discon-
nect sufficient harness clips to allow the sensor and
wiring to be moved out of the work area.
*The speed sensor has a pole piece project-
ing from it. This exposed tip must be pro-
tected from impact or scratches. Do not al-
low the pole piece to contact the toothed
wheel during removal or installation.
4. Remove the front hub and knuckle assembly.
5. Remove the hub from the knuckle.
6. Support the hub in a vise with protected jaws.
7. Remove the retaining bolts from the toothed
wheel and remove the toothed wheel.
To install: 8. Fit the new toothed wheel onto the hub and
tighten the retaining bolts to 7 ft. Ibs. (10 Nm).
9. Assemble the hub to the knuckle
IO. Install the hub and knuckle assembly to the
vehicle.
11. Install the wheel speed sensor.
12. Install the wheel and tire.
13. Lower the vehicle to the ground.
Rear
EXCEPT AWD GALANT
1. Raise and safely support the vehicle.
2. Remove the wheel and tire.
3. Remove the wheel speed sensor and discon-
nect sufficient harness clips to allow the sensor and
wiring to be moved out of the work area.
*The speed sensor has a pole piece project-
ing from it. This exposed tip must be pro-
tected from impact or scratches. Do not al-
low the pole piece to contact the toothed
wheel during removal or installation.
4. Remove the hub assembly.
5. Support the hub in a vise with protected jaws.
6. Remove the retaining bolts from the toothed
wheel and remove the toothed wheel.
To install: 7. Fit the new toothed wheel onto the hub and
tighten the retaining bolts to 7 ft. Ibs. (10 Nm).
8. Install the hub assembly to the vehicle. The
center hub nut is not reusable. The new nut must be
Page 378 of 408

.
IO-10 BODYANDTRIM
4992 models>
10. Remove the retaining screws and the floor
console from the vehicle.
To
install: 11. Install the floor console in position in the ve-
hicle and secure with the retaining screws.
12. The remainder of installation is the reverse of
removal.
1. Ashtray or floor co
2. Switch or plug
REMOVAL&INSTALLATION
u See Figures 40 thru 49
1. Disconnect the negative battery cable.
2. If equipped with manual windows, insert a
ind the window regulator handle and
9315@38 Fig. 38 Floor console assemblv-1992-96 shop towel beh
Fig. 40 Remove the inside door rele
9315Gq39 Fia. 39 Floor console assemblv-1997-00 die cup retaining screw . . .
Diumante , I ,
r+Dn some models, the seat belts are routed
through the console. Carefully slide the belts
out of the hole.
7. The installation is the reverse of removal.
Front
1. Disconnect the negative battery cable. If
equipped with SRS, wrap the cable in insulated tape,
then wait at least 60 seconds before continuing to al-
low the SRS system time to disable.
9315opO3 Fig. 42 Remove the inside pull handle re-
If equipped with SRS, be careful not to let
the console bump against the SRS-ECU dur-
ing removal and installation. taining screw cover , . .
2. If equipped, remove the rear floor console.
3. If necessary, remove the ashtray and cup
holder assemblies.
4. If equipped, remove the carpet inserts from
the floor console assembly.
5. On manual transaxle equipped models, re-
move the manual transaxle shifter knob.
6. On automatic transaxle equipped models, re-
move the transaxle shift lever trim plate.
7. Remove the screw plugs in the side covers.
Remove the retainer screws and the side covers from
the vehicle.
8. Remove the front mounting screw cover from
the floor console.
9. Label and detach the electrical wire harness
connections for the floor console. Fig. 44 Release the front retaining clips,
and lift the handle and switch assembly
from the door oanel push the retainer clip outward. Once the clip is re-
moved, remove the window glass requlator handle
and escutcheon.
3. If equipped with power windows/locks, re-
move the escutcheon panel (control panel) and de-
tach the electrical connectors.
4. If equipped, remove the door grip/pull handle
mounting screws and the grip from the door panel.
5. Remove the door pull handle cover. Remove
the pull handle, if equipped.
6. Remove the door trim panel retaining screws.
7. Pull the door panel gently from the door. The
panel is retained by spring clips. To separate the
clips from the door, slide a small prytool behind the
clip and carefully pull the clip, with the door panel,
outward. Try not to bend the door panel or damaqe
may occur..
Fig. 41 . . . then remove the inside door re-
lease handle cup
Fig. 43
V . . then remove the inside pull han-
dle retaining screw
Fig. 45 Detach the electrical connectors
from the door lock and window switches
isembly ,,,’ ” then remove the switch plate/handle as-
Page 403 of 408

ADJUSTMENTS 2-3
ADJUSTMENTS 2-5
ADJUSTMENTS 7-2
AIR BAG (SUPPLEMENTAL RESTRAINT SYSTEM) 6-7
AIR CONDITIONING COMPONENTS 6-11
REMOVAL & INSTALLATION 6-11
AIRCLEANER(ELEMENT) I-14
REMOVAL&INSTALLATION I-14
AIR CONDITIONING SYSTEM 1-28
ALLWHEELDRIVEMODELS l-44
ALTERNATOR 2-8
ALTERNATORPRECAUTIONS 2-8
ANTENNA IO-4
REPLACEMENT IO-4
ANTI-LOCK BRAKE SYSTEM 9-24
ANTI-LOCK CONTROL UNIT 9-27
REMOVAL & INSTALLATION 9-27
AUTOMATICTRANSAXLEASSEMBLY 7-10
ADJUSTMENTS 7-13
REMOVAL&INSTALLATION 7-10
AUTOMATIC TRANSAXLE 7-10
AUTOMATICTRANSAXLE l-36
DRAIN &REFILL l-36
FLUIDRECOMMENDATIONS l-36
LEVELCHECK l-36
PAN&FILTER SERVICE l-36
AVOIDINGTHEMOSTCOMMON MISTAKES l-2
AVOIDINGTROUBLE l-2
AXLE HOUSING ASSEMBLY 7-16
REMOVAL&INSTALLATION 7-16
BACK-UP LIGHT SWITCH 7-2
REMOVAL & INSTALLATION 7-2
BALANCE SHAFT 3-54
REMOVAL & INSTALLATION 3-54
BASIC ELECTRICAL THEORY 6-2
HOW DOES ELECTRlClTYWORK:THEWATERANALOGY 6-2
OHM'S LAW 6-2
BASIC FUEL SYSTEM DIAGNOSIS 5-2
BASIC OPERATING PRINCIPLES 9-2
DISC BRAKES 9-2
DRUMBRAKES 9-2 .
POWER BOOSTERS 9-2
BATTERY CABLES 6-7
BATTERY I-16
BATTERYFLUID I-16
CABLES I-17
CHARGING I-18
GENERALMAINTENANCE I-16
PRECAUTIONS 1-16
REPLACEMENT I-18
BELTS I-18
ADJUSTMENT I-18
INSPECTION I-18
REMOVAL &INSTALLATION 1-18
BLEEDING BRAKESYSTEM 9-7
BLEEDING THEABS SYSTEM 9-30
BLOWERMOTOR 6-7
REMOVAL &INSTALLATION 6-7
BODYLUBRICATIONANDMAINTENANCE l-43
BOLTS,NUTSANDOTHERTHREADED RETAINERS l-6
BRAKE CALIPER 9-11
OVERHAUL 9-12
REMOVAL & INSTALLATION 9-11
BRAKE DISC (ROTOR) 9-13
1
INSPECTION 9-14
REMOVAL &INSTALLATION 9-13
BRAKEDRUMS 9-16
INSPECTION 9-16
REMOVAL&INSTALLATION. 9-16
BRAKE HOSESAND LINES 9-6
REMOVAL&INSTALLATION 9-6
BRAKE LIGHT SWITCH 9-3