interior lights MITSUBISHI DIAMANTE 1900 Repair Manual
[x] Cancel search | Manufacturer: MITSUBISHI, Model Year: 1900, Model line: DIAMANTE, Model: MITSUBISHI DIAMANTE 1900Pages: 408, PDF Size: 71.03 MB
Page 229 of 408

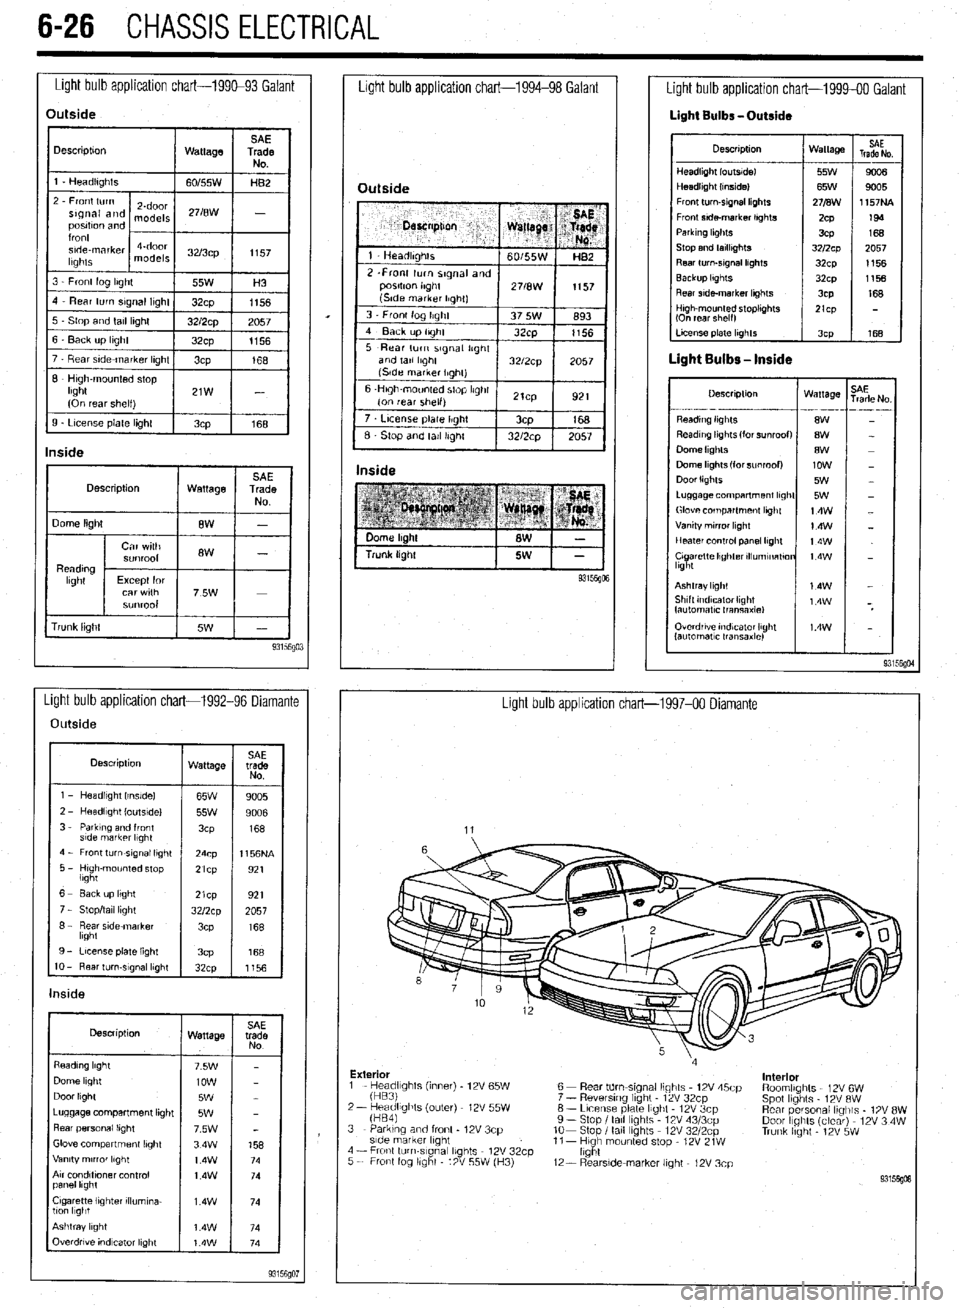
6-26 CHASSIS ELECTRICAL
Light bulb application chart-199&93 Galant
Light bulb application chart-1994-98 Galant
Description
1 Wattage 1
rrunk lrght Overdrwe rndvzator light
lautomatlc transaxle)
Light bulb application chart-1992-96 Diamante
Light bulb application chart-1997-00 Diamante
Outside
Description
wattage SAE
trade
NO
1 - Headlrght Irnslde)
65W
9005
l----if
2 - HeadlIght loutsldel
55w 9006
3 - Parktng and front
3cP 168
s!de markrr l,ght
4 - Front turn-srgnal light
24cp 1156NA
5 - Hugh-mounted stop
lbght 21cp
921
1 6- Eackuplrght
I 1921 21cp
7 - Stop/tall light
8 - Rear side marker
lkght
9 - License plate light
3cP 168
IO - Rear turn-slgnal lkght
32cp
1156
Description
Wattage
Dome light
Door light
Luggage compartment lrght
Rear personal lrght
Glove compartment lbght
Vanity mrrror lkght
Arr condltfoner control
panel lkght
Cigarette lighter rllumrna-
llcm l1gbt
Outside
7 t License plate Ilght / 3cp
168
6 Stop and tall Irghl 1 32/2cp 1 2057 I
Inside
Light bulb application chart-1999-00 Galant
Light Bulbs -Outside
Descrrptron Wattage
HeadlIght loutsldel 55W
Headlight (Inside1 65W
Front turn-srgnal lkghts 271B\1\1
Fronr srde-marker lrghts
ZCP
Parkrng hghts
3CP
Stop and tarllrghts 3212~~
Rear turn-srgnal lrghts
32cp
Backup lkghts
32~x1
Rear srde-marker lkghts
3CP SAE
Trade No
---
90a
9005
1157NA
199
168
2057
1156
1156
168
LI- 168
Descrrptron Wattage
- . ..-- -- --_ .---
8W
8W
8W
low
5W
5W
14w
14W
t4w
t4w
Ashtray light
Shtft tndrcaror Ilght
fautomatlc Iransaxlel
Exterior
interior
1 - He;;;fghts (inner) - 12V 65W
2- keadlights (outer) 12V 55W
fHB41 6 - Rear tdm-stgnal lights 12V 45cp
7 - Reversrng light - 12V 32cp
6 - Lrcense plate light 12V 3cp
9 - Stop I tall lights 12V 43/3cp
lo- Stop I tall Ibghts 12V 3212~~
11- Hugh mounted stop - 12V 21W
light RoomlIghts 12V 6W
Spot lights 12V RW
Rear personal lrglils - 1% 8W
Door IIghts (clear) 12V 3 4W
Trunk hght - 12V 5W 3 - Parking and front - 12V 3cp
side marker lrght
4 - Fronl turn-slgnal lights 12V 32cp
5 - Front fog llghl 12V 55W (H3)
12- RearsIde-marker light - 12V 3cp
Page 383 of 408

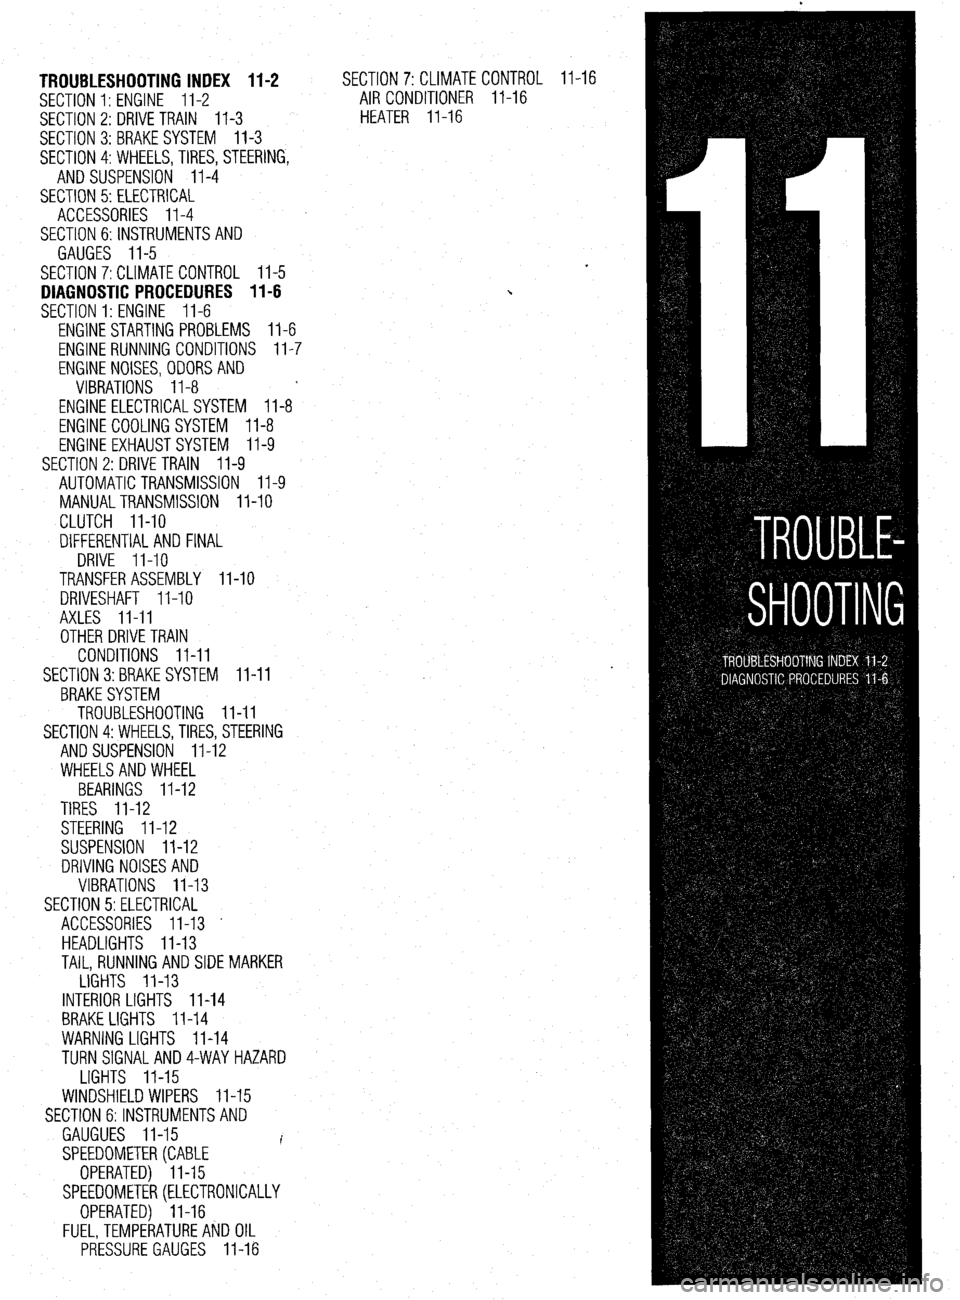
TROUBLESHOOTING INDEX 11-2
SECTION 1: ENGINE 11-2
SECTION 2: DRIVE TRAIN
11-3
SECTION 3:BRAKESYSTEM 11-3
SECTION 4:WHEELS,TIRES, STEERING,
AND SUSPENSION II-4
SECTION 5: ELECTRICAL
ACCESSORIES II-4
SECTION 6:lNSTRUMENTSAND
GAUGES II-5
SECTION 7:CLlMATE CONTROL II-5
DIAGNOSTIC PROCEDURES II-6
SECTION 1: ENGINE II-6
ENGINE STARTING PROBLEMS II-6
ENGINE RUNNING CONDITIONS II-7
ENGINE NOISES,ODORSAND
VIBRATIONS II-8
ENGINE ELECTRICALSYSTEM 11-8
ENGINE COOLING SYSTEM II-8
ENGINE EXHAUSTSYSTEM II-9
SECTION 2: DRIVE TRAIN
II-9
AUTOMATIC TRANSMISSION II-9
MANUALTRANSMISSION II-10
CLUTCH II-10
DIFFERENTIAL AND FINAL
DRIVE II-10
TRANSFER ASSEMBLY II-10
DRIVESHAFT II-10
AXLES II-II
OTHER DRIVE TRAIN
CONDITIONS II-II
SECTION 3:BRAKE SYSTEM II-II
BRAKESYSTEM
TROUBLESHOOTING II-II
SECTION 4:WHEELS, TIRES, STEERING
AND SUSPENSION II-12
WHEELSAND WHEEL
BEARINGS II-12
TIRES II-12
STEERING II-12
SUSPENSION II-12
DRIVING NOISES AND
VIBRATIONS II-13
SECTION 5:ELECTRlCAL
ACCESSORIES II-13 -
HEADLIGHTS II-13
TAIL, RUNNING AND SIDE MARKER
LIGHTS II-13
INTERIOR LIGHTS II-14
BRAKE LIGHTS II-14
WARNING LIGHTS II-14
TURN SlGNALAND4-WAYHAZARD
LIGHTS II-15
WINDSHIELD WIPERS II-15
SECTION 6:lNSTRUMENTSAND
GAUGUES II-15
I
SPEEDOMETER(CABLE
OPERATED) II-15
SPEEDOMETER(ELECTRONICALLY
OPERATED) II-16
FUEL,TEMPERATUREAkJD OIL
PRESSURE GAUGES II-16 SECTION 7:CLlMATECON
AIR CONDITIONER ll-
HEATER II-16 TR(
-16 IL II-16
Page 387 of 408

.
TROUBLESHOOTING II-5
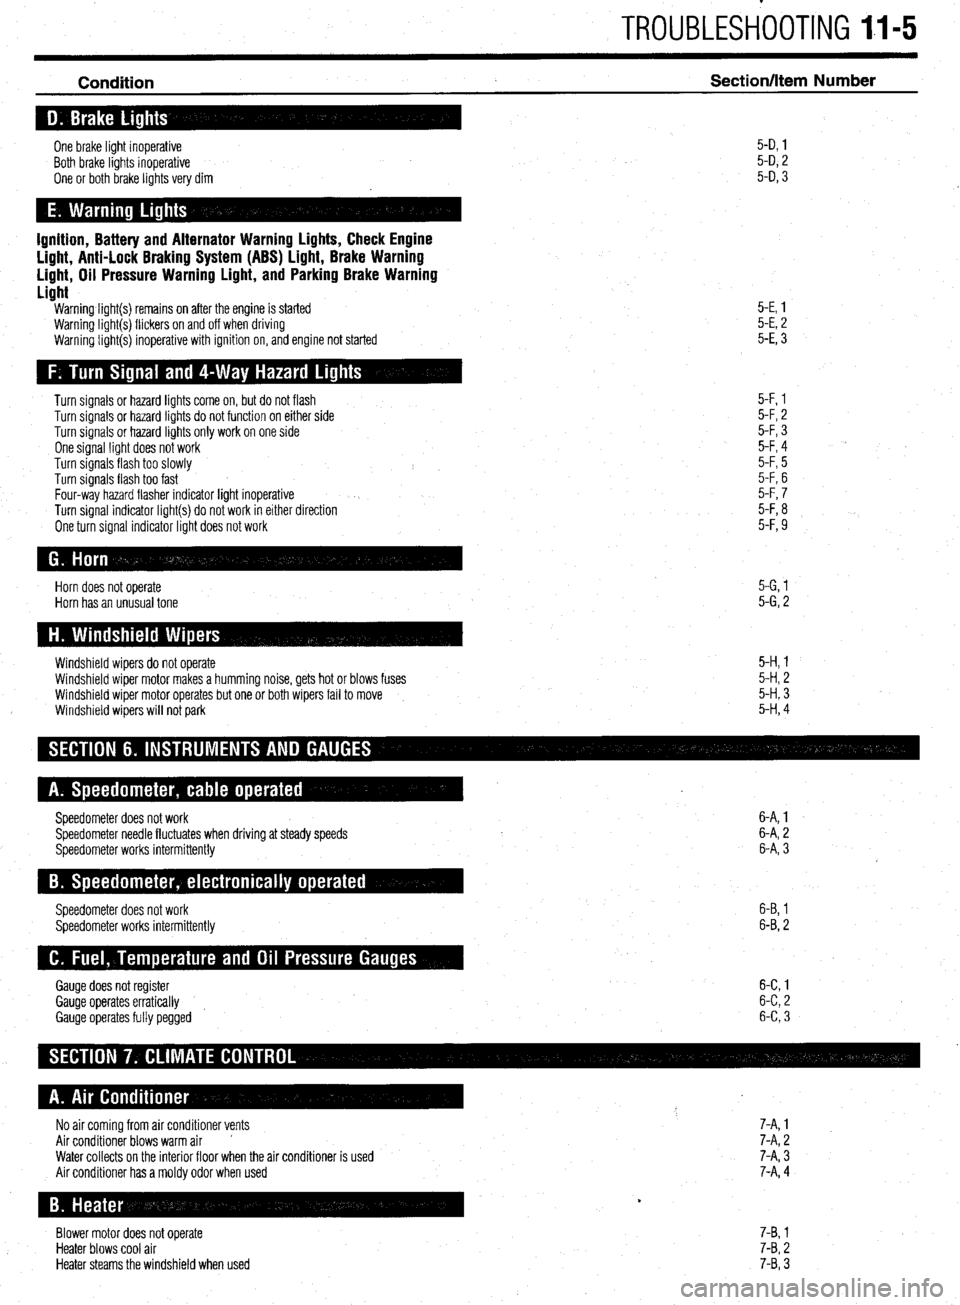
Condition Section/Item Number
One brake light inoperative
Both brake lights inoperative
One or both brake lights very dim 5-D, 1
5-D, 2
5-D, 3
Ignition, Battery and Alternator Warning Lights, Check Engine
Light, Anti-Lock Braking System (ABS) Light, Brake Warning
Light, Oil Pressure Warning Light, and Parking Brake Warning
Light
Warning light(s) remains on after the engine is started
Warning light(s) flickers on and off when driving
Warning light(s) inoperative with ignition on, and engine not started 5-E, 1
5-E, 2
5-E, 3
Turn signals or hazard lights come on, but do not flash
Turn signals or hazard lights do not function on either side
Turn signals or hazard lights only work on one side
One signal light does not work
Turn signals flash too slowly
Turn signals flash too fast
Four-way hazard flasher indicator light inoperative
Turn signal indicator light(s) do not work in either direction
One turn signal indicator light does not work 5-F, 1
5-F, 2
5-F, 3
5-F, 4
5-F, 5
5-F, 6
5-F, 7
5-F, 8
5-F, 9
Horn does not operate
Horn has an unusual tone 5-G, 1
5-G, 2
Windshield wipers do not operate
Windshield wiper motor makes a humming noise, gets hot or blows fuses
Windshield wiper motor operates but one or both wipers fail to move
Windshield wipers will not park 5-H, 1
5-H, 2
5-H, 3
5-H, 4
Speedometer does not work
Speedometer needle fluctuates when driving at steady speeds
Speedometer works intermittently 6-A, 1
6-A, 2
6-A, 3
Speedometer does not work
Speedometer works intermittently 6-B, 1
6-B, 2
Gauge does not register 6-C 1
Gauge operates erratically 6-C 2
’
Gauge operates fully pegged 6-C 3
No air coming from air conditioner vents 7-A, 1
Air conditioner blows warm air ’ 7-A, 2
Water collects on the interior floor when the air conditioner is used
Air conditioner has a moldy odor when used 7-A, 3
7-A, 4
Blower motor does not operate
Heater blows cool air
Heater steams the windshield when used 7-B, 1
7-B, 2
7-B, 3
Page 396 of 408

II-14 TROUBLESHOOTING
b. Check for low voltage at the bulb socket positive terminal or a poor ground. If voltage
is low, or the ground marginal, trace the wiring to, and check for loose, damaged or
corroded wires and electrical terminals; repair as necessary.
c. Check the light switch operation and replace if necessary.
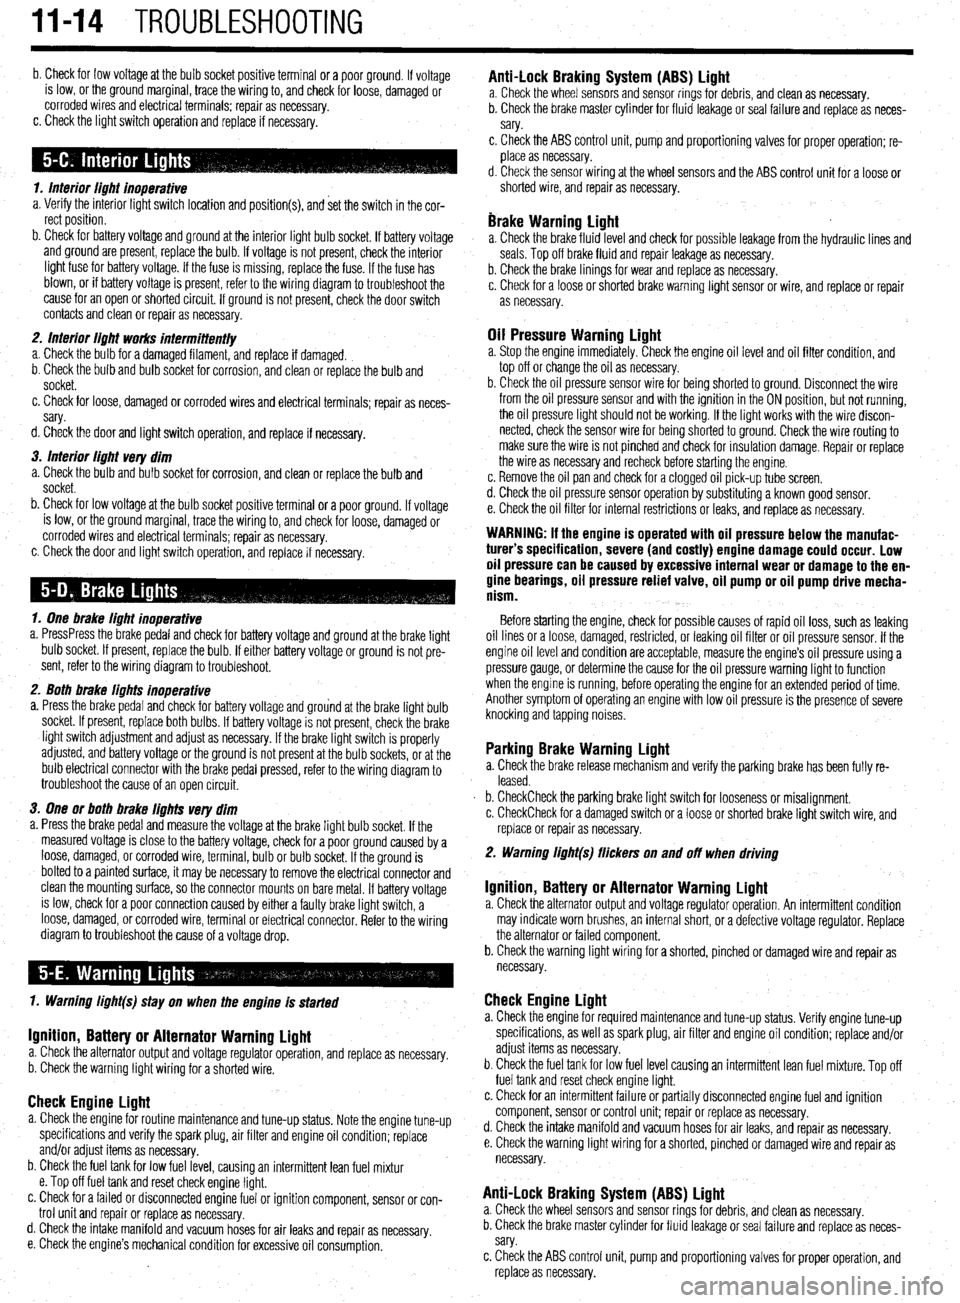
1. Interior light inoperative
a. Verify the interior light switch location and position(s), and set the switch in the cor-
rect position.
b. Check for battery voltage and ground at the interior light bulb socket. If battery voltage
and ground are present, replace the bulb. If voltage is not present, check the interior
light fuse for battery voltage. If the fuse is missing, replace the fuse. If the fuse has
blown, or if battery voltage is present, refer to the wiring diagram to troubleshoot the
cause for an open or shorted circuit. If ground is not present, check the door switch
contacts and clean or repair as necessary.
2. Interior light works intermittent/y
a. Check the bulb for a damaged filament, and replace if damaged.
b. Check the bulb and bulb socket for corrosion, and clean or replace the bulb and
socket.
c. Check for loose, damaged or corroded wires and electrical terminals; repair as neces-
sary.
d. Check the door and light switch operation, and replace if necessary.
3. Interior light very dim
a. Check the bulb and bulb socket for corrosion, and clean or replace the bulb and
socket.
b. Check for low voltage at the bulb socket positive terminal or a poor ground. If voltage
is low, or the ground marginal, trace the wiring to, and check for loose, damaged or
corroded wires and electrical terminals; repair as necessary.
c. Check the door and light switch operation, and replace if necessary.
1. One brake light inoperative
a. PressPress the brake pedal and check for battery voltage and ground at the brake light
bulb socket. If present, replace the bulb. If either battery voltage or ground is not pre-
sent, refer to the wiring diagram to troubleshoot.
2. Both brake lights inoperative
a. Press the brake pedal and check for battery voltage and grou’nd at the brake light bulb
socket. If present, replace both bulbs. If battery voltage is not present, check the brake
light switch adjustment and adjust as necessary. If the brake light switch is properly
adjusted, and battery voltage or the ground is not present at the bulb sockets, or at the
bulb electrical connector with the brake pedal pressed, refer to the wiring diagram to
troubleshoot the cause of an open circuit.
3. One or both brake lights very dim
a. Press the brake pedal and measure the voltage at the brake light bulb socket. If the
measured voltage is close to the battery voltage, check for a poor ground caused by a
loose, damaged, or corroded wire, terminal, bulb or bulb socket. If the ground is
bolted to a painted surface, it may be necessary to remove the electrical connector and
clean the mounting surface, so the connector mounts on bare metal. If battery voltage
is low, check for a poor connection caused by either a faulty brake light switch, a
loose, damaged, or corroded wire, terminal or electrical connector. Refer to the wiring
diagram to troubleshoot the cause of a voltage drop.
1. Warning light(s) stay on when the engine is started
Ignition, Battery or Alternator Warning light a. Check the alternator output and voltage regulator operation, and replace as necessary.
b. Check the warning light wiring for a shorted wire.
Check Engine Light a. Check the engine for routine maintenance and tune-up status. Note the engine tune-up
specifications and verify the spark plug, air filter and engine oil condition; replace
and/or adjust items as necessary.
b. Check the fuel tank for low fuel level, causing an intermittent lean fuel mixtur
e. Top off fuel tank and reset check engine light.
c. Check for a failed or disconnected engine fuel or ignition component, sensor or con-
trol unit and repair or replace as necessary.
d. Check the intake manifold and vacuum hoses for air leaks and repair as
necessary.
e. Check the engine’s mechanical condition for excessive oil consumption.
Anti-Lock Braking System (ABS) Light a. Check the wheel sensors and sensor rings for debris, and clean as necessary.
b. Check the brake master cylinder for fluid leakage or seal failure and replace as neces-
sary.
c, Check the ABS control unit, pump and proportioning valves for proper operation; re-
place as necessary.
d. Check the sensor wiring at the wheel sensors and the ABS control unit for a loose or
shorted wire, and repair as necessary.
brake Warning Light a. Check the brake fluid level and check for possible leakage from the hydraulic lines and
seals. Top off brake fluid and repair leakage as necessary.
b. Check the brake linings for wear and replace as necessary.
c. Check for a loose or shot-ted brake warning light sensor or wire, and replace or repair
as necessary.
Oil Pressure Warning Light a. Stop the engine immediately. Check the engine oil level and oil filter condition, and
top off or change the oil as necessary.
b. Check the oil pressure sensor wire for being shorted to ground. Disconnect the wire
from the oil pressure sensor and with the ignition in the ON position, but not running,
the oil pressure light should not be working. If the light works with the wire discon-
nected, check the sensor wire for being shorted to ground. Check the wire routing to
make sure the wire is not pinched and check for insulation damage. Repair or replace
the wire as necessary and recheck before starting the engine.
c. Remove the oil pan and check for a clogged oil pick-up tube screen.
d. Check the oil pressure sensor operation by substituting a known good sensor.
e. Check the oil filter for internal restrictions or leaks, and replace as necessary.
WARNING: If the engine is operated with oil pressure below the manufac-
turer’s specification, severe (and costly) engine damage could occur. Low
oil pressure can be caused by excessive internal wear or damage to the en-
gine bearings, oil pressure relief valve, oil pump or oil pump drive mecha-
nism.
Before starting the engine, check for possible causes of rapid oil loss, such as leaking
oil lines or a loose, damaged, restricted, or leaking oil filter or oil pressure sensor. If the
engine oil level and condition are acceptable, measure the engine’s oil pressure using a
pressure gauge, or determine the cause for the oil pressure warning light to function
when the engine is running, before operating the engine for an extended period of time.
Another symptom of operating an engine with low oil pressure is the presence of severe
knocking and tapping noises.
Parking Brake Warning Light a. Check the brake release mechanism and verify the parking brake has been fully re-
leased.
b. CheckCheck the parking brake light switch for looseness or misalignment.
c. CheckCheck for a damaged switch or a loose or shorted brake light switch wire, and
replace or repair as necessary.
2. Warning light(s) flickers on and off when driving
Ignition, Battery or Alternator Warning Light a. Check the alternator output and voltage regulator operation. An intermittent condition
may indicate worn brushes, an internal short, or a defective voltage regulator. Replace
the alternator or failed component.
b. Check the warning light wiring for a shorted, pinched or damaged wire and repair as
necessary.
Check Engine Light a. Check the engine for required maintenance and tune-up status. Verify engine tune-up
specifications, as well as spark plug, air filter and engine oil condition; replace and/or
adjust items as necessary.
b. Check the fuel tank for low fuel level causing an intermittent lean fuel mixture. Top off
fuel tank and reset check engine light.
c. Check for an intermittent failure or partially disconnected engine fuel and ignition
component, sensor or control unit; repair or replace as necessary.
d. Check the intake manifold and vacuum hoses for air leaks, and repair as necessary.
e. Check the warning light wiring for a shorted, pinched or damaged wire and repair as
necessary.
Anti-Lock Braking System (ABS) Light a. Check the wheel sensors and sensor rings for debris, and clean as necessary.
b. Check the brake master cylinder for fluid leakage or seal failure and replace as neces-
sary.
c. Check the ABS control unit, pump and proportioning valves for proper operation, and
replace as necessary.