wheel bolts MITSUBISHI ECLIPSE 1991 User Guide
[x] Cancel search | Manufacturer: MITSUBISHI, Model Year: 1991, Model line: ECLIPSE, Model: MITSUBISHI ECLIPSE 1991Pages: 1216, PDF Size: 67.42 MB
Page 355 of 1216
ENGINE - Crankshaft, Flwvheel and Drive Plate9-71
3EN30’lrrow mark toward
cap No,
I
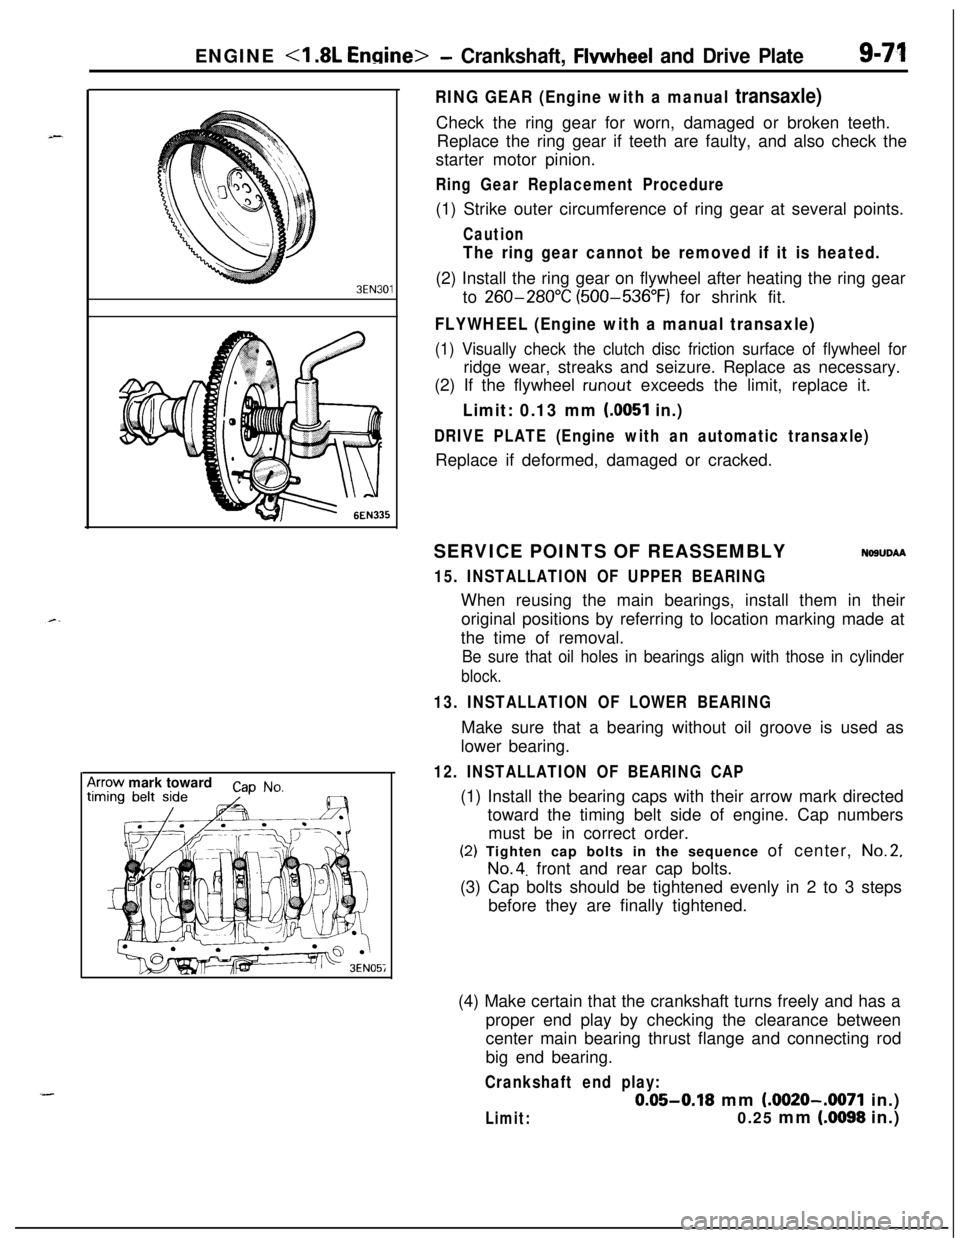
RING GEAR (Engine with a manual transaxle)Check the ring gear for worn, damaged or broken teeth.
Replace the ring gear if teeth are faulty, and also check the
starter motor pinion.
Ring Gear Replacement Procedure(1) Strike outer circumference of ring gear at several points.
Caution
The ring gear cannot be removed if it is heated.(2) Install the ring gear on flywheel after heating the ring gear
to
260-280°C (500-536°F) for shrink fit.
FLYWHEEL (Engine with a manual transaxle)
(1) Visually check the clutch disc friction surface of flywheel forridge wear, streaks and seizure. Replace as necessary.
(2) If the flywheel
runout exceeds the limit, replace it.
Limit: 0.13 mm (0051 in.)
DRIVE PLATE (Engine with an automatic transaxle)Replace if deformed, damaged or cracked.
SERVICE POINTS OF REASSEMBLY
NOSUDAA
15. INSTALLATION OF UPPER BEARINGWhen reusing the main bearings, install them in their
original positions by referring to location marking made at
the time of removal.
Be sure that oil holes in bearings align with those in cylinder
block.
13. INSTALLATION OF LOWER BEARINGMake sure that a bearing without oil groove is used as
lower bearing.
12. INSTALLATION OF BEARING CAP(1) Install the bearing caps with their arrow mark directed
toward the timing belt side of engine. Cap numbers
must be in correct order.(2) Tighten cap bolts in the sequence of center,
No.2,
No.4. front and rear cap bolts.
(3) Cap bolts should be tightened evenly in 2 to 3 steps
before they are finally tightened.
(4) Make certain that the crankshaft turns freely and has a
proper end play by checking the clearance between
center main bearing thrust flange and connecting rod
big end bearing.
Crankshaft end play:
0.05-0.18 mm (.0020-.0071 in.)
Limit:0.25 mm (.0098 in.)
Page 417 of 1216
ENGINE <2.0L DOHC Engine>- Crankshaft, Flywheel and Drive Plate,91133
INSPECTIONNOSUHAD
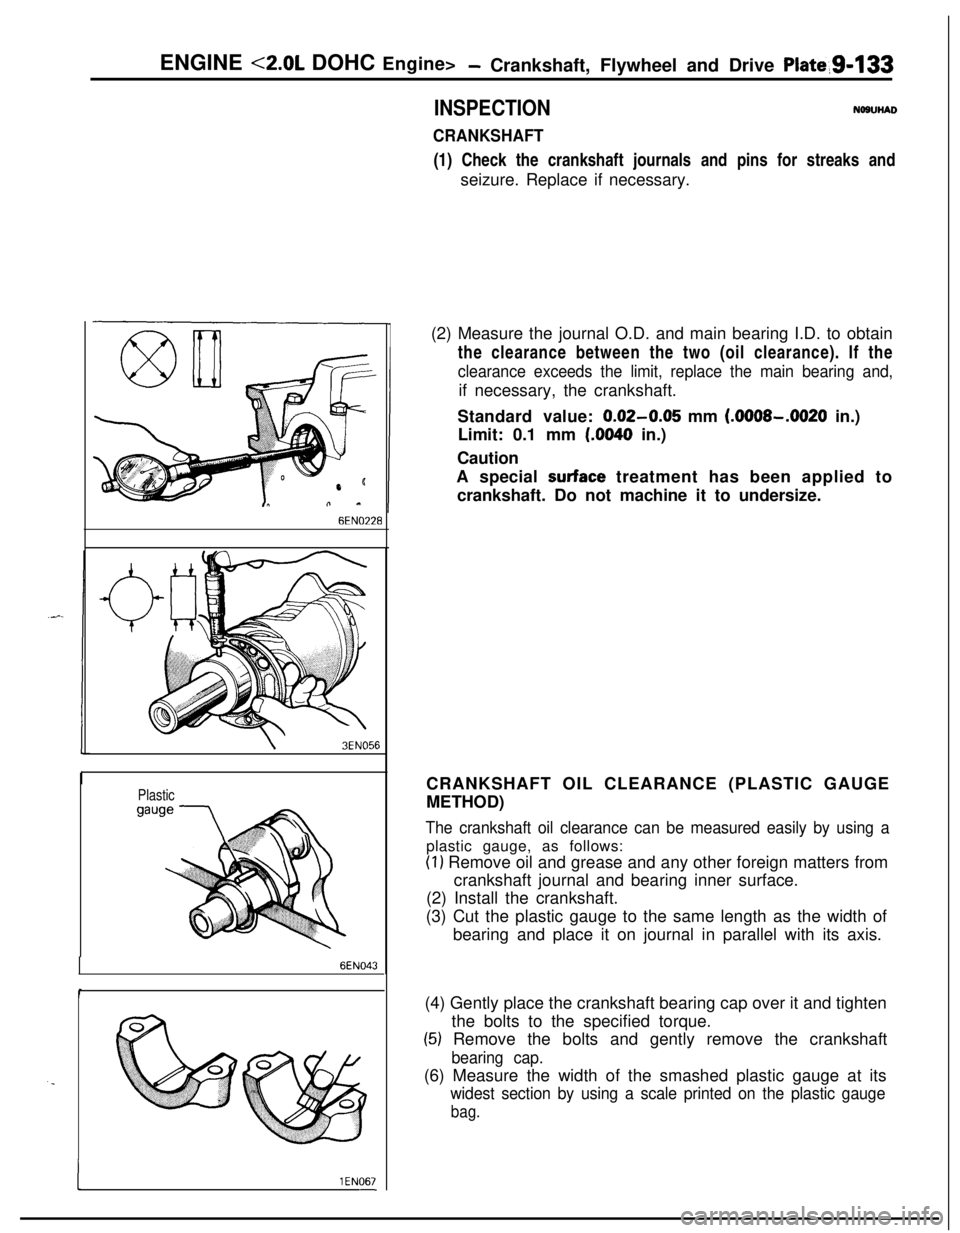
CRANKSHAFT(1) Check the crankshaft journals and pins for streaks and
seizure. Replace if necessary.
6EN0’228
\3EN056
Plastic
6EN043
. .
I1 EN067-(2) Measure the journal O.D. and main bearing I.D. to obtain
the clearance between the two (oil clearance). If the
clearance exceeds the limit, replace the main bearing and,if necessary, the crankshaft.
Standard value:
0.02-0.05 mm (.OOOS-.0020 in.)
Limit: 0.1 mm
(.0040 in.)
Caution
A special
surface treatment has been applied to
crankshaft. Do not machine it to undersize.
CRANKSHAFT OIL CLEARANCE (PLASTIC GAUGE
METHOD)
The crankshaft oil clearance can be measured easily by using aplastic gauge, as follows:
(1) Remove oil and grease and any other foreign matters from
crankshaft journal and bearing inner surface.
(2) Install the crankshaft.
(3) Cut the plastic gauge to the same length as the width of
bearing and place it on journal in parallel with its axis.
(4) Gently place the crankshaft bearing cap over it and tighten
the bolts to the specified torque.
(5) Remove the bolts and gently remove the crankshaft
bearing cap.(6) Measure the width of the smashed plastic gauge at its
widest section by using a scale printed on the plastic gauge
bag.
Page 613 of 1216
Special Tools/Troubleshooting/REAR SUSPENSION
SPECIAL TOOLN17DA.A
ToolNumberName1 Use1
L-451 4
Spring compressorRemoval and installation of the coil spring
bodyTROUBLESHOOTINGNI’IEA-A
Symptom
Squeaks or other
abnormal noiseProbable cause
Loose rear suspension installation bolts and nuts
Malfunction of shock absorber
Worn bushings
Remedy
Retighten
Replace
Poor rideExcessive tire inflation pressure
Malfunction of shock absorberWeak or broken springs
Adjust the pressure
Replace
Body tiltingWeak or deteriorated bushings
Weak or broken springs
Replace
SERVICE ADJUSTMENT PROCEDURES
REAR WHEEL ALIGNMENT INSPECTIONN17FAAC
The rear suspension assembly must be free of worn, loosen or
damaged parts prior to measurement of rear wheel alignment.
Standard value:
Toe-in (Left-right difference)
Of3 mm (Of.118 in.)
Camber-45’ + 30’
NOTEThe rear wheel alignment is set at the factory and cannot be
adjusted.If toe-in or camber is not within the standard value, replace
bent or damaged parts.
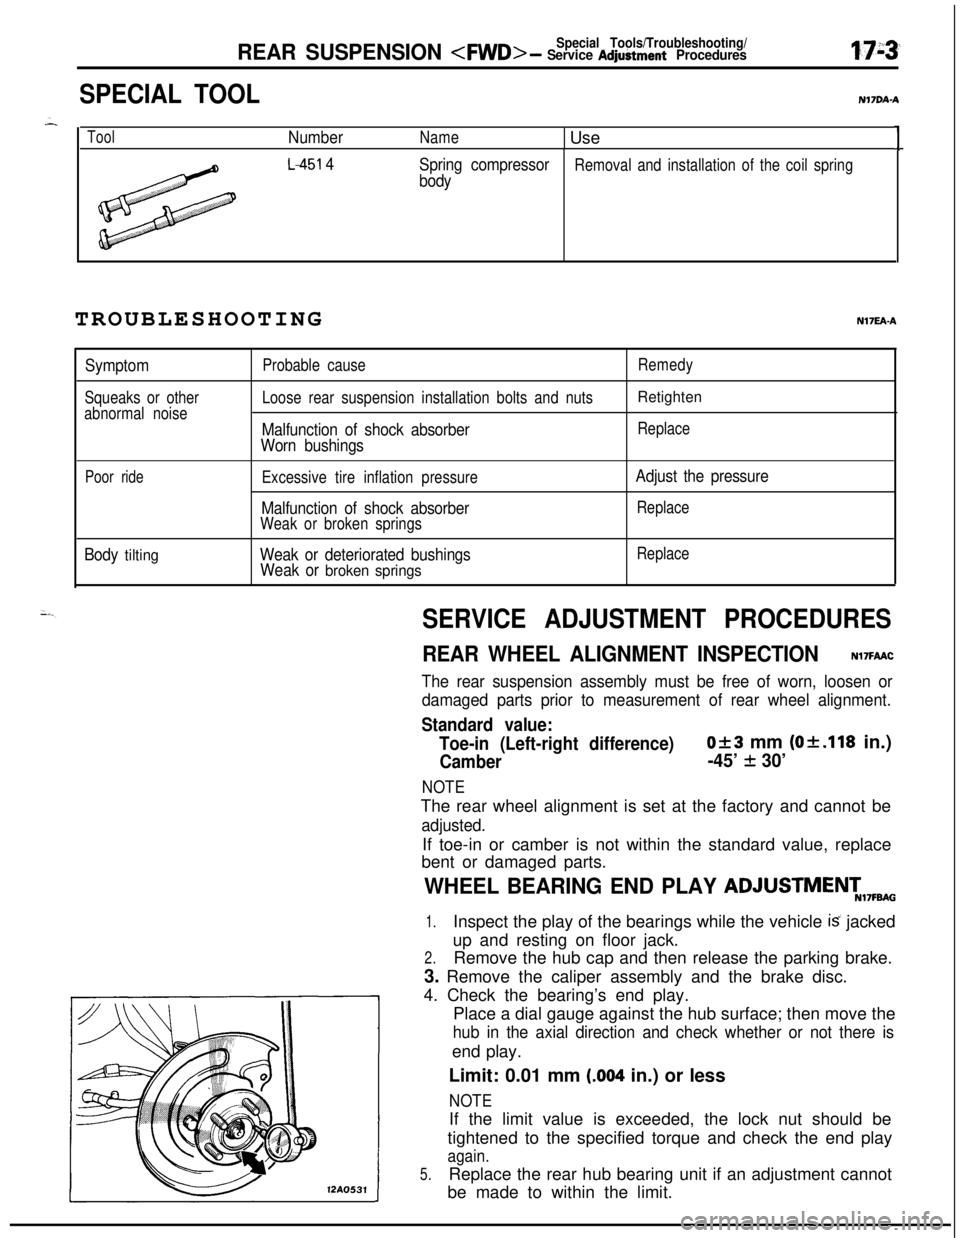
WHEEL BEARING END PLAY ADJUSTMENT,7FBA0
1.Inspect the play of the bearings while the vehicle is jacked
up and resting on floor jack.
2.Remove the hub cap and then release the parking brake.
3. Remove the caliper assembly and the brake disc.
4. Check the bearing’s end play.
Place a dial gauge against the hub surface; then move the
hub in the axial direction and check whether or not there isend play.
Limit: 0.01 mm
(.004 in.) or less
NOTE12AO531If the limit value is exceeded, the lock nut should be
tightened to the specified torque and check the end play
again.
5.Replace the rear hub bearing unit if an adjustment cannot
be made to within the limit.
Page 616 of 1216
17-6REAR SUSPENSION
Drive out
BayArbor
Race
BearingSERVICE POINTS OF REMOVAL
Nl7QBh
1.REMOVAL OF REAR SPEED SENSOR
5-Wheel Speed Sensor.
11. REMOVAL OF LATERAL ROD MOUNTING BOLT
(1) Remove the lateral rod mounting bolt.
(2) Secure and hold the lateral rod to the axle beam with
wire, etc.
13. REMOVAL OF SHOCK ABSORBER UPPER ‘MOUNTINGNUTS/14. TRAILING ARM MOUNTING BOLTS/15
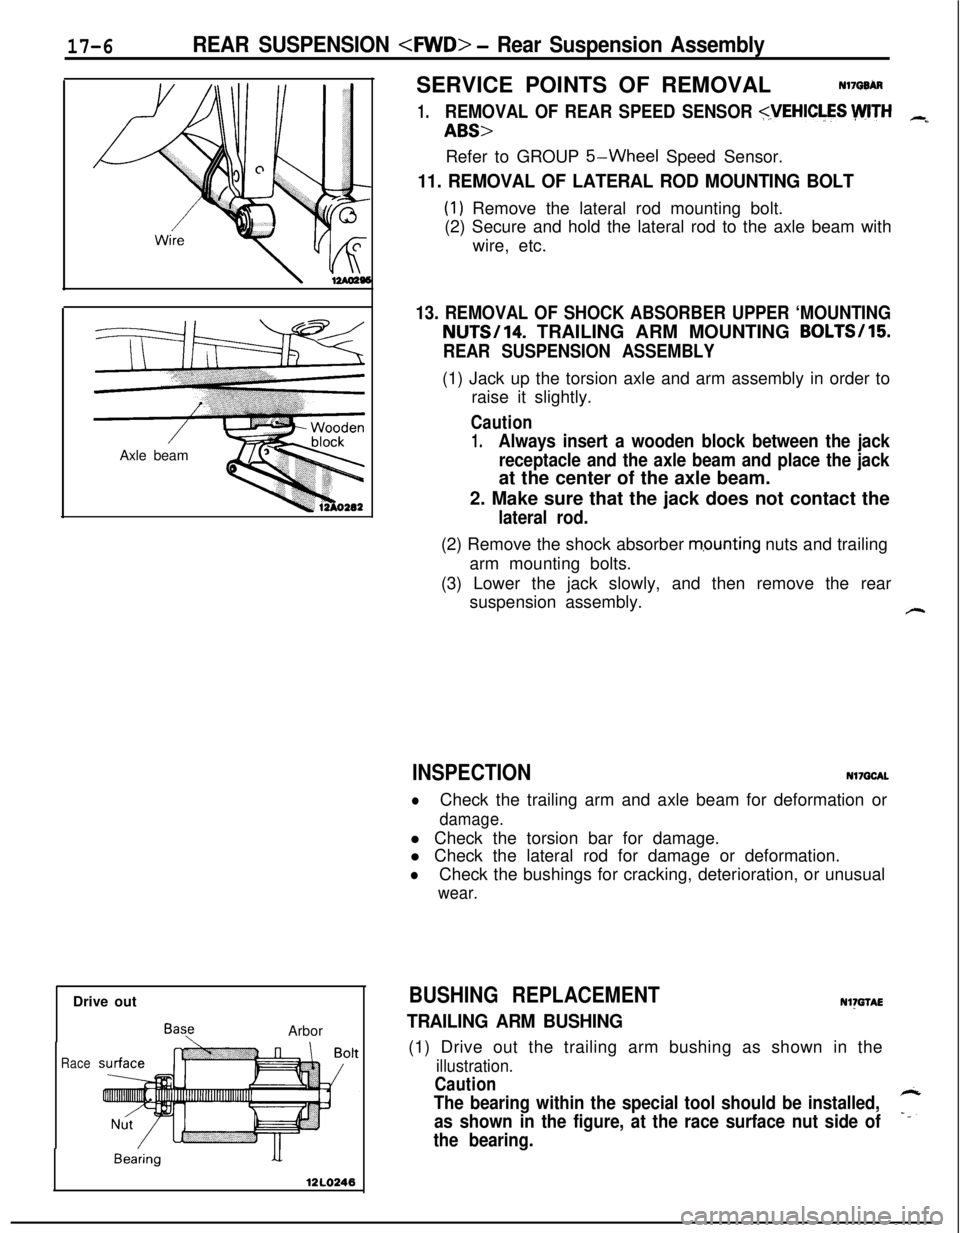
REAR SUSPENSION ASSEMBLY(1) Jack up the torsion axle and arm assembly in order to
raise it slightly.
Caution
1.Always insert a wooden block between the jack
receptacle and the axle beam and place the jackat the center of the axle beam.
2. Make sure that the jack does not contact the
lateral rod.(2) Remove the shock absorber
m,ounting nuts and trailing
arm mounting bolts.
(3) Lower the jack slowly, and then remove the rear
suspension assembly.
#-
INSPECTIONNl7QCAL
lCheck the trailing arm and axle beam for deformation or
damage.l Check the torsion bar for damage.
l Check the lateral rod for damage or deformation.
lCheck the bushings for cracking, deterioration, or unusual
wear.
BUSHING REPLACEMENTNl)GTAE
TRAILING ARM BUSHING(1) Drive out the trailing arm bushing as shown in the
illustration.
Caution
The bearing within the special tool should be installed,
as shown in the figure, at the race surface nut side of7
the bearing.
Page 623 of 1216
REAR SUSPENSION
Inut
-
-Spindle
14AO419
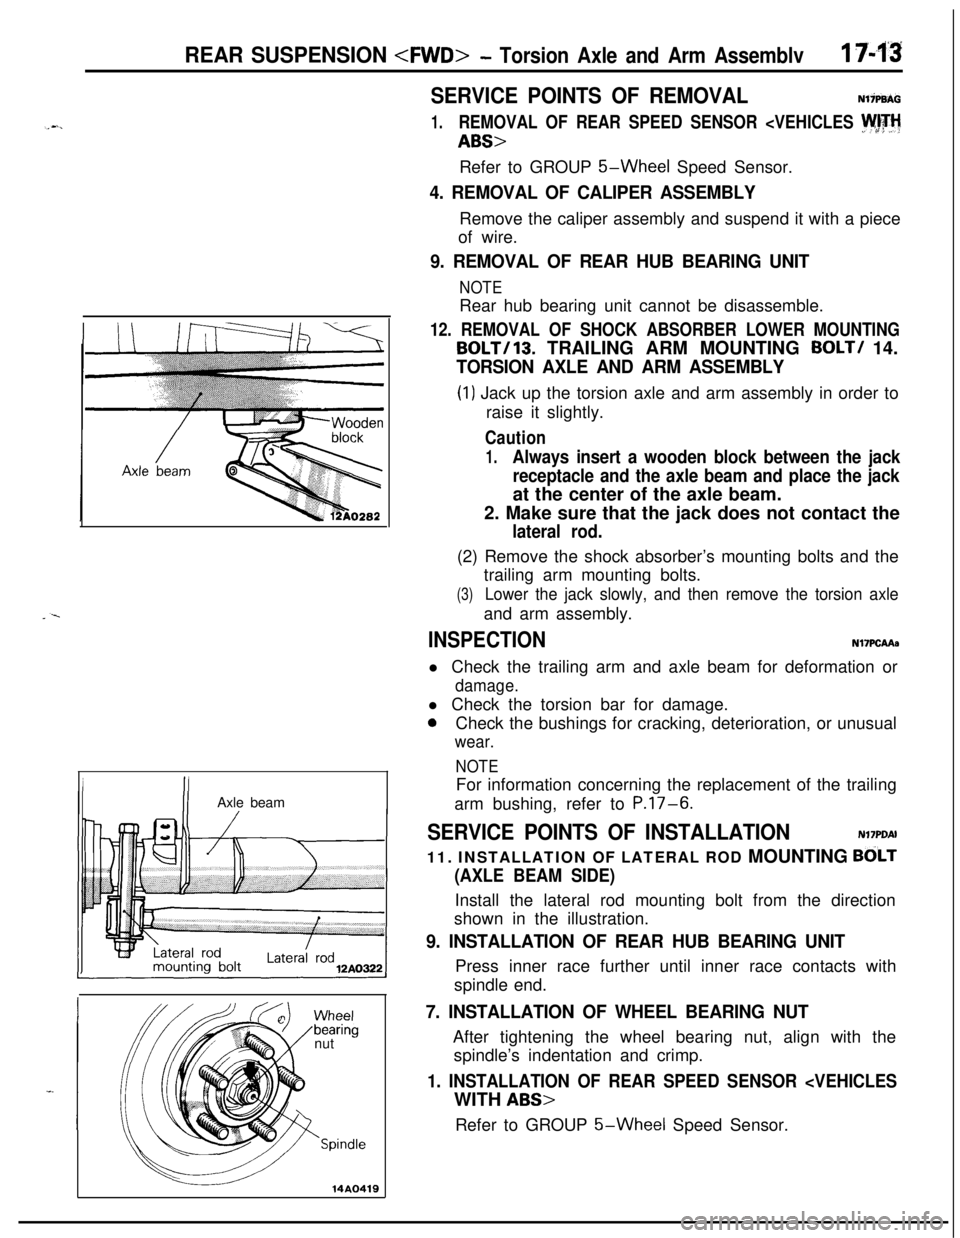
SERVICE POINTS OF REMOVALNliP9AG
1.REMOVAL OF REAR SPEED SENSOR
5-Wheel Speed Sensor.
4. REMOVAL OF CALIPER ASSEMBLYRemove the caliper assembly and suspend it with a piece
of wire.
9. REMOVAL OF REAR HUB BEARING UNIT
NOTERear hub bearing unit cannot be disassemble.
12. REMOVAL OF SHOCK ABSORBER LOWER MOUNTING
BOLT/lB. TRAILING ARM MOUNTING BOLT/ 14.
TORSION AXLE AND ARM ASSEMBLY
(1) Jack up the torsion axle and arm assembly in order to
raise it slightly.
Caution
1.Always insert a wooden block between the jack
receptacle and the axle beam and place the jackat the center of the axle beam.
2. Make sure that the jack does not contact the
lateral rod.(2) Remove the shock absorber’s mounting bolts and the
trailing arm mounting bolts.
(3)Lower the jack slowly, and then remove the torsion axleand arm assembly.
INSPECTIONN17PCAAa
l Check the trailing arm and axle beam for deformation or
damage.l Check the torsion bar for damage.
0Check the bushings for cracking, deterioration, or unusual
wear.
NOTEFor information concerning the replacement of the trailing
arm bushing, refer to
P.17-6.
SERVICE POINTS OF INSTALLATIONN17PDAI
11. INSTALLATION OF LATERAL ROD MOUNTING
BdLT
(AXLE BEAM SIDE)Install the lateral rod mounting bolt from the direction
shown in the illustration.
9. INSTALLATION OF REAR HUB BEARING UNITPress inner race further until inner race contacts with
spindle end.
7. INSTALLATION OF WHEEL BEARING NUTAfter tightening the wheel bearing nut, align with the
spindle’s indentation and crimp.
1. INSTALLATION OF REAR SPEED SENSOR
5-Wheel Speed Sensor.
Page 630 of 1216
17-20REAR SUSPENSION
12R0556-- Upper arm
(L.H.)
12A0081
SERVICE ADJUSTMENT PROCEDURES
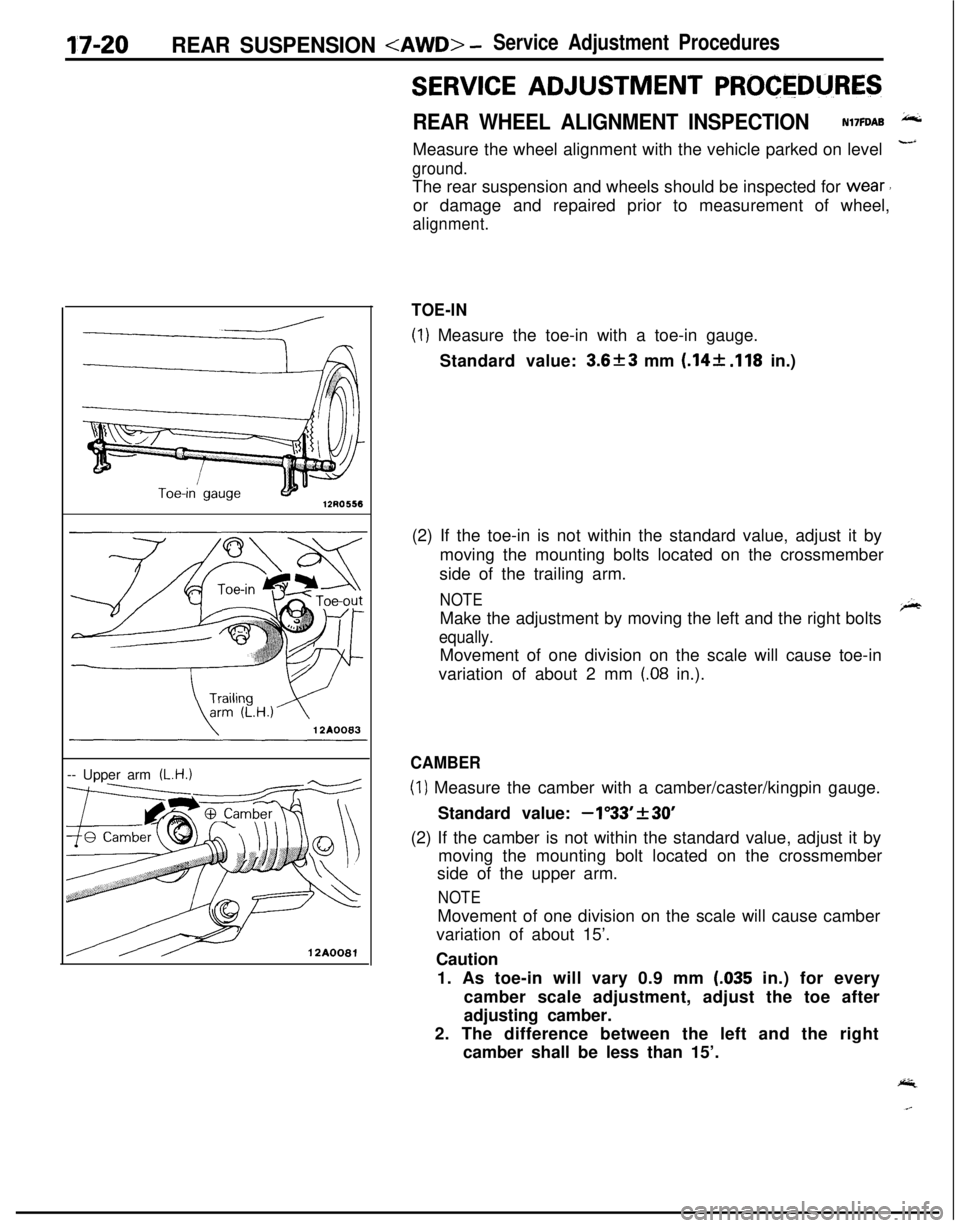
REAR WHEEL ALIGNMENT INSPECTIONN17FDAB is.Measure the wheel alignment with the vehicle parked on level
--’
ground.The rear suspension and wheels should be inspected for
wear’or damage and repaired prior to measurement of wheel,
alignment.
TOE-IN
(1) Measure the toe-in with a toe-in gauge.
Standard value:
3.6f3 mm (.14+ .I18 in.)
(2) If the toe-in is not within the standard value, adjust it by
moving the mounting bolts located on the crossmember
side of the trailing arm.
NOTEMake the adjustment by moving the left and the right bolts
r;hr
equally.Movement of one division on the scale will cause toe-in
variation of about 2 mm
(.08 in.).
CAMBER
(1) Measure the camber with a camber/caster/kingpin gauge.
Standard value:
-1”33’f30’(2) If the camber is not within the standard value, adjust it by
moving the mounting bolt located on the crossmember
side of the upper arm.
NOTEMovement of one division on the scale will cause camber
variation of about 15’.
Caution
1. As toe-in will vary 0.9 mm
(.035 in.) for every
camber scale adjustment, adjust the toe after
adjusting camber.
2. The difference between the left and the right
camber shall be less than 15’.
Page 660 of 1216
19-12STEERING - Service Adjustment Procedures
Pressure ofWater pump
pulleyOlA0059Fluid fluctuation
While engine
runningWhile enginestopped13uo139
Return hoseVinyl hose
x ,3Ao,42-
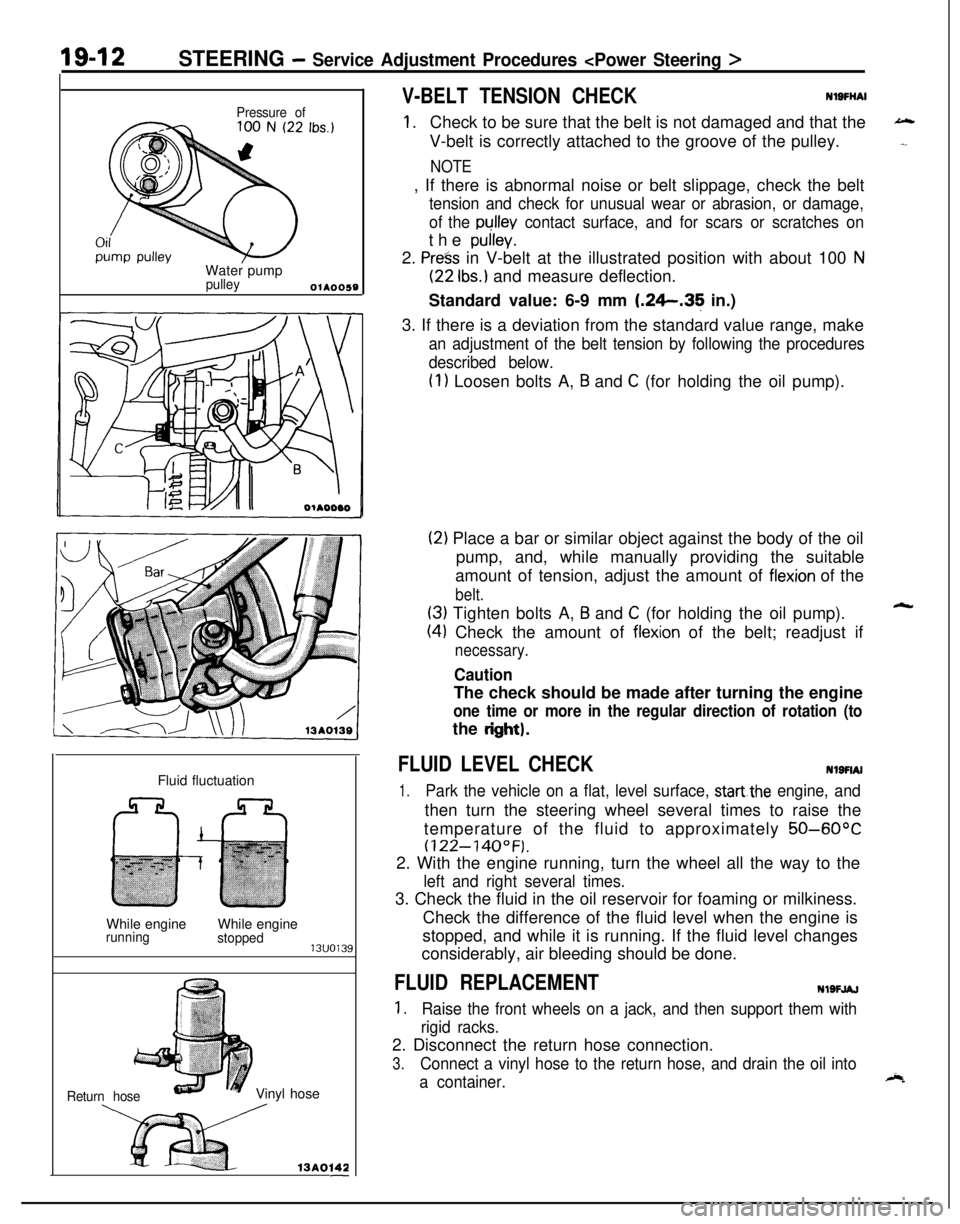
V-BELT TENSION CHECKNlSFliAl
1.Check to be sure that the belt is not damaged and that the
V-belt is correctly attached to the groove of the pulley.
NOTE, If there is abnormal noise or belt slippage, check the belt
tension and check for unusual wear or abrasion, or damage,
of the
pullev contact surface, and for scars or scratches onthe
pulley.2.
Press in V-belt at the illustrated position with about 100 N
(22 Ibs.) and measure deflection.
Standard value: 6-9 mm
1.26.35 in.)
3. If there is a deviation from the standard value range, make
an adjustment of the belt tension by following the procedures
described below.
(1) Loosen bolts A, B and C (for holding the oil pump).
(2) Place a bar or similar object against the body of the oil
pump, and, while manually providing the suitable
amount of tension, adjust the amount of
flexion of the
belt.
(3) Tighten bolts A, B and C (for holding the oil pump).
(4) Check the amount of flexion of the belt; readjust if
necessary.
CautionThe check should be made after turning the engine
one time or more in the regular direction of rotation (tothe
dght).
FLUID LEVEL CHECKNlSFIAI
1.Park the vehicle on a flat, level surface, startthe engine, andthen turn the steering wheel several times to raise the
temperature of the fluid to approximately
50-60°C
(122-140°F).2. With the engine running, turn the wheel all the way to the
left and right several times.3. Check the fluid in the oil reservoir for foaming or milkiness.
Check the difference of the fluid level when the engine is
stopped, and while it is running. If the fluid level changes
considerably, air bleeding should be done.
FLUID REPLACEMENTNlSFJAJ
1.Raise the front wheels on a jack, and then support them with
rigid racks.2. Disconnect the return hose connection.
3.Connect a vinyl hose to the return hose, and drain the oil into
a container.
Page 664 of 1216
19-16STEERING - Steering Wheel and Shaft
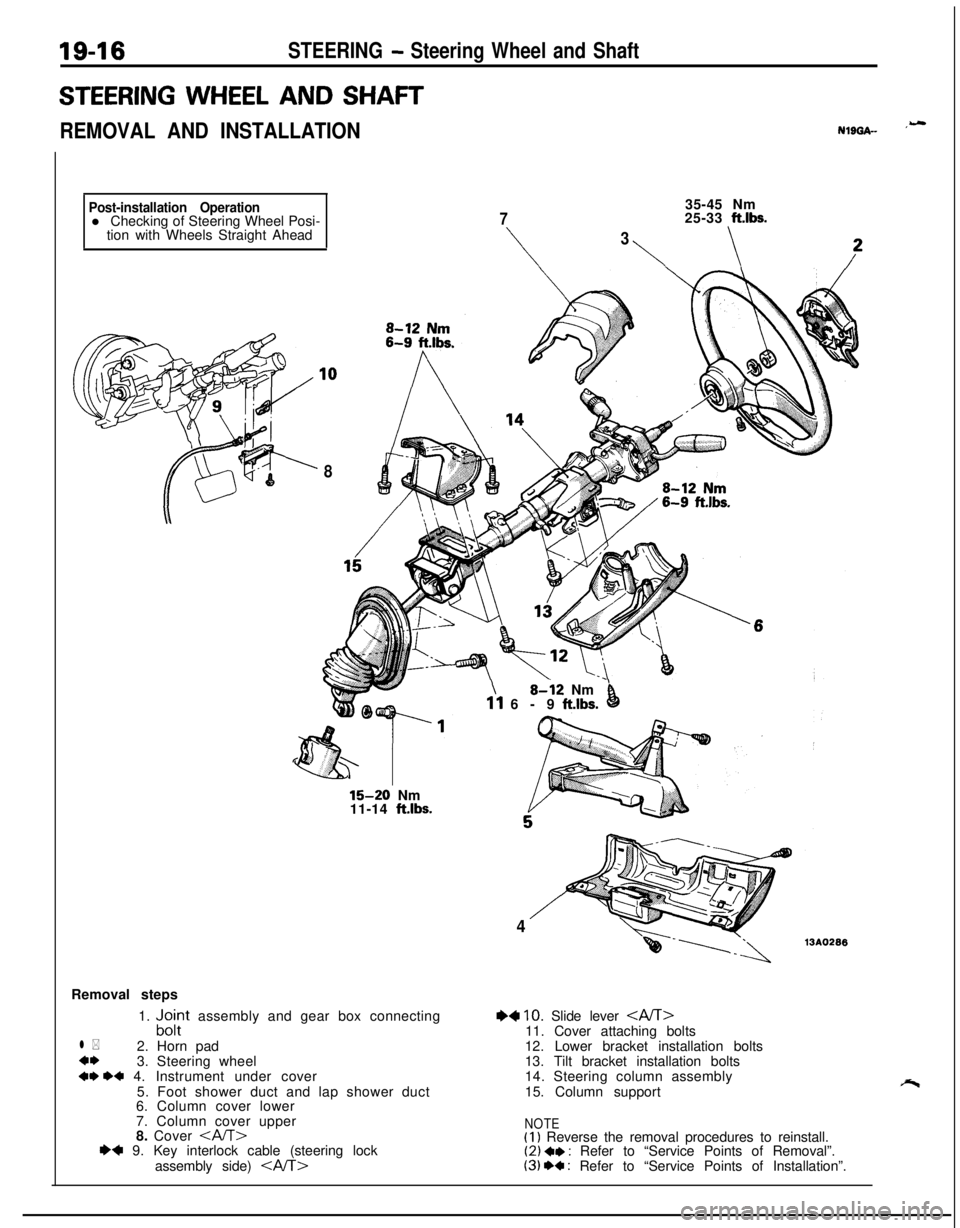
STEERING WHEEL AND SHAFT
REMOVAL AND INSTALLATIONNlL)GA- ‘-
Post-installation Operationl Checking of Steering Wheel Posi-
tion with Wheels Straight Ahead
835-45 Nm
725-33 ft.lbs.
\
3
\\
15-20 Nm
11-14 ft.lbs.Removal steps
1.
“,c$t assembly and gear box connecting
l *2. Horn pad
4*3. Steering wheel
+* ++ 4. Instrument under cover
5. Foot shower duct and lap shower duct
6. Column cover lower
7. Column cover upper
8. Cover
assembly side)
\8-i2 Nm’11 6-9 ft.lbs.0
413AO296
+4 10. Slide lever 11. Cover attaching bolts
12. Lower bracket installation bolts
13. Tilt bracket installation bolts
14. Steering column assembly
15. Column support
NOTE(I) Reverse the removal procedures to reinstall.(2) a* : Refer to “Service Points of Removal”.(3) +a : Refer to “Service Points of Installation”.
Page 667 of 1216
STEERING - Steering Wheel and Shaft
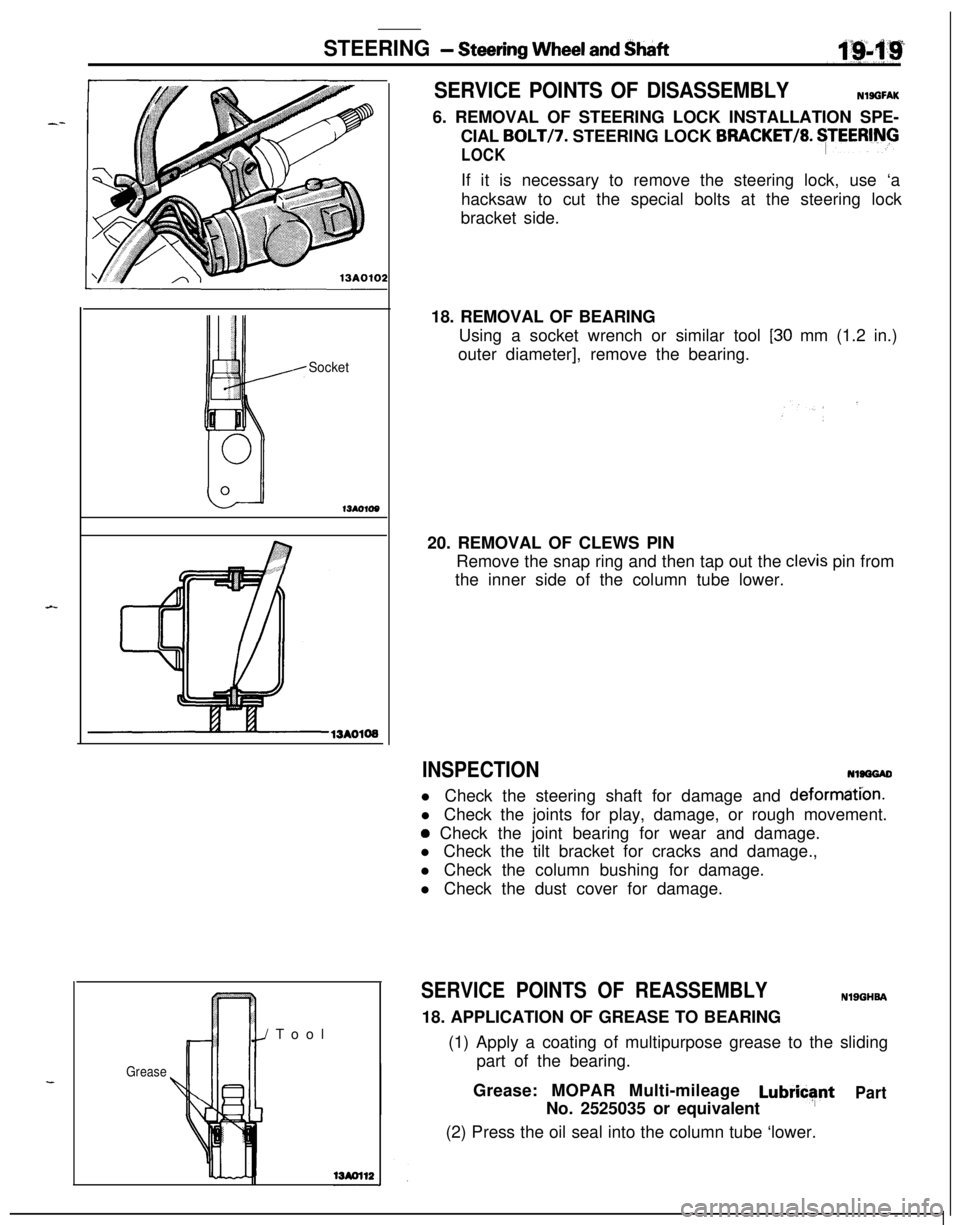
Socket13AO106
SERVICE POINTS OF DISASSEMBLYNlSGFAK6. REMOVAL OF STEERING LOCK INSTALLATION SPE-
CIAL
BOLTI7. STEERING LOCK BRACKET/8. $EERlNG
LOCKIf it is necessary to remove the steering lock, use ‘a
hacksaw to cut the special bolts at the steering lock
bracket side.
18. REMOVAL OF BEARING
Using a socket wrench or similar tool
[30 mm (1.2 in.)
outer diameter], remove the bearing.
20. REMOVAL OF CLEWS PIN
Remove the snap ring and then tap out the
clevis pin from
the inner side of the column tube lower.
INSPECTIONNlSGGADl Check the steering shaft for damage and
deformati’on.l Check the joints for play, damage, or rough movement.
a Check the joint bearing for wear and damage.
l Check the tilt bracket for cracks and damage.,
l Check the column bushing for damage.
l Check the dust cover for damage.
Grease/Tool
SERVICE POINTS OF REASSEMBLYNlSGHSA18. APPLICATION OF GREASE TO BEARING
(1) Apply a coating of multipurpose grease to the sliding
part of the bearing.
Grease: MOPAR Multi-mileage
LubricsfntPartNo. 2525035 or equivalent
(2) Press the oil seal into the column tube ‘lower.
Page 668 of 1216
19-20STEERING - Steering Wheel and Shaft
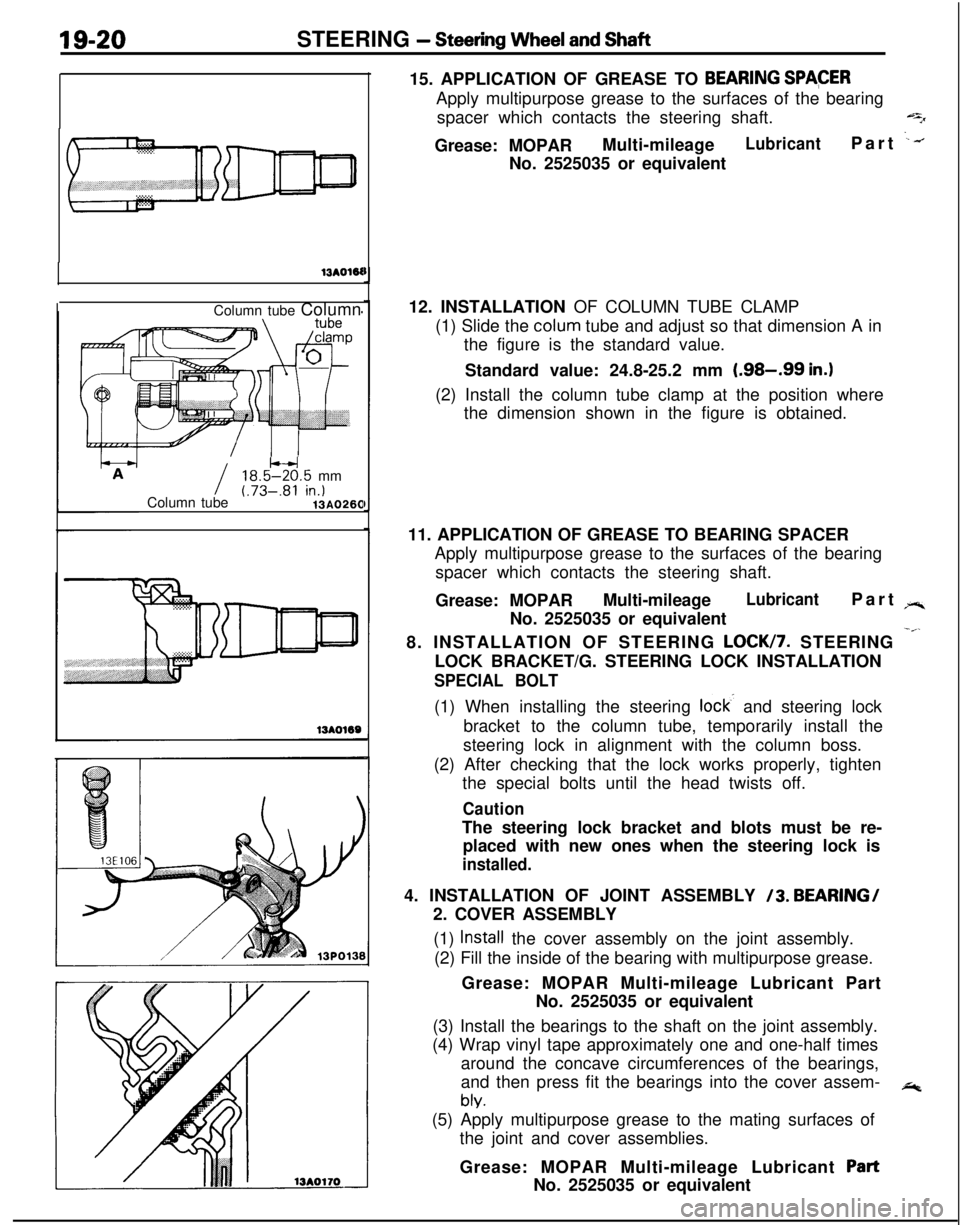
13AOWColumn tube Column
I18.5W.5 mm
Column tube(.73-.81 in.)13AO26015. APPLICATION OF GREASE TO
BEARING SPACERApply multipurpose grease to the surfaces of the bearing
spacer which contacts the steering shaft.
qGrease: MOPARMulti-mileage
LubricantPart .--.No. 2525035 or equivalent
12. INSTALLATION OF COLUMN TUBE CLAMP
(1) Slide the colum tube and adjust so that dimension A in
the figure is the standard value.
Standard value: 24.8-25.2 mm
(.98-.99 in.)(2) Install the column tube clamp at the position where
the dimension shown in the figure is obtained.
11. APPLICATION OF GREASE TO BEARING SPACER
Apply multipurpose grease to the surfaces of the bearing
spacer which contacts the steering shaft.
Grease: MOPARMulti-mileage
LubricantPart rr.No. 2525035 or equivalent
8. INSTALLATION OF STEERING
LOCK/7. STEERING -”LOCK BRACKET/G. STEERING LOCK INSTALLATION
SPECIAL BOLT(1) When installing the steering
lock- and steering lock
bracket to the column tube, temporarily install the
steering lock in alignment with the column boss.
(2) After checking that the lock works properly, tighten
the special bolts until the head twists off.
CautionThe steering lock bracket and blots must be re-
placed with new ones when the steering lock is
installed.4. INSTALLATION OF JOINT ASSEMBLY
/3. BEARING/
2. COVER ASSEMBLY
(1)
Install the cover assembly on the joint assembly.
(2) Fill the inside of the bearing with multipurpose grease.
Grease: MOPAR Multi-mileage Lubricant Part
No. 2525035 or equivalent
(3) Install the bearings to the shaft on the joint assembly.
(4) Wrap vinyl tape approximately one and one-half times
around the concave circumferences of the bearings,
and then press fit the bearings into the cover assem-
*
bly.(5) Apply multipurpose grease to the mating surfaces of
the joint and cover assemblies.
Grease: MOPAR Multi-mileage Lubricant
PartNo. 2525035 or equivalent