window MITSUBISHI ECLIPSE 1991 User Guide
[x] Cancel search | Manufacturer: MITSUBISHI, Model Year: 1991, Model line: ECLIPSE, Model: MITSUBISHI ECLIPSE 1991Pages: 1216, PDF Size: 67.42 MB
Page 1098 of 1216
23-54BODY - Window Glass
WINDOW GLASS
N23LAAB
GENERALThe windshield and
liftgate window glass are attached by an urethane-base adhesive to the window frame.
This adhesive not only provides improved glass holding and sealing, but also permits use of body openings
having a greater
structural strength.
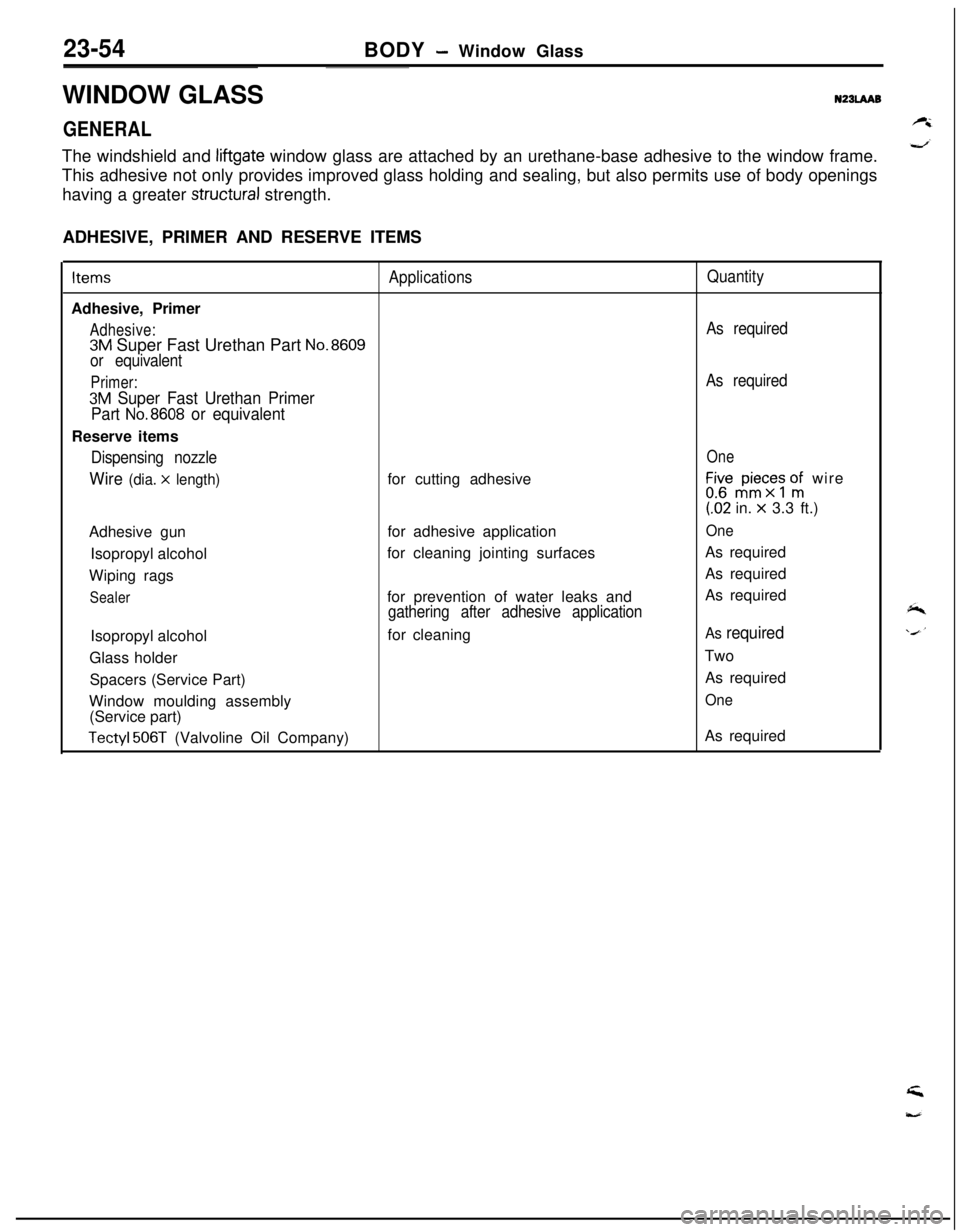
ADHESIVE, PRIMER AND RESERVE ITEMSItems
ApplicationsQuantityAdhesive, Primer
Adhesive:As required
3M Super Fast Urethan Part No.8609
or equivalent
Primer:As required
3M Super Fast Urethan Primer
Part
No.8608 or equivalentReserve items
Dispensing nozzleOne
Wire (dia. x length)for cutting adhesiveLir,“$c;s onfi wire(62 in.
x 3.3 ft.)
Adhesive gunfor adhesive application
OneIsopropyl alcoholfor cleaning jointing surfacesAs required
Wiping ragsAs required
Sealerfor prevention of water leaks andAs requiredgathering after adhesive applicationIsopropyl alcoholfor cleaning
As requiredGlass holderTwo
Spacers (Service Part)As required
Window moulding assembly
One(Service part)
Tectyl 506T (Valvoline Oil Company)As required
Page 1099 of 1216
BODY - Window Glass23-55
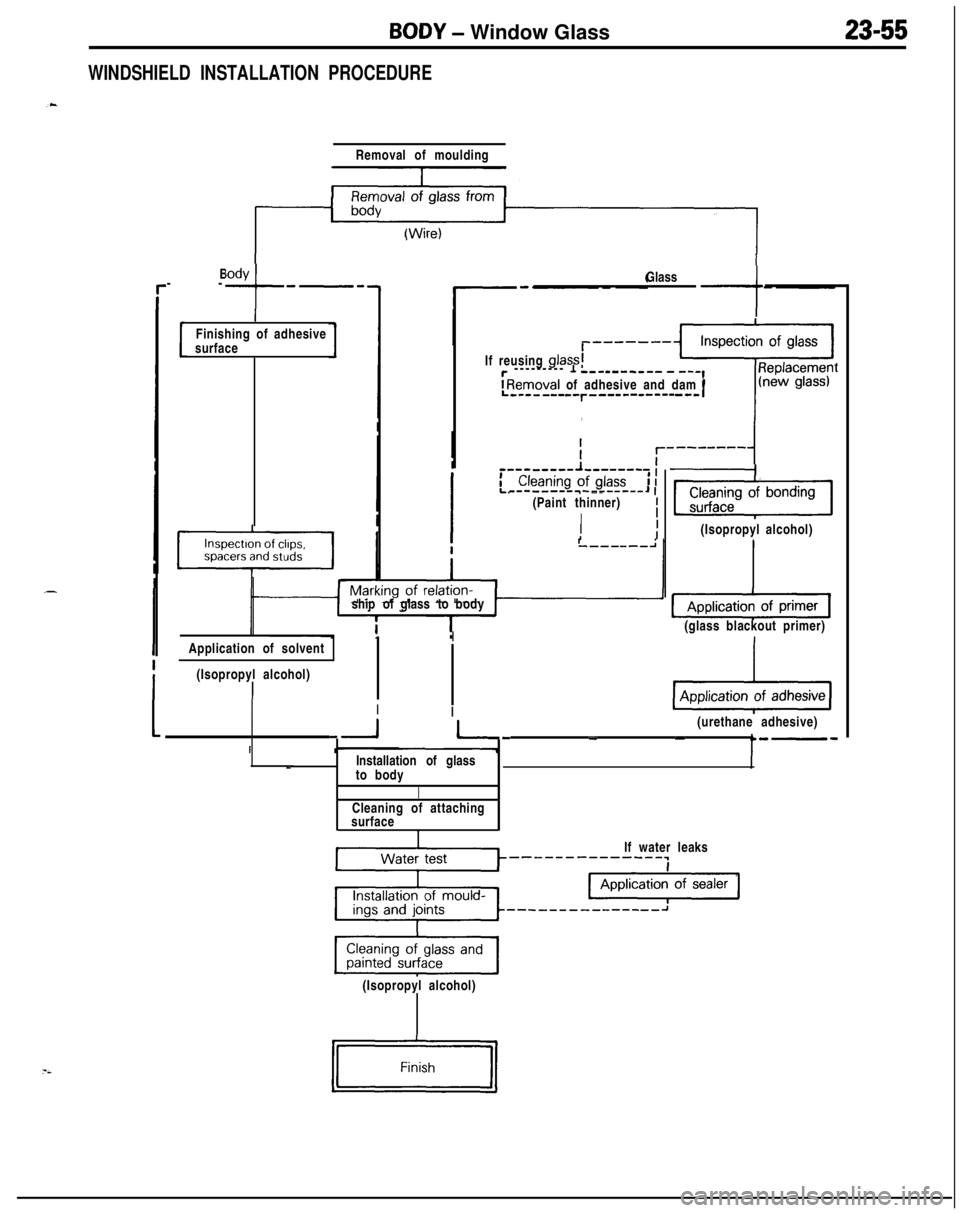
WINDSHIELD INSTALLATION PROCEDURE
_-Body
--
+
e-eRemoval of moulding
(Wire)
IFinishing of adhesive
surfaceGlass-tIf reusing glass;
r --------- 1 ---s------ - -‘-,
IRemoval of adhesive and dam rL---------r---s---------- I
e-e _---mm,- __-_--_ 1,(Paint thinner)
II
IIIship ofglass tobody
IApplication of solvent
(Isopropyl alcohol)
III
-*I(Isopropyl alcohol)
(glass blackout primer)
pi&g(urethane adhesive)
-1 I- - -Installation of glass
_to body
ICleaning of attaching
surface
1If water leaks
--------------~
p%zG&pJ(Isopropyl alcohol)
Page 1100 of 1216
23-56BODY - Window Glass
Recommended tool
Make the toolby
Windshield glass
Roof panel
scoop out
this portion.
iiiii- ,.:::i:::::::::::i.p:://jiiiig;iiiijjiiij
I&
::::::::::iiiiiii.::;QuarterQuarter
panelwindow
glass
WA0870Windshield
uppermoulding
Primer
Quarter
window
moulding
front---
---. Cuthere.
4%
>/yere.
MAO672-
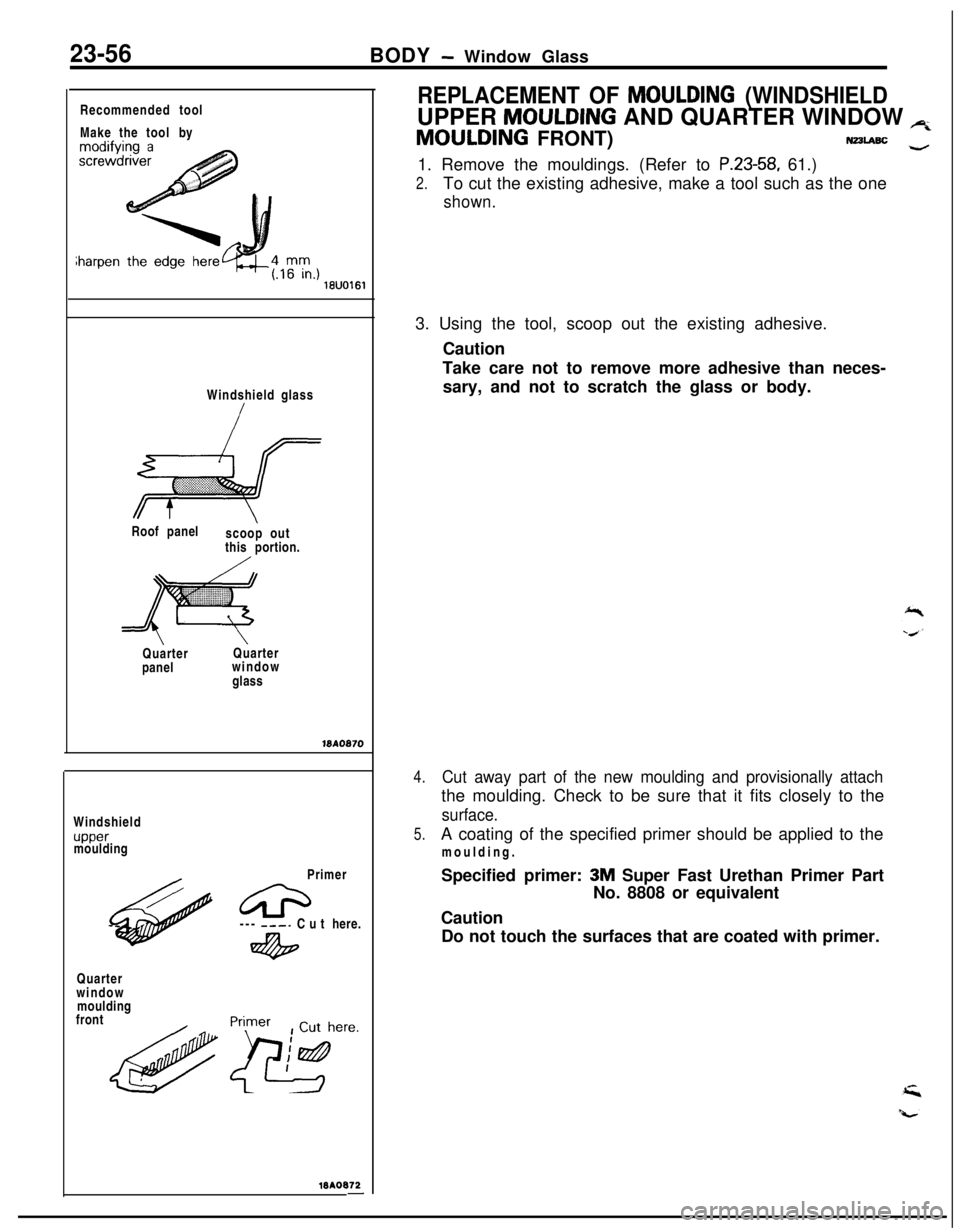
REPLACEMENT OF MOULDING (WINDSHIELDUPPER
MOULDING AND QUARTER WINDOW p;MOULDING FRONT)
N22LABc -1. Remove the mouldings. (Refer to
P.23-58, 61.)
2.To cut the existing adhesive, make a tool such as the one
shown.3. Using the tool, scoop out the existing adhesive.
Caution
Take care not to remove more adhesive than neces-
sary, and not to scratch the glass or body.
4.Cut away part of the new moulding and provisionally attachthe moulding. Check to be sure that it fits closely to the
surface.
5.A coating of the specified primer should be applied to the
moulding.
Specified primer:
3M Super Fast Urethan Primer Part
No. 8808 or equivalent
Caution
Do not touch the surfaces that are coated with primer.
Page 1101 of 1216
BODY - Window Glass23-57Windshield
uppermoulding
Additional
Quarter window
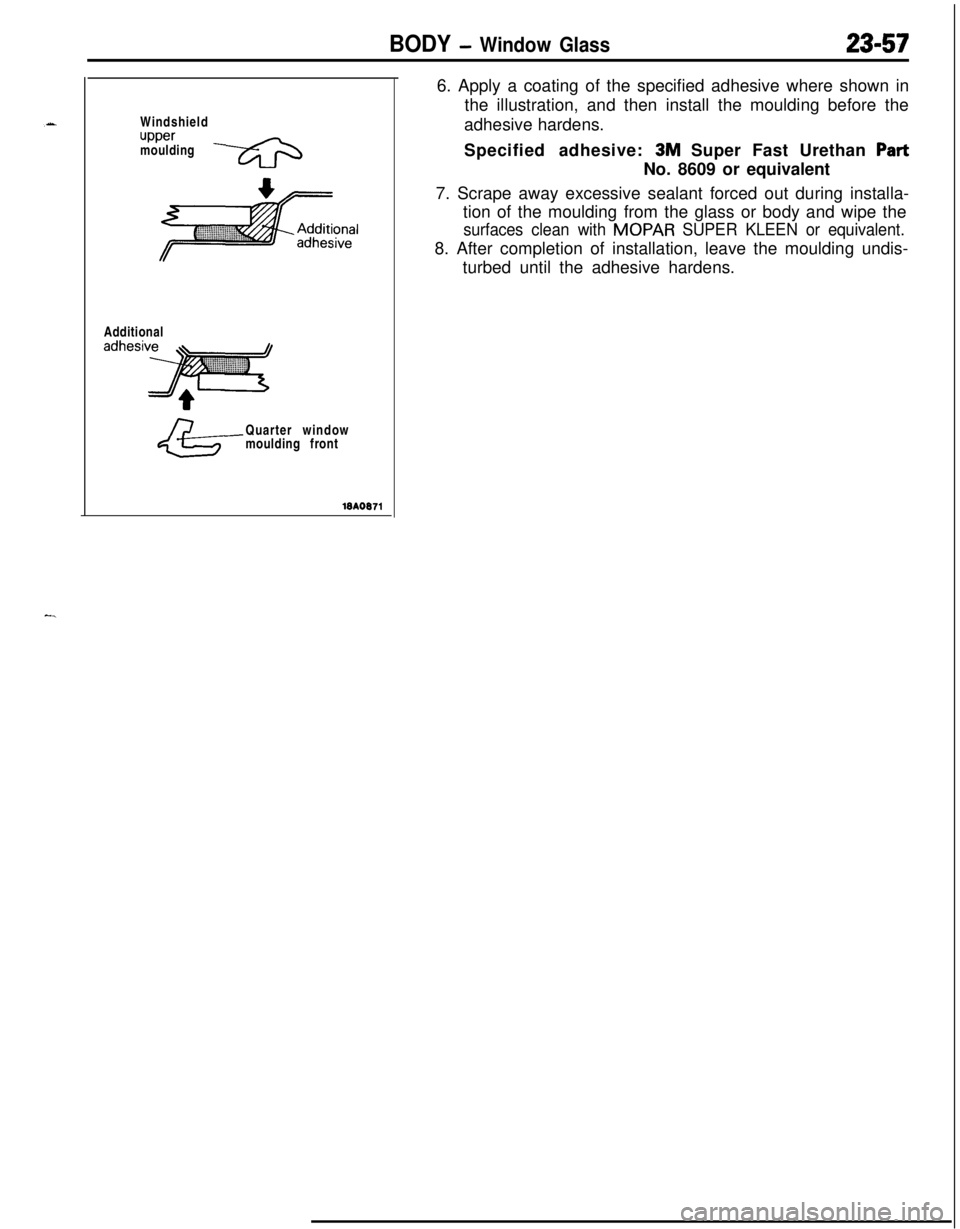
moulding front6. Apply a coating of the specified adhesive where shown in
the illustration, and then install the moulding before the
adhesive hardens.
Specified adhesive: 3M Super Fast Urethan PartNo. 8609 or equivalent
7. Scrape away excessive sealant forced out during installa-
tion of the moulding from the glass or body and wipe the
surfaces clean with MOPAR SUPER KLEEN or equivalent.8. After completion of installation, leave the moulding undis-
turbed until the adhesive hardens.
-.
Page 1105 of 1216
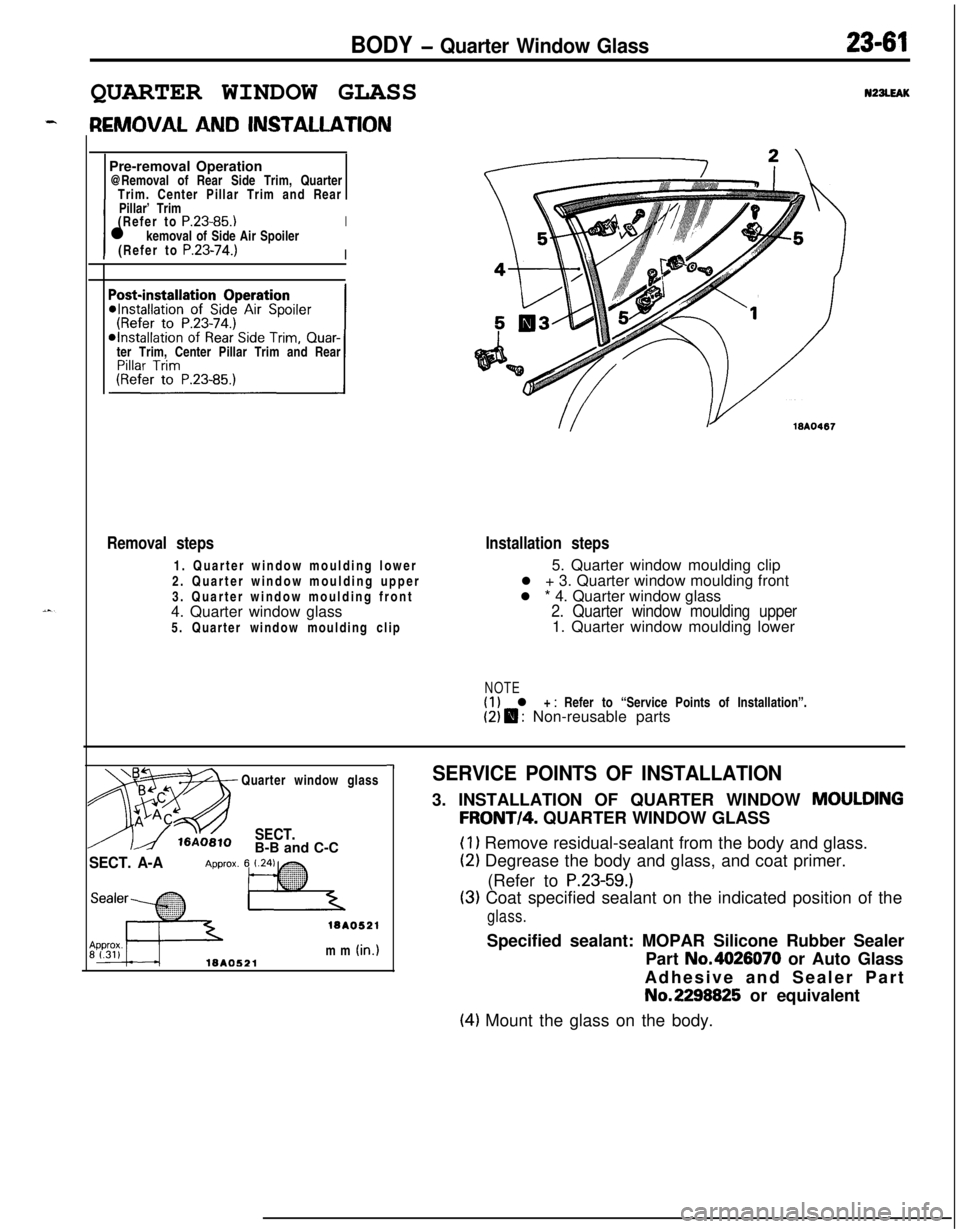
BODY - Quarter Window Glass23-61QUARTER WINDOW GLASS
N22LEAKPre-removal Operation
@Removal of Rear Side Trim, Quarter
Trim. Center Pillar Trim and Rear
IPillar’ Trim
I(Refer to
P.23-85.)l kemoval of Side Air SpoilerI(Refer to
P.23-74.)Iter Trim, Center Pillar Trim and Rear
Removal steps1. Quarter window moulding lower
2. Quarter window moulding upper
3. Quarter window moulding front
4. Quarter window glass
5. Quarter window moulding clipInstallation steps5. Quarter window moulding clip
l + 3. Quarter window moulding front
l * 4. Quarter window glass
2. Quarter window moulding upper1. Quarter window moulding lower
NOTE(1) l + : Refer to “Service Points of Installation”.(2) $ : Non-reusable parts
Quarter window glass
SECT.B-B and C-C
SECT. A-A
18AO521mm
(in.)18AO521
-ISERVICE POINTS OF INSTALLATION3. INSTALLATION OF QUARTER WINDOW
MOULDING
FRONT/4. QUARTER WINDOW GLASS
(1) Remove residual-sealant from the body and glass.
(2) Degrease the body and glass, and coat primer.
(Refer to
P.23-59.)
(3) Coat specified sealant on the indicated position of the
glass.Specified sealant: MOPAR Silicone Rubber Sealer
Part No.4626070 or Auto Glass
Adhesive and Sealer PartNo.2298825 or equivalent
(4) Mount the glass on the body.
Page 1106 of 1216
23-62BODY - Liftgate Window Glass
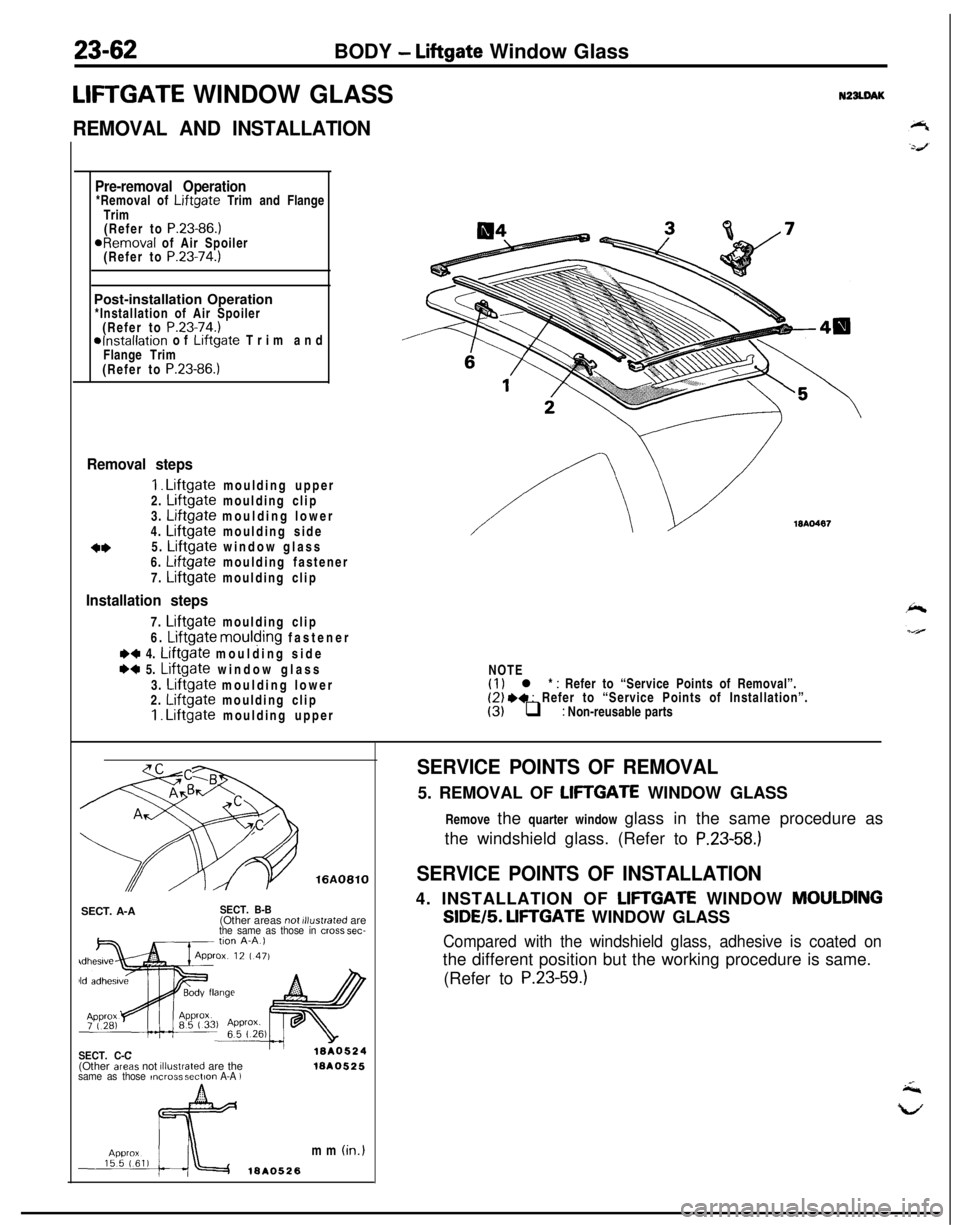
LIFTGATE WINDOW GLASSN22LDAK
REMOVAL AND INSTALLATION
Pre-removal Operation*Removal of Liftgate Trim and Flange
Trim
(Refer to
P.23-86.)aRemoval of Air Spoiler
(Refer to P.23-74.)Post-installation Operation
*Installation of Air Spoiler
(Refer to
P.23-74.)*Installation of Liftgate Trim and
Flange Trim
(Refer to
P.23-86.)
I
Removal steps
I. Liftgate moulding upper
2. Liftgate moulding clip
3. Liftgate moulding lower
4. Liftgate moulding side
o*5. Liftgate window glass
6. Liftgate moulding fastener
7.
Liftgate moulding clip
Installation steps7.
Liftgate moulding clip
6.
Liftgate moulding fastener
M 4. Liftgate moulding side
w 5. Liftgate window glass
3.
Liftgate moulding lower
2. Liftgate moulding clip1. Liftgate moulding upper
WA0487NOTE
(1) l * : Refer to “Service Points of Removal”.(2) .+ : Refer to “Service Points of Installation”.(3) q : Non-reusable parts
SECT. A-A
SECT. B-B(Other areas not illustrated arethe same as those in cmss sec-
SECT. C-C(Other areas not illustrated are thesame as those ,ncrms sectmn A-A )1ar40525mm
(in.)
ISA0526
SERVICE POINTS OF REMOVAL5. REMOVAL OF
LIFTGATE WINDOW GLASS
Remove the quarter window glass in the same procedure as
the windshield glass. (Refer to
P.23-58.)
SERVICE POINTS OF INSTALLATION4. INSTALLATION OF
LIFTGATE WINDOW MOULDINGSIDE/5.
LIFTGATE WINDOW GLASS
Compared with the windshield glass, adhesive is coated onthe different position but the working procedure is same.
(Refer to
P.23-59.)
Page 1109 of 1216
BODY - Door Trim and Waterproof Film2345
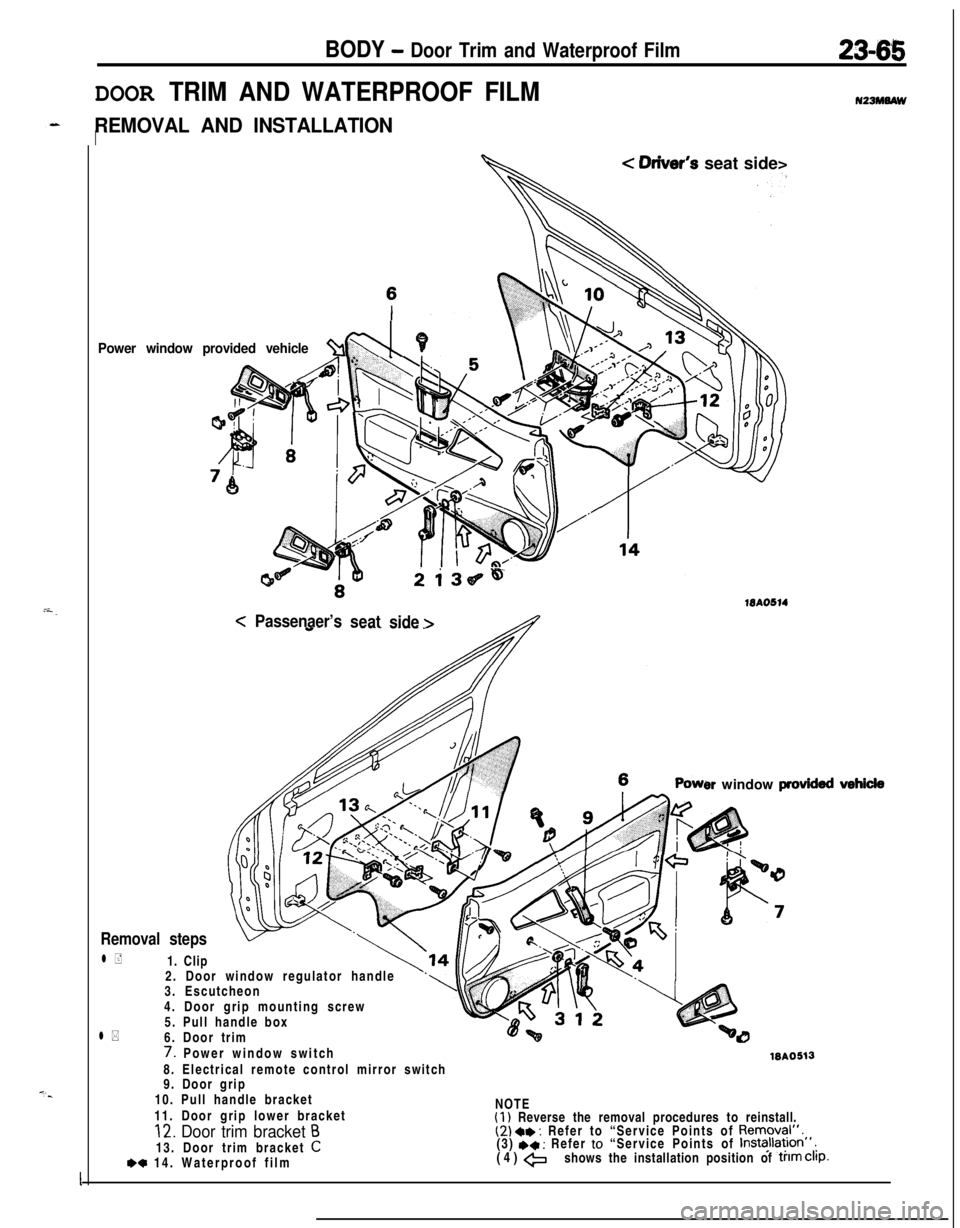
DOOR TRIM AND WATERPROOF FILM
REMOVAL AND INSTALLATIONI
Power window provided vehicle%l \PL
< Oriver’s seat side>
2i36~4
15AO514<
Passenaer’s
seat
side >
er window provkkd
Removal steps2. Door window regulator handle
3. Escutcheon
4. Door grip mounting screw
5. Pull handle box
l *6. Door trim
l +1. Clip
7. Power window switchWA05138. Electrical remote control mirror switch
9. Door grip
10. Pull handle bracket
11. Door grip lower bracketNOTE
(1) Reverse the removal procedures to reinstall.12. Door trim bracket B(2) a* : Refer to “Service Points of Removal”.13. Door trim bracket
C(3) +* : Refer to “Service Points of Installa~lon”,
*c 14. Waterproof film(4) +shows the installation position of trim Clip.
I
Page 1110 of 1216
23-66BODY - Door Trim and Waterproof Film/Door Glass and Regulator
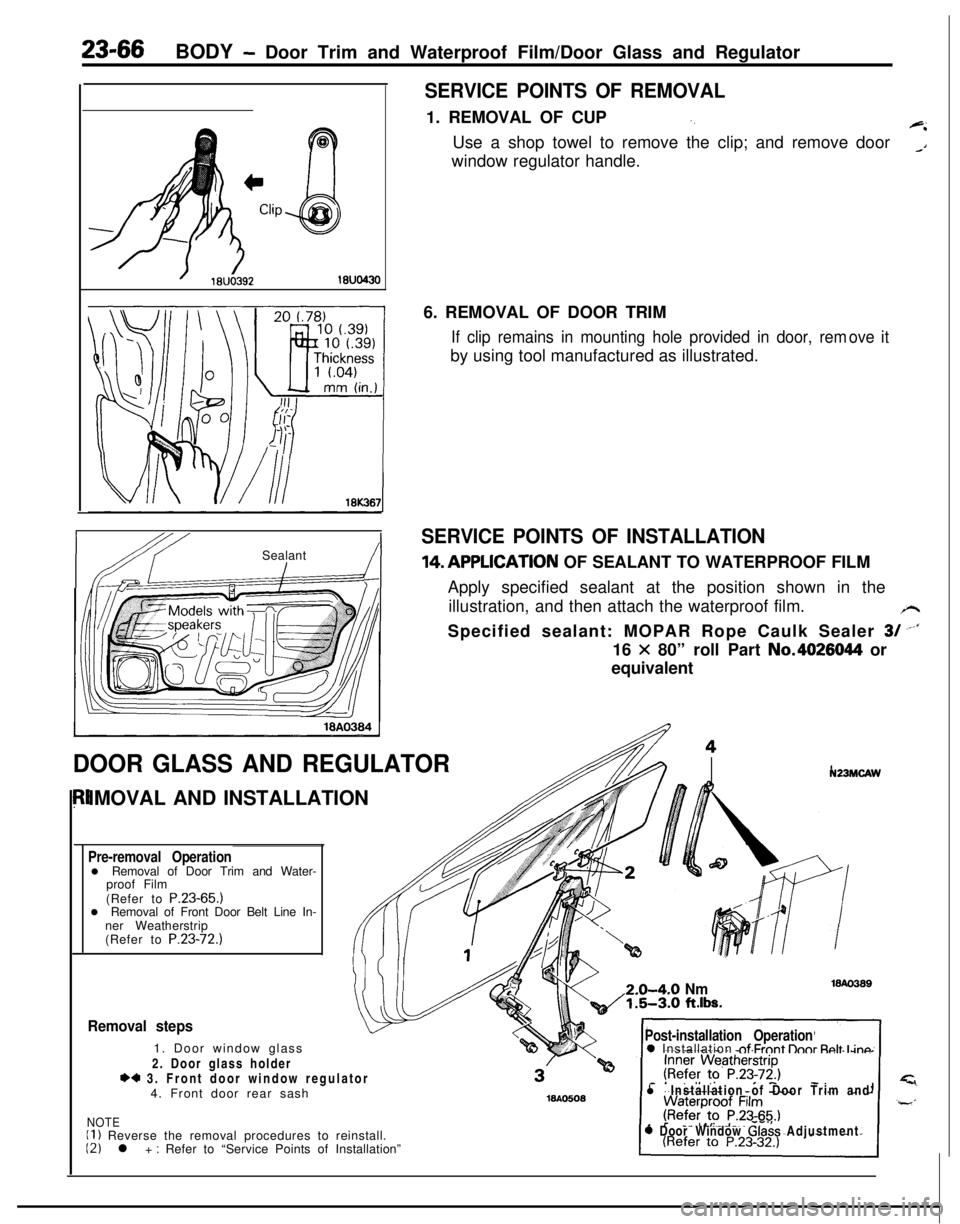
SERVICE POINTS OF REMOVAL1. REMOVAL OF CUP
‘.+iUse a shop towel to remove the clip; and remove door
_Awindow regulator handle.
IbY ISealant!I6. REMOVAL OF DOOR TRIM
If clip remains in mounting hole provided in door, remby using tool manufactured as illustrated.ove it
SERVICE POINTS OF INSTALLATION14,APPLlCATlON OF SEALANT TO WATERPROOF FILM
Apply specified sealant at the position shown in the
illustration, and then attach the waterproof film.
/rSpecified sealant: MOPAR Rope Caulk Sealer
3/ --‘I16
X 80” roll Part No.4026044 or
equivalent
DOOR GLASS AND REGULATORIMOVAL AND INSTALLATION
Pre-removal Operationl Removal of Door Trim and Water-
proof Film
(Refer to P.23-65.)
l Removal of Front Door Belt Line In-
ner Weatherstrip
(Refer to P.23-72.)
N23MCAW2.0-4-O
Nm1.5-3.0 ft.lbs.
Removal steps1. Door window glass
2. Door glass holder
*4 3. Front door window regulator
4. Front door rear sash
NOTEII ) Reverse the removal procedures to reinstall.12) l + : Refer to “Service Points of Installation”
Post-installation Operation0 Installation nf Frnnt lhnr Rnlt I inn
l Installation of Door Trim and
0 Door Window Glass Adjustment
Page 1111 of 1216
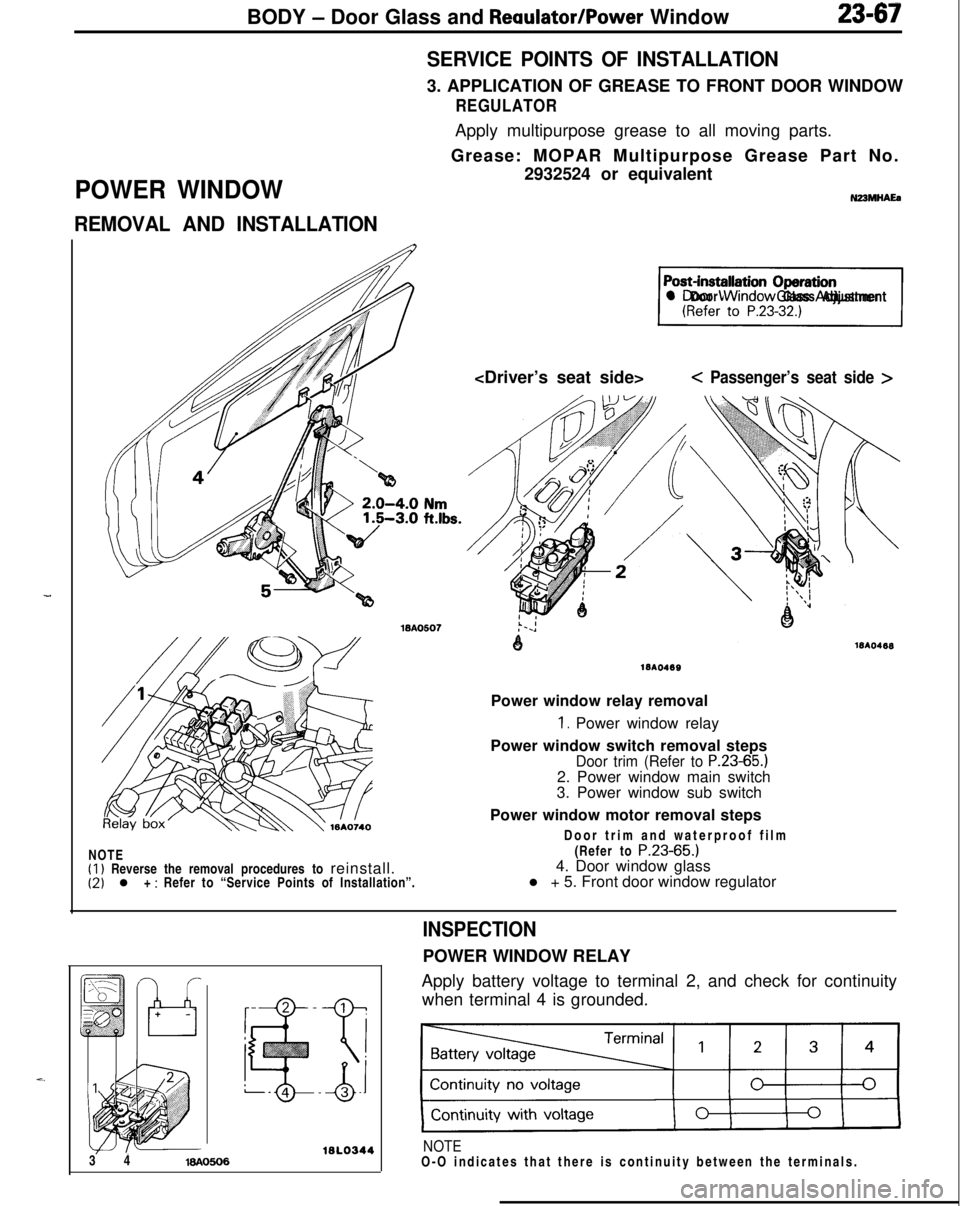
BODY - Door Glass and Reaulator/Power Window23-67
POWER WINDOW
REMOVAL AND INSTALLATIONSERVICE POINTS OF INSTALLATION3. APPLICATION OF GREASE TO FRONT DOOR WINDOW
REGULATORApply multipurpose grease to all moving parts.
Grease: MOPAR Multipurpose Grease Part No.
2932524 or equivalent
N23MHAEa
71l Door Window Glass Adjustment
< Passenger’s seat side >NOTE
(1) Reverse the removal procedures to reinstall.(2) l + : Refer to “Service Points of Installation”.
1810469Power window relay removal
1. Power window relay
Power window switch removal steps
Door trim (Refer to P.23-65.)2. Power window main switch
3. Power window sub switch
Power window motor removal steps
Door trim and waterproof film
(Refer to
P.23-65.)4. Door window glass
l + 5. Front door window regulator
16l.03443 416AO606
INSPECTIONPOWER WINDOW RELAY
Apply battery voltage to terminal 2, and check for continuity
when terminal 4 is grounded.
NOTEO-O indicates that there is continuity between the terminals.
Page 1112 of 1216
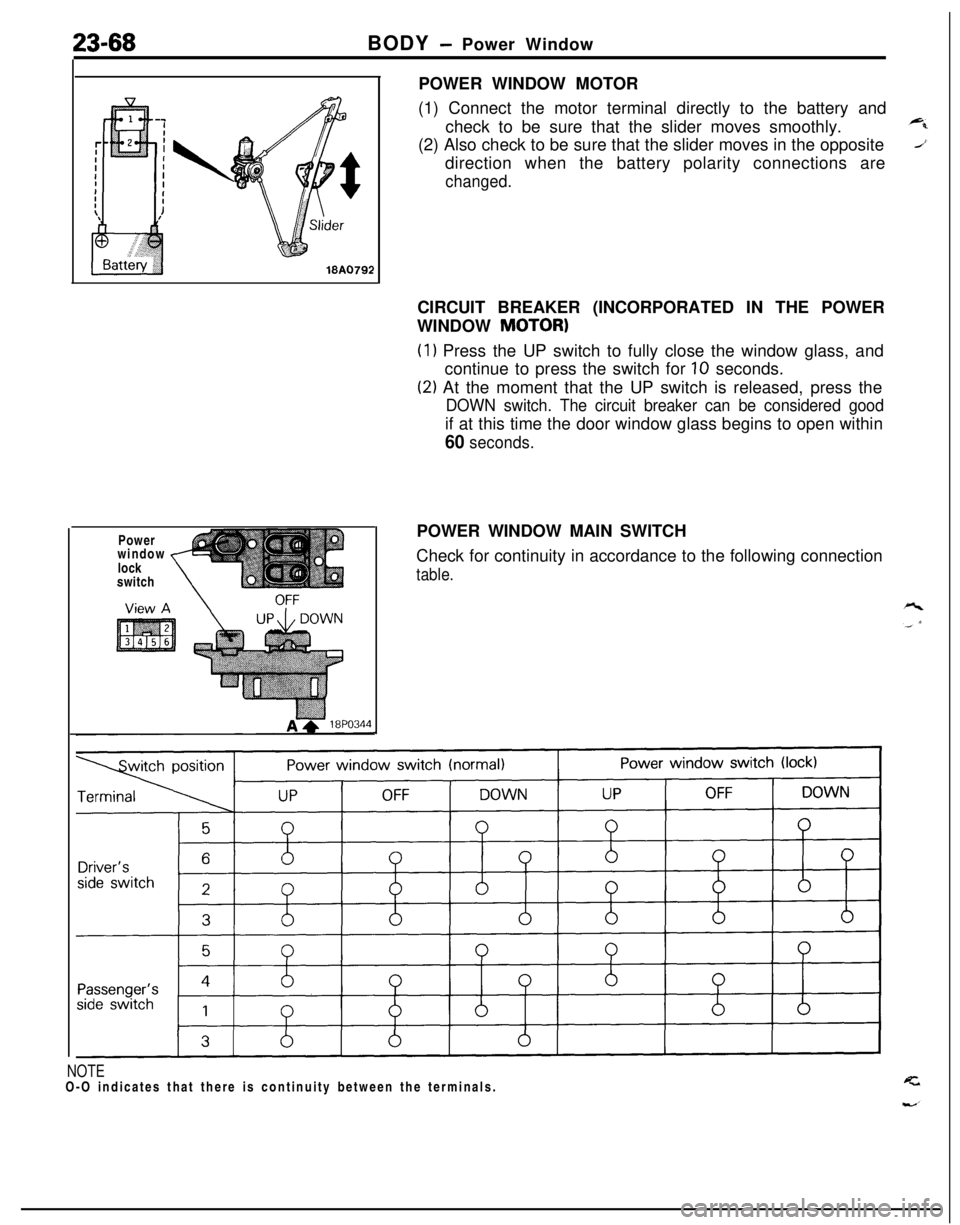
23-68BODY - Power Window
Power
window
lock
switch
,POWER WINDOW MOTOR
(1) Connect the motor terminal directly to the battery and
check to be sure that the slider moves smoothly.
(2) Also check to be sure that the slider moves in the opposite
direction when the battery polarity connections are
changed.CIRCUIT BREAKER (INCORPORATED IN THE POWER
WINDOW
MOTOR)
(1) Press the UP switch to fully close the window glass, and
continue to press the switch for
10 seconds.
(2) At the moment that the UP switch is released, press the
DOWN switch. The circuit breaker can be considered goodif at this time the door window glass begins to open within
60 seconds.POWER WINDOW MAIN SWITCH
Check for continuity in accordance to the following connection
table.
NOTEO-O indicates that there is continuity between the terminals.