radiator MITSUBISHI ECLIPSE 1991 Owner's Guide
[x] Cancel search | Manufacturer: MITSUBISHI, Model Year: 1991, Model line: ECLIPSE, Model: MITSUBISHI ECLIPSE 1991Pages: 1216, PDF Size: 67.42 MB
Page 716 of 1216
21-22MANUAL TRANSAXLE
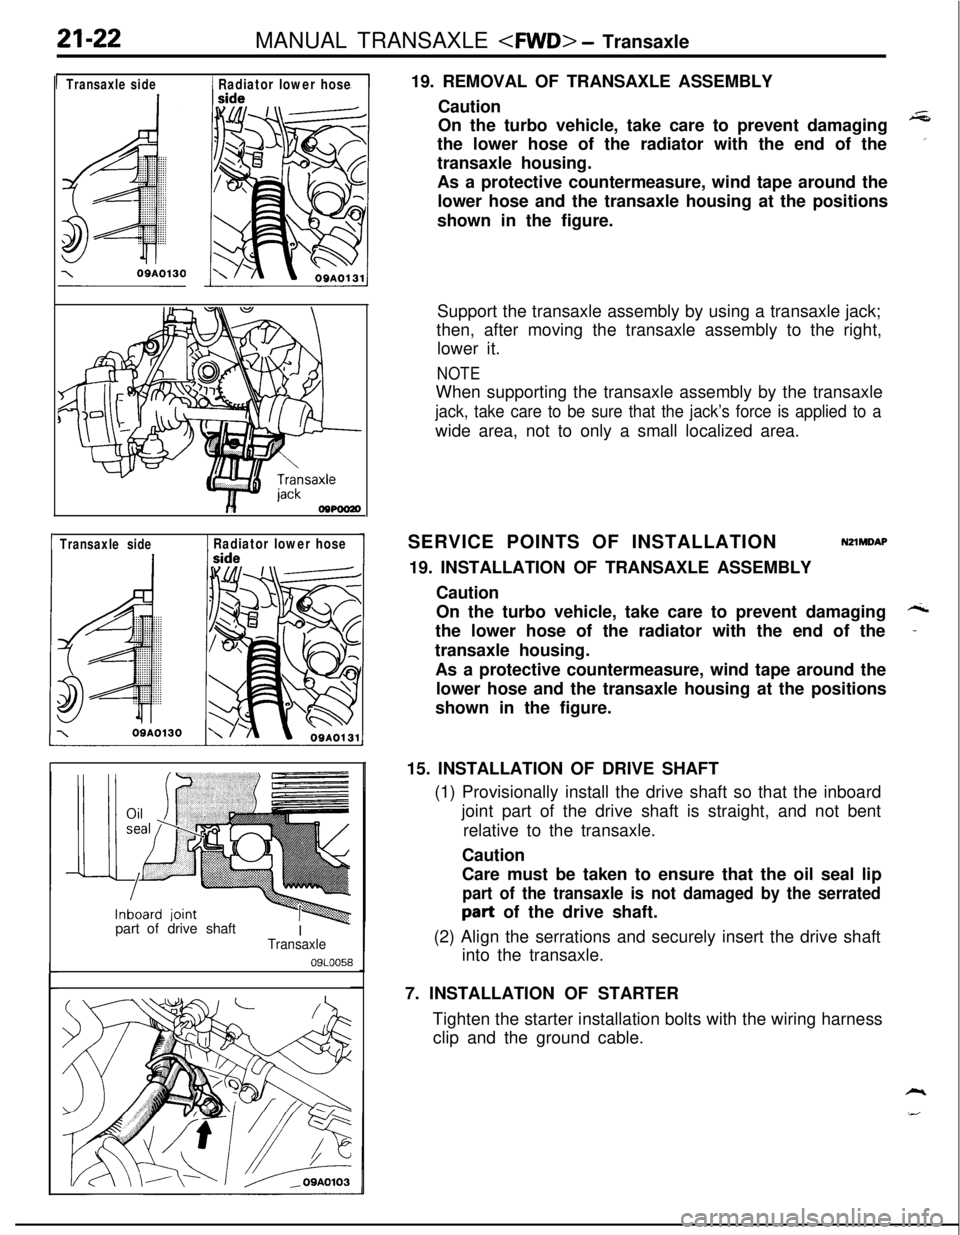
1 Transaxleside1 Radiator lower hose
1 Transaxle side1 Radiator lower hosepart ofdrive shaft
I
-Transaxle
09LOO5819. REMOVAL OF TRANSAXLE ASSEMBLY
Caution
On the turbo vehicle, take care to prevent damaging
+Gthe lower hose of the radiator with the end of the
’transaxle housing.
As a protective countermeasure, wind tape around the
lower hose and the transaxle housing at the positions
shown in the figure.
Support the transaxle assembly by using a transaxle jack;
then, after moving the transaxle assembly to the right,
lower it.
NOTEWhen supporting the transaxle assembly by the transaxle
jack, take care to be sure that the jack’s force is applied to awide area, not to only a small localized area.
SERVICE POINTS OF INSTALLATION
NZlMDAP19. INSTALLATION OF TRANSAXLE ASSEMBLY
Caution
On the turbo vehicle, take care to prevent damaging
Athe lower hose of the radiator with the end of the
-transaxle housing.
As a protective countermeasure, wind tape around the
lower hose and the transaxle housing at the positions
shown in the figure.
15. INSTALLATION OF DRIVE SHAFT
(1) Provisionally install the drive shaft so that the inboard
joint part of the drive shaft is straight, and not bent
relative to the transaxle.
Caution
Care must be taken to ensure that the oil seal lip
part of the transaxle is not damaged by the serratedpart of the drive shaft.
(2) Align the serrations and securely insert the drive shaft
into the transaxle.
7. INSTALLATION OF STARTER
Tighten the starter installation bolts with the wiring harness
clip and the ground cable.
Page 917 of 1216
AUTOMATIC TRANSAXLE - Transaxle Oil Cooler Hoses2 I*-223TRANSAXLE OIL COOLER HOSES
NZlSA-A
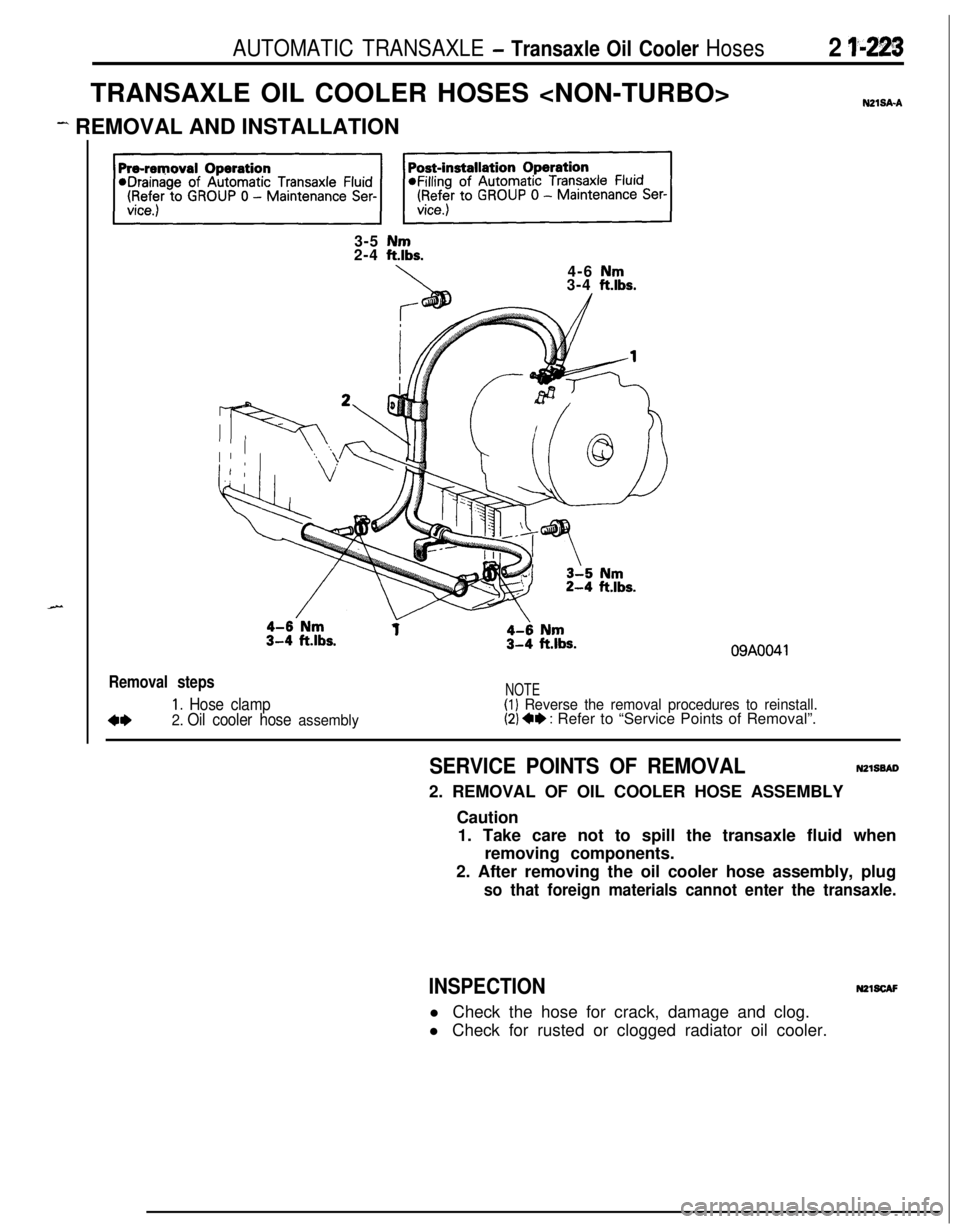
- REMOVAL AND INSTALLATION
3-5
Nm2-4 ftlbs.
4-6
Nm3-4 ftlbs.
09AOO41
Removal steps
1. Hose clamp
4*2. Oil cooler hose assembly
NOTE(1) Reverse the removal procedures to reinstall.(2) 4e : Refer to “Service Points of Removal”.
SERVICE POINTS OF REMOVALNZISSAD2. REMOVAL OF OIL COOLER HOSE ASSEMBLY
Caution
1. Take care not to spill the transaxle fluid when
removing components.
2. After removing the oil cooler hose assembly, plug
so that foreign materials cannot enter the transaxle.
INSPECTIONm1scAFl Check the hose for crack, damage and clog.
l Check for rusted or clogged radiator oil cooler.
Page 918 of 1216
21-224AUTOMATIC TRANSAXLE - Transaxle Oil Cooler
TRANSAXLE OIL COOLER
REMOVAL AND INSTALLATION
OQA01691
30-35 Nm
22-25 ft.lbs.
/I1’
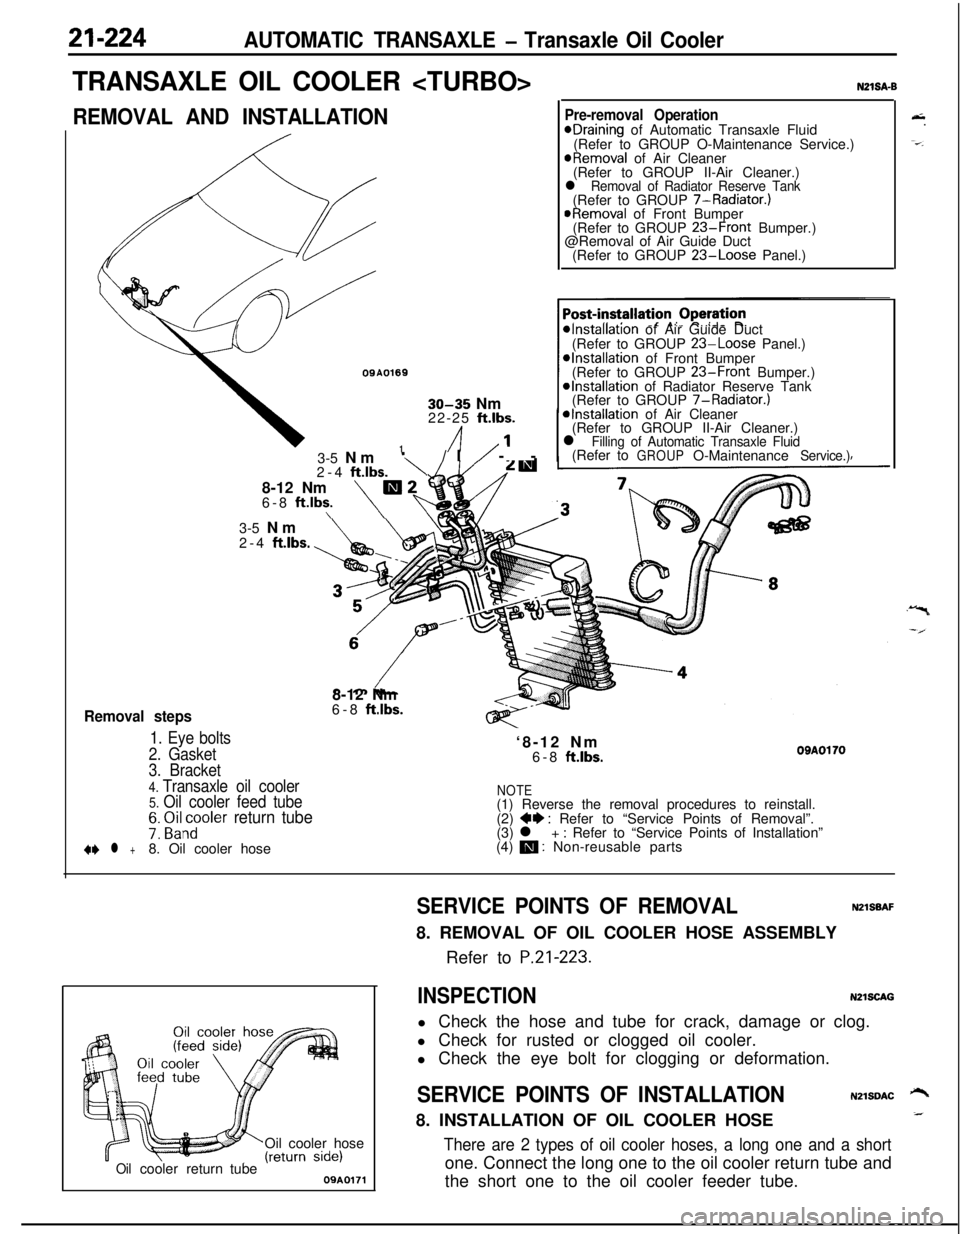
Removal steps
1. Eye bolts
2. Gasket3-5 Nm
‘\/I/ --
2-4
ftlbs.8-12 Nm
m26-8 ft.lbs.\\
N21SA-B
Pre-removal OperationeDraining of Automatic Transaxle Fluid
(Refer to GROUP O-Maintenance Service.)
@Removal of Air Cleaner
(Refer to GROUP II-Air Cleaner.)
l Removal of Radiator Reserve Tank(Refer to GROUP 7-Radiator.)
@Removal of Front Bumper
(Refer to GROUP 23-Front Bumper.)
@Removal of Air Guide Duct
(Refer to GROUP
23-Loose Panel.)
*Installation of Air Guide Duct
(Refer to GROUP 23-Loose Panel.)*Installation of Front Bumper
(Refer to GROUP 23-Front Bumper.)@Installation of Radiator Reserve Tank
(Refer to GROUP 7-Radiator.)
*Installation of Air Cleaner
(Refer to GROUP II-Air Cleaner.)
l Filling of Automatic Transaxle Fluid(Refer toGROUPO-MaintenanceService.)3-5 Nm
2-4
ftlbs.8-12 Nm
6-8
ft.lbs.‘8-12 Nm
6-8
ftlbs.OBAOl703. Bracket
4. Transaxle oil cooler5. Oil cooler feed tubeNOTE(1) Reverse the removal procedures to reinstall.
7: ~i&~oler return tube(2) ++ : Refer to “Service Points of Removal”.
(3) l + : Refer to “Service Points of Installation”
+e l +8. Oil cooler hose(4) m : Non-reusable parts
Oil cooler hose
Oilcoolerreturn tube09A0171
&.
-=-.
SERVICE POINTS OF REMOVALNZlSBAF8. REMOVAL OF OIL COOLER HOSE ASSEMBLY
Refer to
P.21-223.
INSPECTIONN2lSCAGl Check the hose and tube for crack, damage or clog.
l Check for rusted or clogged oil cooler.
l Check the eye bolt for clogging or deformation.
SERVICE POINTS OF INSTALLATIONN2lSDAC ‘-+8. INSTALLATION OF OIL COOLER HOSE_
There are 2 types of oil cooler hoses, a long one and a shortone. Connect the long one to the oil cooler return tube and
the short one to the oil cooler feeder tube.
Page 1157 of 1216
HEATERS AND AIR CONDITIONING - Service Adjustment Procedures 249*I3
--Air-therm0
sensor
Air inlet
sensor
E>aporator(3)
Set the gauge manifold in place and check whether or not
the pressure at the high-pressure side has become the
dual-pressure switch activation pressure.
(4) Replace the switch if, under ordinary conditions, there is no
continuity.Caution
The condition can be considered to be satisfactory if
there is continuity.
Never increase the pressure in a deliberate attempt to
obtain an abnormally high temperature, because to do
so risks blowing the compressor relief valve.AIR-THERM0 SENSOR AND AIR-INLET SENSOR
If frost forms on the surfaces of the evaporator fins, the cause
might be a malfunction of
air-therm0 sensor.
The temperature of the air-flowing from the evaporator’s outlet
is sensed by the thermistor, and the signals conveying this dataare input to the air conditioner control unit, thus switching the
compressor’s clutch ON or OFF.
This functions when the evaporator’s air-flow is low, or the
evaporator’s fins are clogged by dust, etc., or when the amountof refrigerant is insufficient.
These sensors detect the temperature within the passenger
compartment and the temperature at the cooling unit inlet,
thus causing changes of the resistance value, and this data is
provided to the air conditioner control unit as input.
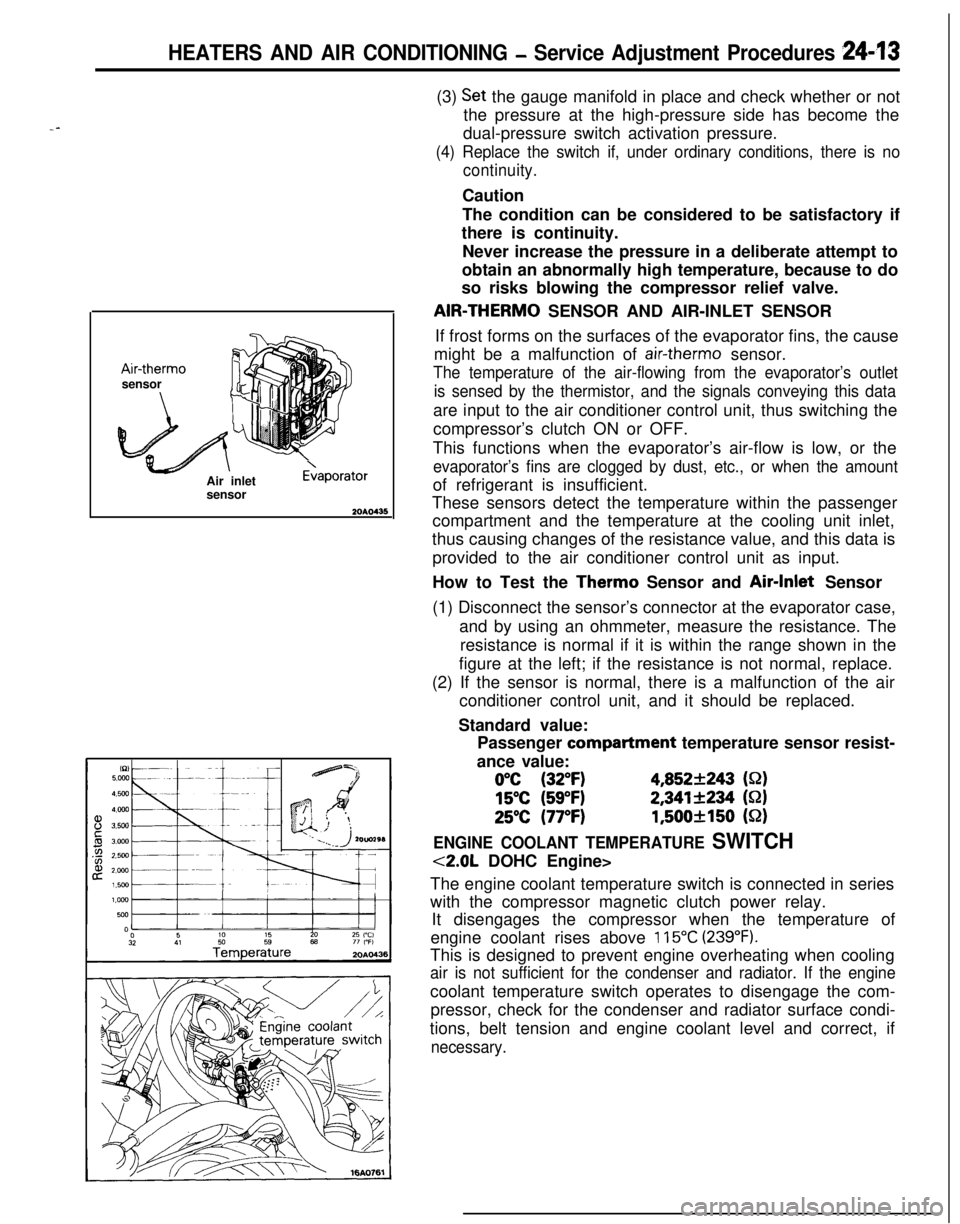
How to Test the Therm0 Sensor and Air-Inlet Sensor
(1) Disconnect the sensor’s connector at the evaporator case,
and by using an ohmmeter, measure the resistance. The
resistance is normal if it is within the range shown in the
figure at the left; if the resistance is not normal, replace.
(2) If the sensor is normal, there is a malfunction of the air
conditioner control unit, and it should be replaced.
Standard value:
Passenger compartment temperature sensor resist-
ance value:
0°C (32°F)4,852+243 (S-2)
15°C (59°F)2,341+234 (S-2)
25°C (77°F)1,500+150 (52)
ENGINE COOLANT TEMPERATURE SWITCH
<2.0L DOHC Engine>
The engine coolant temperature switch is connected in series
with the compressor magnetic clutch power relay.
It disengages the compressor when the temperature of
engine coolant rises above
115°C (239°F).This is designed to prevent engine overheating when cooling
air is not sufficient for the condenser and radiator. If the enginecoolant temperature switch operates to disengage the com-
pressor, check for the condenser and radiator surface condi-
tions, belt tension and engine coolant level and correct, if
necessary.
Page 1189 of 1216
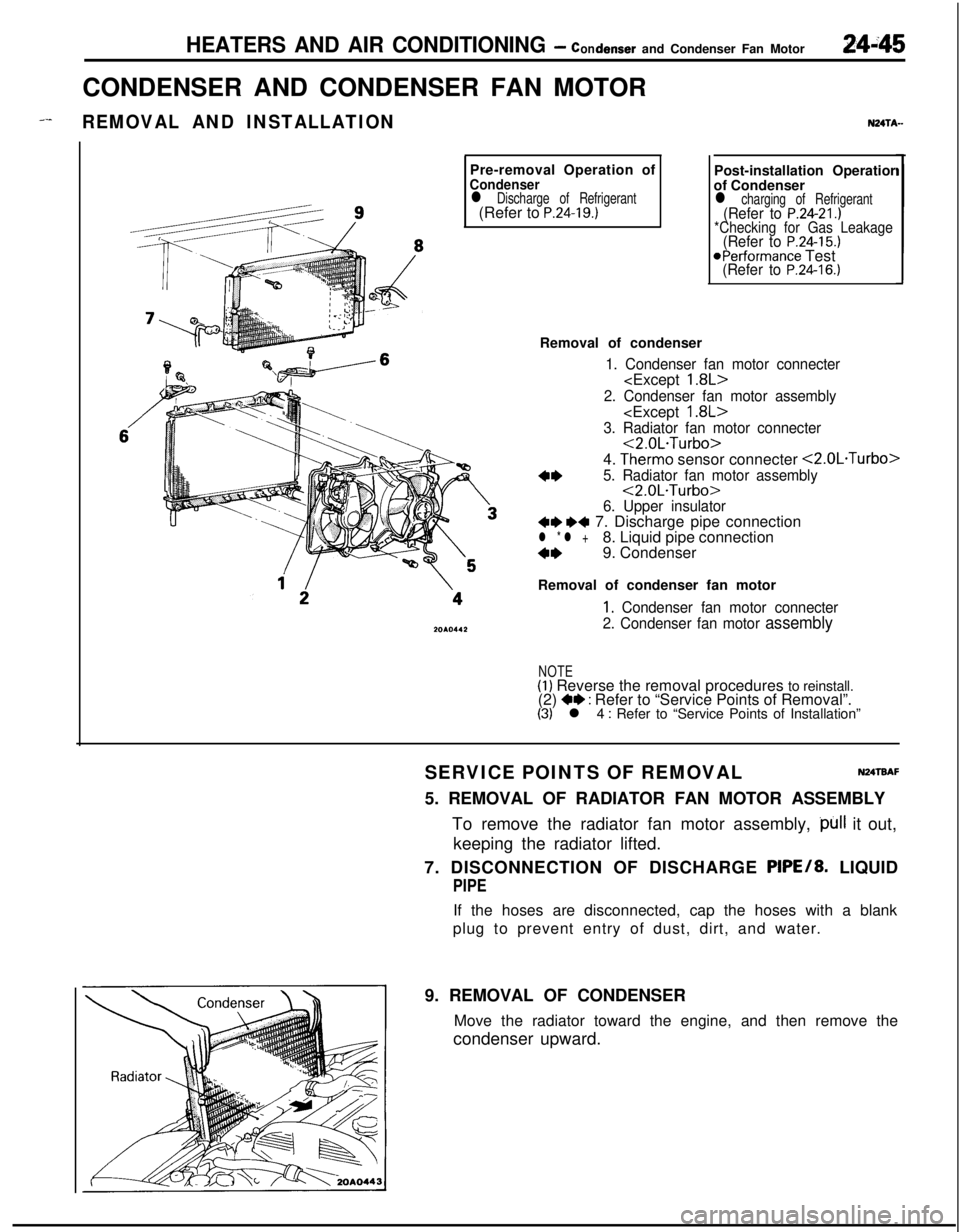
HEATERS AND AIR CONDITIONING - condenser and Condenser Fan Motor24i45CONDENSER AND CONDENSER FAN MOTOR
_--REMOVAL AND INSTALLATIONPre-removal Operation of
Condenserl Discharge of Refrigerant(Refer to P.24-19.)
NZITA-Post-installation Operatior
of Condenser
l charging of Refrigerant(Refer to P.24-21.)*Checking for Gas Leakage(Refer to P.24-15.)@Performance Test(Refer to P.24-16.)Removal of condenser
1. Condenser fan motor connecter
2. Condenser fan motor assembly
3. Radiator fan motor connecter<2.0L.Turbo>
4.
Therm0 sensor connecter <2.0L.Turbo>
4*5. Radiator fan motor assembly<2.0L.Turbo>
6. Upper insulator+e ~~ 7. Discharge pipe connectionl * l +8. Liquid pipe connection
4*9. Condenser
Removal of condenser fan motor
1, Condenser fan motor connecter
2. Condenser fan motor
assembly
NOTE(1) Reverse the removal procedures to reinstall.
(2) +e : Refer to “Service Points of Removal”.(3) l 4 : Refer to “Service Points of Installation”
SERVICE POINTS OF REMOVAL
N24TBAF5. REMOVAL OF RADIATOR FAN MOTOR ASSEMBLY
To remove the radiator fan motor assembly,
)~ll it out,
keeping the radiator lifted.
7. DISCONNECTION OF DISCHARGE PIPE/8. LIQUID
PIPEIf the hoses are disconnected, cap the hoses with a blank
plug to prevent entry of dust, dirt, and water.
9. REMOVAL OF CONDENSER
Move the radiator toward the engine, and then remove the
condenser upward.