MITSUBISHI GRANDIS 2008 Owner's Manual (in English)
Manufacturer: MITSUBISHI, Model Year: 2008, Model line: GRANDIS, Model: MITSUBISHI GRANDIS 2008Pages: 458, PDF Size: 18.52 MB
Page 331 of 458
For emergencies
6-19
6
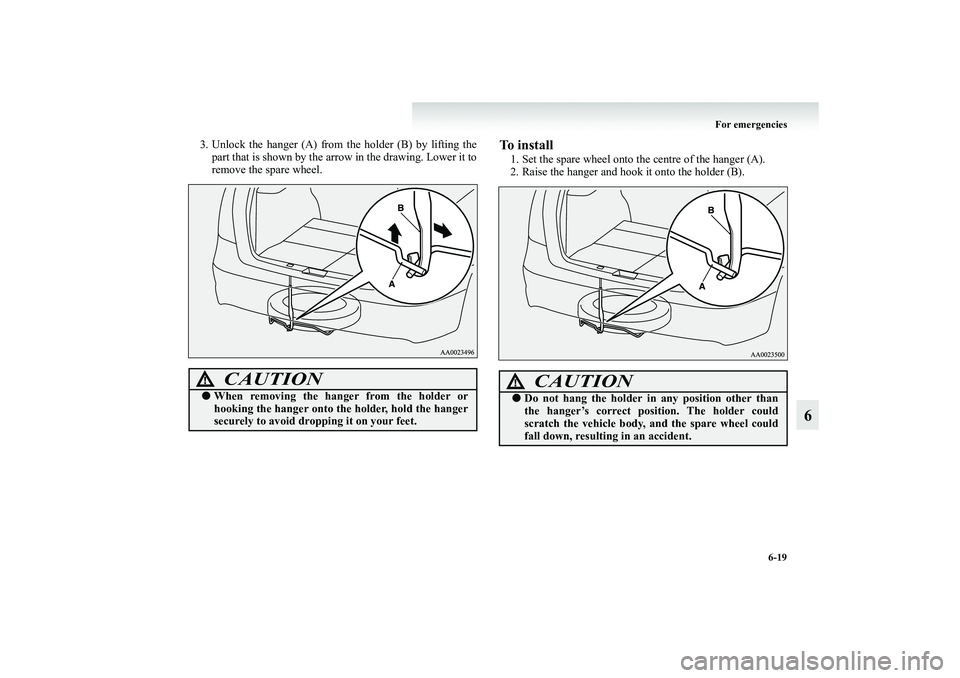
3. Unlock the hanger (A) from the holder (B) by lifting the
part that is shown by the arrow in the drawing. Lower it to
remove the spare wheel.
To install1. Set the spare wheel onto the centre of the hanger (A).
2. Raise the hanger and hook it onto the holder (B).
CAUTION
!●When removing the hanger from the holder or
hooking the hanger onto the holder, hold the hanger
securely to avoid dropping it on your feet.
CAUTION
!●Do not hang the holder in any position other than
the hanger’s correct position. The holder could
scratch the vehicle body, and the spare wheel could
fall down, resulting in an accident.
BK-XP08E1ENUK.en-uk.book Page 19 Monday, August 13, 2007 2:20 PM
Page 332 of 458
6-20 For emergencies
6
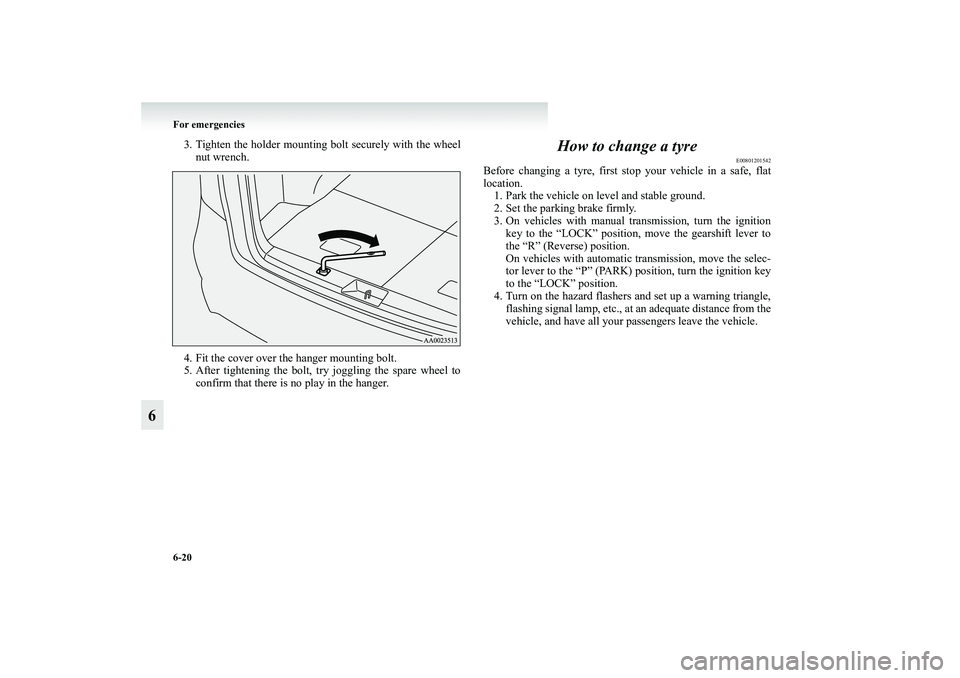
3. Tighten the holder mounting bolt securely with the wheel
nut wrench.
4. Fit the cover over the hanger mounting bolt.
5. After tightening the bolt, try joggling the spare wheel to
confirm that there is no play in the hanger.
How to change a tyre
E00801201542
Before changing a tyre, first stop your vehicle in a safe, flat
location.
1. Park the vehicle on level and stable ground.
2. Set the parking brake firmly.
3. On vehicles with manual transmission, turn the ignition
key to the “LOCK” position, move the gearshift lever to
the “R” (Reverse) position.
On vehicles with automatic transmission, move the selec-
tor lever to the “P” (PARK) position, turn the ignition key
to the “LOCK” position.
4. Turn on the hazard flashers and set up a warning triangle,
flashing signal lamp, etc., at an adequate distance from the
vehicle, and have all your passengers leave the vehicle.
BK-XP08E1ENUK.en-uk.book Page 20 Monday, August 13, 2007 2:20 PM
Page 333 of 458
For emergencies
6-21
6
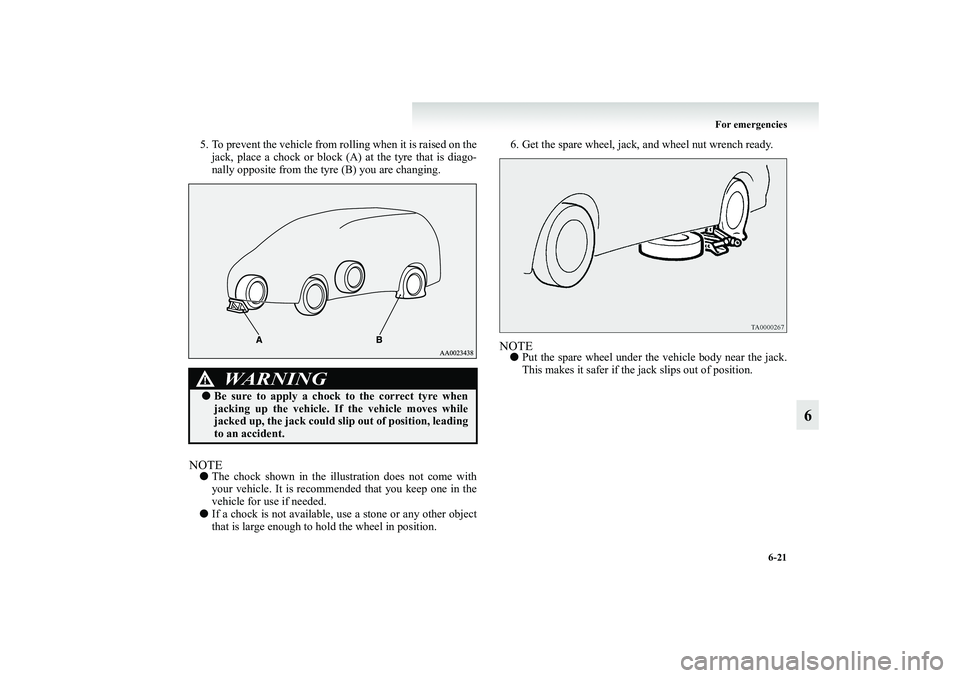
5. To prevent the vehicle from rolling when it is raised on the
jack, place a chock or block (A) at the tyre that is diago-
nally opposite from the tyre (B) you are changing.NOTE●The chock shown in the illustration does not come with
your vehicle. It is recommended that you keep one in the
vehicle for use if needed.
●If a chock is not available, use a stone or any other object
that is large enough to hold the wheel in position.6. Get the spare wheel, jack, and wheel nut wrench ready.
NOTE●Put the spare wheel under the vehicle body near the jack.
This makes it safer if the jack slips out of position.
WARNING
!●Be sure to apply a chock to the correct tyre when
jacking up the vehicle. If the vehicle moves while
jacked up, the jack could slip out of position, leading
to an accident.
BK-XP08E1ENUK.en-uk.book Page 21 Monday, August 13, 2007 2:20 PM
Page 334 of 458
6-22 For emergencies
6
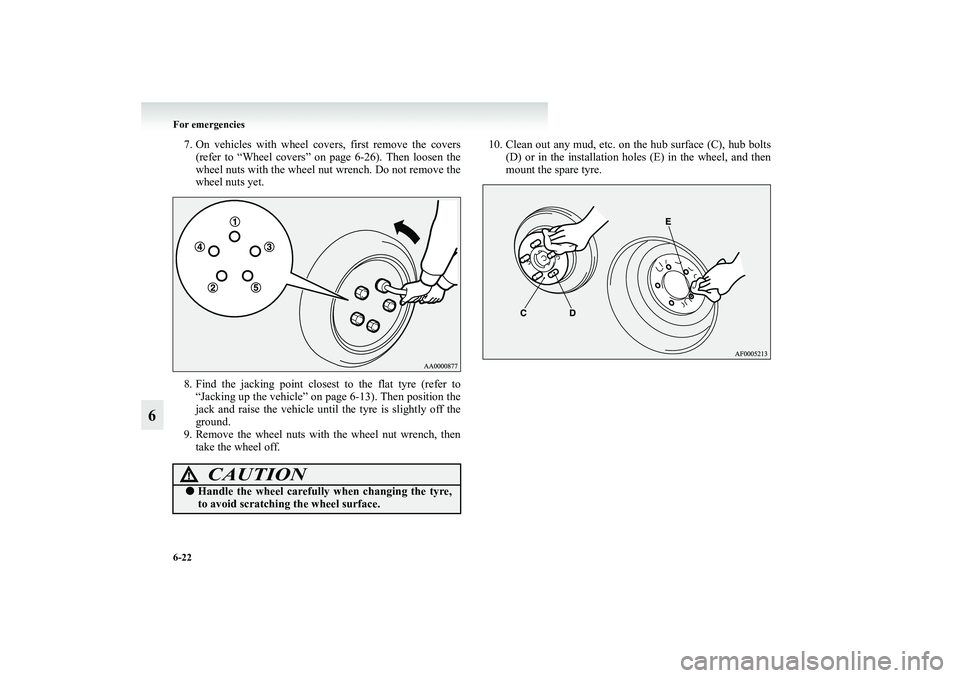
7. On vehicles with wheel covers, first remove the covers
(refer to “Wheel covers” on page 6-26). Then loosen the
wheel nuts with the wheel nut wrench. Do not remove the
wheel nuts yet.
8. Find the jacking point closest to the flat tyre (refer to
“Jacking up the vehicle” on page 6-13). Then position the
jack and raise the vehicle until the tyre is slightly off the
ground.
9. Remove the wheel nuts with the wheel nut wrench, then
take the wheel off.10. Clean out any mud, etc. on the hub surface (C), hub bolts
(D) or in the installation holes (E) in the wheel, and then
mount the spare tyre.
CAUTION
!●Handle the wheel carefully when changing the tyre,
to avoid scratching the wheel surface.
BK-XP08E1ENUK.en-uk.book Page 22 Monday, August 13, 2007 2:20 PM
Page 335 of 458
For emergencies
6-23
6
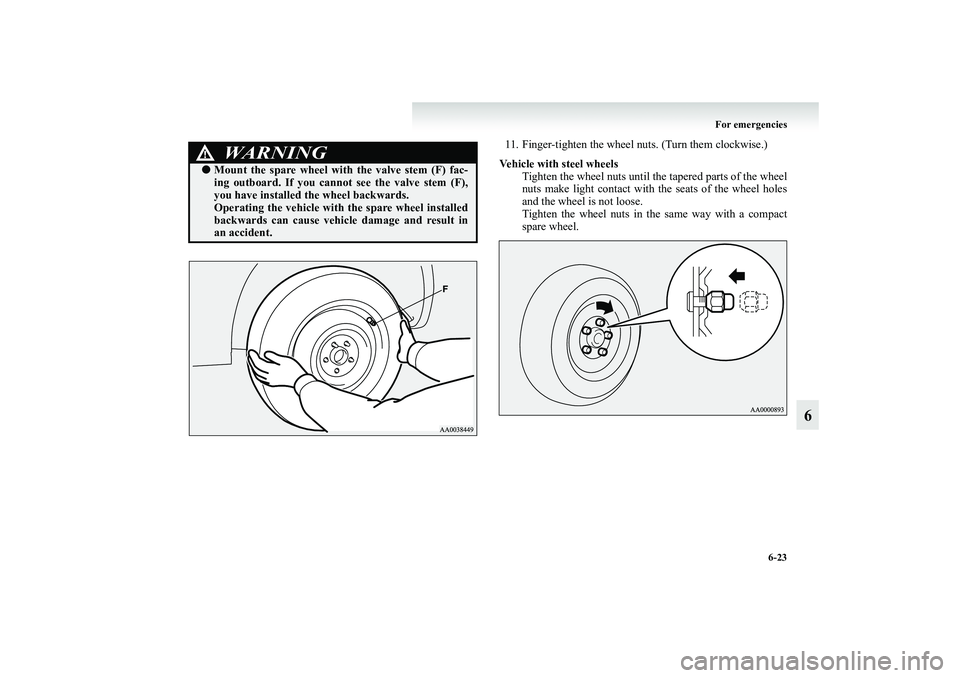
11. Finger-tighten the wheel nuts. (Turn them clockwise.)
Vehicle with steel wheels
Tighten the wheel nuts until the tapered parts of the wheel
nuts make light contact with the seats of the wheel holes
and the wheel is not loose.
Tighten the wheel nuts in the same way with a compact
spare wheel.
WARNING
!●Mount the spare wheel with the valve stem (F) fac-
ing outboard. If you cannot see the valve stem (F),
you have installed the wheel backwards.
Operating the vehicle with the spare wheel installed
backwards can cause vehicle damage and result in
an accident.
BK-XP08E1ENUK.en-uk.book Page 23 Monday, August 13, 2007 2:20 PM
Page 336 of 458
6-24 For emergencies
6
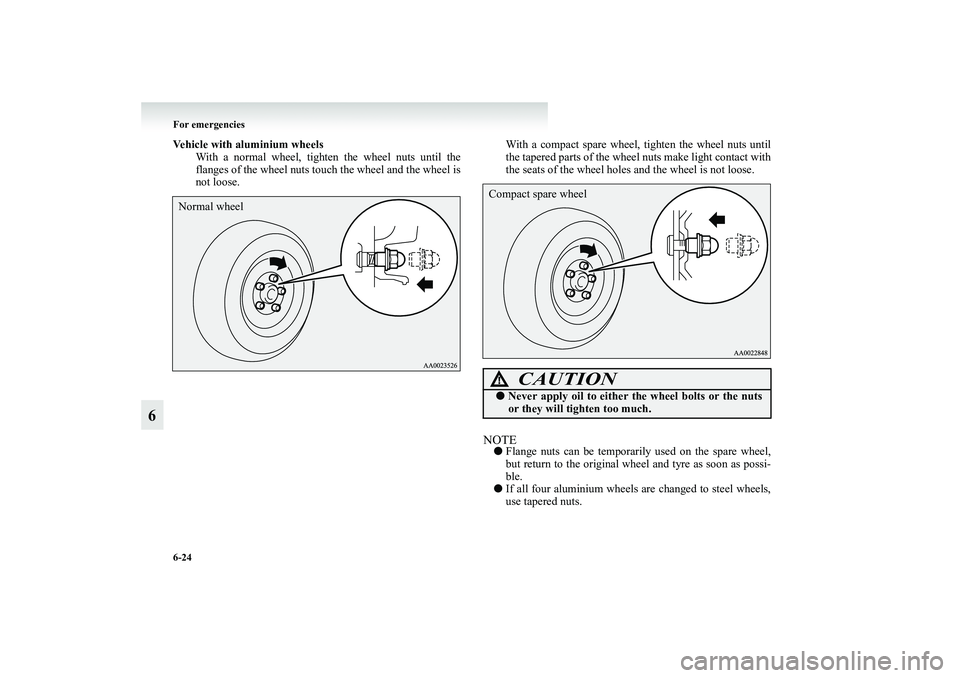
Vehicle with aluminium wheels
With a normal wheel, tighten the wheel nuts until the
flanges of the wheel nuts touch the wheel and the wheel is
not loose.With a compact spare wheel, tighten the wheel nuts until
the tapered parts of the wheel nuts make light contact with
the seats of the wheel holes and the wheel is not loose.
NOTE●Flange nuts can be temporarily used on the spare wheel,
but return to the original wheel and tyre as soon as possi-
ble.
●If all four aluminium wheels are changed to steel wheels,
use tapered nuts.
Normal wheel
CAUTION
!●Never apply oil to either the wheel bolts or the nuts
or they will tighten too much.Compact spare wheel
BK-XP08E1ENUK.en-uk.book Page 24 Monday, August 13, 2007 2:20 PM
Page 337 of 458
For emergencies
6-25
6
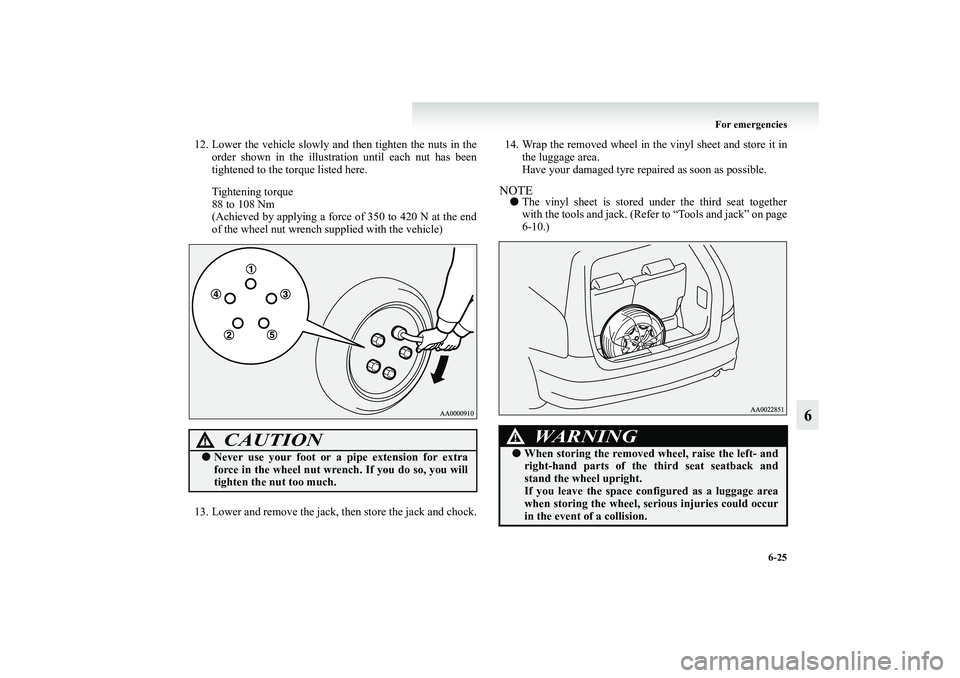
12. Lower the vehicle slowly and then tighten the nuts in the
order shown in the illustration until each nut has been
tightened to the torque listed here.
Tightening torque
88 to 108 Nm
(Achieved by applying a force of 350 to 420 N at the end
of the wheel nut wrench supplied with the vehicle)
13. Lower and remove the jack, then store the jack and chock.14. Wrap the removed wheel in the vinyl sheet and store it in
the luggage area.
Have your damaged tyre repaired as soon as possible.
NOTE●The vinyl sheet is stored under the third seat together
with the tools and jack. (Refer to “Tools and jack” on page
6-10.)
CAUTION
!●Never use your foot or a pipe extension for extra
force in the wheel nut wrench. If you do so, you will
tighten the nut too much.
WARNING
!●When storing the removed wheel, raise the left- and
right-hand parts of the third seat seatback and
stand the wheel upright.
If you leave the space configured as a luggage area
when storing the wheel, serious injuries could occur
in the event of a collision.
BK-XP08E1ENUK.en-uk.book Page 25 Monday, August 13, 2007 2:20 PM
Page 338 of 458
6-26 For emergencies
6
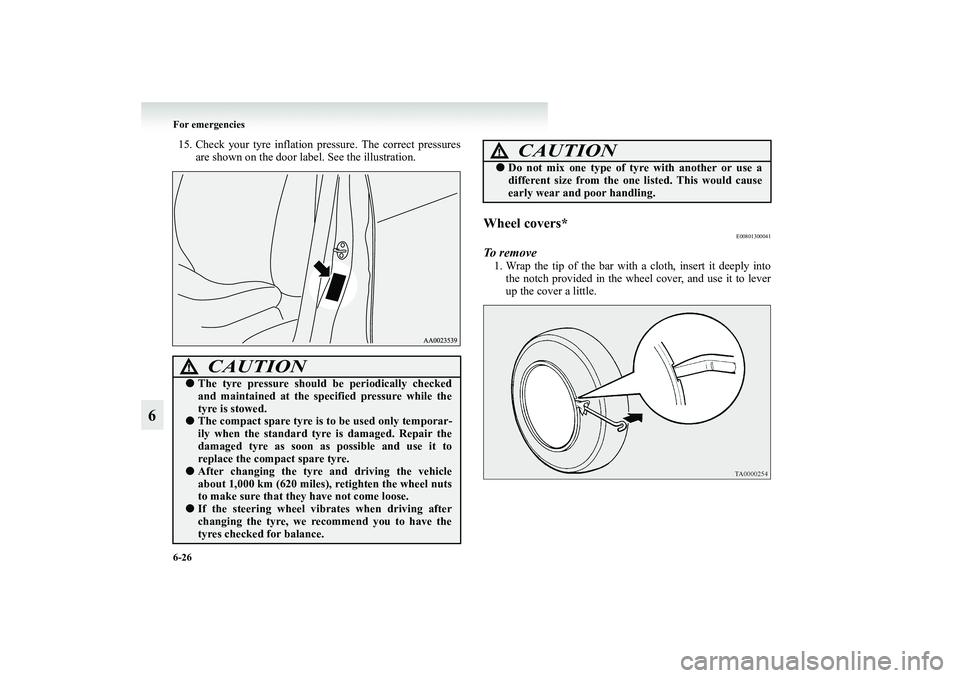
15. Check your tyre inflation pressure. The correct pressures
are shown on the door label. See the illustration.
Wheel covers*
E00801300041
To remove1. Wrap the tip of the bar with a cloth, insert it deeply into
the notch provided in the wheel cover, and use it to lever
up the cover a little.
CAUTION
!●The tyre pressure should be periodically checked
and maintained at the specified pressure while the
tyre is stowed.●The compact spare tyre is to be used only temporar-
ily when the standard tyre is damaged. Repair the
damaged tyre as soon as possible and use it to
replace the compact spare tyre.●After changing the tyre and driving the vehicle
about 1,000 km (620 miles), retighten the wheel nuts
to make sure that they have not come loose.●If the steering wheel vibrates when driving after
changing the tyre, we recommend you to have the
tyres checked for balance.
●Do not mix one type of tyre with another or use a
different size from the one listed. This would cause
early wear and poor handling.
CAUTION
!
BK-XP08E1ENUK.en-uk.book Page 26 Monday, August 13, 2007 2:20 PM
Page 339 of 458
For emergencies
6-27
6
2. With the cover raised a little, pry it off completely using
the jack bar. Insert the jack bar under the cover, and move
it around the circumference, prying the cover away from
the wheel little by little as you move the bar around.NOTE●The wheel cover is made of plastic; take care when prying
it off.
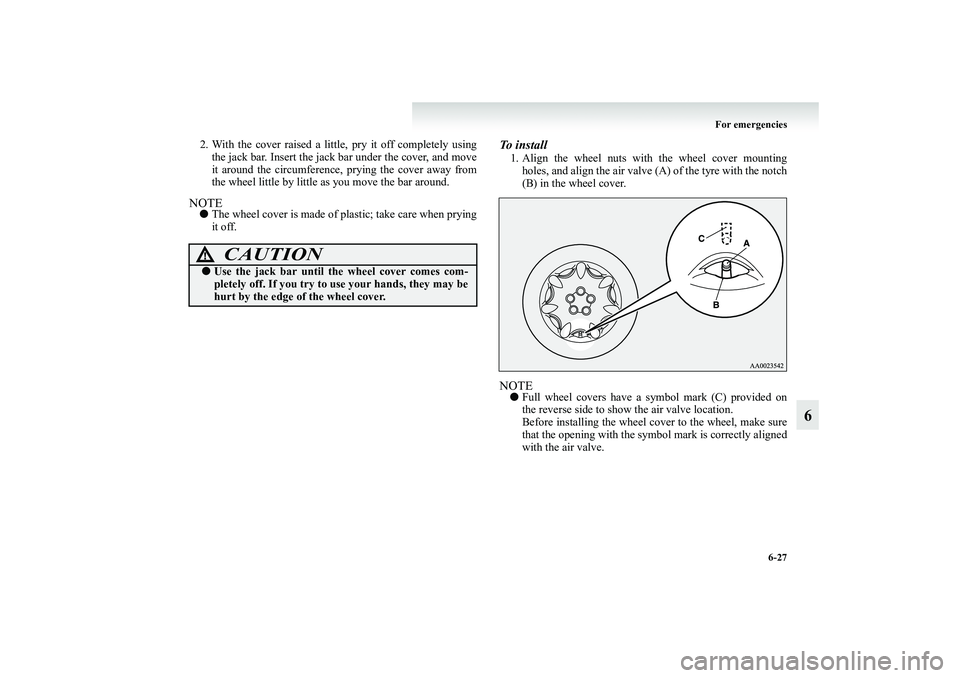
To install 1. Align the wheel nuts with the wheel cover mounting
holes, and align the air valve (A) of the tyre with the notch
(B) in the wheel cover.NOTE●Full wheel covers have a symbol mark (C) provided on
the reverse side to show the air valve location.
Before installing the wheel cover to the wheel, make sure
that the opening with the symbol mark is correctly aligned
with the air valve.
CAUTION
!●Use the jack bar until the wheel cover comes com-
pletely off. If you try to use your hands, they may be
hurt by the edge of the wheel cover.
BK-XP08E1ENUK.en-uk.book Page 27 Monday, August 13, 2007 2:20 PM
Page 340 of 458
6-28 For emergencies
6
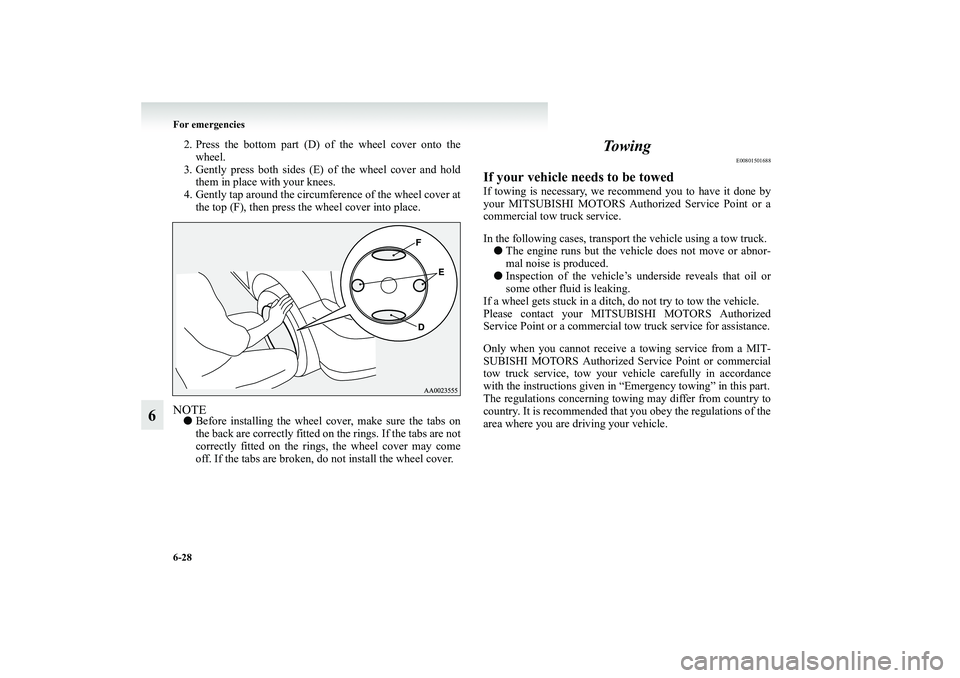
2. Press the bottom part (D) of the wheel cover onto the
wheel.
3. Gently press both sides (E) of the wheel cover and hold
them in place with your knees.
4. Gently tap around the circumference of the wheel cover at
the top (F), then press the wheel cover into place.NOTE●Before installing the wheel cover, make sure the tabs on
the back are correctly fitted on the rings. If the tabs are not
correctly fitted on the rings, the wheel cover may come
off. If the tabs are broken, do not install the wheel cover.
To w i n g
E00801501688
If your vehicle needs to be towedIf towing is necessary, we recommend you to have it done by
your MITSUBISHI MOTORS Authorized Service Point or a
commercial tow truck service.
In the following cases, transport the vehicle using a tow truck.
●The engine runs but the vehicle does not move or abnor-
mal noise is produced.
●Inspection of the vehicle’s underside reveals that oil or
some other fluid is leaking.
If a wheel gets stuck in a ditch, do not try to tow the vehicle.
Please contact your MITSUBISHI MOTORS Authorized
Service Point or a commercial tow truck service for assistance.
Only when you cannot receive a towing service from a MIT-
SUBISHI MOTORS Authorized Service Point or commercial
tow truck service, tow your vehicle carefully in accordance
with the instructions given in “Emergency towing” in this part.
The regulations concerning towing may differ from country to
country. It is recommended that you obey the regulations of the
area where you are driving your vehicle.
BK-XP08E1ENUK.en-uk.book Page 28 Monday, August 13, 2007 2:20 PM