brake MITSUBISHI GRANDIS 2010 Owner's Manual (in English)
[x] Cancel search | Manufacturer: MITSUBISHI, Model Year: 2010, Model line: GRANDIS, Model: MITSUBISHI GRANDIS 2010Pages: 273, PDF Size: 21.01 MB
Page 5 of 273
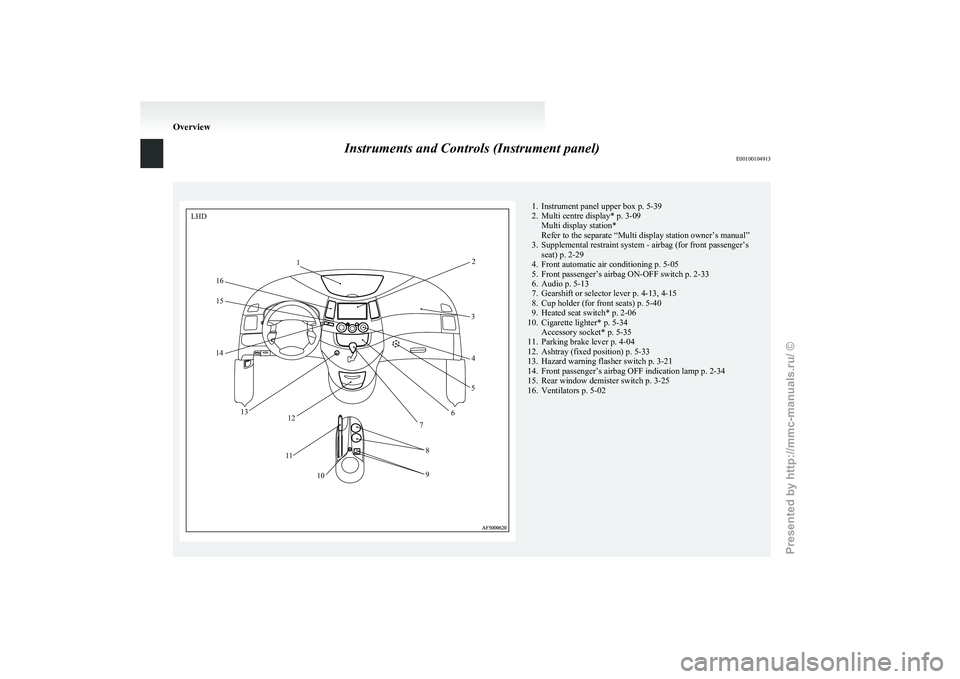
Instruments and Controls (Instrument panel)
E001001049131. Instrument panel upper box p. 5-39
2.
Multi centre display* p. 3-09Multi display station*
Refer to the separate “Multi display station owner’s manual”
3. Supplemental restraint system - airbag (for front passenger’s seat) p. 2-29
4. Front automatic air conditioning p. 5-05
5. Front passenger’s airbag ON-OFF switch p. 2-33
6. Audio p. 5-13
7. Gearshift or selector lever p. 4-13, 4-15
8. Cup holder (for front seats) p. 5-40
9. Heated seat switch* p. 2-06
10. Cigarette lighter* p. 5-34 Accessory socket* p. 5-35
11. Parking brake lever p. 4-04
12. Ashtray (fixed position) p. 5-33
13. Hazard warning flasher switch p. 3-21
14. Front passenger’s airbag OFF indication lamp p. 2-34
15. Rear window demister switch p. 3-25
16. Ventilators p. 5-02 OverviewLHD
1 2
3 4
5
6
7
8
9
10
1
1
12
13
14
15
16
Presented by http://mmc-manuals.ru/ \251
Page 6 of 273
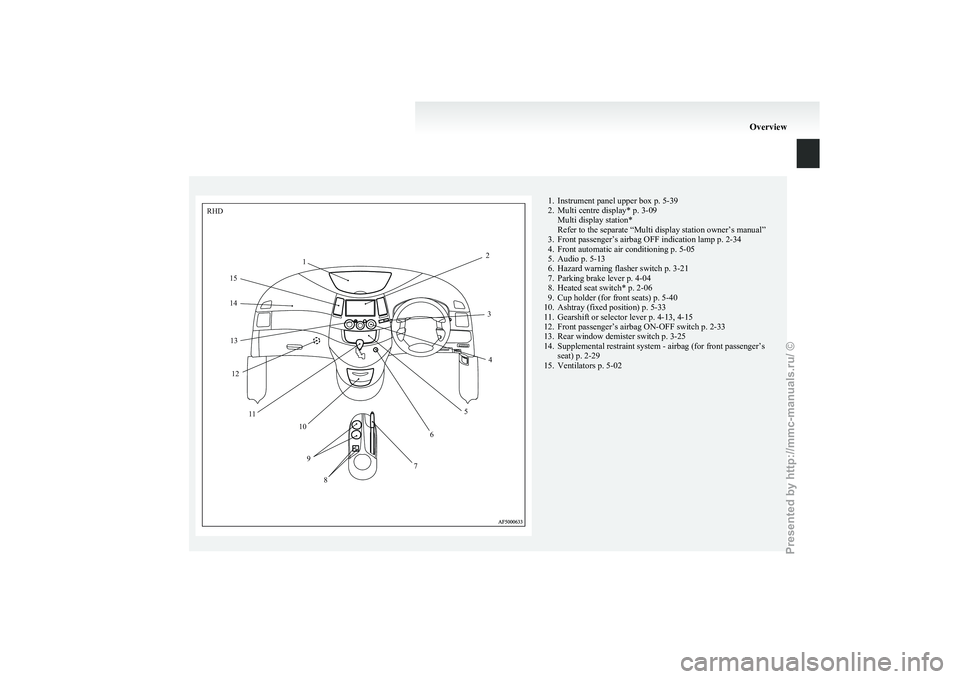
1. Instrument panel upper box p. 5-39
2.
Multi centre display* p. 3-09Multi display station*
Refer to the separate “Multi display station owner’s manual”
3. Front passenger’s airbag OFF indication lamp p. 2-34
4. Front automatic air conditioning p. 5-05
5. Audio p. 5-13
6. Hazard warning flasher switch p. 3-21
7. Parking brake lever p. 4-04
8. Heated seat switch* p. 2-06
9. Cup holder (for front seats) p. 5-40
10. Ashtray (fixed position) p. 5-33
11. Gearshift or selector lever p. 4-13, 4-15
12. Front passenger’s airbag ON-OFF switch p. 2-33
13. Rear window demister switch p. 3-25
14. Supplemental restraint system - airbag (for front passenger’s seat) p. 2-29
15. Ventilators p. 5-02 OverviewRHD
1 2
34
5
6
7
8
9
10
1
1
12
13
14
15
Presented by http://mmc-manuals.ru/ \251
Page 53 of 273
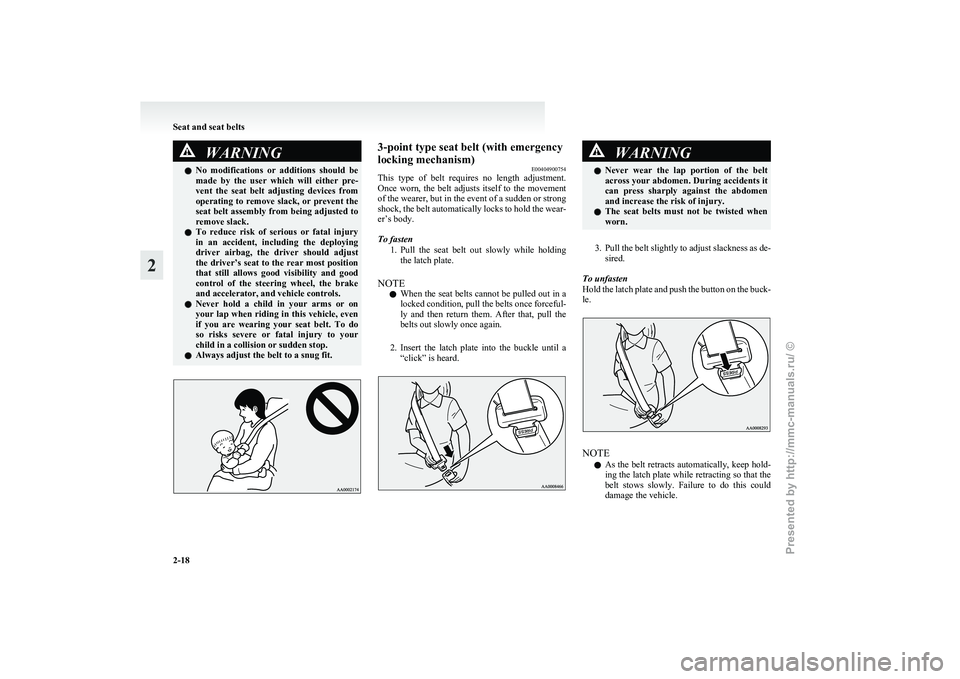
WARNING
l No modifications or additions should be
made by the user which will either pre-
vent the seat belt adjusting devices from
operating to remove slack, or prevent the
seat belt assembly from being adjusted to
remove slack.
l To reduce risk of serious or fatal injury
in an accident, including the deploying
driver airbag, the driver should adjust
the driver’s seat to the rear most position
that still allows good visibility and good
control of the steering wheel, the brake
and accelerator, and vehicle controls.
l Never hold a child in your arms or on
your lap when riding in this vehicle, even
if you are wearing your seat belt. To do
so risks severe or fatal injury to your
child in a collision or sudden stop.
l Always adjust the belt to a snug fit. 3-point type seat belt (with emergency
locking mechanism)
E00404900754
This
type of belt requires no length adjustment.
Once worn, the belt adjusts itself to the movement
of the wearer, but in the event of a sudden or strong
shock, the belt automatically locks to hold the wear-
er’s body.
To fasten
1. Pull the seat belt out slowly while holdingthe latch plate.
NOTE l When the seat belts cannot be pulled out in a
locked condition, pull the belts once forceful-
ly and then return them. After that, pull the
belts out slowly once again.
2. Insert the latch plate into the buckle until a “click” is heard. WARNING
l Never
wear the lap portion of the belt
across your abdomen. During accidents it
can press sharply against the abdomen
and increase the risk of injury.
l The seat belts must not be twisted when
worn.
3. Pull
the belt slightly to adjust slackness as de- sired.
To unfasten
Hold the latch plate and push the button on the buck-
le. NOTE
l As
the belt retracts automatically, keep hold-
ing the latch plate while retracting so that the
belt stows slowly. Failure to do this could
damage the vehicle. Seat and seat belts
2-18
2
Presented by http://mmc-manuals.ru/ \251
Page 82 of 273
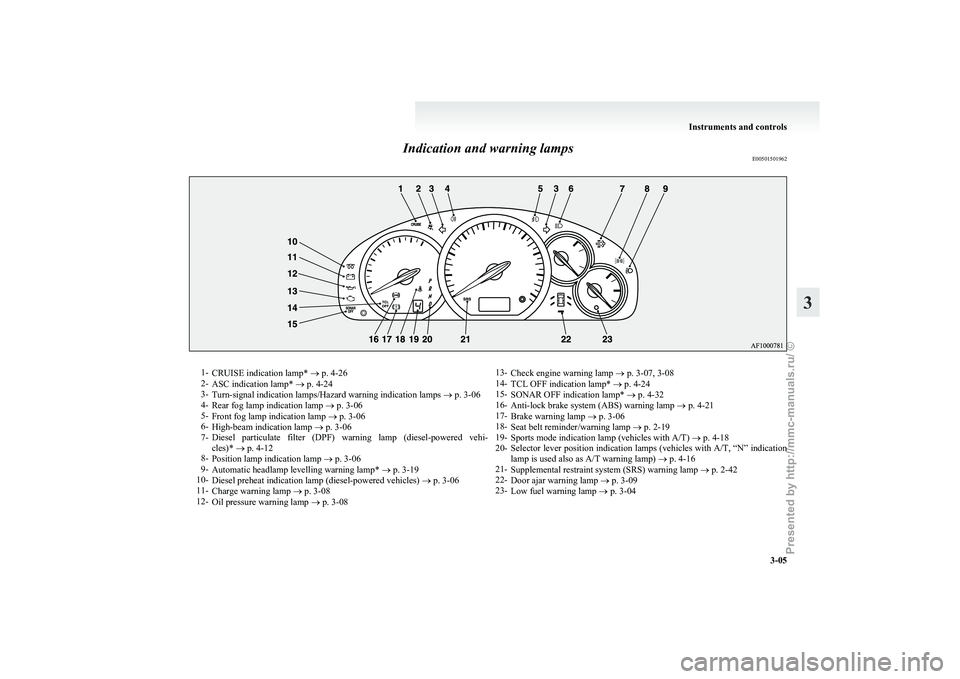
Indication and warning lamps
E005015019621-
CRUISE indication lamp* ® p. 4-26
2- ASC indication lamp* ® p. 4-24
3- Turn-signal indication lamps/Hazard warning indication lamps ® p. 3-06
4- Rear fog lamp indication lamp ® p. 3-06
5- Front fog lamp indication lamp ® p. 3-06
6- High-beam indication lamp ® p. 3-06
7- Diesel particulate filter (DPF) warning lamp (diesel-powered vehi-
cles)* ® p. 4-12
8- Position lamp indication lamp ® p. 3-06
9- Automatic headlamp levelling warning lamp* ® p. 3-19
10- Diesel preheat indication lamp (diesel-powered vehicles) ® p. 3-06
11- Charge warning lamp ® p. 3-08
12- Oil pressure warning lamp ® p. 3-08 13-
Check engine warning lamp ® p. 3-07, 3-08
14- TCL OFF indication lamp* ® p. 4-24
15- SONAR OFF indication lamp* ® p. 4-32
16- Anti-lock brake system (ABS) warning lamp ® p. 4-21
17- Brake warning lamp ® p. 3-06
18- Seat belt reminder/warning lamp ® p. 2-19
19- Sports mode indication lamp (vehicles with A/T) ® p. 4-18
20- Selector lever position indication lamps (vehicles with A/T, “N” indication
lamp is used also as A/T warning lamp) ® p. 4-16
21- Supplemental restraint system (SRS) warning lamp ® p. 2-42
22- Door ajar warning lamp ® p. 3-09
23- Low fuel warning lamp ® p. 3-04 Instruments and controls
3-05 3
Presented by http://mmc-manuals.ru/ \251
Page 83 of 273
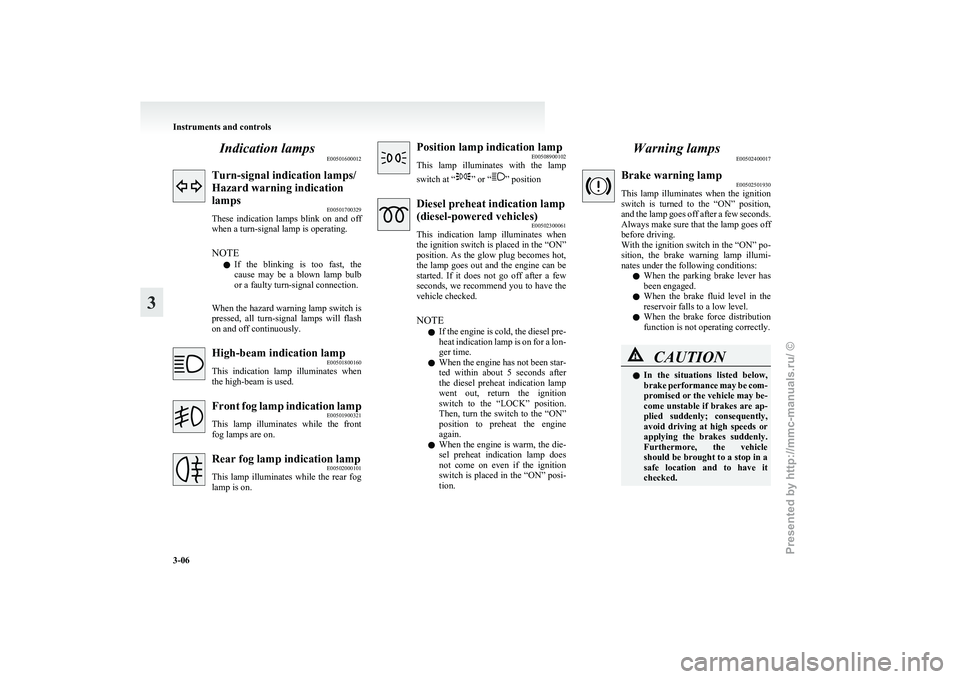
Indication lamps
E00501600012Turn-signal indication lamps/
Hazard warning indication
lamps
E00501700329
These
indication lamps blink on and off
when a turn-signal lamp is operating.
NOTE
l If the blinking is too fast, the
cause may be a blown lamp bulb
or a faulty turn-signal connection.
When the hazard warning lamp switch is
pressed, all turn-signal lamps will flash
on and off continuously. High-beam indication lamp
E00501800160
This
indication lamp illuminates when
the high-beam is used. Front fog lamp indication lamp
E00501900321
This
lamp illuminates while the front
fog lamps are on. Rear fog lamp indication lamp
E00502000101
This
lamp illuminates while the rear fog
lamp is on. Position lamp indication lamp
E00508900102
This
lamp illuminates with the lamp
switch at “ ” or “ ” position
Diesel preheat indication lamp
(diesel-powered vehicles)
E00502300061
This
indication lamp illuminates when
the ignition switch is placed in the “ON”
position. As the glow plug becomes hot,
the lamp goes out and the engine can be
started. If it does not go off after a few
seconds, we recommend you to have the
vehicle checked.
NOTE
l If the engine is cold, the diesel pre-
heat indication lamp is on for a lon-
ger time.
l When the engine has not been star-
ted within about 5 seconds after
the diesel preheat indication lamp
went out, return the ignition
switch to the “LOCK” position.
Then, turn the switch to the “ON”
position to preheat the engine
again.
l When the engine is warm, the die-
sel preheat indication lamp does
not come on even if the ignition
switch is placed in the “ON” posi-
tion. Warning lamps
E00502400017 Brake warning lamp
E00502501930
This
lamp illuminates when the ignition
switch is turned to the “ON” position,
and the lamp goes off after a few seconds.
Always make sure that the lamp goes off
before driving.
With the ignition switch in the “ON” po-
sition, the brake warning lamp illumi-
nates under the following conditions:
l When the parking brake lever has
been engaged.
l When the brake fluid level in the
reservoir falls to a low level.
l When the brake force distribution
function is not operating correctly. CAUTION
l
In
the situations listed below,
brake performance may be com-
promised or the vehicle may be-
come unstable if brakes are ap-
plied suddenly; consequently,
avoid driving at high speeds or
applying the brakes suddenly.
Furthermore, the vehicle
should be brought to a stop in a
safe location and to have it
checked. Instruments and controls
3-06
3
Presented by http://mmc-manuals.ru/ \251
Page 84 of 273
CAUTION
• The brake warning lamp
does not illuminate when
the parking brake is applied
or does not turn off when
the parking brake is re-
leased.
• The ABS warning lamp and brake warning lamp illumi-
nate at the same time.
For details, refer to “ABS
warning lamp” on page
4-21.
• The brake warning lamp re- mains illuminated during
driving.
l The vehicle should be brought
to a halt in the following man-
ner when brake performance
has deteriorated.
• Depress the brake pedalharder than usual.
Even if the brake pedal
moves down to the very end
of its possible stroke, keep it
pressed down hard.
• Should the brakes fail, use engine braking to reduce
your speed and carefully
pull the parking brake lever
to park your vehicle.
Depress the brake pedal to
operate the stop lamp
(brake lamp) to alert the ve-
hicles behind you. Check engine warning lamp
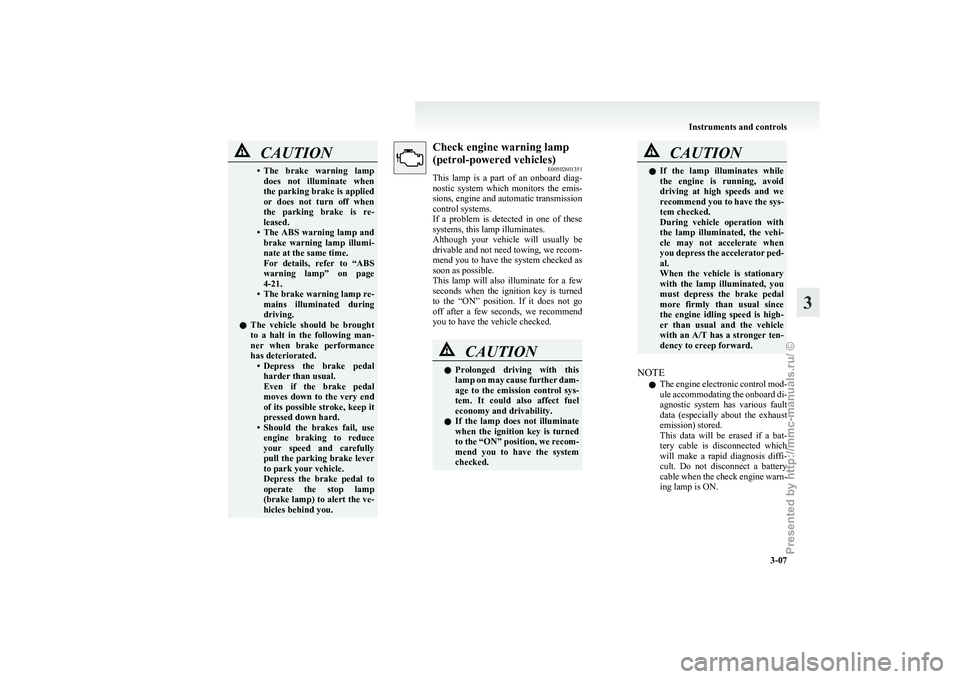
(petrol-powered vehicles)
E00502601351
This
lamp is a part of an onboard diag-
nostic system which monitors the emis-
sions, engine and automatic transmission
control systems.
If a problem is detected in one of these
systems, this lamp illuminates.
Although your vehicle will usually be
drivable and not need towing, we recom-
mend you to have the system checked as
soon as possible.
This lamp will also illuminate for a few
seconds when the ignition key is turned
to the “ON” position. If it does not go
off after a few seconds, we recommend
you to have the vehicle checked. CAUTION
l
Prolonged
driving with this
lamp on may cause further dam-
age to the emission control sys-
tem. It could also affect fuel
economy and drivability.
l If the lamp does not illuminate
when the ignition key is turned
to the “ON” position, we recom-
mend you to have the system
checked. CAUTION
l
If
the lamp illuminates while
the engine is running, avoid
driving at high speeds and we
recommend you to have the sys-
tem checked.
During vehicle operation with
the lamp illuminated, the vehi-
cle may not accelerate when
you depress the accelerator ped-
al.
When the vehicle is stationary
with the lamp illuminated, you
must depress the brake pedal
more firmly than usual since
the engine idling speed is high-
er than usual and the vehicle
with an A/T has a stronger ten-
dency to creep forward.
NOTE l The
engine electronic control mod-
ule accommodating the onboard di-
agnostic system has various fault
data (especially about the exhaust
emission) stored.
This data will be erased if a bat-
tery cable is disconnected which
will make a rapid diagnosis diffi-
cult. Do not disconnect a battery
cable when the check engine warn-
ing lamp is ON. Instruments and controls
3-07 3
Presented by http://mmc-manuals.ru/ \251
Page 85 of 273
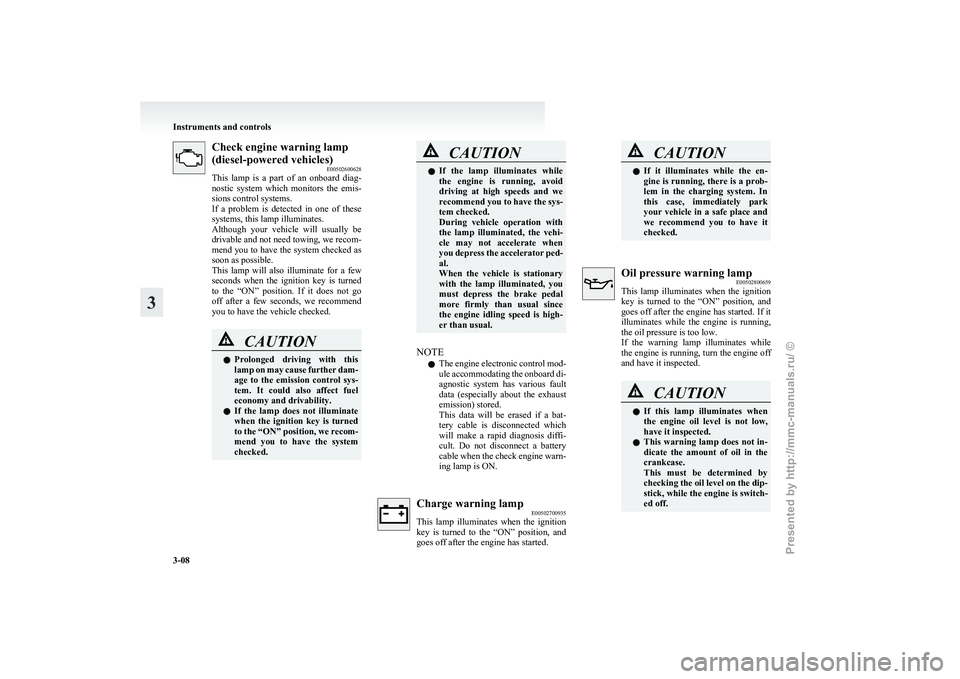
Check engine warning lamp
(diesel-powered vehicles)
E00502600628
This
lamp is a part of an onboard diag-
nostic system which monitors the emis-
sions control systems.
If a problem is detected in one of these
systems, this lamp illuminates.
Although your vehicle will usually be
drivable and not need towing, we recom-
mend you to have the system checked as
soon as possible.
This lamp will also illuminate for a few
seconds when the ignition key is turned
to the “ON” position. If it does not go
off after a few seconds, we recommend
you to have the vehicle checked. CAUTION
l
Prolonged
driving with this
lamp on may cause further dam-
age to the emission control sys-
tem. It could also affect fuel
economy and drivability.
l If the lamp does not illuminate
when the ignition key is turned
to the “ON” position, we recom-
mend you to have the system
checked. CAUTION
l
If
the lamp illuminates while
the engine is running, avoid
driving at high speeds and we
recommend you to have the sys-
tem checked.
During vehicle operation with
the lamp illuminated, the vehi-
cle may not accelerate when
you depress the accelerator ped-
al.
When the vehicle is stationary
with the lamp illuminated, you
must depress the brake pedal
more firmly than usual since
the engine idling speed is high-
er than usual.
NOTE l The
engine electronic control mod-
ule accommodating the onboard di-
agnostic system has various fault
data (especially about the exhaust
emission) stored.
This data will be erased if a bat-
tery cable is disconnected which
will make a rapid diagnosis diffi-
cult. Do not disconnect a battery
cable when the check engine warn-
ing lamp is ON. Charge warning lamp
E00502700935
This
lamp illuminates when the ignition
key is turned to the “ON” position, and
goes off after the engine has started. CAUTION
l
If
it illuminates while the en-
gine is running, there is a prob-
lem in the charging system. In
this case, immediately park
your vehicle in a safe place and
we recommend you to have it
checked. Oil pressure warning lamp
E00502800659
This
lamp illuminates when the ignition
key is turned to the “ON” position, and
goes off after the engine has started. If it
illuminates while the engine is running,
the oil pressure is too low.
If the warning lamp illuminates while
the engine is running, turn the engine off
and have it inspected. CAUTION
l
If
this lamp illuminates when
the engine oil level is not low,
have it inspected.
l This warning lamp does not in-
dicate the amount of oil in the
crankcase.
This must be determined by
checking the oil level on the dip-
stick, while the engine is switch-
ed off. Instruments and controls
3-08
3
Presented by http://mmc-manuals.ru/ \251
Page 104 of 273
Economical driving.......................................................................4-02
Driving, alcohol and drugs
........................................................... 4-02
Safe driving techniques ................................................................ 4-03
Running-in recommendations
.......................................................4-03
Parking brake................................................................................ 4-04
Parking.......................................................................................... 4-05
Steering wheel height adjustment .................................................4-06
Inside rear-view mirror ................................................................. 4-06
Outside rear-view mirrors ............................................................. 4-07
Ignition switch .............................................................................. 4-08
Steering wheel lock ...................................................................... 4-10
Starting..........................................................................................4-10
Diesel particulate filter (DPF)* .................................................... 4-12
Manual transmission* ................................................................... 4-13
Automatic transmission INVECS-II Sports Mode 4A/T (Intelligent & Innovative Vehicle Electronic Control
System II)*............................................................................... 4-15
Braking......................................................................................... 4-20
Anti-lock brake system (ABS) ..................................................... 4-21
Power steering system.................................................................. 4-23
Active stability control (ASC)* .................................................... 4-23
Auto-speed (cruise) control* ........................................................ 4-25
Corner sensor system*.................................................................. 4-29
Cargo loads................................................................................... 4-32
Trailer towing ............................................................................... 4-34Starting and driving
4
Presented by http://mmc-manuals.ru/ \251
Page 105 of 273
Economical driving
E00600100372
For
economical driving, there are some technical re-
quirements that have to be met. The prerequisite
for low fuel consumption is a properly adjusted en-
gine. In order to achieve longer life of the vehicle
and the most economical operation, we recommend
you to have the vehicle checked at regular intervals
in accordance with the service standards.
Fuel economy and generation of exhaust gas and
noise are highly influenced by personal driving hab-
its as well as the particular operating conditions.
The following points should be observed in order
to minimize wear of brakes, tyres and engine as
well as to reduce environmental pollution.
Starting
Avoid rapid acceleration and sudden starts; such op-
eration will result in higher fuel consumption.
Shifting
Shift only at an appropriate speed and engine
speed. Always use the highest gear possible.
City traffic
Frequent starting and stopping increases the aver-
age fuel consumption. Use roads with smooth traf-
fic flow whenever possible. When driving on con-
gested roads, avoid use of a low gear at high en-
gine speeds.
Idling
The vehicle consumes fuel even during idling.
Avoid extended idling whenever possible. Speed
At
higher vehicle speed, more fuel is consumed.
Avoid driving at full speed. Even a slight release of
the accelerator pedal will save a significant amount
of fuel.
Tyre inflation pressure
Check the tyre inflation pressures at regular inter-
vals. Low tyre inflation pressure increases road re-
sistance and fuel consumption. In addition, low
tyre pressures adversely affect tyre wear and driv-
ing stability.
Load
Do not drive with unnecessary articles in the lug-
gage compartment. Especially during city driving
where frequent starting and stopping is necessary,
the increased weight of the vehicle will greatly af-
fect fuel consumption.
Also avoid driving with unnecessary luggage, etc.,
on the roof; the increased air resistance will in-
crease fuel consumption.
Cold engine starting
Starting of a cold engine consumes more fuel.
Unnecessary fuel consumption is also caused by
keeping a hot engine running. After the engine is
started, commence driving as soon as possible.
Air conditioning
The use of the air conditioning will increase the
fuel consumption. Driving, alcohol and drugs
E00600200012
Driving
after drinking alcohol is one of the most fre-
quent causes of accidents.
Your driving ability can be seriously impaired even
with blood alcohol levels far below the legal mini-
mum. If you have been drinking, don’t drive. Ride
with a designated non-drinking driver, call a cab or
a friend, or use public transportation.
Drinking coffee or taking a cold shower will not
make you sober.
Similarly, prescription and nonprescription drugs af-
fect your alertness, perception and reaction time.
Consult with your doctor or pharmacist before driv-
ing while under the influence of any of these medi-
cations. WARNING
l NEVER DRINK AND DRIVE.
Your
perceptions are less accurate, your
reflexes are slower and your judgment is
impaired. Starting and driving
4-02
4
Presented by http://mmc-manuals.ru/ \251
Page 107 of 273
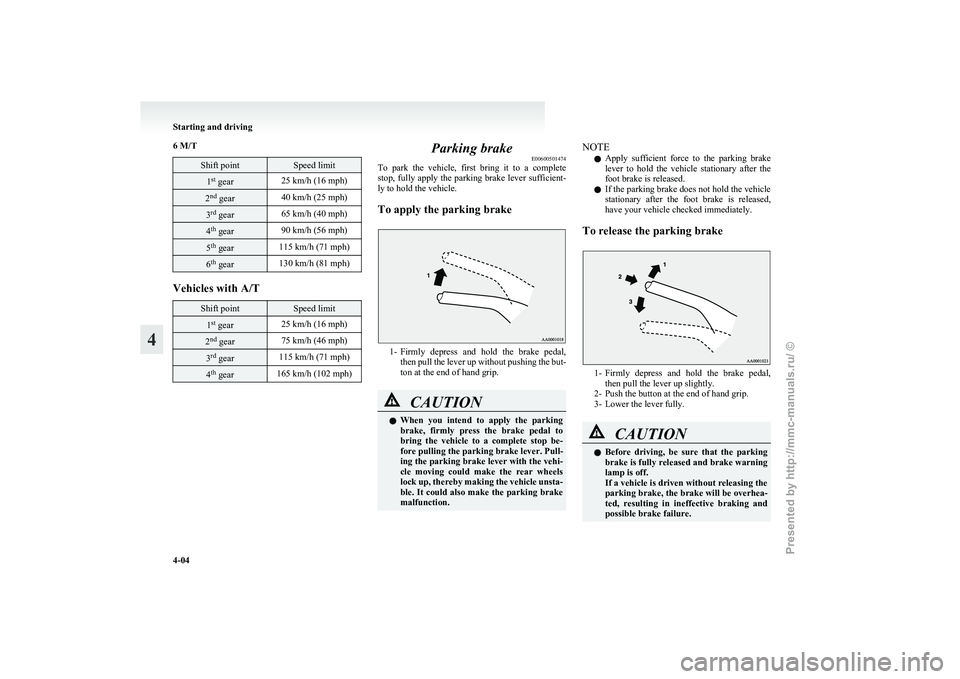
6 M/T
Shift point Speed limit
1
st
gear 25 km/h (16 mph)2
nd
gear 40 km/h (25 mph) 3
rd
gear 65 km/h (40 mph) 4
th
gear 90 km/h (56 mph) 5
th
gear 115 km/h (71 mph) 6
th
gear 130 km/h (81 mph)Vehicles with A/T
Shift point Speed limit
1
st
gear 25 km/h (16 mph)2
nd
gear 75 km/h (46 mph) 3
rd
gear 115 km/h (71 mph) 4
th
gear 165 km/h (102 mph) Parking brake
E00600501474
To
park the vehicle, first bring it to a complete
stop, fully apply the parking brake lever sufficient-
ly to hold the vehicle.
To apply the parking brake 1- Firmly
depress and hold the brake pedal,
then pull the lever up without pushing the but-
ton at the end of hand grip. CAUTION
l
When
you intend to apply the parking
brake, firmly press the brake pedal to
bring the vehicle to a complete stop be-
fore pulling the parking brake lever. Pull-
ing the parking brake lever with the vehi-
cle moving could make the rear wheels
lock up, thereby making the vehicle unsta-
ble. It could also make the parking brake
malfunction. NOTE
l Apply
sufficient force to the parking brake
lever to hold the vehicle stationary after the
foot brake is released.
l If the parking brake does not hold the vehicle
stationary after the foot brake is released,
have your vehicle checked immediately.
To release the parking brake 1- Firmly
depress and hold the brake pedal,
then pull the lever up slightly.
2- Push the button at the end of hand grip.
3- Lower the lever fully. CAUTION
l
Before
driving, be sure that the parking
brake is fully released and brake warning
lamp is off.
If a vehicle is driven without releasing the
parking brake, the brake will be overhea-
ted, resulting in ineffective braking and
possible brake failure. Starting and driving
4-04
4
Presented by http://mmc-manuals.ru/ \251