MITSUBISHI L200 2013 Owner's Manual (in English)
Manufacturer: MITSUBISHI, Model Year: 2013, Model line: L200, Model: MITSUBISHI L200 2013Pages: 362, PDF Size: 21.07 MB
Page 191 of 362
NOTEl Set the temperature at about 22 (Type 1) or
25 (Type 2) under normal conditions.
l When the temperature is set to the highest or
the lowest setting under the AUTO opera-
tion, the air selection, mode selection, blower
speed and the air conditioning will be auto-
matically changed as follows.
Also, if manually operated after an automatic
changeover, manual operation will be selec-
ted. •Quick Heating (When the temperature is
set to the highest setting)
Outside air will be introduced, the air
flow will select foot position, and the air
conditioning will stop.
• Quick Cooling (When the temperature is
set to the lowest setting)
Inside air will be recirculated, the air
flow will select face position, and the air
conditioning will operate.Operating the system in manual mode E00704200040
Blower speed and ventilator mode may be control-
led manually by setting the blower speed selection
dial and the mode selection dial to the desired posi-
tions. To return to automatic operation, set the dials
to the “AUTO” position.
Demisting of the windscreen and door windows E00704300689CAUTIONlFor safety, make sure you have a clear
view through all the windows.To remove frost or mist from the windscreen and
door windows, use the mode selection dial (“”
or “”).
For ordinary demisting
Use this setting to keep the windscreen and door
windows clear of mist, and to keep the leg area heat-
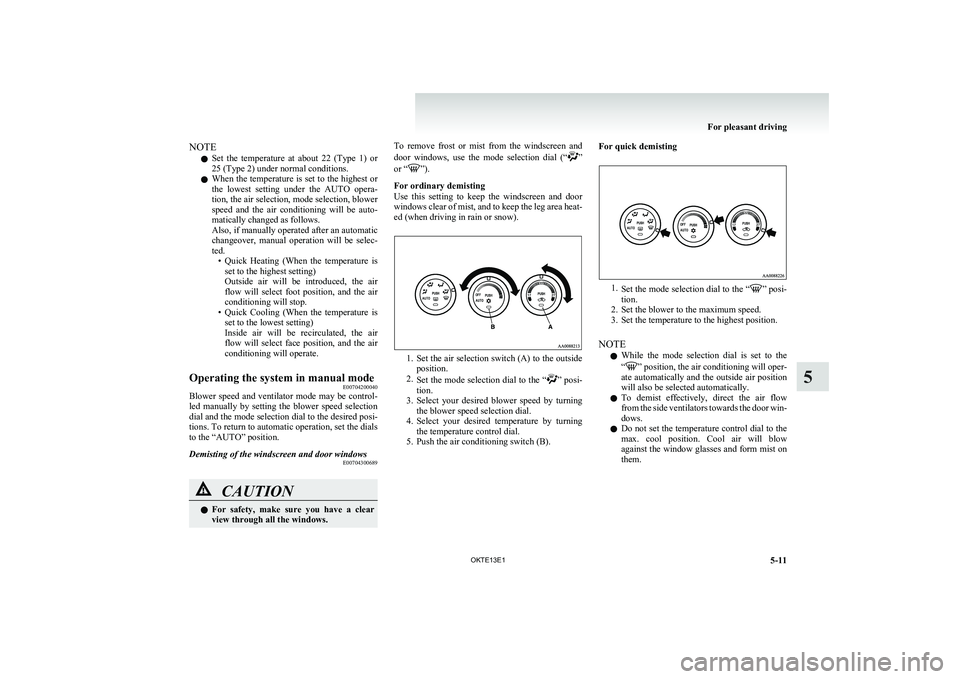
ed (when driving in rain or snow).
1. Set the air selection switch (A) to the outside
position.
2. Set the mode selection dial to the “
” posi-
tion.
3. Select your desired blower speed by turning
the blower speed selection dial.
4. Select your desired temperature by turning
the temperature control dial.
5. Push the air conditioning switch (B).
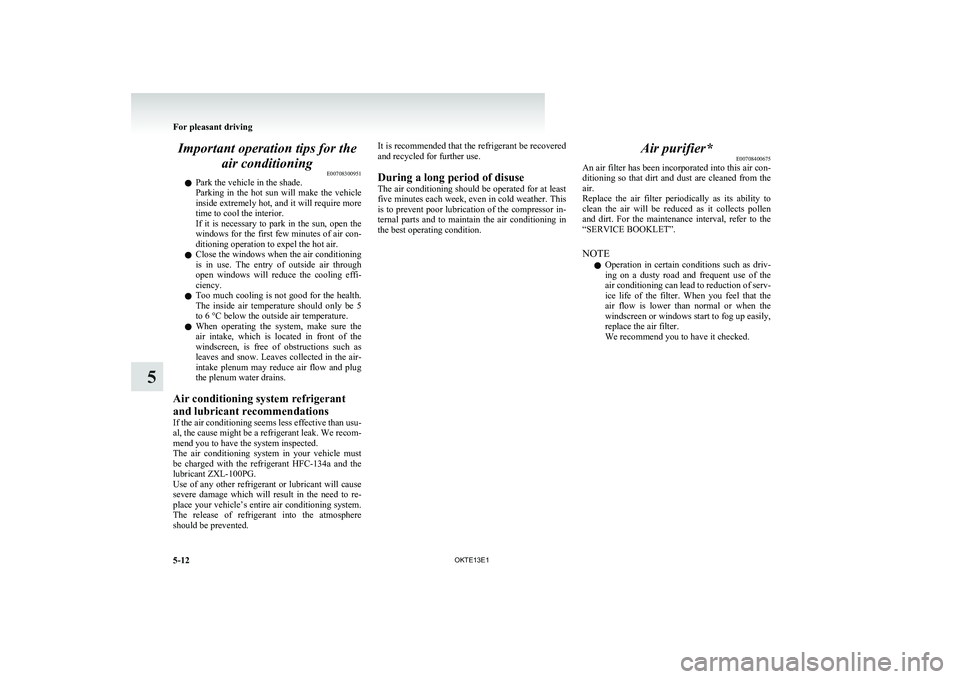
For quick demisting
1. Set the mode selection dial to the “” posi-
tion.
2. Set the blower to the maximum speed.
3. Set the temperature to the highest position.
NOTE l While the mode selection dial is set to the
“
” position, the air conditioning will oper-
ate automatically and the outside air position
will also be selected automatically.
l To demist effectively, direct the air flow
from the side ventilators towards the door win-
dows.
l Do not set the temperature control dial to the
max. cool position. Cool air will blow
against the window glasses and form mist on
them.
For pleasant driving
5-11
OKTE13E1
5
Page 192 of 362
Important operation tips for theair conditioning E00708300951
l Park the vehicle in the shade.
Parking in the hot sun will make the vehicle
inside extremely hot, and it will require more
time to cool the interior.
If it is necessary to park in the sun, open the
windows for the first few minutes of air con-
ditioning operation to expel the hot air.
l Close the windows when the air conditioning
is in use. The entry of outside air through
open windows will reduce the cooling effi-
ciency.
l Too much cooling is not good for the health.
The inside air temperature should only be 5
to 6 °C below the outside air temperature.
l When operating the system, make sure the
air intake, which is located in front of the
windscreen, is free of obstructions such as
leaves and snow. Leaves collected in the air-
intake plenum may reduce air flow and plug
the plenum water drains.
Air conditioning system refrigerant
and lubricant recommendations
If the air conditioning seems less effective than usu-
al, the cause might be a refrigerant leak. We recom-
mend you to have the system inspected.
The air conditioning system in your vehicle must
be charged with the refrigerant HFC-134a and the
lubricant ZXL-100PG.
Use of any other refrigerant or lubricant will cause
severe damage which will result in the need to re-
place your vehicle’s entire air conditioning system.
The release of refrigerant into the atmosphere
should be prevented.It is recommended that the refrigerant be recovered
and recycled for further use.
During a long period of disuse
The air conditioning should be operated for at least
five minutes each week, even in cold weather. This
is to prevent poor lubrication of the compressor in-
ternal parts and to maintain the air conditioning in
the best operating condition.Air purifier* E00708400675
An air filter has been incorporated into this air con-
ditioning so that dirt and dust are cleaned from the
air.
Replace the air filter periodically as its ability to
clean the air will be reduced as it collects pollen
and dirt. For the maintenance interval, refer to the
“SERVICE BOOKLET”.
NOTE l Operation in certain conditions such as driv-
ing on a dusty road and frequent use of the
air conditioning can lead to reduction of serv-
ice life of the filter. When you feel that the
air flow is lower than normal or when the
windscreen or windows start to fog up easily,
replace the air filter.
We recommend you to have it checked.
For pleasant driving
5-12 OKTE13E1
5
Page 193 of 362
LW/MW/FM electronic tuning radio with CD player*E00708501745
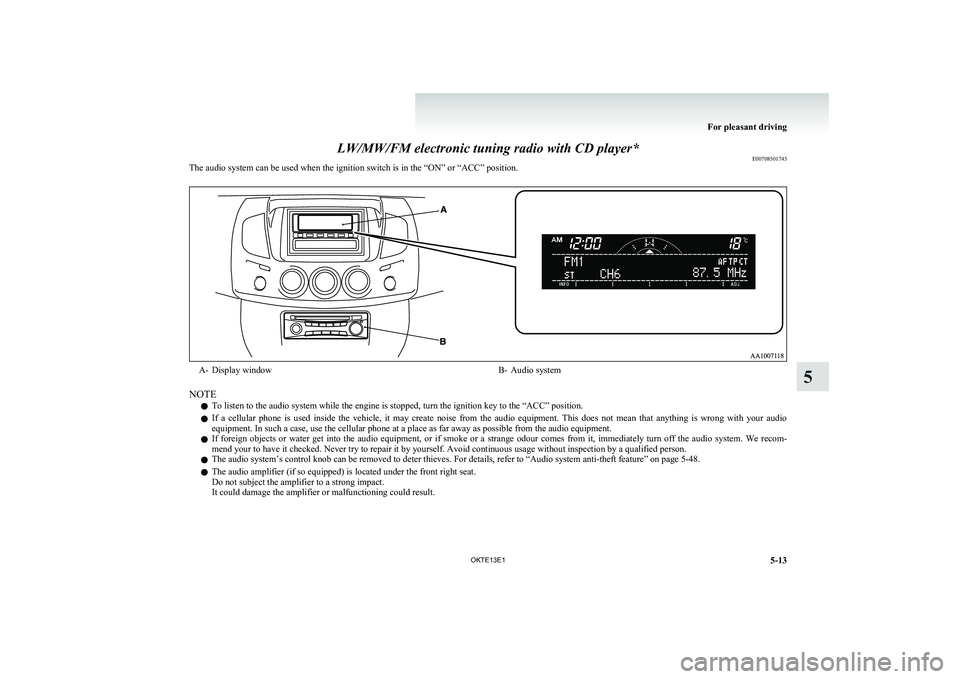
The audio system can be used when the ignition switch is in the “ON” or “ACC” position.A- Display windowB- Audio system
NOTE
l To listen to the audio system while the engine is stopped, turn the ignition key to the “ACC” position.
l If a cellular phone is used inside the vehicle, it may create noise from the audio equipment. This does not mean that anything is wrong with your audio
equipment. In such a case, use the cellular phone at a place as far away as possible from the audio equipment.
l If foreign objects or water get into the audio equipment, or if smoke or a strange odour comes from it, immediately turn off the audio system. We recom-
mend your to have it checked. Never try to repair it by yourself. Avoid continuous usage without inspection by a qualified person.
l The audio system’s control knob can be removed to deter thieves. For details, refer to “Audio system anti-theft feature” on page 5-48.
l The audio amplifier (if so equipped) is located under the front right seat.
Do not subject the amplifier to a strong impact.
It could damage the amplifier or malfunctioning could result.
For pleasant driving
5-13
OKTE13E1
5
Page 194 of 362
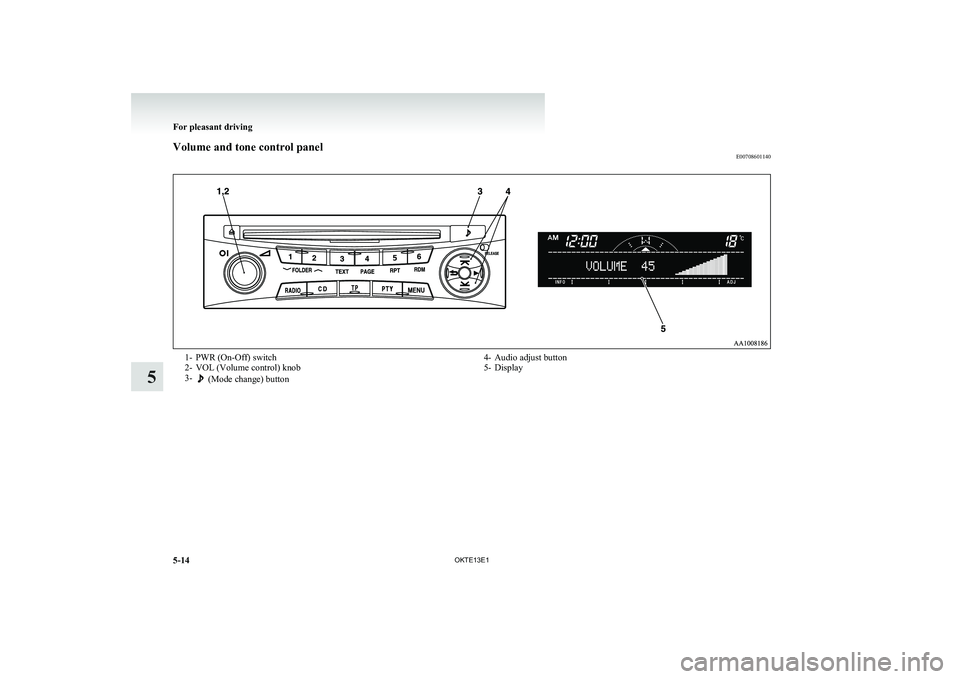
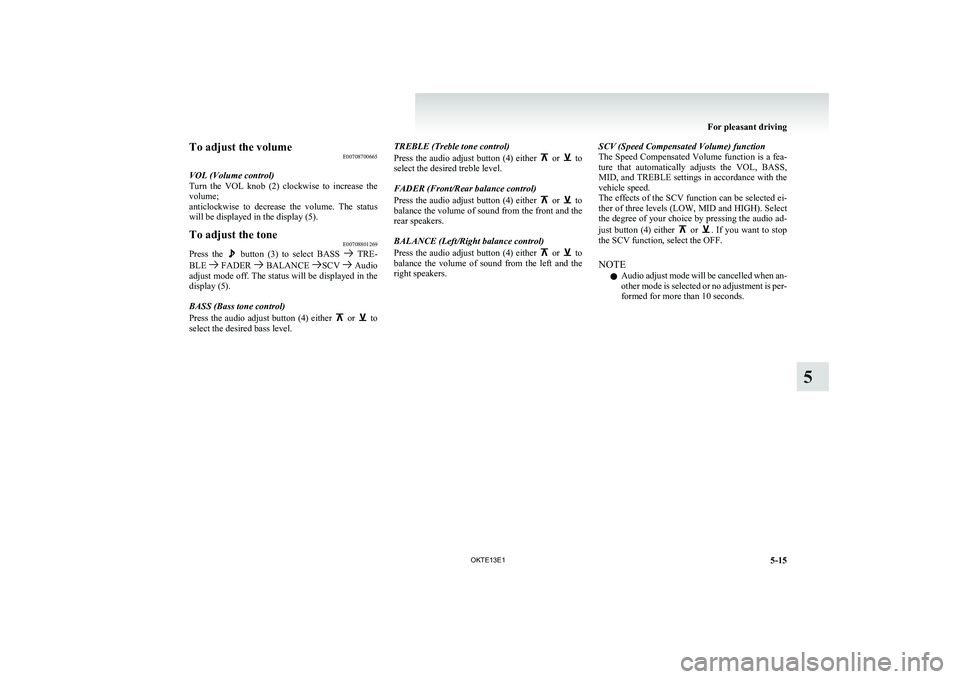
Volume and tone control panelE007086011401- PWR (On-Off) switch
2- VOL (Volume control) knob
3-
(Mode change) button
4- Audio adjust button
5- Display
For pleasant driving
5-14 OKTE13E1
5
Page 195 of 362
To adjust the volumeE00708700665
VOL (Volume control)
Turn the VOL knob (2) clockwise to increase the
volume;
anticlockwise to decrease the volume. The status
will be displayed in the display (5).To adjust the tone E00708801269
Press the button (3) to select BASS TRE-
BLE FADER BALANCE SCV Audio
adjust mode off. The status will be displayed in the
display (5).
BASS (Bass tone control)
Press the audio adjust button (4) either
or to
select the desired bass level.
TREBLE (Treble tone control)
Press the audio adjust button (4) either
or to
select the desired treble level.
FADER (Front/Rear balance control)
Press the audio adjust button (4) either
or to
balance the volume of sound from the front and the
rear speakers.
BALANCE (Left/Right balance control)
Press the audio adjust button (4) either
or to
balance the volume of sound from the left and the
right speakers.
SCV (Speed Compensated Volume) function
The Speed Compensated Volume function is a fea-
ture that automatically adjusts the VOL, BASS,
MID, and TREBLE settings in accordance with the
vehicle speed.
The effects of the SCV function can be selected ei-
ther of three levels (LOW, MID and HIGH). Select
the degree of your choice by pressing the audio ad-
just button (4) either
or . If you want to stop
the SCV function, select the OFF.
NOTE l Audio adjust mode will be cancelled when an-
other mode is selected or no adjustment is per-
formed for more than 10 seconds.
For pleasant driving
5-15
OKTE13E1
5
Page 196 of 362
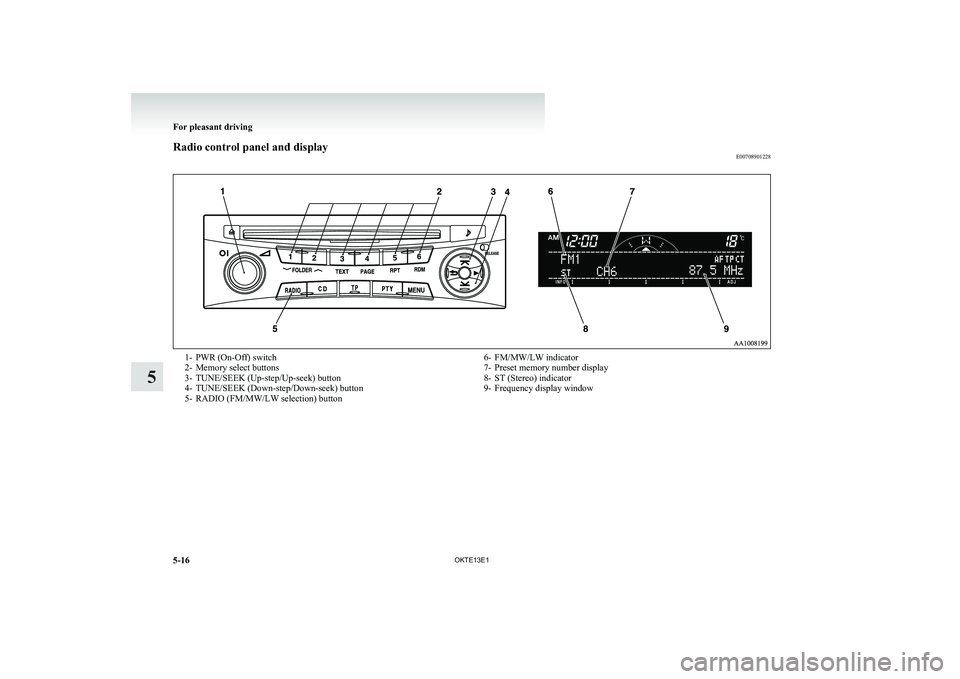
Radio control panel and displayE007089012281- PWR (On-Off) switch
2- Memory select buttons
3- TUNE/SEEK (Up-step/Up-seek) button
4- TUNE/SEEK (Down-step/Down-seek) button
5- RADIO (FM/MW/LW selection) button6- FM/MW/LW indicator
7- Preset memory number display
8- ST (Stereo) indicator
9- Frequency display window
For pleasant driving
5-16 OKTE13E1
5
Page 197 of 362
To listen to the radioE00709000896
1. Press the PWR switch (1) to turn the audio
system ON and OFF. The system turns on in
the last mode used.
2. Press the RADIO buttons (5) to select the de- sired band.
3. Press the TUNE/SEEK button (3 or 4) to
tune to a station, or press one of the memory
select buttons (2) to recall a station memo-
rised for that button.To tune the radio E00709100451
Automatic tuning
After keeping the TUNE/SEEK button (3 or 4) de-
pressed, release the button, and the selected station
reception will start.
Manual tuning
The frequency changes every time the TUNE/
SEEK button (3 or 4) is pressed. Press the button to
select the desired station.
To enter frequencies into the memory E00716101173
Manual setting
You can assign to the memory select buttons (2) a
maximum of 18 stations in the FM band (6 FM1, 6
FM2 and 6 FM3 stations) and 6 stations each in the
MW and LW band. (Stations already assigned to
the memory select buttons are replaced by any new-
ly assigned stations.)
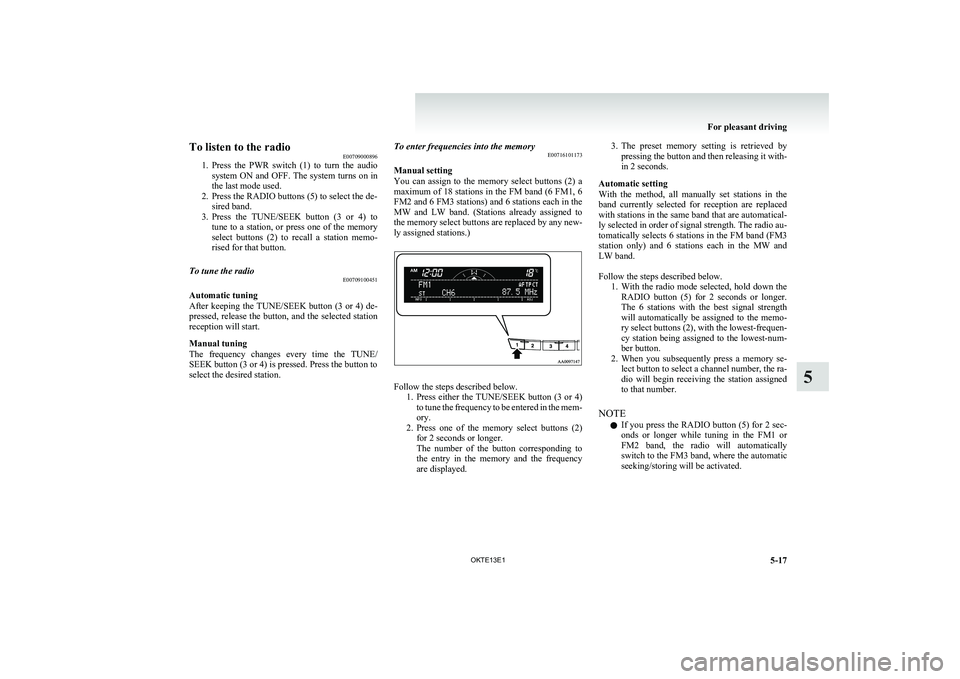
Follow the steps described below. 1.Press either the TUNE/SEEK button (3 or 4)
to tune the frequency to be entered in the mem-
ory.
2. Press one of the memory select buttons (2)
for 2 seconds or longer.
The number of the button corresponding to
the entry in the memory and the frequency
are displayed.
3. The preset memory setting is retrieved by
pressing the button and then releasing it with-
in 2 seconds.
Automatic setting
With the method, all manually set stations in the
band currently selected for reception are replaced
with stations in the same band that are automatical-
ly selected in order of signal strength. The radio au-
tomatically selects 6 stations in the FM band (FM3
station only) and 6 stations each in the MW and
LW band.
Follow the steps described below. 1.With the radio mode selected, hold down the
RADIO button (5) for 2 seconds or longer.
The 6 stations with the best signal strength
will automatically be assigned to the memo-
ry select buttons (2), with the lowest-frequen-
cy station being assigned to the lowest-num-
ber button.
2. When you subsequently press a memory se-
lect button to select a channel number, the ra-
dio will begin receiving the station assigned
to that number.
NOTE l If you press the RADIO button (5) for 2 sec-
onds or longer while tuning in the FM1 or
FM2 band, the radio will automatically
switch to the FM3 band, where the automatic
seeking/storing will be activated.
For pleasant driving
5-17
OKTE13E1
5
Page 198 of 362
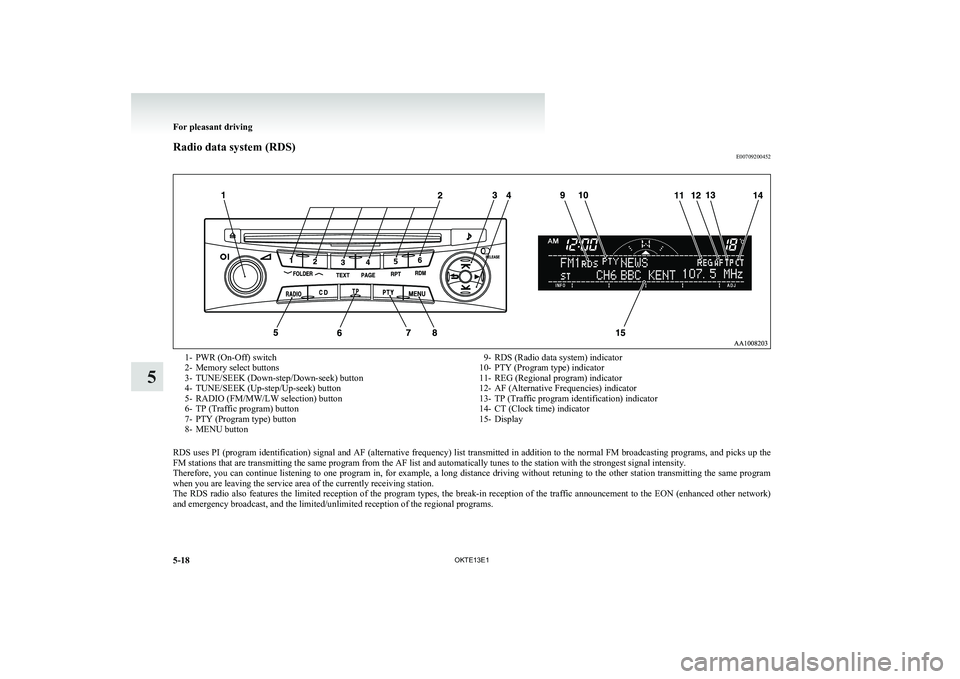
Radio data system (RDS)E007092004521- PWR (On-Off) switch
2- Memory select buttons
3- TUNE/SEEK (Down-step/Down-seek) button
4- TUNE/SEEK (Up-step/Up-seek) button
5- RADIO (FM/MW/LW selection) button
6- TP (Traffic program) button
7- PTY (Program type) button
8- MENU button9- RDS (Radio data system) indicator
10- PTY (Program type) indicator
11- REG (Regional program) indicator
12- AF (Alternative Frequencies) indicator
13- TP (Traffic program identification) indicator
14- CT (Clock time) indicator
15- Display
RDS uses PI (program identification) signal and AF (alternative frequency) list transmitted in addition to the normal FM broadcasting programs, and picks up the
FM stations that are transmitting the same program from the AF list and automatically tunes to the station with the strongest signal intensity.
Therefore, you can continue listening to one program in, for example, a long distance driving without retuning to the other station transmitting the same program
when you are leaving the service area of the currently receiving station.
The RDS radio also features the limited reception of the program types, the break-in reception of the traffic announcement to the EON (enhanced other network)
and emergency broadcast, and the limited/unlimited reception of the regional programs.
For pleasant driving
5-18 OKTE13E1
5
Page 199 of 362
AF (Alternative Frequencies) functionE00720900061
The AF function finds a station broadcasting the
same program and selects the station with the stron-
gest signal of AF lists.
The AF function is turned on (with the AF indica-
tor (12) shown on the display) at all times unless
you manually switch it off.
The AF function can be turned ON and OFF.
Refer to “Function setup mode” on page 5-21.CT (Clock Time) function E00721000131
The clock can be set automatically by using the sig-
nal from the local RDS stations. Refer to “Adjust-
ing the time” on page 3-12.
REG (Regional) function E00721100057
REG function limits to receive the stations broad-
casting regional programs.
Regional programming and regional networks are
organized differently depending on the country or
area (they may be changed according to the hour,
state, or broadcast area), so if you don’t want to re-
ceive the regional programs automatically, you can
set up REG ON not to receive regional programs.
The REG function can be turned ON and OFF.
Refer to “Function setup mode” on page 5-21.
PI (Program Identification) search function E00721200221
When travelling long distance and the recalled pre-
set station is weak, the radio searches another fre-
quency broadcasting the same programming with
the same PI code in AF list.
If there are no frequencies broadcasting the same
programming, the radio searches a frequency broad-
casting the regional programming. The radio suc-
ceeds in searching the regional programming, then
the display shows the REG indicator (11).
If the radio does not succeed in searching the re-
gional programming, the radio returns to the recal-
led preset station.
The PI function can be turned ON and OFF.
Refer to “Function setup mode” on page 5-21.
NOTE l While searching, the audio system is muted.
The display shows “WAIT” or “SEARCH”.PTY (Program type) E00721300349
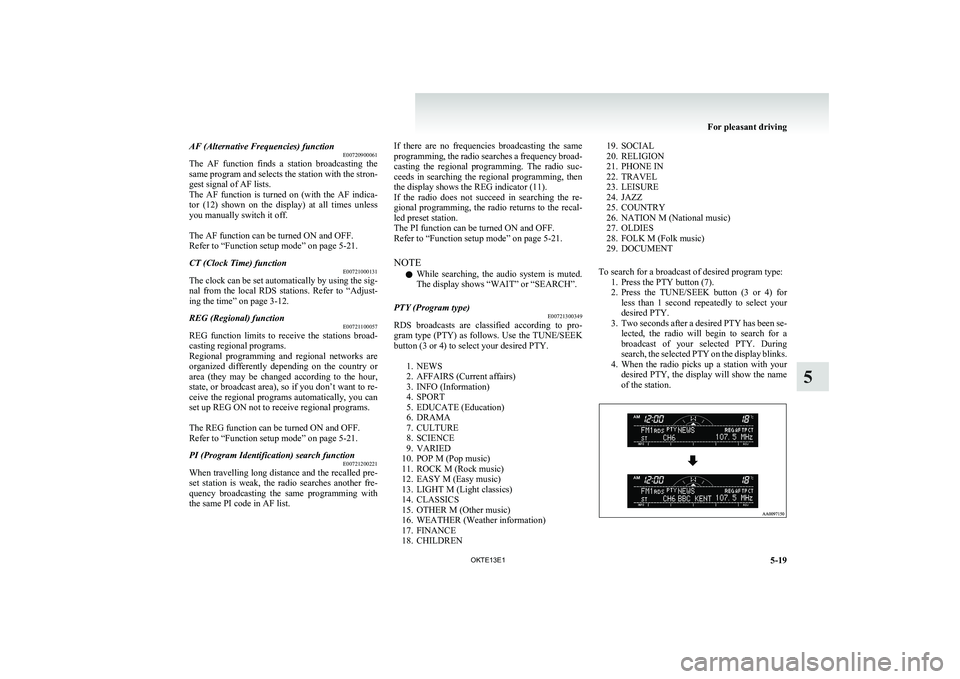
RDS broadcasts are classified according to pro-
gram type (PTY) as follows. Use the TUNE/SEEK
button (3 or 4) to select your desired PTY.
1. NEWS
2. AFFAIRS (Current affairs)
3. INFO (Information)
4. SPORT
5. EDUCATE (Education)
6. DRAMA
7. CULTURE
8. SCIENCE
9. VARIED
10. POP M (Pop music)
11. ROCK M (Rock music)
12. EASY M (Easy music)
13. LIGHT M (Light classics)
14. CLASSICS
15. OTHER M (Other music)
16. WEATHER (Weather information)
17. FINANCE
18. CHILDREN
19. SOCIAL
20. RELIGION
21. PHONE IN
22. TRAVEL
23. LEISURE
24. JAZZ
25. COUNTRY
26. NATION M (National music)
27. OLDIES
28. FOLK M (Folk music)
29. DOCUMENT
To search for a broadcast of desired program type: 1. Press the PTY button (7).
2. Press the TUNE/SEEK button (3 or 4) for
less than 1 second repeatedly to select your
desired PTY.
3. Two seconds after a desired PTY has been se-
lected, the radio will begin to search for a
broadcast of your selected PTY. During
search, the selected PTY on the display blinks.
4. When the radio picks up a station with your
desired PTY, the display will show the name
of the station.
For pleasant driving
5-19
OKTE13E1
5
Page 200 of 362
NOTEl If the TUNE/SEEK button (3 or 4) is pressed
for more than 1 second, the radio will try to
find out another broadcast of the same pro-
gram type as currently selected.
l If no station is found with your desired PTY,
the display will show “EMPTY” for about
5 seconds and the radio will return to the pre-
vious station.How to enter PTYs in the memory E00721400135
As many as 6 PTYs can be entered in the memory.
Follow the steps described below. 1.Press either the TUNE/SEEK button (3 or 4)
to tune the PTY to be entered in the memory.
2. Press one of the memory select buttons (2)
for 2 seconds or longer. The number of the
button corresponding to the entry into the
memory and the PTY are displayed.
3. The preset memory setting is retrieved by
pressing the button and then releasing it with-
in about 2 seconds.
Traffic information E00721600254
The radio will automatically tune in to traffic infor-
mation broadcasts while receiving FM broadcasts
or playing compact discs etc.
To select this function, follow the instructions below. 1.Press the TP button (6). The display will
show “TP” (13). If the RDS data can be read,
the display will show “RDS” (9). If not, the
display will show “NO RDS” for about 5 sec-
onds.
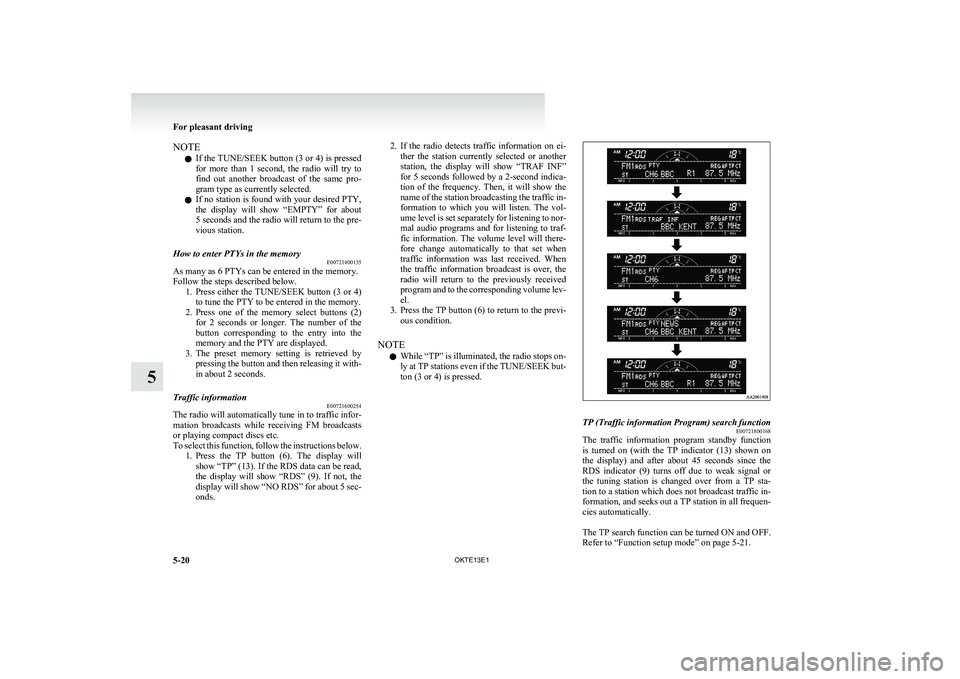
2. If the radio detects traffic information on ei-
ther the station currently selected or another
station, the display will show “TRAF INF”
for 5 seconds followed by a 2-second indica-
tion of the frequency. Then, it will show the
name of the station broadcasting the traffic in-
formation to which you will listen. The vol-
ume level is set separately for listening to nor-
mal audio programs and for listening to traf-
fic information. The volume level will there-
fore change automatically to that set when
traffic information was last received. When
the traffic information broadcast is over, the
radio will return to the previously received
program and to the corresponding volume lev-
el.
3. Press the TP button (6) to return to the previ-
ous condition.
NOTE l While “TP” is illuminated, the radio stops on-
ly at TP stations even if the TUNE/SEEK but-
ton (3 or 4) is pressed.TP (Traffic information Program) search function E00721800168
The traffic information program standby function
is turned on (with the TP indicator (13) shown on
the display) and after about 45 seconds since the
RDS indicator (9) turns off due to weak signal or
the tuning station is changed over from a TP sta-
tion to a station which does not broadcast traffic in-
formation, and seeks out a TP station in all frequen-
cies automatically.
The TP search function can be turned ON and OFF.
Refer to “Function setup mode” on page 5-21.
For pleasant driving
5-20 OKTE13E1
5