MITSUBISHI L200 2017 Owner's Manual (in English)
Manufacturer: MITSUBISHI, Model Year: 2017, Model line: L200, Model: MITSUBISHI L200 2017Pages: 426, PDF Size: 14.12 MB
Page 221 of 426
liPhone4
l iPhone3GS
l iPhone3G
l iPhone
l iPod Nano (3 rd
Generation ~ 7 th
Genera-
tion)
l iPod Touch (1 st
Generation ~ 5 th
Gener-
ation)
l iPod ClassicHandling of Discs
E00735901125
This explains care that should be taken in thehandling of discs.
Important Points on Handling
l Fingerprints or other marks on the read
surface of the disc may result in its con-
tent being more difficult to read. When
holding the disc, grip both edges, or one edge and the centre hole, in order that
the read surface is not touched.
l Do not affix paper or stickers, or other-
wise damage the disc.
l Do not forcefully insert a disc if another
is already within the device. This can re- sult in damage to discs, or malfunction.
Cleaning
l Periodically clean the read surface of the
disc. When cleaning, do not wipe in a circular motion. Instead, wipe gently
outwards from the centre of the disc to the outer edge.
l New discs may have burring around the
outer edge or in the hole in the centre.
Ensure you check for these. If there are burrs, these may lead to faulty operation,therefore ensure these are removed.
Important Points on Storage
l When not using discs, ensure these are
kept in cases, and stored out of direct
sunlight.
l If discs are not going to be used for a
long period of time, remove these from
the product.
Disc Playback Environment
In cold environments such as in mid-winter when the interior of the vehicle is cold, turn-
ing the heater on and immediately trying to
use the product may cause condensation (wa- ter droplets) to form on the disc and internaloptical components, and this may prevent the
product from operating correctly.
In these conditions, remove the disc, and wait a short time before use.
Copyright
Actions such as unauthorized reproduction,
broadcast, public performance, or rental ofdiscs that comprise other than personal use
are prohibited by law.
Types of Disc That Can Be
Played
E00736001123
The following marks are printed on the disc
label, package, or jacket.
TypeSize
Maxi- mum
playing time
Comments
CD-DA12 cm74 mi-
nutes—CD-
TEXT12 cm74 mi-
nutes—
Handling of Discs
7-19OKTE17E1For pleasant driving7
Page 222 of 426
TypeSize
Maxi-mum
playing time
Comments
CD-
R/RW12 cm—•Disc contain-
ing MP3 files
Discs That May Not Be Played
l Playback of discs other than those de-
scribed in “Types of Disc That Can Be
Played” is not guaranteed.
l 8 cm discs may not be used.
l Do not insert irregularly-shaped discs
(for example, heart-shaped), as these
may result in malfunction. Additionally, discs that have transparent portions may
not be played.
l Discs that have not been finalized cannot
be played.
l Even if recorded using the correct for-
mat on a recorder or computer, applica- tion software settings and environments;
disc peculiarities, damage, or marking; or dirt or condensation on the lens inside
the product may render the disc unplaya- ble.
l Depending on the disc, some functions
may not be used, or the disc may not be
played.
l Do not use discs with cracks or warps.
l If the disc has stickers affixed, remains
from removed stickers, or affixed adhe-
sive, then do not use the disc.
l Discs that have decorative labels or
stickers may not be used.
Nonstandard CDs
This product will play audio CDs, however,
please be aware of the following points re-
garding CD standards.
l Ensure that you use discs with
on the
label surface.
l Playback of other than standard CDs is
not guaranteed. Even if the audio can be played, the audio quality cannot be guar-
anteed.
l When playing other than standard CDs,
the following may occur. • There may be noise during playback.
• There may be jumping in the audio.
• The disc may not be recognized.
• The first track may not be played.
• It may take longer than usual before
start of playback of tracks.
• Playback may start from within the
track.
• Some parts may not be played.
• Tracks may freeze during playback.
• Tracks may be displayed erroneously.Audio Files (MP3/WMA/
AAC) E00736101094
This product can play MP3/WMA/AAC for-mat audio files recorded on CD-ROM, CDR/
RW, and USB devices.
There are limitations on the files and media that can be used, therefore read the following prior to recording MP3/WMA/AAC format
audio files on discs or USB devices.
Additionally, ensure you read the user man- uals for your CD-R/RW drive and the writingsoftware, and ensure these are used correctly.
If the MP3/WMA/AAC format audio files in-
cludes title information or other data, then
this can be displayed.
Audio Files (MP3/WMA/AAC)
7-20OKTE17E1For pleasant driving7
Page 223 of 426
CAUTIONlActions such as copying audio CDs or files
and either distributing these to others for free or for charge, or uploading files via the Internet or other means to servers is an in- fringement of the law.
l Do not append the file extensions “.mp3”,
“.wma”, or “.m4a”, to other than
MP3/WMA/AAC format files. Playing discs with these types of files recorded upon them
may cause the files to be incorrectly identi-
fied for playback, which may lead to loud noise, resulting in speaker damage or acci- dent.NOTEl Depending on the condition of the disc re-
corder or recording software used, correct
playback may not be possible. In these ca- ses, refer to the user manual for your product or software.
l Depending on your computer’s operating
system, version, software, or settings, files may not have a file extension appended. In these cases, append the file extensions
“.mp3”, “.wma”, or “.m4a” when copying
the files.Folder Structure
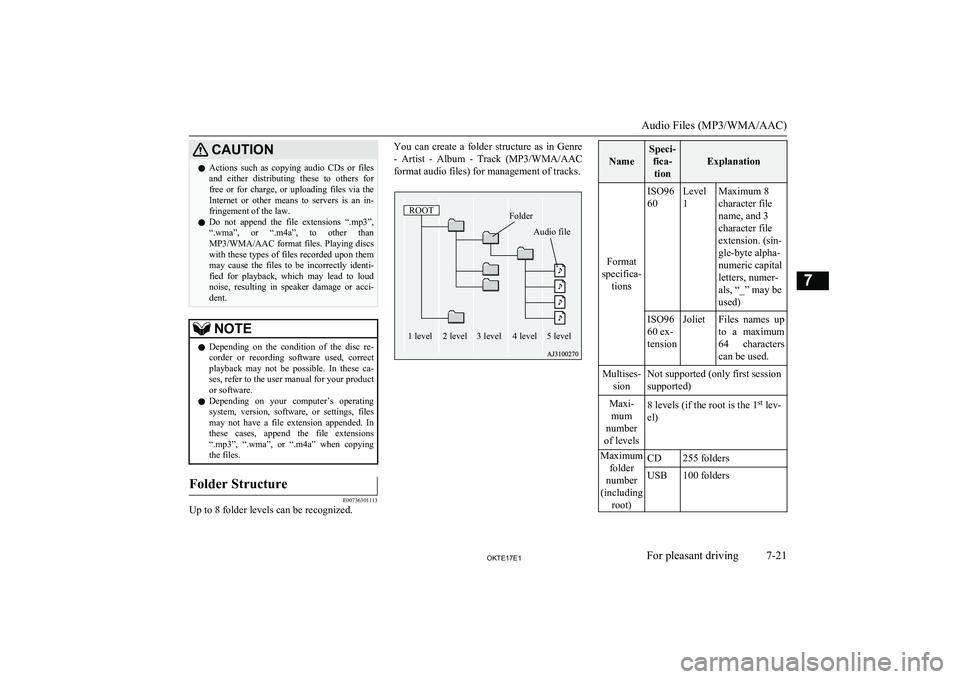
E00736301113
Up to 8 folder levels can be recognized.
You can create a folder structure as in Genre
- Artist - Album - Track (MP3/WMA/AAC
format audio files) for management of tracks.
Name
Speci- fica-tion
Explanation
Format
specifica- tions
ISO96
60Level
1Maximum 8
character file
name, and 3
character file
extension. (sin-
gle-byte alpha-
numeric capital
letters, numer-
als, “_” may be
used)ISO96
60 ex-
tensionJolietFiles names up
to a maximum 64 characters
can be used.Multises- sionNot supported (only first session
supported)Maxi- mum
number
of levels8 levels (if the root is the 1 st
lev-
el)Maximum folder
number
(including root)CD255 foldersUSB100 folders
Audio Files (MP3/WMA/AAC)
7-21OKTE17E1For pleasant driving7 ROOTFolder
4 level
3 level Audio file
5 level
2 level
1 level
Page 224 of 426
Name
Speci-fica-tion
Explanation
Maxi-
mum file number (total
number on me- dia)CD509 filesMaxi-
mum file number (total
number on me- dia)USB10,000 files
(Up to 100 files can be
stored in one folder.)File name and fold- er namerestric- tionsMaximum 64 bytes (for Uni-
code, 32 characters), files/ fold-
ers with file/ folder names longer
than this will not be displayed or
played.USB sup- ported
formatsThe recommended file system is
FAT32.
1 partition onlyNOTEl The order in which folders and audio files
are displayed on this product may be differ-ent to how they are displayed on a computer.What Is MP3?
E00736401039
MP3 is the abbreviation of “MPEG-1 Audio
Layer 3”. MPEG is an abbreviation of “Mo-tion Picture Experts Group”, and this is a vid-
eo compression standard used in video CDs, etc.
MP3 is one of the audio compression meth-
ods contained in the MPEG audio standard,
and reduces the quality of sounds that are be- yond the auditory resolution of the human ear
and that are hidden by louder sounds, thus
creating high-quality data with a lower data
size.
This can compress CD audio to approximate- ly 1/10 its original data size without percepti-
ble loss, approximately 10 CDs can be writ-
ten to a single CD-R/RW disc.
CAUTIONl MP3 files different to the standards at right
may not be played correctly, or file/folder
names may not be displayed correctly.Standards for MP3 Files That
Can Be Played
Specifications for MP3 files that can be
played are as shown below.
ItemDetailsSpecifica- tionMPEG-1 AUDIO LAYER3MPEG-2 AUDIO LAYER3Sampling
frequency [kHz]MPEG-1: 32/44.1/48MPEG-2: 16/22.05/24Bit rate[kbps]MPEG-1: 32 to 320MPEG-2: 8~180VBR (var- iable bit rate)SupportChannelmodeStereo/ Joint stereo/ Dual chan-
nel/ MonauralFile ex- tensionmp3Supported tag infor- mationID3 tag Ver. 1.0, Ver. 1.1, Ver.
2.2, Ver. 2.3, Ver. 2.4
(ISO-8859-1, UTF-16 (Uni-
code)), Titles, Artist name, Al-
bum name
Audio Files (MP3/WMA/AAC)
7-22OKTE17E1For pleasant driving7
Page 225 of 426
ItemDetailsMaximumnumber of characters that can
be indica- ted on the display64 characters
What Is WMA?
E00736601044
WMA is the abbreviation of Windows MediaAudio, and this is an audio compression for-
mat from Microsoft. This is a compression format that has a higher compression ratio
than MP3.
NOTEl Microsoft, Windows Media, and Windows
are registered trademarks of Microsoft Cor-
poration (USA) and in other countries.CAUTIONl WMA supports digital rights management
(DRM). This product cannot play WMA files protected using this system.
l WMA files different to the standards at right
may not be played correctly, or file/folder
names may not be displayed correctly.CAUTIONl “Pro”, “Lossless”, and “Voice” are not sup-
ported.
Standards for WMA Files That
Can Be Played
Specifications for WMA files that can be
played are as shown below.
ItemDetailsSpecificationWindows Media Audio
Version7.0/8.0/9.0Sampling
frequency [kHz]32/44.1/48Bit rate[kbps]32 to 192VBR (varia-ble bit rate)SupportChannel modeStereo/MonauralFile exten- sionwmaSupported
tag informa- tionWMA tags
Title name, Artist name, Al-
bum nameItemDetailsMaximum number of characters
that can be
indicated on the display64 characters
What is AAC?
E00736801059
AAC is the abbreviation of Advanced Audio
Coding, and this is an audio compression standard used in “MPEG-2” and “MPEG-4”. This features 1.4x the compression of MP3,
with comparable audio quality.
CAUTIONl AAC supports digital rights management
(DRM). This product cannot play AAC files
protected using this system.
l AAC files different to the standards at right
may not be played correctly, or file/folder
names may not be displayed correctly.
Standards for AAC Files That
Can Be Played
Specifications for AAC files that can be played are as shown below.
Audio Files (MP3/WMA/AAC)
7-23OKTE17E1For pleasant driving7
Page 226 of 426
![MITSUBISHI L200 2017 Owners Manual (in English) ItemDetailsSpecificationAdvanced Audio Coding
MPEG4/AAC-LC
MPEG2/AAC-LCSampling
frequency [kHz]MPEG48/11.025/12/16/22.05/
24/32/44.1/48MPE G28/11.025/12/16/22.05/
24/32/44.1/48Bit rate [kbps]MPE G416 MITSUBISHI L200 2017 Owners Manual (in English) ItemDetailsSpecificationAdvanced Audio Coding
MPEG4/AAC-LC
MPEG2/AAC-LCSampling
frequency [kHz]MPEG48/11.025/12/16/22.05/
24/32/44.1/48MPE G28/11.025/12/16/22.05/
24/32/44.1/48Bit rate [kbps]MPE G416](/img/19/34878/w960_34878-225.png)
ItemDetailsSpecificationAdvanced Audio Coding
MPEG4/AAC-LC
MPEG2/AAC-LCSampling
frequency [kHz]MPEG48/11.025/12/16/22.05/
24/32/44.1/48MPE G28/11.025/12/16/22.05/
24/32/44.1/48Bit rate [kbps]MPE G416 to 320MPEG216 to 320VBR (variable bit rate)SupportChannel modeStereo/MonauralFile extensionm4aSupported taginformationAAC tags or ID3 tags
Title, Artist name, Album
nameMaximum num-
ber of characters that can be indi-
cated on the dis- play64 charactersImportant Points on Safety
for the Customer E00737001120
This product features a number of pictorial indications as well as points concerning han-
dling so that you can use the product correct-
ly and in a safe manner, as well as prevent in-
jury or damage to yourself, other users, or
property.WARNINGl The driver should not pay close attention
to the display while driving.
This may prevent the driver looking where they are going, and cause an acci-
dent.
l The driver should not perform complica-
ted operations while driving.
Performing complicated operations while driving may prevent the driver looking
where they are going, and cause an acci- dent.
Therefore stop the vehicle in a safe loca- tion before performing such operations.
l Do not use during malfunctions, such as
when no sound is audible.
This may lead to accident, fire, or electric shock.
l Ensure water or other foreign objects do
not enter the product.
This may lead to smoking, fire, electric shock, or malfunction.WARNINGl Do not insert foreign objects into the disc
slot.
This may lead to fire, electric shock, or malfunction.
l In the event of abnormalities occurring
when foreign objects or water enter the
product, resulting in smoke or a strange
smell, immediately stop using the product, and consult a MITSUBISHI MOTORS
Authorized Service Point.
Continuing to use the product may result in accident, fire, or electric shock.
l Do not disassemble or modify the prod-
uct.
This may lead to malfunction, fire, or
electric shock.
l During thunderstorms, do not touch the
antenna or the front panel.
This may lead to electrical shock from lightning.CAUTIONl Do not block ventilation holes or heat sinks
on the product.
Blocking ventilation holes or heat sinks may prevent heat from escaping from within theproduct, leading to fire or malfunction.
Important Points on Safety for the Customer
7-24OKTE17E1For pleasant driving7
Page 227 of 426
CAUTIONlDo not turn the volume up to the extent that
you cannot hear sounds from outside the ve-
hicle while driving.
Driving without being able to hear sounds from outside the vehicle may result in an ac-
cident.
l Do not insert your hand or fingers into the
disc slot.
This may result in injury.Operation Keys
E00737101134
Turn the Power ON/ OFF
E00737201193
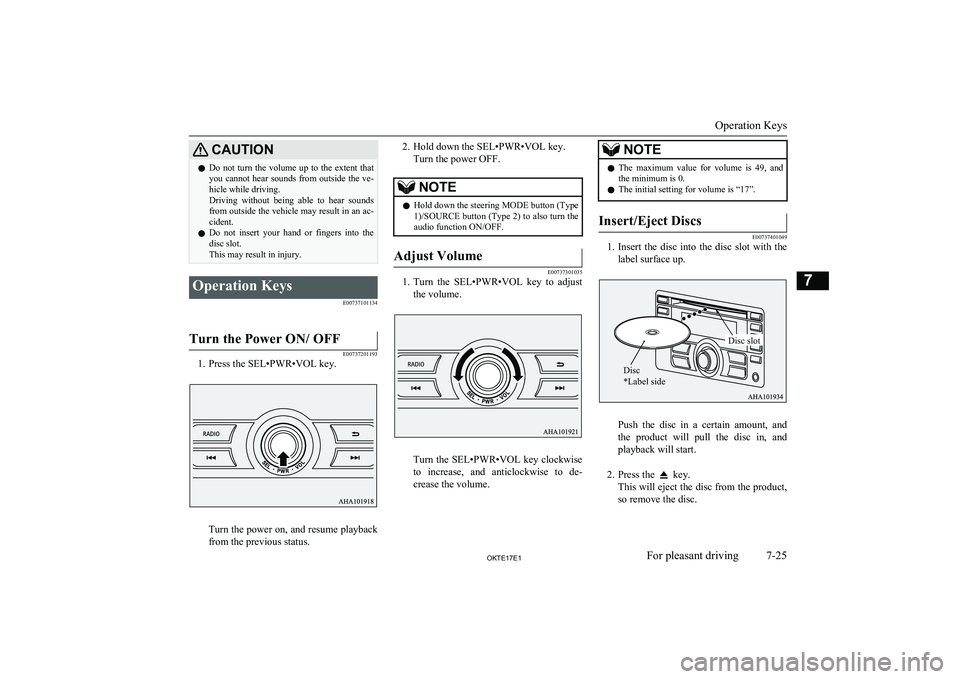
1. Press the SEL•PWR•VOL key.
Turn the power on, and resume playback
from the previous status.
2. Hold down the SEL•PWR•VOL key.
Turn the power OFF.NOTEl Hold down the steering MODE button (Type
1)/SOURCE button (Type 2) to also turn the
audio function ON/OFF.Adjust Volume
E00737301035
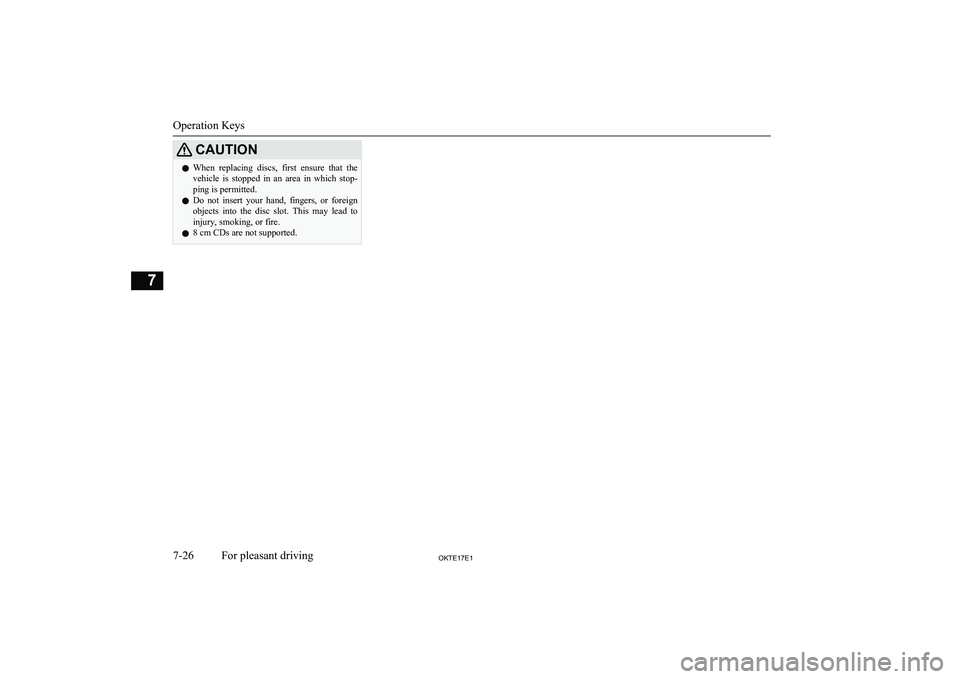
1. Turn the SEL•PWR•VOL key to adjust
the volume.
Turn the SEL•PWR•VOL key clockwise
to increase, and anticlockwise to de- crease the volume.
NOTEl The maximum value for volume is 49, and
the minimum is 0.
l The initial setting for volume is “17”.Insert/Eject Discs
E00737401049
1.
Insert the disc into the disc slot with the
label surface up.
Push the disc in a certain amount, and
the product will pull the disc in, and playback will start.
2. Press the
key.
This will eject the disc from the product,
so remove the disc.
Operation Keys
7-25OKTE17E1For pleasant driving7 Disc
*Label sideDisc slot
Page 228 of 426
CAUTIONlWhen replacing discs, first ensure that the
vehicle is stopped in an area in which stop-ping is permitted.
l Do not insert your hand, fingers, or foreign
objects into the disc slot. This may lead to injury, smoking, or fire.
l 8 cm CDs are not supported.
Operation Keys
7-26OKTE17E1For pleasant driving7
Page 229 of 426
Explanation of Buttons
E00737501138
This explains names and functions of each part.
1- key
Use to eject a disc.
2- 1DISP key Switch the content of the display.
For radio, use as preset key 1.
3- 2PAGE key Display the content page forward.
For radio, use as preset key 2.
4- 3key For radio, use as preset key 3.5- MEDIA keyEach time this is pressed, the audio
source switches in the order “CD”,
“USB/iPod”, and “AUX”.
6- RADIO key Switch the radio and the band.
7-
key/ key
For audio, press to select audio track/file
and hold down to rewind/fast forward;
for radio, select radio station.
8- SEL•PWR•VOL key Adjust the volume, and turn the power
ON/OFF. Additionally, adjust audio quality and select items.
9-
key
Return during audio track search
10- Disc slot
11- AUTO-P key Auto preset the radio.
12- 4RPT key For audio, press to turn repeat playback
mode on/off; for radio, use as preset key
4.
Operation Keys
7-27OKTE17E1For pleasant driving7
Page 230 of 426
13- 5RDM keyFor audio, press to turn random playback
mode on/off; for radio, use as preset key
5.14- 6key For radio, use as preset key 6.
15-
/MENU key
Switch to Menu mode.
16- Auxiliary Audio connector (mini-jack) Connect a commercially-available audio
device.
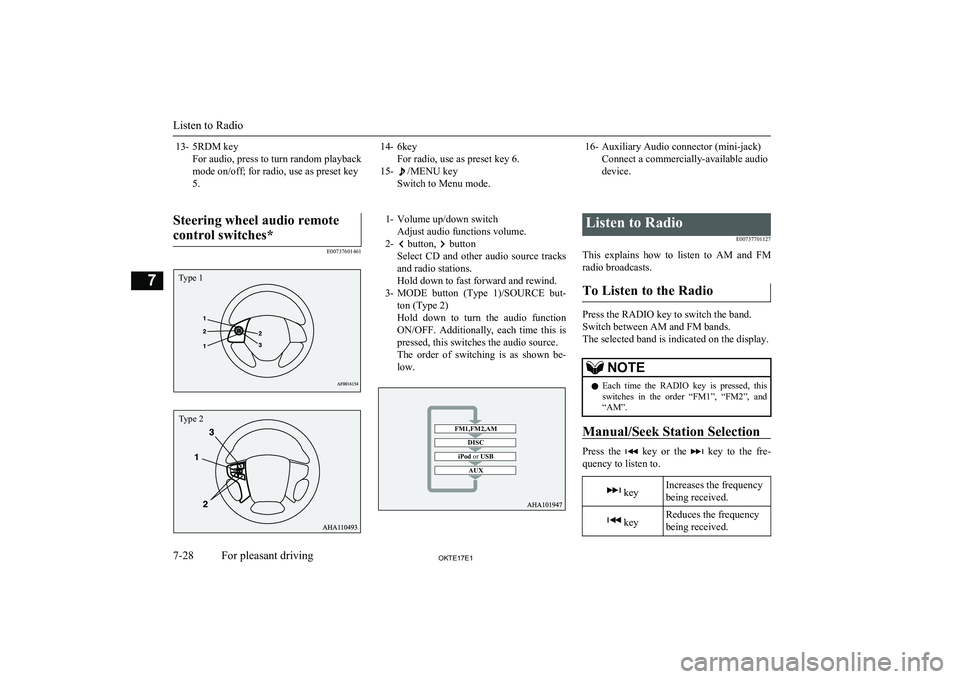
Steering wheel audio remote
control switches*
E00737601461
1- Volume up/down switch Adjust audio functions volume.
2-
button, button
Select CD and other audio source tracks
and radio stations.
Hold down to fast forward and rewind.
3- MODE button (Type 1)/SOURCE but-
ton (Type 2)
Hold down to turn the audio function ON/OFF. Additionally, each time this is
pressed, this switches the audio source.
The order of switching is as shown be- low.
Listen to Radio
E00737701127
This explains how to listen to AM and FM
radio broadcasts.
To Listen to the Radio
Press the RADIO key to switch the band.
Switch between AM and FM bands.
The selected band is indicated on the display.
NOTEl Each time the RADIO key is pressed, this
switches in the order “FM1”, “FM2”, and
“AM”.
Manual/Seek Station Selection
Press the key or the key to the fre-
quency to listen to.
keyIncreases the frequency
being received. keyReduces the frequency
being received.
Listen to Radio
7-28OKTE17E1For pleasant driving7 Type 1 Type 2 FM1,FM2,AMDISC
iPod or USB
AUX