Service MITSUBISHI L200 2018 (in English) Owner's Guide
[x] Cancel search | Manufacturer: MITSUBISHI, Model Year: 2018, Model line: L200, Model: MITSUBISHI L200 2018Pages: 466, PDF Size: 28.42 MB
Page 94 of 466
NOTElWhen the ignition switch or the operation mode is OFF, the driving range display, average fuel consumption display and outside temperature display are not
displayed.
l While driving, the service reminder is not displayed even if you operate the multi information display switch.
Odometer
E00527801123
The odometer indicates the distance travel-
led.
Tripmeter
E00527901094
The tripmeter indicates the distance travelled between two points.
Example usage of tripmeter
and tripmeter
It is possible to measure two currently
travelled distances, from home using
tripmeter
and from a particular point
on the way using tripmeter
.
To reset the tripmeter
To return the display to 0, hold down the multi information display switch for about 2
seconds or more. Only the currently dis-
played value will be reset.
Example
If tripmeter is displayed, only tripmeter
will be reset.NOTEl When disconnecting the battery terminal, the
memory of tripmeter and are
cleared, and the display returns to “0”.Meter illumination control
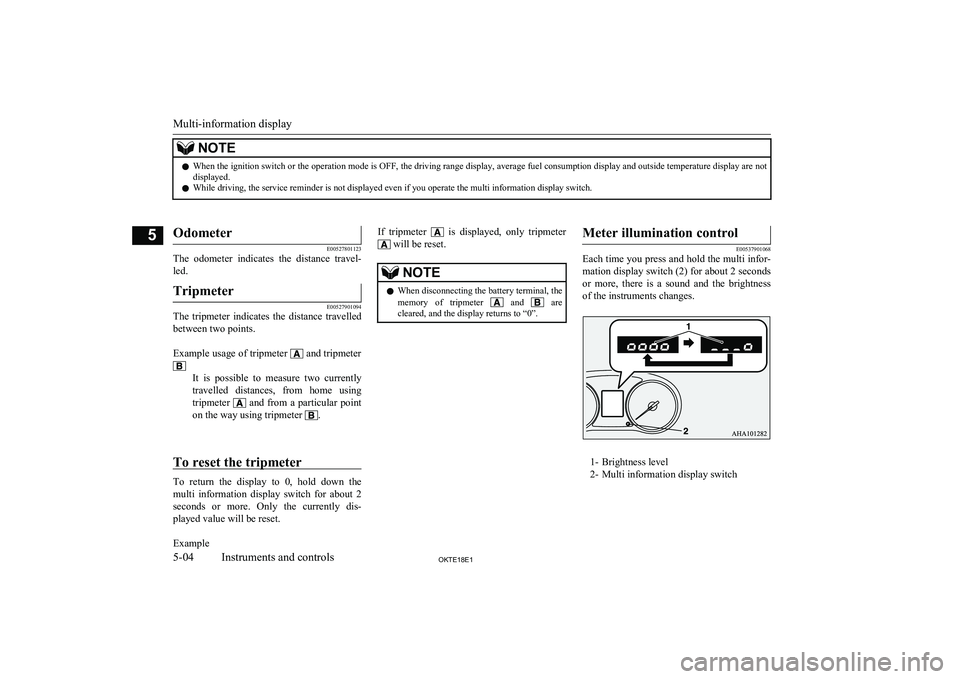
E00537901068
Each time you press and hold the multi infor-
mation display switch (2) for about 2 seconds or more, there is a sound and the brightnessof the instruments changes.
1- Brightness level
2- Multi information display switch
Multi-information display
5-04OKTE18E1Instruments and controls5
Page 97 of 466
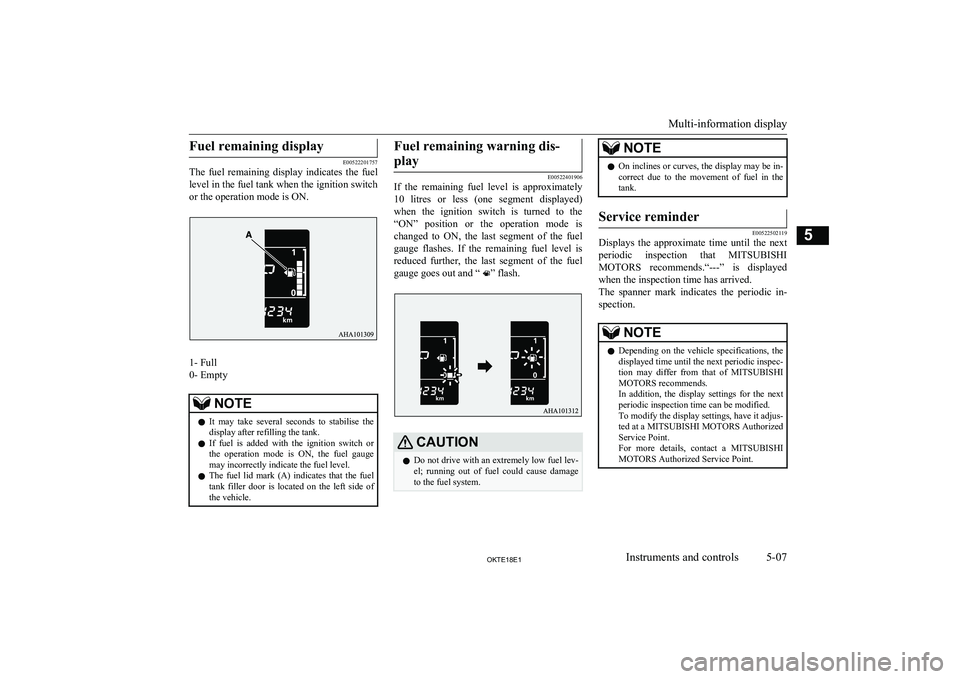
Fuel remaining display
E00522201757
The fuel remaining display indicates the fuel
level in the fuel tank when the ignition switch or the operation mode is ON.
1- Full
0- Empty
NOTEl It may take several seconds to stabilise the
display after refilling the tank.
l If fuel is added with the ignition switch or
the operation mode is ON, the fuel gauge
may incorrectly indicate the fuel level.
l The fuel lid mark (A) indicates that the fuel
tank filler door is located on the left side of the vehicle.Fuel remaining warning dis-
play
E00522401906
If the remaining fuel level is approximately
10 litres or less (one segment displayed)
when the ignition switch is turned to the “ON” position or the operation mode is
changed to ON, the last segment of the fuel gauge flashes. If the remaining fuel level is
reduced further, the last segment of the fuel gauge goes out and “
” flash.
CAUTIONl Do not drive with an extremely low fuel lev-
el; running out of fuel could cause damage to the fuel system.NOTEl On inclines or curves, the display may be in-
correct due to the movement of fuel in the
tank.Service reminder
E00522502119
Displays the approximate time until the next
periodic inspection that MITSUBISHI
MOTORS recommends.“---” is displayed
when the inspection time has arrived.
The spanner mark indicates the periodic in- spection.
NOTEl Depending on the vehicle specifications, the
displayed time until the next periodic inspec-
tion may differ from that of MITSUBISHI
MOTORS recommends.
In addition, the display settings for the next periodic inspection time can be modified.
To modify the display settings, have it adjus-
ted at a MITSUBISHI MOTORS Authorized Service Point.
For more details, contact a MITSUBISHI
MOTORS Authorized Service Point.
Multi-information display
5-07OKTE18E1Instruments and controls5
Page 98 of 466
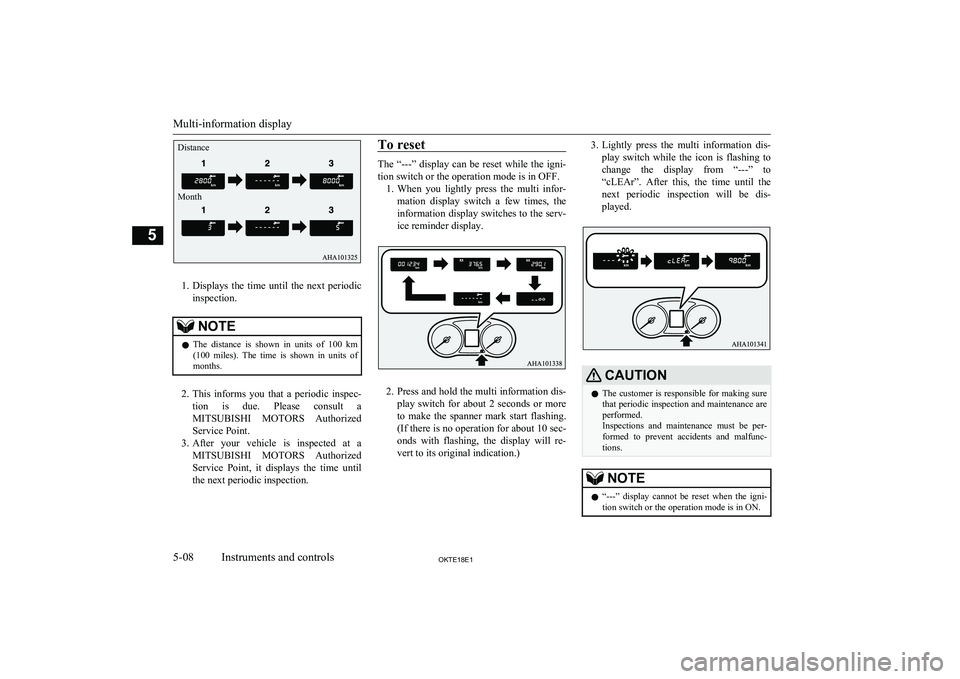
1.Displays the time until the next periodic
inspection.
NOTEl The distance is shown in units of 100 km
(100 miles). The time is shown in units of months.
2. This informs you that a periodic inspec-
tion is due. Please consult a MITSUBISHI MOTORS Authorized
Service Point.
3. After your vehicle is inspected at a
MITSUBISHI MOTORS Authorized
Service Point, it displays the time until the next periodic inspection.
To reset
The “---” display can be reset while the igni- tion switch or the operation mode is in OFF. 1. When you lightly press the multi infor-
mation display switch a few times, the
information display switches to the serv- ice reminder display.
2. Press and hold the multi information dis-
play switch for about 2 seconds or more to make the spanner mark start flashing.
(If there is no operation for about 10 sec-
onds with flashing, the display will re-
vert to its original indication.)
3. Lightly press the multi information dis-
play switch while the icon is flashing to
change the display from “---” to
“cLEAr”. After this, the time until the next periodic inspection will be dis-played.CAUTIONl The customer is responsible for making sure
that periodic inspection and maintenance are
performed.
Inspections and maintenance must be per- formed to prevent accidents and malfunc- tions.NOTEl “---” display cannot be reset when the igni-
tion switch or the operation mode is in ON.
Multi-information display
5-08OKTE18E1Instruments and controls5Distance
Month
Page 100 of 466
lWhen the engine switch or the operation
mode is in the following conditions, the
average fuel consumption display is au-
tomatically reset.
[Except for vehicles equipped with key-
less operation system]
The ignition switch is in the “ACC” or “LOCK” position for about 4 hours or
longer.
[For vehicles equipped with keyless op- eration system]
The operation mode is in ACC or OFF
for about 4 hours or longer.NOTEl The average fuel consumption display can
be reset separately for the auto reset mode and for the manual reset mode.
l The memory of the auto reset mode or man-
ual reset mode for the average fuel con- sumption display is erased if the battery isdisconnected.
l The initial (default) setting is “Auto reset
mode”.Changing the fuel consumption
display unit
E00523001808
The display unit for fuel consumption can be
switched. The distance and amount units are also switched to match the selected fuel con- sumption unit.
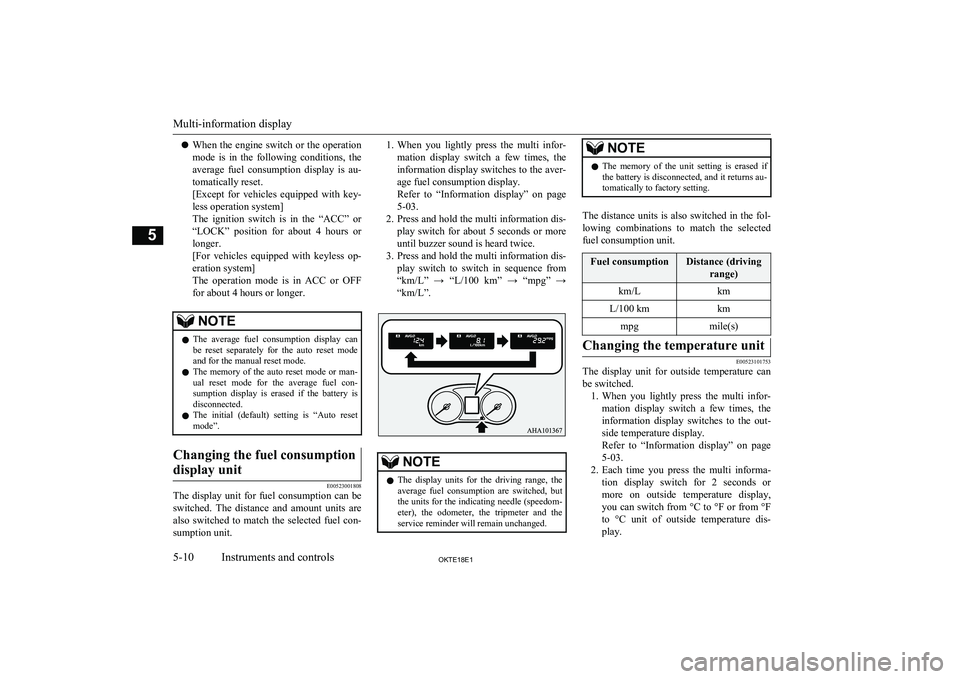
1. When you lightly press the multi infor-
mation display switch a few times, theinformation display switches to the aver-age fuel consumption display.
Refer to “Information display” on page
5-03.
2. Press and hold the multi information dis-
play switch for about 5 seconds or more until buzzer sound is heard twice.
3. Press and hold the multi information dis-
play switch to switch in sequence from “km/L” → “L/100 km” → “mpg” →“km/L”.NOTEl The display units for the driving range, the
average fuel consumption are switched, but the units for the indicating needle (speedom- eter), the odometer, the tripmeter and the
service reminder will remain unchanged.NOTEl The memory of the unit setting is erased if
the battery is disconnected, and it returns au- tomatically to factory setting.
The distance units is also switched in the fol-
lowing combinations to match the selected
fuel consumption unit.
Fuel consumptionDistance (driving range)km/LkmL/100 kmkmmpgmile(s)Changing the temperature unit
E00523101753
The display unit for outside temperature canbe switched. 1. When you lightly press the multi infor-
mation display switch a few times, the information display switches to the out-
side temperature display.
Refer to “Information display” on page
5-03.
2. Each time you press the multi informa-
tion display switch for 2 seconds or more on outside temperature display,you can switch from °C to °F or from °F
to °C unit of outside temperature dis-
play.
Multi-information display
5-10OKTE18E1Instruments and controls5
Page 107 of 466
refer to “Capacity” on page 11-17.Combination headlampsand dipper switch E00506004514
Headlamps
NOTElDo not leave the lamps on for a long time
while the engine is stationary (not running).A run-down battery could result.
l When it rains, or when the vehicle has been
washed, the inside of the lens sometimes be-
comes foggy, but this does not indicate a
functional problem.
When the lamp is switched on, the heat will remove the fog. However, if water gathers
inside the lamp, we recommend you to have it checked.
l The bulbs of the high intensity discharge
headlamps (if so equipped) have the follow-
ing characteristics.
• While the headlamps are used, the light
will gradually become a bluish-white col- our.
• The life time of a bulb becomes shorter as
it is repeatedly turned on and off. Whenthe bulb approaches the end of its life time, the brightness may decrease, the
bulb may flicker, and the light may be- come a reddish colour. If this occurs, have
the vehicle inspected by a MITSUBISHI
MOTORS Authorized Service Point.NOTE
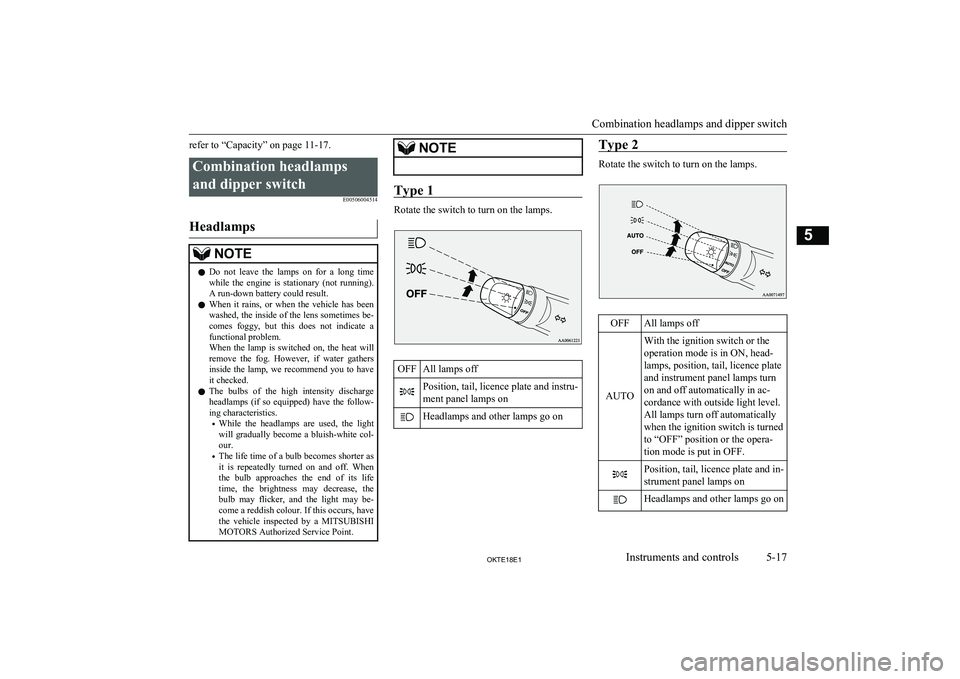
Type 1
Rotate the switch to turn on the lamps.
OFFAll lamps offPosition, tail, licence plate and instru-
ment panel lamps onHeadlamps and other lamps go onType 2
Rotate the switch to turn on the lamps.
OFFAll lamps off
AUTO
With the ignition switch or the
operation mode is in ON, head-
lamps, position, tail, licence plate
and instrument panel lamps turn
on and off automatically in ac-
cordance with outside light level.
All lamps turn off automatically
when the ignition switch is turned
to “OFF” position or the opera-
tion mode is put in OFF.Position, tail, licence plate and in-
strument panel lamps onHeadlamps and other lamps go on
Combination headlamps and dipper switch
5-17OKTE18E1Instruments and controls5
Page 108 of 466
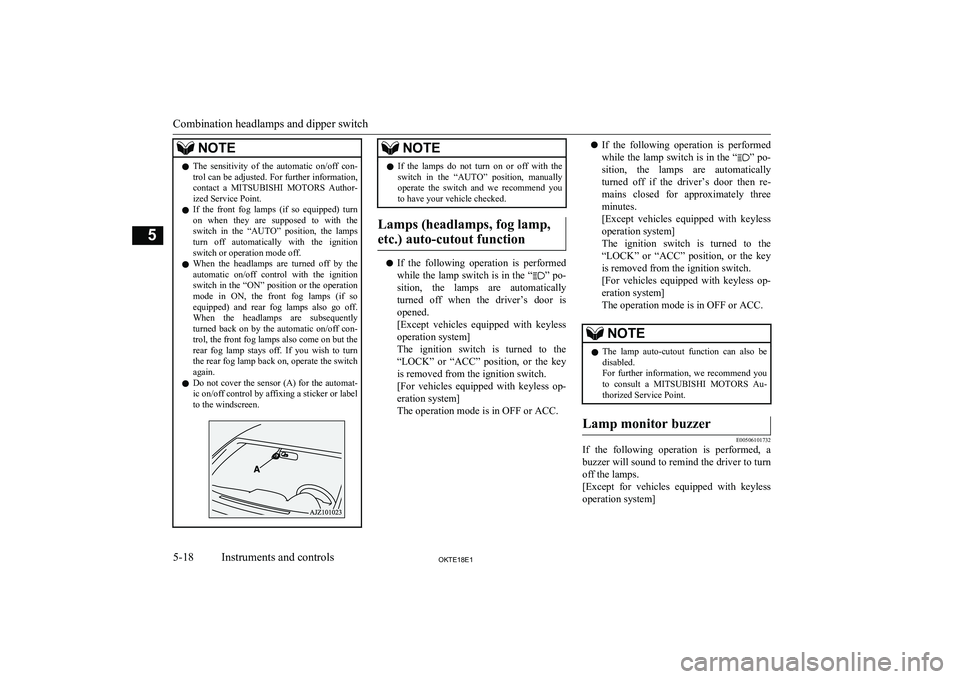
NOTElThe sensitivity of the automatic on/off con-
trol can be adjusted. For further information,contact a MITSUBISHI MOTORS Author-
ized Service Point.
l If the front fog lamps (if so equipped) turn
on when they are supposed to with theswitch in the “AUTO” position, the lamps
turn off automatically with the ignition
switch or operation mode off.
l When the headlamps are turned off by the
automatic on/off control with the ignition
switch in the “ON” position or the operation
mode in ON, the front fog lamps (if so
equipped) and rear fog lamps also go off.
When the headlamps are subsequently turned back on by the automatic on/off con-
trol, the front fog lamps also come on but the rear fog lamp stays off. If you wish to turn
the rear fog lamp back on, operate the switch again.
l Do not cover the sensor (A) for the automat-
ic on/off control by affixing a sticker or label
to the windscreen.NOTEl If the lamps do not turn on or off with the
switch in the “AUTO” position, manually
operate the switch and we recommend you
to have your vehicle checked.
Lamps (headlamps, fog lamp,
etc.) auto-cutout function
l If the following operation is performed
while the lamp switch is in the “” po-
sition, the lamps are automatically
turned off when the driver’s door is
opened.
[Except vehicles equipped with keyless
operation system]
The ignition switch is turned to the
“LOCK” or “ACC” position, or the key is removed from the ignition switch.
[For vehicles equipped with keyless op- eration system]
The operation mode is in OFF or ACC.
l If the following operation is performed
while the lamp switch is in the “” po-
sition, the lamps are automatically
turned off if the driver’s door then re- mains closed for approximately three
minutes.
[Except vehicles equipped with keyless
operation system]
The ignition switch is turned to the
“LOCK” or “ACC” position, or the key is removed from the ignition switch.
[For vehicles equipped with keyless op- eration system]
The operation mode is in OFF or ACC.NOTEl The lamp auto-cutout function can also be
disabled.
For further information, we recommend you
to consult a MITSUBISHI MOTORS Au-
thorized Service Point.Lamp monitor buzzer
E00506101732
If the following operation is performed, a
buzzer will sound to remind the driver to turn
off the lamps.
[Except for vehicles equipped with keyless
operation system]
Combination headlamps and dipper switch
5-18OKTE18E1Instruments and controls5
Page 111 of 466
2- Lane-change signalsWhen moving the lever to (2) slightly tochange a lane, the turn-signal lamps and
indication lamp in the instrument cluster will only flash while the lever is operat- ed.
Also, when you move the lever to (2) slightly then release it, the turn-signal lamps and indication lamp in the instru-
ment cluster will flash 3 times.NOTEl If the lamp flashes unusually quickly, the
bulb in a turn-signal lamp may have burned out. We recommend you to have the vehicle
inspected.
l It is possible to activate the following func-
tions.
• Flashing of the turn-signal lamps when
the lever is operated with the ignition
switch or the operation mode is in ACC.
• The turn-signal lamps 3-flash function for
lane changes can be deactivated.
• The time required to operate the lever for
the 3-flash function can be adjusted.
• Changing of the tone of a sounding buz-
zer as the turn-signal lamps flash.
For further information, we recommend you
to consult a MITSUBISHI MOTORS Au-
thorized Service Point.Hazard warning flasher
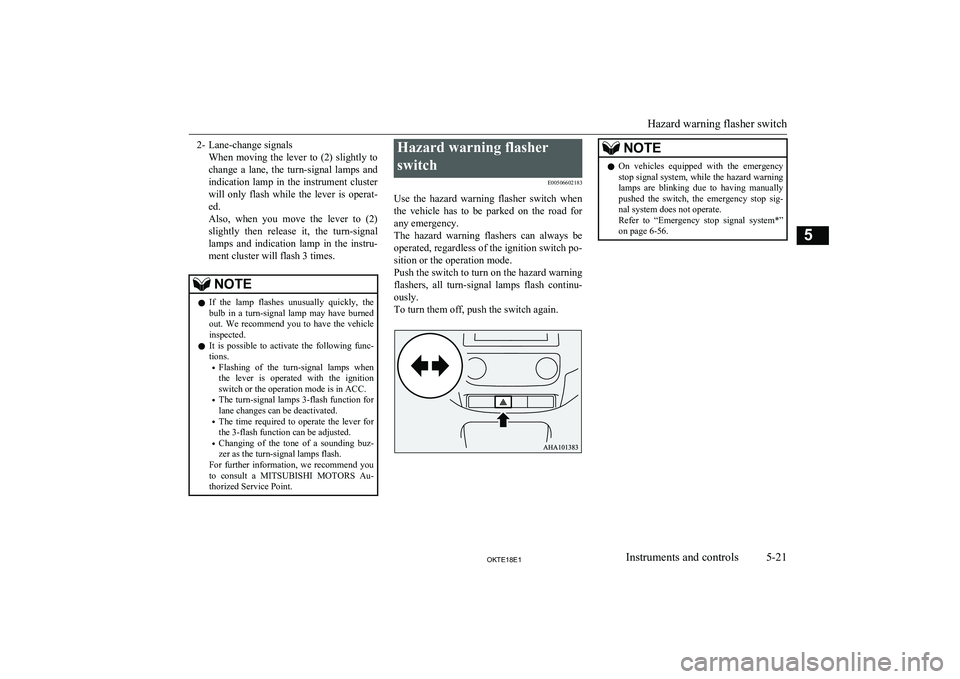
switch E00506602183
Use the hazard warning flasher switch when
the vehicle has to be parked on the road for
any emergency.
The hazard warning flashers can always be operated, regardless of the ignition switch po-
sition or the operation mode.
Push the switch to turn on the hazard warning flashers, all turn-signal lamps flash continu-
ously.
To turn them off, push the switch again.NOTEl On vehicles equipped with the emergency
stop signal system, while the hazard warning lamps are blinking due to having manually
pushed the switch, the emergency stop sig-
nal system does not operate.
Refer to “Emergency stop signal system*” on page 6-56.
Hazard warning flasher switch
5-21OKTE18E1Instruments and controls5
Page 113 of 466
NOTElTo turn the rear fog lamp on again, turn the
knob twice in the “ON” direction after turn-ing on the headlamps. (Vehicle with frontfog lamps)Wiper and washer switch
E00507102824
The windscreen wipers and washer can be
operated with the ignition switch or the oper- ation mode in ON or ACC.
If the blades are frozen to the windscreen, do
not operate the wipers until the ice has mel- ted and the blades are freed, otherwise thewiper motor may be damaged.
CAUTIONl If the washer is used in cold weather, the
washer fluid sprayed against the glass may freeze, which may hinder visibility. Warm
the glass with the defroster or rear window demister before using the washer.Windscreen wipers
E00516900127
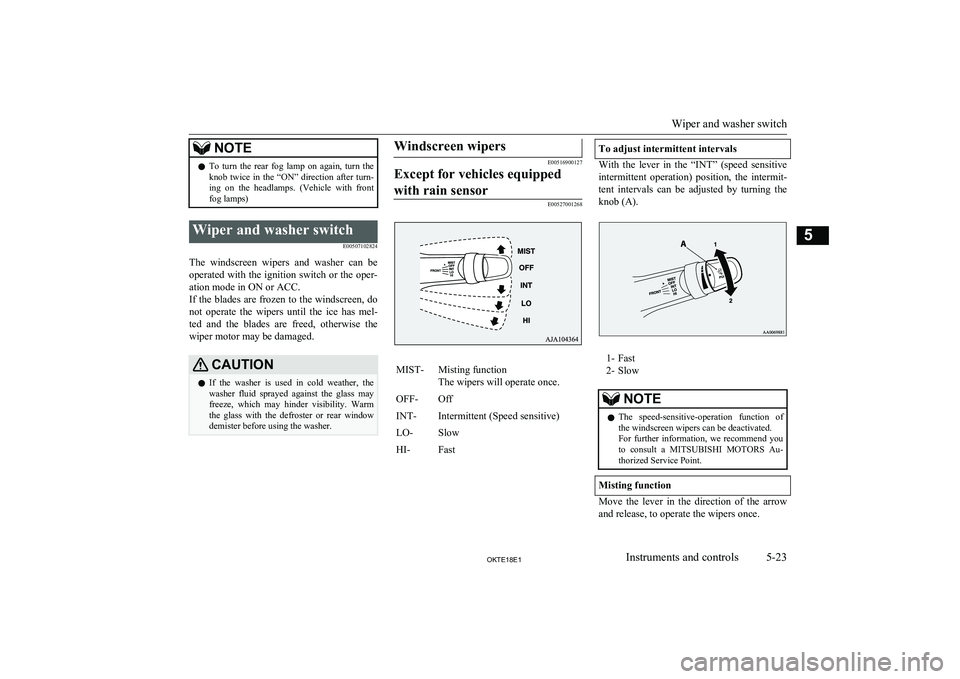
Except for vehicles equipped
with rain sensor
E00527001268
MIST-Misting function
The wipers will operate once.OFF-OffINT-Intermittent (Speed sensitive)LO-SlowHI-FastTo adjust intermittent intervals
With the lever in the “INT” (speed sensitive intermittent operation) position, the intermit-
tent intervals can be adjusted by turning the knob (A).
1- Fast
2- Slow
NOTEl The speed-sensitive-operation function of
the windscreen wipers can be deactivated.
For further information, we recommend you to consult a MITSUBISHI MOTORS Au-
thorized Service Point.
Misting function
Move the lever in the direction of the arrow
and release, to operate the wipers once.
Wiper and washer switch
5-23OKTE18E1Instruments and controls5
Page 115 of 466
NOTElDo not cover the sensor by affixing a sticker
or label to the windscreen. Also, do not put
any water-repellent coating on the wind- screen. The rain sensor would not be able to
detect the extent of rain, and the wipers might stop working normally.
l In the following cases, the rain sensor may
be malfunctioning.
For further information, we recommend you
to consult a MITSUBISHI MOTORS Au-
thorized Service Point.
• When the wipers operate at a constant in-
terval despite changes in the extent of rain.
• When the wipers do not operate even
though it is raining.
l The wipers may automatically operate when
things such as insects or foreign objects are affixed to the windscreen on top of the rainsensor or when the windscreen is frozen.
Objects affixed to the windscreen will stop
the wipers when the wipers cannot remove them. To operate the wipers again, move the
lever in the “LO” or “HI” position.
Also, the wipers may operate automatically
due to strong direct sunlight or electromag- netic wave. To stop the wipers, place thelever in the “OFF” position.
l Contact a
MITSUBISHI MOTORS Author-
ized Service Point when replacing the wind- screen or reinforcing the glass around the
sensor.To adjust the sensitivity of the rain sensor
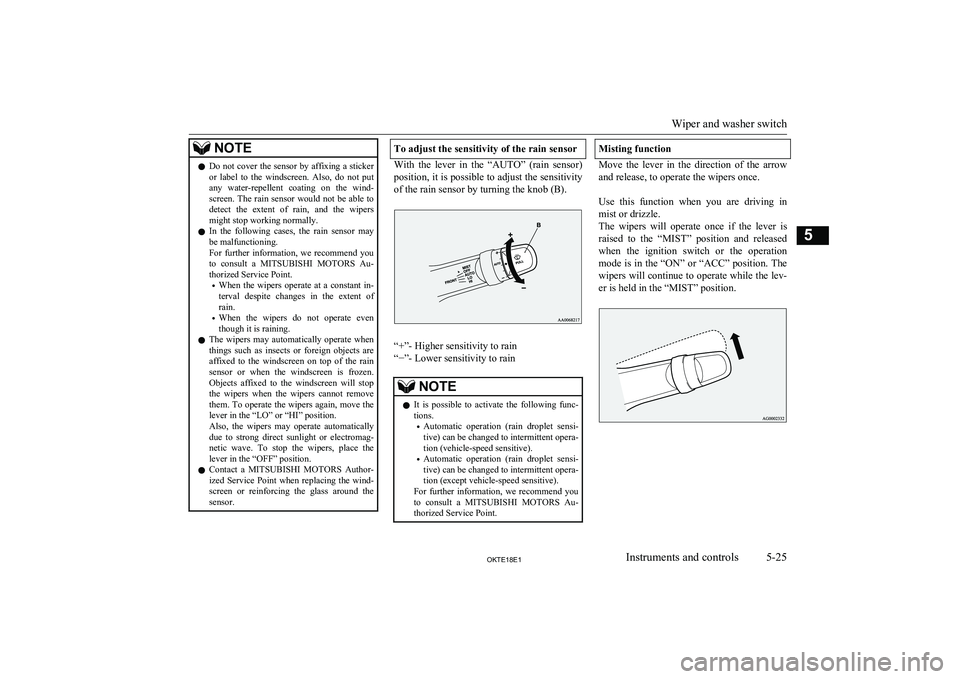
With the lever in the “AUTO” (rain sensor)
position, it is possible to adjust the sensitivity of the rain sensor by turning the knob (B).
“+”- Higher sensitivity to rain
“−”- Lower sensitivity to rain
NOTEl It is possible to activate the following func-
tions.
• Automatic operation (rain droplet sensi-
tive) can be changed to intermittent opera-
tion (vehicle-speed sensitive).
• Automatic operation (rain droplet sensi-
tive) can be changed to intermittent opera-
tion (except vehicle-speed sensitive).
For further information, we recommend you to consult a MITSUBISHI MOTORS Au-
thorized Service Point.Misting function
Move the lever in the direction of the arrow
and release, to operate the wipers once.
Use this function when you are driving in
mist or drizzle.
The wipers will operate once if the lever is raised to the “MIST” position and released
when the ignition switch or the operation
mode is in the “ON” or “ACC” position. The wipers will continue to operate while the lev-
er is held in the “MIST” position.Wiper and washer switch
5-25OKTE18E1Instruments and controls5
Page 120 of 466
Economical drivingE00600102608
For economical driving, there are some tech- nical requirements that have to be met. Theprerequisite for low fuel consumption is a
properly adjusted engine. In order to achieve longer life of the vehicle and the most eco- nomical operation, we recommend you tohave the vehicle checked at regular intervals in accordance with the service standards.
Fuel economy and generation of exhaust gas
and noise are highly influenced by personal
driving habits as well as the particular operat- ing conditions. The following points shouldbe observed in order to minimize wear of
brakes, tyres and engine as well as to reduce
environmental pollution.
Accelerating and decelerating
Drive according to the traffic conditions andavoid sudden starts, sudden acceleration and
sudden braking, as they will increase fuel
consumption.
Shifting
Shift only at an appropriate speed and engine speed. Always use the highest shift position
possible.
The transfer shift lever or the drive mode-se-
lector should be set to “2H” when driving 4WD vehicles on normal roads and express
ways to obtain best possible fuel economy.
City traffic
Frequent starting and stopping increases the
average fuel consumption. Use roads with smooth traffic flow whenever possible. When driving on congested roads, avoid use of a
low shift position at high engine speeds.
Idling
The vehicle consumes fuel even during idling. Avoid extended idling whenever pos-
sible.
Speed
At higher vehicle speed, more fuel is con-
sumed. Avoid driving at full speed. Even a slight release of the accelerator pedal willsave a significant amount of fuel.
Tyre inflation pressure
Check the tyre inflation pressures at regular intervals. Low tyre inflation pressure increa-ses road resistance and fuel consumption. In addition, low tyre pressures adversely affect
tyre wear and driving stability.
Cargo loads
Do not drive with unnecessary articles in the
luggage compartment. Especially during city
driving where frequent starting and stopping is necessary, the increased weight of the ve-
hicle will greatly affect fuel consumption. Al- so avoid driving with unnecessary luggage or carriers, etc., on the roof; the increased air re- sistance will increase fuel consumption.
Cold engine starting
Starting of a cold engine consumes more fuel. Unnecessary fuel consumption is alsocaused by keeping a hot engine running. Af-
ter the engine is started, commence driving as soon as possible.
Cooler or air conditioning
The use of the air conditioner will increase the fuel consumption.
Driving, alcohol and drugs
E00600200070
Driving after drinking alcohol is one of the
most frequent causes of accidents.
Economical driving
6-02OKTE18E1Starting and driving6