coolant temperature MITSUBISHI LANCER 2005 User Guide
[x] Cancel search | Manufacturer: MITSUBISHI, Model Year: 2005, Model line: LANCER, Model: MITSUBISHI LANCER 2005Pages: 788, PDF Size: 45.98 MB
Page 123 of 788
EMISSION CONTROL
ENGINE AND EMISSION CONTROL17-15
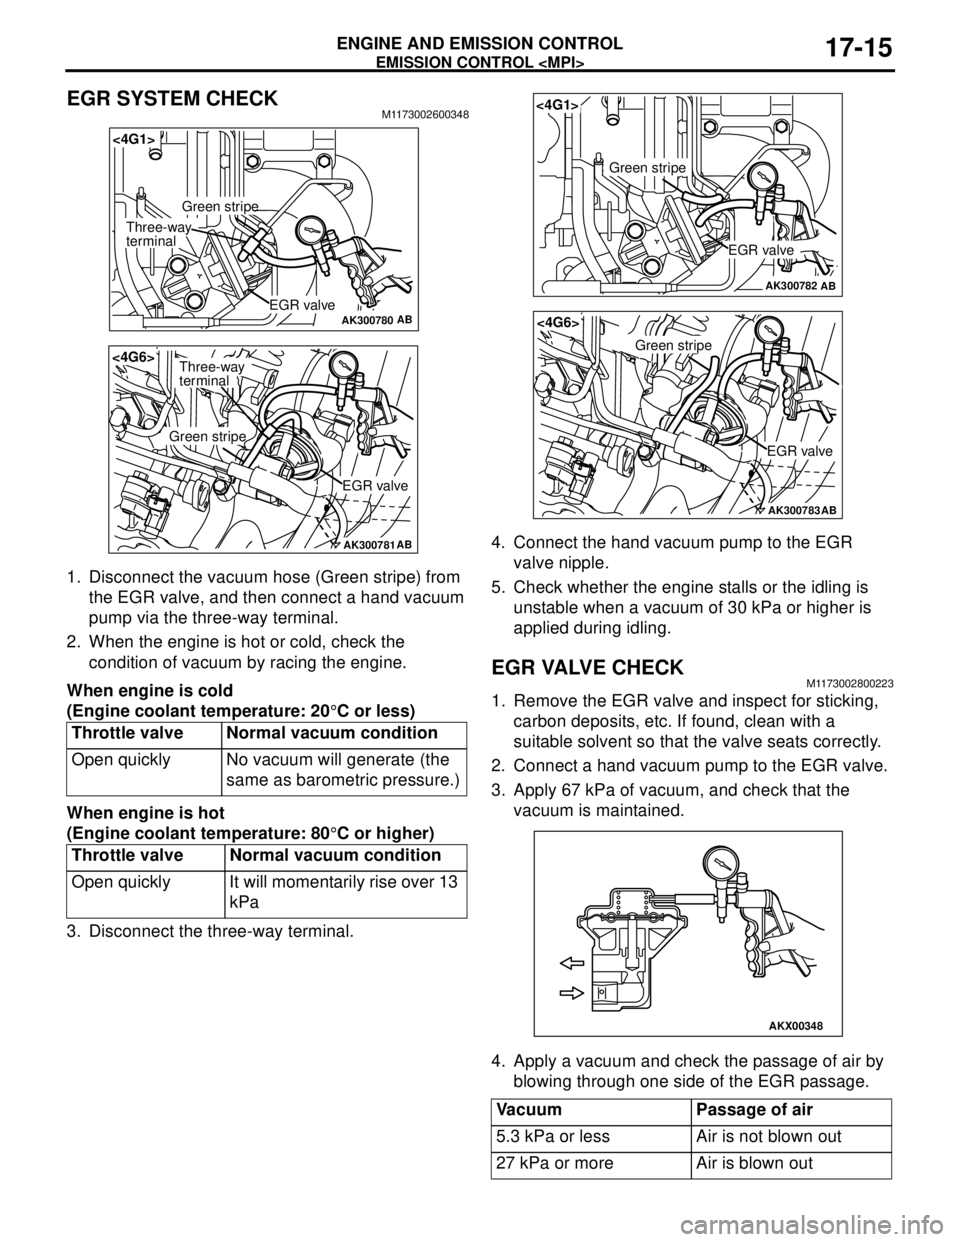
EGR SYSTEM CHECKM1173002600348
1. Disconnect the vacuum hose (Green stripe) from
the EGR valve, and then connect a hand vacuum
pump via the three-way terminal.
2. When the engine is hot or cold, check the
condition of vacuum by racing the engine.
When engine is cold
(Engine coolant temperature: 20°C or less)
When engine is hot
(Engine coolant temperature: 80°C or higher)
3. Disconnect the three-way terminal.4. Connect the hand vacuum pump to the EGR
valve nipple.
5. Check whether the engine stalls or the idling is
unstable when a vacuum of 30 kPa or higher is
applied during idling.
EGR VALVE CHECKM1173002800223
1. Remove the EGR valve and inspect for sticking,
carbon deposits, etc. If found, clean with a
suitable solvent so that the valve seats correctly.
2. Connect a hand vacuum pump to the EGR valve.
3. Apply 67 kPa of vacuum, and check that the
vacuum is maintained.
4. Apply a vacuum and check the passage of air by
blowing through one side of the EGR passage. Throttle valve Normal vacuum condition
Open quickly No vacuum will generate (the
same as barometric pressure.)
Throttle valve Normal vacuum condition
Open quickly It will momentarily rise over 13
kPa
AK300780AB
<4G1>
EGR valve
Green stripe
Three-way
terminal
AK300781AB
<4G6>
EGR valve
Green stripe
Three-way
terminal
Vacuum Passage of air
5.3 kPa or less Air is not blown out
27 kPa or more Air is blown out
AK300782AB
<4G1>
EGR valve
Green stripe
AK300783AB
<4G6>
EGR valve
Green stripe
AKX00348
Page 390 of 788
54A-2
COMBINATION METER
ASSEMBLY . . . . . . . . . . . . . . . .
54A-29
SERVICE SPECIFICATIONS. . . . .
54A-29
SEALANT. . . . . . . . . . . . . . . . . . . .54A-29
SPECIAL TOOLS. . . . . . . . . . . . . .54A-29
TROUBLESHOOTING . . . . . . . . . .54A-31
SYMPTOM CHART . . . . . . . . . . . . . . . . 54A-31
SYMPTOM PROCEDURES . . . . . .54A-32
ON-VEHICLE SERVICE. . . . . . . . .54A-60
SPEEDOMETER CHECK . . . . . . . . . . . 54A-60
TACHOMETER CHECK . . . . . . . . . . . . 54A-60
FUEL TANK GAUGE UNIT CHECK . . . 54A-61
ENGINE COOLANT TEMPERATURE GAUGE
UNIT CHECK . . . . . . . . . . . . . . . . . . . . . 54A-61
COMBINATION METER ASSEMBLY54A-63
REMOVAL AND INSTALLATION . . . . . 54A-63
INSPECTION . . . . . . . . . . . . . . . . . . . . . 54A-64
DISASSEMBLY AND REASSEMBLY . . 54A-65
HEADLAMP . . . . . . . . . . . . . . . .54A-66
SERVICE SPECIFICATIONS. . . . .
54A-66
TROUBLESHOOTING . . . . . . . . . .54A-66
ON-VEHICLE SERVICE. . . . . . . . .54A-66
HEADLAMP AIMING . . . . . . . . . . . . . . . 54A-66
LUMINOUS INTENSITY
MEASUREMENT . . . . . . . . . . . . . . . . . . 54A-67
BULB REPLACEMENT . . . . . . . . . . . . . 54A-68
HEADLAMP . . . . . . . . . . . . . . . . . .54A-69
REMOVAL AND INSTALLATION . . . . . 54A-69
HEADLAMP LEVELING SWITCH .54A-70
REMOVAL AND INSTALLATION . . . . . 54A-70
INSPECTION . . . . . . . . . . . . . . . . . . . . . 54A-70
FOG LAMP . . . . . . . . . . . . . . . . 54A-71
SERVICE SPECIFICATION . . . . . .
54A-71
SPECIAL TOOL . . . . . . . . . . . . . . .54A-71
TROUBLESHOOTING . . . . . . . . . .54A-71
ON-VEHICLE SERVICE . . . . . . . . .54A-71
FRONT FOG LAMP AIMING CHECK . . 54A-71
FOG LAMP . . . . . . . . . . . . . . . . . . .54A-73
REMOVAL AND INSTALLATION . . . . . . 54A-73
FOG LAMP SWITCH . . . . . . . . . . .54A-74
REMOVAL AND INSTALLATION . . . . . . 54A-74
INSPECTION . . . . . . . . . . . . . . . . . . . . . 54A-74
REAR FOG LAMP . . . . . . . . . . 54A-75
TROUBLESHOOTING . . . . . . . . . .
54A-75
SPECIAL TOOL . . . . . . . . . . . . . . .54A-75
REAR FOG LAMP . . . . . . . . . . . . .54A-76
REMOVAL AND INSTALLATION . . . . . . 54A-76
REAR FOG LAMP SWITCH . . . . . .54A-76
REMOVAL AND INSTALATION . . . . . . . 54A-76
INSPECTION . . . . . . . . . . . . . . . . . . . . . 54A-76
SIDE TURN-SIGNAL LAMP. . . 54A-77
SPECIAL TOOL . . . . . . . . . . . . . . .
54A-77
SIDE TURN-SIGNAL LAMP . . . . . .54A-77
REMOVAL AND INSTALLATION . . . . . . 54A-77
ROOM LAMP . . . . . . . . . . . . . . 54A-78
TROUBLESHOOTING . . . . . . . . . . . . . . 54A-78
Continued on next page
Page 417 of 788
COMBINATION METER ASSEMBLY
CHASSIS ELECTRICAL54A-29
COMBINATION METER ASSEMBLY
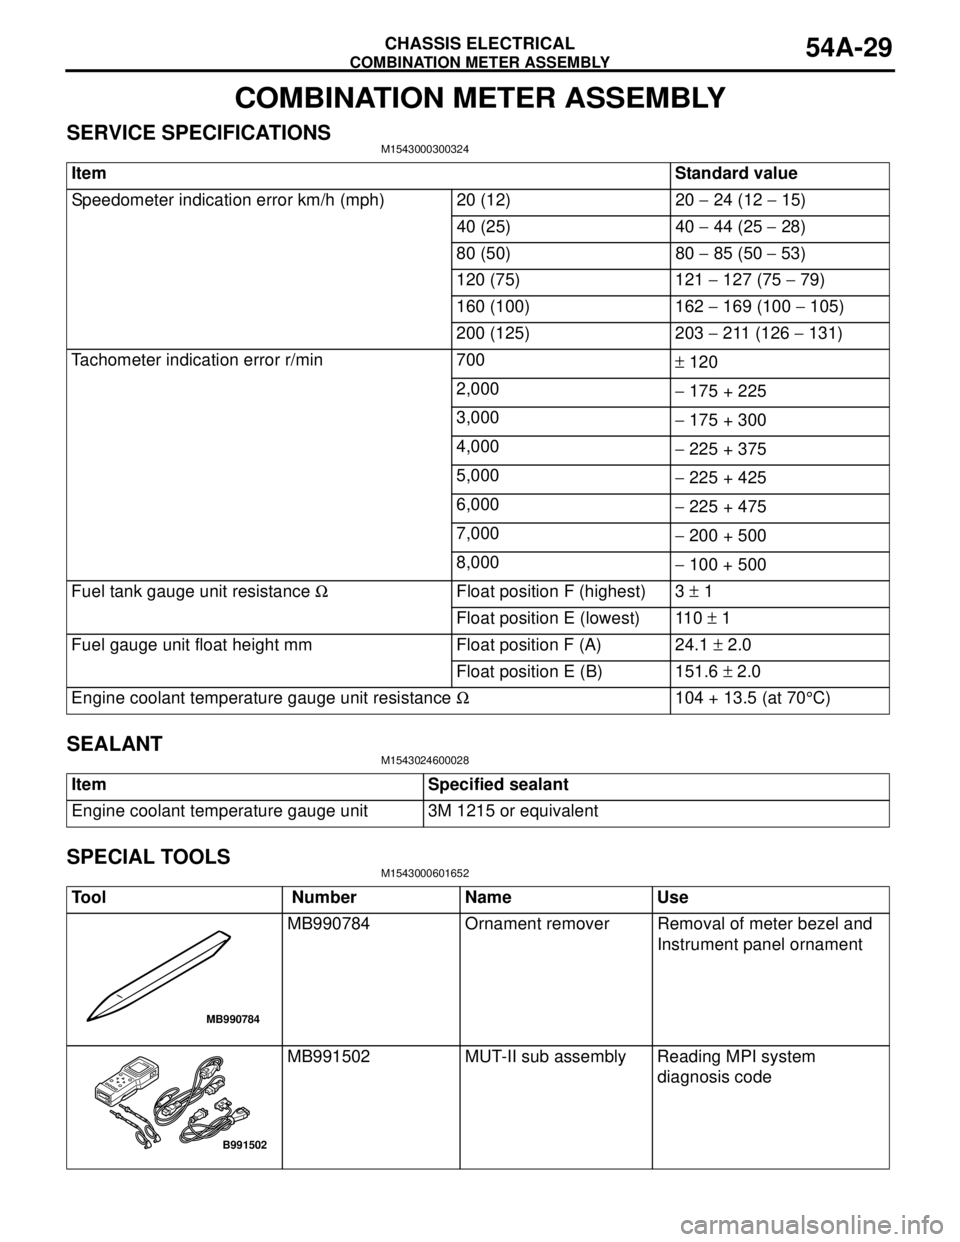
SERVICE SPECIFICATIONSM1543000300324
SEALANTM1543024600028
SPECIAL TOOLSM1543000601652
ItemStandard value
Speedometer indication error km/h (mph) 20 (12) 20 − 24 (12 − 15)
40 (25) 40 − 44 (25 − 28)
80 (50) 80 − 85 (50 − 53)
120 (75) 121 − 127 (75 − 79)
160 (100) 162 − 169 (100 − 105)
200 (125) 203 − 211 (126 − 131)
Tachometer indication error r/min 700
± 120
2,000
− 175 + 225
3,000
− 175 + 300
4,000
− 225 + 375
5,000
− 225 + 425
6,000
− 225 + 475
7,000
− 200 + 500
8,000
− 100 + 500
Fuel tank gauge unit resistance ΩFloat position F (highest) 3 ± 1
Float position E (lowest) 110 ± 1
Fuel gauge unit float height mm Float position F (A) 24.1 ± 2.0
Float position E (B) 151.6 ± 2.0
Engine coolant temperature gauge unit resistance Ω104 + 13.5 (at 70°C)
Item Specified sealant
Engine coolant temperature gauge unit 3M 1215 or equivalent
Tool Number Name Use
MB990784 Ornament remover Removal of meter bezel and
Instrument panel ornament
MB991502 MUT-II sub assembly Reading MPI system
diagnosis code
MB990784
B991502
Page 419 of 788

COMBINATION METER ASSEMBLY
CHASSIS ELECTRICAL54A-31
TROUBLESHOOTING
SYMPTOM CHARTM1543007201086
MB991223
A: MB991219
B: MB991220
C: MB991221
D: MB991222Harness set
A: Test harness
B: LED harness
C: LED harness
adapter
D: ProbeMaking voltage and
resistance measurements
during troubleshooting
A: Connect pin contact
pressure inspection
B: Power circuit inspection
C: Power circuit inspection
D: Commercial tester
connection Tool Number Name Use
MB991223
A
B
C
D
AC
Symptom Inspection
procedure No.Reference page
Speedometer does not work (the other meters work).
P.54A-32
Speedometer does not work (the other meters work). 2
P.54A-37
Tachometer does not work (the other meters work). 3
P.54A-44
Fuel gauge does not work (the other meters work). 4
P.54A-48
Engine coolant temperature gauge does not work (the other
meters work).5
P.54A-51
Combination meters does not work (the instruments do not
work).6
P.54A-54
Page 439 of 788
COMBINATION METER ASSEMBLY
CHASSIS ELECTRICAL54A-51
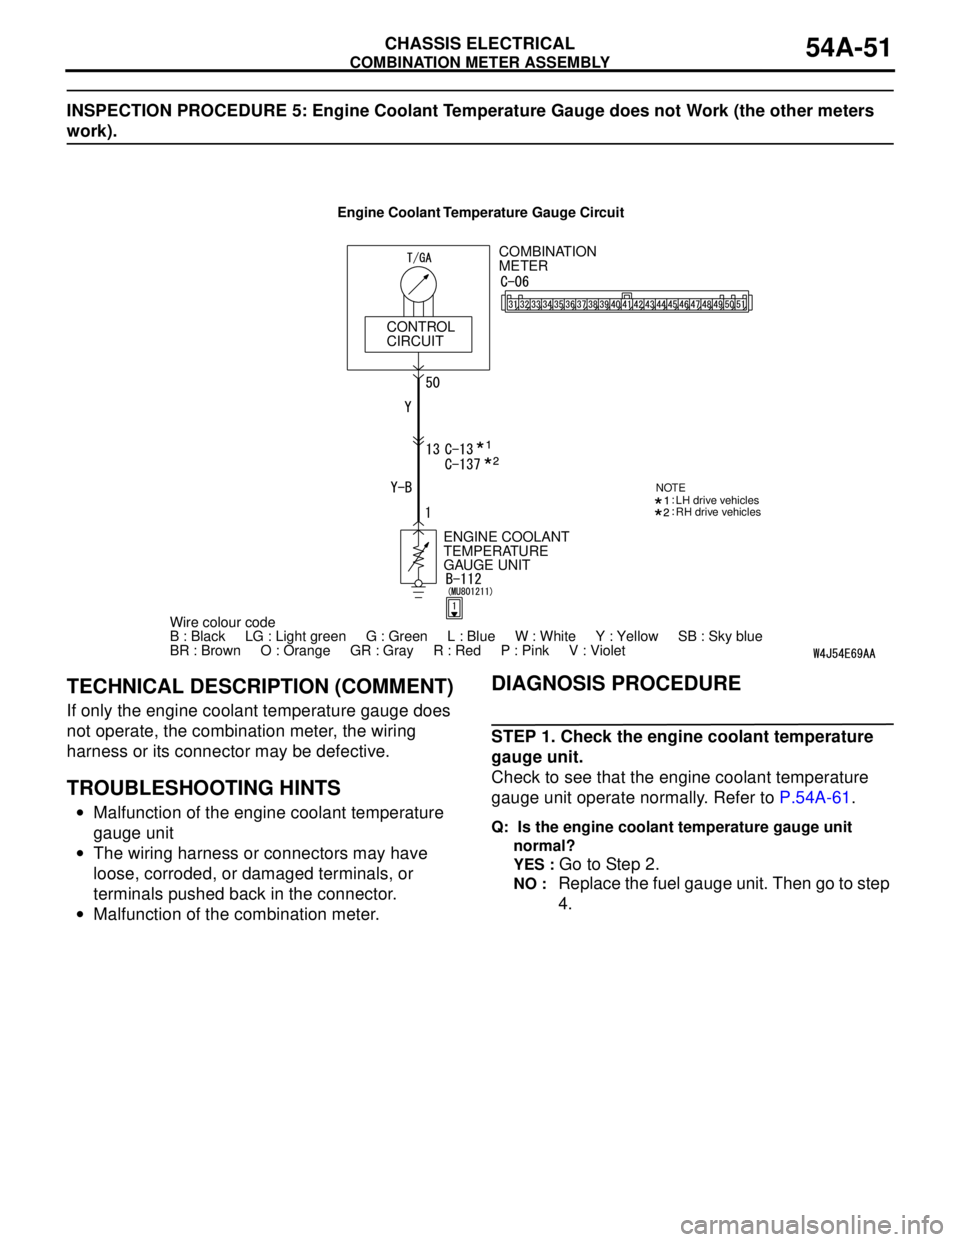
INSPECTION PROCEDURE 5: Engine Coolant Temperature Gauge does not Work (the other meters
work).
TECHNICAL DESCRIPTION (COMMENT)
If only the engine coolant temperature gauge does
not operate, the combination meter, the wiring
harness or its connector may be defective.
TROUBLESHOOTING HINTS
•Malfunction of the engine coolant temperature
gauge unit
•The wiring harness or connectors may have
loose, corroded, or damaged terminals, or
terminals pushed back in the connector.
•Malfunction of the combination meter.
DIAGNOSIS PROCEDURE
STEP 1. Check the engine coolant temperature
gauge unit.
Check to see that the engine coolant temperature
gauge unit operate normally. Refer to P.54A-61.
Q: Is the engine coolant temperature gauge unit
normal?
YES :
Go to Step 2.
NO : Replace the fuel gauge unit. Then go to step
4.
COMBINATION
METER
CONTROL
CIRCUIT
Wire colour code
B : Black LG : Light green G : Green L : Blue W : White Y : Yellow SB : Sky blue
BR : Brown O : Orange GR : Gray R : Red P : Pink V : Violet ENGINE COOLANT
TEMPERATURE
GAUGE UNIT
NOTELH drive vehicles
RH drive vehicles
Engine Coolant Temperature Gauge Circuit
Page 440 of 788

COMBINATION METER ASSEMBLY
CHASSIS ELECTRICAL54A-52
STEP 2. Connector check: Combination meter
connector C-06 and engine coolant temperature
gauge unit connector B-112
Q: Is combination meter connector C-06 and engine
coolant temperature gauge unit connector B-112 in
good condition?
YES :
Go to Step 3.
NO : Repair or replace the damage
component(s).
STEP 3. Check the wiring harness between
combination meter connector C-06 (terminal 50)
and engine coolant temperature gauge unit
connector B-112 (terminal 1).
AC303784
Connector: B-112
<4G1-MPI>
Harness side
B-112 (B)
AF
AC303792
AE
Connector: B-112
<4G6-MPI>
B-112 (B) Harness side
AC303798
Connector: C-06
Harness side
C-06 (L)
31 32 33 34 35 36 37 38 39 40 41 42 43 44 45 46 47 48 49 50 51
AV
AC303814AU
Connector: C-06
Harness side
31 32 33 34 35 36 37 38 39 40 41 42 43 44 45 46 47 48 49 50 51
C-06 (L)
Page 441 of 788
COMBINATION METER ASSEMBLY
CHASSIS ELECTRICAL54A-53
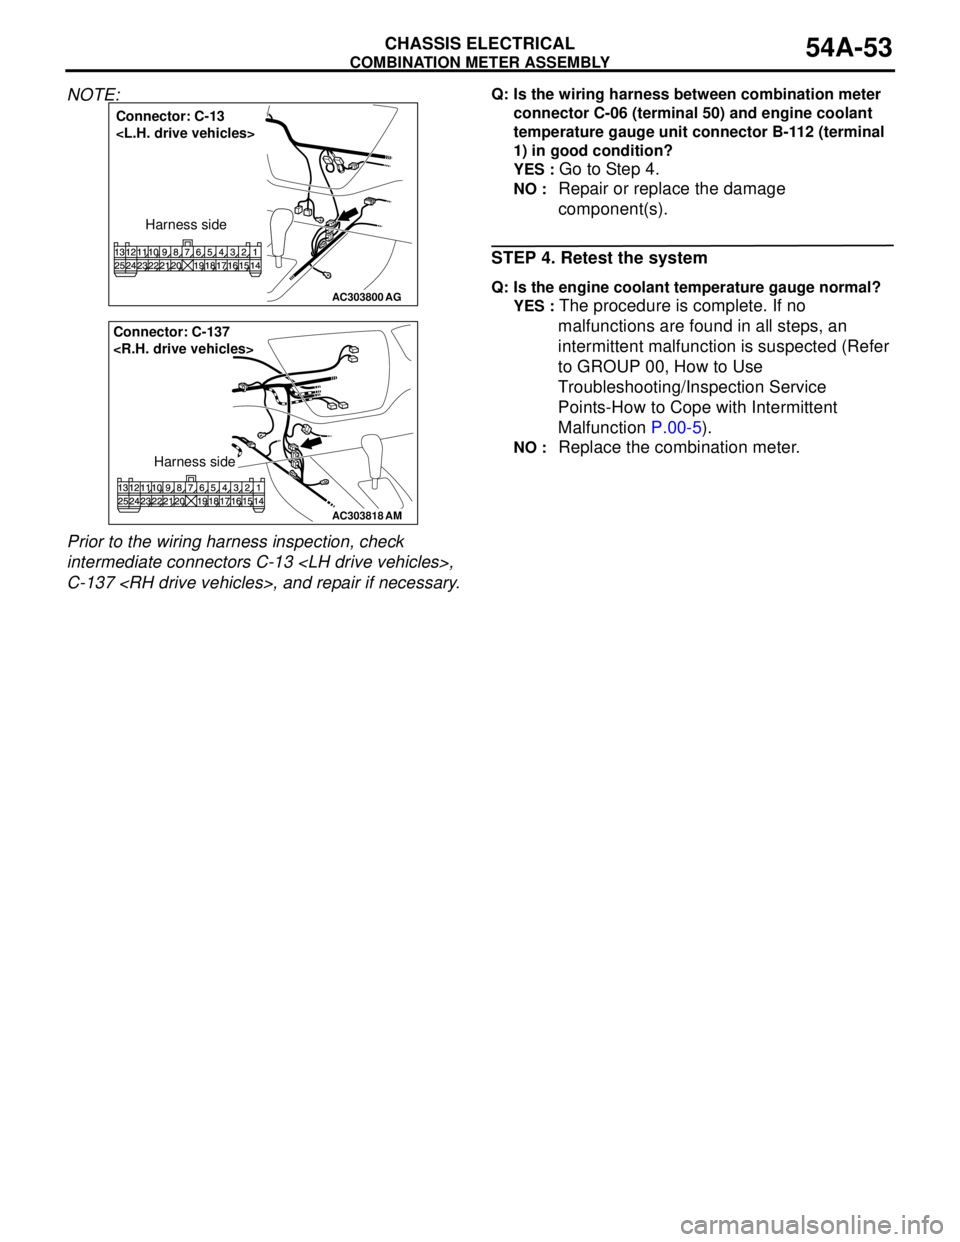
NOTE:
Prior to the wiring harness inspection, check
intermediate connectors C-13
C-137
connector C-06 (terminal 50) and engine coolant
temperature gauge unit connector B-112 (terminal
1) in good condition?
YES :
Go to Step 4.
NO : Repair or replace the damage
component(s).
STEP 4. Retest the system
Q: Is the engine coolant temperature gauge normal?
YES :
The procedure is complete. If no
malfunctions are found in all steps, an
intermittent malfunction is suspected (Refer
to GROUP 00, How to Use
Troubleshooting/Inspection Service
Points-How to Cope with Intermittent
Malfunction P.00-5).
NO : Replace the combination meter.
AC303800
Connector: C-13
Harness side
AG
AC303818
AM
Connector: C-137
Harness side
Page 449 of 788
COMBINATION METER ASSEMBLY
CHASSIS ELECTRICAL54A-61
NOTE: For tachometer check, use an external
high quality inductive tachometer.
2. Compare the readings of the vehicle tachometer
and the external tachometer at every engine
speed, and check if the variations are within the
standard values.
Standard values:
FUEL TANK GAUGE UNIT CHECKM1543001200461
Remove the fuel tank gauge unit. (Refer to GROUP
13C, Fuel Tank P.13C-4.)
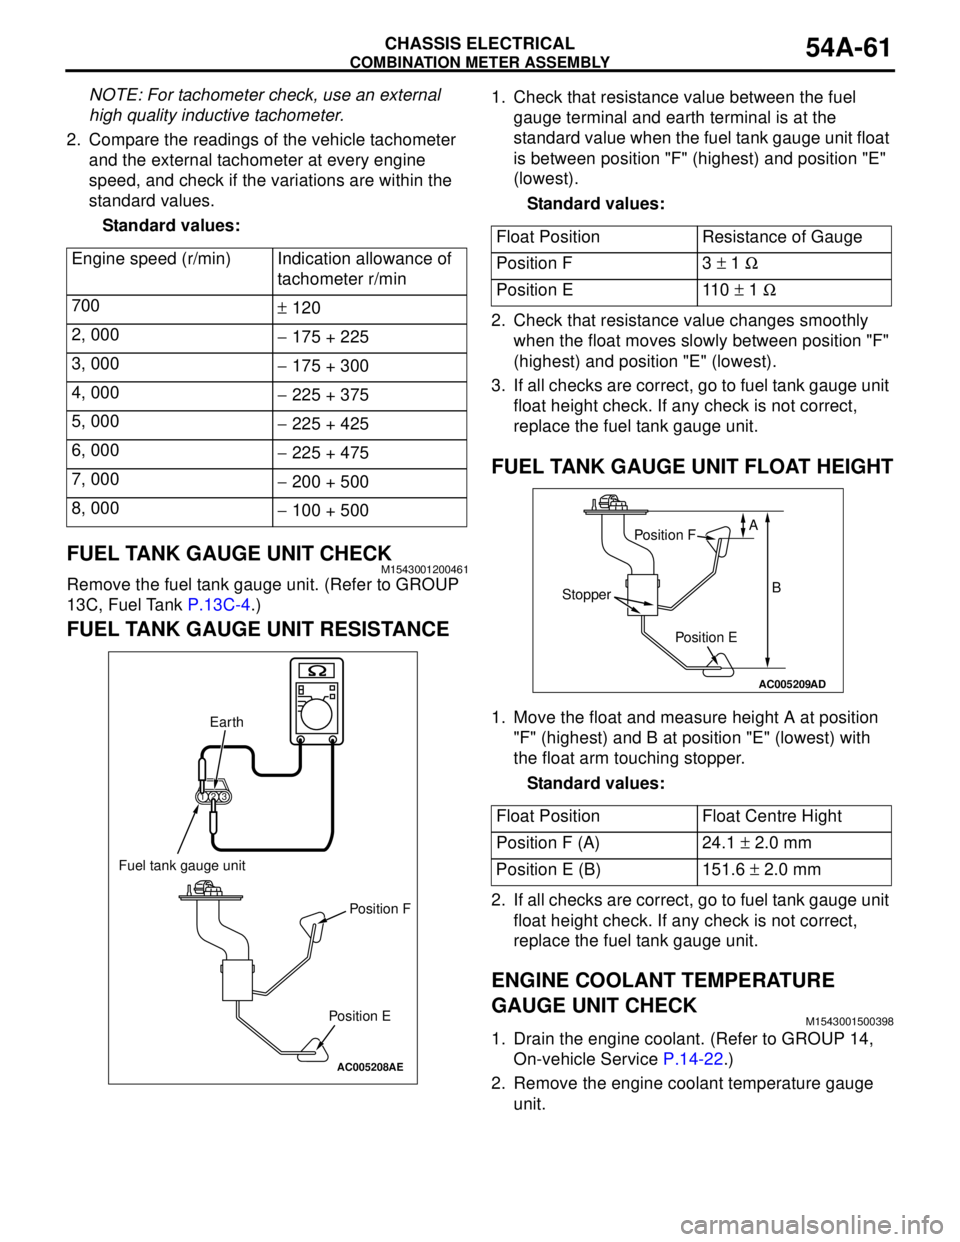
FUEL TANK GAUGE UNIT RESISTANCE
1. Check that resistance value between the fuel
gauge terminal and earth terminal is at the
standard value when the fuel tank gauge unit float
is between position "F" (highest) and position "E"
(lowest).
Standard values:
2. Check that resistance value changes smoothly
when the float moves slowly between position "F"
(highest) and position "E" (lowest).
3. If all checks are correct, go to fuel tank gauge unit
float height check. If any check is not correct,
replace the fuel tank gauge unit.
FUEL TANK GAUGE UNIT FLOAT HEIGHT
1. Move the float and measure height A at position
"F" (highest) and B at position "E" (lowest) with
the float arm touching stopper.
Standard values:
2. If all checks are correct, go to fuel tank gauge unit
float height check. If any check is not correct,
replace the fuel tank gauge unit.
ENGINE COOLANT TEMPERATURE
GAUGE UNIT CHECK
M1543001500398
1. Drain the engine coolant. (Refer to GROUP 14,
On-vehicle Service P.14-22.)
2. Remove the engine coolant temperature gauge
unit. Engine speed (r/min) Indication allowance of
tachometer r/min
700
± 120
2, 000
− 175 + 225
3, 000
− 175 + 300
4, 000
− 225 + 375
5, 000
− 225 + 425
6, 000
− 225 + 475
7, 000
− 200 + 500
8, 000
− 100 + 500
AC005208
123
AE
Fuel tank gauge unit
Earth
Position F
Position E
Float Position Resistance of Gauge
Position F 3 ± 1 Ω
Position E 110 ± 1 Ω
Float Position Float Centre Hight
Position F (A) 24.1 ± 2.0 mm
Position E (B) 151.6 ± 2.0 mm
AC005209
AD
Position F
Position E
Stopper
A
B
Page 450 of 788
COMBINATION METER ASSEMBLY
CHASSIS ELECTRICAL54A-62
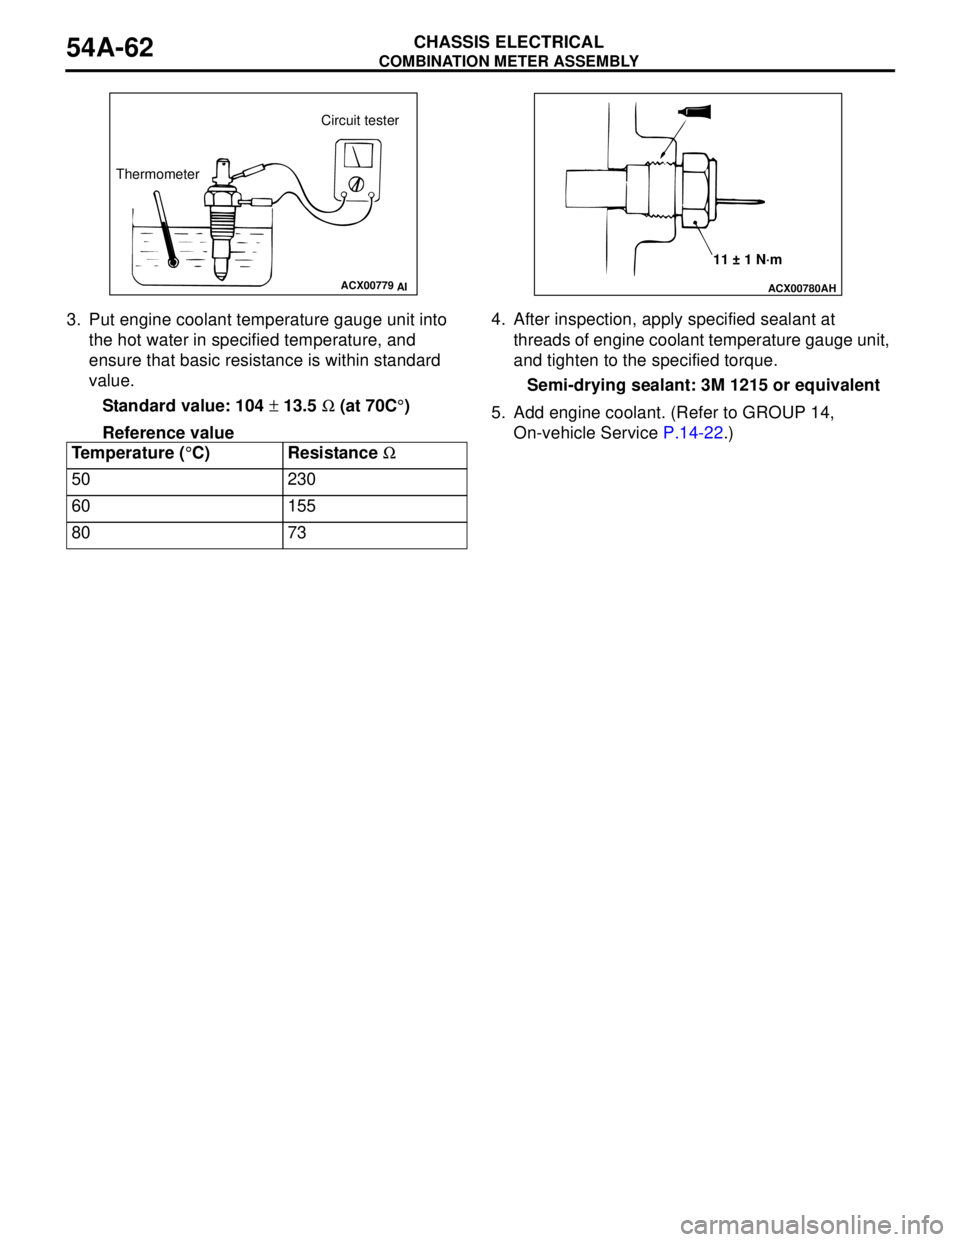
3. Put engine coolant temperature gauge unit into
the hot water in specified temperature, and
ensure that basic resistance is within standard
value.
Standard value: 104 ± 13.5 Ω (at 70C°)
Reference value4. After inspection, apply specified sealant at
threads of engine coolant temperature gauge unit,
and tighten to the specified torque.
Semi-drying sealant: 3M 1215 or equivalent
5. Add engine coolant. (Refer to GROUP 14,
On-vehicle Service P.14-22.)
Temperature (°C) Resistance Ω
50 230
60 155
80 73
ACX00779
AI
Circuit tester
Thermometer
ACX00780
AH
11 ± 1 N·m
Page 452 of 788
COMBINATION METER ASSEMBLY
CHASSIS ELECTRICAL54A-64
INSPECTIONM1543019502407
VEHICLE SPEED SENSOR CHECK
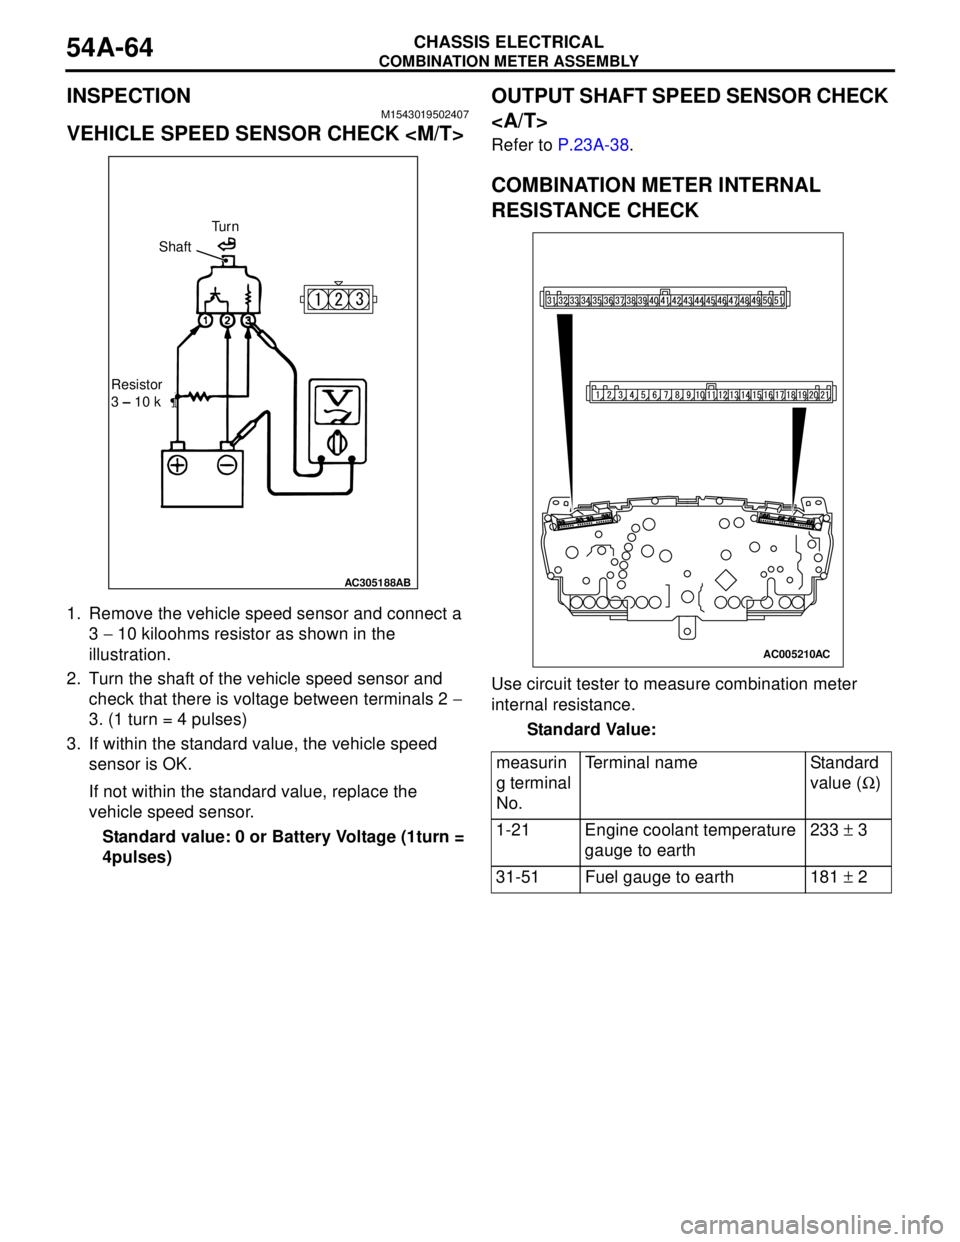
1. Remove the vehicle speed sensor and connect a
3 − 10 kiloohms resistor as shown in the
illustration.
2. Turn the shaft of the vehicle speed sensor and
check that there is voltage between terminals 2 −
3. (1 turn = 4 pulses)
3. If within the standard value, the vehicle speed
sensor is OK.
If not within the standard value, replace the
vehicle speed sensor.
Standard value: 0 or Battery Voltage (1turn =
4pulses)
OUTPUT SHAFT SPEED SENSOR CHECK
Refer to P.23A-38.
COMBINATION METER INTERNAL
RESISTANCE CHECK
Use circuit tester to measure combination meter
internal resistance.
Standard Value:
AC305188AB
Tu r n
Shaft
Resistor
3 – 10 k
measurin
g terminal
No.Terminal name Standard
value (Ω)
1-21 Engine coolant temperature
gauge to earth233 ± 3
31-51 Fuel gauge to earth 181 ± 2
AC005210AC