engine oil MITSUBISHI LANCER 2005 Owner's Manual
[x] Cancel search | Manufacturer: MITSUBISHI, Model Year: 2005, Model line: LANCER, Model: MITSUBISHI LANCER 2005Pages: 788, PDF Size: 45.98 MB
Page 82 of 788
CHARGING SYSTEM
ENGINE ELECTRICAL16-18
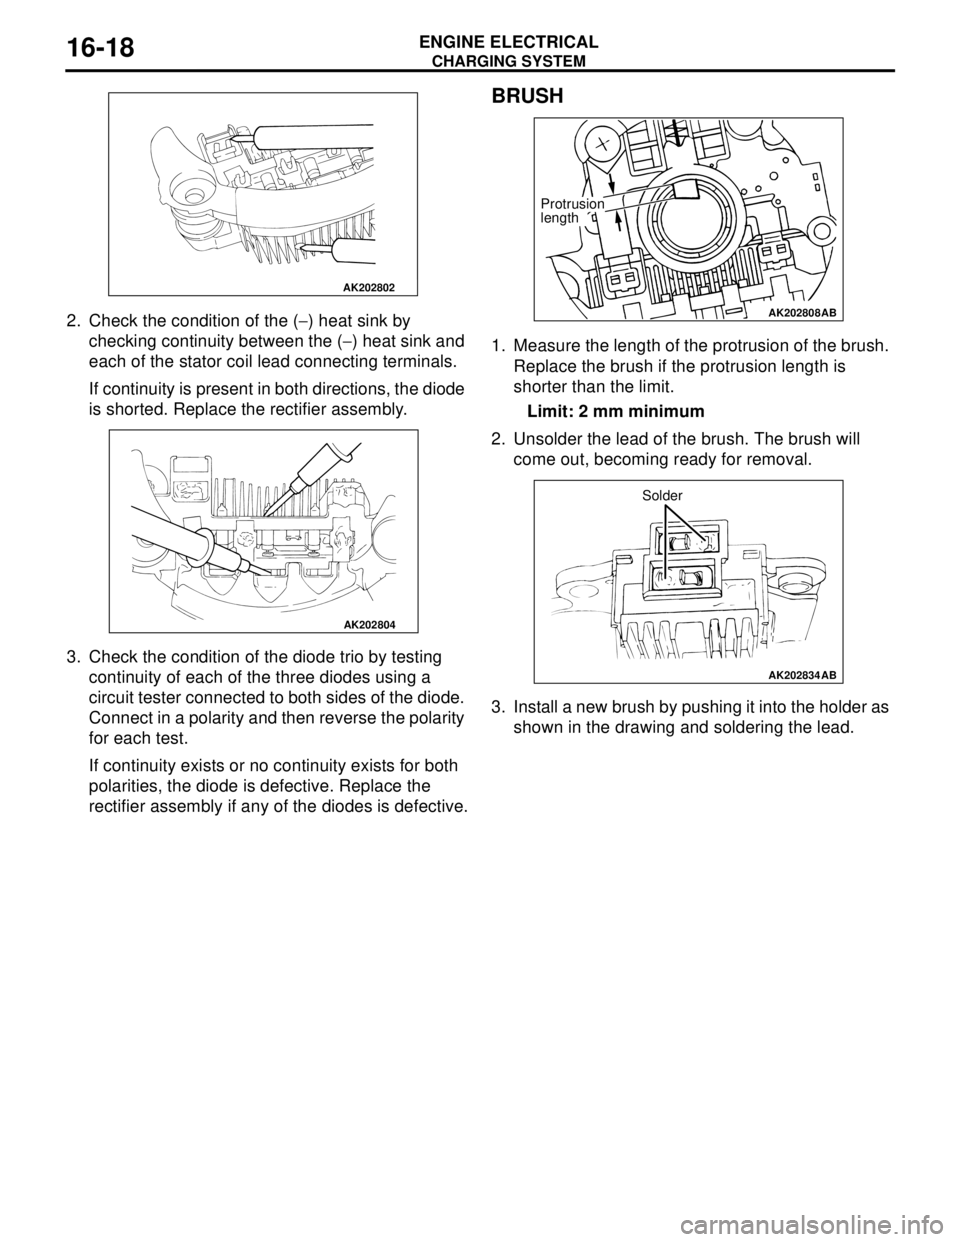
2. Check the condition of the (−) heat sink by
checking continuity between the (−) heat sink and
each of the stator coil lead connecting terminals.
If continuity is present in both directions, the diode
is shorted. Replace the rectifier assembly.
3. Check the condition of the diode trio by testing
continuity of each of the three diodes using a
circuit tester connected to both sides of the diode.
Connect in a polarity and then reverse the polarity
for each test.
If continuity exists or no continuity exists for both
polarities, the diode is defective. Replace the
rectifier assembly if any of the diodes is defective.
BRUSH
1. Measure the length of the protrusion of the brush.
Replace the brush if the protrusion length is
shorter than the limit.
Limit: 2 mm minimum
2. Unsolder the lead of the brush. The brush will
come out, becoming ready for removal.
3. Install a new brush by pushing it into the holder as
shown in the drawing and soldering the lead.
AK202802
AK202804
AK202808
Protrusion
length
AB
AK202834
Solder
AB
Page 83 of 788
STARTING SYSTEM
ENGINE ELECTRICAL16-19
STARTING SYSTEM
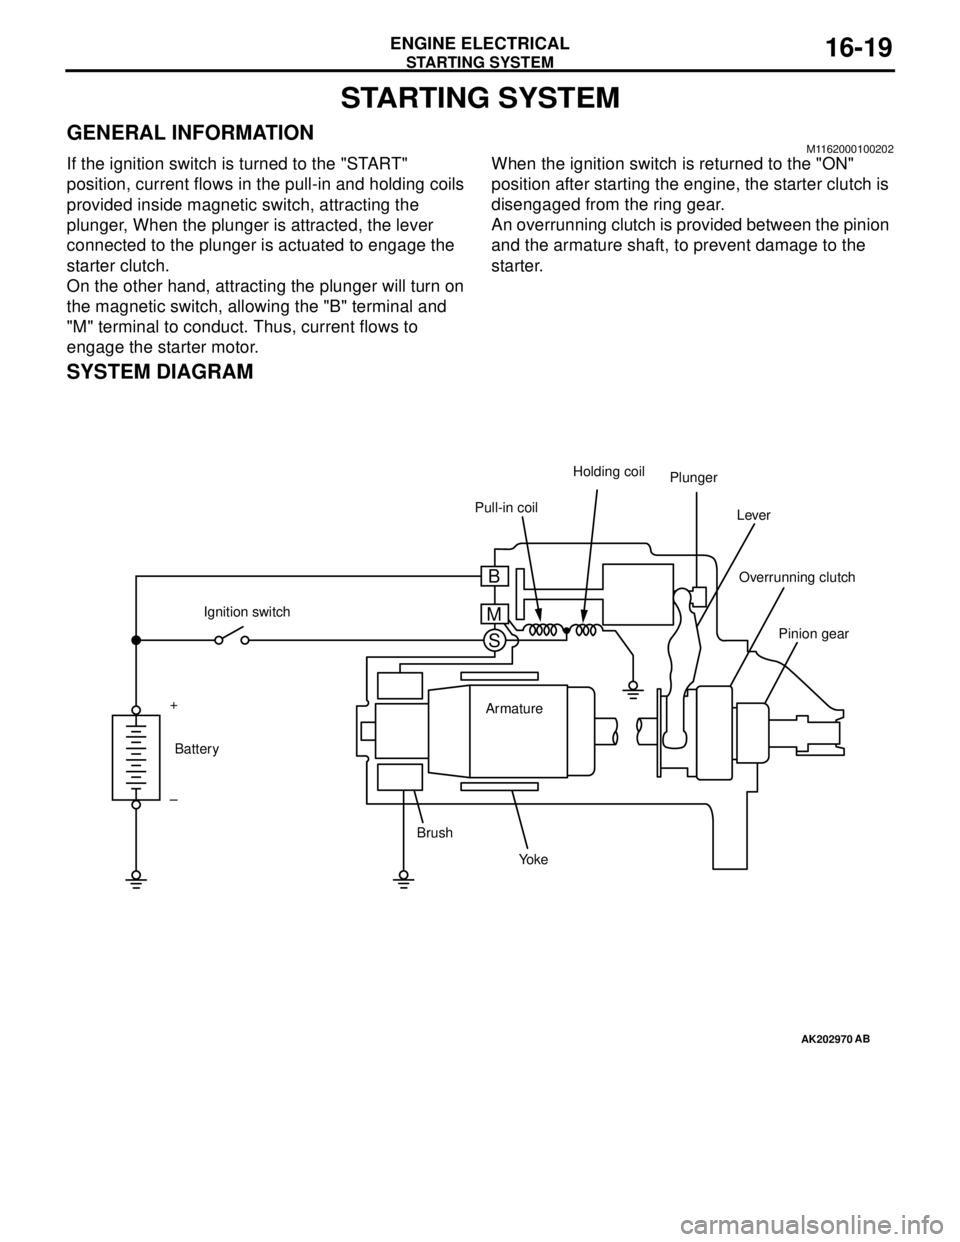
GENERAL INFORMATIONM1162000100202
If the ignition switch is turned to the "START"
position, current flows in the pull-in and holding coils
provided inside magnetic switch, attracting the
plunger, When the plunger is attracted, the lever
connected to the plunger is actuated to engage the
starter clutch.
On the other hand, attracting the plunger will turn on
the magnetic switch, allowing the "B" terminal and
"M" terminal to conduct. Thus, current flows to
engage the starter motor.When the ignition switch is returned to the "ON"
position after starting the engine, the starter clutch is
disengaged from the ring gear.
An overrunning clutch is provided between the pinion
and the armature shaft, to prevent damage to the
starter.
SYSTEM DIAGRAM
AK202970
Pull-in coilHolding coil
Plunger
Lever
Pinion gear Overrunning clutch
Yo k e BrushArmature Ignition switch
Battery +
–
AB
B
M
S
Page 87 of 788
STARTING SYSTEM
ENGINE ELECTRICAL16-23
STARTER MOTOR ASSEMBLY INSPECTIONM1162001100205
PINION GAP ADJUSTMENT
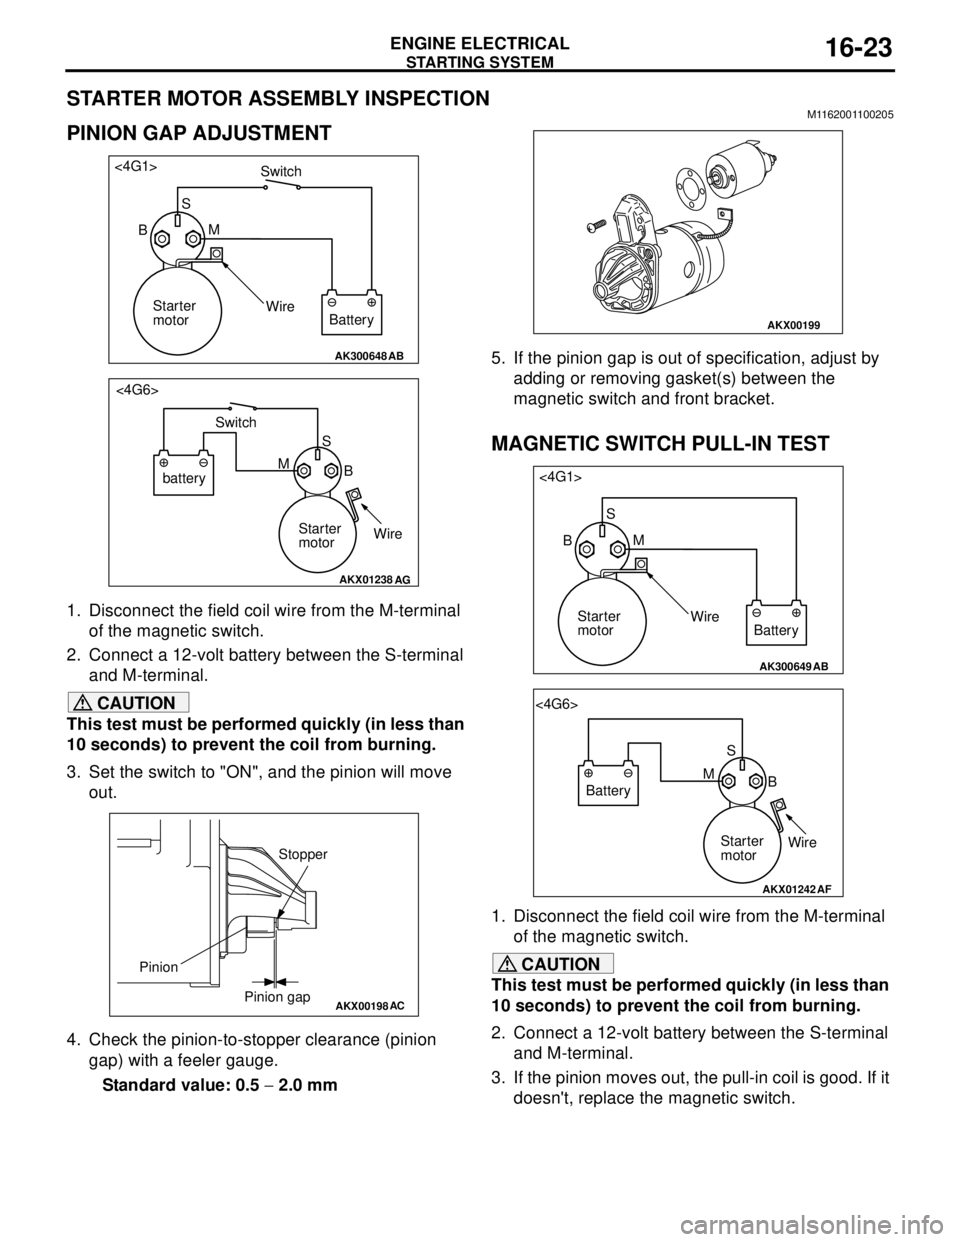
1. Disconnect the field coil wire from the M-terminal
of the magnetic switch.
2. Connect a 12-volt battery between the S-terminal
and M-terminal.
CAUTION
This test must be performed quickly (in less than
10 seconds) to prevent the coil from burning.
3. Set the switch to "ON", and the pinion will move
out.
4. Check the pinion-to-stopper clearance (pinion
gap) with a feeler gauge.
Standard value: 0.5 − 2.0 mm5. If the pinion gap is out of specification, adjust by
adding or removing gasket(s) between the
magnetic switch and front bracket.
MAGNETIC SWITCH PULL-IN TEST
1. Disconnect the field coil wire from the M-terminal
of the magnetic switch.
CAUTION
This test must be performed quickly (in less than
10 seconds) to prevent the coil from burning.
2. Connect a 12-volt battery between the S-terminal
and M-terminal.
3. If the pinion moves out, the pull-in coil is good. If it
doesn't, replace the magnetic switch.
AK300648AB
<4G1>
Switch
S
M
Wire
Battery Starter
motor B
AKX01238
<4G6>
B MS
batterySwitch
Starter
motorWire
AG
AKX00198
Stopper
Pinion gap Pinion
AC
AKX00199
AK300649AB
<4G1>
S
M
Wire
Battery Starter
motor B
AKX01242
<4G6>
S
B M
Battery
Starter
motorWire
AF
Page 88 of 788
STARTING SYSTEM
ENGINE ELECTRICAL16-24
MAGNETIC SWITCH HOLD-IN TEST
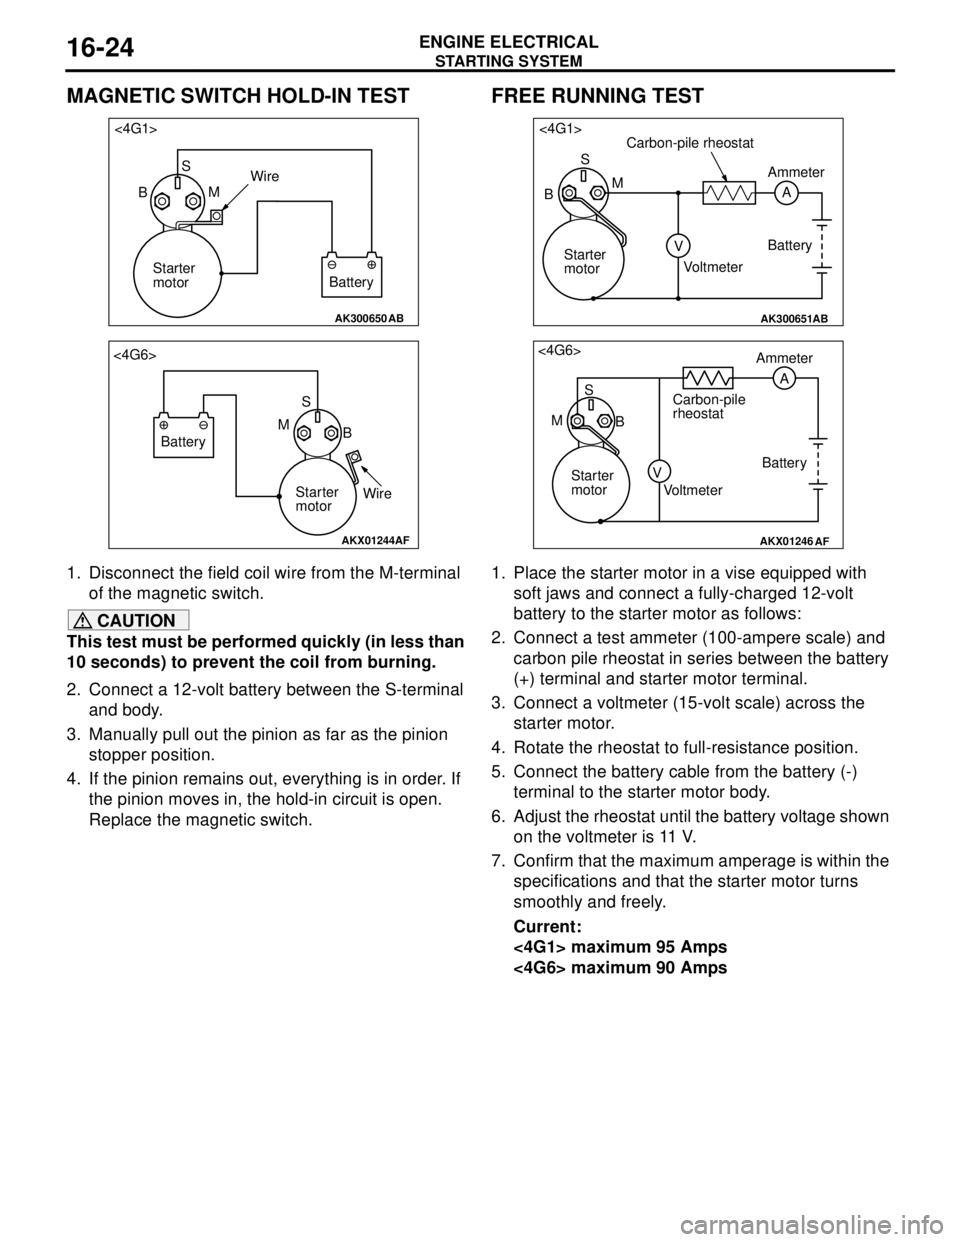
1. Disconnect the field coil wire from the M-terminal
of the magnetic switch.
CAUTION
This test must be performed quickly (in less than
10 seconds) to prevent the coil from burning.
2. Connect a 12-volt battery between the S-terminal
and body.
3. Manually pull out the pinion as far as the pinion
stopper position.
4. If the pinion remains out, everything is in order. If
the pinion moves in, the hold-in circuit is open.
Replace the magnetic switch.
FREE RUNNING TEST
1. Place the starter motor in a vise equipped with
soft jaws and connect a fully-charged 12-volt
battery to the starter motor as follows:
2. Connect a test ammeter (100-ampere scale) and
carbon pile rheostat in series between the battery
(+) terminal and starter motor terminal.
3. Connect a voltmeter (15-volt scale) across the
starter motor.
4. Rotate the rheostat to full-resistance position.
5. Connect the battery cable from the battery (-)
terminal to the starter motor body.
6. Adjust the rheostat until the battery voltage shown
on the voltmeter is 11 V.
7. Confirm that the maximum amperage is within the
specifications and that the starter motor turns
smoothly and freely.
Current:
<4G1> maximum 95 Amps
<4G6> maximum 90 Amps
AK300650AB
<4G1>
S
BMWire
Battery Starter
motor
AKX01244
<4G6>
S
B M
Battery
Starter
motorWire
AF
AK300651AB
<4G1>
S
A M
V BCarbon-pile rheostat
Battery
VoltmeterAmmeter
Starter
motor
AKX01246
<4G6>
S
M
BAmmeter
Carbon-pile
rheostat
Battery
Starter
motor
Voltmeter
AF
A
V
Page 89 of 788
STARTING SYSTEM
ENGINE ELECTRICAL16-25
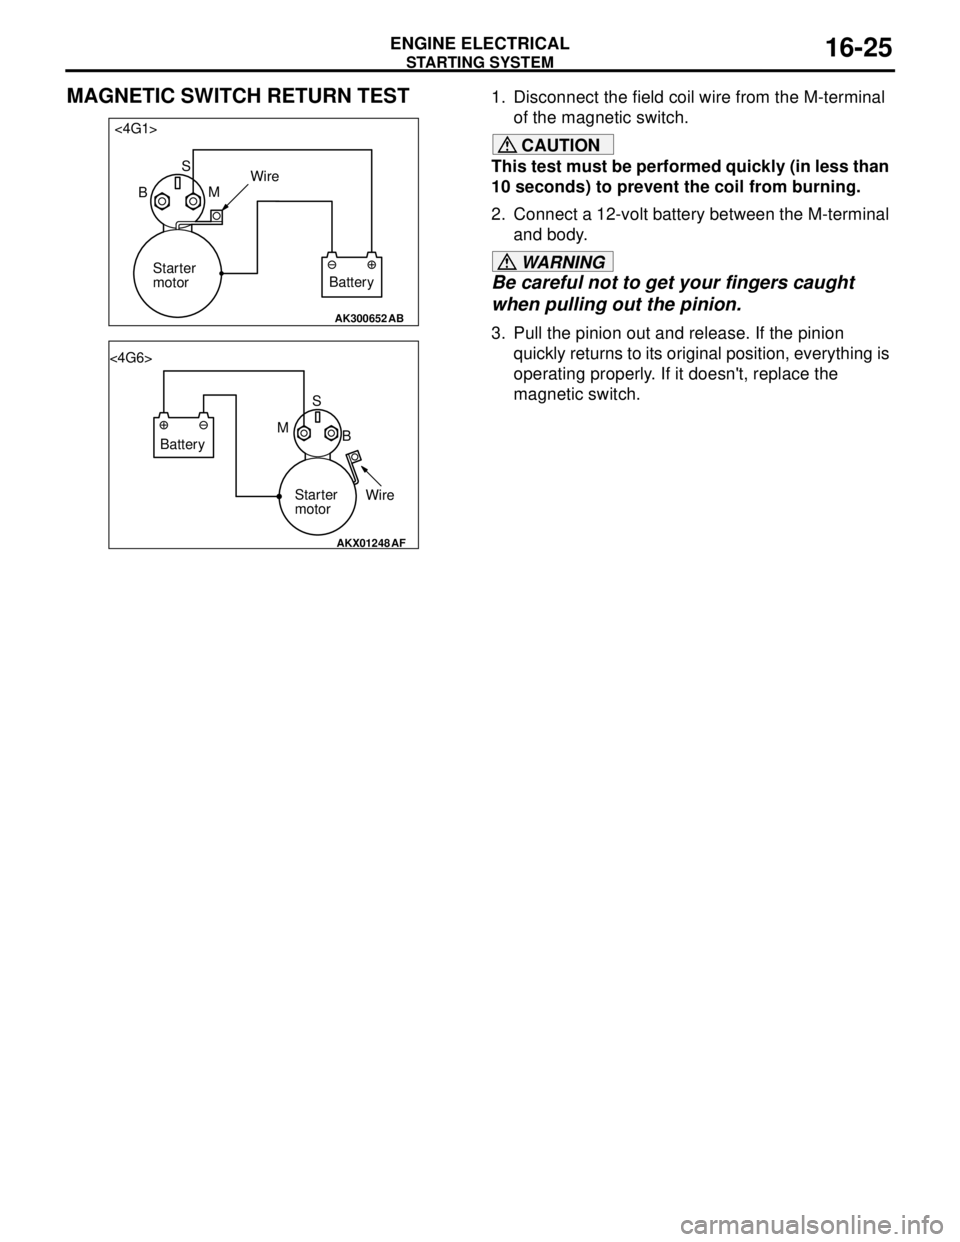
MAGNETIC SWITCH RETURN TEST1. Disconnect the field coil wire from the M-terminal
of the magnetic switch.
CAUTION
This test must be performed quickly (in less than
10 seconds) to prevent the coil from burning.
2. Connect a 12-volt battery between the M-terminal
and body.
WARNING
Be careful not to get your fingers caught
when pulling out the pinion.
3. Pull the pinion out and release. If the pinion
quickly returns to its original position, everything is
operating properly. If it doesn't, replace the
magnetic switch.
AK300652AB
<4G1>
S
BMWire
Battery Starter
motor
AKX01248
<4G6>
S
B M
Battery
Starter
motorWire
AF
Page 92 of 788
STARTING SYSTEM
ENGINE ELECTRICAL16-28
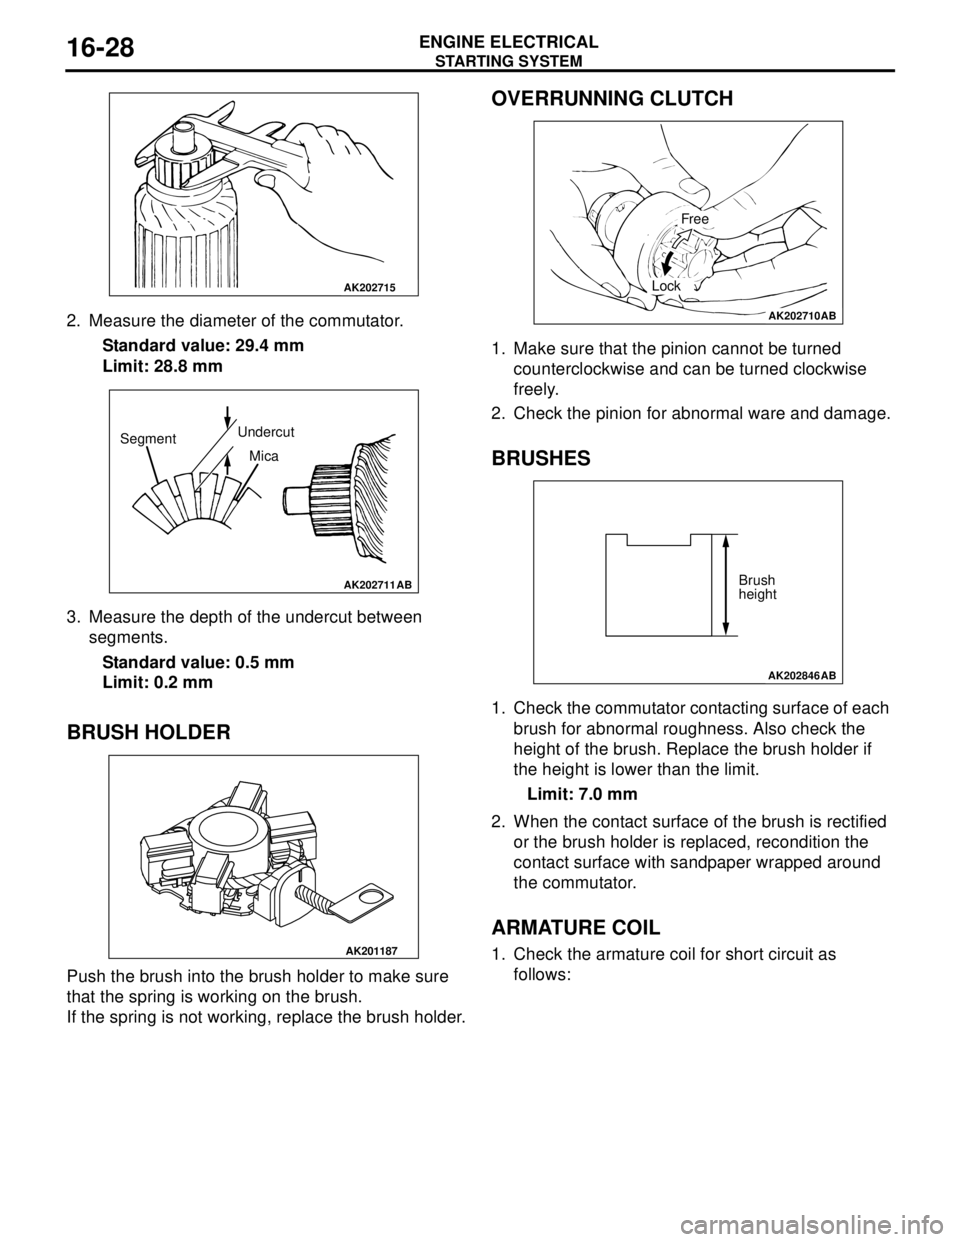
2. Measure the diameter of the commutator.
Standard value: 29.4 mm
Limit: 28.8 mm
3. Measure the depth of the undercut between
segments.
Standard value: 0.5 mm
Limit: 0.2 mm
BRUSH HOLDER
Push the brush into the brush holder to make sure
that the spring is working on the brush.
If the spring is not working, replace the brush holder.
OVERRUNNING CLUTCH
1. Make sure that the pinion cannot be turned
counterclockwise and can be turned clockwise
freely.
2. Check the pinion for abnormal ware and damage.
BRUSHES
1. Check the commutator contacting surface of each
brush for abnormal roughness. Also check the
height of the brush. Replace the brush holder if
the height is lower than the limit.
Limit: 7.0 mm
2. When the contact surface of the brush is rectified
or the brush holder is replaced, recondition the
contact surface with sandpaper wrapped around
the commutator.
ARMATURE COIL
1. Check the armature coil for short circuit as
follows:
AK202715
AK202711
SegmentUndercut
Mica
AB
AK201187
AK202710
Free
Lock
AB
AK202846
Brush
height
AB
Page 93 of 788
STARTING SYSTEM
ENGINE ELECTRICAL16-29
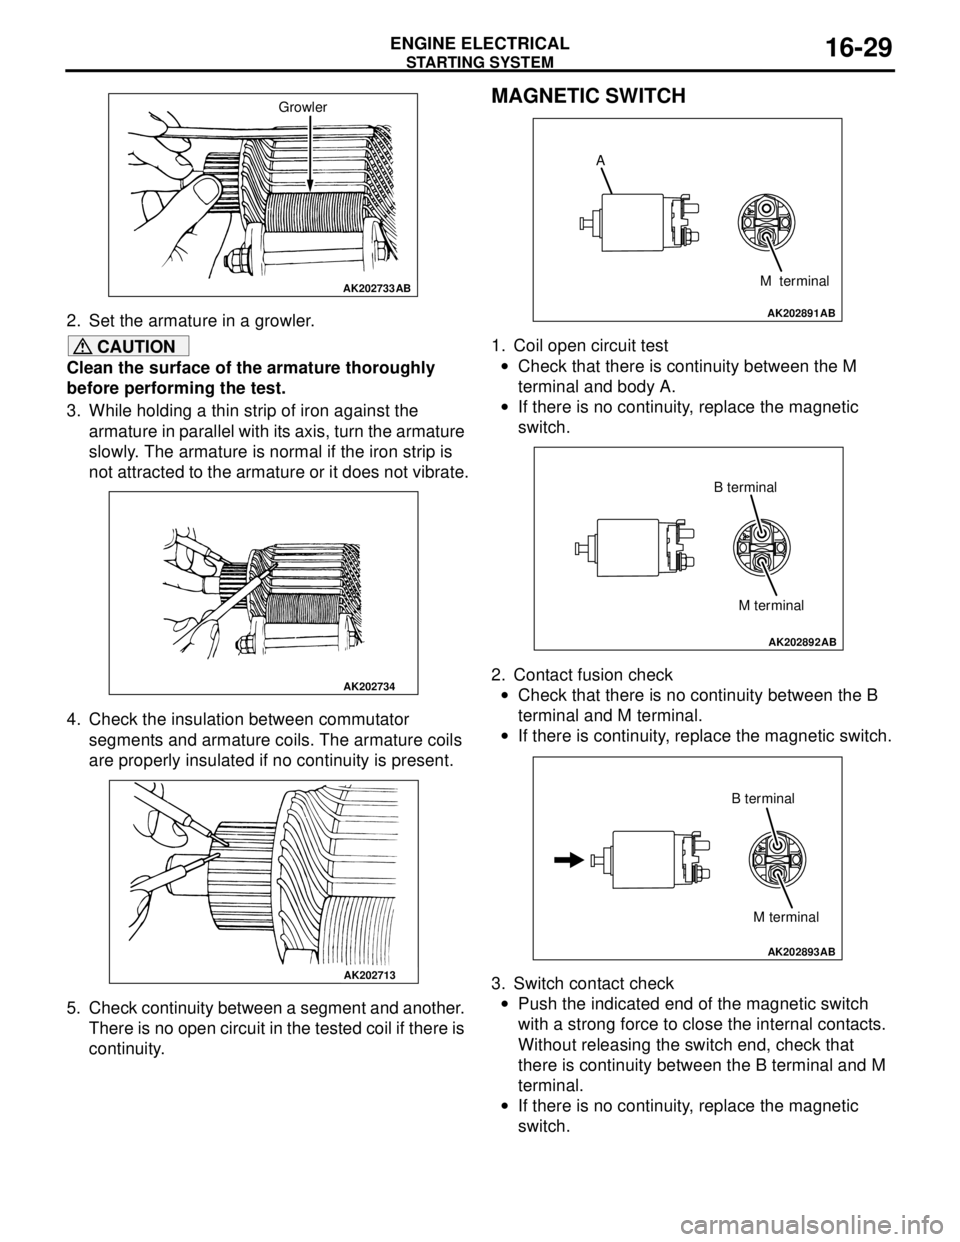
2. Set the armature in a growler.
CAUTION
Clean the surface of the armature thoroughly
before performing the test.
3. While holding a thin strip of iron against the
armature in parallel with its axis, turn the armature
slowly. The armature is normal if the iron strip is
not attracted to the armature or it does not vibrate.
4. Check the insulation between commutator
segments and armature coils. The armature coils
are properly insulated if no continuity is present.
5. Check continuity between a segment and another.
There is no open circuit in the tested coil if there is
continuity.
MAGNETIC SWITCH
1. Coil open circuit test
•Check that there is continuity between the M
terminal and body A.
•If there is no continuity, replace the magnetic
switch.
2. Contact fusion check
•Check that there is no continuity between the B
terminal and M terminal.
•If there is continuity, replace the magnetic switch.
3. Switch contact check
•Push the indicated end of the magnetic switch
with a strong force to close the internal contacts.
Without releasing the switch end, check that
there is continuity between the B terminal and M
terminal.
•If there is no continuity, replace the magnetic
switch.
AK202733
Growler
AB
AK202734
AK202713
AK202891
A
M terminal
AB
AK202892
M terminal B terminal
AB
AK202893
M terminal B terminal
AB
Page 94 of 788
IGNITION SYSTEM
ENGINE ELECTRICAL16-30
IGNITION SYSTEM
GENERAL INFORMATIONM1163000100294
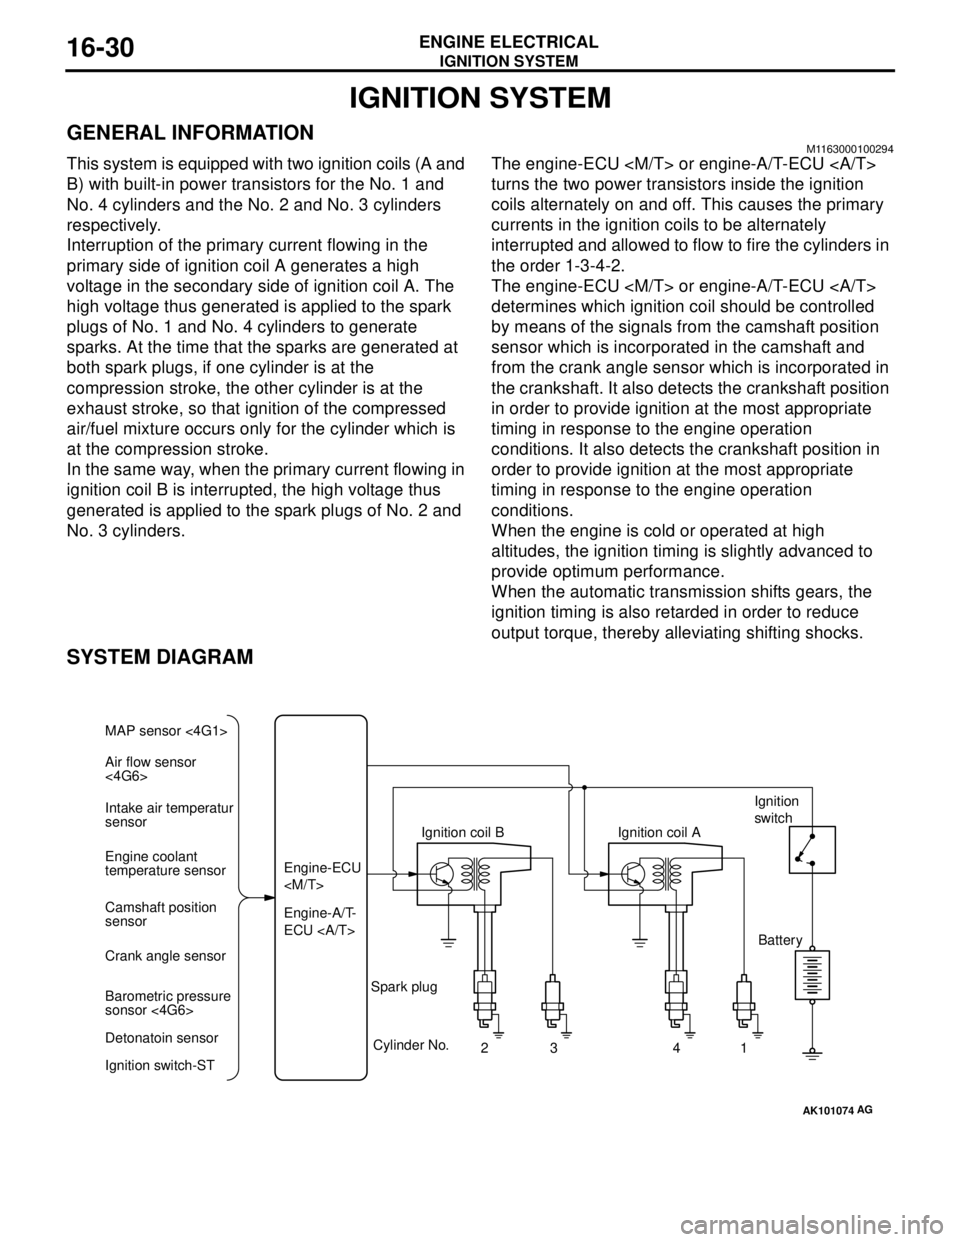
This system is equipped with two ignition coils (A and
B) with built-in power transistors for the No. 1 and
No. 4 cylinders and the No. 2 and No. 3 cylinders
respectively.
Interruption of the primary current flowing in the
primary side of ignition coil A generates a high
voltage in the secondary side of ignition coil A. The
high voltage thus generated is applied to the spark
plugs of No. 1 and No. 4 cylinders to generate
sparks. At the time that the sparks are generated at
both spark plugs, if one cylinder is at the
compression stroke, the other cylinder is at the
exhaust stroke, so that ignition of the compressed
air/fuel mixture occurs only for the cylinder which is
at the compression stroke.
In the same way, when the primary current flowing in
ignition coil B is interrupted, the high voltage thus
generated is applied to the spark plugs of No. 2 and
No. 3 cylinders.The engine-ECU
turns the two power transistors inside the ignition
coils alternately on and off. This causes the primary
currents in the ignition coils to be alternately
interrupted and allowed to flow to fire the cylinders in
the order 1-3-4-2.
The engine-ECU
determines which ignition coil should be controlled
by means of the signals from the camshaft position
sensor which is incorporated in the camshaft and
from the crank angle sensor which is incorporated in
the crankshaft. It also detects the crankshaft position
in order to provide ignition at the most appropriate
timing in response to the engine operation
conditions. It also detects the crankshaft position in
order to provide ignition at the most appropriate
timing in response to the engine operation
conditions.
When the engine is cold or operated at high
altitudes, the ignition timing is slightly advanced to
provide optimum performance.
When the automatic transmission shifts gears, the
ignition timing is also retarded in order to reduce
output torque, thereby alleviating shifting shocks.
SYSTEM DIAGRAM
AK101074
Air flow sensor
<4G6> MAP sensor <4G1>
Intake air temperatur
sensor
Engine coolant
temperature sensor
Camshaft position
sensor
Crank angle sensor
Barometric pressure
sonsor <4G6>
Detonatoin sensor
Ignition switch-STEngine-A/T-
ECU Engine-ECU
Cylinder No.
23 4
AG
1 Spark plugIgnition coil AIgnition
switch
Battery
Page 95 of 788
IGNITION SYSTEM
ENGINE ELECTRICAL16-31
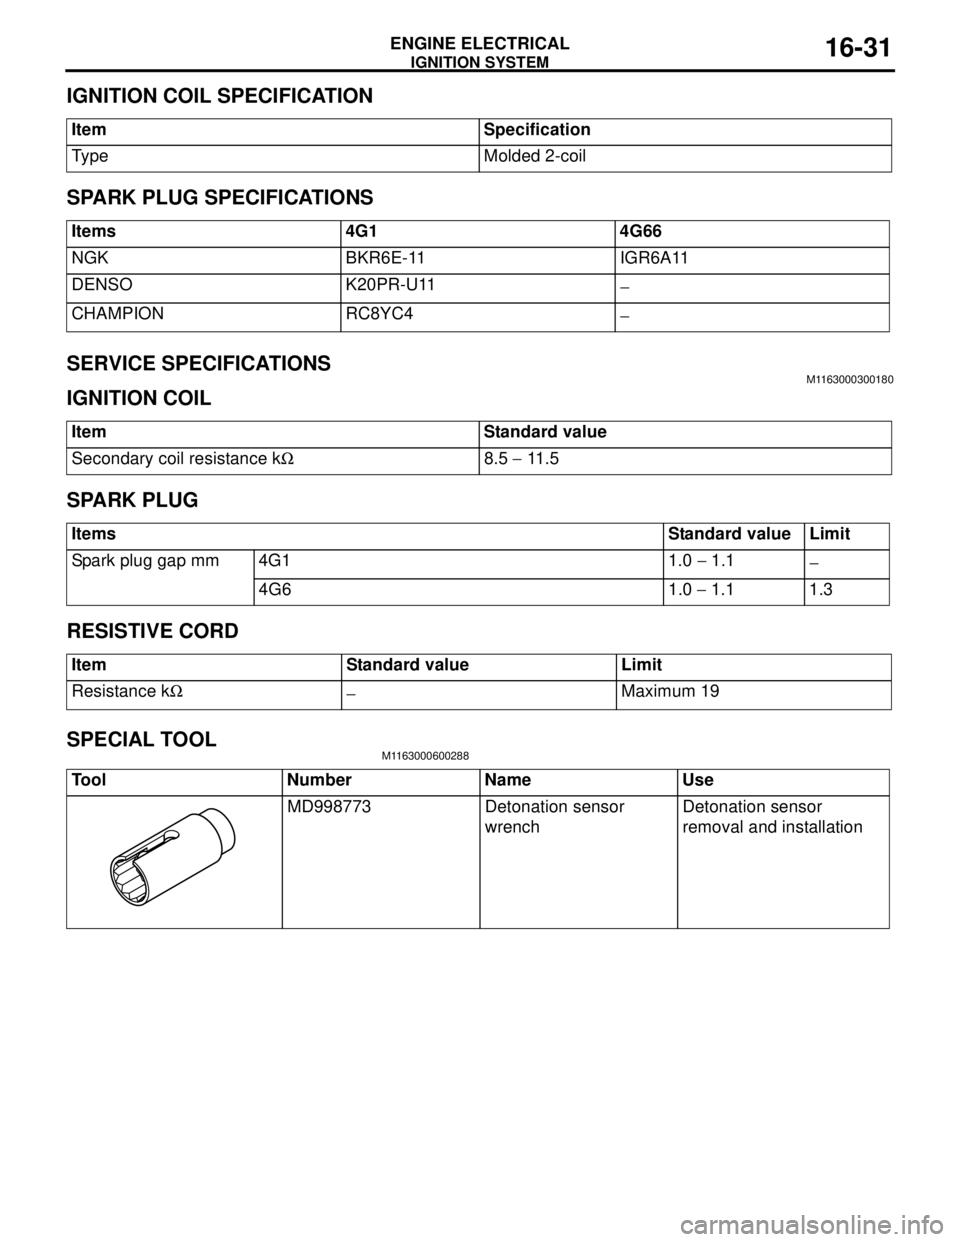
IGNITION COIL SPECIFICATION
SPARK PLUG SPECIFICATIONS
SERVICE SPECIFICATIONS
M1163000300180
IGNITION COIL
SPARK PLUG
RESISTIVE CORD
SPECIAL TOOL
M1163000600288
Item Specification
Type Molded 2-coil
Items 4G1 4G66
NGK BKR6E-11 IGR6A11
DENSO K20PR-U11
−
CHAMPION RC8YC4
−
Item Standard value
Secondary coil resistance kΩ8.5 − 11 . 5
ItemsStandard value Limit
Spark plug gap mm 4G1 1.0 − 1.1
−
4G6 1.0 − 1.1 1.3
Item Standard value Limit
Resistance kΩ
−Maximum 19
Tool Number Name Use
MD998773 Detonation sensor
wrenchDetonation sensor
removal and installation
Page 96 of 788
IGNITION SYSTEM
ENGINE ELECTRICAL16-32
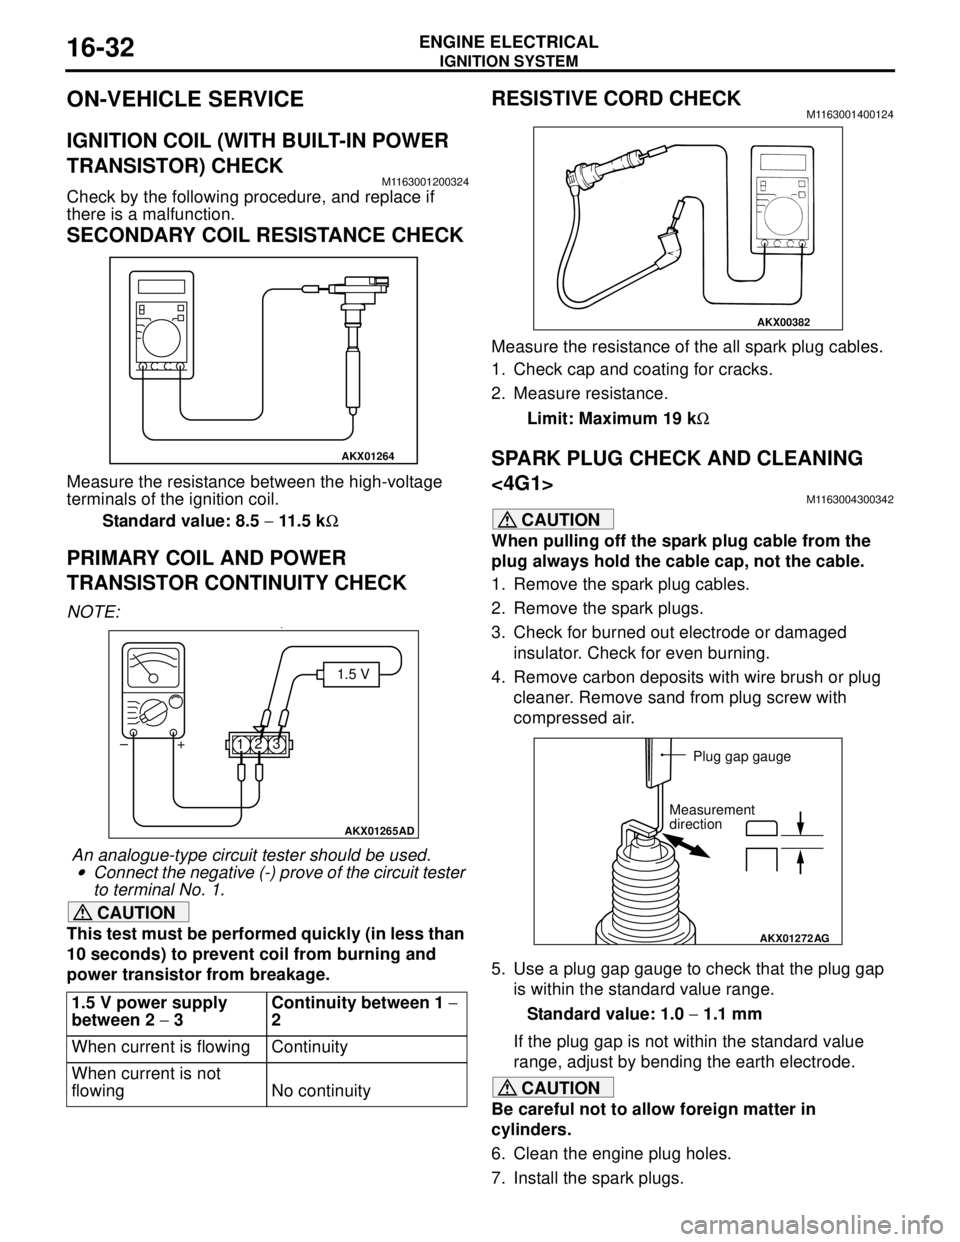
ON-VEHICLE SERVICE
IGNITION COIL (WITH BUILT-IN POWER
TRANSISTOR) CHECK
M1163001200324
Check by the following procedure, and replace if
there is a malfunction.
SECONDARY COIL RESISTANCE CHECK
Measure the resistance between the high-voltage
terminals of the ignition coil.
Standard value: 8.5 − 11.5 kΩ
PRIMARY COIL AND POWER
TRANSISTOR CONTINUITY CHECK
NOTE: .•
An analogue-type circuit tester should be used.
•Connect the negative (-) prove of the circuit tester
to terminal No. 1.
CAUTION
This test must be performed quickly (in less than
10 seconds) to prevent coil from burning and
power transistor from breakage.
RESISTIVE CORD CHECKM1163001400124
Measure the resistance of the all spark plug cables.
1. Check cap and coating for cracks.
2. Measure resistance.
Limit: Maximum 19 kΩ
SPARK PLUG CHECK AND CLEANING
<4G1>
M1163004300342
CAUTION
When pulling off the spark plug cable from the
plug always hold the cable cap, not the cable.
1. Remove the spark plug cables.
2. Remove the spark plugs.
3. Check for burned out electrode or damaged
insulator. Check for even burning.
4. Remove carbon deposits with wire brush or plug
cleaner. Remove sand from plug screw with
compressed air.
5. Use a plug gap gauge to check that the plug gap
is within the standard value range.
Standard value: 1.0 − 1.1 mm
If the plug gap is not within the standard value
range, adjust by bending the earth electrode.
CAUTION
Be careful not to allow foreign matter in
cylinders.
6. Clean the engine plug holes.
7. Install the spark plugs. 1.5 V power supply
between 2 − 3Continuity between 1 −
2
When current is flowing Continuity
When current is not
flowing No continuity
AKX01264
AKX01265AD
1.5 V
123 +
–
AKX00382
AKX01272
AG
Plug gap gauge
Measurement
direction