ac compressor MITSUBISHI LANCER 2005 Workshop Manual
[x] Cancel search | Manufacturer: MITSUBISHI, Model Year: 2005, Model line: LANCER, Model: MITSUBISHI LANCER 2005Pages: 788, PDF Size: 45.98 MB
Page 106 of 788
IGNITION SYSTEM
ENGINE ELECTRICAL16-42
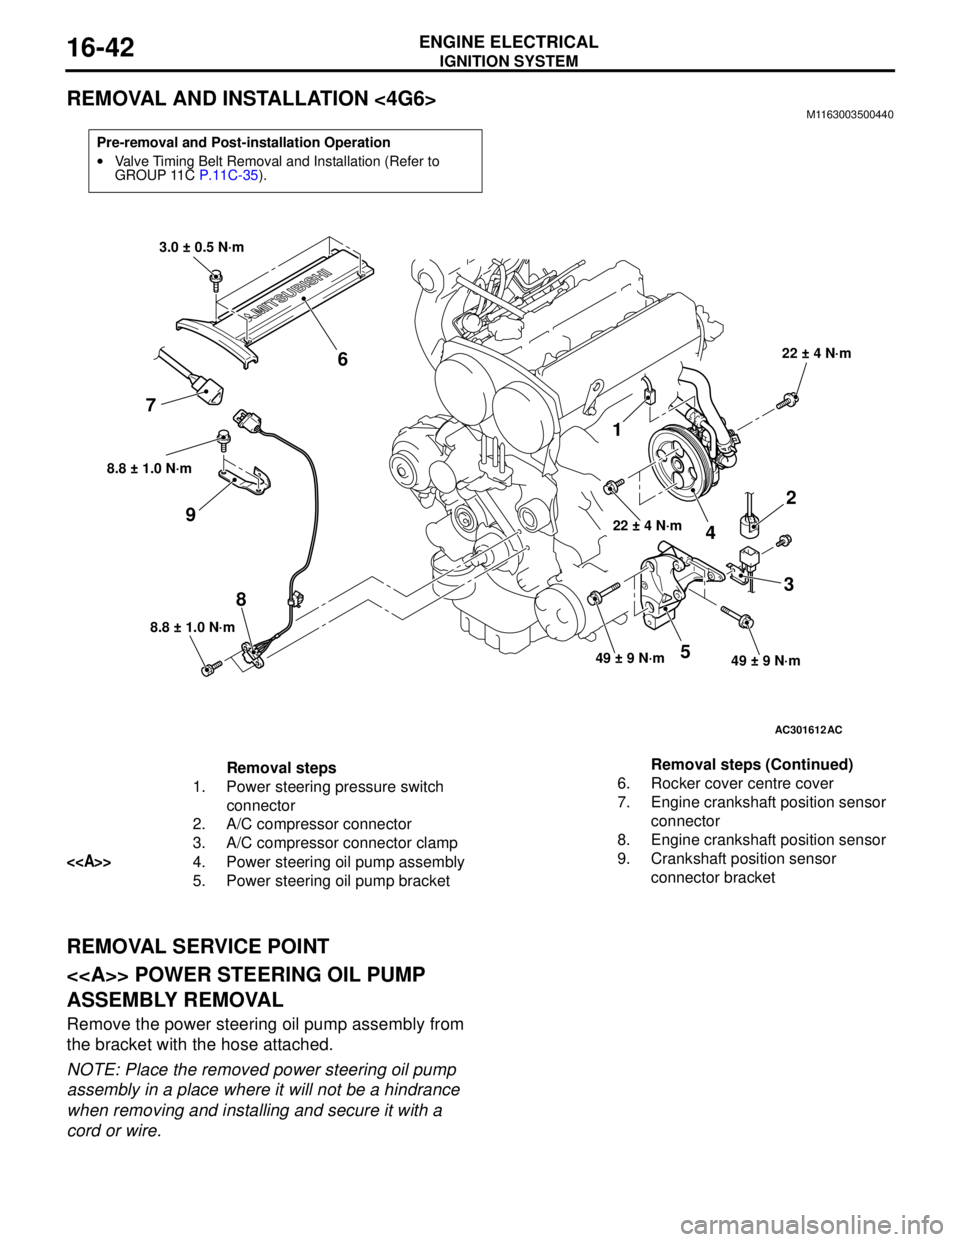
REMOVAL AND INSTALLATION <4G6>M1163003500440
REMOVAL SERVICE POINT
<> POWER STEERING OIL PUMP
ASSEMBLY REMOVAL
Remove the power steering oil pump assembly from
the bracket with the hose attached.
NOTE: Place the removed power steering oil pump
assembly in a place where it will not be a hindrance
when removing and installing and secure it with a
cord or wire.
Pre-removal and Post-installation Operation
•Valve Timing Belt Removal and Installation (Refer to
GROUP 11C P.11C-35).
AC301612
8.8 ± 1.0 N·m
8
8.8 ± 1.0 N·m
9
1
22 ± 4 N·m
4
2
3
49 ± 9 N·m49 ± 9 N·m5
22 ± 4 N·m
3.0 ± 0.5 N·m
6
7
AC
Removal steps
1. Power steering pressure switch
connector
2. A/C compressor connector
3. A/C compressor connector clamp
<>4. Power steering oil pump assembly
5. Power steering oil pump bracket6. Rocker cover centre cover
7. Engine crankshaft position sensor
connector
8. Engine crankshaft position sensor
9. Crankshaft position sensor
connector bracket Removal steps (Continued)
Page 186 of 788
SPECIAL TOOLS
FRONT SUSPENSION33-4
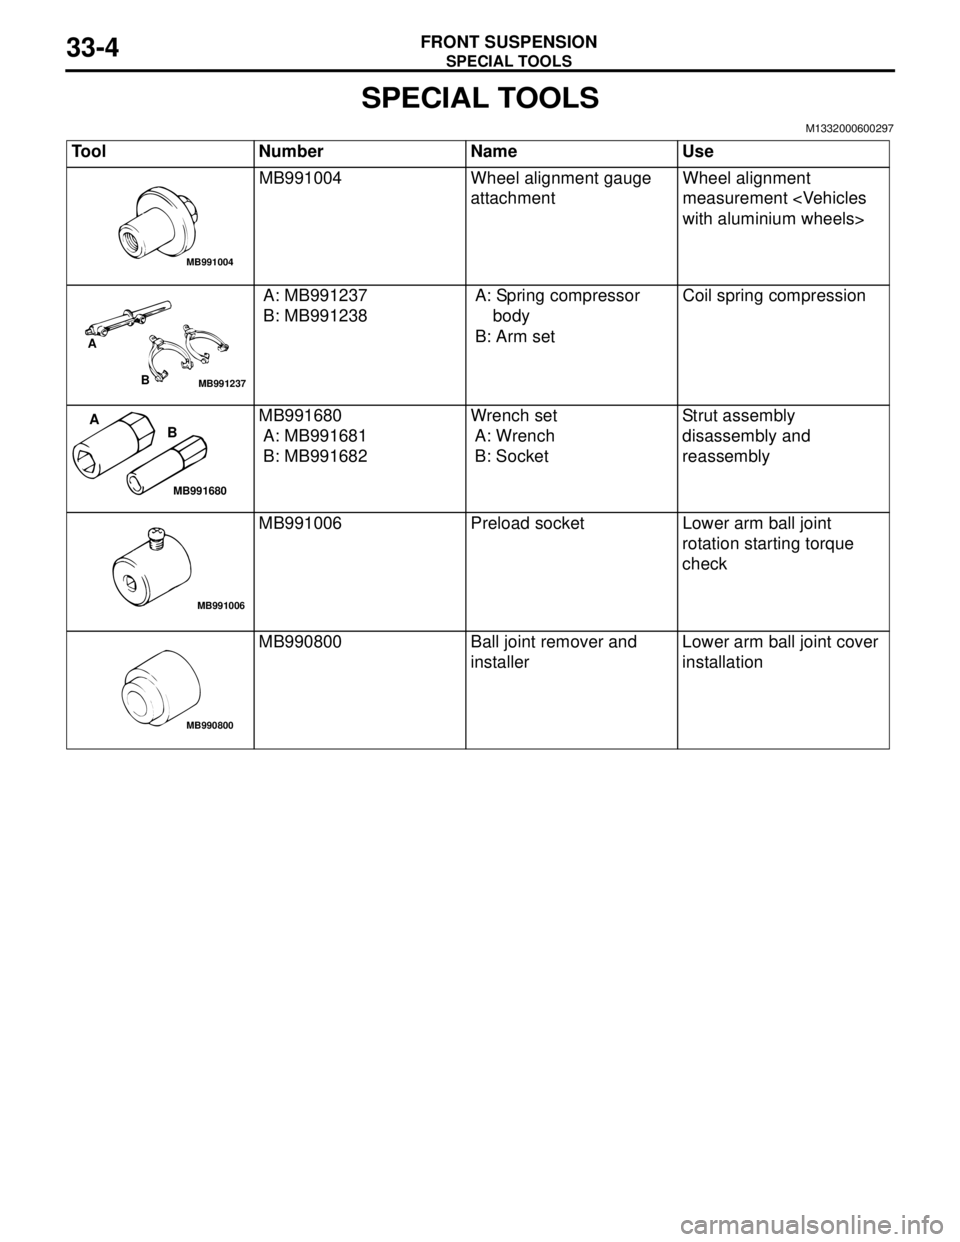
SPECIAL TOOLS
M1332000600297
Tool Number Name Use
MB991004 Wheel alignment gauge
attachmentWheel alignment
measurement
A: MB991237
B: MB991238A: Spring compressor
body
B: Arm setCoil spring compression
MB991680
A: MB991681
B: MB991682Wrench set
A: Wrench
B: SocketStrut assembly
disassembly and
reassembly
MB991006 Preload socket Lower arm ball joint
rotation starting torque
check
MB990800 Ball joint remover and
installerLower arm ball joint cover
installation
MB991004
MB991237
A
B
MB991680
A
B
MB991006
MB990800
Page 191 of 788
Page 192 of 788
STRUT ASSEMBLY
FRONT SUSPENSION33-10
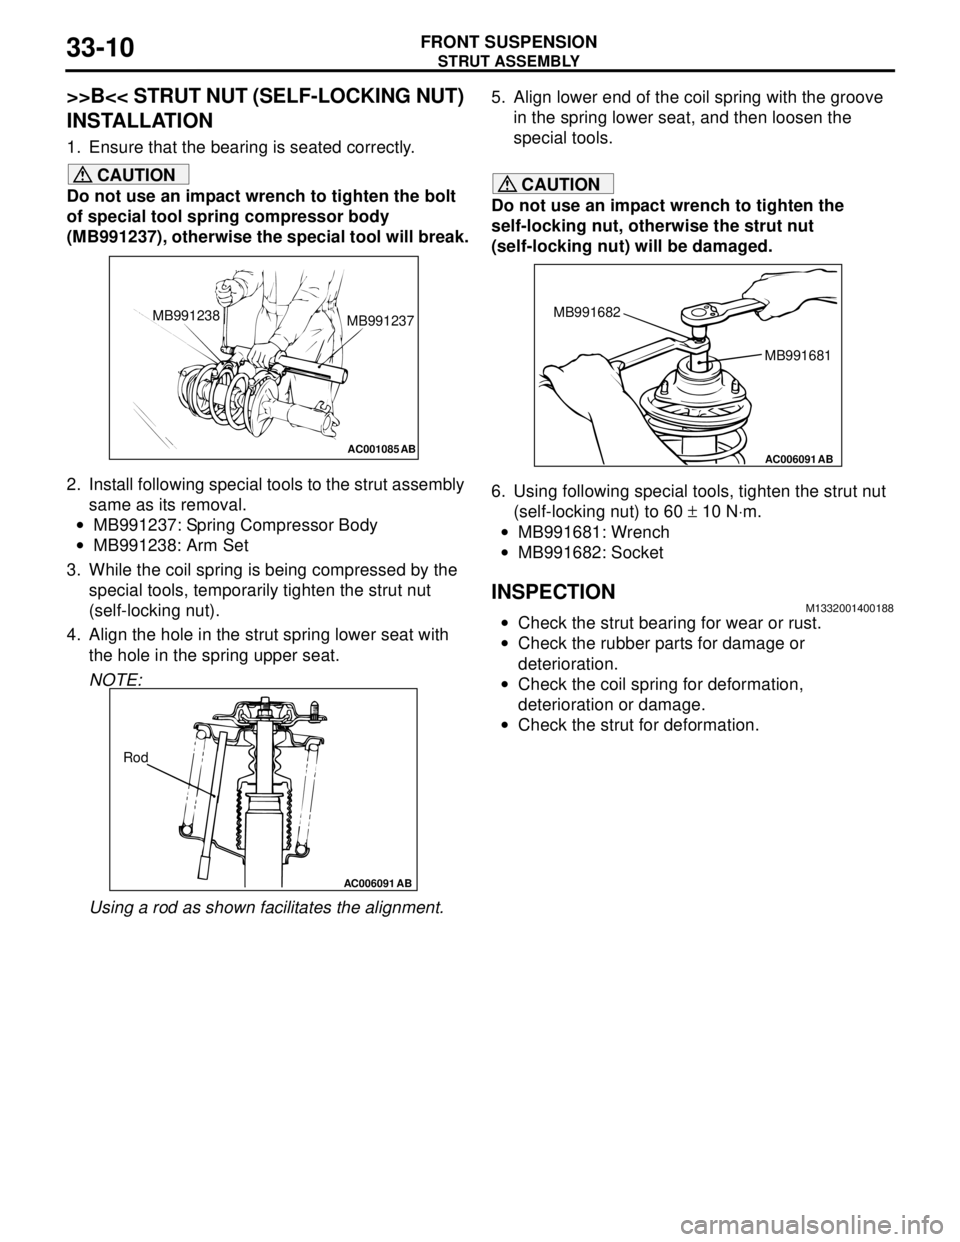
>>B<< STRUT NUT (SELF-LOCKING NUT)
INSTALLATION
1. Ensure that the bearing is seated correctly.
CAUTION
Do not use an impact wrench to tighten the bolt
of special tool spring compressor body
(MB991237), otherwise the special tool will break.
2. Install following special tools to the strut assembly
same as its removal.
•MB991237: Spring Compressor Body
•MB991238: Arm Set
3. While the coil spring is being compressed by the
special tools, temporarily tighten the strut nut
(self-locking nut).
4. Align the hole in the strut spring lower seat with
the hole in the spring upper seat.
NOTE:
Using a rod as shown facilitates the alignment.5. Align lower end of the coil spring with the groove
in the spring lower seat, and then loosen the
special tools.CAUTION
Do not use an impact wrench to tighten the
self-locking nut, otherwise the strut nut
(self-locking nut) will be damaged.
6. Using following special tools, tighten the strut nut
(self-locking nut) to 60 ± 10 N⋅m.
•MB991681: Wrench
•MB991682: Socket
INSPECTIONM1332001400188
•Check the strut bearing for wear or rust.
•Check the rubber parts for damage or
deterioration.
•Check the coil spring for deformation,
deterioration or damage.
•Check the strut for deformation.
AC001085 AB
MB991238
MB991237
AC006091 AB
Rod
AC006091 AB
MB991681 MB991682
Page 205 of 788
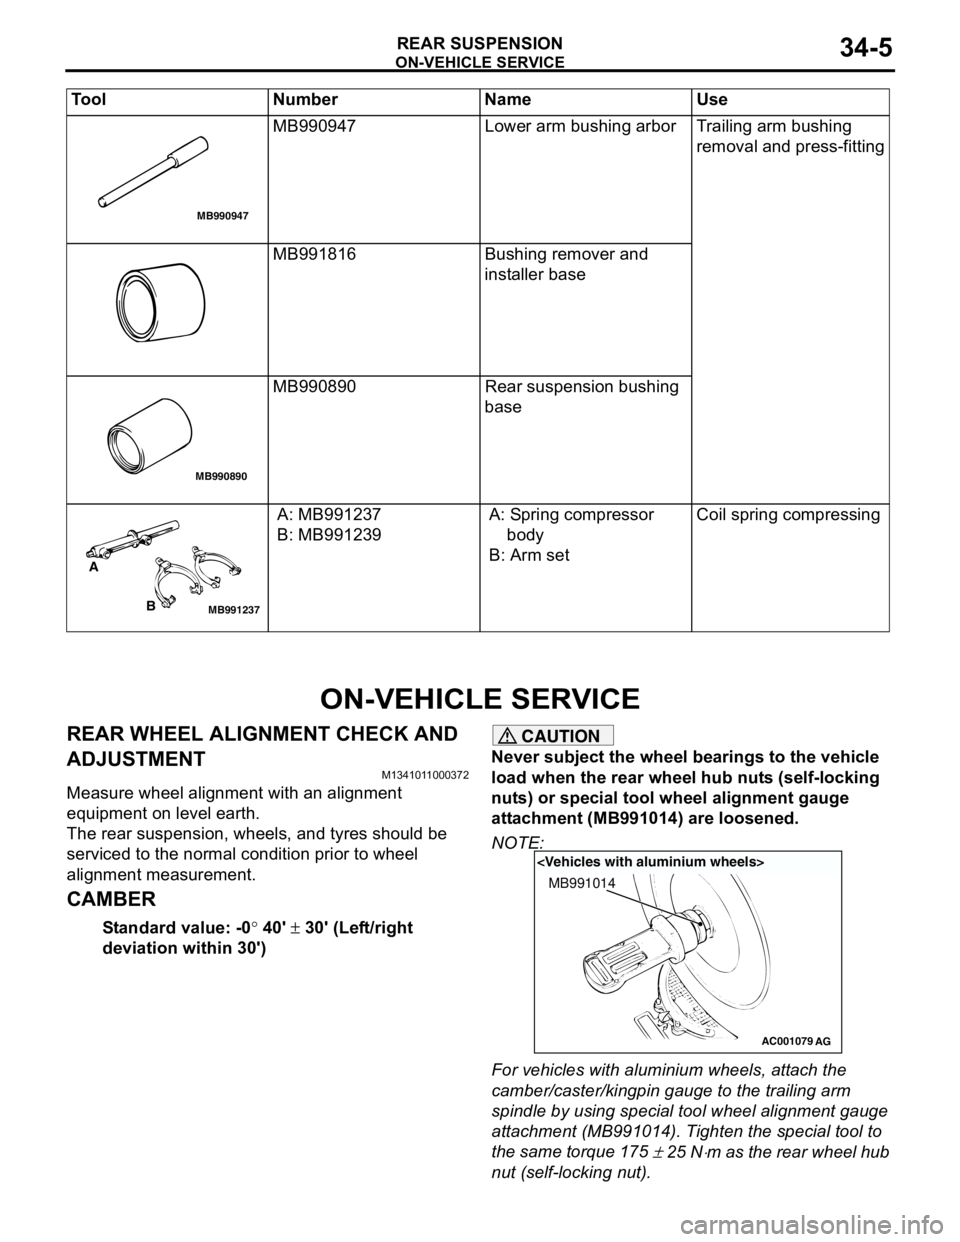
ON-VEHICLE SERVICE
REAR SUSPENSION34-5
ON-VEHICLE SERVICE
REAR WHEEL ALIGNMENT CHECK AND
ADJUSTMENT
M1341011000372
Measure wheel alignment with an alignment
equipment on level earth.
The rear suspension, wheels, and tyres should be
serviced to the normal condition prior to wheel
alignment measurement.
CAMBER
Standard value: -0° 40' ± 30' (Left/right
deviation within 30')
CAUTION
Never subject the wheel bearings to the vehicle
load when the rear wheel hub nuts (self-locking
nuts) or special tool wheel alignment gauge
attachment (MB991014) are loosened.
NOTE:
For vehicles with aluminium wheels, attach the
camber/caster/kingpin gauge to the trailing arm
spindle by using special tool wheel alignment gauge
attachment (MB991014). Tighten the special tool to
the same torque 175
± 25 N⋅m as the rear wheel hub
nut (self-locking nut). MB990947 Lower arm bushing arbor Trailing arm bushing
removal and press-fitting
MB991816 Bushing remover and
installer base
MB990890 Rear suspension bushing
base
A: MB991237
B: MB991239A: Spring compressor
body
B: Arm setCoil spring compressing Tool Number Name Use
MB990947
MB990890
MB991237
A
B
AC001079
MB991014
AG
Page 218 of 788
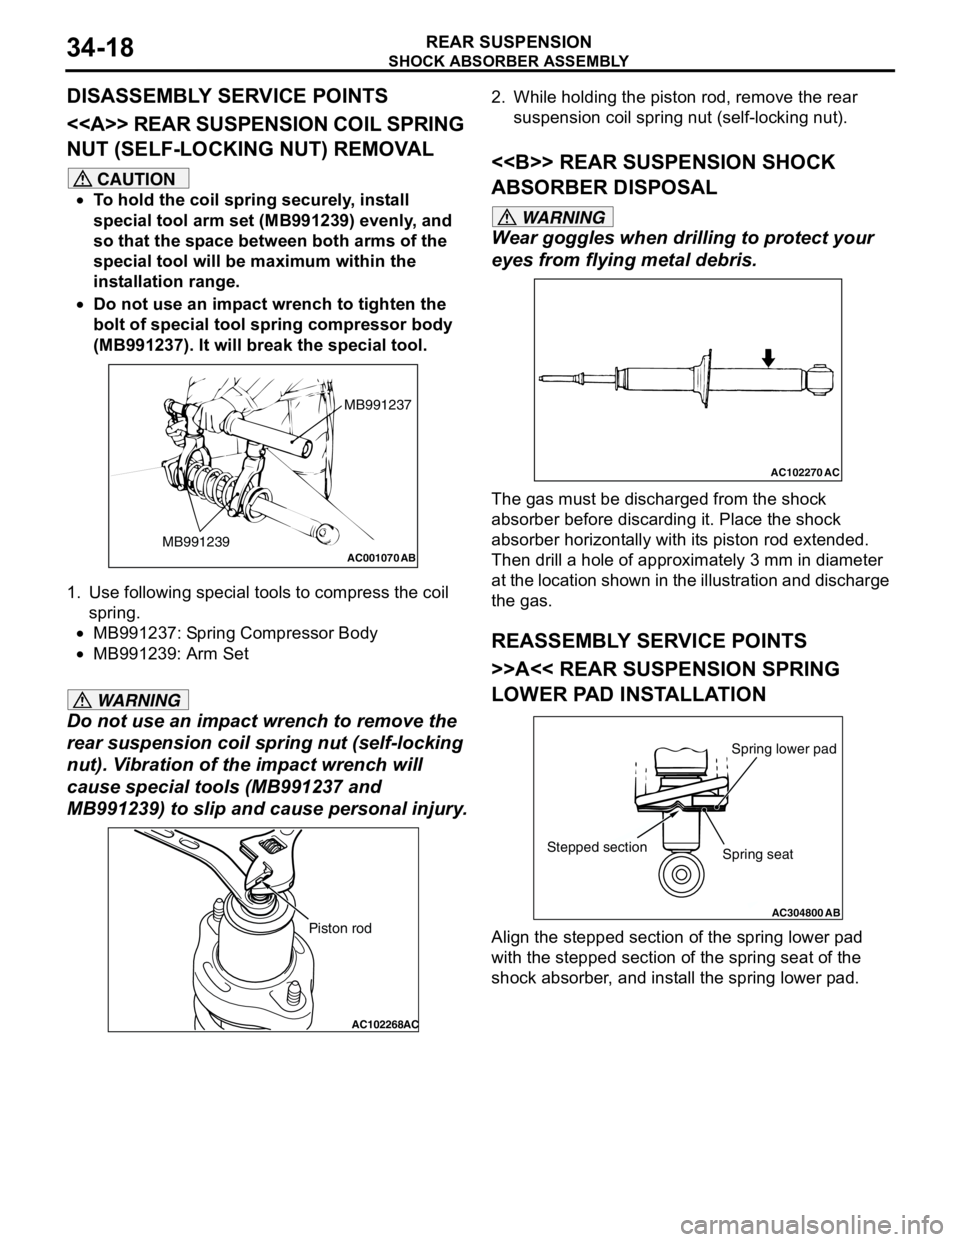
Page 219 of 788
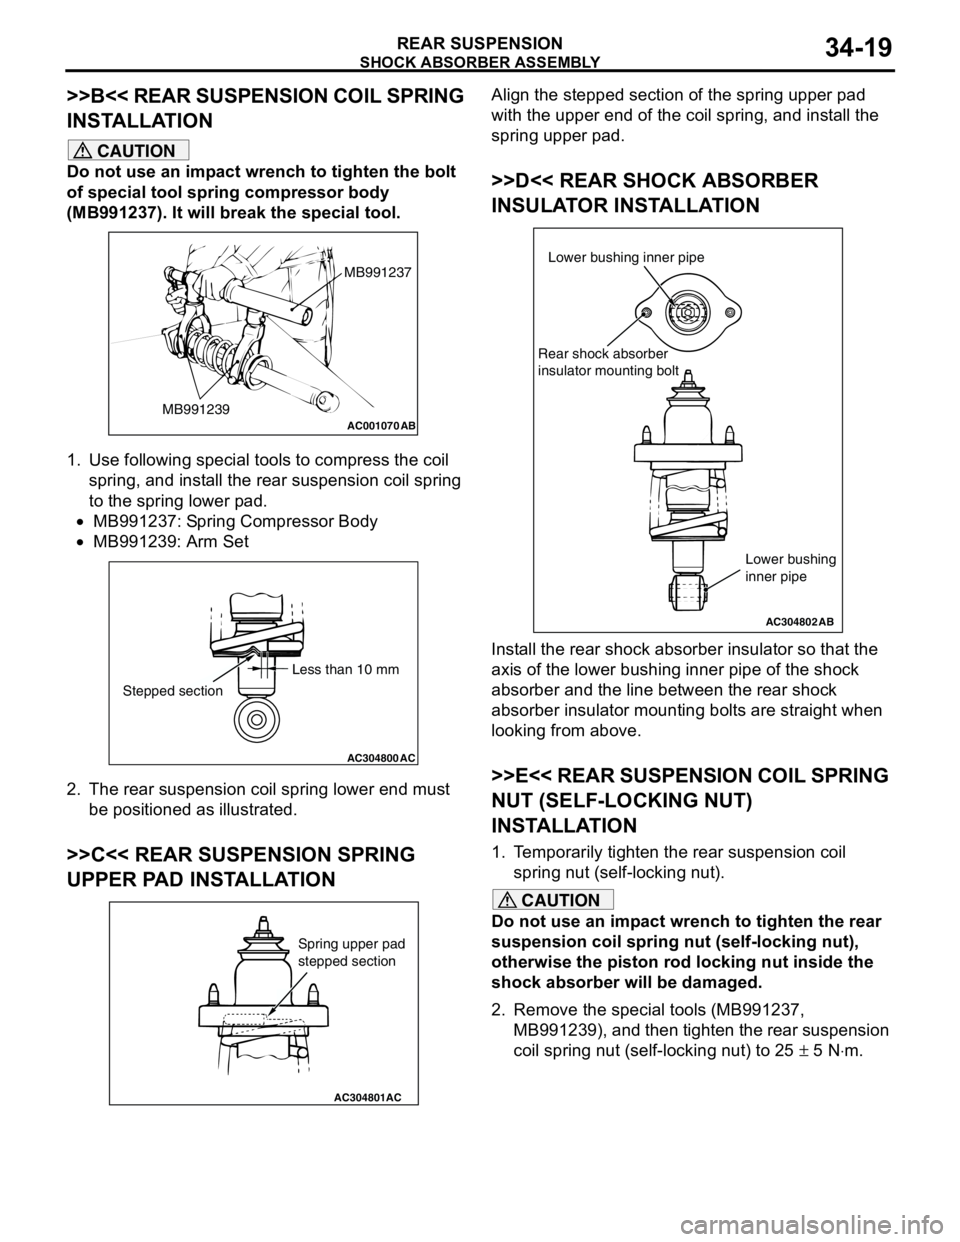
SHOCK ABSORBER ASSEMBLY
REAR SUSPENSION34-19
>>B<< REAR SUSPENSION COIL SPRING
INSTALLATION
CAUTION
Do not use an impact wrench to tighten the bolt
of special tool spring compressor body
(MB991237). It will break the special tool.
1. Use following special tools to compress the coil
spring, and install the rear suspension coil spring
to the spring lower pad.
•MB991237: Spring Compressor Body
•MB991239: Arm Set
2. The rear suspension coil spring lower end must
be positioned as illustrated.
>>C<< REAR SUSPENSION SPRING
UPPER PAD INSTALLATION
Align the stepped section of the spring upper pad
with the upper end of the coil spring, and install the
spring upper pad.
>>D<< REAR SHOCK ABSORBER
INSULATOR INSTALLATION
Install the rear shock absorber insulator so that the
axis of the lower bushing inner pipe of the shock
absorber and the line between the rear shock
absorber insulator mounting bolts are straight when
looking from above.
>>E<< REAR SUSPENSION COIL SPRING
NUT (SELF-LOCKING NUT)
INSTALLATION
1. Temporarily tighten the rear suspension coil
spring nut (self-locking nut).
CAUTION
Do not use an impact wrench to tighten the rear
suspension coil spring nut (self-locking nut),
otherwise the piston rod locking nut inside the
shock absorber will be damaged.
2. Remove the special tools (MB991237,
MB991239), and then tighten the rear suspension
coil spring nut (self-locking nut) to 25 ± 5 N⋅m.
AC001070
MB991237
MB991239
AB
AC304800AC
Less than 10 mm
Stepped section
AC304801AC
Spring upper pad
stepped section
AC304802
Lower bushing inner pipe
Rear shock absorber
insulator mounting bolt
AB
Lower bushing
inner pipe
Page 271 of 788
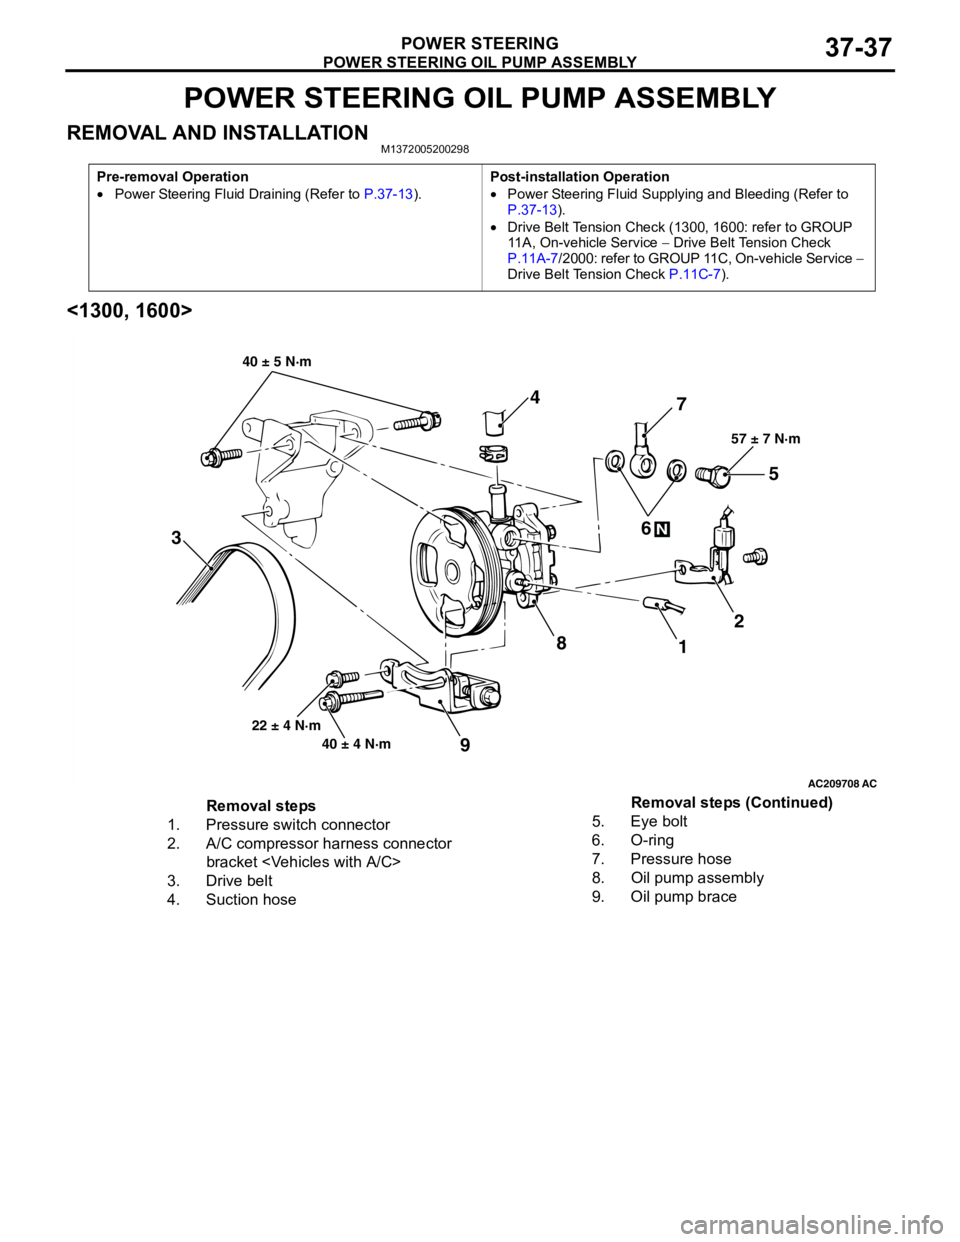
POWER STEERING OIL PUMP ASSEMBLY
POWER STEERING37-37
POWER STEERING OIL PUMP ASSEMBLY
REMOVAL AND INSTALLATIONM1372005200298
<1300, 1600>
Pre-removal Operation
•Power Steering Fluid Draining (Refer to P.37-13).Post-installation Operation
•Power Steering Fluid Supplying and Bleeding (Refer to
P.37-13).
•Drive Belt Tension Check (1300, 1600: refer to GROUP
11A, On-vehicle Service − Drive Belt Tension Check
P.11A-7/2000: refer to GROUP 11C, On-vehicle Service −
Drive Belt Tension Check P.11C-7).
AC209708
87
12 34
5
6
57 ± 7 N·m
40 ± 4 N·m 22 ± 4 N·m
N
9
40 ± 5 N·m
AC
Removal steps
1. Pressure switch connector
2. A/C compressor harness connector
bracket
3. Drive belt
4. Suction hose5. Eye bolt
6. O-ring
7. Pressure hose
8. Oil pump assembly
9. Oil pump braceRemoval steps (Continued)
Page 272 of 788
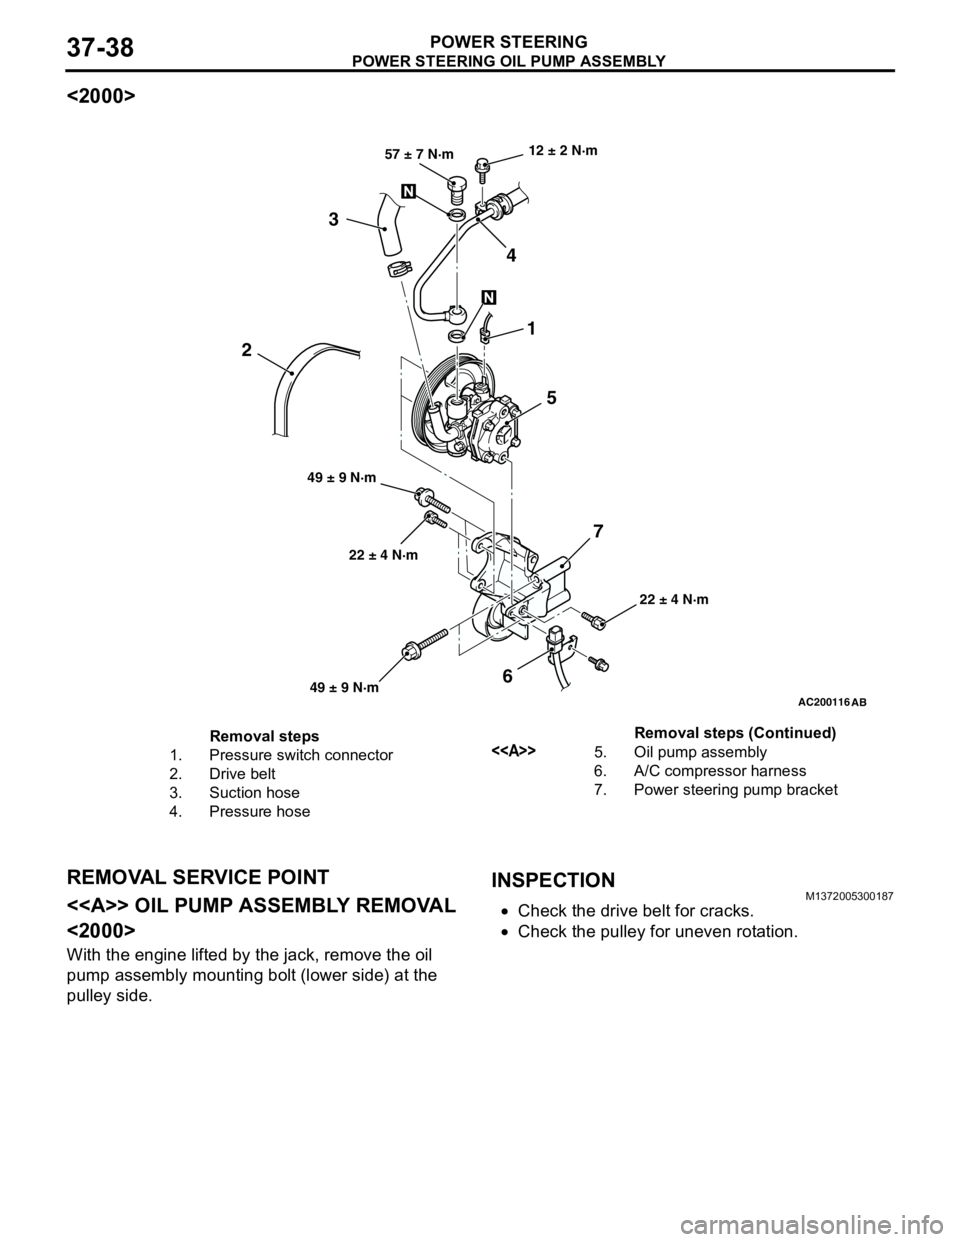
POWER STEERING OIL PUMP ASSEMBLY
POWER STEERING37-38
<2000>
REMOVAL SERVICE POINT
<> OIL PUMP ASSEMBLY REMOVAL
<2000>
With the engine lifted by the jack, remove the oil
pump assembly mounting bolt (lower side) at the
pulley side.
INSPECTIONM1372005300187
•Check the drive belt for cracks.
•Check the pulley for uneven rotation.
AC200116
AB
22 ± 4 N·m 12 ± 2 N·m
22 ± 4 N·m 49 ± 9 N·m57 ± 7 N·m
1
5 4 3
6 2
7
49 ± 9 N·m
Removal steps
1. Pressure switch connector
2. Drive belt
3. Suction hose
4. Pressure hose<>5. Oil pump assembly
6. A/C compressor harness
7. Power steering pump bracketRemoval steps (Continued)
Page 486 of 788
55-2
ON-VEHICLE SERVICE . . . . . . . . . . .55-69
SIGHT GLASS REFRIGERANT
LEVEL TEST . . . . . . . . . . . . . . . . . . . . . . . . 55-69
MAGNETIC CLUTCH TEST . . . . . . . . . . . . 55-69
COMPRESSOR DRIVE BELT
ADJUSTMENT . . . . . . . . . . . . . . . . . . . . . . 55-69
DUAL PRESSURE SWITCH CHECK . . . . . 55-69
CHARGING . . . . . . . . . . . . . . . . . . . . . . . . . 55-70
CORRECTING LOW REFRIGERANT LEVEL
IN CASE THE SERVICE CAN IN USED. . . 55-72
DISCHARGING SYSTEM . . . . . . . . . . . . . . 55-72
REFILLING OF OIL IN THE A/C
SYSTEM . . . . . . . . . . . . . . . . . . . . . . . . . . . 55-72
PERFORMANCE TEST . . . . . . . . . . . . . . . 55-73
REFRIGERANT LEAK REPAIR
PROCEDURE . . . . . . . . . . . . . . . . . . . . . . . 55-74
COMPRESSOR NOISE CHECK . . . . . . . . 55-74
POWER RELAY CHECK . . . . . . . . . . . . . . 55-75
IDLE-UP OPERATION CHECK . . . . . . . . . 55-76
CLEAN AIR FILTER REPLACEMENT
PROCEDURE . . . . . . . . . . . . . . . . . . . . . . . 55-76
HEATER CONTROL ASSEMBLY AND A/C
SWITCH . . . . . . . . . . . . . . . . . . . . . . .55-77
REMOVAL AND INSTALLATION . . . . . . . . 55-77
INSPECTION . . . . . . . . . . . . . . . . . . . . . . . 55-79
DISASSEMBLY AND REASSEMBLY . . . . . 55-79
HEATER UNIT, HEATER CORE,
BLOWER ASSEMBLY AND
EVAPORATOR UNIT* . . . . . . . . . . . .55-81
REMOVAL AND INSTALLATION . . . . . . . . 55-81
HEATER UNIT . . . . . . . . . . . . . . . . . . . . . . 55-82
DISASSEMBLY AND REASSEMBLY
DISASSEMBLY AND ASSEMBLY
BLOWER ASSEMBLY . . . . . . . . . . . . . . . . 55-84
DISASSEMBLY AND REASSEMBLY . . . . . 55-84
BLOWERMOTOR, RESISTOR AND
OUTSIDE/INSIDE AIR SELECTION
DAMPER CONTROL MOTOR . . . . . .55-85
REMOVAL AND INSTALLATION . . . . . . . . 55-85
INSPECTION . . . . . . . . . . . . . . . . . . . . . . . . 55-86
EVAPORATOR ASSEMBLY . . . . . . .55-88
REMOVAL AND INSTALLATION
REMOVAL AND INSTALLATION
INSPECTION . . . . . . . . . . . . . . . . . . . . . . . . 55-90
COMPRESSOR ASSEMBLY AND
TENSION PULLEY . . . . . . . . . . . . . . .55-91
REMOVAL AND INSTALLATION . . . . . . . . 55-91
INSPECTION . . . . . . . . . . . . . . . . . . . . . . . . 55-93
DISASSEMBLY AND REASSEMBLY . . . . . 55-94
INSPECTION . . . . . . . . . . . . . . . . . . . . . . . . 55-95
CONDENSER AND CONDENSER
FAN MOTOR . . . . . . . . . . . . . . . . . . . .55-96
REMOVAL AND INSTALLATION . . . . . . . . 55-96
INSPECTION . . . . . . . . . . . . . . . . . . . . . . . . 55-97
REFRIGERANT LINE . . . . . . . . . . . . .55-98
REMOVAL AND INSTALLATION
REMOVAL AND INSTALLATION
DUCTS . . . . . . . . . . . . . . . . . . . . . . . .55-101
REMOVAL AND INSTALLATION . . . . . . . . 55-101
VENTILATORS . . . . . . . . . . . . . . . . . .55-102
REMOVAL AND INSTALLATION . . . . . . . . 55-102