engine coolant MITSUBISHI LANCER 2005 Workshop Manual
[x] Cancel search | Manufacturer: MITSUBISHI, Model Year: 2005, Model line: LANCER, Model: MITSUBISHI LANCER 2005Pages: 788, PDF Size: 45.98 MB
Page 10 of 788
ON-VEHICLE SERVICE
ENGINE LUBRICATION12-4
ON-VEHICLE SERVICE
ENGINE OIL CHECKM1121000900342
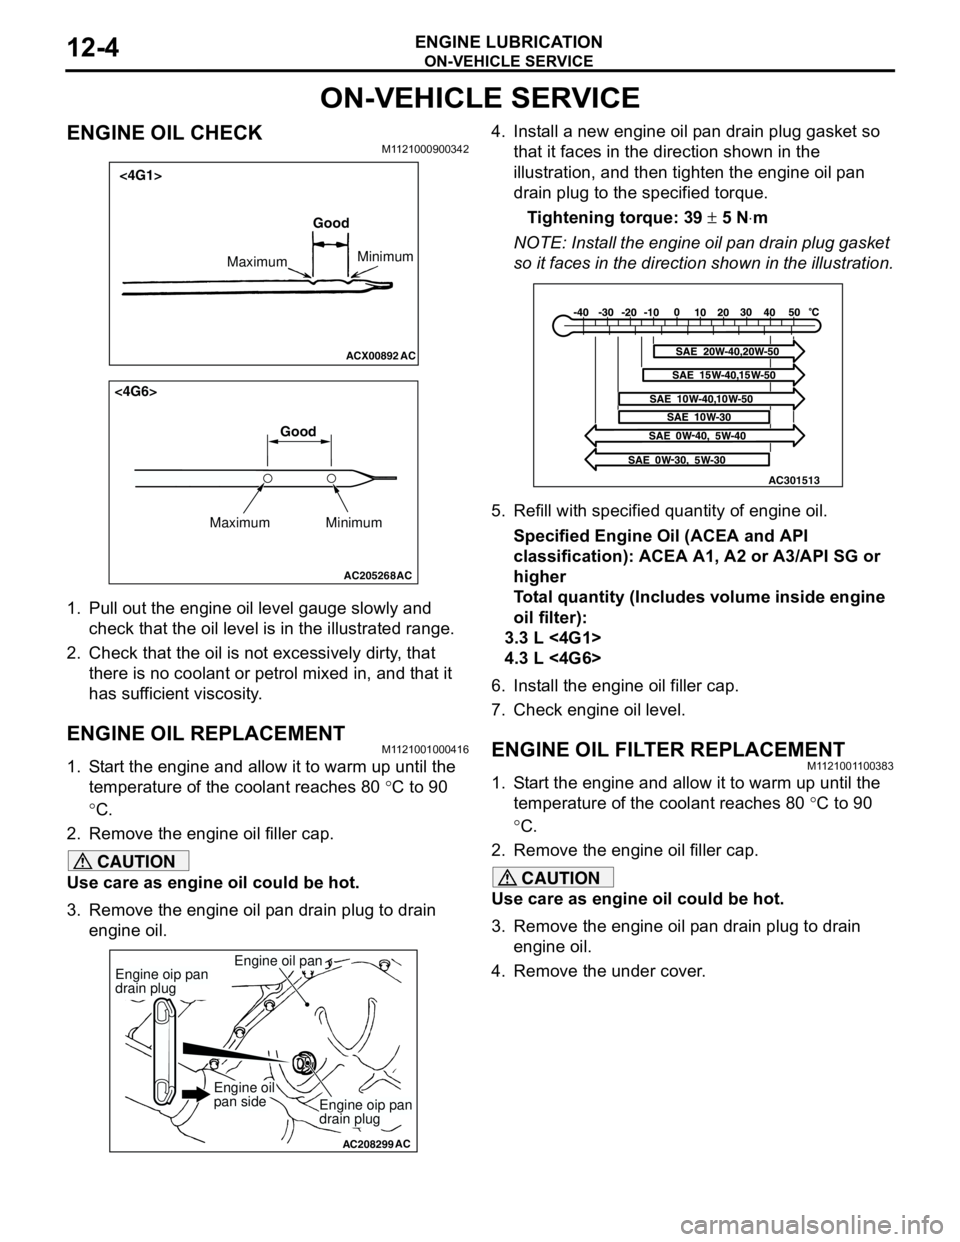
1. Pull out the engine oil level gauge slowly and
check that the oil level is in the illustrated range.
2. Check that the oil is not excessively dirty, that
there is no coolant or petrol mixed in, and that it
has sufficient viscosity.
ENGINE OIL REPLACEMENTM1121001000416
1. Start the engine and allow it to warm up until the
temperature of the coolant reaches 80 °C to 90
°C.
2. Remove the engine oil filler cap.
CAUTION
Use care as engine oil could be hot.
3. Remove the engine oil pan drain plug to drain
engine oil.4. Install a new engine oil pan drain plug gasket so
that it faces in the direction shown in the
illustration, and then tighten the engine oil pan
drain plug to the specified torque.
Tightening torque: 39 ± 5 N⋅m
NOTE: Install the engine oil pan drain plug gasket
so it faces in the direction shown in the illustration.
5. Refill with specified quantity of engine oil.
Specified Engine Oil (ACEA and API
classification): ACEA A1, A2 or A3/API SG or
higher
Total quantity (Includes volume inside engine
oil filter):
3.3 L <4G1>
4.3 L <4G6>
6. Install the engine oil filler cap.
7. Check engine oil level.
ENGINE OIL FILTER REPLACEMENTM1121001100383
1. Start the engine and allow it to warm up until the
temperature of the coolant reaches 80 °C to 90
°C.
2. Remove the engine oil filler cap.
CAUTION
Use care as engine oil could be hot.
3. Remove the engine oil pan drain plug to drain
engine oil.
4. Remove the under cover.
ACX00892 AC
Good
MaximumMinimum
<4G1>
AC205268
Maximum MinimumGood
AC
<4G6>
AC208299
Engine oil pan
AC
Engine oip pan
drain plug
Engine oip pan
drain plug
Engine oil
pan side
AC301513
Page 15 of 788
14-1
GROUP 14
ENGINE COOLING
CONTENTS
GENERAL INFORMATION . . . . . . . .14-2
SERVICE SPECIFICATIONS . . . . . . .14-2
LUBRICANT . . . . . . . . . . . . . . . . . . . .14-2
SEALANTS . . . . . . . . . . . . . . . . . . . .14-3
SPECIAL TOOLS . . . . . . . . . . . . . . . .14-3
TROUBLESHOOTING . . . . . . . . . . . .14-5
INSPECTION CHART FOR TROUBLE
SYMPTOMS . . . . . . . . . . . . . . . . . . . . . . . . 14-5
INSPECTION PROCEDURE FOR
TROUBLE SYMPTOMS . . . . . . . . . . . . . . . 14-6
ON-VEHICLE SERVICE . . . . . . . . . . .14-22
ENGINE COOLANT LEAK CHECK . . . . . . 14-22
RADIATOR CAP VALVE OPENING
PRESSURE CHECK . . . . . . . . . . . . . . . . . . 14-22
ENGINE COOLANT REPLACEMENT . . . . 14-22
CONCENTRATION MEASUREMENT . . . . 14-23COOLING FAN MOTOR DRIVE CONTROL
UNIT CHECK . . . . . . . . . . . . . . . . . . . . . . . . 14-23
FAN CONTROL RELAY CONTINUITY
CHECK . . . . . . . . . . . . . . . . . . . . . . . . . . . . 14-24
COOLING FAN MOTOR CHECK . . . . . . . . 14-25
THERMOSTAT . . . . . . . . . . . . . . . . . .14-26
REMOVAL AND INSTALLATION . . . . . . . . 14-26
INSPECTION . . . . . . . . . . . . . . . . . . . . . . . . 14-27
WATER PUMP . . . . . . . . . . . . . . . . . .14-29
REMOVAL AND INSTALLATION <4G1> . . 14-29
REMOVAL AND INSTALLATION <4G6> . . 14-30
WATER HOSE AND WATER PIPE . .14-31
REMOVAL AND INSTALLATION <4G1> . . 14-31
REMOVAL AND INSTALLATION <4G6> . . 14-33
INSPECTION . . . . . . . . . . . . . . . . . . . . . . . . 14-34
RADIATOR . . . . . . . . . . . . . . . . . . . . .14-35
REMOVAL AND INSTALLATION . . . . . . . . 14-35
Page 16 of 788

GENERAL INFORMATION
ENGINE COOLING14-2
GENERAL INFORMATION
M1141000100371The cooling system is designed to keep every part of
the engine at appropriate temperature in whatever
condition the engine may be operated. The cooling
method is of the water-cooled, pressure forced
circulation type in which the water pump pressurizes
coolant and circulates it throughout the engine. If the
coolant temperature exceeds the prescribed temperature, the thermostat opens to circulate the
coolant through the radiator as well so that the heat
absorbed by the coolant may be radiated into the air.
The water pump is of the centrifugal type and is
driven by the alternator drive belt from the
crankshaft. The radiator is the corrugated fin, down
flow type.
SERVICE SPECIFICATIONS
M1141000300416
LUBRICANT
M1141000400338
ItemSpecification
Radiator Performance kJ/h 4G13 Standard vehicles 137,720
Vehicles with capacity up radiator
(option)161,288
4G18 Standard vehicles 161,288
Vehicles with capacity up radiator
(option)181,800
4G63 181,800
A/T oil cooler Performance kJ/h 5,651
Item Standard value Limit
High-pressure valve opening pressure of radiator cap kPa 93 − 123 Minimum 83
Range of coolant antifreeze concentration of radiator % 30 − 60 -
Thermostat Valve opening temperature of
thermostat °C4G1 88 ± 1.5 -
4G6 82 ± 1.5 -
Full-opening temperature of
thermostat °C4G1 100 -
4G6 95 -
Valve lift mm 8.5 or more -
Item Specified coolant Quantity L
Engine coolant (including
condense tank)DIAQUEEN SUPER LONG LIFE COOLANT
or an equivalent4G1 5.0
4G6 7.0
Page 19 of 788
TROUBLESHOOTING
ENGINE COOLING14-5
TROUBLESHOOTING
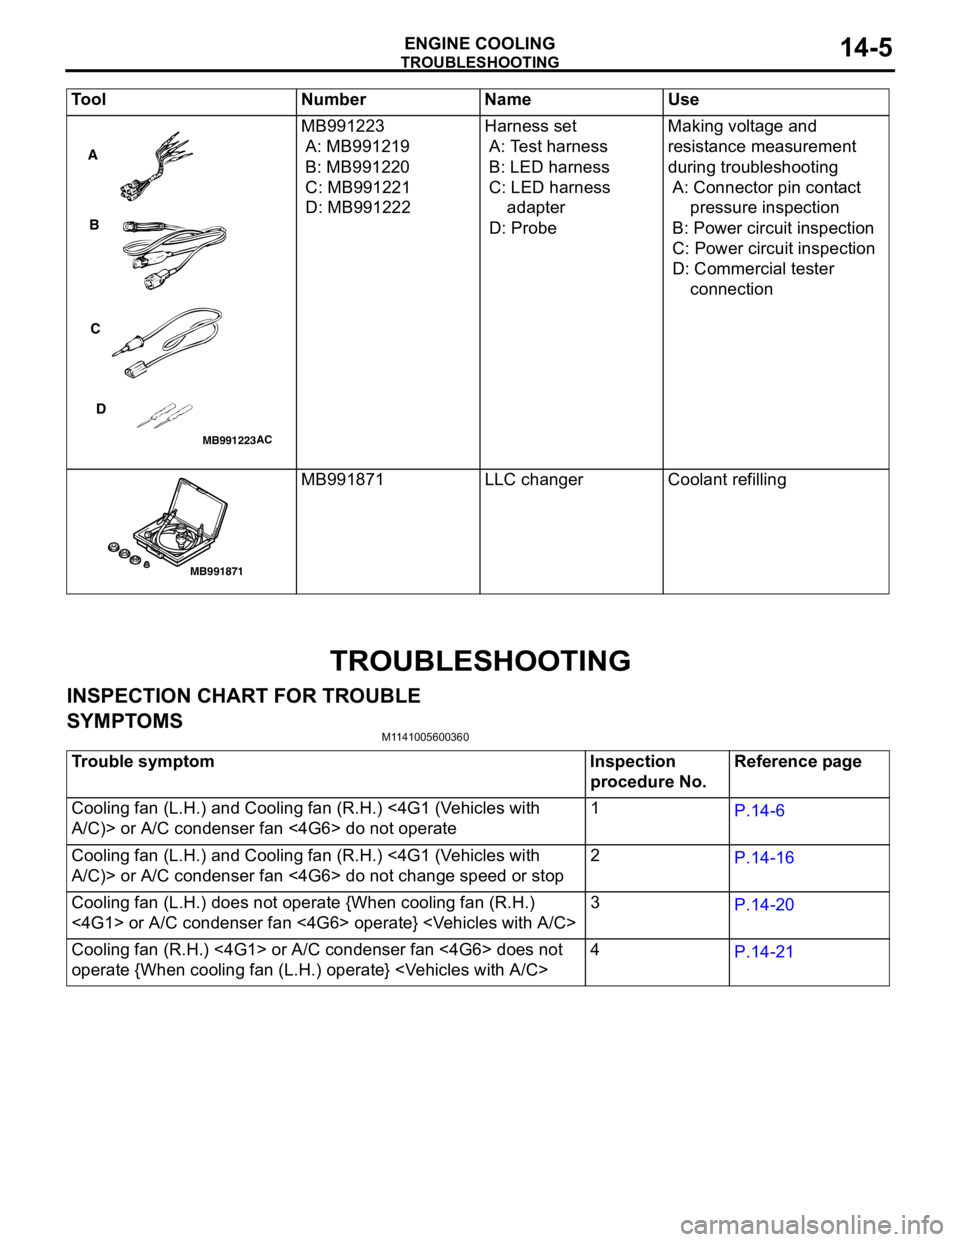
INSPECTION CHART FOR TROUBLE
SYMPTOMS
M1141005600360
MB991223
A: MB991219
B: MB991220
C: MB991221
D: MB991222 Harness set
A: Test harness
B: LED harness
C: LED harness
adapter
D: ProbeMaking voltage and
resistance measurement
during troubleshooting
A: Connector pin contact
pressure inspection
B: Power circuit inspection
C: Power circuit inspection
D: Commercial tester
connection
MB991871 LLC changer Coolant refilling Tool Number Name Use
MB991223
A
B
C
D
AC
MB991871
Trouble symptom Inspection
procedure No.Reference page
Cooling fan (L.H.) and Cooling fan (R.H.) <4G1 (Vehicles with
A/C)> or A/C condenser fan <4G6> do not operate 1
P.14-6
Cooling fan (L.H.) and Cooling fan (R.H.) <4G1 (Vehicles with
A/C)> or A/C condenser fan <4G6> do not change speed or stop2
P.14-16
Cooling fan (L.H.) does not operate {When cooling fan (R.H.)
<4G1> or A/C condenser fan <4G6> operate}
P.14-20
Cooling fan (R.H.) <4G1> or A/C condenser fan <4G6> does not
operate {When cooling fan (L.H.) operate}
P.14-21
Page 36 of 788
ON-VEHICLE SERVICE
ENGINE COOLING14-22
ON-VEHICLE SERVICE
ENGINE COOLANT LEAK CHECKM1141001000300
WARNING
When pressure testing the cooling system,
slowly release cooling system pressure to
avoid getting burned by hot coolant.
CAUTION
•Be sure to completely clean away any
moisture from the places checked.
•When the tester is taken out, be careful not to
spill any coolant.
•Be careful when installing and removing the
tester and when testing not to deform the
filler neck of the radiator.
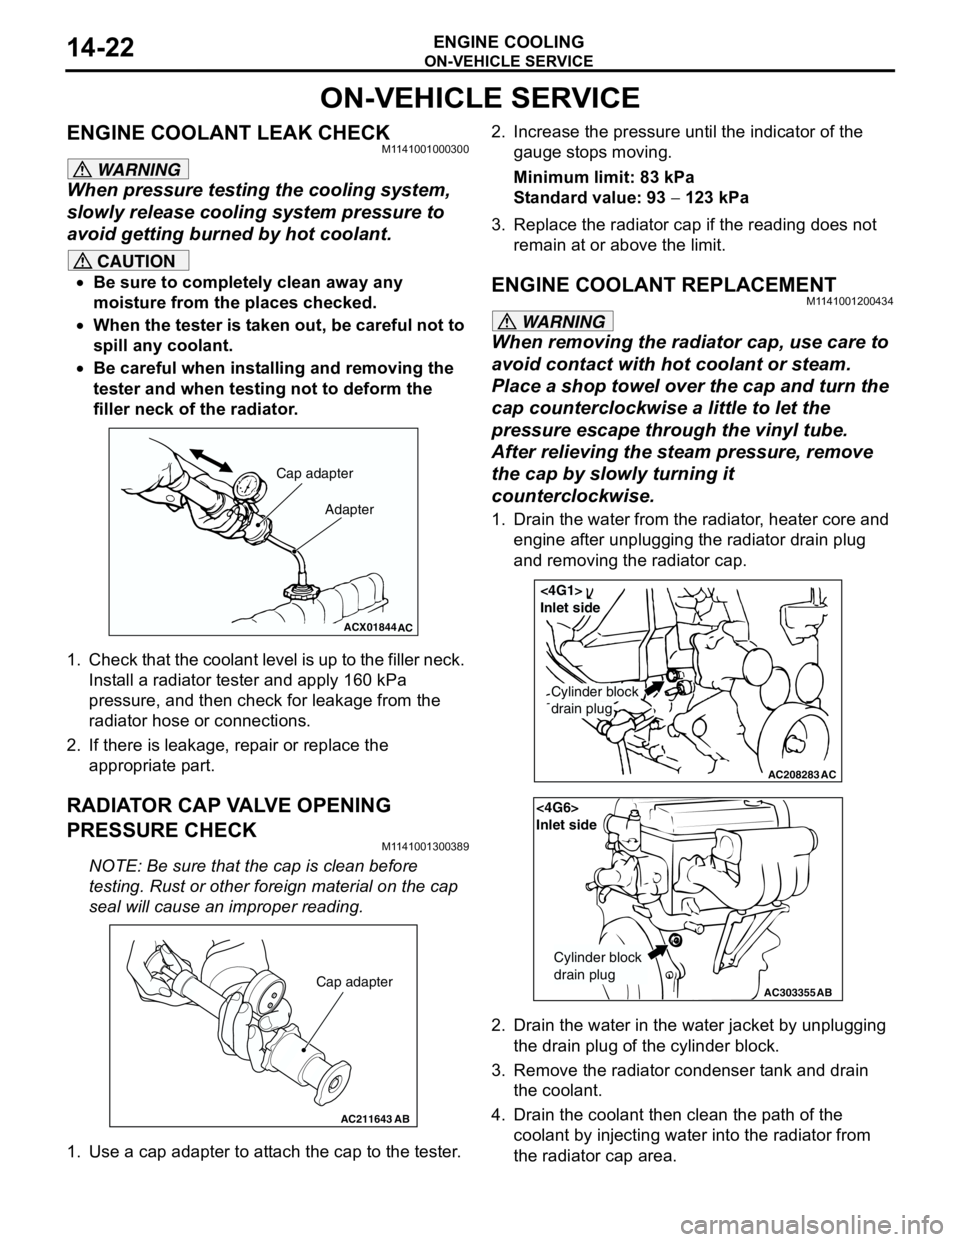
1. Check that the coolant level is up to the filler neck.
Install a radiator tester and apply 160 kPa
pressure, and then check for leakage from the
radiator hose or connections.
2. If there is leakage, repair or replace the
appropriate part.
RADIATOR CAP VALVE OPENING
PRESSURE CHECK
M1141001300389
NOTE: Be sure that the cap is clean before
testing. Rust or other foreign material on the cap
seal will cause an improper reading.
1. Use a cap adapter to attach the cap to the tester.2. Increase the pressure until the indicator of the
gauge stops moving.
Minimum limit: 83 kPa
Standard value: 93 − 123 kPa
3. Replace the radiator cap if the reading does not
remain at or above the limit.
ENGINE COOLANT REPLACEMENTM1141001200434
WARNING
When removing the radiator cap, use care to
avoid contact with hot coolant or steam.
Place a shop towel over the cap and turn the
cap counterclockwise a little to let the
pressure escape through the vinyl tube.
After relieving the steam pressure, remove
the cap by slowly turning it
counterclockwise.
1. Drain the water from the radiator, heater core and
engine after unplugging the radiator drain plug
and removing the radiator cap.
2. Drain the water in the water jacket by unplugging
the drain plug of the cylinder block.
3. Remove the radiator condenser tank and drain
the coolant.
4. Drain the coolant then clean the path of the
coolant by injecting water into the radiator from
the radiator cap area.
ACX01844
Cap adapter
Adapter
AC
AC211643AB
Cap adapter
AC208283AC
Cylinder block
drain plug
<4G1>
Inlet side
AC303355
<4G6>
Inlet side
Cylinder block
drain plug
AB
Page 37 of 788
ON-VEHICLE SERVICE
ENGINE COOLING14-23
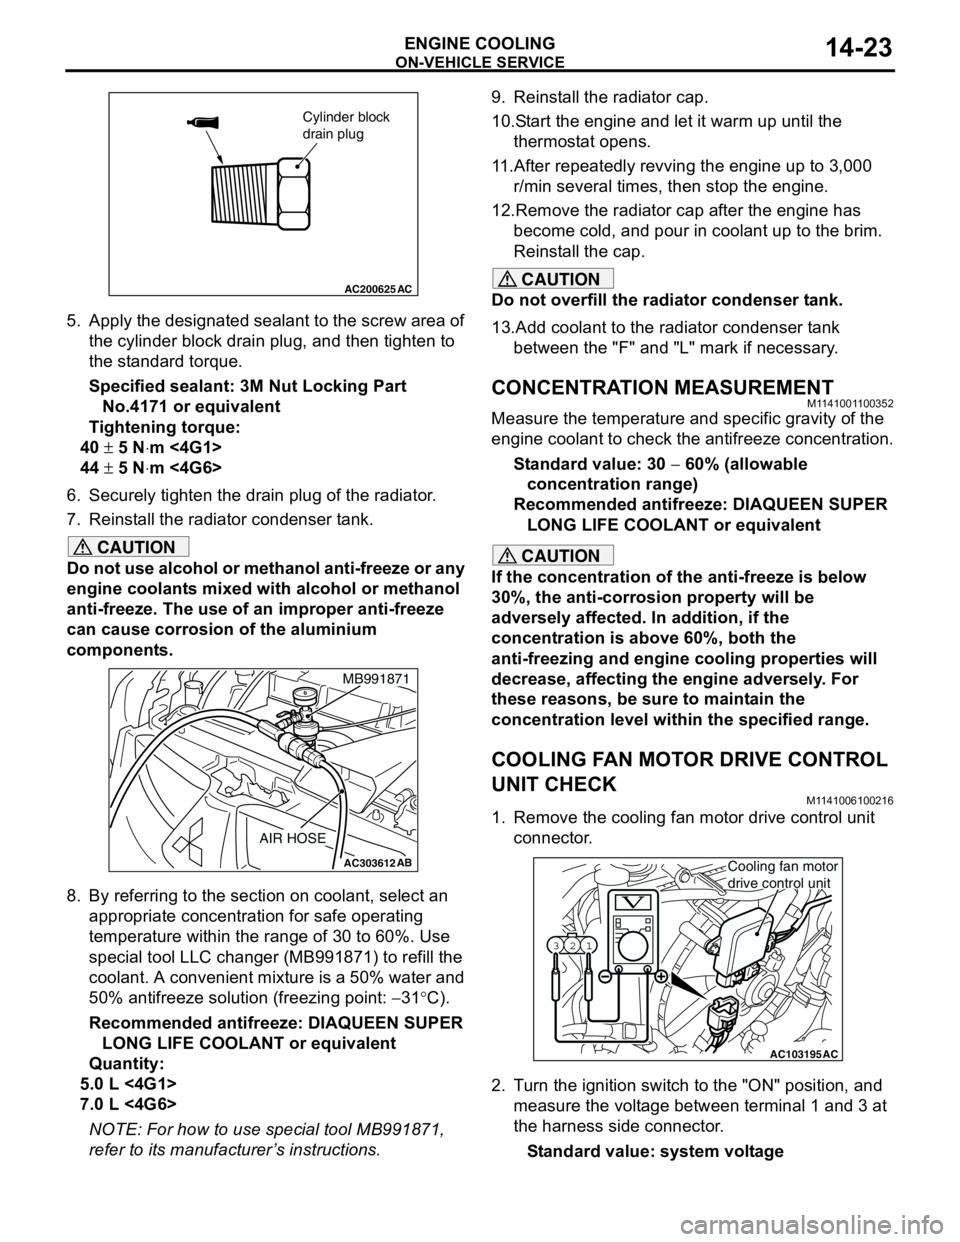
5. Apply the designated sealant to the screw area of
the cylinder block drain plug, and then tighten to
the standard torque.
Specified sealant: 3M Nut Locking Part
No.4171 or equivalent
Tightening torque:
40 ± 5 N⋅m <4G1>
44 ± 5 N⋅m <4G6>
6. Securely tighten the drain plug of the radiator.
7. Reinstall the radiator condenser tank.
CAUTION
Do not use alcohol or methanol anti-freeze or any
engine coolants mixed with alcohol or methanol
anti-freeze. The use of an improper anti-freeze
can cause corrosion of the aluminium
components.
8. By referring to the section on coolant, select an
appropriate concentration for safe operating
temperature within the range of 30 to 60%. Use
special tool LLC changer (MB991871) to refill the
coolant. A convenient mixture is a 50% water and
50% antifreeze solution (freezing point: −31°C).
Recommended antifreeze: DIAQUEEN SUPER
LONG LIFE COOLANT or equivalent
Quantity:
5.0 L <4G1>
7.0 L <4G6>
NOTE: For how to use special tool MB991871,
refer to its manufacturer’s instructions.9. Reinstall the radiator cap.
10.Start the engine and let it warm up until the
thermostat opens.
11.After repeatedly revving the engine up to 3,000
r/min several times, then stop the engine.
12.Remove the radiator cap after the engine has
become cold, and pour in coolant up to the brim.
Reinstall the cap.
CAUTION
Do not overfill the radiator condenser tank.
13.Add coolant to the radiator condenser tank
between the "F" and "L" mark if necessary.
CONCENTRATION MEASUREMENTM1141001100352
Measure the temperature and specific gravity of the
engine coolant to check the antifreeze concentration.
Standard value: 30 − 60% (allowable
concentration range)
Recommended antifreeze: DIAQUEEN SUPER
LONG LIFE COOLANT or equivalent
CAUTION
If the concentration of the anti-freeze is below
30%, the anti-corrosion property will be
adversely affected. In addition, if the
concentration is above 60%, both the
anti-freezing and engine cooling properties will
decrease, affecting the engine adversely. For
these reasons, be sure to maintain the
concentration level within the specified range.
COOLING FAN MOTOR DRIVE CONTROL
UNIT CHECK
M1141006100216
1. Remove the cooling fan motor drive control unit
connector.
2. Turn the ignition switch to the "ON" position, and
measure the voltage between terminal 1 and 3 at
the harness side connector.
Standard value: system voltage
AC200625
Cylinder block
drain plug
AC
AC303612AB
MB991871
AIR HOSE
AC103195
Y1716AU
1 23
AC
Cooling fan motor
drive control unit
Page 40 of 788

THERMOSTAT
ENGINE COOLING14-26
THERMOSTAT
REMOVAL AND INSTALLATIONM1141002400442
Pre-removal and Post-installation Operation
•Engine Coolant Draining and Refilling (Refer to P.14-22).
•Air Cleaner Assembly Removal and Installation (Refer to
GROUP 15 P.15-3).
•Battery Removal and Installation
AC203409AC
4
3 6 7
22 ± 4 N·m
<4G1>
AC301429
1
2
36 7
13 ± 2 N·m
AD
5
<4G6>
Page 43 of 788
WAT ER P U M P
ENGINE COOLING14-29
WAT E R P U M P
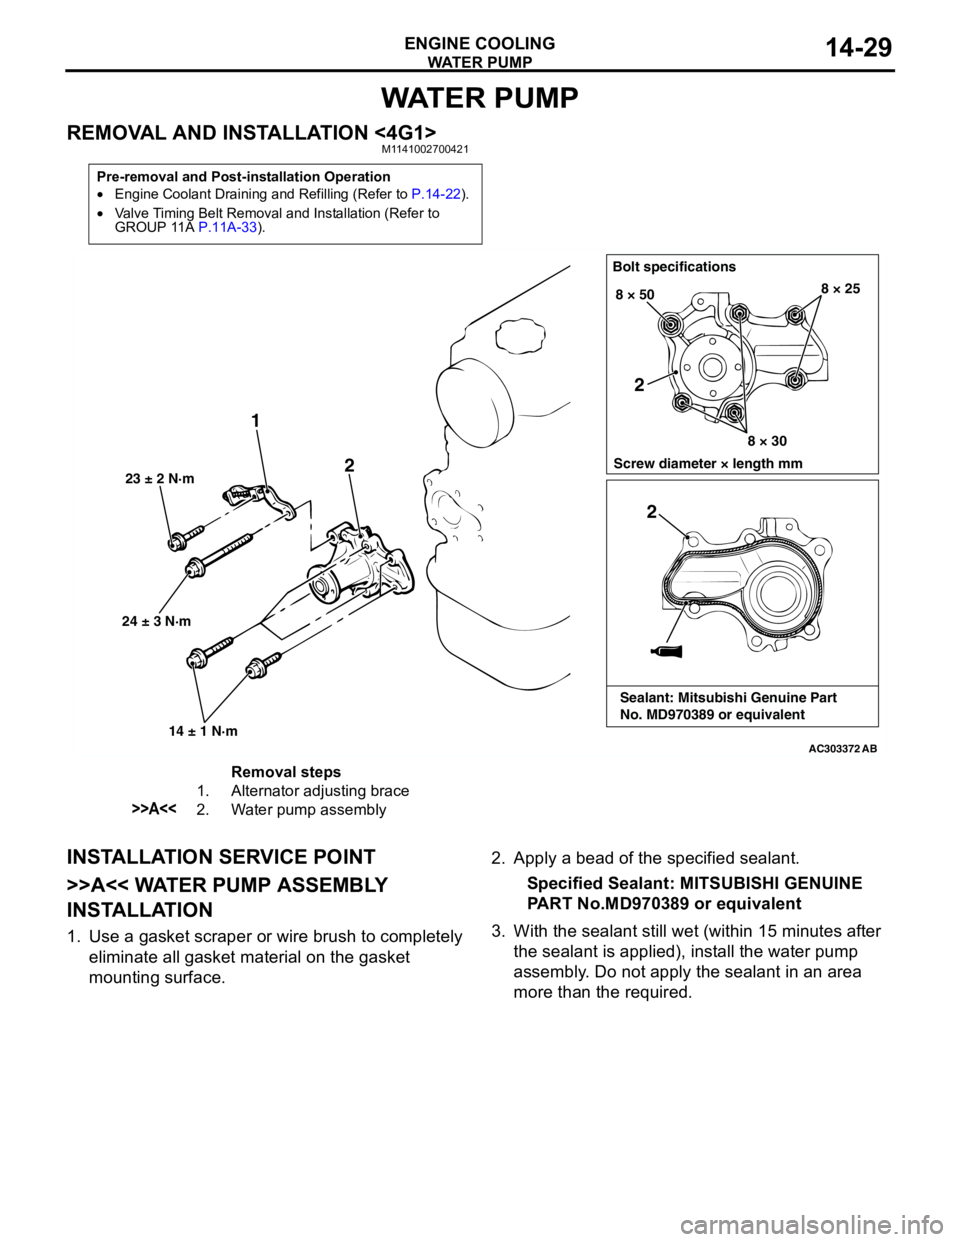
REMOVAL AND INSTALLATION <4G1>M1141002700421
INSTALLATION SERVICE POINT
>>A<< WATER PUMP ASSEMBLY
INSTALLATION
1. Use a gasket scraper or wire brush to completely
eliminate all gasket material on the gasket
mounting surface.2. Apply a bead of the specified sealant.
Specified Sealant: MITSUBISHI GENUINE
PART No.MD970389 or equivalent
3. With the sealant still wet (within 15 minutes after
the sealant is applied), install the water pump
assembly. Do not apply the sealant in an area
more than the required.
Pre-removal and Post-installation Operation
•Engine Coolant Draining and Refilling (Refer to P.14-22).
•Valve Timing Belt Removal and Installation (Refer to
GROUP 11A P.11A-33).
AC303372
24 ± 3 N·m 23 ± 2 N·m
14 ± 1 N·m
1
2
Bolt specifications
Screw diameter × length mm 8 × 50
8 × 308 × 25
AB
2
2
Sealant: Mitsubishi Genuine Part
No. MD970389 or equivalent
Removal steps
1. Alternator adjusting brace
>>A<<2. Water pump assembly
Page 44 of 788
WAT E R P U M P
ENGINE COOLING14-30
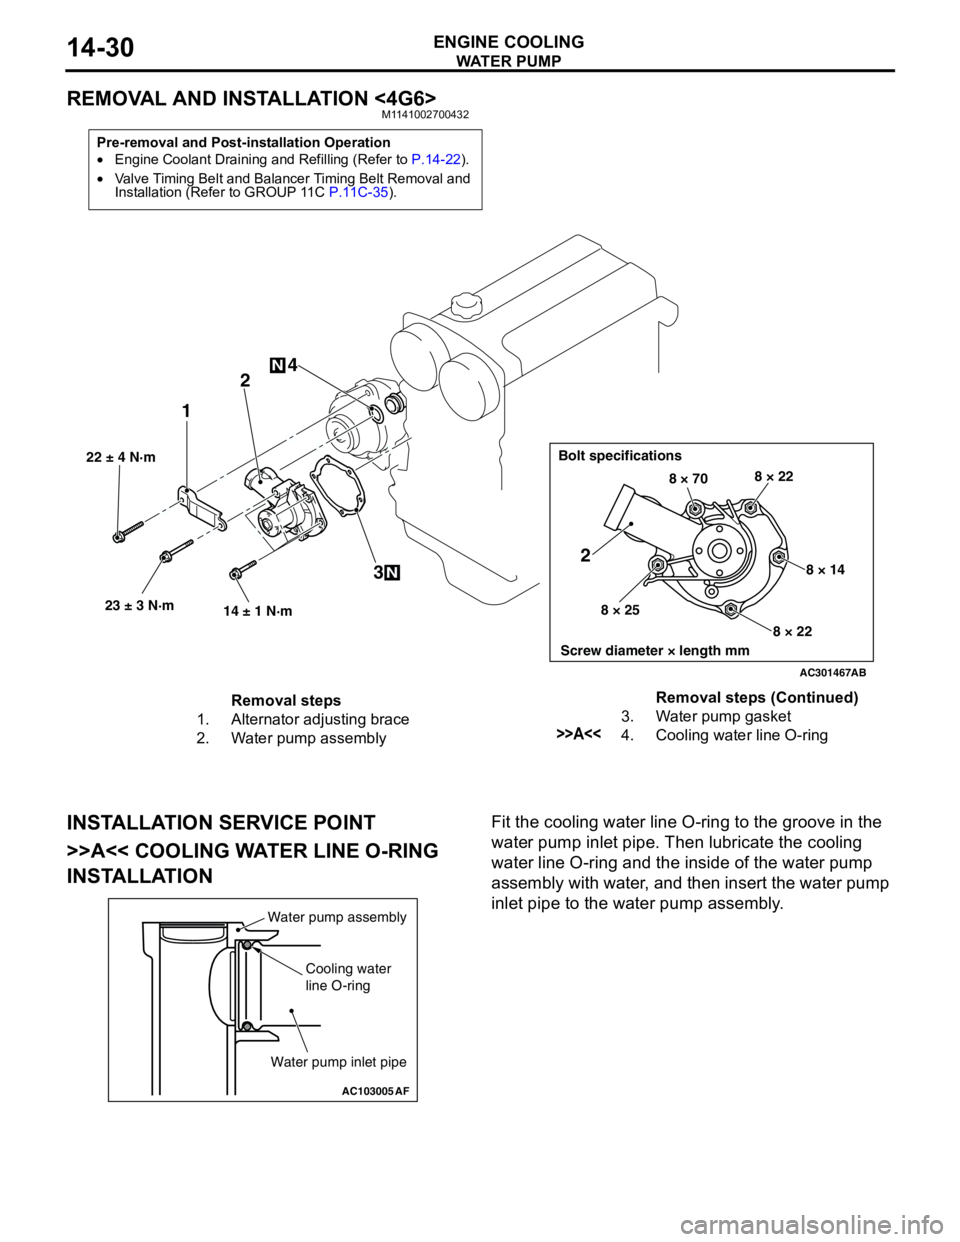
REMOVAL AND INSTALLATION <4G6>M1141002700432
INSTALLATION SERVICE POINT
>>A<< COOLING WATER LINE O-RING
INSTALLATIONFit the cooling water line O-ring to the groove in the
water pump inlet pipe. Then lubricate the cooling
water line O-ring and the inside of the water pump
assembly with water, and then insert the water pump
inlet pipe to the water pump assembly.
Pre-removal and Post-installation Operation
•Engine Coolant Draining and Refilling (Refer to P.14-22).
•Valve Timing Belt and Balancer Timing Belt Removal and
Installation (Refer to GROUP 11C P.11C-35).
AC301467
22 ± 4 N·m
23 ± 3 N·m
14 ± 1 N·m
12
3 4
N
N
Bolt specifications
Screw diameter × length mm
8 × 708 × 22
8 × 14
8 × 22 8 × 25
2
AB
Removal steps
1. Alternator adjusting brace
2. Water pump assembly3. Water pump gasket
>>A<<4. Cooling water line O-ringRemoval steps (Continued)
AC103005
Water pump assembly
Cooling water
line O-ring
Water pump inlet pipe
AF
Page 45 of 788
WATER HOSE AND WATER PIPE
ENGINE COOLING14-31
WATER HOSE AND WATER PIPE
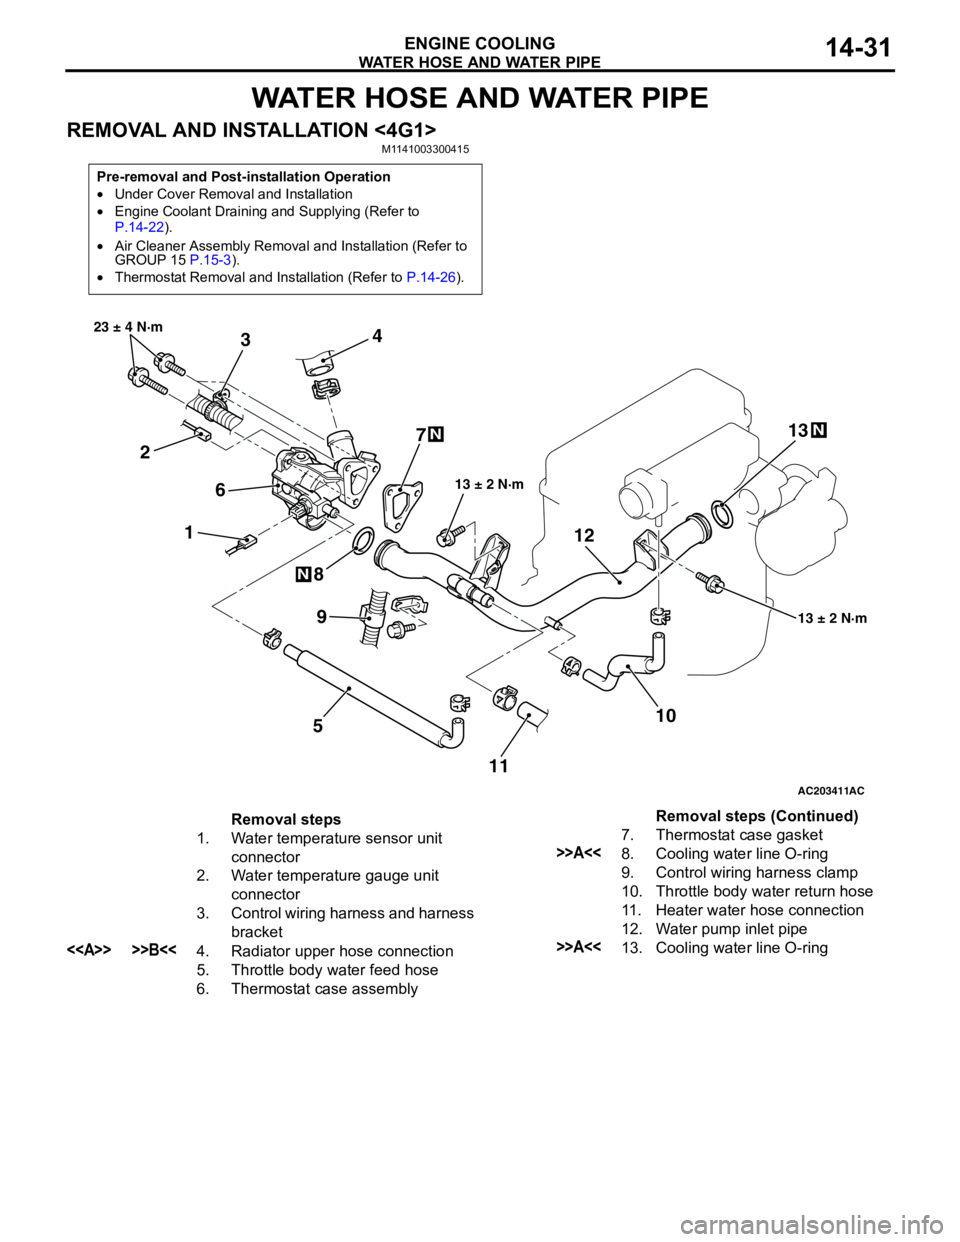
REMOVAL AND INSTALLATION <4G1>M1141003300415
Pre-removal and Post-installation Operation
•Under Cover Removal and Installation
•Engine Coolant Draining and Supplying (Refer to
P.14-22).
•Air Cleaner Assembly Removal and Installation (Refer to
GROUP 15 P.15-3).
•Thermostat Removal and Installation (Refer to P.14-26).
AC203411
1 234
5 67
8
10 9
13 ± 2 N·m 23 ± 4 N·m
13 ± 2 N·m
N
N
AC
111213
N
Removal steps
1. Water temperature sensor unit
connector
2. Water temperature gauge unit
connector
3. Control wiring harness and harness
bracket
<> >>B<<4. Radiator upper hose connection
5. Throttle body water feed hose
6. Thermostat case assembly7. Thermostat case gasket
>>A<<8. Cooling water line O-ring
9. Control wiring harness clamp
10. Throttle body water return hose
11. Heater water hose connection
12. Water pump inlet pipe
>>A<<13. Cooling water line O-ringRemoval steps (Continued)