Condition MITSUBISHI LANCER 2006 Workshop Manual
[x] Cancel search | Manufacturer: MITSUBISHI, Model Year: 2006, Model line: LANCER, Model: MITSUBISHI LANCER 2006Pages: 800, PDF Size: 45.03 MB
Page 16 of 800

GENERAL INFORMATION
ENGINE COOLING14-2
GENERAL INFORMATION
M1141000100371
The cooling system is designed to keep every part of
the engine at appropriate temperature in whatever
condition the engine may be operated. The cooling
method is of the water-cooled, pressure forced circu
-
lation type in which the water pump pressurizes cool-
ant and circulates it throughout the engine. If the
coolant temperature exceeds the prescribed temper
-
ature, the thermostat opens to circulate the coolant
through the radiator as well so that the heat
absorbed by the coolant may be radiated into the air.
The water pump is of the centrifugal type and is
driven by the alternator drive belt from the crank
-
shaft. The radiator is the corrugated fin, down flow
type.
ItemSpecification
RadiatorPerformance kJ/h4G13Standard vehicles137,720
Vehicles with capacity up radiator
(option)161,288
4G18Standard vehicles161,288
Vehicles with capacity up radiator
(option)181,800
4G63181,800
A/T oil coolerPerformance kJ/h5,651
SERVICE SPECIFICATIONS
M1141000300687
ItemStandard valueLimit
Fan controller VA/C OFF1 or less-
A/C ONRepeat
8.2 ± 0.7
System voltage ± 2.6
-
High-pressure valve opening pressure of radiator cap kPa93 − 123Minimum 83
Range of coolant antifreeze concentration of radiator %30 − 60-
ThermostatValve opening temperature of
thermostat
°C
4G188 ± 1.5-
4G682 ± 1.5-
Full-opening temperature of
thermostat
°C
4G1100-
4G695-
Valve lift mm8.5 or more-
Page 21 of 800
TROUBLESHOOTING
ENGINE COOLING14-7
•The engine-ECU
controls the cooling fan motor drive control
unit to activate the cooling fan motor (L.H.) and
the cooling fan motor (R.H.) <4G1 (Vehicles with
A/C)> or A/C condenser fan motor <4G6>.
TECHNICAL DESCRIPTION
•The cause could be a malfunction of the cooling
fan motor drive control unit power supply or earth
circuit.
•If the communication line wiring harness between
the cooling fan motor drive control unit and the
engine-ECU
short-circuited to earth, the cooling fan motor
(L.H.) and the cooling fan motor (R.H.) <4G1
(Vehicles with A/C)> or the A/C condenser fan
motor <4G6> will not rotate.
•The cause could also be a malfunction of the
cooling fan motor (L.H.).
•The cause could also be a malfunction of imput
signal from the A/C switch, the water temperature
sensor unit and the vehicle speed sensor
or the output shaft speed sensor to the
engine-ECU
•The cause could also be a malfunction of the
cooling fan motor drive control unit or the
engine-ECU
TROUBLESHOOTING HINTS
•Malfunction of fusible link (2)
•Malfunction of fan control relay
•Malfunction of cooling fan motor (L.H.)
•Malfunction of cooling fan motor drive control unit
•Malfunction of engine-ECU
engine-A/T-ECU
•Damaged wiring harness or connector
DIAGNOSIS
STEP 1. Check the cooling fan motor (L.H.).
Refer to P.14-24.
Q: Is the cooling fan motor (L.H.) in good condition?
YES : Go to Step 2 .
NO : Replace the cooling fan motor (L.H.) (Refer
to
P.14-33) <4G1> (Refer to P.14-35)
<4G6>. Then go to Step 24 .
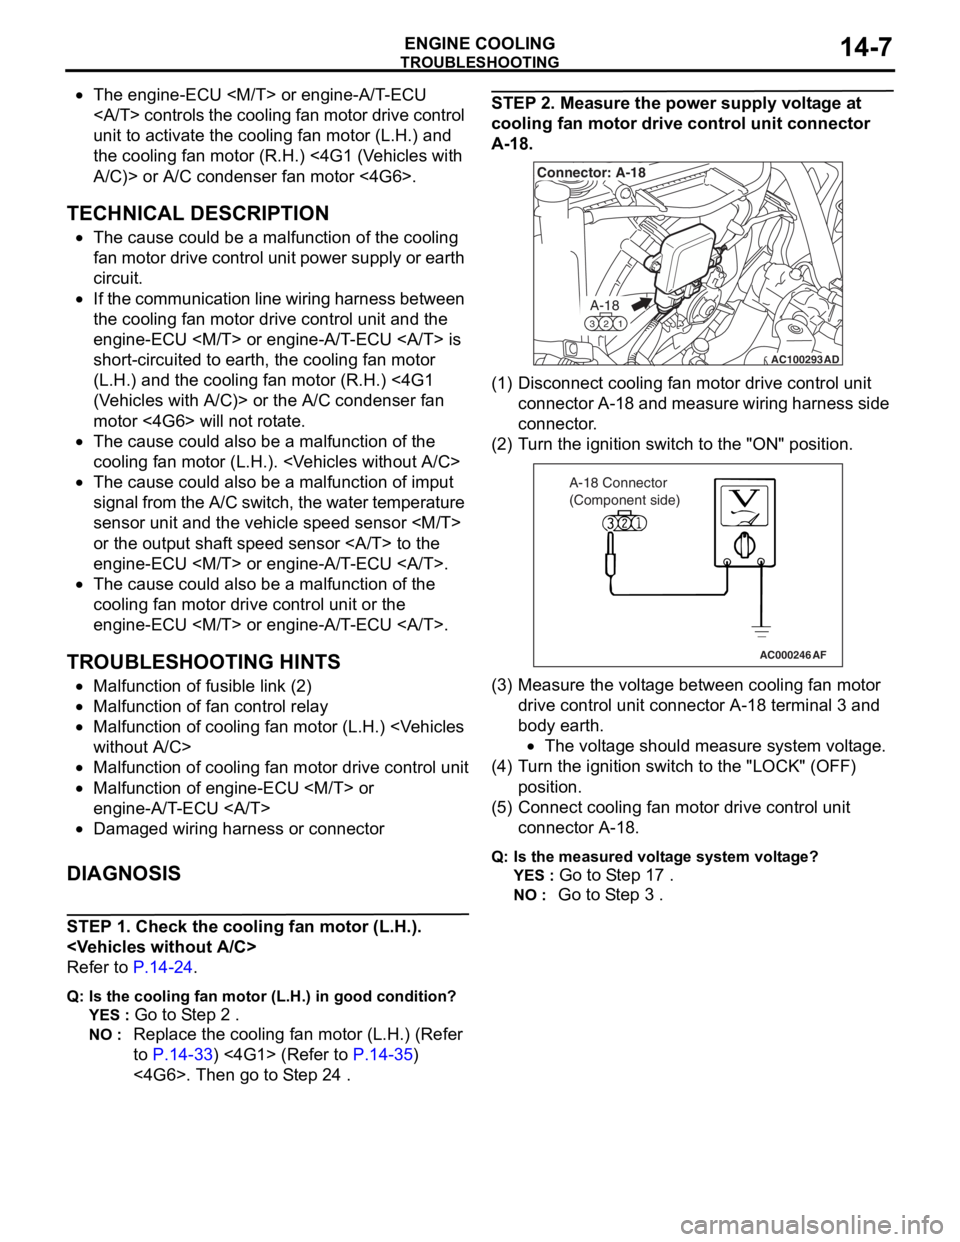
STEP 2. Measure the power supply voltage at
cooling fan motor drive control unit connector
A-18.
AC100293
A-18
321
Connector: A-18
AD
(1)D isconn ect cooling f an motor drive contro l unit
conne ctor A-18 a nd measure wirin g har ness side
connector .
(2)T urn t he ig nition switch t o the "ON" positio n.
AC000246AF
A-18 Connector
(Component side)
(3)M easu r e the volt age between cooling fan motor
drive control unit con nect o r A-18 te rmin al 3 a nd
bod y ea rth.
•The voltage shou ld measu r e syste m volt age.
(4)T urn t he ig nition switch t o the "L OCK" (OF F )
position.
(5)C onne ct cooling fa n mot o r drive control unit
connector A-18.
Q:Is t h e mea s ure d volt a g e sy ste m v o lt ag e?
YES : Go to S t ep 1 7 .
NO : Go to S t ep 3 .
Page 30 of 800
TROUBLESHOOTING
ENGINE COOLING14-16
INSPECTION PROCEDURE 2: Cooling Fan (L.H.) and Cooling Fan (R.H.) <4G1 (Vehicles with A/C)> or
A/C Condenser Fan <4G6> do not Change Speed or Stop
COOLING FAN (L.H.) AND COOLING FAN
(R.H.) OR A/C CONDENSER FAN DRIVE
CIRCUIT
Refer to P.14-6.
CIRCUIT OPERATION
Refer to P.14-6.
TECHNICAL DESCRIPTION
•If the communication line wiring harness between
the cooling fan motor drive control unit and the
engine-ECU
is open, the cooling fan motor (L.H.) and
the cooling fan motor (R.H.) <4G1 (Vehicles with
A/C)>, or the A/C condenser fan motor <4G6>
rotate to prevent the engine from overheating.
•If the system voltage is continuously supplied to
the cooling fan motor drive control unit by a fan
motor relay malfunction and a short circuit on the
cooling fan motor drive control unit power supply
wiring harness, the cooling fan motor (L.H.) and
the cooling fan motor (R.H.) <4G1 (Vehicles with
A/C)>, or the A/C condenser fan motor <4G6>
rotate.
•The cause could also be a malfunction of the
cooling fan motor (L.H.).
•The cause could also be a malfunction of input
signal from the A/C switch, the water temperature
sensor unit and the vehicle speed sensor
or the output shaft speed sensor to the
engine-ECU
•The cause could also be a malfunction of the
cooling fan motor drive control unit or the
engine-ECU
TROUBLESHOOTING HINTS
•Malfunction of fan control relay
•Malfunction of cooling fan motor (L.H.)
•Malfunction of cooling fan motor drive control unit
•Malfunction of engine-ECU
engine-A/T-ECU
•Damaged wiring harness or connector
DIAGNOSIS
STEP 1. Check the fan control relay.
Refer to P.14-23.
Q: Is the fan control relay in good condition?
YES : Go to Step 2 .
NO : Replace the fan control relay. Then go to
Step 8
.
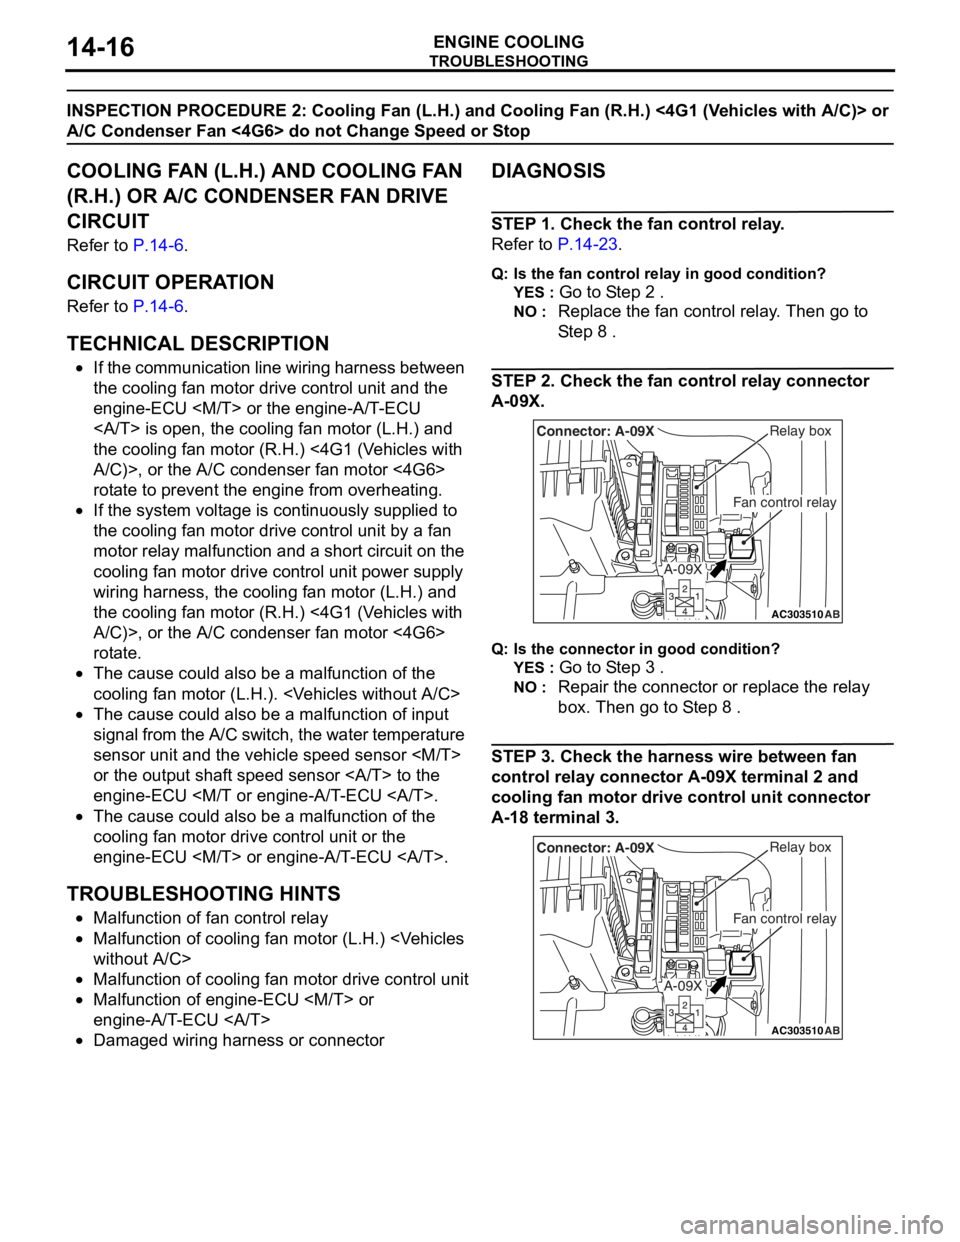
STEP 2. Check the fan control relay connector
A-09X.
AC303510AB
Fan control relay
Relay boxConnector: A-09X
A-09X
Q:Is t h e con n ec tor in goo d c ond it io n?
YES : Go to S t ep 3 .
NO : Repa ir th e con nect o r or rep l ace the re lay
box. Then
go to S t ep 8
.
STEP 3 . Check the harness wire be twee n fan
control relay
connec tor A-0 9 X terminal 2 and
cooling f
an motor drive control uni t connec tor
A-1
8 terminal 3.
AC303510AB
Fan control relay
Relay boxConnector: A-09X
A-09X
Page 33 of 800
TROUBLESHOOTING
ENGINE COOLING14-19
(8) Reconnect the connector with connector terminal
pin still installed.
Q: Does the cooling fan rotate? And when the
connector terminal pin is connected to the body
earth, does the cooling fan stop?
YES : Go to Step 7 .
NO : Replace the cooling fan motor drive control
unit (Refer to
P.14-33) <4G1> (Refer to
P.14-35) 4G6>. Then go to Step 8 .
STEP 7. M.U.T.-II/III self-diag code
Check if an MPI system self-diag code is set. (Refer
to GROUP 13A - Trouble shooting
P.13A-9) <4G1>
or (Refer to GROUP 13B - Trouble shooting
P.13B-9) <4G6>.
Q: Diagnosis code set?
YES : Inspection chart for diagnosis code (Refer
to GROUP 13A - Trouble shooting
P.13A-15) <4G1> or Inspection chart for
diagnosis code (Refer to GROUP 13B -
Trouble shooting
P.13B-15) <4G6>.
NO : Replace the engine-ECU
engine-A/T-ECU (Refer to GROUP
13A
P.13A-384). Then go to Step 8 .
STEP 8. Check the symptoms.
Q: Does the cooling fan motor (L.H.) and the cooling
fan motor (R.H.) <4G1 (Vehicles with A/C)> or A/C
condenser fan motor <4G6> operate correctly?
YES : This symptoms is complete.
NO : Return to Step 1 .
INSPECTION PROCEDURE 3: Cooling Fan (L.H.) does not Operate {When Cooling Fan (R.H.) <4G1> or
A/C Condenser Fan <4G6> Operate}
COOLING FAN (L.H.) AND COOLING FAN
(R.H.) OR A/C CONDENSER FAN DRIVE
CIRCUIT
Refer to P.14-6.
CIRCUIT OPERATION
Refer to P.14-6.
TECHNICAL DESCRIPTION
The cause could be a malfunction of the cooling fan
motor (L.H.) or cooling fan motor drive control unit.
TROUBLESHOOTING HINTS
•Malfunction of cooling fan motor (L.H.)
•Malfunction of cooling fan motor drive control unit
DIAGNOSIS
STEP 1. Check the cooling fan motor (L.H.).
Refer to P.14-24.
Q: Is the cooling fan motor (L.H.) in good condition?
YES : Go to Step 2 .
NO : Replace the cooling fan motor (L.H.) (Refer
to
P.14-33) <4G1> (Refer to P.14-35)
<4G6>. Then go to Step 3 .
STEP 2. Check the cooling fan motor drive
control unit.
Refer to P.14-22.
Q: Is the cooling fan motor drive control unit in good
condition?
YES : Go to Step 3 .
NO : Replace the cooling fan motor drive control
unit (Refer to
P.14-33) <4G1> (Refer to
P.14-35) <4G6>. Then go to Step 3 .
STEP 3. Check the symptoms.
Q: Do the cooling fan (L.H.) operate (when the cooling
fan (R.H.) <4G1> or A/C condenser fan <4G6>
operate)?
YES : This symptoms is complete.
NO : Return to Step 1 .
Page 34 of 800
TROUBLESHOOTING
ENGINE COOLING14-20
INSPECTION PROCEDURE 4: Cooling Fan (R.H.) <4G1> or A/C Condenser Fan <4G6> does not
Operate {When Cooling Fan (L.H.) Operate}
COOLING FAN (L.H.) AND COOLING FAN
(R.H.) OR A/C CONDENSER FAN DRIVE
CIRCUIT
Refer to P.14-6.
CIRCUIT OPERATION
Refer to P.14-6.
TECHNICAL DESCRIPTION
The cause could be a malfunction of the cooling fan
motor (R.H.) <4G1> or A/C condenser fan motor
<4G6> or cooling fan motor drive control unit.
TROUBLESHOOTING HINTS
•Malfunction of cooling fan motor (R.H.) <4G1> or
A/C condenser fan motor <4G6>
•Malfunction of cooling fan motor drive control unit
DIAGNOSIS
STEP 1. Check the cooling fan motor (R.H.)
<4G1> or A/C condenser fan motor <4G6>.
Cooling fan motor (R.H.) check. (Refer to P.14-24)
<4G1>.
A/C condenser fan motor check. (Refer to GROUP
55
P.55A-91) <4G6>.
Q: Is the cooling fan motor (R.H.) <4G1> or A/C
condenser fan motor <4G6> in good condition?
YES : Go to Step 2 .
NO : Replace the cooling fan motor (R.H.) (Refer
to
P.14-33) <4G1> or A/C condenser fan
motor (Refer to GROUP 55 P.55A-90)
<4G6>. Then go to Step 3 .
STEP 2. Check the cooling fan motor drive
control unit.
Refer to P.14-22.
Q: Is the cooling fan motor drive control unit in good
condition?
YES : Go to Step 3 .
NO : Replace the cooling fan motor drive control
unit (Refer to
P.14-33) <4G1> (Refer to
P.14-35) <4G6>. Then go to Step 3 .
STEP 3. Check the symptoms.
Q: Do the cooling fan (R.H.) <4G1> or A/C condenser
fan <4G6> operate (when the cooling fan (L.H.)
operate)?
YES : This symptoms is complete.
NO : Return to Step 1 .
Page 65 of 800
CHARGING SYSTEM
ENGINE ELECTRICAL16-3
SERVICE SPECIFICATIONS
M1161000300258
ItemStandard valueLimit
Alternator output line voltage drop (at 30 A) V−maximum 0.3
Regulated voltage ambient
temperature at voltage regulator V−20°C14.2 − 15.4−
20°C13.9 − 14.9−
60°C13.4 − 14.6−
80°C13.1 − 14.5−
Output current−70 % of normal output current
SPECIAL TOOLM1161000600163
ToolNumberNameUse
MB991519Alterna t or test harn e ssChec king th e alt e rnator
("S" te rminal volt age )
ON-VEHICLE SERV ICE
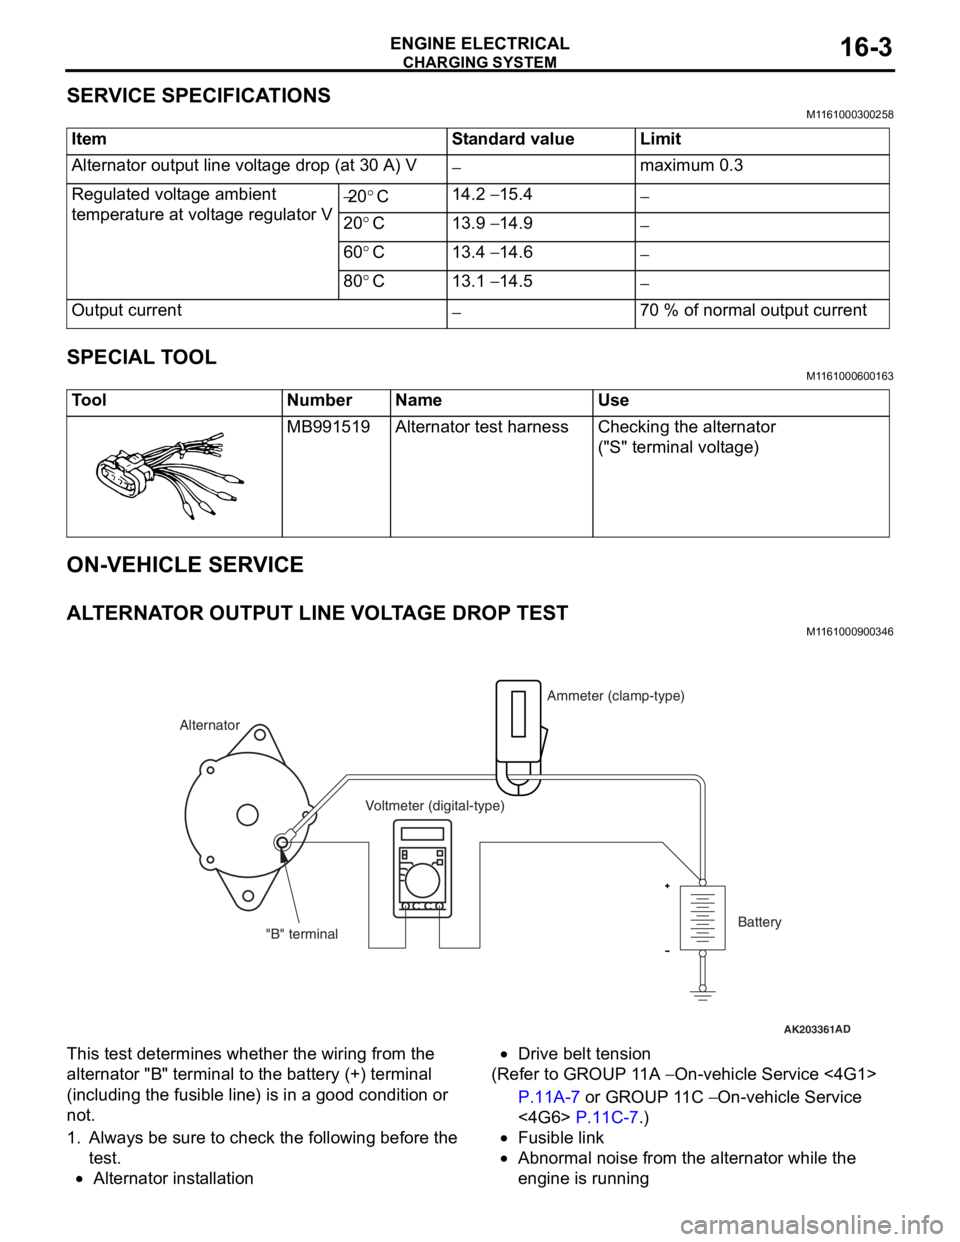
ALTERNA T O R OUTPUT LINE VOL T AGE DROP TEST
M1161 0009 0034 6
AK203361AD
Alternator Ammeter (clamp-type)
Voltmeter (digital-type)
"B" terminal Battery
This test
determine s whethe r the wiring fro m th e
altern
ator "B" termina l to t he batt e ry (+) terminal
(including the
fusible line ) is in a good condition or
not.
1.Always b e su re to check the following b e fore th e
te st.
•Alternator inst allatio n
•Drive belt tension
(Ref er to GROUP 1 1 A − On-veh icle Service <4G1>
P.11A-7 or GROUP 1 1 C − On-vehicle Service
<4G6> P.11C-7.)
•Fusible link
•Abnormal noise from the altern ator while the
eng
ine is ru nning
Page 70 of 800

CHARGING SYSTEM
ENGINE ELECTRICAL16-8
If the voltage is not within the standard value,
there is a malfunction of the voltage regulator or of
the alternator.
14.After the test, lower the engine speed to the idle speed.
15.Turn the ignition switch to the "LOCK" (OFF) position.
16.Remove the tachometer or the M.U.T.-II/III.
17.Disconnect the negative battery cable.
18.Disconnect the ammeter and voltmeter.
19.Connect the alternator output wire to the alternator "B" terminal.
20.Remove the special tool, and return the connector
to the original condition.
21.Connect the negative battery cable.
Voltage Regulation Table
Standard value:
Inspection terminalVoltage regulator ambient
temperature
°C
Voltage V
Terminal "S"−2014.2 − 15.4
2013.9 − 14.9
6013.4 − 14.6
8013.1 − 14.5
Page 72 of 800
CHARGING SYSTEM
ENGINE ELECTRICAL16-10
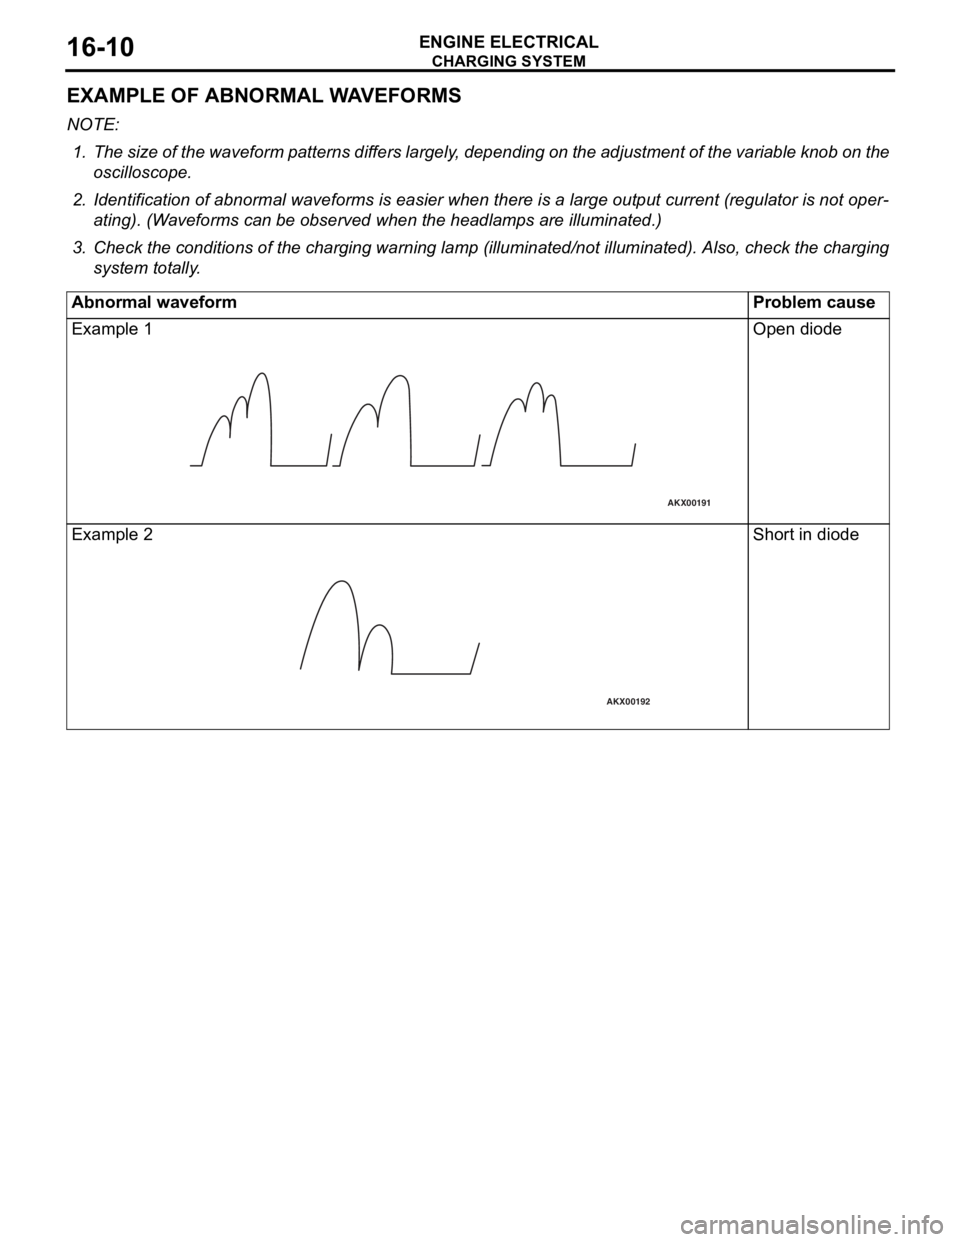
EXAMPLE OF ABNORMAL WAVEFORMS
NOTE: .
1. The size of the waveform patterns differs largely, depending on the adjustment of the variable knob on the
oscilloscope.
2. Identification of abnormal waveforms is easier when th ere is a large output current (regulator is not oper-
ating). (Waveforms can be observed when the headlamps are illuminated.)
3. Check the conditions of the charging warning lamp (illuminated/not illum inated). Also, check the charging
system totally.
Abnormal waveformProblem cause
Example 1
AKX00191
Open diod e
Exampl e 2
AKX00192
Shor t in diode
Page 92 of 800
IGNITION SYSTEM
ENGINE ELECTRICAL16-30
IGNITION SYSTEM
GENERAL INFORMATIONM1163000100294
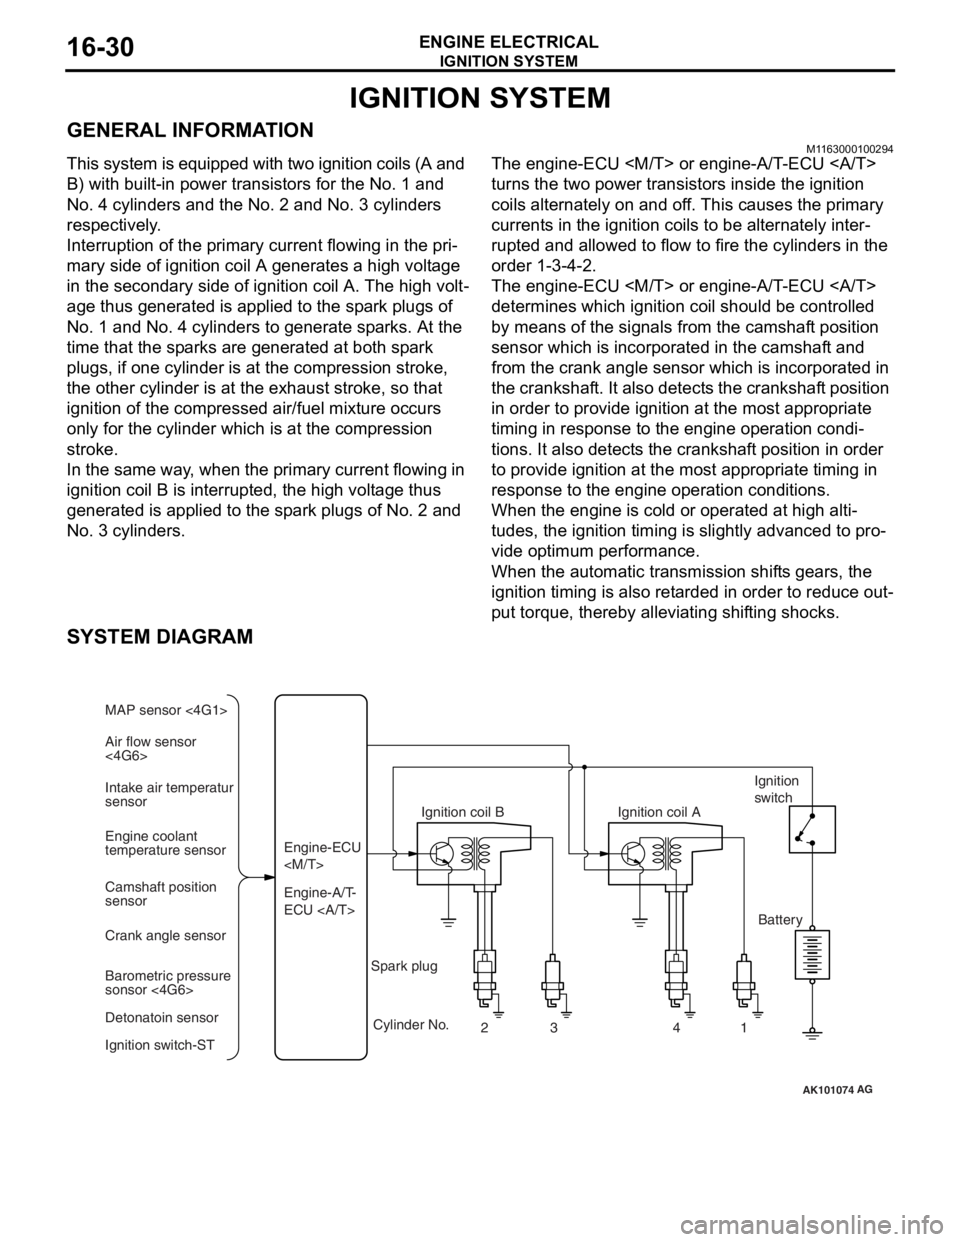
This system is equipped with two ignition coils (A and
B) with built-in power transistors for the No. 1 and
No. 4 cylinders and the No. 2 and No. 3 cylinders
respectively.
Interruption of the primary current flowing in the pri-
mary side of ignition coil A generates a high voltage
in the secondary side of ignition coil A. The high volt
-
age thus generated is applied to the spark plugs of
No. 1 and No. 4 cylinders to generate sparks. At the
time that the sparks are generated at both spark
plugs, if one cylinder is at the compression stroke,
the other cylinder is at the exhaust stroke, so that
ignition of the compressed air/fuel mixture occurs
only for the cylinder which is at the compression
stroke.
In the same way, when the primary current flowing in
ignition coil B is interrupted, the high voltage thus
generated is applied to the spark plugs of No. 2 and
No. 3 cylinders.
The engine-ECU
turns the two power transistors inside the ignition
coils alternately on and off. This causes the primary
currents in the ignition coils to be alternately inter
-
rupted and allowed to flow to fire the cylinders in the
order 1-3-4-2.
The engine-ECU
determines which ignition coil should be controlled
by means of the signals from the camshaft position
sensor which is incorporated in the camshaft and
from the crank angle sensor which is incorporated in
the crankshaft. It also detects the crankshaft position
in order to provide ignition at the most appropriate
timing in response to the engine operation condi
-
tions. It also detects the crankshaft position in order
to provide ignition at the most appropriate timing in
response to the engine operation conditions.
When the engine is cold or operated at high alti-
tudes, the ignition timing is slightly advanced to pro-
vide optimum performance.
When the automatic transmission shifts gears, the
ignition timing is also retarded in order to reduce out
-
put torque, thereby alleviating shifting shocks.
SYSTEM DIAGRAM
AK101074
Air flow sensor
<4G6> MAP sensor <4G1>
Intake air temperatur
sensor
Engine coolant
temperature sensor
Camshaft position
sensor
Crank angle sensor
Barometric pressure
sonsor <4G6>
Detonatoin sensor
Ignition switch-ST Engine-A/T-
ECU Engine-ECU
Ignition coil B
Cylinder No. 23 4
AG
1
Spark plug Ignition coil A
Ignition
switch
Battery
Page 96 of 800
IGNITION SYSTEM
ENGINE ELECTRICAL16-34
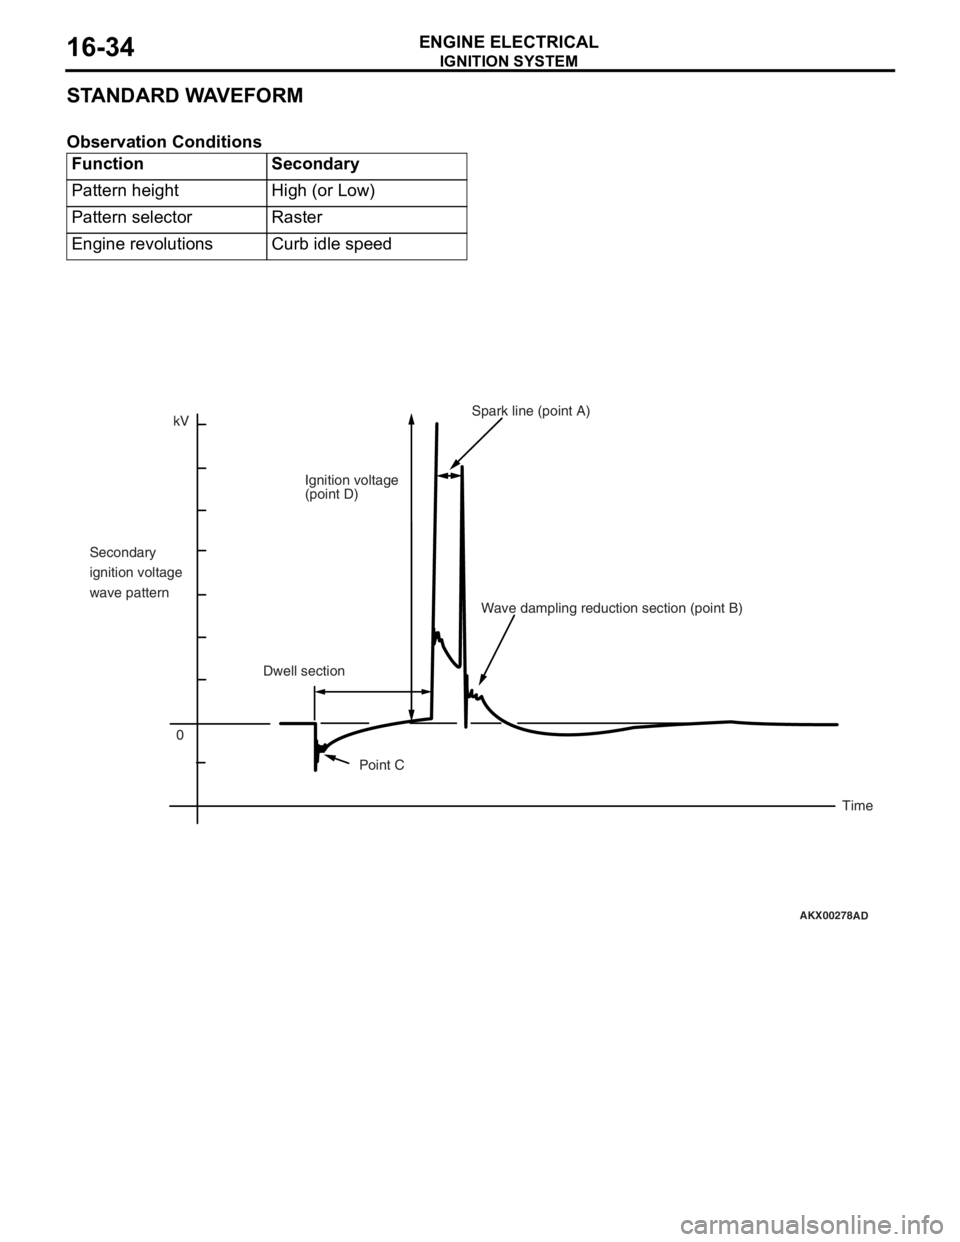
STANDARD WAVEFORM
Observation Conditions
FunctionSecondary
Pattern heightHigh (or Low)
Pattern selectorRaster
Engine revolutionsCurb idle speed
AKX00278
kV0
Secondary
ignition voltage
wave pattern
Ignition voltage
(point D)
Spark line (point A)
Dwell section Wave dampling reduction section (point B)
Point C Time
AD