body MITSUBISHI LANCER 2006 Workshop Manual
[x] Cancel search | Manufacturer: MITSUBISHI, Model Year: 2006, Model line: LANCER, Model: MITSUBISHI LANCER 2006Pages: 800, PDF Size: 45.03 MB
Page 26 of 800
TROUBLESHOOTING
ENGINE COOLING14-12
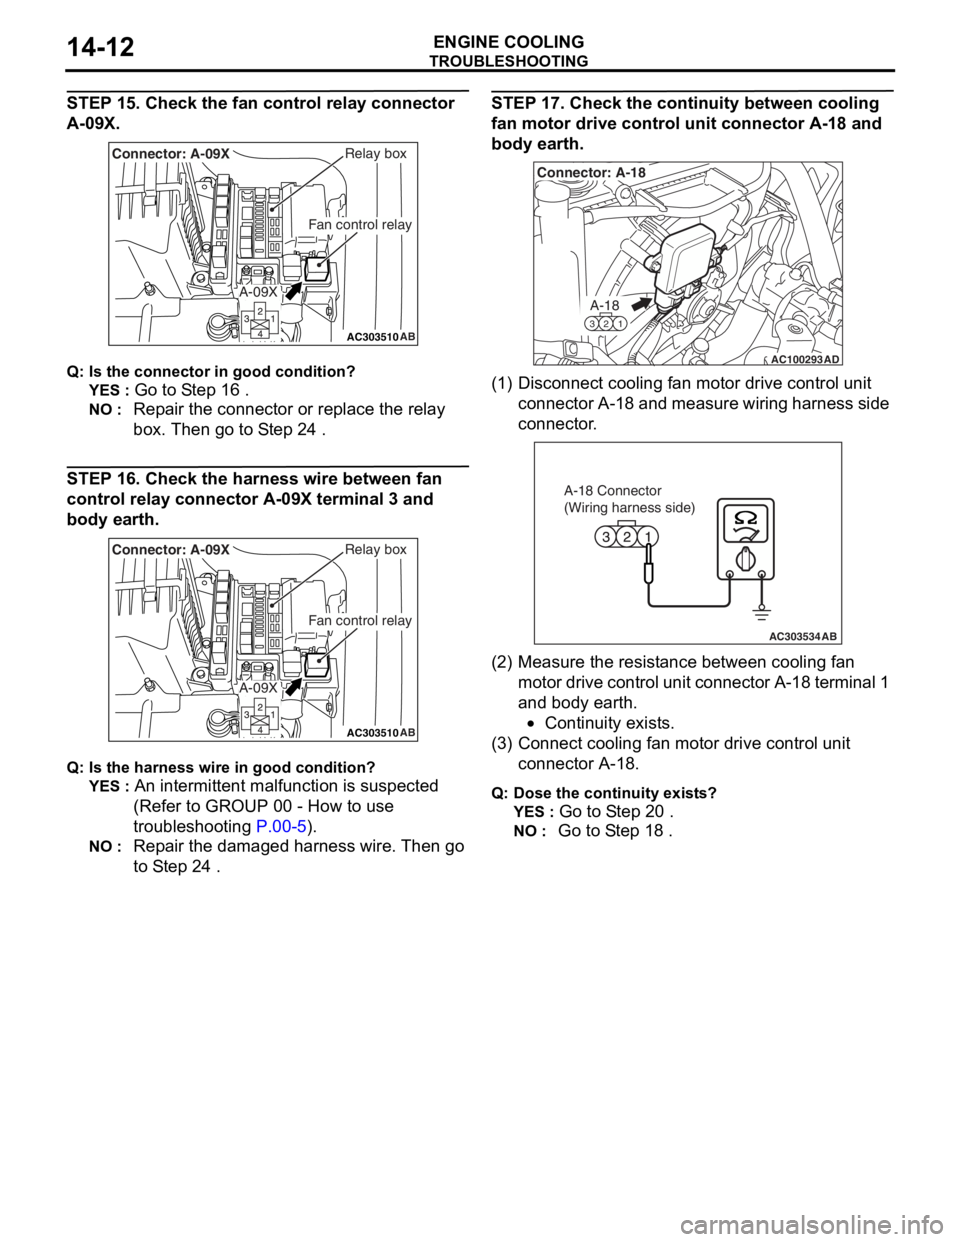
STEP 15. Check the fan control relay connector
A-09X.
AC303510AB
Fan control relay
Relay boxConnector: A-09X
A-09X
Q:Is t h e con n ec tor in goo d c ondit i o n ?
YES : Go to S t ep 16 .
NO : Repa ir the con nect o r or rep l ace the re lay
box. Then
go to S t ep 24
.
STEP 16 . Check th e harness wire b e twee n fan
control relay
connect or A-09 X terminal 3 and
body ea
rth.
AC303510AB
Fan control relay
Relay boxConnector: A-09X
A-09X
Q:Is t h e har n es s wire in good c ondition ?
YES : An intermittent malf unction is suspe c ted
(Refer to GROUP 00 - How to use
troub lesh ooting
P.00-5).
NO : Repa ir the dama ged harness wire. Then go
to S
t ep 2 4
.
STEP 1 7 . Check t he contin uity between cooling
fan motor drive
control un it connec tor A-1 8 and
body ea
rth.
AC100293
A-18
321
Connector: A-18
AD
(1)D isconn ect cooling f an motor drive contro l unit
conne ctor A-18 a nd measure wirin g har ness side
connector .
AC303534AB
A-18 Connector
(Wiring harness side)
(2)M easu r e the re sist ance between cooling fan
mot o r d r ive cont rol unit conn ecto r A-1 8 te rmina l 1
and body earth .
•Continu i ty exist s .
(3)C onne ct cooling fa n mot o r drive control unit
connector A-18.
Q:Dos e the cont inuity e x ist s ?
YES : Go to S t ep 2 0 .
NO : Go to S t ep 18 .
Page 29 of 800
TROUBLESHOOTING
ENGINE COOLING14-15
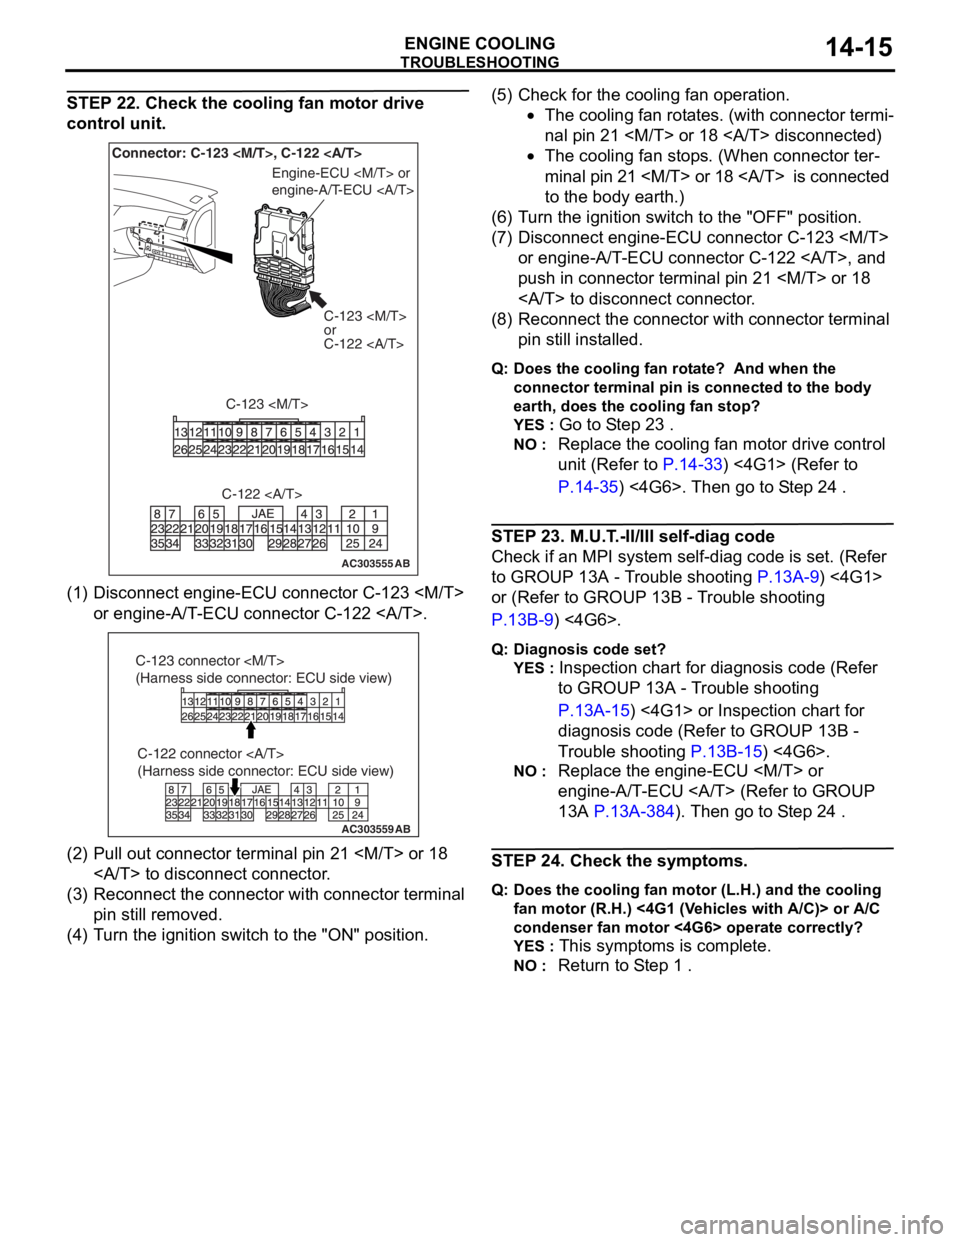
STEP 22. Check the cooling fan motor drive
control unit.
AC303555AB
Connector: C-123
or
C-122
C-123
Engine-ECU
engine-A/T-ECU
C-122
(1) D isconn ect e ngin e -ECU conne ctor C-12 3
or e ngine -A/T -ECU conne ctor C-12 2 .
AC303559
C-122 connector
(Harness side connector: ECU side view)
AB
C-123 connector
(Harness side connector: ECU side view)
(2)P ull out conne ctor t e rminal p i n 21
to discon nect conn ector .
(3)R eco nnect t he con necto r with conn ector ter m in al
pin still removed.
(4)T urn t he ig nition switch to the "ON" positio n.
(5)C heck fo r the cooling fan opera t ion.
•The cooling fan ro t a t e s. (with conne ctor termi-
nal pi n 21
•The cooling fan stop s. (When con necto r ter-
minal pi n 21
to the
body earth.)
(6)T urn t he ig nition switch t o the "OFF" po sit i on.
(7)D isconn ect e ngin e -ECU conne ctor C-12 3
or e ngine -A/T -ECU conne ctor C-12 2 , a nd
push in con nect o r terminal pin 21
to discon nect conn ector .
(8)R econnect the con necto r with conn ector te rmin al
pin still inst alled.
Q:Doe s the cooling fa n rot a te ? And wh en th e
c onne ct or te rmin a l p i n is co nnec t e d to t h e bod y
e a rt h, d o es t h e co olin g f a n s t op ?
YES : Go to S t ep 2 3 .
NO : Replac e th e coo lin g fan motor d r ive con t rol
unit (Refer to
P.14-33) <4G1> (Refer to
P.14-35) <4G6>. Then go to S t e p 24 .
STEP 2 3 . M.U.T . -II/III self-dia g code
Check if an MPI system self- d iag code is set. (Ref er
to GROUP
13A - T r ouble shooting
P.13A-9) <4G1>
or (Refer to GROUP 13 B - T r ouble sho o ting
P.13B-9) <4G6>.
Q:Diagn o sis co de se t?
YES : Inspecti on chart fo r dia gnosis code (Re f er
to GROUP 13A - T r ou ble shoot ing
P.13A-15) <4G1 > or Inspection chart for
diagnosis code (Re f er to GROUP 13B -
T
r ouble sh ootin g
P.13B-15) <4G6>.
NO : Replac e th e engine-ECU
engine-A/T
- ECU (Refer to GROUP
13A
P.13A- 384). Then go t o S t ep 24 .
STEP 2 4 . Check t he sym ptoms.
Q:Doe s the cooling fa n moto r ( L .H.) and t h e coo l ing
fa n mo to r ( R .H. ) <4G 1 (V ehicles with A/ C)> or A/C
c onde nse r fa n mo tor <4G6> o p era t e c o rre ct ly ?
YES : This symptoms is comple te.
NO : Return to S t ep 1 .
Page 32 of 800
TROUBLESHOOTING
ENGINE COOLING14-18
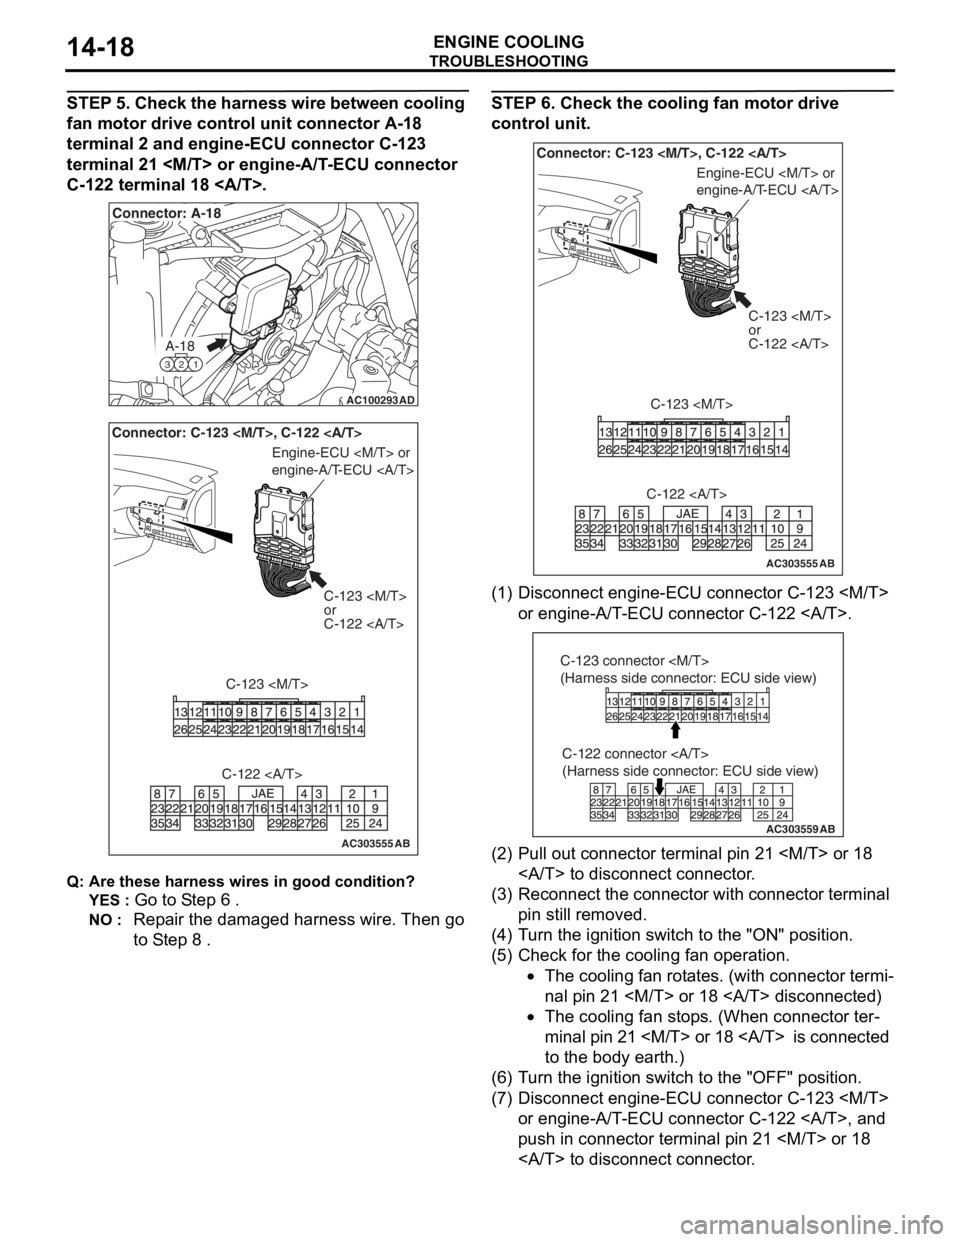
STEP 5. Check the harness wire between cooling
fan motor drive control unit connector A-18
terminal 2 and engine-ECU connector C-123
terminal 21
C-122 terminal 18 .
AC100293
A-18
321
Connector: A-18
AD
AC303555AB
Connector: C-123
or
C-122
C-123
Engine-ECU
engine-A/T-ECU
C-122
Q: Are t h es e har n es s wires in goo d cond it ion?
YES : Go to S t ep 6 .
NO : Repa ir the dama ged harness wire. Then go
to S
t ep 8
.
STEP 6 . Check the cooling fan moto r d r iv e
control unit.
AC303555AB
Connector: C-123
C-123
or
C-122
C-123
Engine-ECU
engine-A/T-ECU
C-122
(1) D isconn ect e ngin e -ECU conne ctor C-12 3
or e ngine -A/T -ECU conne ctor C-12 2 .
AC303559
C-122 connector
(Harness side connector: ECU side view)
AB
C-123 connector
(Harness side connector: ECU side view)
(2)P ull out conne ctor terminal p i n 21
to discon nect conn ector .
(3)R econnect the con necto r with conn ector te rmin al
pin still removed.
(4)T urn t he ig nition switch t o the "ON" positio n.
(5)C heck fo r the cooling fan opera t ion.
•The cooling fan ro t a t e s. (with conne ctor termi-
nal pi n 21
•The cooling fan stop s. (When con necto r ter-
minal pi n 21
to the
body earth.)
(6)T urn t he ig nition switch t o the "OFF" po sit i on.
(7)D isconn ect e ngin e -ECU conne ctor C-12 3
or e ngine -A/T -ECU conne ctor C-12 2 , a nd
push in con nect o r terminal pin 21
to discon nect conn ector .
Page 33 of 800
TROUBLESHOOTING
ENGINE COOLING14-19
(8) Reconnect the connector with connector terminal
pin still installed.
Q: Does the cooling fan rotate? And when the
connector terminal pin is connected to the body
earth, does the cooling fan stop?
YES : Go to Step 7 .
NO : Replace the cooling fan motor drive control
unit (Refer to
P.14-33) <4G1> (Refer to
P.14-35) 4G6>. Then go to Step 8 .
STEP 7. M.U.T.-II/III self-diag code
Check if an MPI system self-diag code is set. (Refer
to GROUP 13A - Trouble shooting
P.13A-9) <4G1>
or (Refer to GROUP 13B - Trouble shooting
P.13B-9) <4G6>.
Q: Diagnosis code set?
YES : Inspection chart for diagnosis code (Refer
to GROUP 13A - Trouble shooting
P.13A-15) <4G1> or Inspection chart for
diagnosis code (Refer to GROUP 13B -
Trouble shooting
P.13B-15) <4G6>.
NO : Replace the engine-ECU
engine-A/T-ECU (Refer to GROUP
13A
P.13A-384). Then go to Step 8 .
STEP 8. Check the symptoms.
Q: Does the cooling fan motor (L.H.) and the cooling
fan motor (R.H.) <4G1 (Vehicles with A/C)> or A/C
condenser fan motor <4G6> operate correctly?
YES : This symptoms is complete.
NO : Return to Step 1 .
INSPECTION PROCEDURE 3: Cooling Fan (L.H.) does not Operate {When Cooling Fan (R.H.) <4G1> or
A/C Condenser Fan <4G6> Operate}
COOLING FAN (L.H.) AND COOLING FAN
(R.H.) OR A/C CONDENSER FAN DRIVE
CIRCUIT
Refer to P.14-6.
CIRCUIT OPERATION
Refer to P.14-6.
TECHNICAL DESCRIPTION
The cause could be a malfunction of the cooling fan
motor (L.H.) or cooling fan motor drive control unit.
TROUBLESHOOTING HINTS
•Malfunction of cooling fan motor (L.H.)
•Malfunction of cooling fan motor drive control unit
DIAGNOSIS
STEP 1. Check the cooling fan motor (L.H.).
Refer to P.14-24.
Q: Is the cooling fan motor (L.H.) in good condition?
YES : Go to Step 2 .
NO : Replace the cooling fan motor (L.H.) (Refer
to
P.14-33) <4G1> (Refer to P.14-35)
<4G6>. Then go to Step 3 .
STEP 2. Check the cooling fan motor drive
control unit.
Refer to P.14-22.
Q: Is the cooling fan motor drive control unit in good
condition?
YES : Go to Step 3 .
NO : Replace the cooling fan motor drive control
unit (Refer to
P.14-33) <4G1> (Refer to
P.14-35) <4G6>. Then go to Step 3 .
STEP 3. Check the symptoms.
Q: Do the cooling fan (L.H.) operate (when the cooling
fan (R.H.) <4G1> or A/C condenser fan <4G6>
operate)?
YES : This symptoms is complete.
NO : Return to Step 1 .
Page 43 of 800
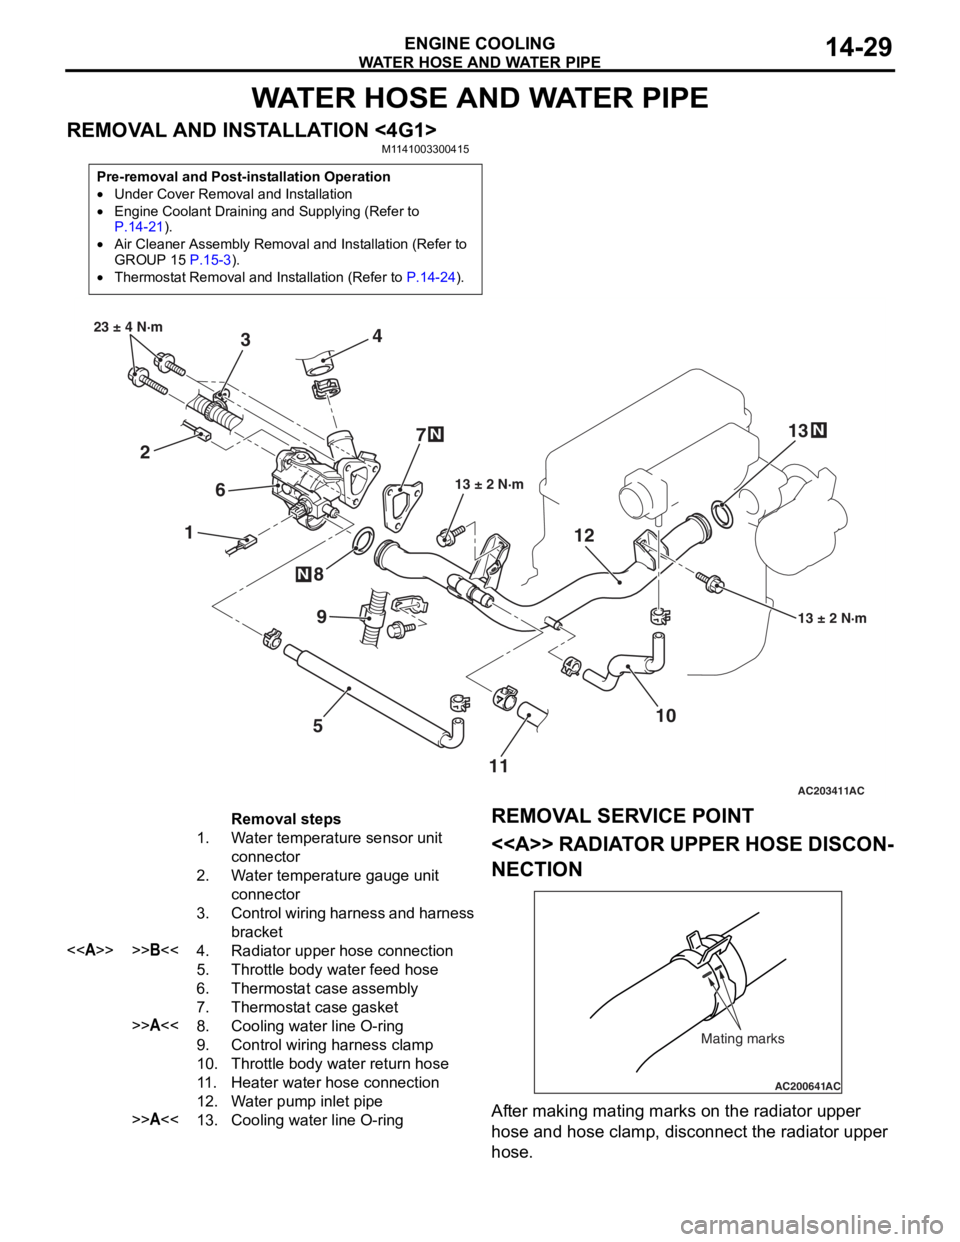
WATER HOSE AND WATER PIPE
ENGINE COOLING14-29
WATER HOSE AND WATER PIPE
REMOVAL AND INSTALLATION <4G1>M1141003300415
Pre-removal and Post-installation Operation
•Under Cover Removal and Installation
•Engine Coolant Draining and Supplying (Refer to P.14-21).
•Air Cleaner Assembly Removal and Installation (Refer to
GROUP 15 P.15-3).
•Thermostat Removal and Installation (Refer to P.14-24).
AC203411
1
2 3
4
5
6
7
8
10
9
13 ± 2 N·m
23 ± 4 N·m
13 ± 2 N·m
N
N
AC
1112
13
N
Removal steps
1.Water temperature sensor unit
connector
2.Water temperature gauge unit
connector
3.Control wiring harness and harness
bracket
<>>>B<<4.Radiator upper hose connection
5.Throttle body water feed hose
6.Thermostat case assembly
7.Thermostat case gasket
>>A<<8.Cooling water line O-ring
9.Control wiring harness clamp
10.Throttle body water return hose
11 .Heater water hose connection
12.Water pump inlet pipe
>>A<<13.Cooling water line O-ring
REMOV
A L SER VICE POINT
<> RADIAT OR UPPER HOSE DISCON-
NECTION
AC200641AC
Mating marks
After making matin g ma rks on the radia t or upp er
hose
and h o se clamp, disconnect the radia t or upp er
hose
.
Page 45 of 800
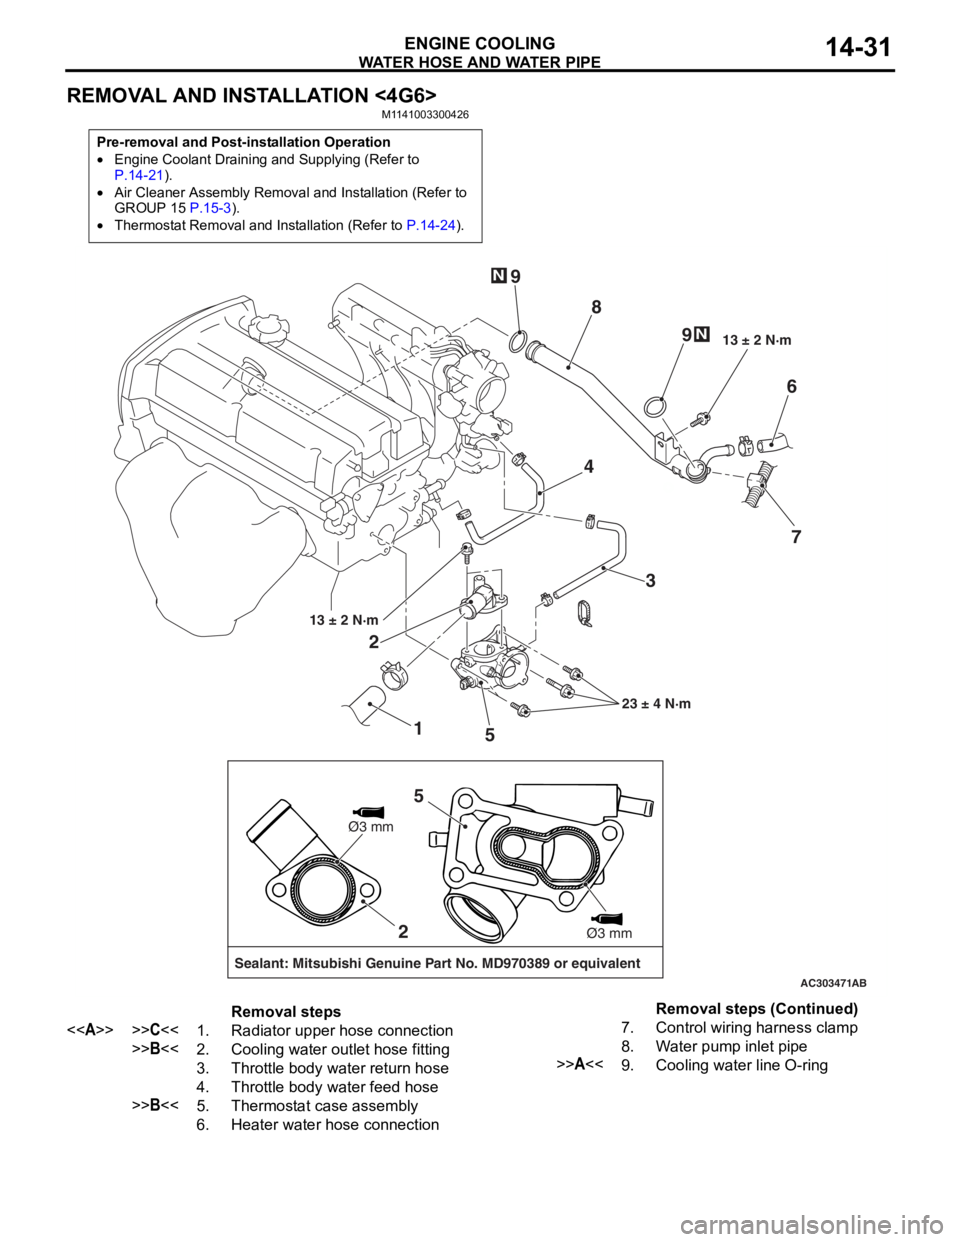
WATER HOSE AND WATER PIPE
ENGINE COOLING14-31
REMOVAL AND INSTALLATION <4G6>
M1141003300426
Pre-removal and Post-installation Operation
•Engine Coolant Draining and Supplying (Refer to P.14-21).
•Air Cleaner Assembly Removal and Installation (Refer to
GROUP 15 P.15-3).
•Thermostat Removal and Installation (Refer to P.14-24).
AC303471
1
2
3
4
5 6
7
8
9
9
13 ± 2 N·m
23 ± 4 N·m
13 ± 2 N·m
N
N
AB
2
Sealant: Mitsubishi Genuine Part No. MD970389 or equivalent
Ø3 mm
Ø3 mm
5
Removal steps
<>>>C<<1.Radiator upper hose connection
>>B<<2.Cooling water outlet hose fitting
3.Throttle body water return hose
4.Throttle body water feed hose
>>B<<5.Thermostat case assembly
6.Heater water hose connection
7.Control wiring harness clamp
8.Water pump inlet pipe
>>A<<9.Cooling water line O-ring
Removal steps (Continued)
Page 46 of 800
Page 53 of 800
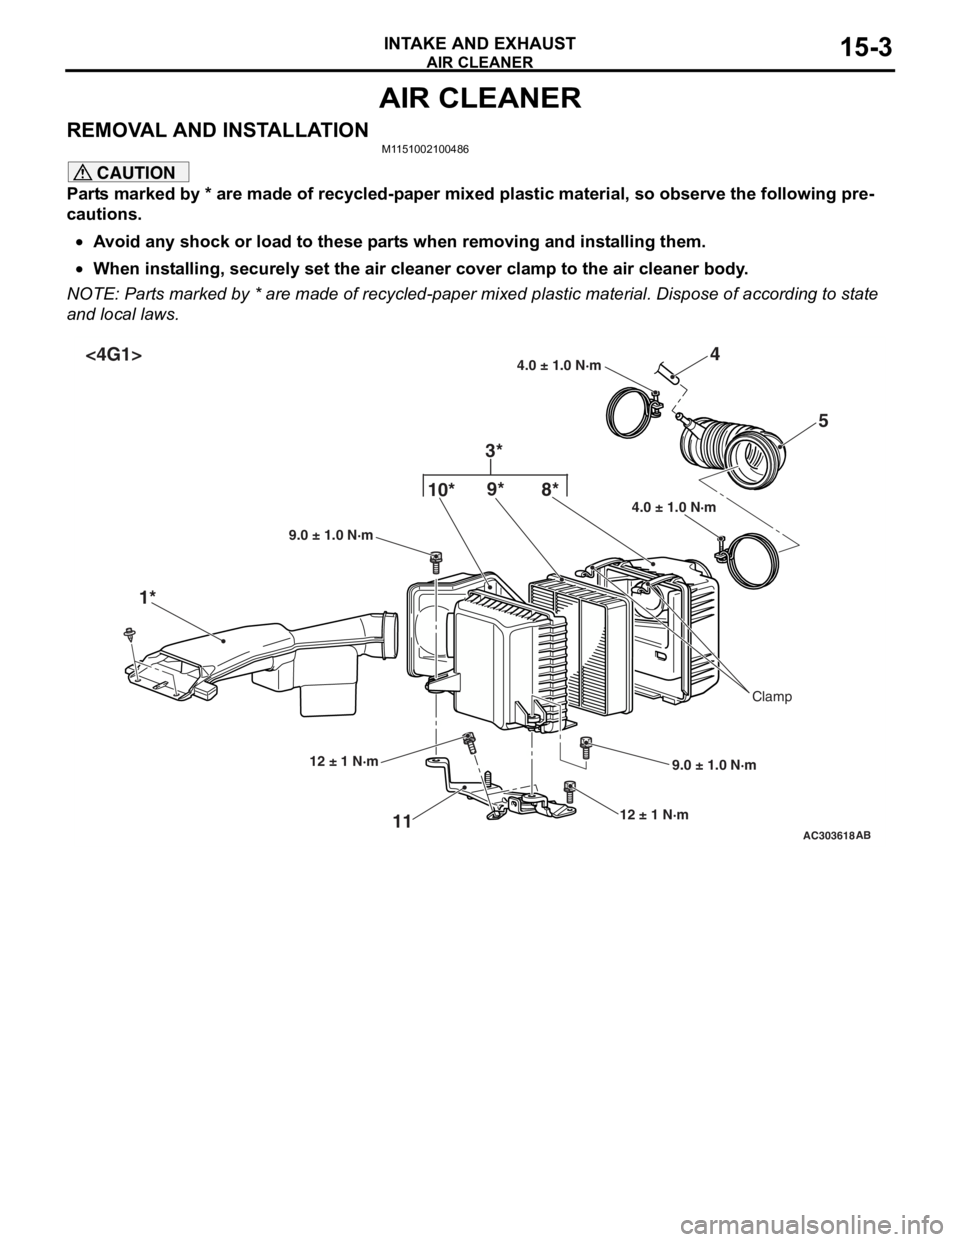
AIR CLEANER
INTAKE AND EXHAUST15-3
AIR CLEANER
REMOVAL AND INSTALLATIONM1151002100486
CAUTION
Parts marked by * are made of recycled-paper mixed plastic material, so observe the following pre-
cautions.
•Avoid any shock or load to these parts when removing and installing them.
•When installing, securely set the air cleaner cover clamp to the air cleaner body.
NOTE: Parts marked by * are made of recycled-paper mixed plastic material. Dispose of according to state
and local laws.
AC303618
4.0 ± 1.0 N·m
4.0 ± 1.0 N·m
10*
9* 4
1* 5
11
12 ± 1 N·m 9.0 ± 1.0 N·m
9.0 ± 1.0 N·m
AB
12 ± 1 N·m
Clamp
8*
3*
<4G1>
Page 54 of 800
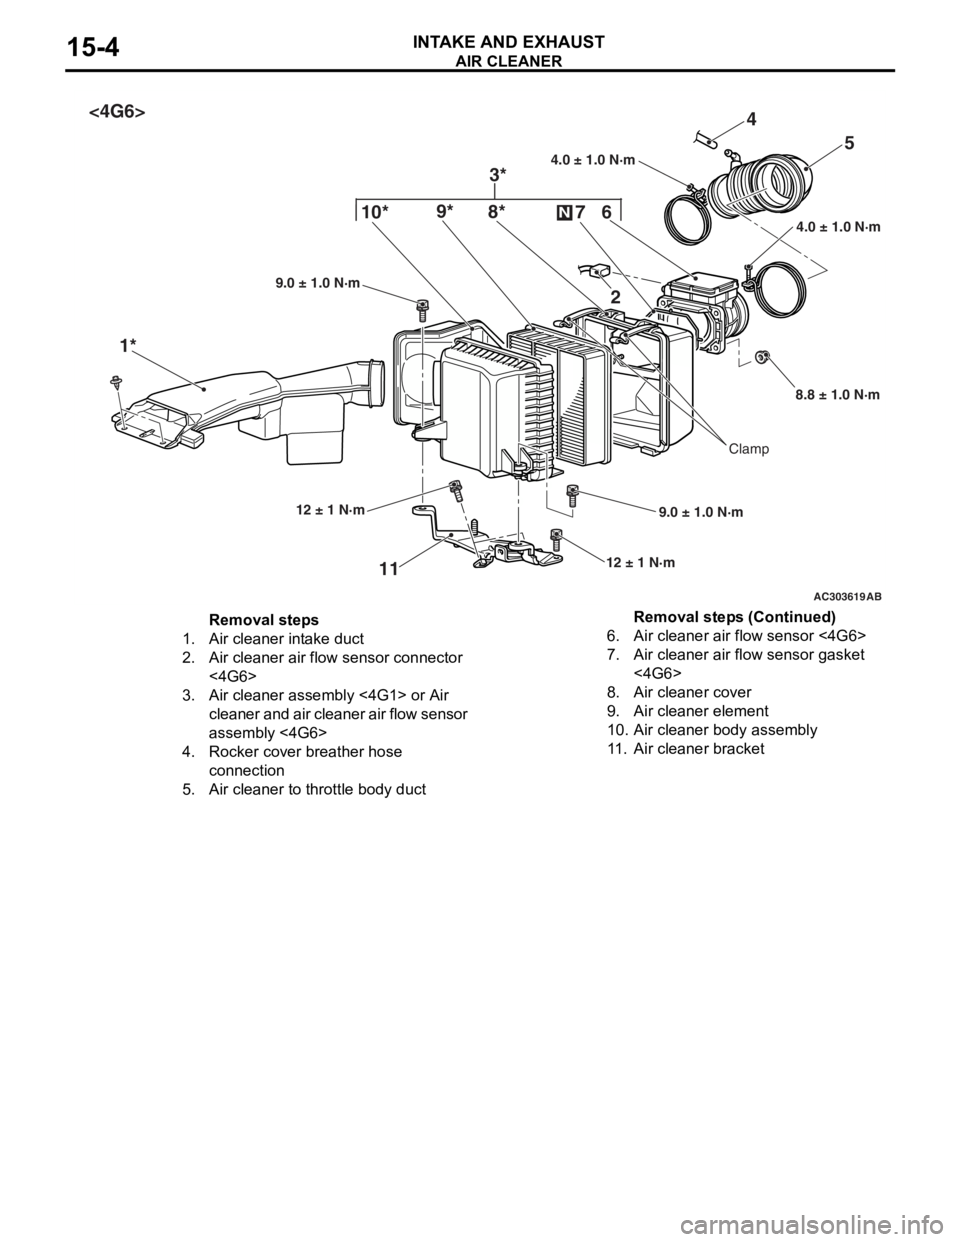
AC303619
4.0 ± 1.0 N·m
4.0 ± 1.0 N·m10*
9* 4
1* 5
11
12 ± 1 N·m 9.0 ± 1.0 N·m
9.0 ± 1.0 N·m
AB
12 ± 1 N·m
Clamp
8*
3*
<4G6>
6
7
N
2
8.8 ± 1.0 N·m
Removal steps
1.Air cleaner intake duct
2.Air cleaner air flow sensor connector
<4G6>
3.Air cleaner assembly <4G1> or Air
cleaner and air cleaner air flow sensor
assembly <4G6>
4.Rocker cover breather hose
connection
5.Air cleaner to throttle body duct
6.Air cleaner air flow sensor <4G6>
7.Air cleaner air flow sensor gasket
<4G6>
8.Air cleaner cover
9.Air cleaner element
10.Air cleaner body assembly
11 .Air cleaner bracket
AIR CLEA NER
INTAKE AN D EXHAU ST15-4
Removal steps (Continued)
Page 55 of 800
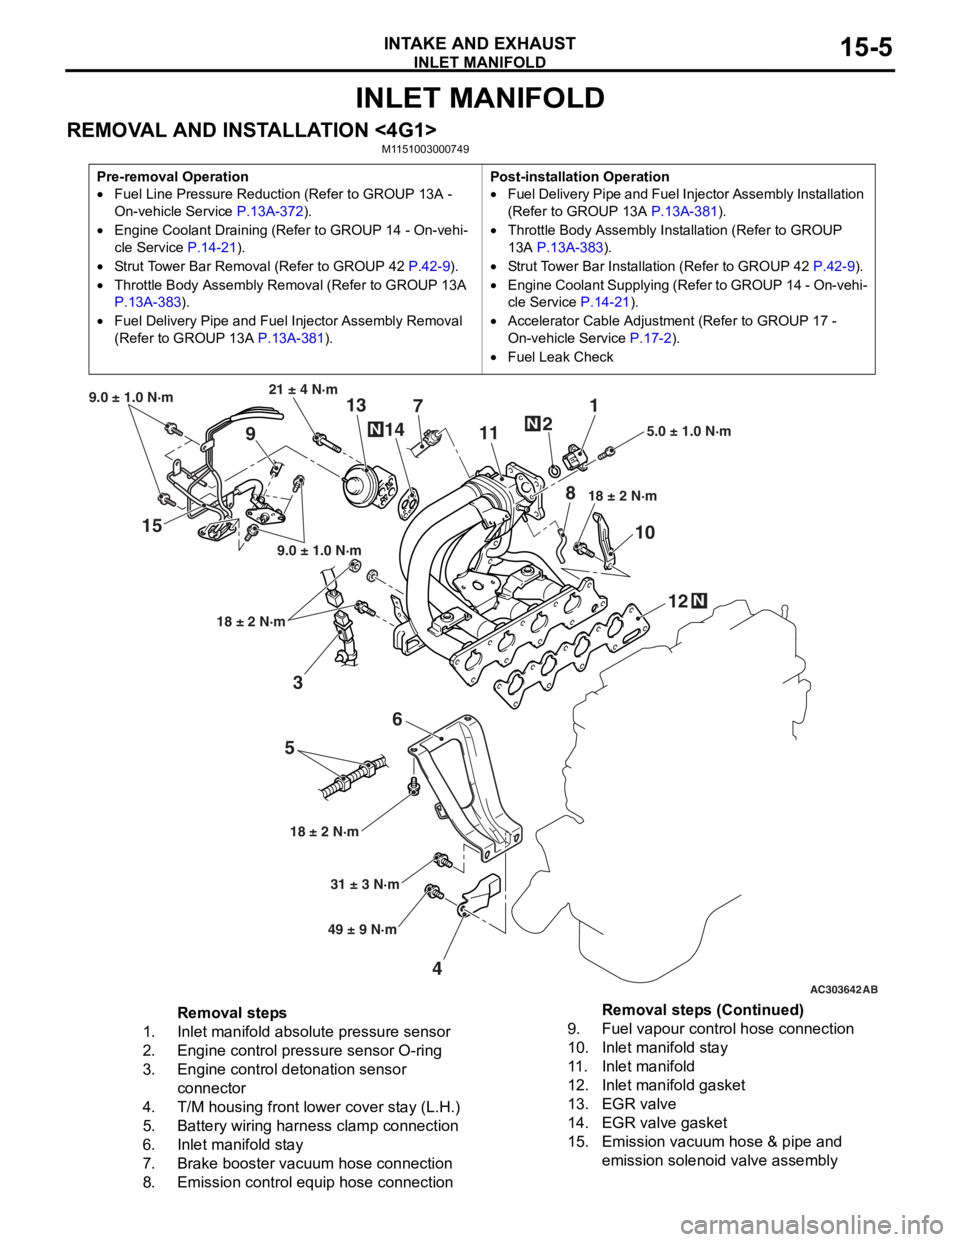
INLET MANIFOLD
INTAKE AND EXHAUST15-5
INLET MANIFOLD
REMOVAL AND INSTALLATION <4G1>M1151003000749
Pre-removal Operation
•Fuel Line Pressure Reduction (Refer to GROUP 13A -
On-vehicle Service
P.13A-372).
•Engine Coolant Draining (Refer to GROUP 14 - On-vehi-
cle Service P.14-21).
•Strut Tower Bar Removal (Refer to GROUP 42 P.42-9).
•Throttle Body Assembly Re moval (Refer to GROUP 13A
P.13A-383).
•Fuel Delivery Pipe and Fuel Injector Assembly Removal
(Refer to GROUP 13A
P.13A-381).
Post-installation Operation
•Fuel Delivery Pipe and Fuel Injector Assembly Installation
(Refer to GROUP 13A
P.13A-381).
•Throttle Body Assembly Inst allation (Refer to GROUP
13A
P.13A-383).
•Strut Tower Bar Installati on (Refer to GROUP 42 P.42-9).
•Engine Coolant Supplying (Refer to GROUP 14 - On-vehi-
cle Service P.14-21).
•Accelerator Cable Adjustment (Refer to GROUP 17 -
On-vehicle Service
P.17-2).
•Fuel Leak Check
AC303642AB
15
36
5
4 12
10
7
1
2
11
9 13
14
21 ± 4 N·m
9.0 ± 1.0 N·m
9.0 ± 1.0 N·m
18 ± 2 N·m
18 ± 2 N·m 18 ± 2 N·m
5.0 ± 1.0 N·m
31 ± 3 N·m
49 ± 9 N·m
N
N
N
8
Removal steps
1.Inlet manifold absolute pressure sensor
2.Engine control pressure sensor O-ring
3.Engine control detonation sensor
connector
4.T/M housing front lower cover stay (L.H.)
5.Battery wiring harness clamp connection
6.Inlet manifold stay
7.Brake booster vacuum hose connection
8.Emission control equip hose connection
9.Fuel vapour control hose connection
10.Inlet manifold stay
11 .Inlet manifold
12.Inlet manifold gasket
13.EGR valve
14.EGR valve gasket
15.Emission vacuum hose & pipe and
emission solenoid valve assembly
Removal steps (Continued)