lock MITSUBISHI LANCER EVOLUTION 2007 Service Repair Manual
[x] Cancel search | Manufacturer: MITSUBISHI, Model Year: 2007, Model line: LANCER EVOLUTION, Model: MITSUBISHI LANCER EVOLUTION 2007Pages: 1449, PDF Size: 56.82 MB
Page 1323 of 1449

54A-3
SIDE TURN-SIGNAL LAMP 31............
SPECIAL TOOL 31............................
SIDE TURN-SIGNAL LAMP 31..................
ROOM LAMP 31.........................
TROUBLESHOOTING 31.......................
REAR COMBINATION LAMP 32...........
SPECIAL TOOL 32............................
TROUBLESHOOTING 32.......................
REAR COMBINATION LAMP 32................
HIGH-MOUNTED STOP LAMP 34.........
ON-VEHICLE SERVICE 34......................
High-mounted Stop Lamp Bulb Replacement 34.
HIGH-MOUNTED STOP LAMP 34................
LICENCE PLATE LAMP 35...............
ON-VEHICLE SERVICE 35.....................
License Plate Lamp Replacement 35...........
LICENCE PLATE LAMP 35.....................
HAZARD WARNING LAMP SWITCH 36....
SPECIAL TOOL 36............................
HAZARD WARNING LAMP SWITCH 36.........
HORN 37................................
CIGARETTE LIGHTER 37.................
COLUMN SWITCH 38....................
SPECIAL TOOL 38............................
COLUMN SWITCH 38..........................
CLOCK 40...............................
SPECIAL TOOL 40............................
CLOCK 40....................................
POLE ANTENNA 41......................
ROOF ANTENNA 42......................
DEFOGGER 42...........................
TROUBLESHOOTING 42......................
ON-VEHICLE SERVICE 43.....................
Printed Heater Check 43......................
Defogger Relay Continuity Check 43...........
DEFOGGER SWITCH 43.......................
Page 1331 of 1449

CHASSIS ELECTRICAL -Ignition Switch and Immobilizer System54A-11
IGNITION SWITCH
REMOVAL AND INSTALLATION
7
6
15 32
4
8
Removal steps
1. Lower column cover (Refer to GROUP
52A - Instrument Panel.)
2. Upper column cover (Refer to GROUP
52A - Instrument Panel.)
3. Steering Wheel (Refer to GROUP
37A.)
4. Clock spring column switch assembly
(Refer to GROUP 37A - Steering
Shaft.)AA"5. Steering lock cylinder
6. Ignition switch
7. Key reminder switch
8. Immobilizer-ECU
REMOVAL SERVICE POINT
AA"STEERING LOCK CYLINDER REMOVAL
1. Insert key into steering lock cylinder to turn ignition key
to “ACC” position.
2. Insert locking pin with small plus screwdriver, etc., and
remove steering lock cylinder.
Locking pin
Page 1332 of 1449

CHASSIS ELECTRICAL -Ignition Switch and Immobilizer System54A-12
INSPECTION
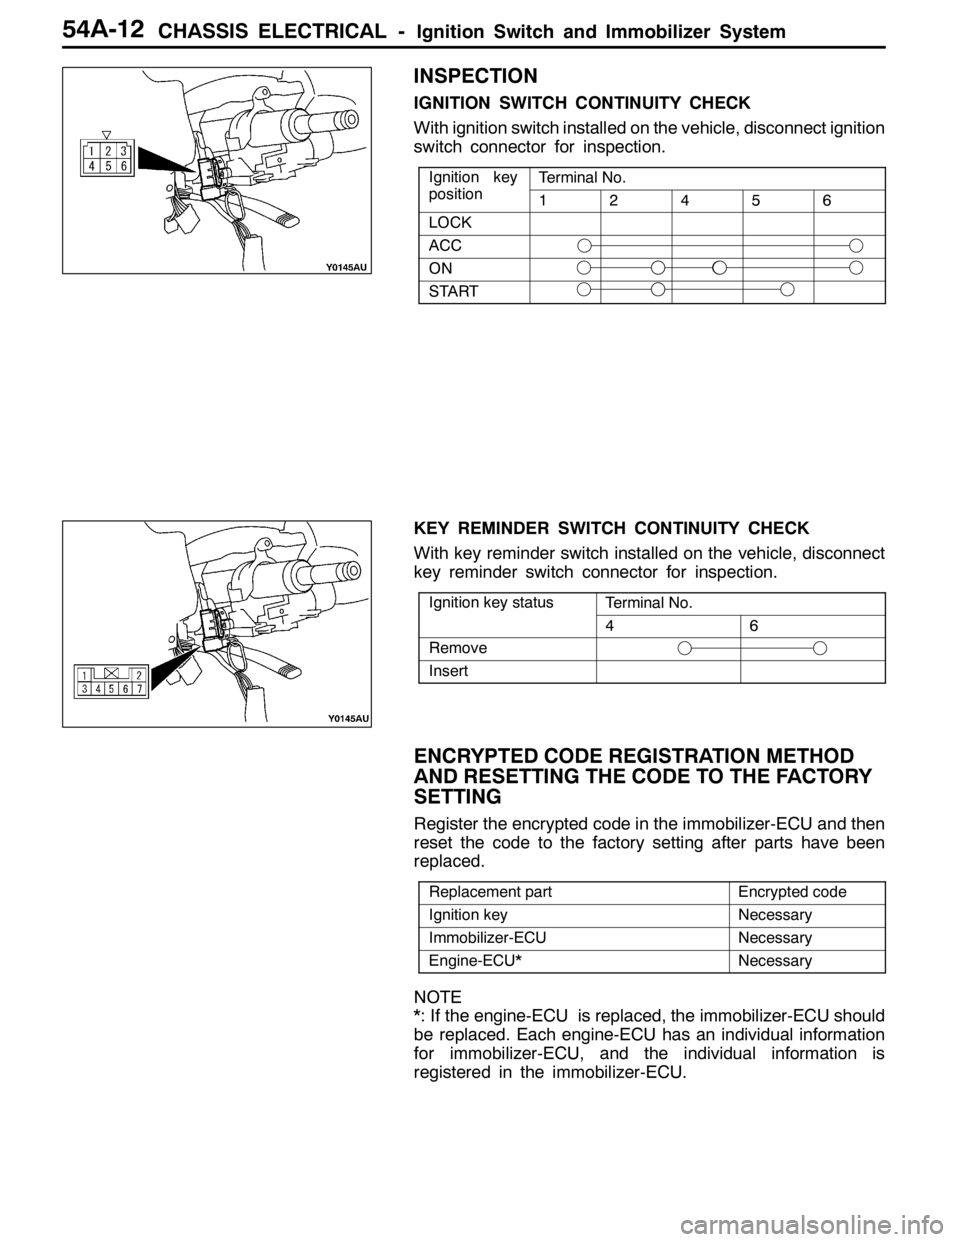
IGNITION SWITCH CONTINUITY CHECK
With ignition switch installed on the vehicle, disconnect ignition
switch connector for inspection.
Ignition key
iti
Terminal No.gy
position12456
LOCK
ACC
ON
START
KEY REMINDER SWITCH CONTINUITY CHECK
With key reminder switch installed on the vehicle, disconnect
key reminder switch connector for inspection.
Ignition key statusTerminal No.gy
46
Remove
Insert
ENCRYPTED CODE REGISTRATION METHOD
AND RESETTING THE CODE TO THE FACTORY
SETTING
Register the encrypted code in the immobilizer-ECU and then
reset the code to the factory setting after parts have been
replaced.
Replacement partEncrypted code
Ignition keyNecessary
Immobilizer-ECUNecessary
Engine-ECU*Necessary
NOTE
*: If the engine-ECU is replaced, the immobilizer-ECU should
be replaced. Each engine-ECU has an individual information
for immobilizer-ECU, and the individual information is
registered in the immobilizer-ECU.
Page 1333 of 1449

CHASSIS ELECTRICAL -Ignition Switch and Immobilizer System54A-13
ENCRYPTED CODE REGISTRATION METHOD
If using an ignition key that has just been newly purchased,
or if the immobilizer-ECU has been replaced, you will need
to register the encrypted codes for each ignition key being
used into the immobilizer-ECU. (A maximum of eight different
encrypted codes can be registered.)
Moreover, when the immobilizer-ECU has been replaced, you
will need to use the MUT-IIto register the password that
the user specifies into the immobilizer-ECU. (Refer to the
MUT-IIinstruction manual for instructions on using the MUT-II.)
Caution
Because registering of the encrypted codes is carried
out after all previously-registered codes have been
erased, you should have ready all of the ignition keys
that have already been registered.
1. Connect the MUT-IIto the diagnosis connector.
Caution
Turn the ignition switch to LOCK (OFF) position before
connecting or disconnecting the MUT-II.
2. Check that diagnosis code No. P1160 is not being
generated by the each engine-ECU. If it is being generated
check according to the Troubleshooting Procedures.
(Refer to GROUP 13A - Troubleshooting.)
3 Use the ignition key that is to be registered to turn on
the ignition switch.
4. Use the MUT-IIto register the encrypted code. If you
are registering two or more codes, use the next key to
the registered to turn on the ignition switch without
disconnecting the MUT-II.
5. Turn off the ignition switch.
6. Check that the engine can be started with each of the
ignition keys.
7. Check the diagnosis output from the each engine-ECU,
and erase code No. P1160 if it appears. (Refer to GROUP
13A - Troubleshooting.)
8. Disconnect the MUT-II. This completes the registration
operation.
dummy
Page 1360 of 1449

CHASSIS ELECTRICAL-Clock54A-40
CLOCK
SPECIAL TOOL
ToolNumberNameUse
MB990784Ornament removerCenter panel assembly and center air outlet
panel removal
CLOCK
REMOVAL AND INSTALLATION
2
3 4
1
Removal steps
1. Center panel assembly (Refer to
GROUP 52A - Instrument Panel.)
2. Meter bezel (Refer to P.54A-22.)3. Center air outlet panel (Refer to
GROUP 52A - Instrument Panel.)
4. Clock
Page 1361 of 1449

CHASSIS ELECTRICAL -Pole Antenna54A-41
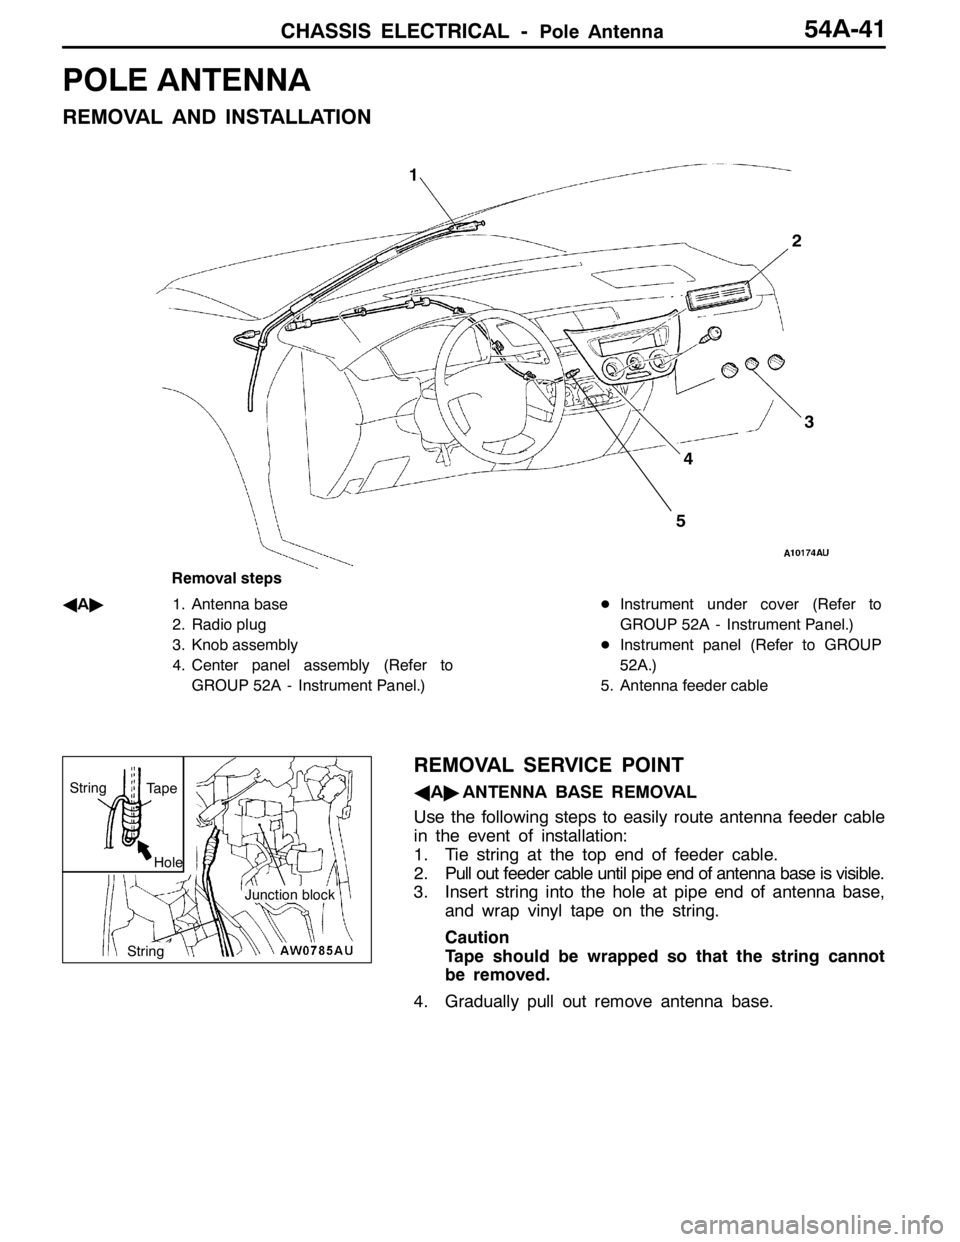
POLE ANTENNA
REMOVAL AND INSTALLATION
3 1
2
4
5
Removal steps
A
A"1. Antenna base
2. Radio plug
3. Knob assembly
4. Center panel assembly (Refer to
GROUP 52A - Instrument Panel.)DInstrument under cover (Refer to
GROUP 52A - Instrument Panel.)
DInstrument panel (Refer to GROUP
52A.)
5. Antenna feeder cable
REMOVAL SERVICE POINT
AA"ANTENNA BASE REMOVAL
Use the following steps to easily route antenna feeder cable
in the event of installation:
1. Tie string at the top end of feeder cable.
2. Pull out feeder cable until pipe end of antenna base is visible.
3. Insert string into the hole at pipe end of antenna base,
and wrap vinyl tape on the string.
Caution
Tape should be wrapped so that the string cannot
be removed.
4. Gradually pull out remove antenna base.
Hole
Tape
Junction block
String
String
Page 1367 of 1449

SWS -Troubleshooting54B-3
INPUT SIGNAL CHECK
1. Check the inputs using MUT-II or a voltmeter. (Refer to GROUP 00 - How to Use
Troubleshooting/Inspection Service Points.)
2. The following input signals can be checked using MUT-II or a voltmeter connected to the diagnosis
connector.
NOTE
When fault is detected during input signal inspection, refer to Trouble Symptom Chart to perform
troubleshooting. (Refer to P.54B-7).
Input Signal Check Function
Input signalBuzzer operation condition
Ignition switch (ACC)When ignition switch turned from “LOCK” (OFF)
to ACC.
Ignition switch (IG1)When ignition switch turned from “ACC” to “ON”.
Hazard warning lamp switchWhen switch turned from OFF to ON.
Rear fog lamp switch
Driver’s door switchWhen driver’s door opened from closed
All door switchesWhen any door opened when all doors were
closed.
Driver’s door lock actuatorWhen the driver’s side key cylinder or inside lock
knob is moved from the locked to unlocked
position or vice versa.
Vehicle speed signalVehicle speed changes from less than 10 km/h to
10 km/h or more.
Column switchesTail lamp switchWhen lighting switch turned from automatic
lighting to tail lamp position.
Headlamp switchWhen lighting switch turned from tail lamp to
headlamp position.
Dimmer switchWhen switch turned from OFF to ON.
Passing switch
Left-hand turn signal lamp switch
Right-hand turn signal lamp switch
Windshield mist wiper switch
Windshield wiper intermittent timing switch
Windshield wiper LO speed switch
Windshield wiper HI speed switch
Windshield washer switchWhen switch turned from OFF to ON.
Power window
main switchAll switchesWhen switch turned from OFF to ON.
DIAGNOSIS CODE CHART
Code No.Diagnosis itemReference page
11ETACS-ECU-related failure54B-4
12Column switch-related failure or fault in connecting to ETACS-ECU54B-4
13Front-ECU-related failure or fault in connecting to ETACS-ECU54B-5
21Short circuit in communication lines54B-6
Page 1371 of 1449

SWS -Troubleshooting54B-7
TROUBLE SYMPTOM CHART
Trouble symptomInspection
procedureReference
page
No communication with MUT-IIA-154B-10
BuzzersLights left ON reminder warning function not working normally.B-154B-10
Central lockingCentral door locking system not working at all.C-154B-11g
Some doors not locking or unlocking.C-254B-11
Power windowPower windows not working at all.D-154B-12
Power windows are not operated with the power window main
switch.
Driver’s power window not responding to power window main
switch.D-254B-13
Windows not responding to passenger or rear power window
switches.D-354B-14
Passenger or rear power windows not responding to power window
main switch.D-454B-15
Power window timer function not working normally.D-554B-15
While the window is winding up, it suddenly starts coming down
again.D-654B-16
Safety mechanism (to prevent jamming of fingers, etc.) not
working.D-754B-16
Windshield wipers
dh
The windshield wipers do not work at all.E-154B-17p
and washerThe windshield wipers only operate at LO speed (though the wipers
and washer can be switched OFF).E-254B-17
The windshield wipers do not respond to any switch position.E-354B-18
The windshield wipers do not stop in the normal predetermined
position.E-454B-18
The windshield washer does not work at all.E-554B-19
Windshield wipers are not operated with the switch in INT,
WASHER and MIST positions, and operated in a low mode with the
switch in Lo and Hi positions.E-654B-19
Headlamps, tail lampsExcept for lighting switch“OFF,” the headlamps only respond to the
“low-beam” position.
F-154B-20
The tail lamps do not work.F-254B-20
The headlamps (low-beam) do not light.F-354B-21
The headlamps (high-beam) do not light.F-454B-21
The headlamps (low or high-beam) do not work when the passing
switch is ON.F-554B-22
The headlamp automatic cut-off function is not working normally.F-654B-22
Rear fog lampRear fog lamp is not properly illuminated.G-154B-23
Flasher timerThe turn signal lamps do not light.H-154B-24
The hazard warning lamps do not light up.H-254B-24
Room lampsThe room lamps do not come ON or OFF normally.I-154B-25
Page 1372 of 1449

SWS -TroubleshootingSWS -Troubleshooting54B-8
DEFECTS FOUND BY INPUT SIGNAL CHECK
When a fault is identified in an input signal check, use the following table to investigate the fault.
Trouble symptomInspection
procedureReference
page
No ignition switch (ACC) signal input to ETACS-ECU.J-154B-26
No ignition switch (IG1) signal input to ETACS-ECU.J-254B-26
No hazard warning lamp switch signal input to ETACS-ECU.J-354B-27
No rear fog lamp switch signal input to ETACS-ECU.J-454B-28
No driver’s door switch signal input to ETACS-ECU.J-554B-29
No door switch signals input to ETACS-ECU.
No driver’s door lock actuator signal input to ETACS-ECU.J-654B-30
Column switchesNo tail lamp switch signal input to ETACS-ECU.J-754B-31
No headlamp switch signal input to ETACS-ECU.
No dimmer switch signal input to ETACS-ECU.
No passing switch signal input to ETACS-ECU.
No turn signal lamp left-hand switch signal input to
ETACS-ECU.
No turn signal lamp right-hand switch signal input to
ETACS-ECU.
Column switchesNo windshield mist wiper switch signal input to ETACS-ECU.J-854B-31
No windshield wiper intermittent switch signal input to
ETACS-ECU.
No windshield low-speed wiper switch signal input to
ETACS-ECU.
No windshield high-speed wiper switch signal input to
ETACS-ECU.
No windshield washer switch signal input to ETACS-ECU.
Power window main switchNo power window main switch signal input to ETACS-ECU.J-954B-32
When the ignition switch is in the LOCK (OFF) position, no functions work normally.K-154B-33
ETACS-ECU battery power supply circuit control check.
NOTE
A diagnosis code is output for front-ECU and column switch battery power supply circuit control abnormalities.
Apply the diagnosis code inspection procedures to address these abnormalities.
Page 1373 of 1449

SWS -Troubleshooting54B-9
Input Signal Inspection Procedure Nos. by Function
When more than one SWS function fails at the same time, run checks based on the following table.
(The table lists only input signals and functions in which multiple faults can occur.)
FunctionJ-1J-2J-3J-5J-6J-7J-8
Driver’s doorAll doors
Central locking
controlF
Power window controlF
Power window timerFF
Windshield wiper
and washer controlFF
Rear wiper and
washer controlFF
Headlamp controlF
Rear fog lamp controlF
Tail lamp controlF
Headlamp automatic
turn-offFFF
Turn signal lamp
controlFF
Hazard warning lamp
controlF
Room lamp controlFFF