MITSUBISHI LANCER EVOLUTION 2015 10.G MMCS Manual
Manufacturer: MITSUBISHI, Model Year: 2015, Model line: LANCER EVOLUTION, Model: MITSUBISHI LANCER EVOLUTION 2015 10.GPages: 229, PDF Size: 58.35 MB
Page 101 of 229
Listen to Satellite Radio
101
AV Radio
Search for Your Favorite
Channel.
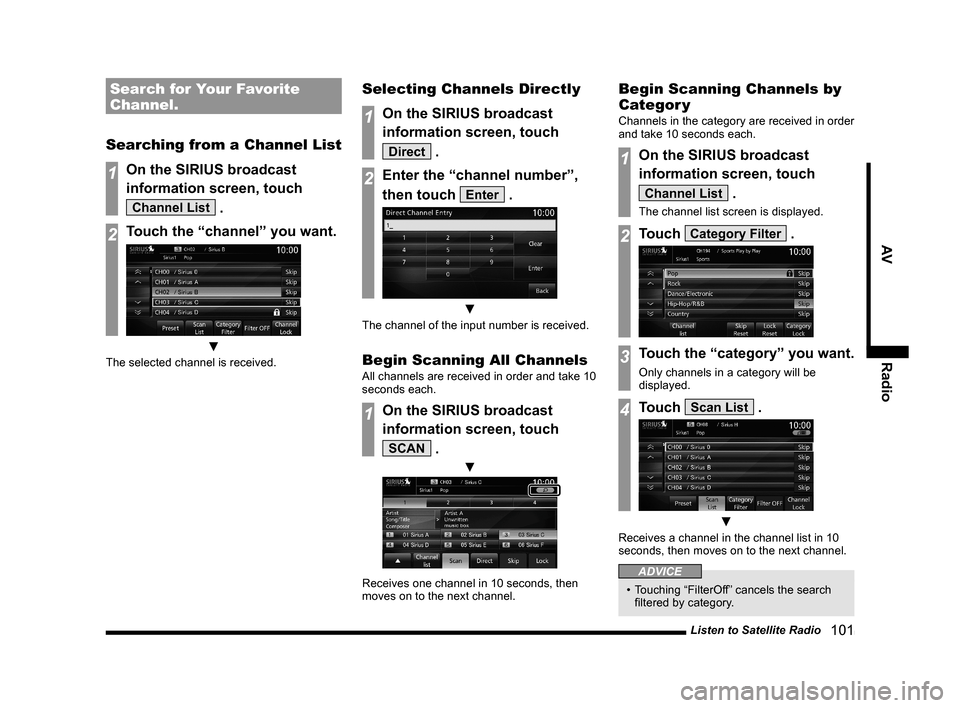
Searching from a Channel List
1On the SIRIUS broadcast
information screen, touch
Channel List .
2Touch the “channel” you want.
▼
The selected channel is received.
Selecting Channels Directly
1On the SIRIUS broadcast
information screen, touch
Direct .
2Enter the “channel number”,
then touch
Enter .
▼
The channel of the input number is received.
Begin Scanning All Channels
All channels are received in order and take 10
seconds each.
1On the SIRIUS broadcast
information screen, touch
SCAN .
▼
Receives one channel in 10 seconds, then
moves on to the next channel.
Begin Scanning Channels by
Categor y
Channels in the category are received in order
and take 10 seconds each.
1On the SIRIUS broadcast
information screen, touch
Channel List .
The channel list screen is displayed.
2Touch Category Filter .
3Touch the “category” you want.
Only channels in a category will be
displayed.
4Touch Scan List .
▼
Receives a channel in the channel list in 10
seconds, then moves on to the next channel.
ADVICE
• Touching “FilterOff” cancels the search
fi ltered by category.
Page 102 of 229
102 Listen to Satellite Radio Canceling a Scan
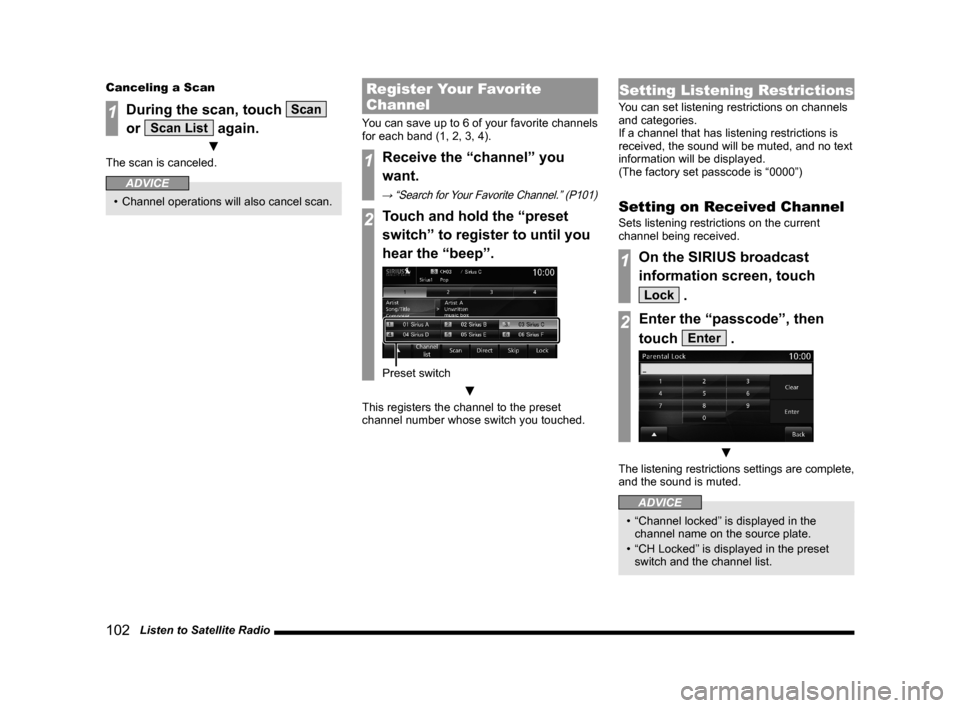
1During the scan, touch Scan
or
Scan List again.
▼
The scan is canceled.
ADVICE
• Channel operations will also cancel scan.
Register Your Favorite
Channel
You can save up to 6 of your favorite channels
for each band (1, 2, 3, 4).
1Receive the “channel” you
want.
→ “Search for Your Favorite Channel.” (P101)
2Touch and hold the “preset
switch” to register to until you
hear the “beep”.
Preset switch
▼
This registers the channel to the preset
channel number whose switch you touched.
Setting Listening Restrictions
You can set listening restrictions on channels
and categories.
If a channel that has listening restrictions is
received, the sound will be muted, and no text
information will be displayed.
(The factory set passcode is “0000”)
Setting on Received Channel
Sets listening restrictions on the current
channel being received.
1On the SIRIUS broadcast
information screen, touch
Lock .
2Enter the “passcode”, then
touch
Enter .
▼
The listening restrictions settings are complete,
and the sound is muted.
ADVICE
• “Channel locked” is displayed in the
channel name on the source plate.
• “CH Locked” is displayed in the preset
switch and the channel list.
Page 103 of 229
Listen to Satellite Radio
103
AV Radio
Setting from Channel List
Sets listening restrictions from the channel list.
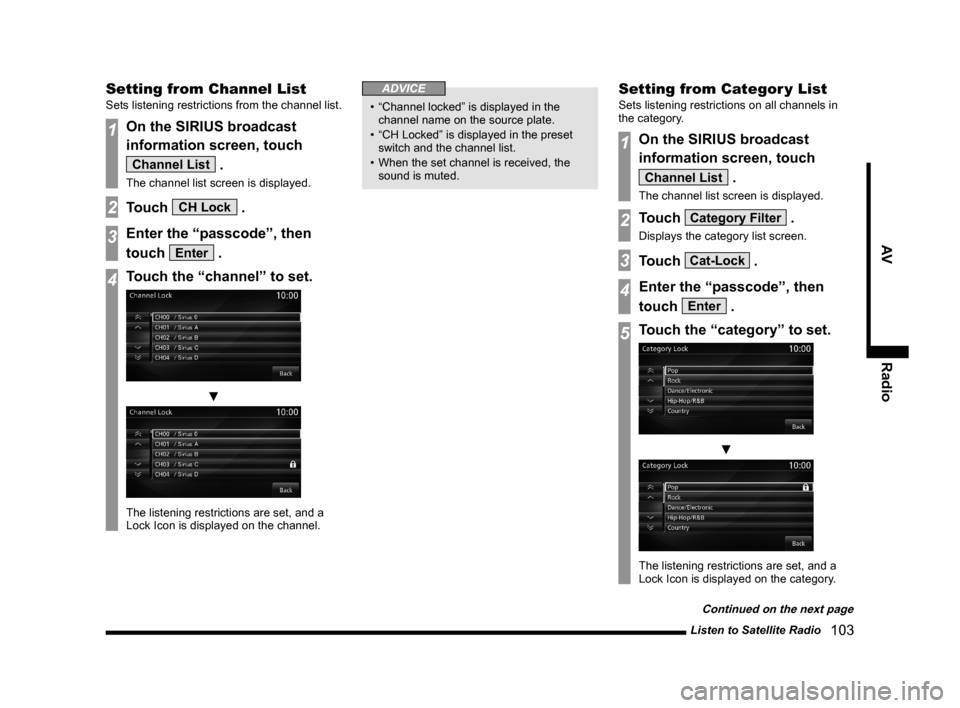
1On the SIRIUS broadcast
information screen, touch
Channel List .
The channel list screen is displayed.
2Touch CH Lock .
3Enter the “passcode”, then
touch
Enter .
4Touch the “channel” to set.
▼
The listening restrictions are set, and a
Lock Icon is displayed on the channel.
ADVICE
• “Channel locked” is displayed in the
channel name on the source plate.
• “CH Locked” is displayed in the preset
switch and the channel list.
• When the set channel is received, the
sound is muted.
Setting from Categor y List
Sets listening restrictions on all channels in
the category.
1On the SIRIUS broadcast
information screen, touch
Channel List .
The channel list screen is displayed.
2Touch Category Filter .
Displays the category list screen.
3Touch Cat-Lock .
4Enter the “passcode”, then
touch
Enter .
5Touch the “category” to set.
▼
The listening restrictions are set, and a
Lock Icon is displayed on the category.
Continued on the next page
Page 104 of 229
104 Listen to Satellite Radio
ADVICE
• “Channel locked” is displayed in the
channel name on the source plate.
• “CH Locked” is displayed in the preset
switch and the channel list.
• When the set channel is received, the
sound is muted.
Unlocking All Locked
Channels
Cancels the listening restrictions on all
channels.
1On the SIRIUS broadcast
information screen, touch
Channel List .
The channel list screen is displayed.
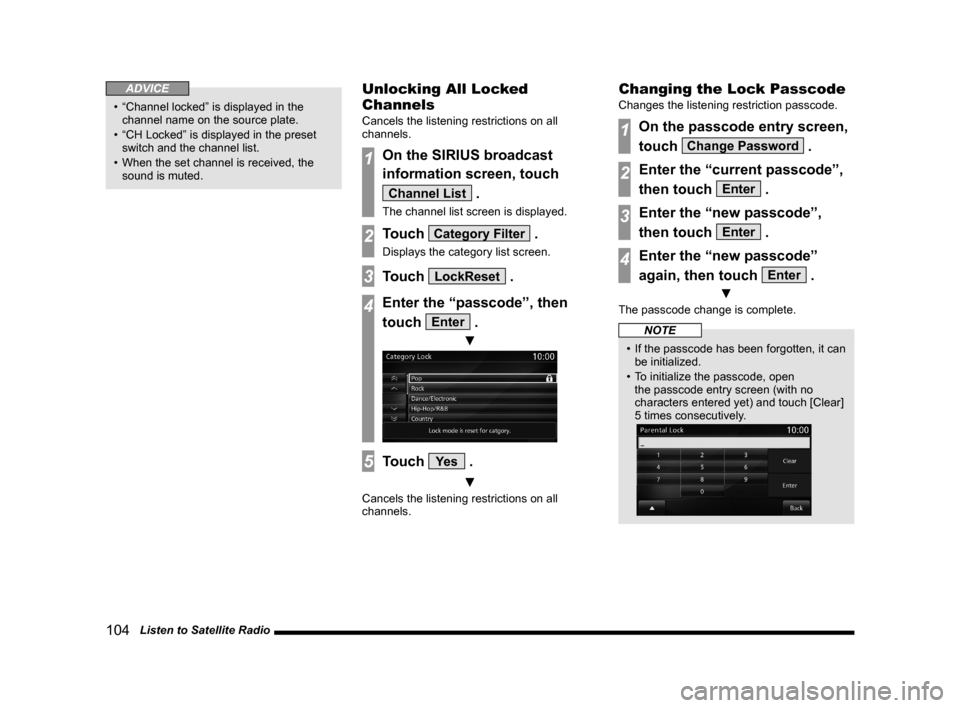
2Touch Category Filter .
Displays the category list screen.
3Touch LockReset .
4Enter the “passcode”, then
touch
Enter .
▼
5Touch Ye s .
▼
Cancels the listening restrictions on all
channels.
Changing the Lock Passcode
Changes the listening restriction passcode.
1On the passcode entry screen,
touch
Change Password .
2Enter the “current passcode”,
then touch
Enter .
3Enter the “new passcode”,
then touch
Enter .
4Enter the “new passcode”
again, then touch
Enter .
▼
The passcode change is complete.
NOTE
• If the passcode has been forgotten, it can
be initialized.
• To initialize the passcode, open
the passcode entry screen (with no
characters entered yet) and touch [Clear]
5 times consecutively.
Page 105 of 229
Listen to Satellite Radio
105
AV Radio
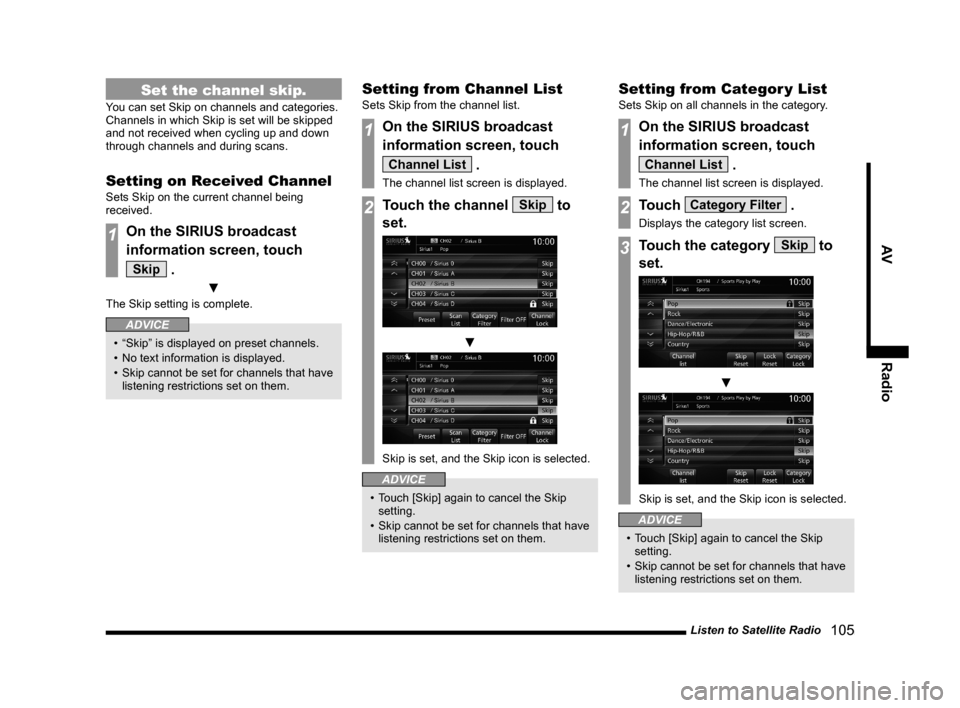
Set the channel skip.
You can set Skip on channels and categories.
Channels in which Skip is set will be skipped
and not received when cycling up and down
through channels and during scans.
Setting on Received Channel
Sets Skip on the current channel being
received.
1On the SIRIUS broadcast
information screen, touch
Skip .
▼
The Skip setting is complete.
ADVICE
• “Skip” is displayed on preset channels.
• No text information is displayed.
• Skip cannot be set for channels that have
listening restrictions set on them.
Setting from Channel List
Sets Skip from the channel list.
1On the SIRIUS broadcast
information screen, touch
Channel List .
The channel list screen is displayed.
2Touch the channel Skip to
set.
▼
Skip is set, and the Skip icon is selected.
ADVICE
• Touch [Skip] again to cancel the Skip
setting.
• Skip cannot be set for channels that have
listening restrictions set on them.
Setting from Categor y List
Sets Skip on all channels in the category.
1On the SIRIUS broadcast
information screen, touch
Channel List .
The channel list screen is displayed.
2Touch Category Filter .
Displays the category list screen.
3Touch the category Skip to
set.
▼
Skip is set, and the Skip icon is selected.
ADVICE
• Touch [Skip] again to cancel the Skip
setting.
• Skip cannot be set for channels that have
listening restrictions set on them.
Page 106 of 229
106 Listen to Satellite Radio
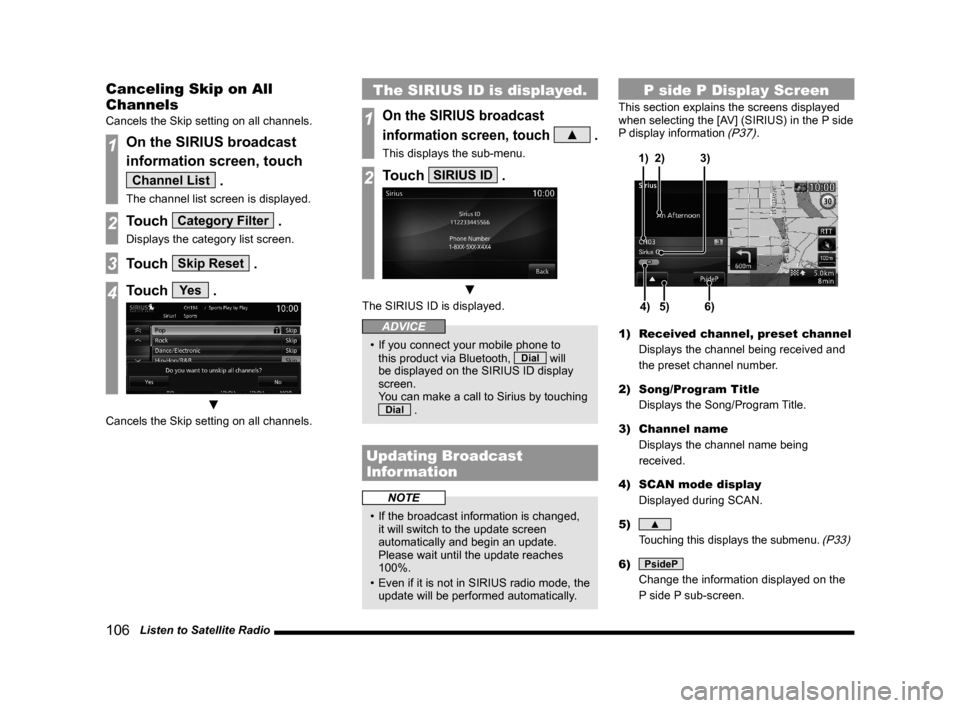
Canceling Skip on All
Channels
Cancels the Skip setting on all channels.
1On the SIRIUS broadcast
information screen, touch
Channel List .
The channel list screen is displayed.
2Touch Category Filter .
Displays the category list screen.
3Touch Skip Reset .
4Touch Ye s .
▼
Cancels the Skip setting on all channels.
The SIRIUS ID is displayed.
1On the SIRIUS broadcast
information screen, touch
▲ .
This displays the sub-menu.
2Touch SIRIUS ID .
▼
The SIRIUS ID is displayed.
ADVICE
• If you connect your mobile phone to
this product via Bluetooth, Dial will
be displayed on the SIRIUS ID display
screen.
You can make a call to Sirius by touching
Dial .
Updating Broadcast
Information
NOTE
• If the broadcast information is changed,
it will switch to the update screen
automatically and begin an update.
Please wait until the update reaches
100%.
• Even if it is not in SIRIUS radio mode, the
update will be performed automatically.
P side P Display Screen
This section explains the screens displayed
when selecting the [AV] (SIRIUS) in the P side
P display information
(P37).
5)4)6) 3) 2) 1)
1) Received channel, preset channel
Displays the channel being received and
the preset channel number.
2) Song/Program Title
Displays the Song/Program Title.
3) Channel name
Displays the channel name being
received.
4) SCAN mode display
Displayed during SCAN.
5)
▲
Touching this displays the submenu. (P33)
6) PsideP
Change the information displayed on the
P side P sub-screen.
Page 107 of 229
Listen to CDs
107
AV DISC
DISC
Listen to CDs
This explains how to listen to audio CDs
(CD-DA/CD-TEXT).
Insert a disc in this product to automatically
start playback.
→“Inserting the Disc”(P82)
NOTE
• Operate with an audio CD loaded
into this product.
1Press the MODE key.
This displays the mode.
2Touch CD .
The audio CD playback information
screen is displayed.
3Press the key
or
key to select
the track.
▼
The selected track is played back.
ADVICE
• You can fast forward or rewind the
track being played by holding down the
key or
key.
• By pressing the [AUDIO] key, you can
display the navigation screen while using
the audio function.
Pressing the [AUDIO] key again returns
the display to the audio screen.
Display a List
You can display a track list.
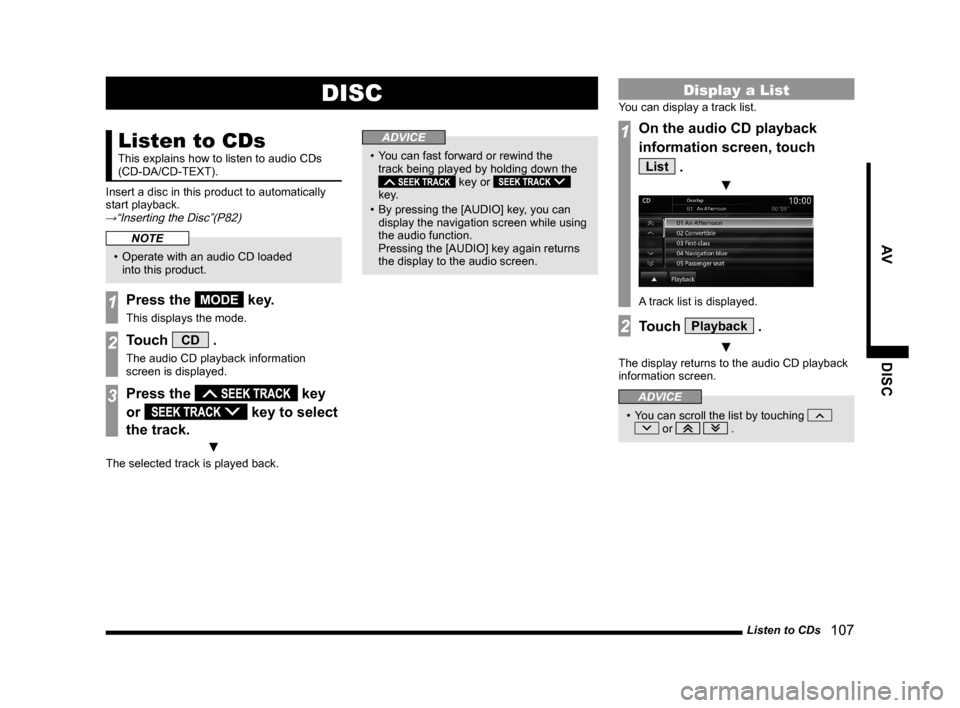
1On the audio CD playback
information screen, touch
List .
▼
A track list is displayed.
2Touch Playback .
▼
The display returns to the audio CD playback
information screen.
ADVICE
• You can scroll the list by touching or .
Page 108 of 229
108 Listen to CDs
Display Contents
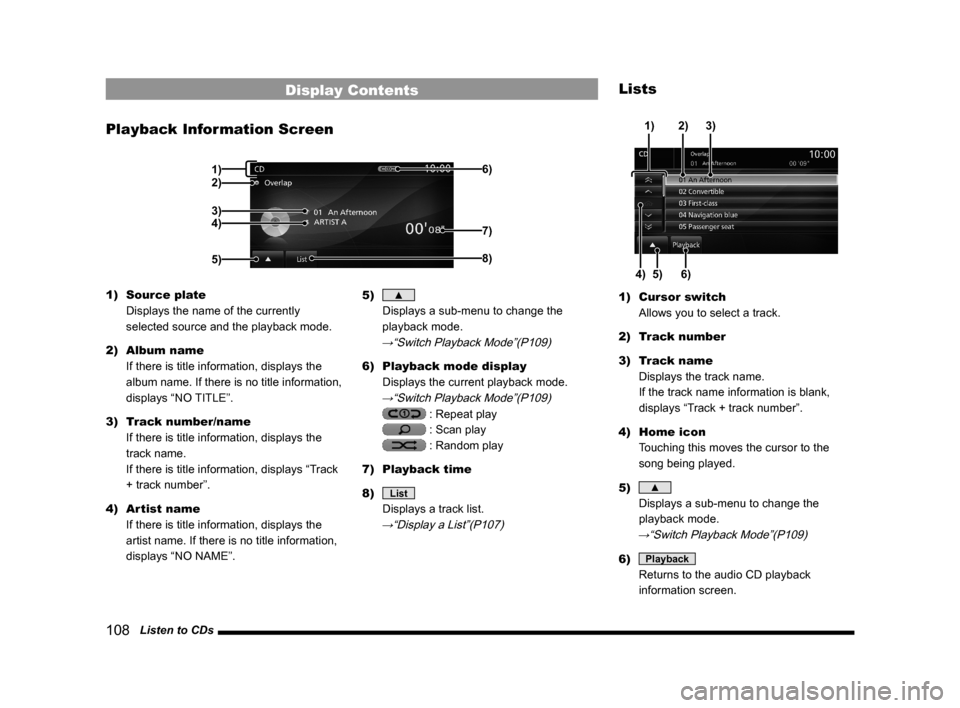
Playback Information Screen
2)
3)
4)
5)6)8)
7)
1)
1) Source plate
Displays the name of the currently
selected source and the playback mode.
2) Album name
If there is title information, displays the
album name. If there is no title information,
displays “NO TITLE”.
3) Track number/name
If there is title information, displays the
track name.
If there is title information, displays “Track
+ track number”.
4) Artist name
If there is title information, displays the
artist name. If there is no title information,
displays “NO NAME”.5) ▲
Displays a sub-menu to change the
playback mode.
→“Switch Playback Mode”(P109)
6) Playback mode display
Displays the current playback mode.
→“Switch Playback Mode”(P109)
: Repeat play
: Scan play
: Random play
7) Playback time
8)
List
Displays a track list.
→“Display a List”(P107)
Lists
5) 4)6)3) 2)
1)
1) Cursor switch
Allows you to select a track.
2) Track number
3) Track name
Displays the track name.
If the track name information is blank,
displays “Track + track number”.
4) Home icon
Touching this moves the cursor to the
song being played.
5)
▲
Displays a sub-menu to change the
playback mode.
→“Switch Playback Mode”(P109)
6) Playback
Returns to the audio CD playback
information screen.
Page 109 of 229
Listen to CDs
109
AV DISC
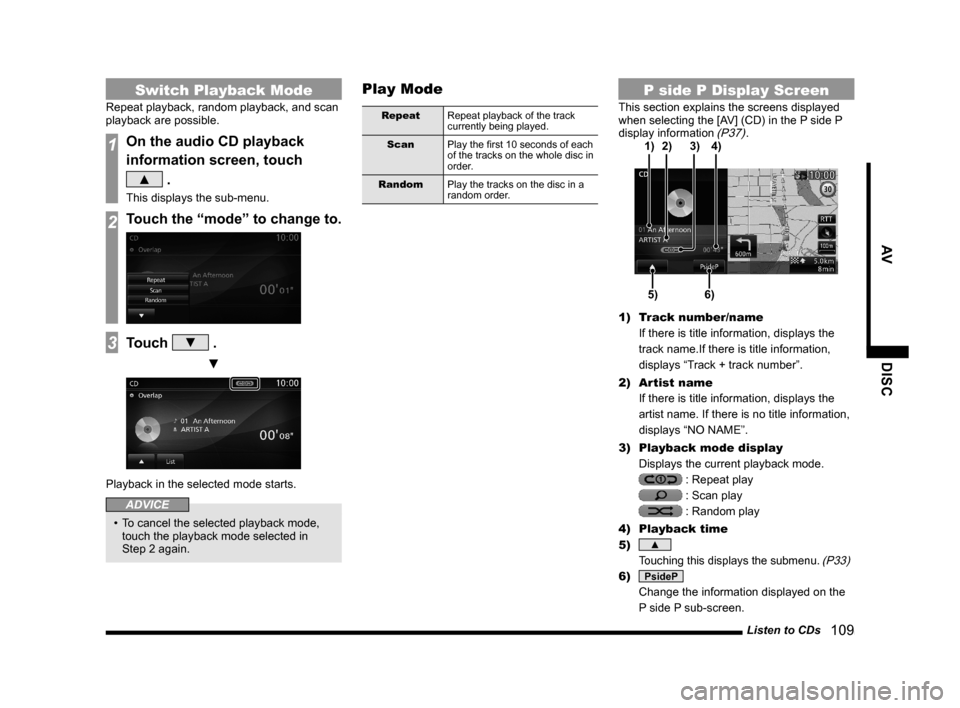
Switch Playback Mode
Repeat playback, random playback, and scan
playback are possible.
1On the audio CD playback
information screen, touch
▲ .
This displays the sub-menu.
2Touch the “mode” to change to.
3Touch ▼ .
▼
Playback in the selected mode starts.
ADVICE
• To cancel the selected playback mode,
touch the playback mode selected in
Step 2 again.
Play Mode
Repeat
Repeat playback of the track
currently being played.
Scan
Play the fi rst 10 seconds of each
of the tracks on the whole disc in
order.
Random
Play the tracks on the disc in a
random order.
P side P Display Screen
This section explains the screens displayed
when selecting the [AV] (CD) in the P side P
display information
(P37).
5)6) 3) 2)
4) 1)
1) Track number/name
If there is title information, displays the
track name.If there is title information,
displays “Track + track number”.
2) Artist name
If there is title information, displays the
artist name. If there is no title information,
displays “NO NAME”.
3) Playback mode display
Displays the current playback mode.
: Repeat play
: Scan play
: Random play
4) Playback time
5)
▲
Touching this displays the submenu. (P33)
6) PsideP
Change the information displayed on the
P side P sub-screen.
Page 110 of 229
11 0 Listen to Audio Files on a Disc
Listen to Audio Files
on a Disc
This explains how to listen to audio fi les on
a disc.
Insert a disc in this product to automatically
start playback.
→“Inserting the Disc”(P82)
NOTE
• Operate with an audio fi le disc loaded
into this product.
• WAV fi les recorded on CD-ROMs cannot
be played.
1Press the MODE key.
This displays the mode.
2Touch CD .
The audio fi le playback information screen
is displayed.
3Turn the FOLDER/TUNE key
to select the folder.
4Press the key
or
key to select
the track.
▼
The selected track is played back.
ADVICE
• You can fast forward or rewind the
track being played by holding down the
key or
key.
• By pressing the [AUDIO] key, you can
display the navigation screen while using
the audio function.
Pressing the [AUDIO] key again returns
the display to the audio screen.
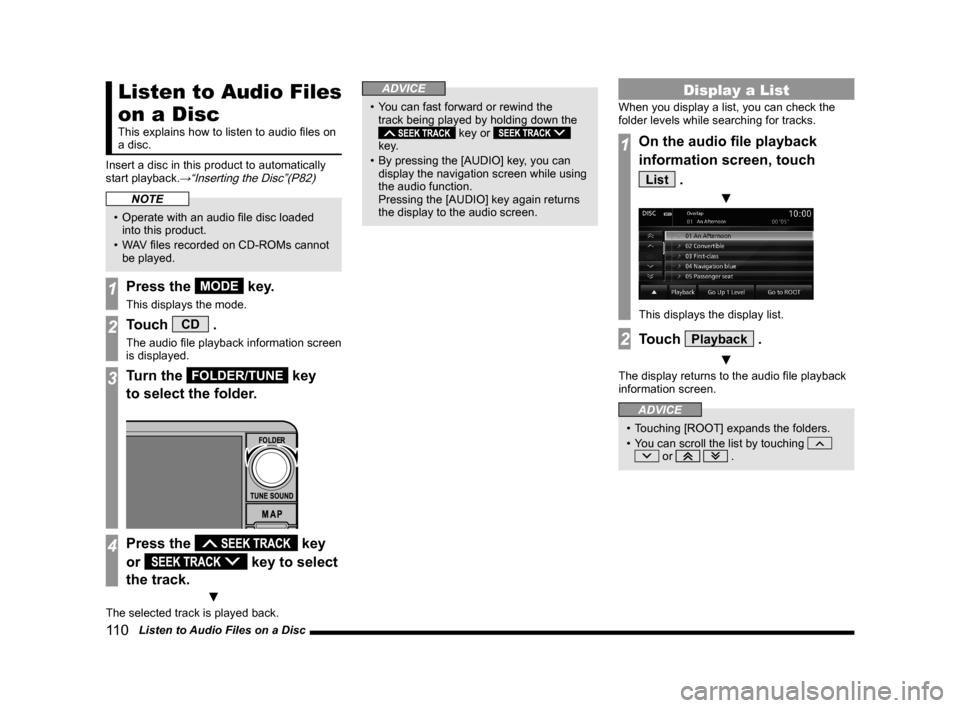
Display a List
When you display a list, you can check the
folder levels while searching for tracks.
1On the audio fi le playback
information screen, touch
List .
▼
This displays the display list.
2Touch Playback .
▼
The display returns to the audio fi le playback
information screen.
ADVICE
• Touching [ROOT] expands the folders.
• You can scroll the list by touching
or .