MITSUBISHI LANCER RALLIART 2014 8.G Display Audio Manual
Manufacturer: MITSUBISHI, Model Year: 2014, Model line: LANCER RALLIART, Model: MITSUBISHI LANCER RALLIART 2014 8.GPages: 88, PDF Size: 11.63 MB
Page 11 of 88
How to Perform Touch Operations 11
IntroductionBasic Operation
How to Perform
Touch Operations
This system uses a touch panel that is
operated by touching the display directly.
When Touching ___
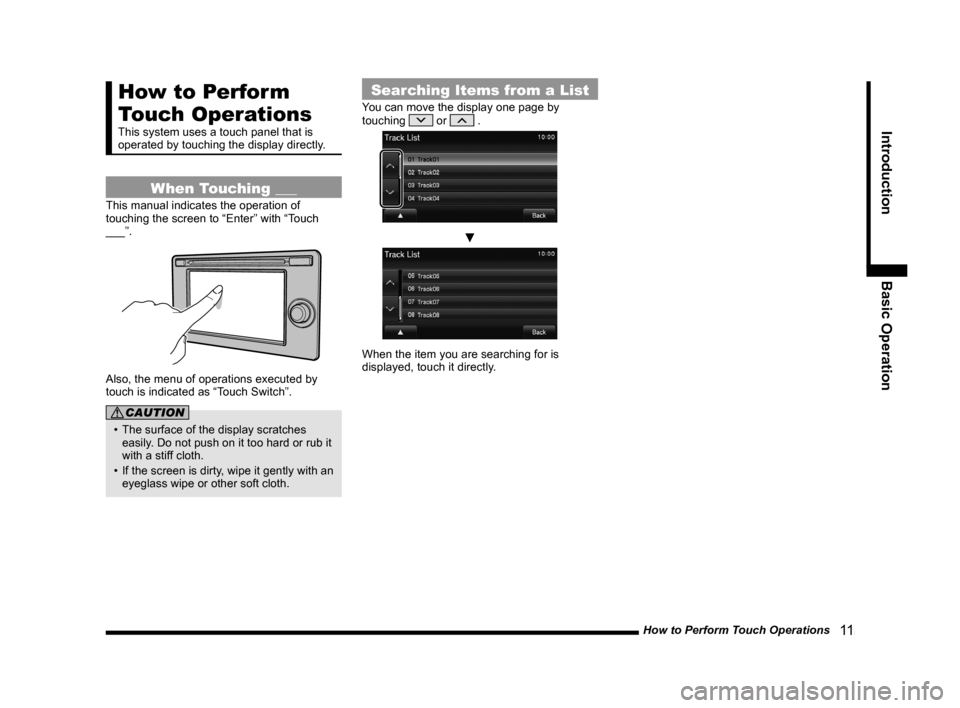
This manual indicates the operation of
touching the screen to “Enter” with “Touch
___”.
Also, the menu of operations executed by
touch is indicated as “Touch Switch”.
CAUTION
• The surface of the display scratches
easily. Do not push on it too hard or rub it
with a stiff cloth.
• If the screen is dirty, wipe it gently with an eyeglass wipe or other soft cloth.
Searching Items from a List
You can move the display one page by
touching or .
▼
When the item you are searching for is
displayed, touch it directly.
13MY_AVC(NAS).indb 112013/02/14 10:57:22
Page 12 of 88
![MITSUBISHI LANCER RALLIART 2014 8.G Display Audio Manual 12 Top Menu
Top Menu
By pressing the [MENU] key to display the top menu, then selecting a sou\
rce from that menu,
you can use various functions.
Display Contents
TOP
5)6)7)9)8)
1)2) 3)4)
2nd TOP
1 MITSUBISHI LANCER RALLIART 2014 8.G Display Audio Manual 12 Top Menu
Top Menu
By pressing the [MENU] key to display the top menu, then selecting a sou\
rce from that menu,
you can use various functions.
Display Contents
TOP
5)6)7)9)8)
1)2) 3)4)
2nd TOP
1](/img/19/7487/w960_7487-11.png)
12 Top Menu
Top Menu
By pressing the [MENU] key to display the top menu, then selecting a sou\
rce from that menu,
you can use various functions.
Display Contents
TOP
5)6)7)9)8)
1)2) 3)4)
2nd TOP
10)11)12)13)
1) FM (P25)
Allows you to use the FM radio function.
2)
AM (P25)
Allows you to use the AM radio function.
3)
SIRIUS *7 (P32)
Allows you to use the satellite radio
function.
4) Clock
Displays the current time using 24-hour
time or 12-hour time.
5)
CD
Plays media inserted into this product.
Audio CD
(P41)
Audio files (MP3/WMA/AAC)
(P44)
6) USB/iPod *1
When an iPod is connected to this
product,
iPod is displayed and when you
touch this, the iPod screen is displayed.
(P52)
When a USB device is connected to this
product,
USB is displayed and when you
touch this, the USB screen is displayed.
(P57)
When nothing is connected to this product,
USB/iPod is displayed.
7)
BT Audio *2(P62)
When a Bluetooth-capable audio device
is connected to this product, the Bluetooth
audio function can be used. 8)
Next
Displays the top menu (2nd top).
9)
Voice *3(P17)
Allows you to use the voice control
function.
10)
AUX *1, *4, *5(P65)
When an external input device is connected to this product, the audio from
the external input device is played.
11)
Phone *6(P66)
Allows you to make and receive telephone
calls.
12)
Setting (P73)
Displays the settings screen, on which you
can make various settings for this product.
13)
Back
Displays the top menu (top).
*1) An iPod and external input cable (both available separately) are required.
*2) Requires a separately-purchased Bluetooth-
capable audio device in
Equipment by type (vehicles
with a Bluetooth® 2.0 interface).
*3) Can be used with Equipment by type (vehicles with a
Bluetooth® 2.0 interface).
*4) Equipment by type Even when no external input
cable or AUX device (both available separately)
is connected to this product, [AUX] is displayed,
but touching it does not output any audio.
*5)
Equipment by type Not displayed for vehicles that do
not support AUX devices.
*6) Requires a separately-purchased Bluetooth-
capable mobile phone in
Equipment by type (vehicles
with a Bluetooth® 2.0 interface).
*7) Equipment by type Requires a satellite tuner
connection.
13MY_AVC(NAS).indb 122013/02/14 10:57:23
Page 13 of 88
Top Menu 13
IntroductionBasic Operation
Switch the Top Menu
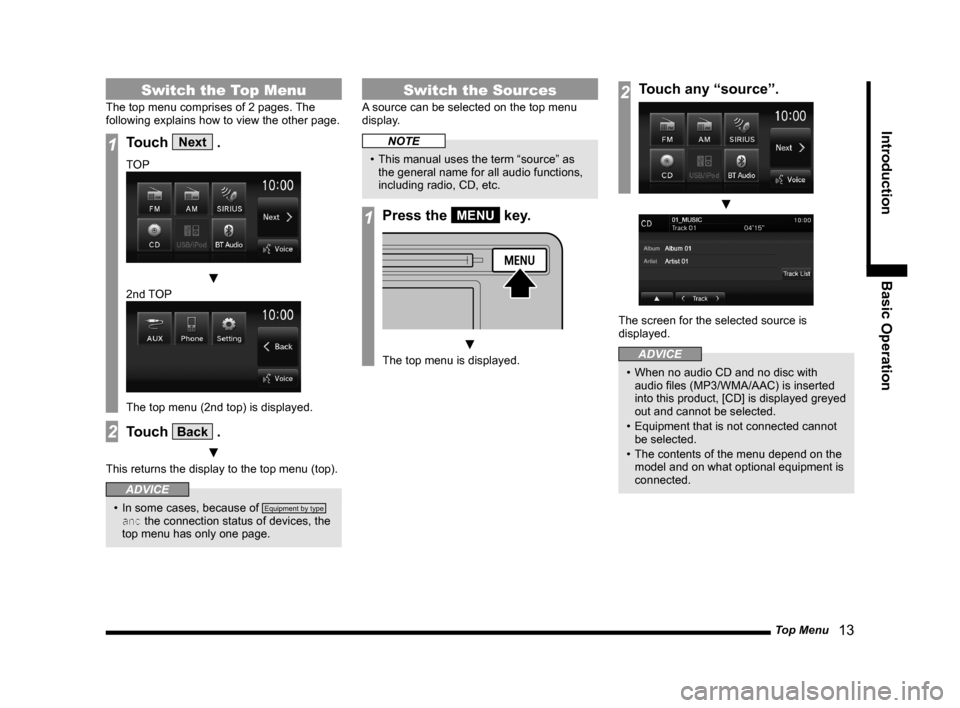
The top menu comprises of 2 pages. The
following explains how to view the other page.
1Touch Next .
TOP
▼
2nd TOP
The top menu (2nd top) is displayed.
2Touch Back .
▼
This returns the display to the top menu (top).
ADVICE
• In some cases, because of Equipment by type
and the connection status of devices, the
top menu has only one page.
Switch the Sources
A source can be selected on the top menu
display.
NOTE
• This manual uses the term “source” as the general name for all audio functions,
including radio, CD, etc.
1Press the MENU key.
▼
The top menu is displayed.
2Touch any “source”.
▼
The screen for the selected source is
displayed.
ADVICE
• When no audio CD and no disc with audio files (MP3/WMA/AAC) is inserted
into this product, [CD] is displayed greyed
out and cannot be selected.
• Equipment that is not connected cannot be selected.
• The contents of the menu depend on the model and on what optional equipment is
connected.
13MY_AVC(NAS).indb 132013/02/14 10:57:24
Page 14 of 88
14 Basic Operation
AV
The following explains audio function operations.
Audio Functions
Basic Operation
NOTE
• The album names, titles, etc. in the title information in pictures used with the
audio functions and related functions
of this manual were prepared for these
explanations. They have no relationship
whatsoever with actual title information.
Switch Audio ON/OFF
You can switch the audio function ON/OFF.
ADVICE
• Hold down the steering [MODE] key to also turn the audio function ON/OFF.
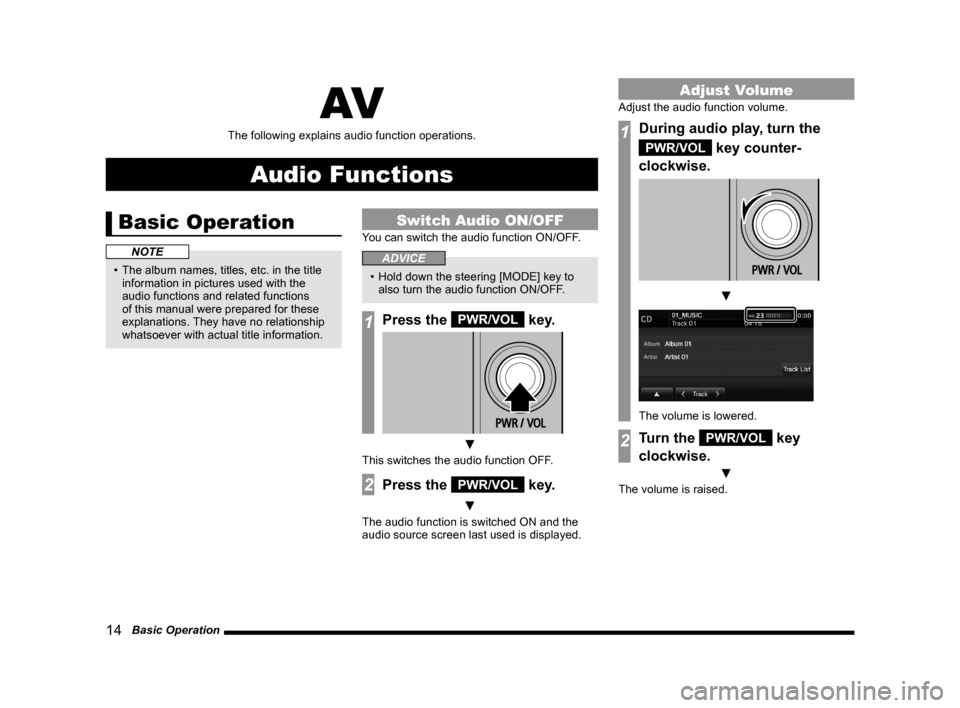
1Press the PWR/VOL key.
▼
This switches the audio function OFF.
2Press the PWR/VOL key.
▼
The audio function is switched ON and the
audio source screen last used is displayed.
Adjust Volume
Adjust the audio function volume.
1During audio play, turn the
PWR/VOL key counter-
clockwise.
▼
The volume is lowered.
2Turn the PWR/VOL key
clockwise.
▼
The volume is raised.
13MY_AVC(NAS).indb 142013/02/14 10:57:25
Page 15 of 88
Basic Operation 15
AVAudio Functions
Insert/Eject Discs
The following explains how to insert a disc into
this product.
CAUTION
• When replacing discs, first ensure that the vehicle is stopped in an area in which
stopping is permitted.
• Do not insert your hand, fingers, or foreign objects into the disc slot. This
may lead to injury, smoking, or fire.
Inserting the Disc
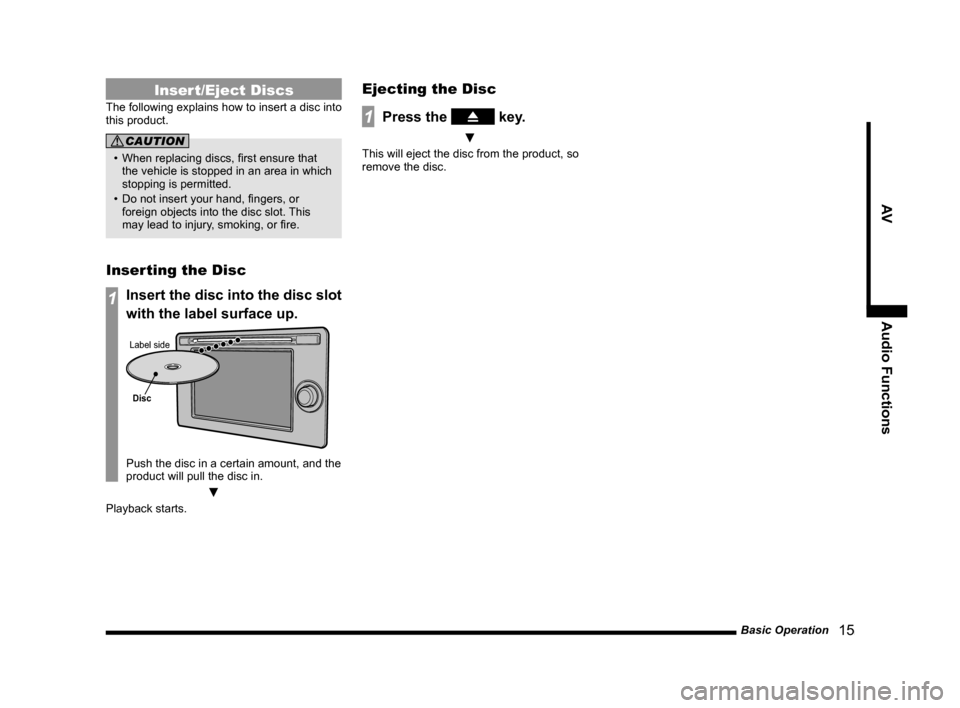
1Insert the disc into the disc slot
with the label surface up.
Disc
Label side
Push the disc in a certain amount, and the
product will pull the disc in.
▼
Playback starts.
Ejecting the Disc
1Press the key.
▼
This will eject the disc from the product, so
remove the disc.
13MY_AVC(NAS).indb 152013/02/14 10:57:26
Page 16 of 88
16 Basic Operation
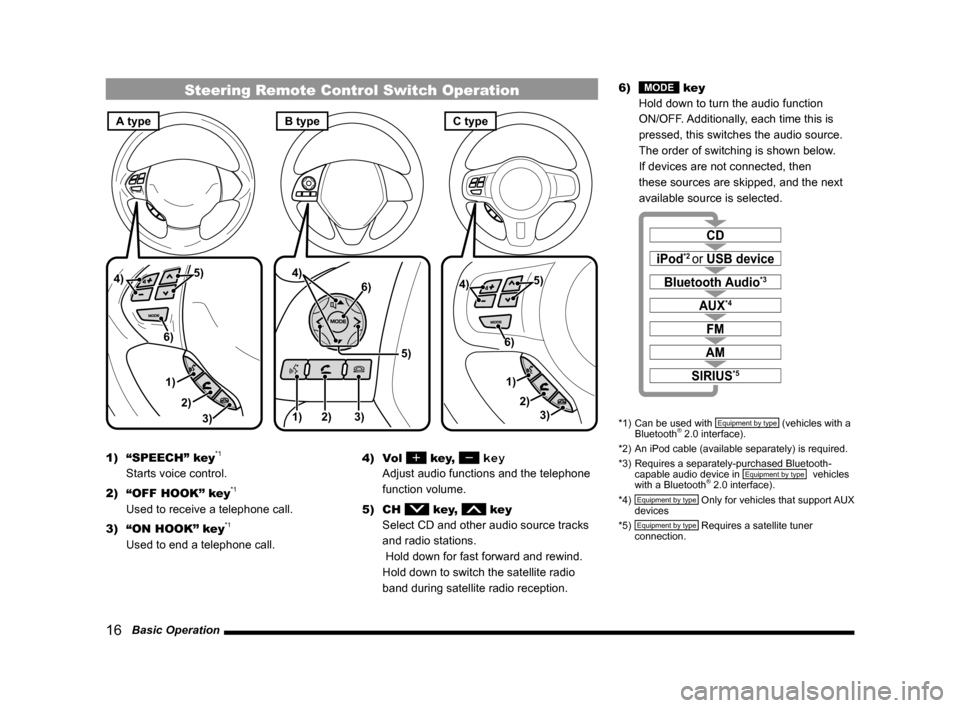
Steering Remote Control Switch Operation
1)3)
2) 5)
4)
6)1) 2) 3)
5)
4)
6)
3)
1) 2)
5)
4)
6)
A typeC typeB type
1) “SPEECH” key*1
Starts voice control.
2) “OFF HOOK” key
*1
Used to receive a telephone call.
3) “ON HOOK” key
*1
Used to end a telephone call. 4) Vol
key, key
Adjust audio functions and the telephone
function volume.
5) CH
key, key
Select CD and other audio source tracks
and radio stations.
Hold down for fast forward and rewind.
Hold down to switch the satellite radio
band during satellite radio reception. 6)
MODE key
Hold down to turn the audio function
ON/OFF. Additionally, each time this is
pressed, this switches the audio source.
The order of switching is shown below.
If devices are not connected, then
these sources are skipped, and the next
available source is selected.
CD
iPod*2 or USB device
Bluetooth Audio*3
FM
AM
AUX*4
SIRIUS*5
*1) Can be used with Equipment by type (vehicles with a
Bluetooth® 2.0 interface).
*2) An iPod cable (available separately) is required.
*3) Requires a separately-purchased Bluetooth-
capable audio device in
Equipment by type (vehicles
with a Bluetooth® 2.0 interface).
*4) Equipment by type Only for vehicles that support AUX
devices
*5)
Equipment by type Requires a satellite tuner
connection.
13MY_AVC(NAS).indb 162013/02/14 10:57:27
Page 17 of 88
Voice Control 17
AVAudio Functions
Equipment by type
(Vehicles with a Bluetooth® 2.0 interface).
Voice Control
You can perform telephone and audio
operations by voice command.
1Press the “SPEECH” key on
the steering wheel. After you
hear the “beep”, say “Voice
commands”.
→“Steering Remote Control Switch
Operation” (P16)
ADVICE
• You can also start voice control by touching [Voice] on the Top Menu.
• Please refer to your vehicle's user manual
(Bluetooth
® 2.0 interface) regarding the
voice control function.
NOTE
The voice control function may have
difficulty in some environments and with
the way some people speak.
The followings will help you make the best
use of the voice control function.
• Speak loud and clear. This makes voice
recognition easier.
• When making a call, avoid saying things such as “uh”, “um, uh”, “aah”, etc. These
may be mistaken for other words.
• Close the windows. Noise from the outside can cause recognition mistakes.
• Ask everyone else in the vehicle to please be quiet while you voice-dial a
call. The voices of others in the vehicle
can cause recognition mistakes.
• Words are sometimes mistaken for other words with a similar pronunciation.
• If there is too much ambient noise, recognition mistakes may occur.
Example: Driving through a tunnel,
driving with chains on the tires
• Strong air flow from the air conditioner or heater may make recognition more
difficult.
• In the following cases, voice commands are not accepted.
- Speaking too slow or fast
- Speaking too loud or soft
- Not saying anything or pronunciation is unclear
- Spoke before the “beep”
13MY_AVC(NAS).indb 172013/02/14 10:57:27
Page 18 of 88
18 Handling of Discs
Handling of Discs
This explains care that should be taken in
the handling of discs.
Important Points on Handling
• Fingerprints or other marks on the read surface of the disc may result in its content
being more difficult to read. When holding
the disc, grip both edges, or one edge and
the center hole, to avoid touching the read
surface.
• Do not affix paper or stickers, or otherwise damage the disc.
• Do not forcefully insert a disc if a disc is already within the device. This can result in
damage to discs, or malfunction.
Cleaning
• Periodically clean the read surface of the disc. When cleaning, do not wipe in a circular
motion. Instead, wipe gently outwards from
the center of the disc to the outer edge.
• New discs may have burring around the outer edge or in the hole in the center.
Ensure you check for these. If there are
burrs, these may lead to faulty operation,
therefore ensure these are removed.
Important Points on Storage
• When not using discs, ensure these are kept in cases, and stored out of direct sunlight.
• If discs are not going to be used for a long period of time, remove these from the
product.
Disc Playback Environment
In cold environments such as in mid-winter
when the interior of the vehicle is cold, turning
the heater on and immediately trying to use
the product may cause condensation (water
droplets) to form on the disc and internal
optical components, and this may prevent the
product from operating correctly.
In these conditions, remove the disc, and wait
a short time before use.
Copyright
Actions such as unauthorized reproduction,
broadcast, public performance, or rental of
discs that comprise other than personal use
are prohibited by law.
13MY_AVC(NAS).indb 182013/02/14 10:57:27
Page 19 of 88
Handling of Discs 19
AVAudio Functions
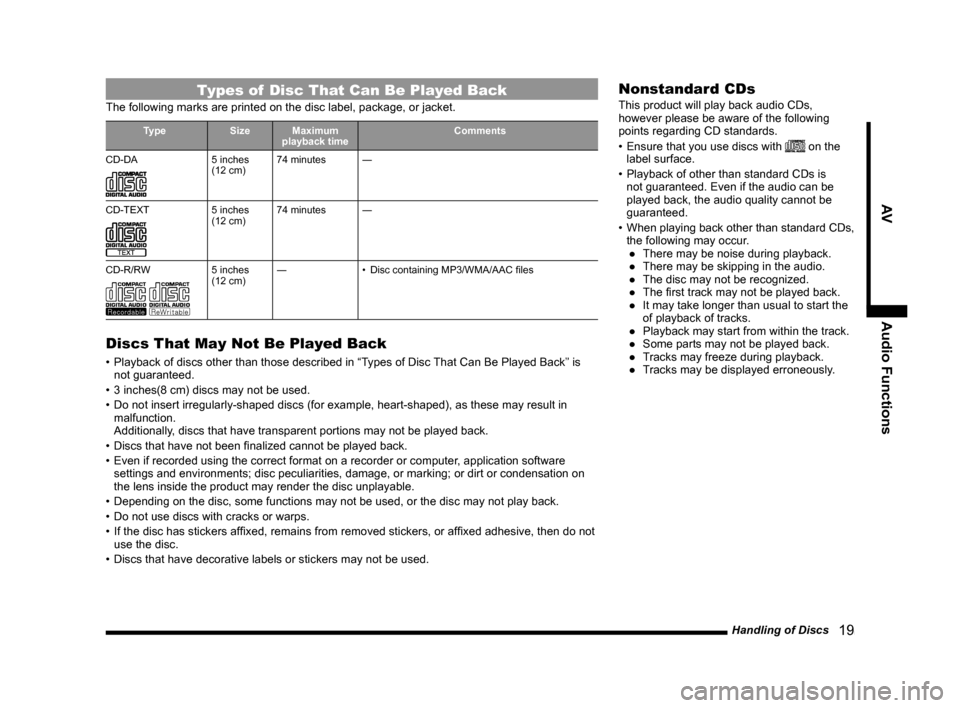
Types of Disc That Can Be Played Back
The following marks are printed on the disc label, package, or jacket.
Type SizeMaximum
playback time Comments
CD-DA
5 inches
(12 cm) 74 minutes
―
CD-TEXT
5 inches
(12 cm) 74 minutes
―
CD-R/RW
5 inches
(12 cm) ―
• Disc containing MP3/WMA/AAC files
Discs That May Not Be Played Back
• Playback of discs other than those described in “Types of Disc That Can Be Played Back” is
not guaranteed.
• 3 inches(8 cm) discs may not be used.
• Do not insert irregularly-shaped discs (for example, heart-shaped), as these may result in malfunction.
Additionally, discs that have transparent portions may not be played back.
• Discs that have not been finalized cannot be played back.
• Even if recorded using the correct format on a recorder or computer, application software settings and environments; disc peculiarities, damage, or marking; or di\
rt or condensation on
the lens inside the product may render the disc unplayable.
• Depending on the disc, some functions may not be used, or the disc may not play back.
• Do not use discs with cracks or warps.
• If the disc has stickers affixed, remains from removed stickers, or affixed adhesive, then do not use the disc.
• Discs that have decorative labels or stickers may not be used.
Nonstandard CDs
This product will play back audio CDs,
however please be aware of the following
points regarding CD standards.
• Ensure that you use discs with
on the
label surface.
• Playback of other than standard CDs is not guaranteed. Even if the audio can be
played back, the audio quality cannot be
guaranteed.
• When playing back other than standard CDs,
the following may occur. ● There may be noise during playback.
● There may be skipping in the audio.
● The disc may not be recognized.
● The first track may not be played back.
● It may take longer than usual to start the of playback of tracks.
● Playback may start from within the track.
● Some parts may not be played back.
● Tracks may freeze during playback.
● Tracks may be displayed erroneously.
13MY_AVC(NAS).indb 192013/02/14 10:57:28
Page 20 of 88
20 Audio Files (MP3/WMA/AAC)
Audio Files (MP3/
WMA/AAC)
This product can play back MP3/WMA/AAC
format audio files recorded on CD-ROM,
CD-R/RW, and USB devices.
There are limitations on the files and media
that can be used, therefore read the following
prior to recording MP3/WMA/AAC format
audio files on discs or USB devices.
Additionally, ensure you read the user
manuals for your CD-R/RW drive and the
writing software, and ensure these are used
correctly.
If the MP3/WMA/AAC format audio files
includes title information or other data, then
this can be displayed.
CAUTION
• Actions such as copying audio CDs or files and either distributing these to others
for free or for charge, or uploading files
via the Internet or other means to servers
is an infringement of the law.
• Do not append the file extensions “.mp3”, “.wma”, or “.m4a”, to other than MP3/
WMA/AAC format files. Playing back discs
with these types of files recorded upon
them may cause the files to be incorrectly
identified for playback, which may lead to
loud noise, resulting in speaker damage
or accident.
ADVICE
• Depending on the condition of the disc recorder or recording software used,
correct playback may not be possible. In
these cases, refer to the user manual for
your product or software.
• Depending on your computer's operating system, version, software, or settings,
files may not have a file extension
appended. In these cases, append the
file extensions “.mp3”, “.wma”, or “.m4a”
when copying the files.
• Files larger than 2GB in size cannot be played back.
• This product can also play back discs that
contain audio files in different formats,
MP3, WMA, and AAC.
13MY_AVC(NAS).indb 202013/02/14 10:57:28