check MITSUBISHI OUTLANDER 2014 3.G MMCS Manual
[x] Cancel search | Manufacturer: MITSUBISHI, Model Year: 2014, Model line: OUTLANDER, Model: MITSUBISHI OUTLANDER 2014 3.GPages: 226, PDF Size: 31.21 MB
Page 63 of 226
Change the Route 63
NAVI Route Checking and Changing
Select from Four Routes
You can simultaneously search for routes with
four different conditions, then select one of
them.
ADVICE
• Depending on the road conditions, it
may not be possible to search for all four
routes.
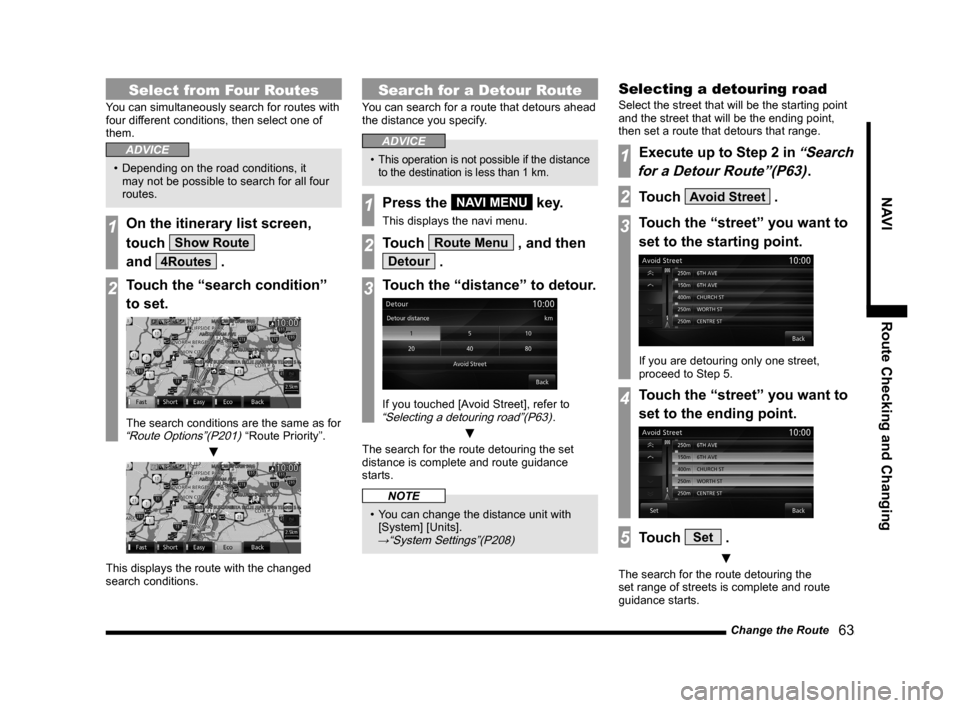
1On the itinerary list screen,
touch
Show Route
and
4Routes .
2Touch the “search condition”
to set.
The search conditions are the same as for “Route Options”(P201) “Route Priority”.
▼
This displays the route with the changed
search conditions.
Search for a Detour Route
You can search for a route that detours ahead
the distance you specify.
ADVICE
• This operation is not possible if the distance
to the destination is less than 1 km.
1Press the NAVI MENU key.
This displays the navi menu.
2Touch Route Menu , and then
Detour .
3Touch the “distance” to detour.
If you touched [Avoid Street], refer to “Selecting a detouring road”(P63).
▼
The search for the route detouring the set
distance is complete and route guidance
starts.
NOTE
• You can change the distance unit with
[System] [Units].
→“System Settings”(P208)
Selecting a detouring road
Select the street that will be the starting point
and the street that will be the ending point,
then set a route that detours that range.
1Execute up to Step 2 in “Search
for a Detour Route”(P63)
.
2Touch Avoid Street .
3Touch the “street” you want to
set to the starting point.
If you are detouring only one street,
proceed to Step 5.
4Touch the “street” you want to
set to the ending point.
5Touch Set .
▼
The search for the route detouring the
set range of streets is complete and route
guidance starts.
Page 65 of 226
Change the Route 65
NAVI Route Checking and Changing
Select the DRG route
When the RTT message is detected, a route
based on the detected information is searched
and DRG (Dynamic Route Guidance) route
can be selected.
ADVICE
• It is necessary to set the [RTT Options]
“Dynamic Route Guidance” to [On].→
“Navi Settings” (P195)
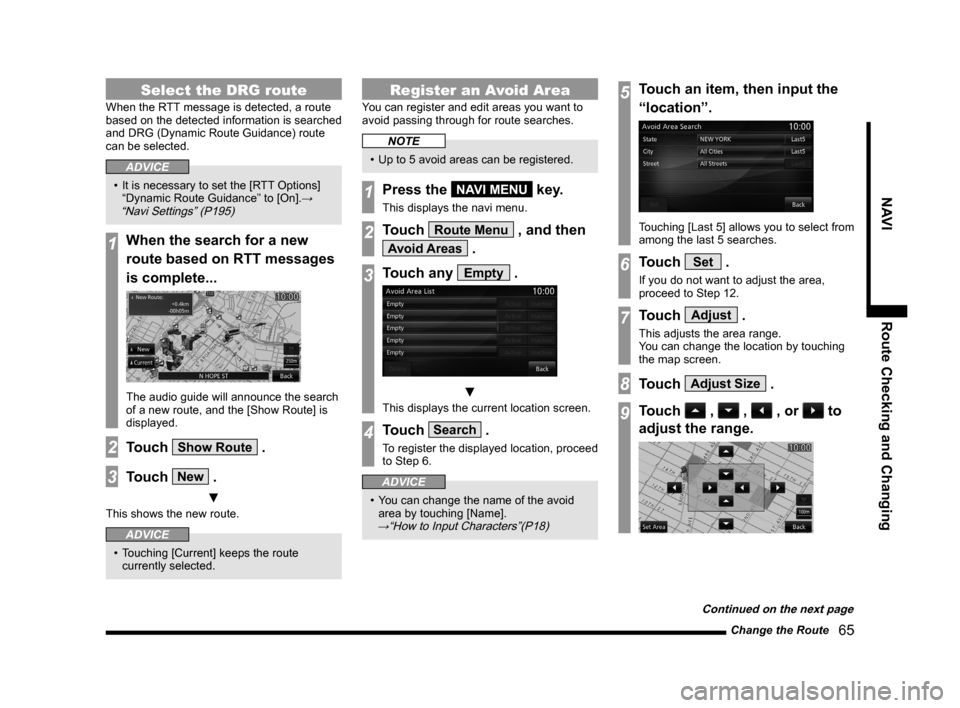
1When the search for a new
route based on RTT messages
is complete...
The audio guide will announce the search
of a new route, and the [Show Route] is
displayed.
2Touch Show Route .
3Touch New .
▼
This shows the new route.
ADVICE
• Touching [Current] keeps the route
currently selected.
Register an Avoid Area
You can register and edit areas you want to
avoid passing through for route searches.
NOTE
• Up to 5 avoid areas can be registered.
1Press the NAVI MENU key.
This displays the navi menu.
2Touch Route Menu , and then
Avoid Areas .
3Touch any Empty .
▼
This displays the current location screen.
4Touch Search .
To register the displayed location, proceed
to Step 6.
ADVICE
• You can change the name of the avoid
area by touching [Name].
→“How to Input Characters”(P18)
5Touch an item, then input the
“location”.
Touching [Last 5] allows you to select from
among the last 5 searches.
6Touch Set .
If you do not want to adjust the area,
proceed to Step 12.
7Touch Adjust .
This adjusts the area range.
You can change the location by touching
the map screen.
8Touch Adjust Size .
9Touch , , , or to
adjust the range.
Continued on the next page
Page 75 of 226
RTT 75
NAVI RTT
RTT
RTT
You can use the real-time traffic message.
DRG (Dynamic Route
Guidance)
When the RTT messages or traffic rule
information is detected, the best route
is calculated automatically based on the
detected information and guidance is
provided.
→ “Select the DRG route” (P65)
ADVICE
• It is necessary to set the [RTT Options]
“Dynamic Route Guidance” to [On].→
“Navi Settings” (P195)
RTT Sur veillance Map
RTT is a service that provides traffic message
using FM HD Radio signal (FM Radio waves).
Areas can be registered to check the traffic
rules and traffic messages of the registered
area.
→ “Registering the RTT Surveillance Map” (P78)
RTT Switches
You can receive or check traffic messages.
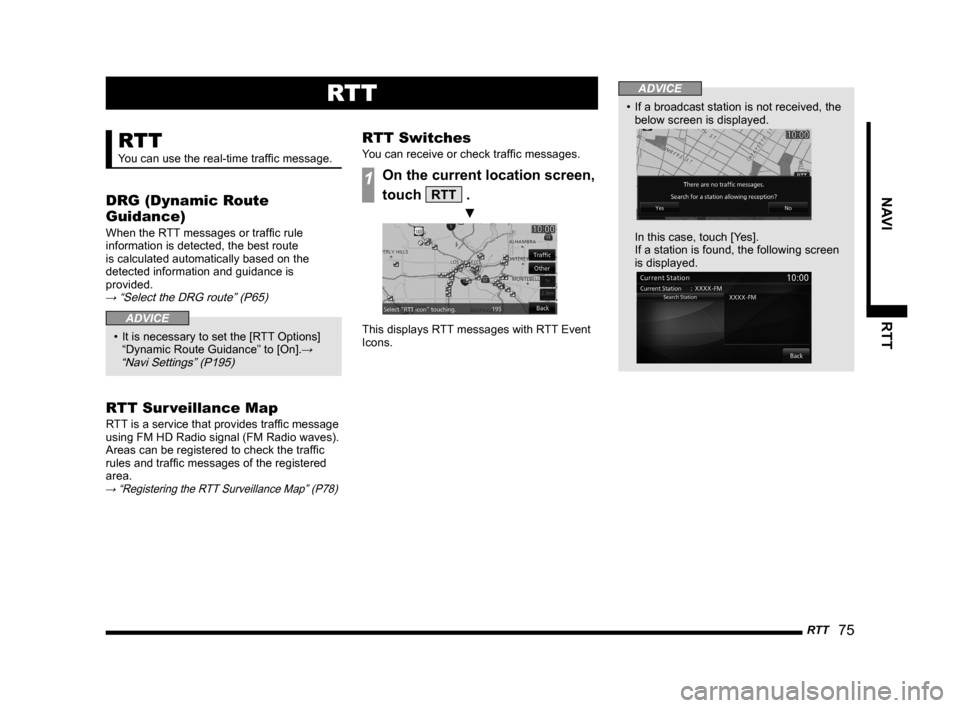
1On the current location screen,
touch
RTT .
▼
This displays RTT messages with RTT Event
Icons.
ADVICE
• If a broadcast station is not received, the
below screen is displayed.
In this case, touch [Yes].
If a station is found, the following screen
is displayed.
Page 76 of 226
![MITSUBISHI OUTLANDER 2014 3.G MMCS Manual 76 RTT
RTT Event Icons
Each traffic message is displayed with the
following marks on the map.
ADVICE
• Whether or not to display “RTT Event
Icons” can be selected with [RTT] → [RTT
Icons](/img/19/7529/w960_7529-75.png "MITSUBISHI OUTLANDER 2014 3.G MMCS Manual 76 RTT
RTT Event Icons
Each traffic message is displayed with the
following marks on the map.
ADVICE
• Whether or not to display “RTT Event
Icons” can be selected with [RTT] → [RTT
Icons")
76 RTT
RTT Event Icons
Each traffic message is displayed with the
following marks on the map.
ADVICE
• Whether or not to display “RTT Event
Icons” can be selected with [RTT] → [RTT
Icons on Map].
→ “RTT Icons on Map” (P199)
Traffic
Closed/BlockedContra flow
AccidentDiversion
Congestion*1Narrow Road
Road WorkSlippery Road
Other
Other HazardsParking Information
Information*1
Traffic Congestion Information
Red Road closures
Traffic jams
Orange Congestion
Cyan Favorable route
*2
*1 This is displayed when [RTT] is touched and there is an
icon to display.
*2 This may not be displayed depending on the region.
1) Traffic Congestion Information
Traffic congestion (red line), crowded
(orange line), and no traffic (cyan line) is
displayed with lines to check the traffic
congestion information.
The favorable route (Cyan line) may not
be displayed depending on the region.
2) Traffic rule information
Allows you to check the road closures and
lane regulations with RTT Event Icons. 3) Traffic *
Only Traffic icons can be displayed.
4)
Other *
Only Other icons can be displayed.
* This is not displayed when there are no icons to display.
Display Contents
This section explains the RTT messages displayed on the map.
1)
2) 4)
3)
Page 77 of 226
Checking the RTT Traffic Messages 77
NAVIRTT
Checking the RTT
Traffic Messages
You can check the traffic messages using
R T T.
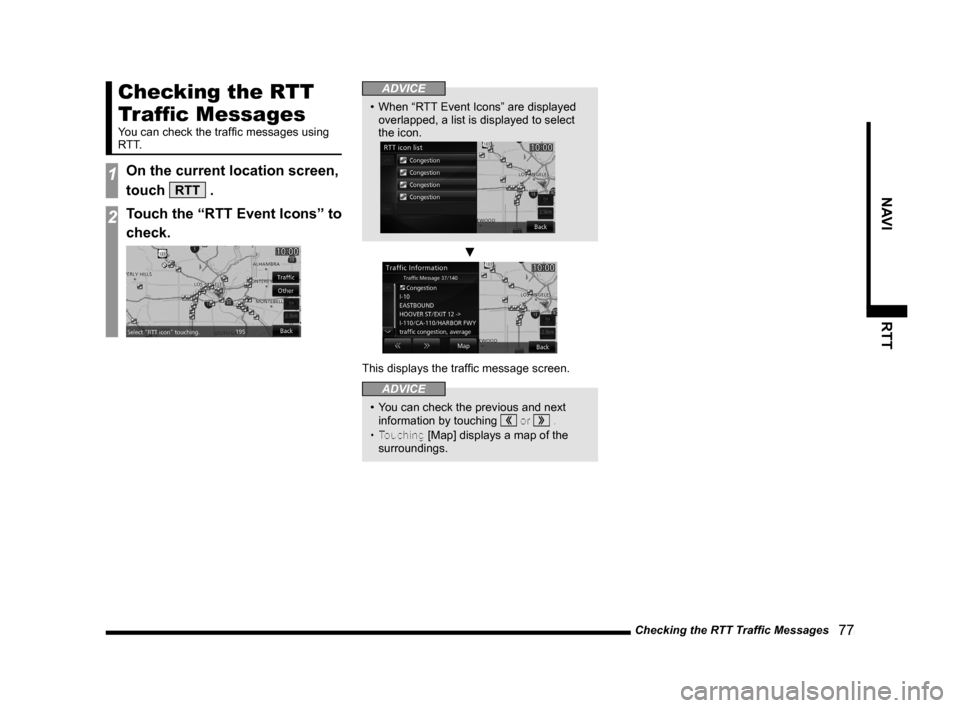
1On the current location screen,
touch
RTT .
2Touch the “RTT Event Icons” to
check.
ADVICE
• When “RTT Event Icons” are displayed
overlapped, a list is displayed to select
the icon.
▼
This displays the traffic message screen.
ADVICE
• You can check the previous and next
information by touching or .
• Touching [Map] displays a map of the
surroundings.
Page 78 of 226
78 Registering the RTT Surveillance Map
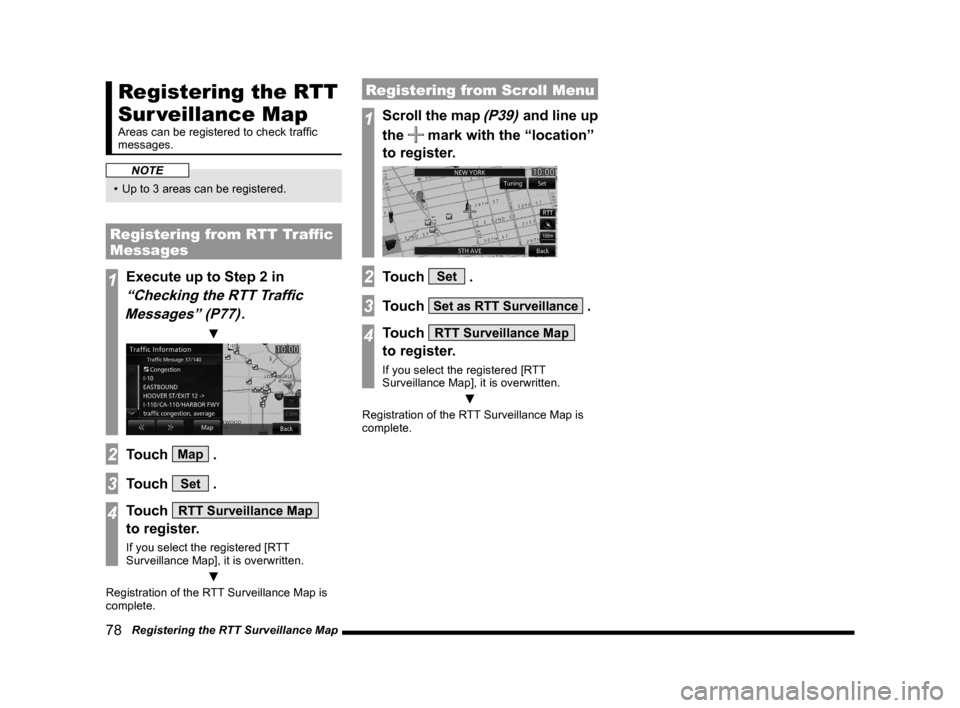
Registering the RTT
Sur veillance Map
Areas can be registered to check traffic
messages.
NOTE
• Up to 3 areas can be registered.
Registering from RTT Traffic
Messages
1Execute up to Step 2 in
“Checking the RTT Traffic
Messages” (P77)
.
▼
2Touch Map .
3Touch Set .
4Touch RTT Surveillance Map
to register.
If you select the registered [RTT
Surveillance Map], it is overwritten.
▼
Registration of the RTT Surveillance Map is
complete.
Registering from Scroll Menu
1Scroll the map (P39) and line up
the
mark with the “location”
to register.
2Touch Set .
3Touch Set as RTT Surveillance .
4Touch RTT Surveillance Map
to register.
If you select the registered [RTT
Surveillance Map], it is overwritten.
▼
Registration of the RTT Surveillance Map is
complete.
Page 80 of 226
80 Basic Operation
Insert/Eject Discs
The following explains how to insert a disc into
this product.
CAUTION
• When replacing discs, first ensure that
the vehicle is stopped in an area in which
stopping is permitted.
• Do not insert your hand, fingers, or
foreign objects into the disc slot. This
may lead to injury, smoking, or fire.
• Do not place anything (juice or anything
else) on the panel.
• Be careful that your hand or fingers are
not pinched when you open or close the
panel.
• Some discs cannot be detected in the
disc slot, for example discs that cannot
be played back. Check that the panel can
close before trying to close it.
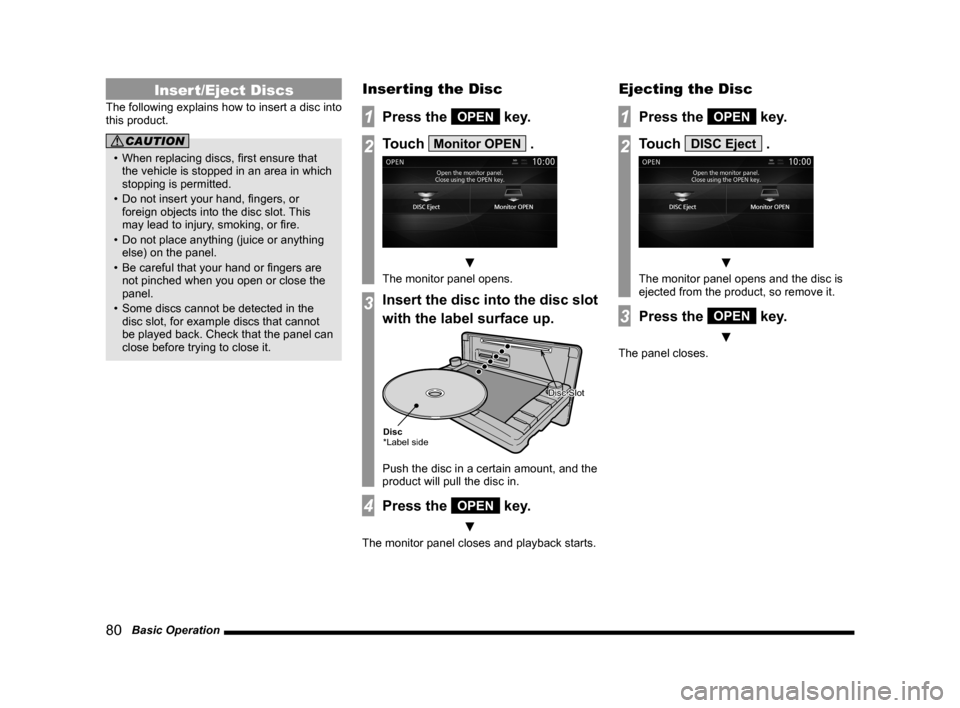
Inserting the Disc
1Press the OPEN key.
2Touch Monitor OPEN .
▼
The monitor panel opens.
3Insert the disc into the disc slot
with the label surface up.
Disc
*Label side
Disc SlotDisc Slot
Push the disc in a certain amount, and the
product will pull the disc in.
4Press the OPEN key.
▼
The monitor panel closes and playback starts.
Ejecting the Disc
1Press the OPEN key.
2Touch DISC Eject .
▼
The monitor panel opens and the disc is
ejected from the product, so remove it.
3Press the OPEN key.
▼
The panel closes.
Page 83 of 226
Handling of Discs 83
AVAudio Functions
Handling of Discs
This explains care that should be taken in
the handling of discs.
Important Points on Handling
• Fingerprints or other marks on the read
surface of the disc may result in its content
being more difficult to read. When holding
the disc, grip both edges, or one edge
and the center hole, in order that the read
surface is not touched.
• Do not affix paper or stickers,
or otherwise damage the disc.
• Do not forcefully insert a disc if a disc is
already within the device. This can result in
damage to discs, or malfunction.
Cleaning
• Periodically clean the read surface of the
disc. When cleaning, do not wipe in a circular
motion. Instead, wipe gently outwards from
the center of the disc to the outer edge.
• New discs may have burring around the
outer edge or in the hole in the center.
Ensure you check for these. If there are
burrs, these may lead to faulty operation,
therefore ensure these are removed.
Important Points on Storage
• When not using discs, ensure these are kept
in cases, and stored out of direct sunlight.
• If discs are not going to be used for a long
period of time, remove these from the
product.
Disc Playback Environment
In cold environments such as in mid-winter
when the interior of the vehicle is cold, turning
the heater on and immediately trying to use
the product may cause condensation (water
droplets) to form on the disc and internal
optical components, and this may prevent the
product from operating correctly.
In these conditions, remove the disc, and wait
a short time before use.
Copyright
Actions such as unauthorized reproduction,
broadcast, public performance, or rental of
discs that comprise other than personal use
are prohibited by law.
Page 98 of 226
98 Listen to Satellite Radio
Display Contents
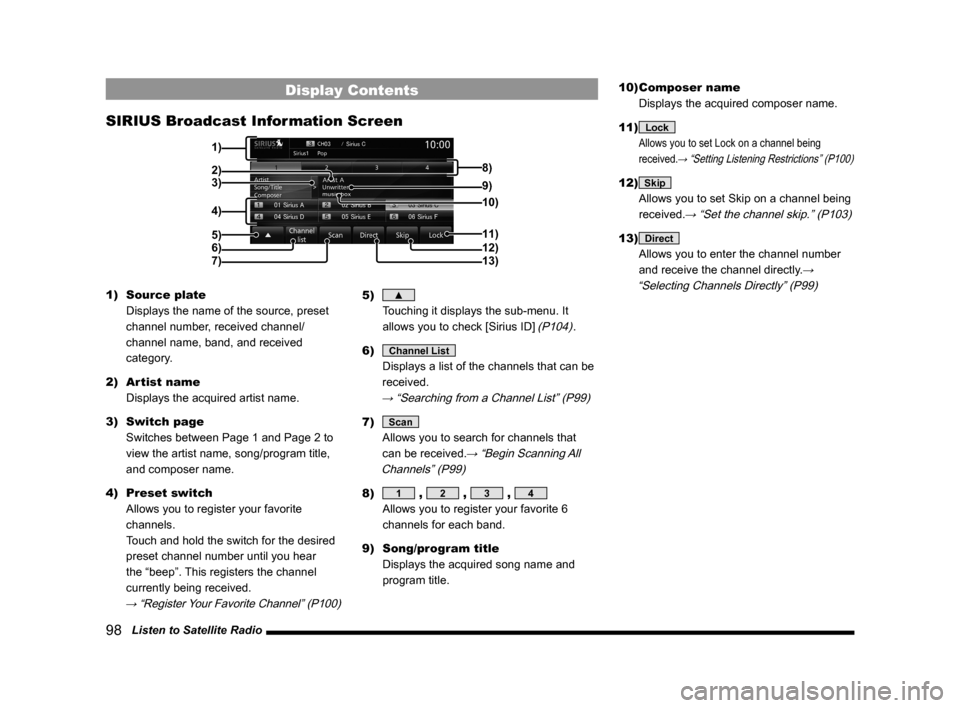
SIRIUS Broadcast Information Screen
2)3)
4)
5)
6)
7)11)
12)
13)
9) 8)
10)
1)
1) Source plate
Displays the name of the source, preset
channel number, received channel/
channel name, band, and received
category.
2) Artist name
Displays the acquired artist name.
3) Switch page
Switches between Page 1 and Page 2 to
view the artist name, song/program title,
and composer name.
4) Preset switch
Allows you to register your favorite
channels.
Touch and hold the switch for the desired
preset channel number until you hear
the “beep”. This registers the channel
currently being received.
→ “Register Your Favorite Channel” (P100)
5) ▲
Touching it displays the sub-menu. It
allows you to check [Sirius ID]
(P104).
6)
Channel List
Displays a list of the channels that can be
received.
→ “Searching from a Channel List” (P99)
7) Scan
Allows you to search for channels that
can be received.
→ “Begin Scanning All
Channels” (P99)
8) 1 , 2 , 3 , 4
Allows you to register your favorite 6
channels for each band.
9) Song/program title
Displays the acquired song name and
program title. 10) Composer name
Displays the acquired composer name.
11)
Lock
Allows you to set Lock on a channel being
received.
→ “Setting Listening Restrictions” (P100)
12) Skip
Allows you to set Skip on a channel being
received.
→ “Set the channel skip.” (P103)
13) Direct
Allows you to enter the channel number
and receive the channel directly.
→
“Selecting Channels Directly” (P99)
Page 108 of 226
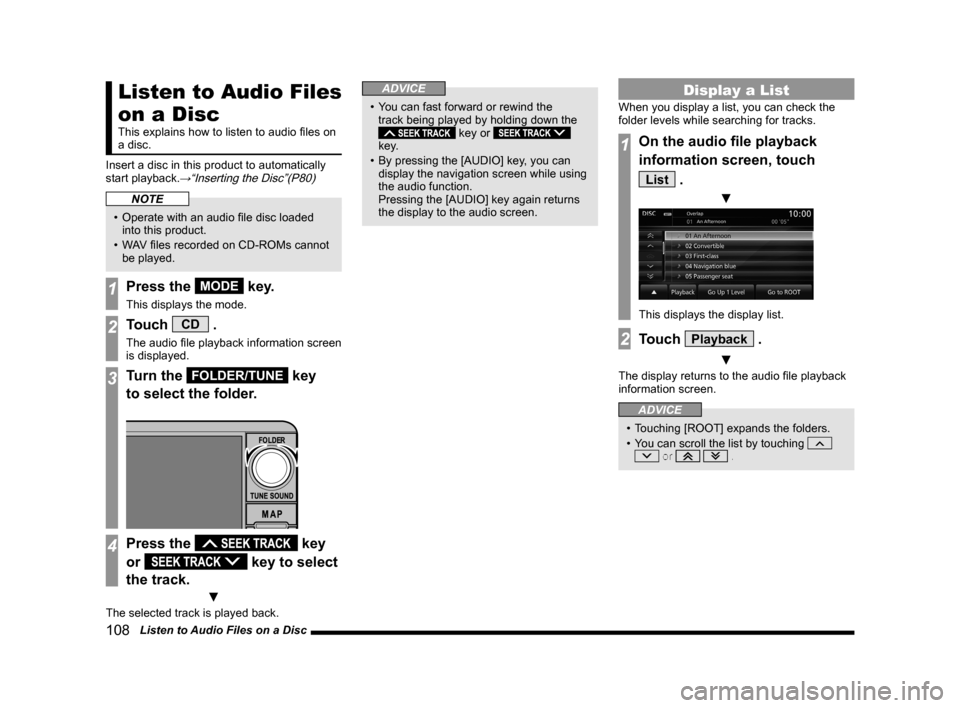
108 Listen to Audio Files on a Disc
Listen to Audio Files
on a Disc
This explains how to listen to audio files on
a disc.
Insert a disc in this product to automatically
start playback.
→“Inserting the Disc”(P80)
NOTE
• Operate with an audio file disc loaded
into this product.
• WAV files recorded on CD-ROMs cannot
be played.
1Press the MODE key.
This displays the mode.
2Touch CD .
The audio file playback information screen
is displayed.
3Turn the FOLDER/TUNE key
to select the folder.
4Press the key
or
key to select
the track.
▼
The selected track is played back.
ADVICE
• You can fast forward or rewind the
track being played by holding down the
key or
key.
• By pressing the [AUDIO] key, you can
display the navigation screen while using
the audio function.
Pressing the [AUDIO] key again returns
the display to the audio screen.
Display a List
When you display a list, you can check the
folder levels while searching for tracks.
1On the audio file playback
information screen, touch
List .
▼
This displays the display list.
2Touch Playback .
▼
The display returns to the audio file playback
information screen.
ADVICE
• Touching [ROOT] expands the folders.
• You can scroll the list by touching
or .