check MITSUBISHI OUTLANDER 2014 3.G MMCS Manual
[x] Cancel search | Manufacturer: MITSUBISHI, Model Year: 2014, Model line: OUTLANDER, Model: MITSUBISHI OUTLANDER 2014 3.GPages: 226, PDF Size: 31.21 MB
Page 113 of 226
Play iPod 11 3
AV iPod/USB/SD
1Press the MODE key.
This displays the mode.
2Touch iPod .
The iPod playback information screen is
displayed.
3Press the key
or
key to select
the track.
▼
The selected track is played back.
ADVICE
• You can fast forward or rewind the
track being played by holding down the
key or
key.
• By pressing the [AUDIO] key, you can
display the navigation screen while using
the audio function.
Pressing the [AUDIO] key again returns
the display to the audio screen.
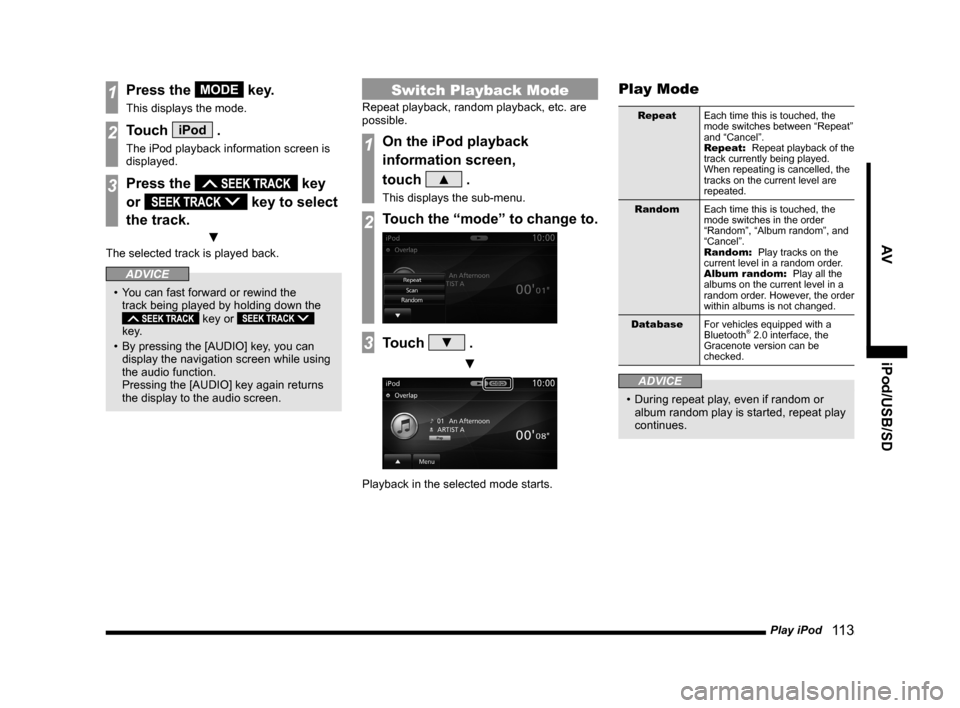
Switch Playback Mode
Repeat playback, random playback, etc. are
possible.
1On the iPod playback
information screen,
touch
▲ .
This displays the sub-menu.
2Touch the “mode” to change to.
3Touch ▼ .
▼
Playback in the selected mode starts.
Play Mode
Repeat Each time this is touched, the
mode switches between “Repeat”
and “Cancel”.
Repeat: Repeat playback of the
track currently being played.
When repeating is cancelled, the
tracks on the current level are
repeated.
Random Each time this is touched, the
mode switches in the order
“Random”, “Album random”, and
“Cancel”.
Random: Play tracks on the
current level in a random order.
Album random: Play all the
albums on the current level in a
random order. However, the order
within albums is not changed.
Database For vehicles equipped with a
Bluetooth
® 2.0 interface, the
Gracenote version can be
checked.
ADVICE
• During repeat play, even if random or
album random play is started, repeat play
continues.
Page 115 of 226
![MITSUBISHI OUTLANDER 2014 3.G MMCS Manual Play iPod 11 5
AV iPod/USB/SD
iPod Menu
Touching [Menu] on the iPod playback
information screen will display the iPod menu.
Lists of various categories can be displayed
from the iPod menu.
Categor](/img/19/7529/w960_7529-114.png "MITSUBISHI OUTLANDER 2014 3.G MMCS Manual Play iPod 11 5
AV iPod/USB/SD
iPod Menu
Touching [Menu] on the iPod playback
information screen will display the iPod menu.
Lists of various categories can be displayed
from the iPod menu.
Categor")
Play iPod 11 5
AV iPod/USB/SD
iPod Menu
Touching [Menu] on the iPod playback
information screen will display the iPod menu.
Lists of various categories can be displayed
from the iPod menu.
Categorymenu
Categor y
menu Displays the list of categories.→“Search by List”(P115)
Playback
Returns to the playback
information screen.
→“iPod Playback Information
Screen”(P114)
▲Displays a submenu and changes
the playback mode.
→“Switch Playback Mode”(P113)
Search by List
Touching a category on the iPod menu (P115)
displays a list of the categories. By touching
the list, you can check album names and track
names while searching for the tracks you
want.
1On the iPod playback
information screen, touch
Menu .
The iPod menu is displayed.
2Touch “category”.
Categorymenu
▼
A list of the selected category is displayed.
3Touch the “item” to play from
the list.
▼
This displays a list of the selected item.
Repeat Step 3 to search for songs (tracks).
When you touch the song (track) to play from
the list, playback starts.
ADVICE
• The level of items operated on in Step 3
depends on which category you selected
in Step 2.
• The title information recorded into the
iPod is displayed on the list.
Page 118 of 226
11 8 Listen to Audio Files on a USB Device/SD Card
1Press the MODE key.
This displays the mode.
2Touch USB or SD .
The playback information screen is
displayed.
3Turn the FOLDER/TUNE key
to select the folder.
4Press the key
or
key to select
the track.
▼
The selected track is played back.
ADVICE
• You can fast forward or rewind the
track being played by holding down the
key or
key.
• By pressing the [AUDIO] key, you can
display the navigation screen while using
the audio function.
Pressing the [AUDIO] key again returns
the display to the audio screen.
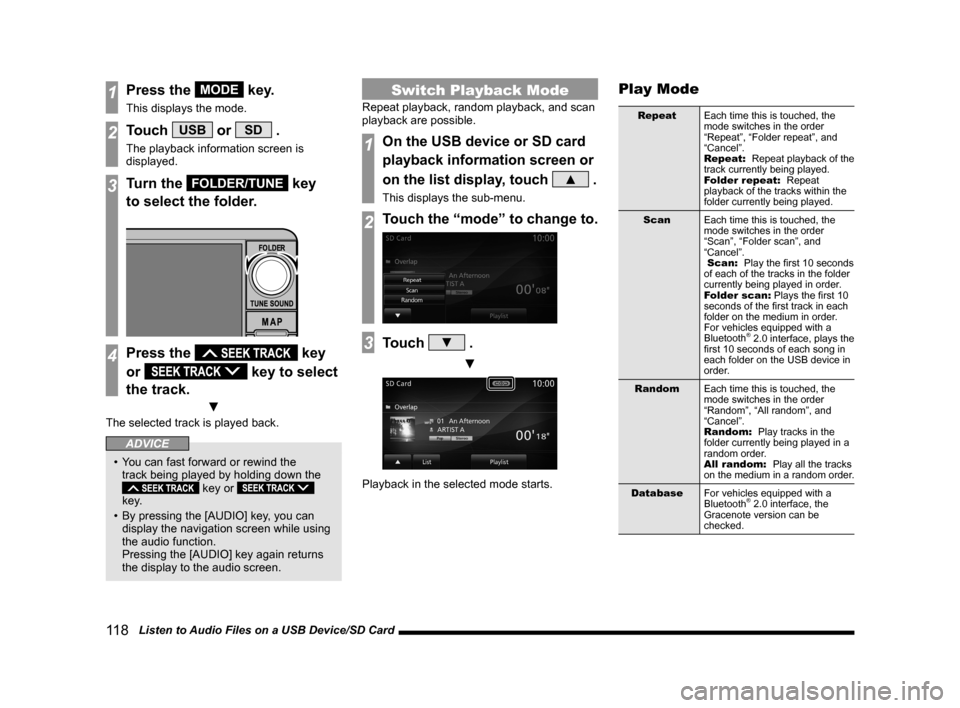
Switch Playback Mode
Repeat playback, random playback, and scan
playback are possible.
1On the USB device or SD card
playback information screen or
on the list display, touch
▲ .
This displays the sub-menu.
2Touch the “mode” to change to.
3Touch ▼ .
▼
Playback in the selected mode starts.
Play Mode
Repeat Each time this is touched, the
mode switches in the order
“Repeat”, “Folder repeat”, and
“Cancel”.
Repeat: Repeat playback of the
track currently being played.
Folder repeat: Repeat
playback of the tracks within the
folder currently being played.
Scan Each time this is touched, the
mode switches in the order
“Scan”, “Folder scan”, and
“Cancel”.
Scan: Play the first 10 seconds
of each of the tracks in the folder
currently being played in order.
Folder scan: Plays the first 10
seconds of the first track in each
folder on the medium in order.
For vehicles equipped with a
Bluetooth
® 2.0 interface, plays the
first 10 seconds of each song in
each folder on the USB device in
order.
Random Each time this is touched, the
mode switches in the order
“Random”, “All random”, and
“Cancel”.
Random: Play tracks in the
folder currently being played in a
random order.
All random: Play all the tracks
on the medium in a random order.
Database For vehicles equipped with a
Bluetooth
® 2.0 interface, the
Gracenote version can be
checked.
Page 120 of 226
120 Listen to Audio Files on a USB Device/SD Card
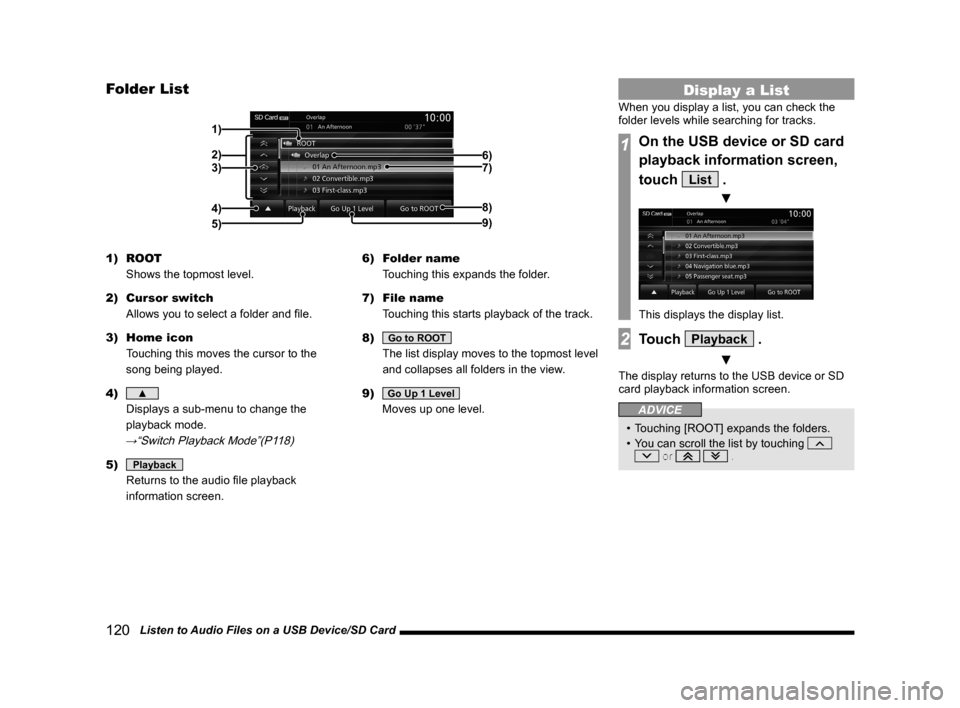
Folder List
2) 1)
4) 3) 6)
7)
8)
9)
5)
1) ROOT
Shows the topmost level.
2) Cursor switch
Allows you to select a folder and file.
3) Home icon
Touching this moves the cursor to the
song being played.
4)
▲
Displays a sub-menu to change the
playback mode.
→“Switch Playback Mode”(P118)
5) Playback
Returns to the audio file playback
information screen. 6)
Folder name
Touching this expands the folder.
7) File name
Touching this starts playback of the track.
8)
Go to ROOT
The list display moves to the topmost level
and collapses all folders in the view.
9)
Go Up 1 Level
Moves up one level.
Display a List
When you display a list, you can check the
folder levels while searching for tracks.
1On the USB device or SD card
playback information screen,
touch
List .
▼
This displays the display list.
2Touch Playback .
▼
The display returns to the USB device or SD
card playback information screen.
ADVICE
• Touching [ROOT] expands the folders.
• You can scroll the list by touching
or .
Page 129 of 226
Calendar 129
INFO/SETTINGS INFO
INFO/SETTINGS
INFO
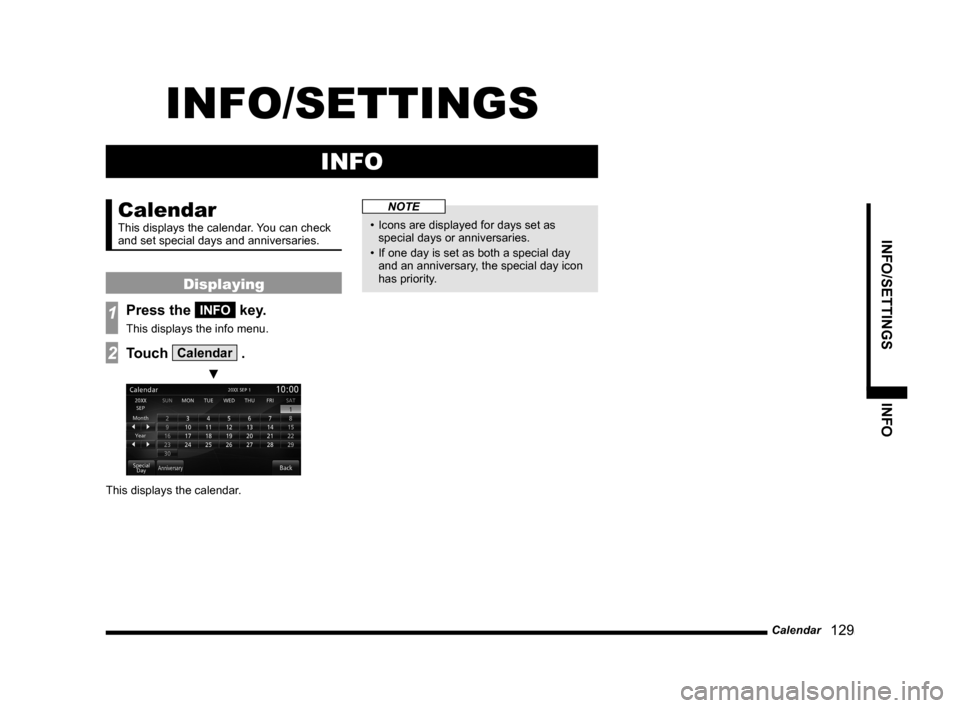
Calendar
This displays the calendar. You can check
and set special days and anniversaries.
Displaying
1Press the INFO key.
This displays the info menu.
2Touch Calendar .
▼
This displays the calendar.
NOTE
• Icons are displayed for days set as
special days or anniversaries.
• If one day is set as both a special day
and an anniversary, the special day icon
has priority.
Page 134 of 226
134 User SD
User SD
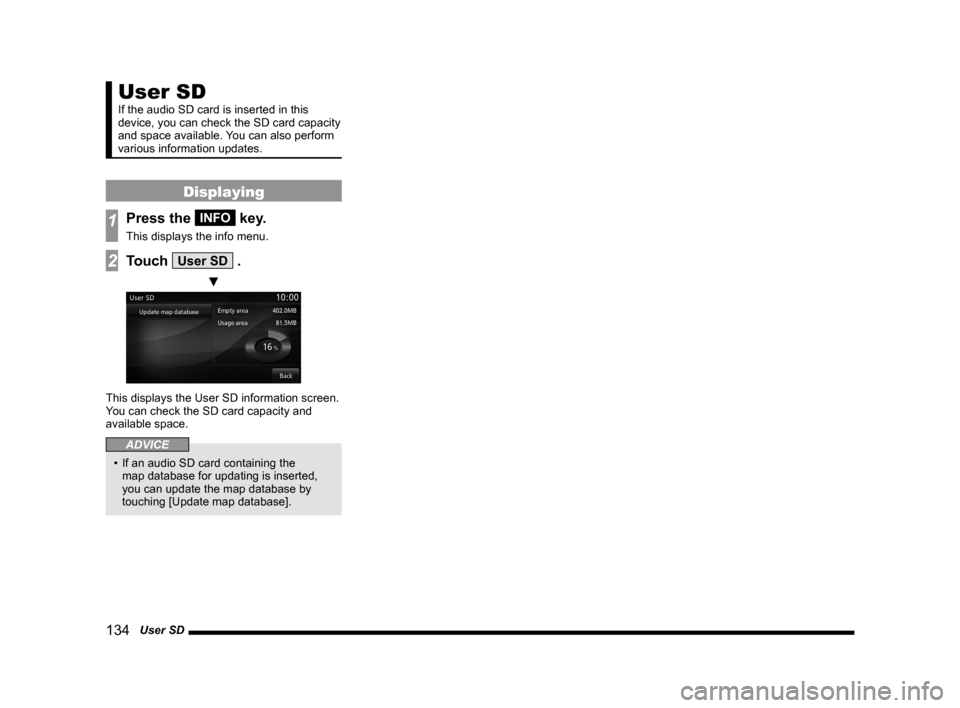
If the audio SD card is inserted in this
device, you can check the SD card capacity
and space available. You can also perform
various information updates.
Displaying
1Press the INFO key.
This displays the info menu.
2Touch User SD .
▼
This displays the User SD information screen.
You can check the SD card capacity and
available space.
ADVICE
• If an audio SD card containing the
map database for updating is inserted,
you can update the map database by
touching [Update map database].
Page 136 of 226
136 Trip
Equipment by type
Trip
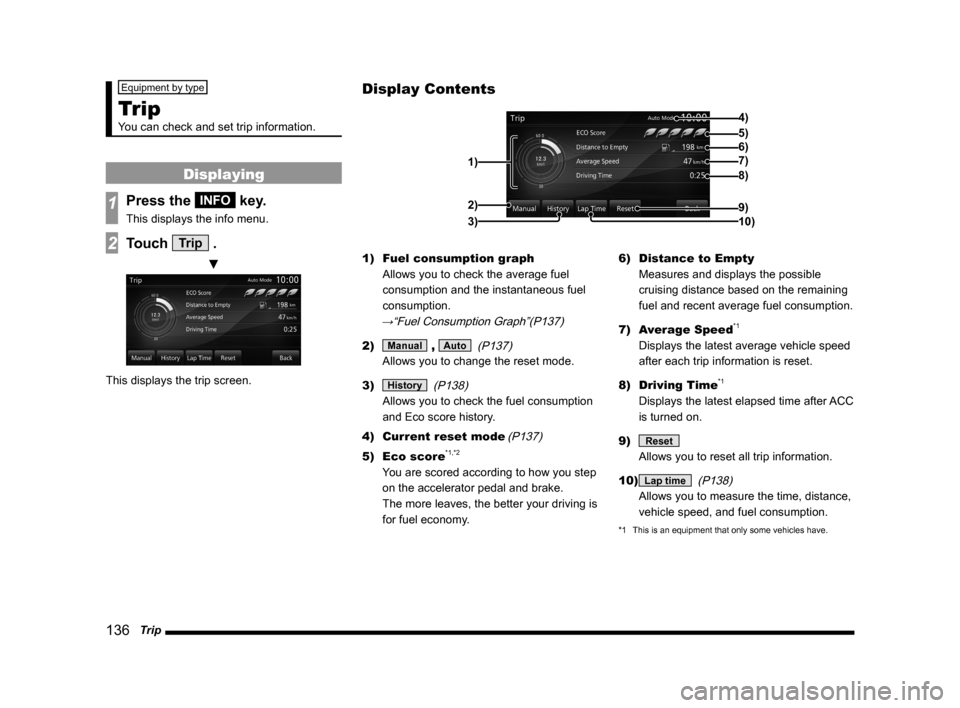
You can check and set trip information.
Displaying
1Press the INFO key.
This displays the info menu.
2Touch Trip .
▼
This displays the trip screen. 1)
Fuel consumption graph
Allows you to check the average fuel
consumption and the instantaneous fuel
consumption.
→“Fuel Consumption Graph”(P137)
2) Manual , Auto (P137)
Allows you to change the reset mode.
3)
History (P138)
Allows you to check the fuel consumption
and Eco score history.
4) Current reset mode
(P137)
5) Eco score*1,*2
You are scored according to how you step
on the accelerator pedal and brake.
The more leaves, the better your driving is
for fuel economy. 6)
Distance to Empty
Measures and displays the possible
cruising distance based on the remaining
fuel and recent average fuel consumption.
7) Average Speed
*1
Displays the latest average vehicle speed
after each trip information is reset.
8) Driving Time
*1
Displays the latest elapsed time after ACC
is turned on.
9)
Reset
Allows you to reset all trip information.
10)
Lap time (P138)
Allows you to measure the time, distance,
vehicle speed, and fuel consumption.
*1 This is an equipment that only some vehicles have.
Display Contents
4)
6)5)
7)
8)
9)
10)
1)2)
3)
Page 138 of 226
138 Trip
Check the Histor y
You can check the fuel consumption and Eco
score history.*1
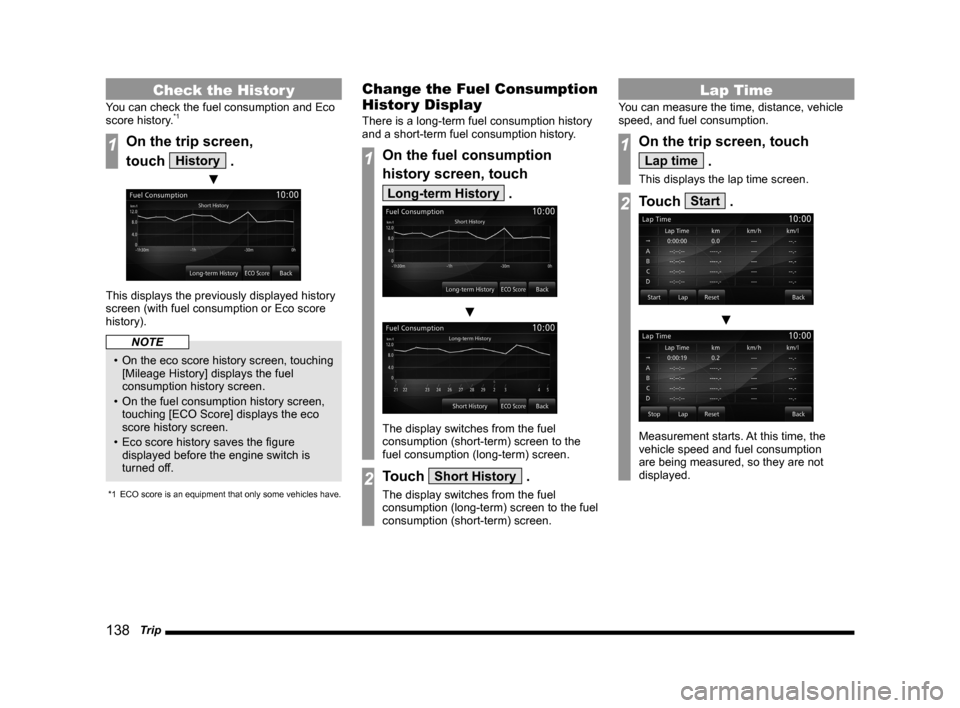
1On the trip screen,
touch
History .
▼
This displays the previously displayed history
screen (with fuel consumption or Eco score
history).
NOTE
• On the eco score history screen, touching
[Mileage History] displays the fuel
consumption history screen.
• On the fuel consumption history screen,
touching [ECO Score] displays the eco
score history screen.
• Eco score history saves the figure
displayed before the engine switch is
turned off.
*1 ECO score is an equipment that only some vehicles have.
Change the Fuel Consumption
Histor y Display
There is a long-term fuel consumption history
and a short-term fuel consumption history.
1On the fuel consumption
history screen, touch
Long-term History .
▼
The display switches from the fuel
consumption (short-term) screen to the
fuel consumption (long-term) screen.
2Touch Short History .
The display switches from the fuel
consumption (long-term) screen to the fuel
consumption (short-term) screen.
Lap Time
You can measure the time, distance, vehicle
speed, and fuel consumption.
1On the trip screen, touch
Lap time .
This displays the lap time screen.
2Touch Start .
▼
Measurement starts. At this time, the
vehicle speed and fuel consumption
are being measured, so they are not
displayed.
Page 140 of 226
140 Air Conditioner
Air Conditioner
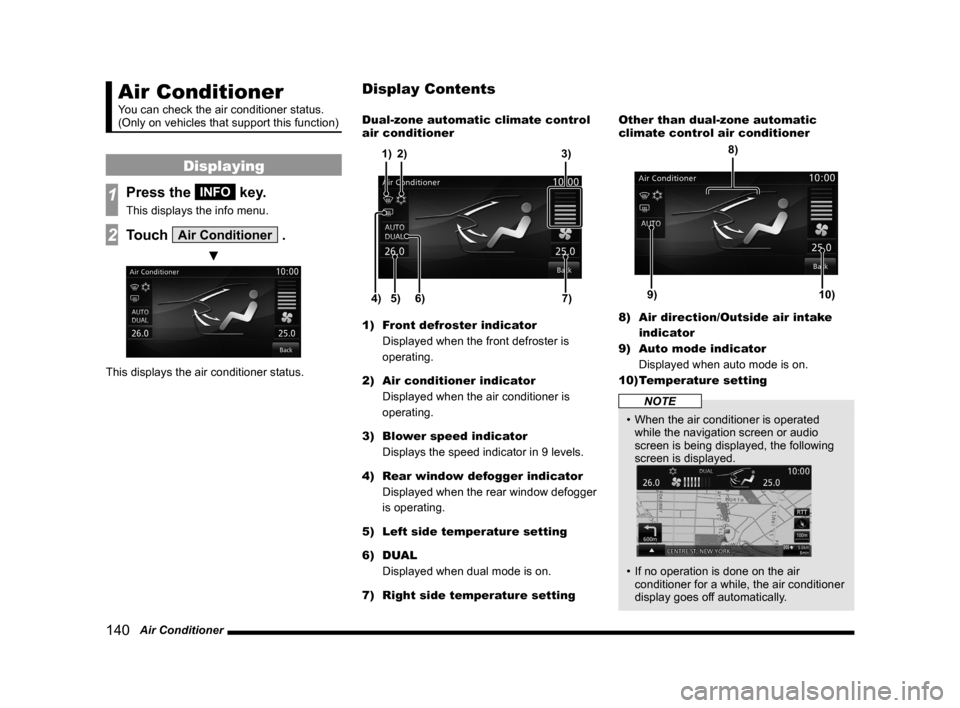
You can check the air conditioner status.
(Only on vehicles that support this function)
Displaying
1Press the INFO key.
This displays the info menu.
2Touch Air Conditioner .
▼
This displays the air conditioner status. Dual-zone automatic climate control
air conditioner
5)
6)4)7)
3)
2)
1)
1) Front defroster indicator
Displayed when the front defroster is
operating.
2) Air conditioner indicator
Displayed when the air conditioner is
operating.
3) Blower speed indicator
Displays the speed indicator in 9 levels.
4) Rear window defogger indicator
Displayed when the rear window defogger
is operating.
5) Left side temperature setting
6) DUAL
Displayed when dual mode is on.
7) Right side temperature setting Other than dual-zone automatic
climate control air conditioner
9)10)
8)
8)
Air direction/Outside air intake
indicator
9) Auto mode indicator
Displayed when auto mode is on.
10) Temperature setting
NOTE
• When the air conditioner is operated
while the navigation screen or audio
screen is being displayed, the following
screen is displayed.
• If no operation is done on the air
conditioner for a while, the air conditioner
display goes off automatically.
Display Contents
Page 141 of 226
GPS Information 141
INFO/SETTINGS INFO
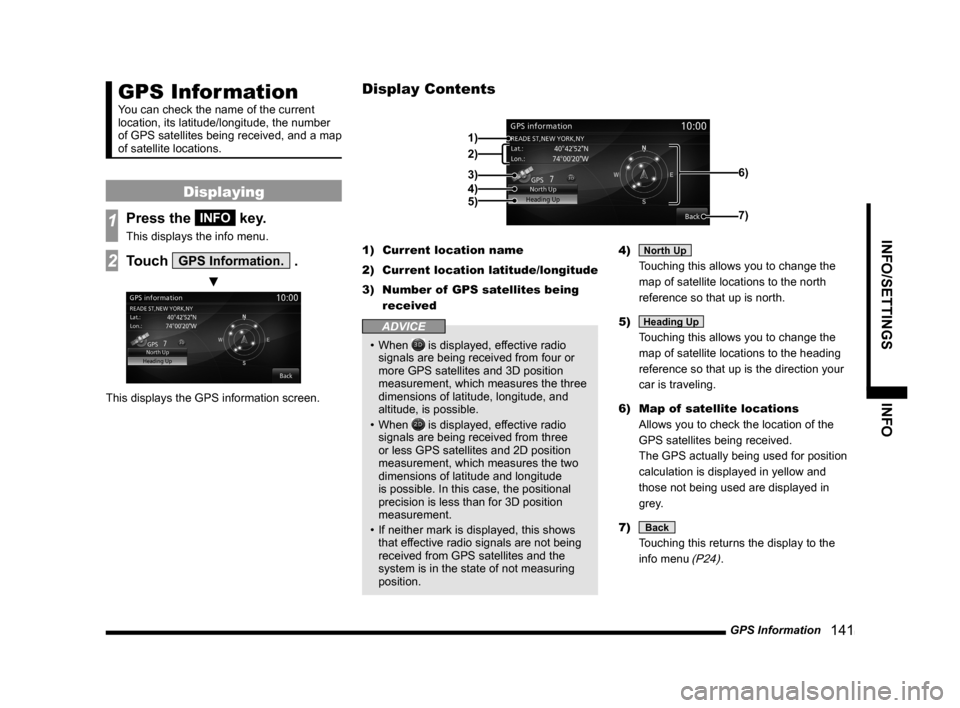
GPS Information
You can check the name of the current
location, its latitude/longitude, the number
of GPS satellites being received, and a map
of satellite locations.
Displaying
1Press the INFO key.
This displays the info menu.
2Touch GPS Information. .
▼
This displays the GPS information screen. 1)
Current location name
2) Current location latitude/longitude
3) Number of GPS satellites being
received
ADVICE
• When is displayed, effective radio
signals are being received from four or
more GPS satellites and 3D position
measurement, which measures the three
dimensions of latitude, longitude, and
altitude, is possible.
• When
is displayed, effective radio
signals are being received from three
or less GPS satellites and 2D position
measurement, which measures the two
dimensions of latitude and longitude
is possible. In this case, the positional
precision is less than for 3D position
measurement.
• If neither mark is displayed, this shows
that effective radio signals are not being
received from GPS satellites and the
system is in the state of not measuring
position. 4)
North Up
Touching this allows you to change the
map of satellite locations to the north
reference so that up is north.
5)
Heading Up
Touching this allows you to change the
map of satellite locations to the heading
reference so that up is the direction your
car is traveling.
6) Map of satellite locations
Allows you to check the location of the
GPS satellites being received.
The GPS actually being used for position
calculation is displayed in yellow and
those not being used are displayed in
grey.
7)
Back
Touching this returns the display to the
info menu
(P24).
Display Contents
2)
3)
4)
5)
1)
6)
7)